Getting started

Sign in and open a programme

Sign in to CoverageTrackr, confirm the active programme and switch to another programme when needed.

Organization Administrator 2 min read Web

Before you start

  • You have an active CoverageTrackr web account.
  • Your administrator has assigned you to the required programme.

Open CoverageTrackr

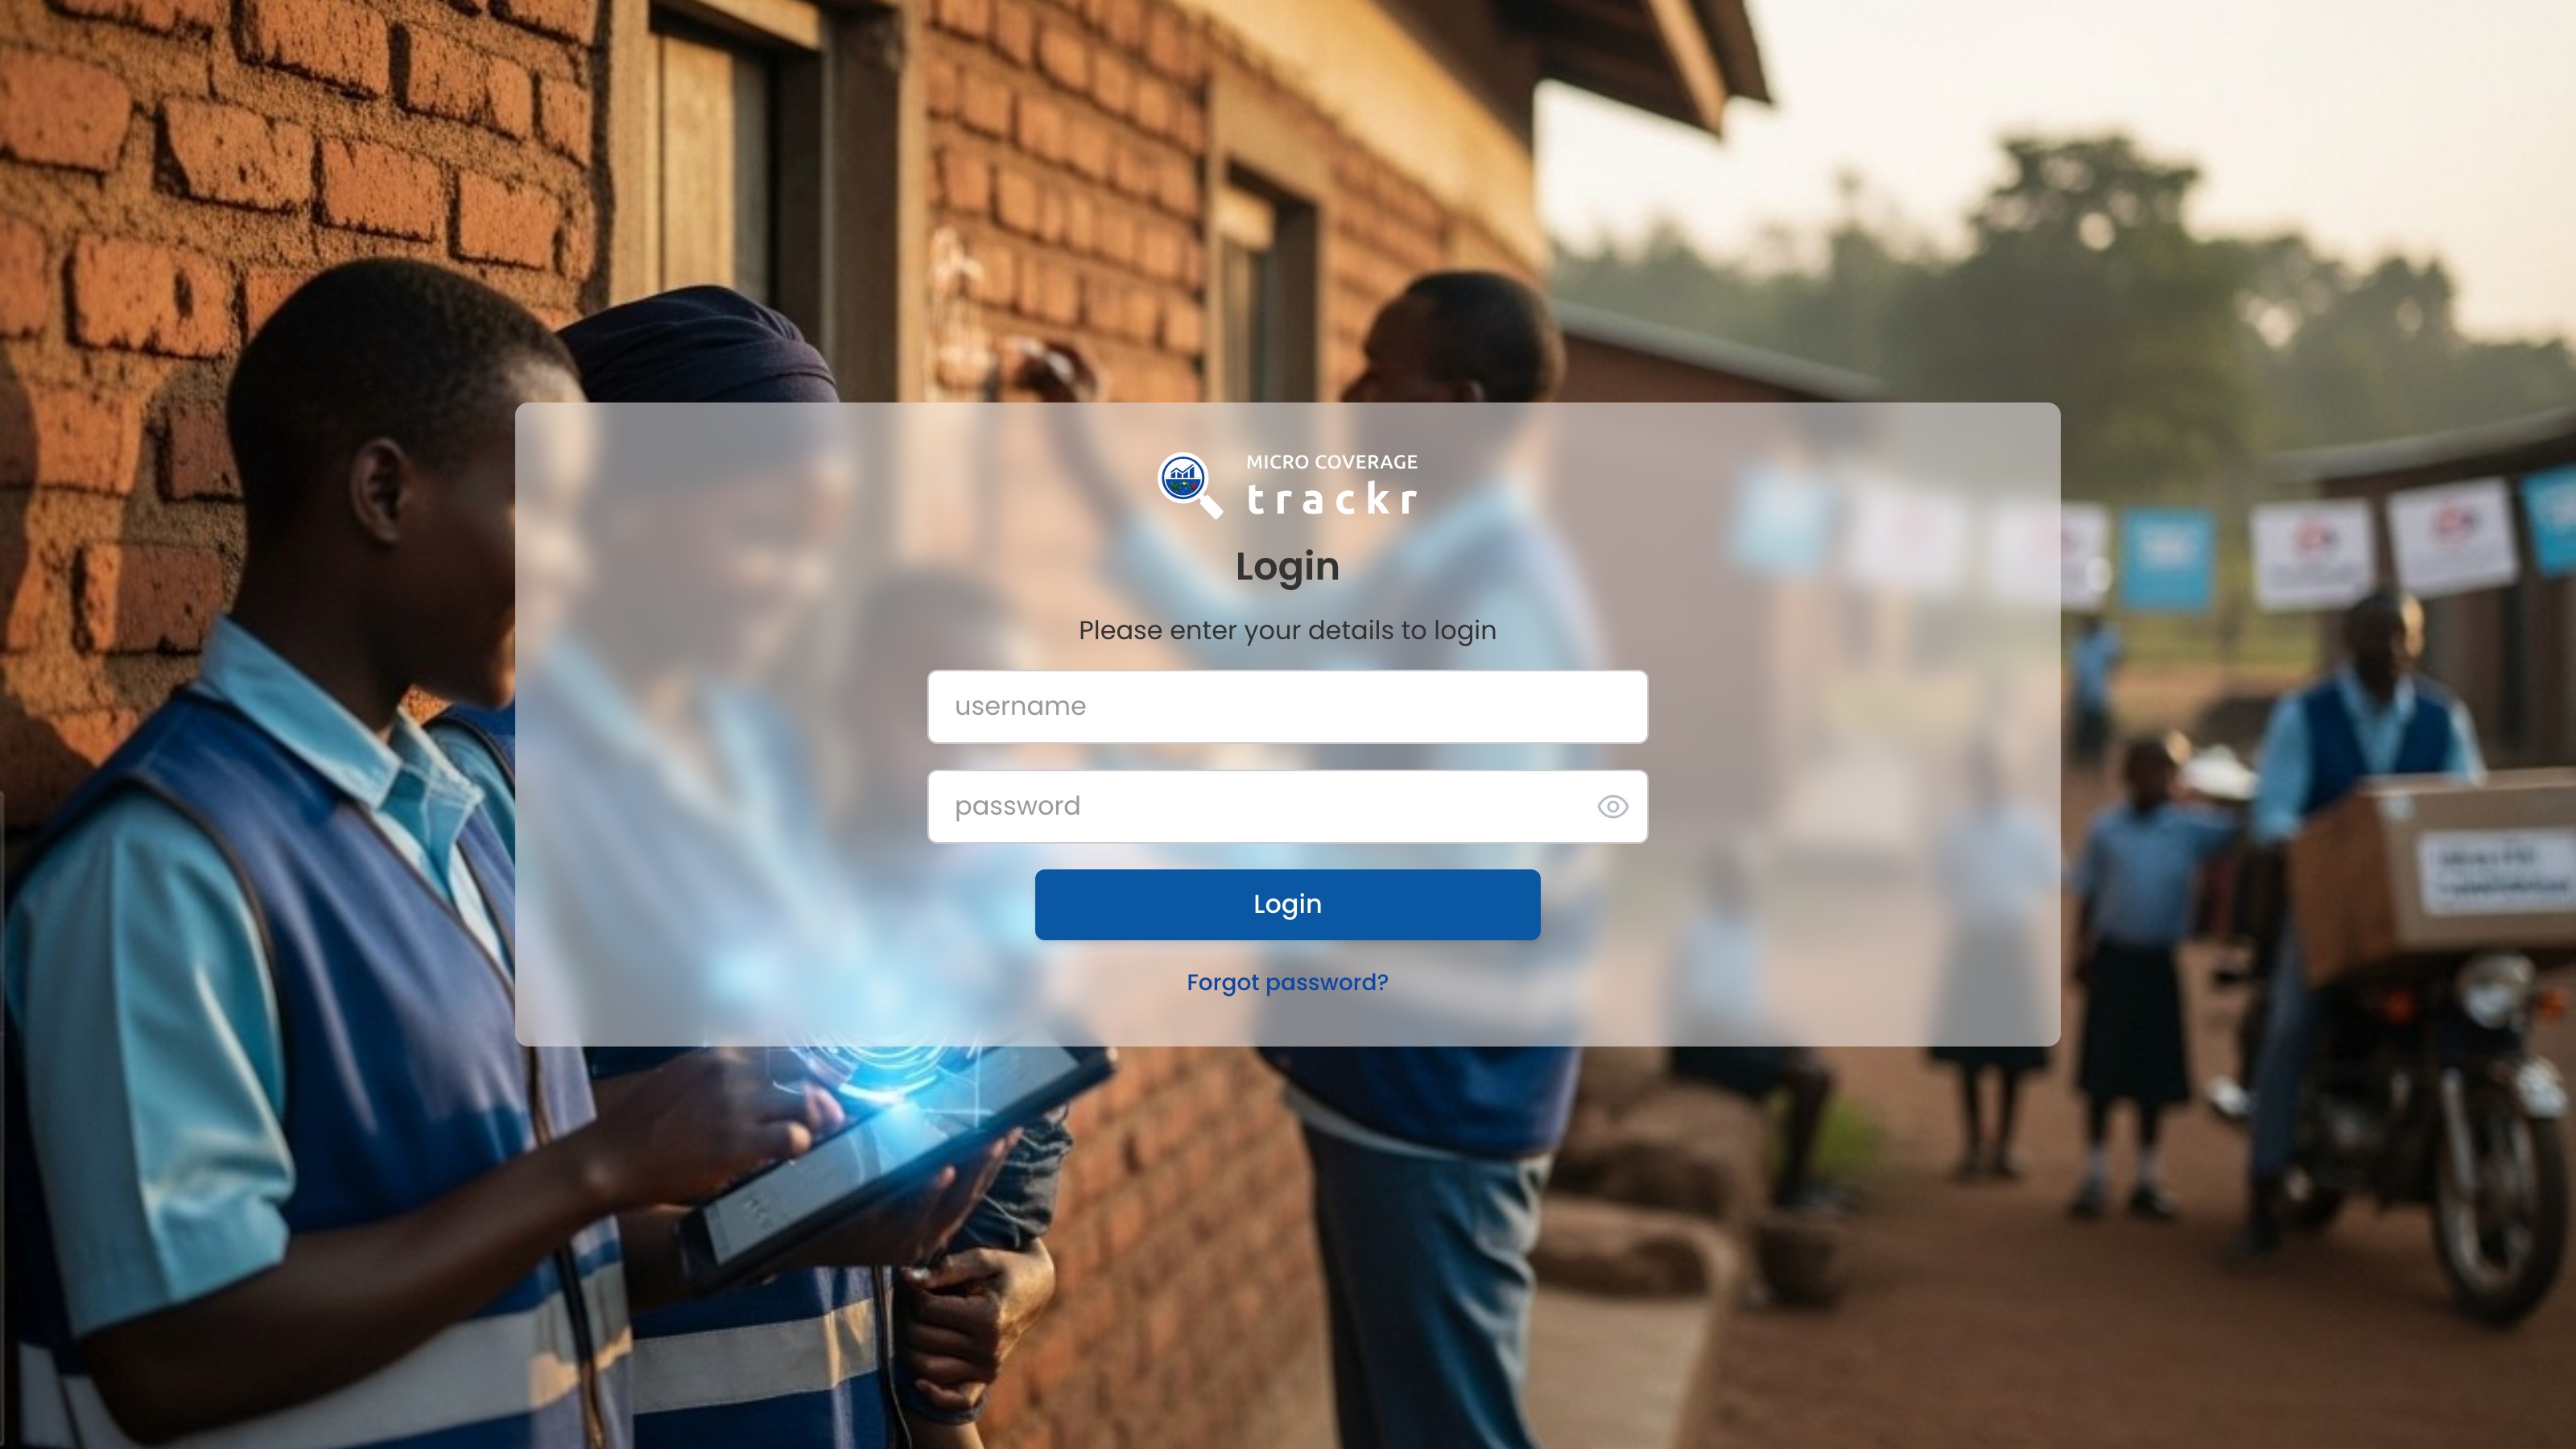
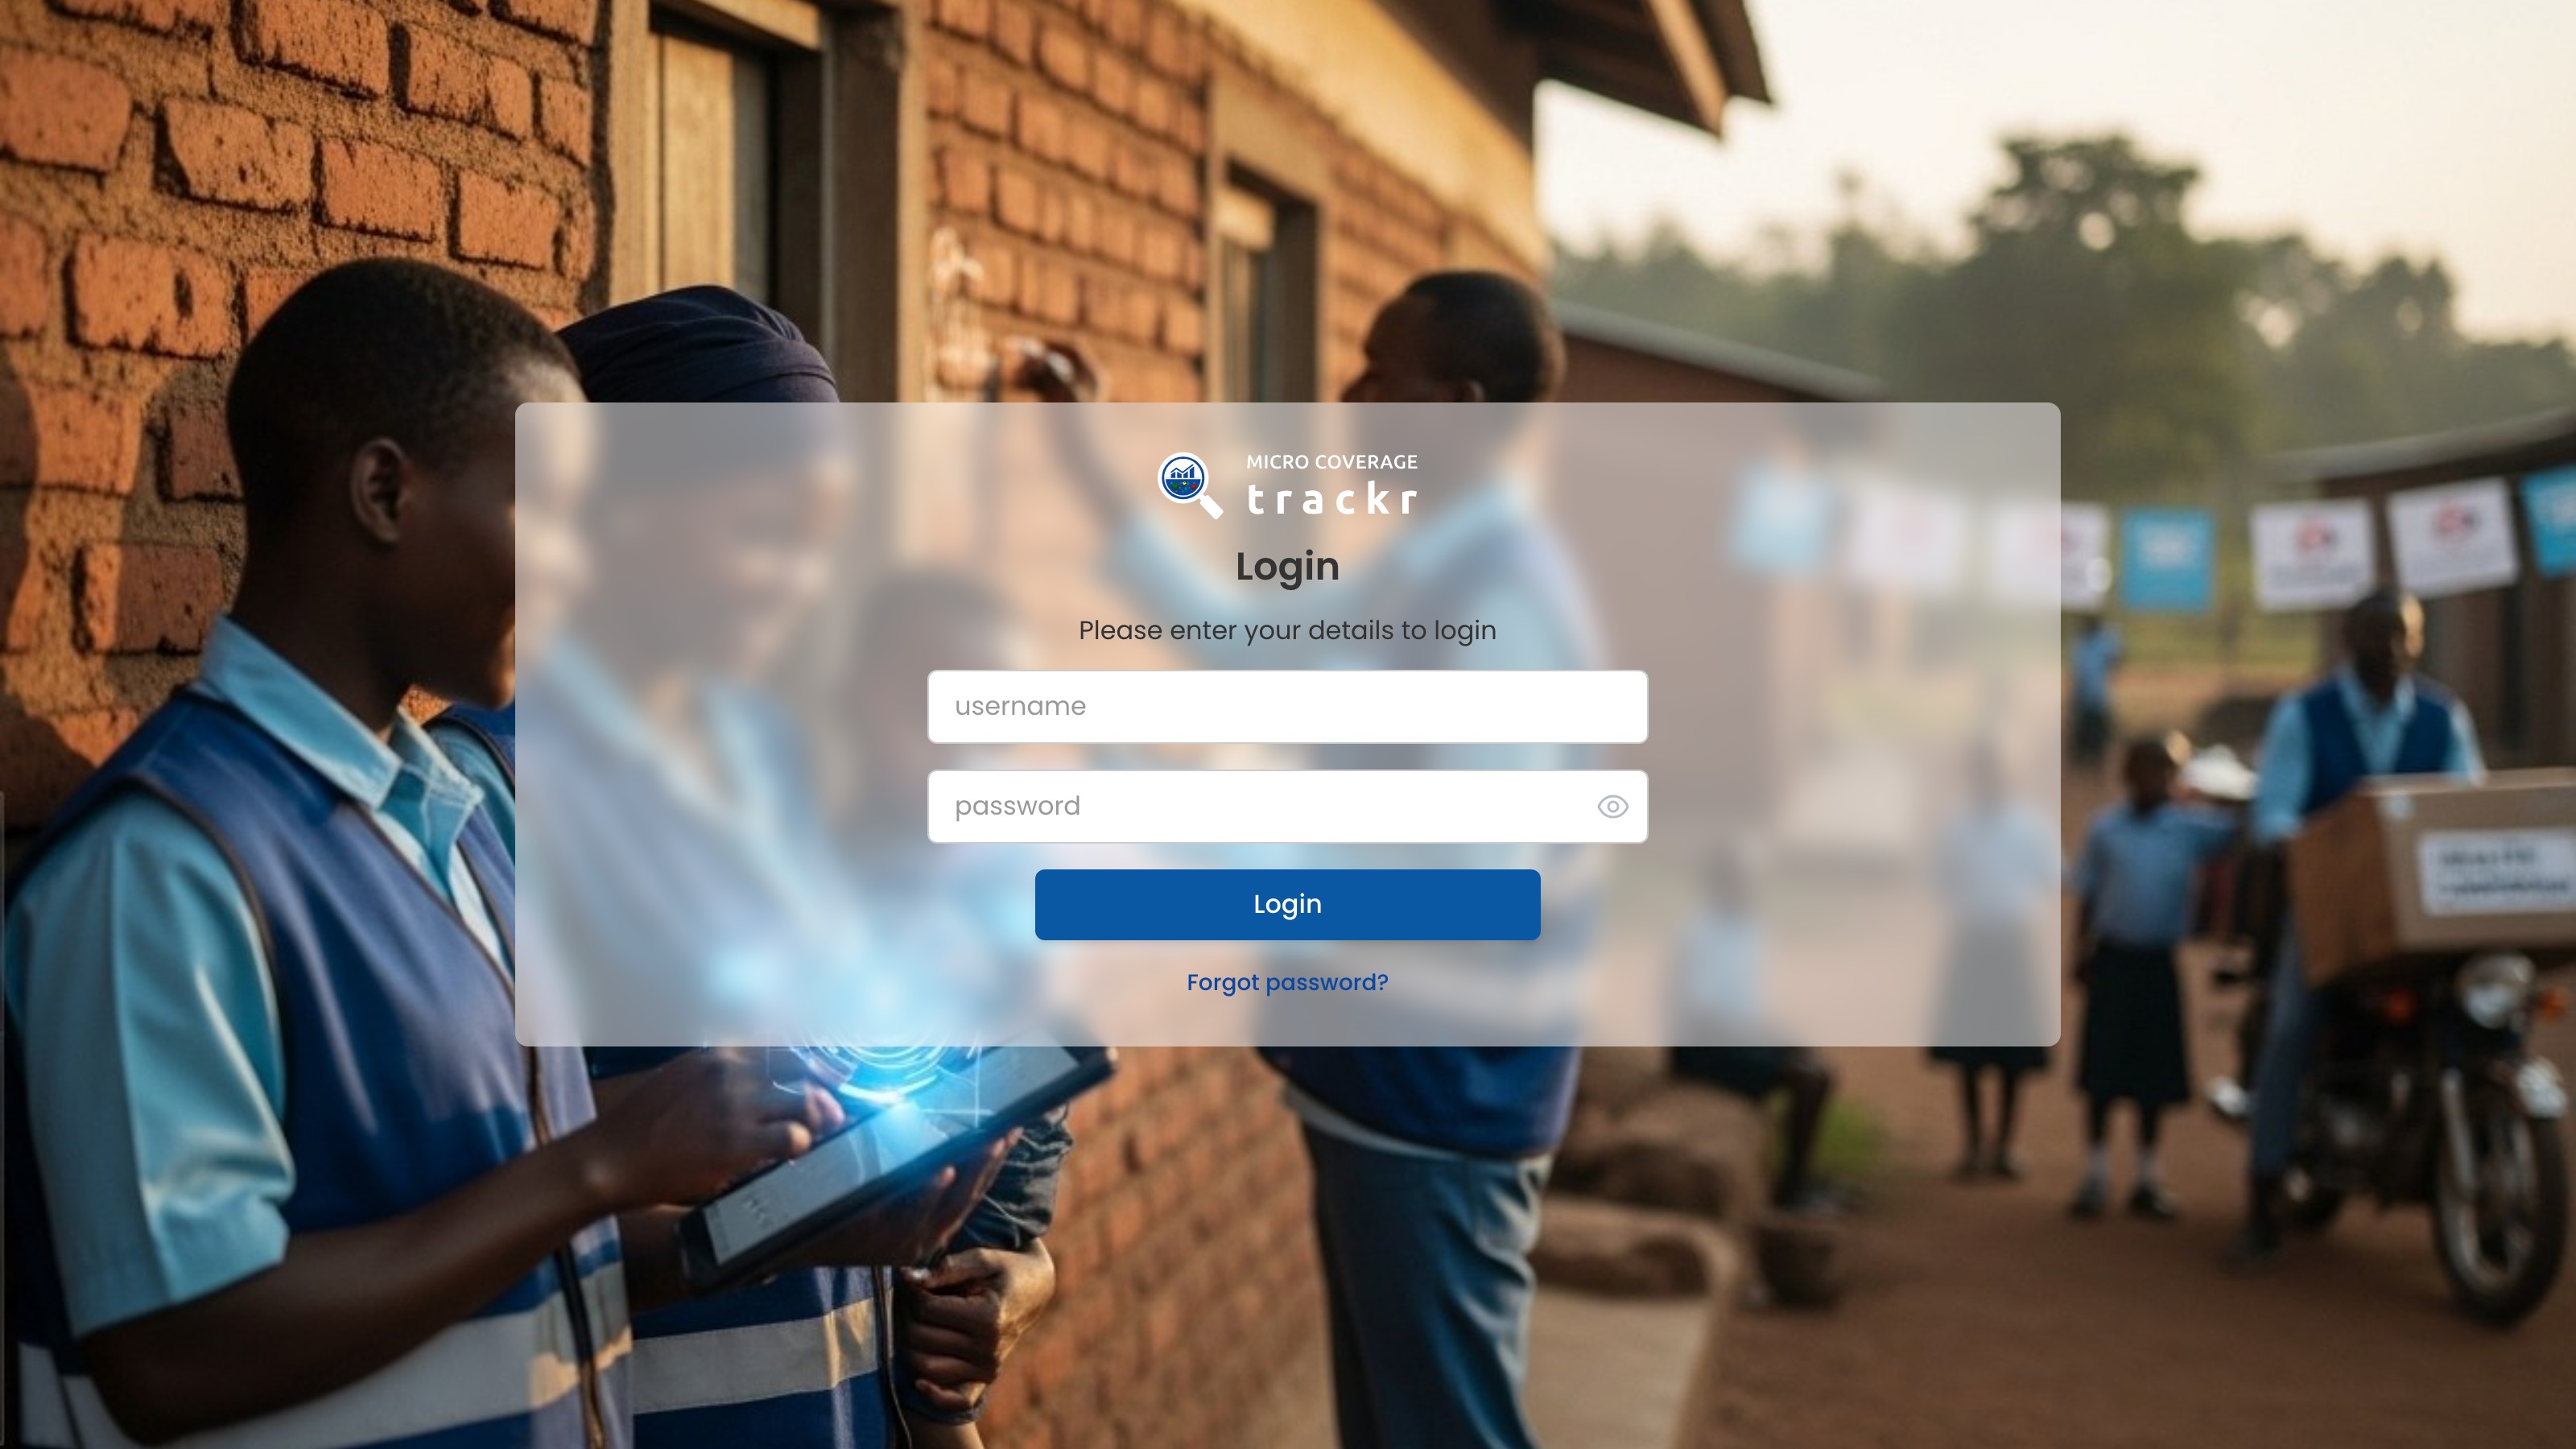
Open the CoverageTrackr web address, enter your username and password, then select Login.
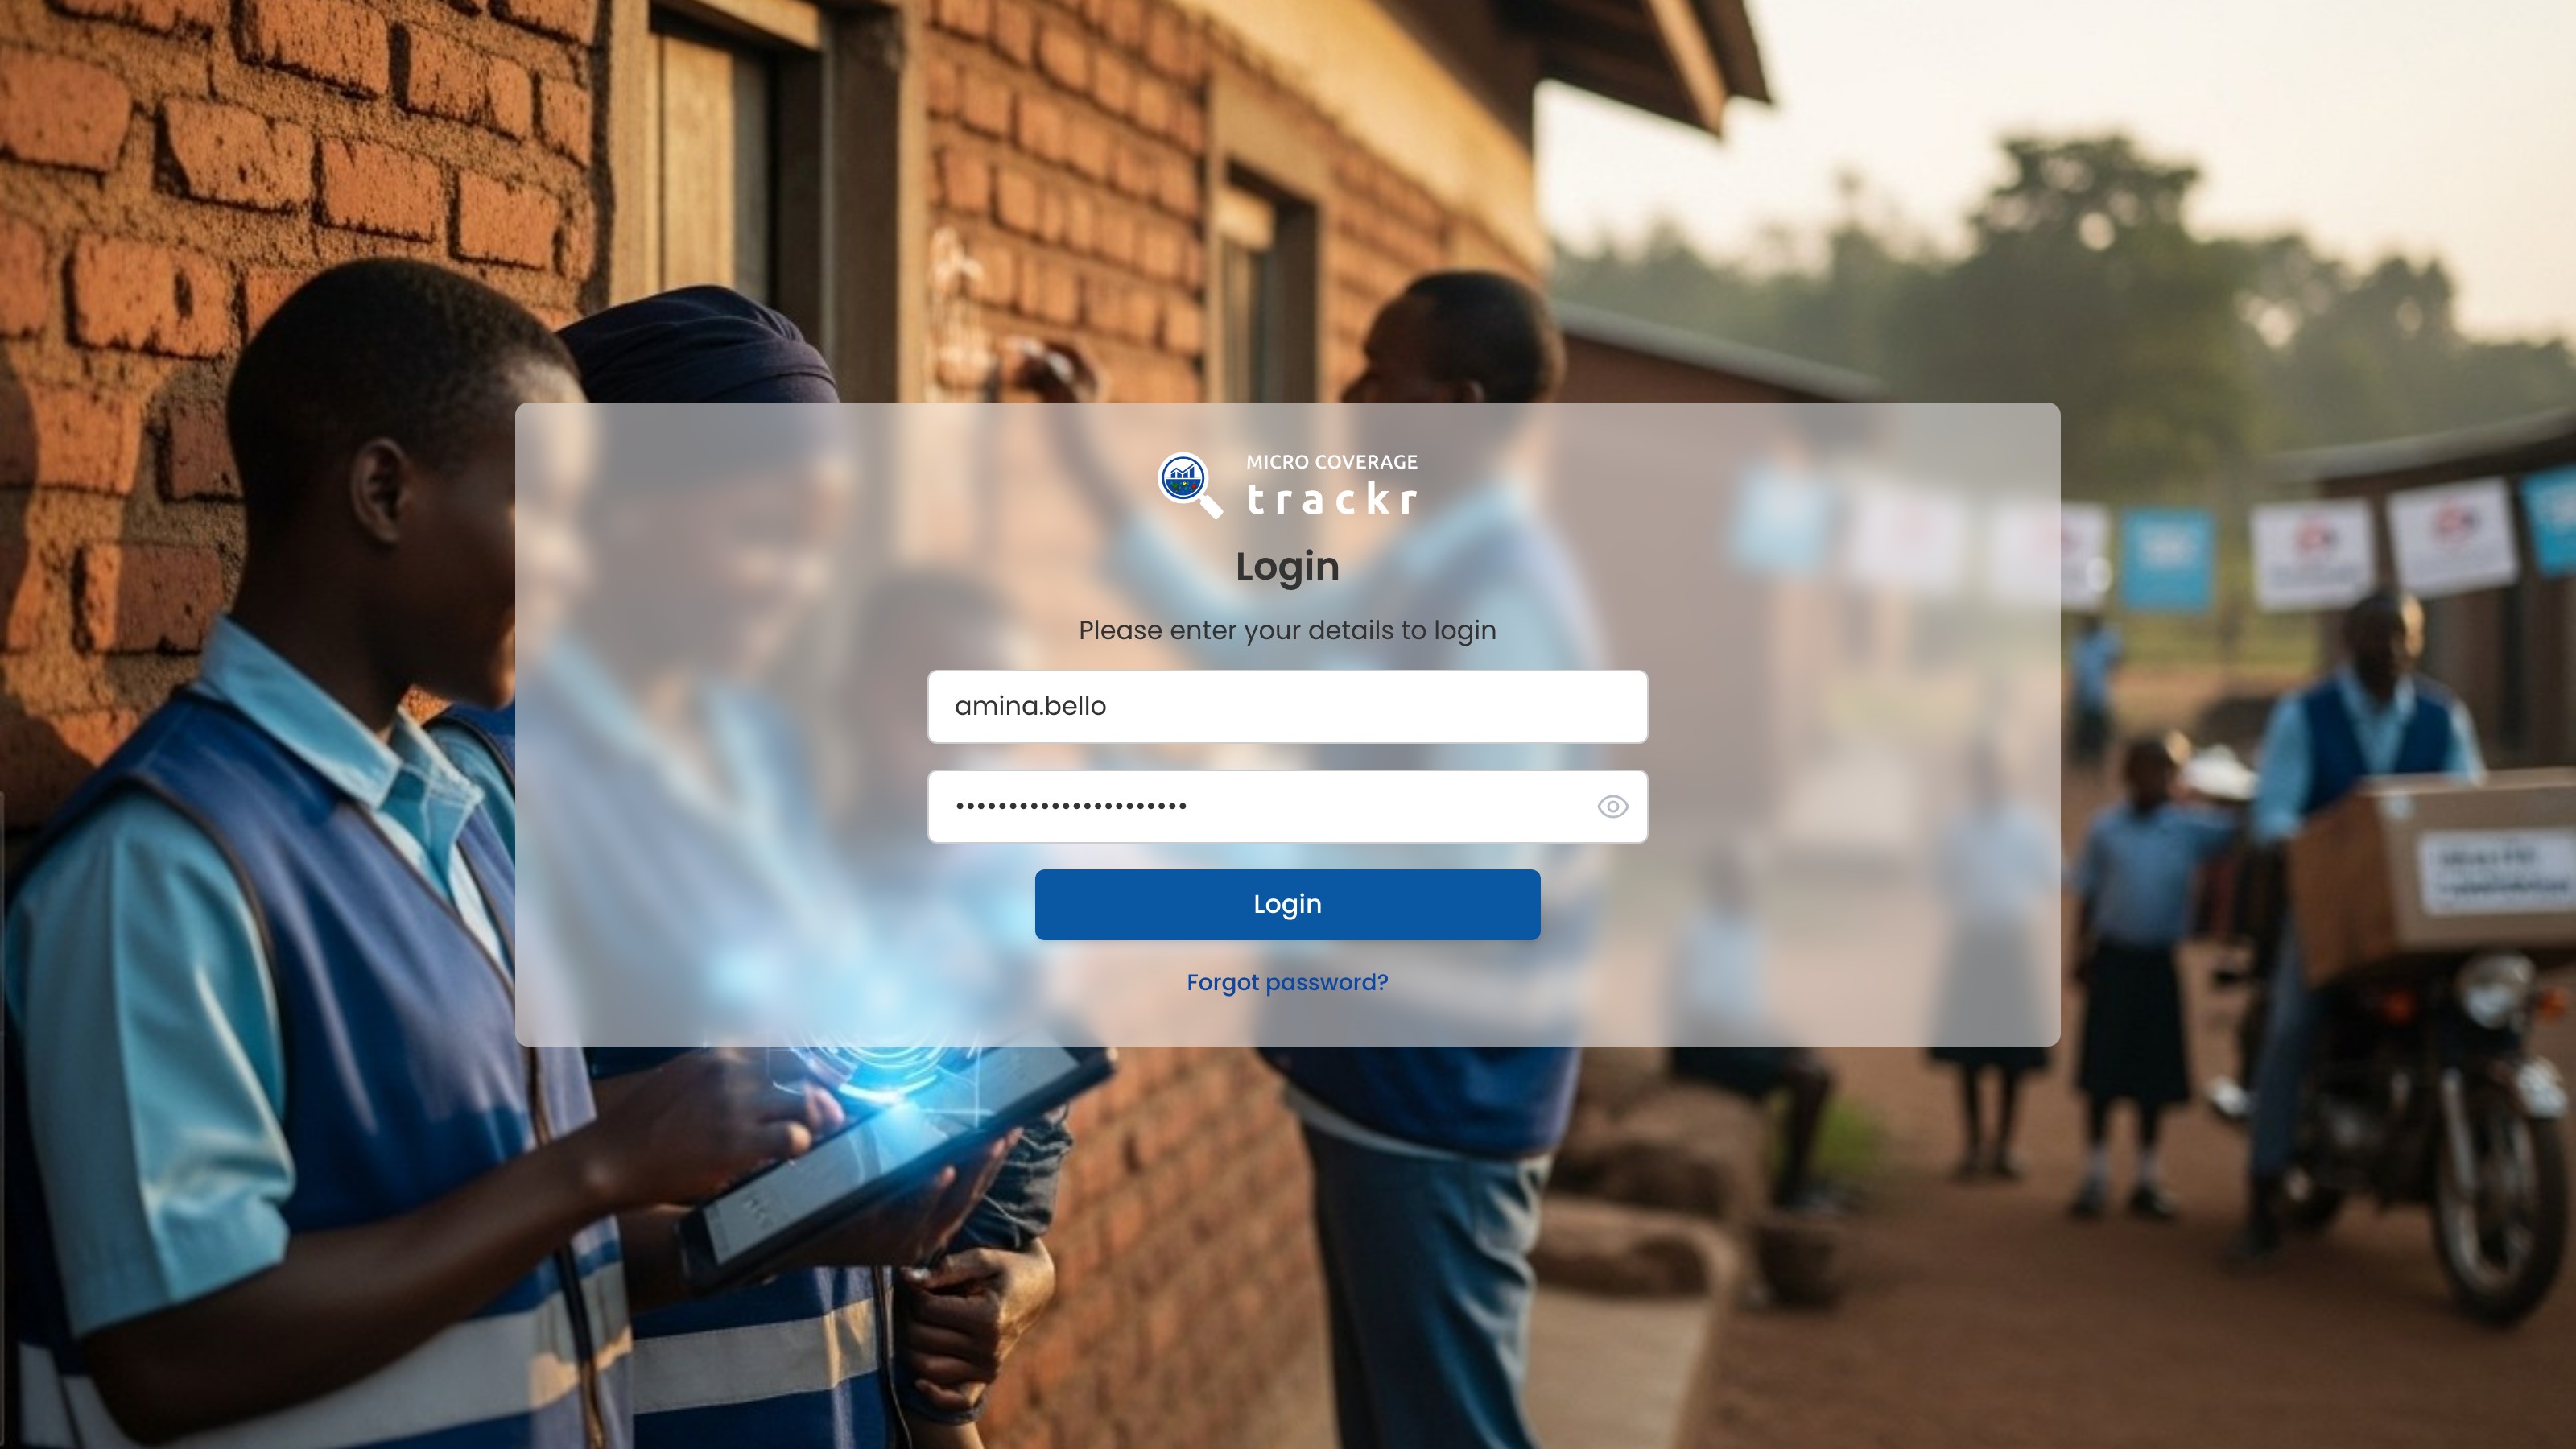
CoverageTrackr sign-in page with the login form

1 — sign-in fields · 2 — login button.

CoverageTrackr sign-in page with the login form

Confirm the active programme

On Overview, check the programme selector in the header before opening a workflow.
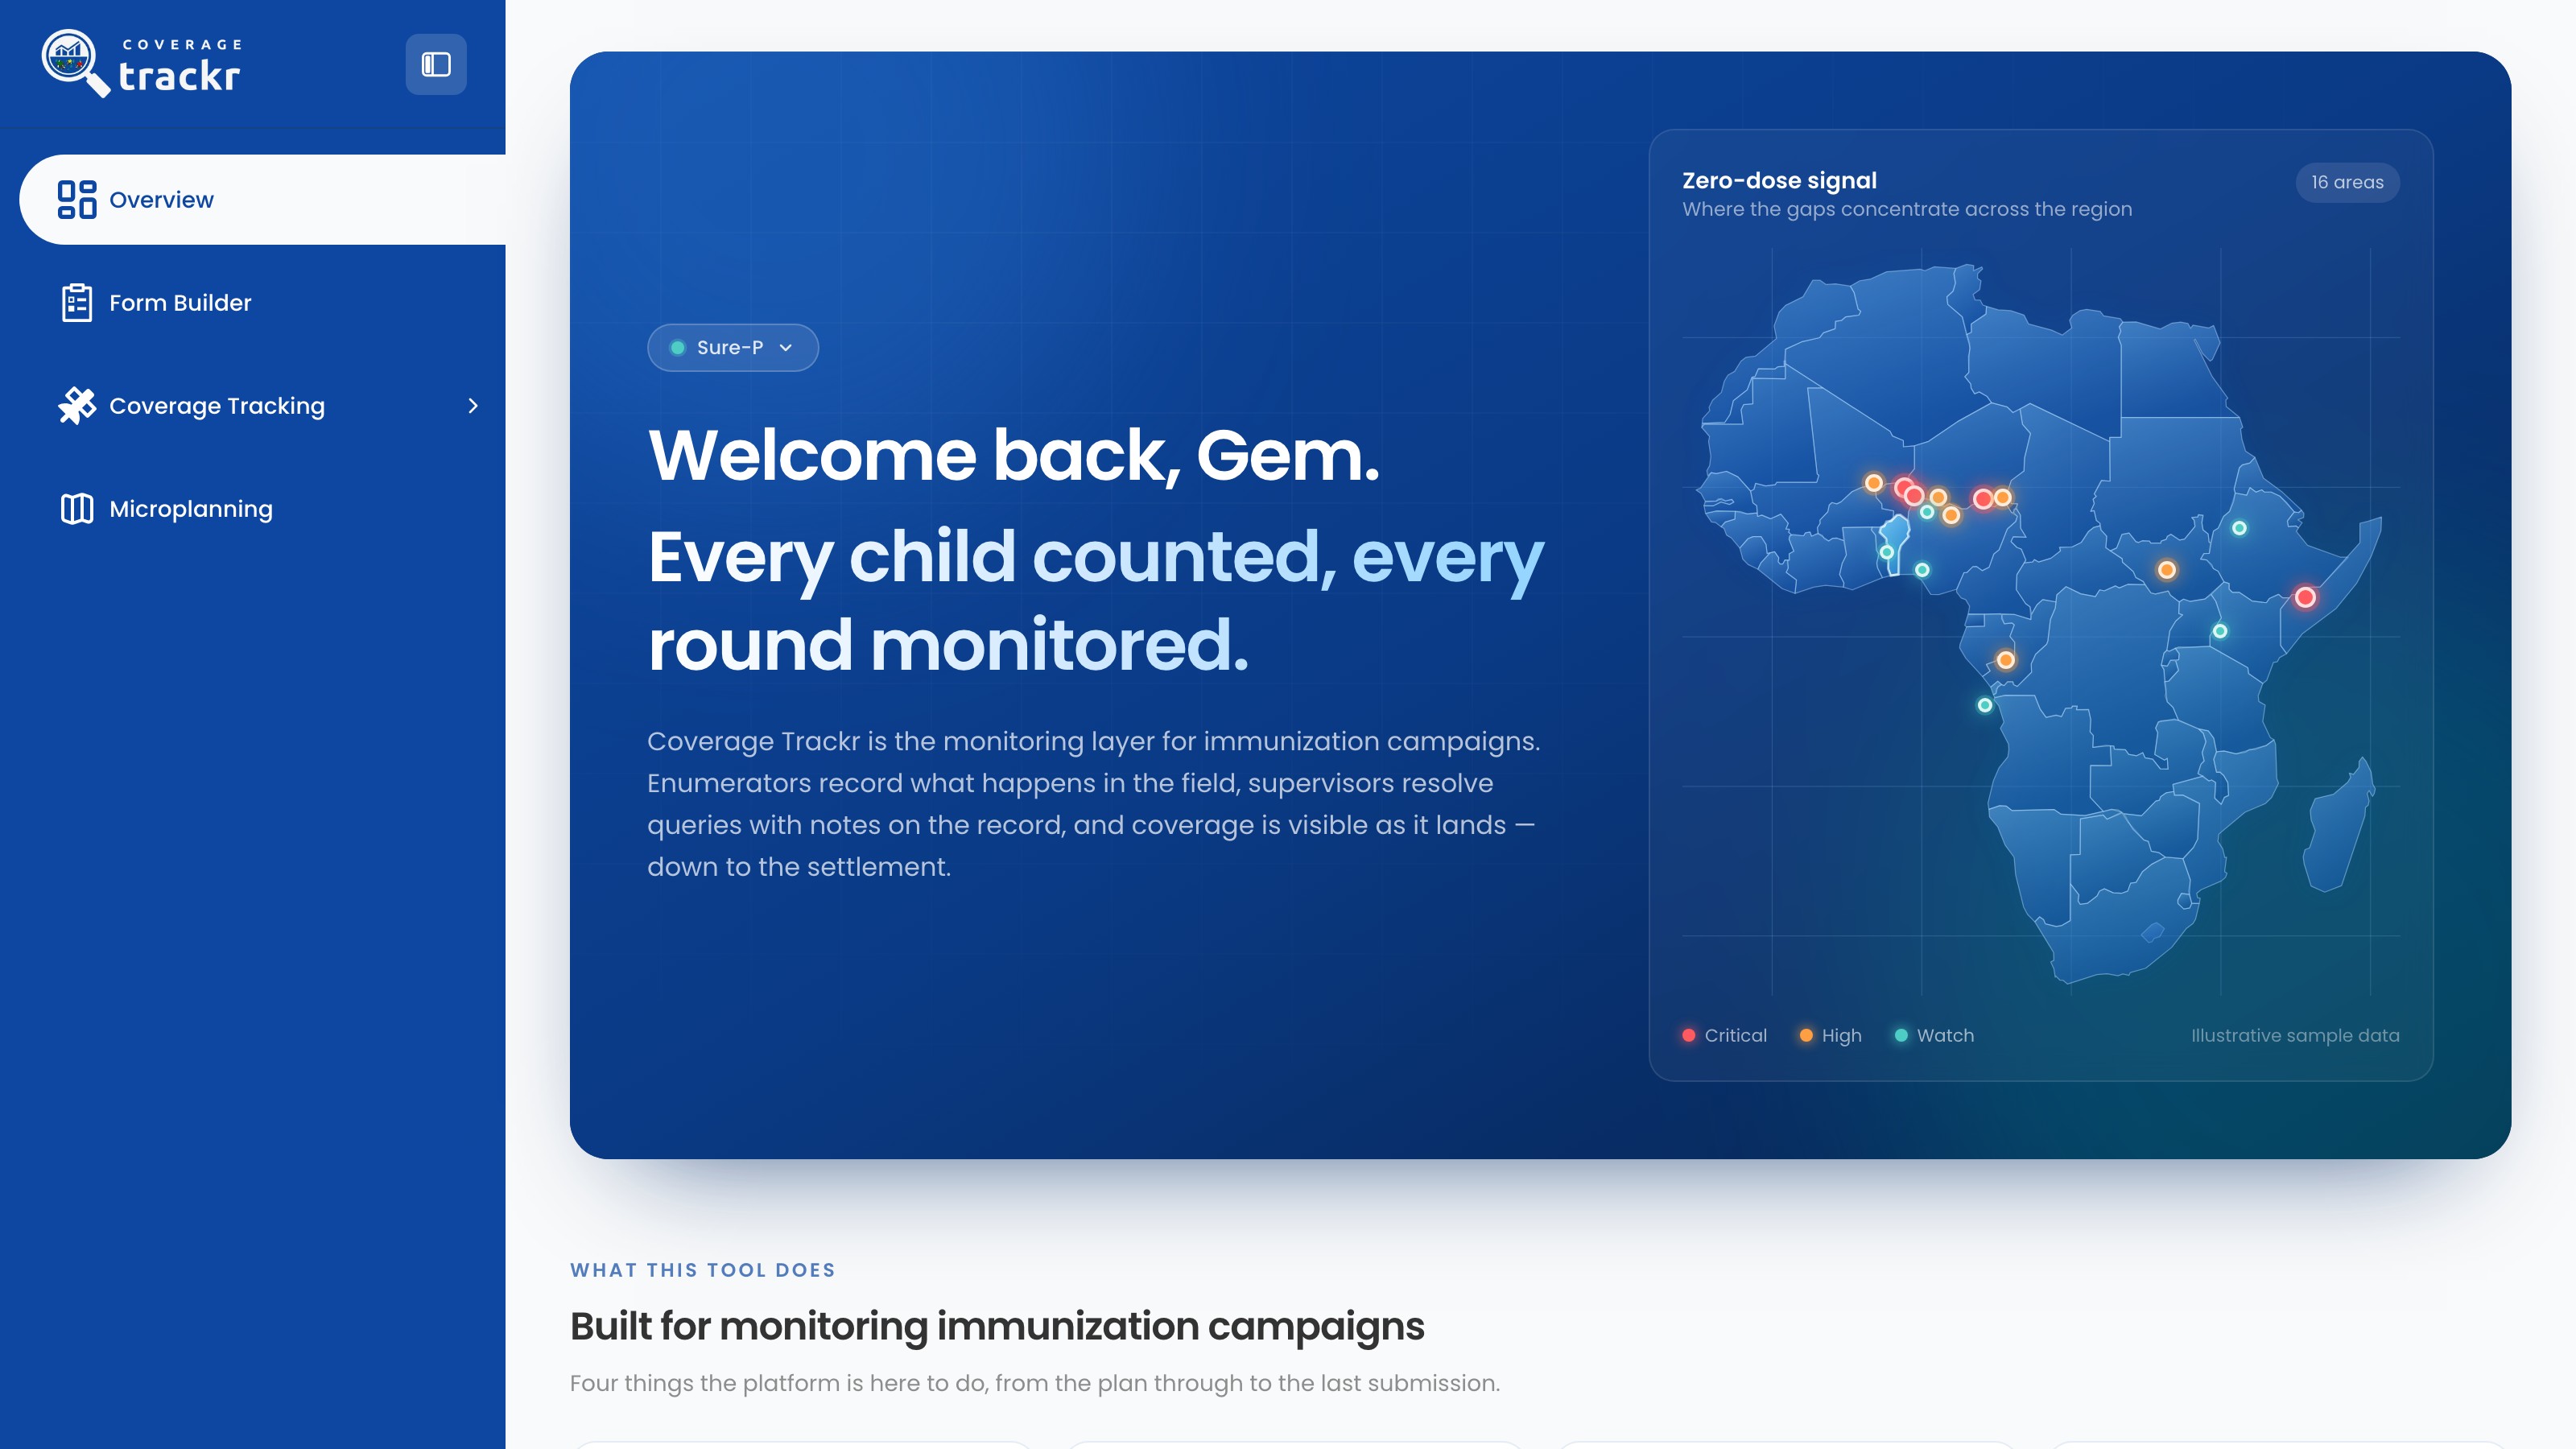
CoverageTrackr Overview page with the programme selector in the header

1 — programme selector.

CoverageTrackr Overview page with the programme selector in the header

Switch programme when required

Open the programme selector and choose the programme whose activities you want to manage. The current programme is marked CURRENT.
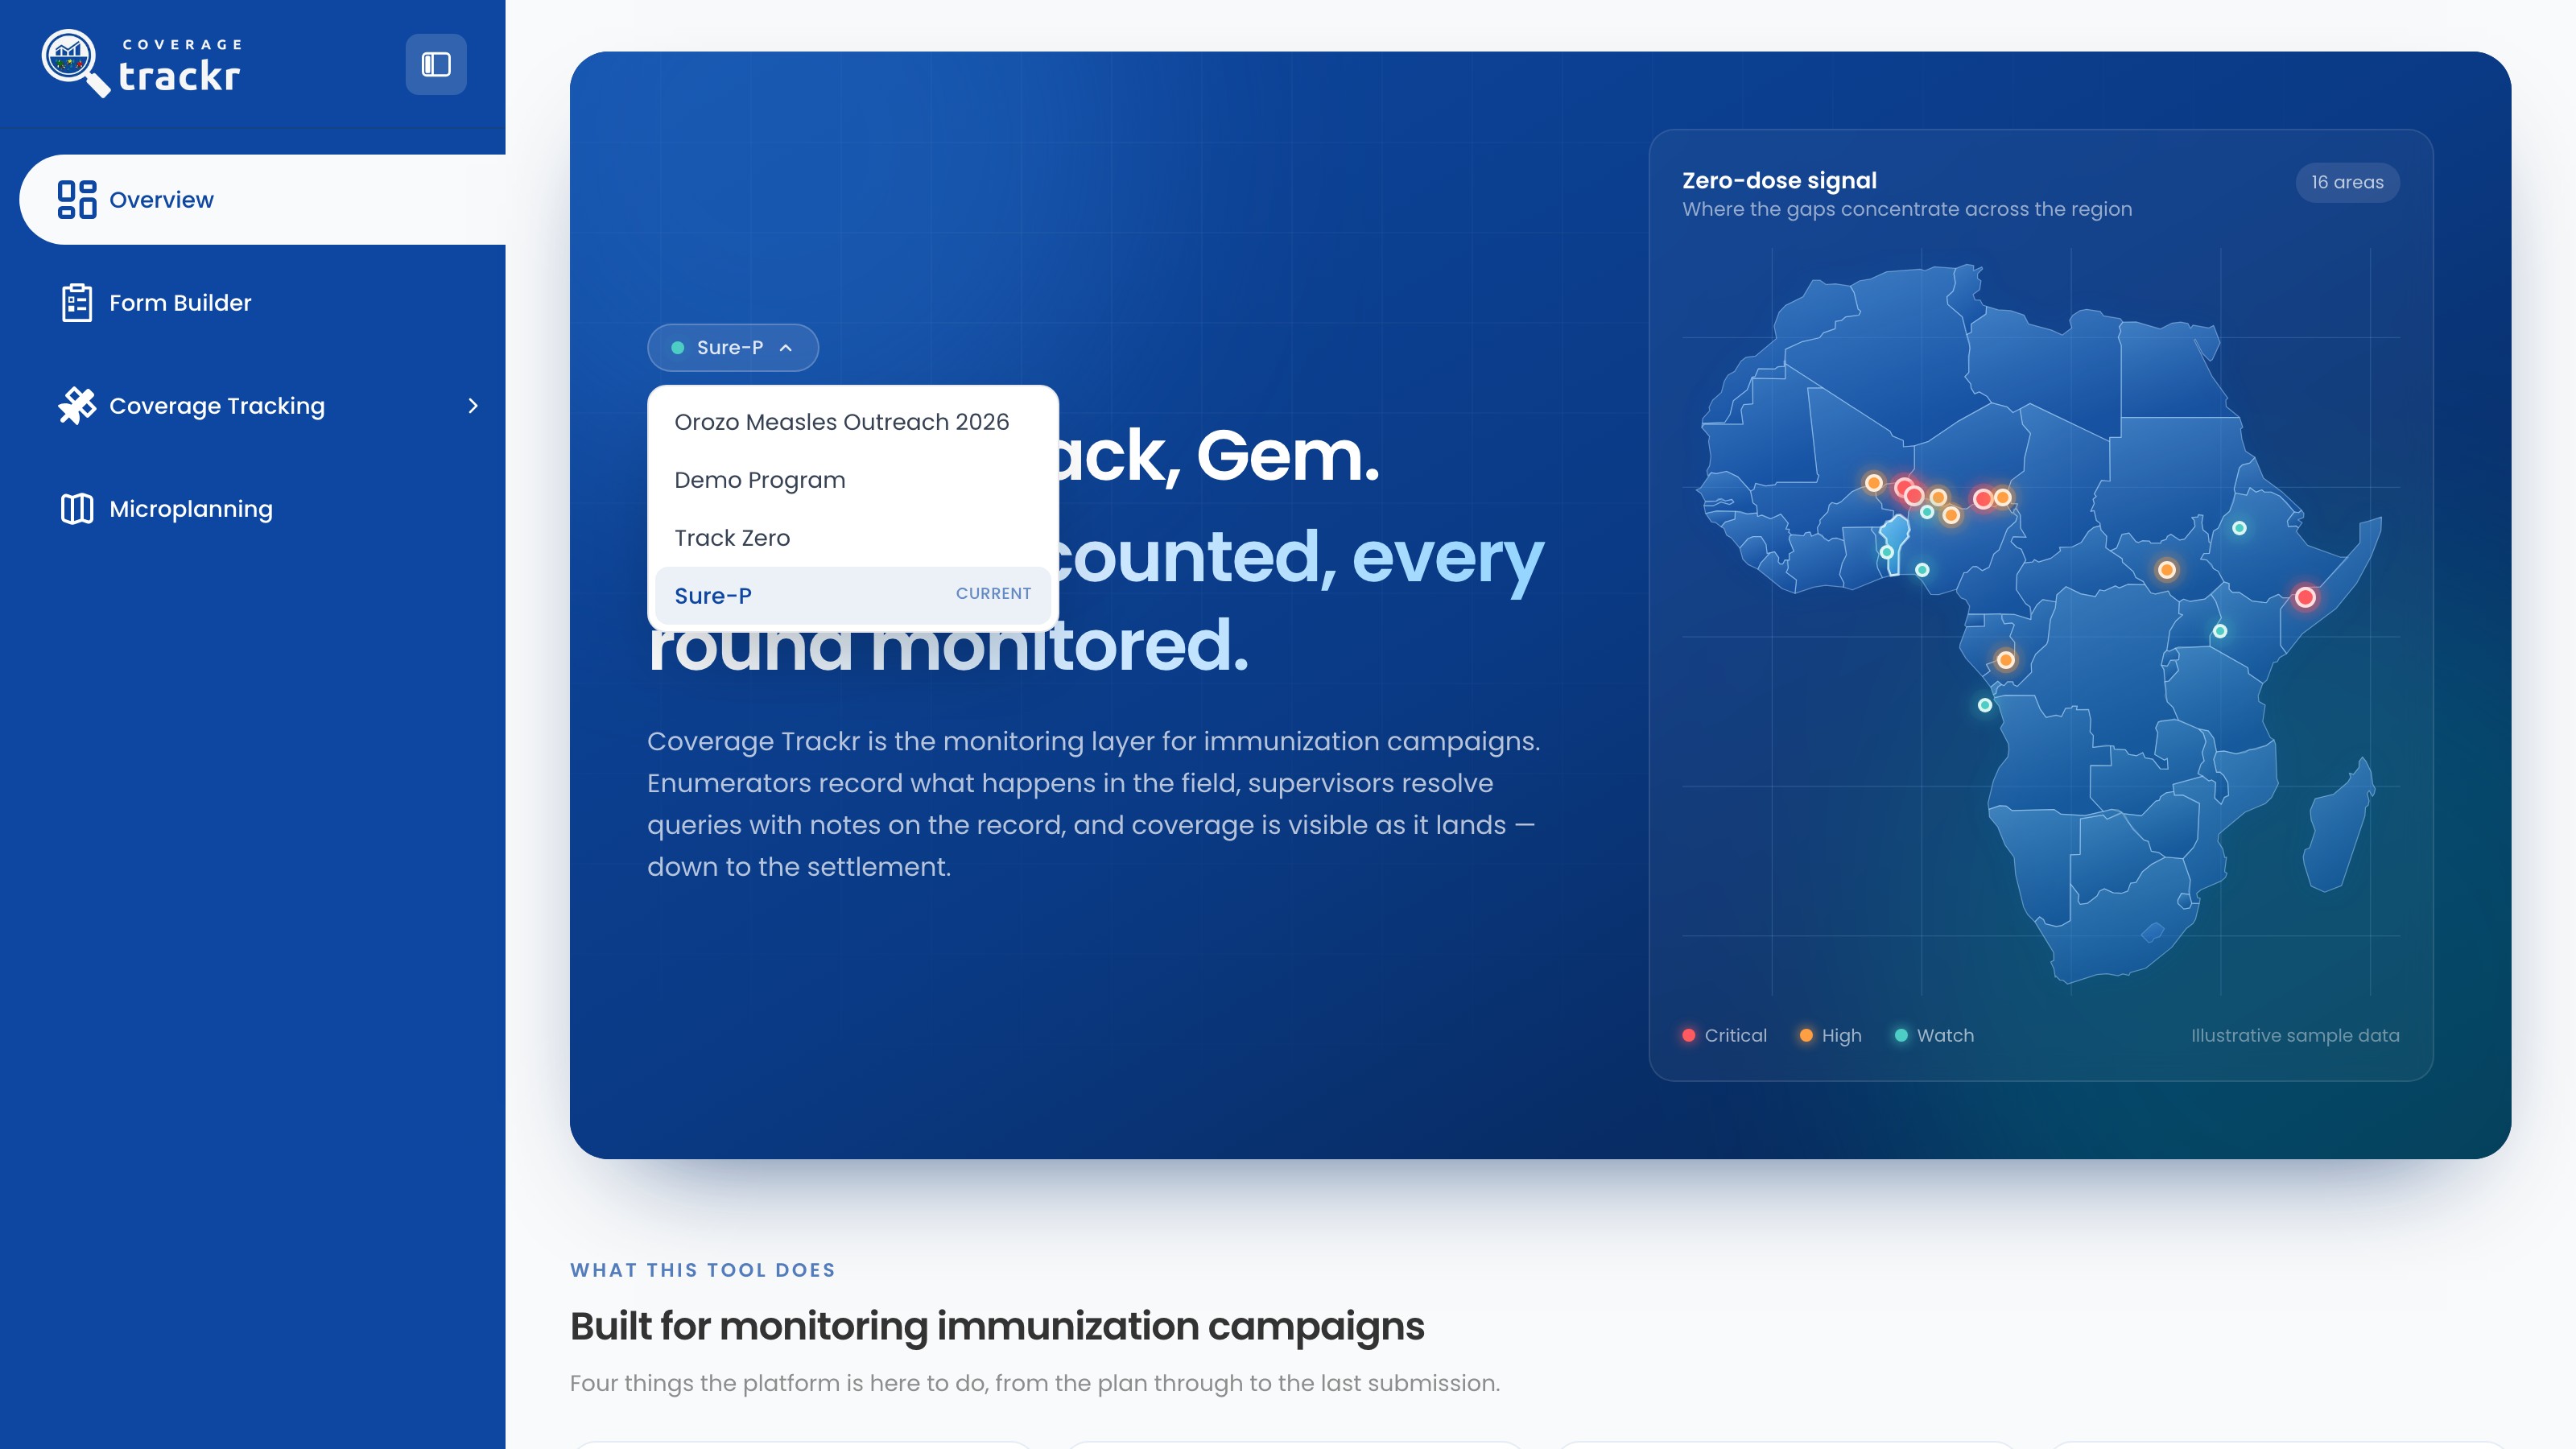
Open programme selector showing the available CoverageTrackr programmes

1 — programme selector · 2 — current programme.

Open programme selector showing the available CoverageTrackr programmes

Done. The required programme is active and its programme navigation is available.

If something goes wrong

The programme I need is not listed. What should I do?

Ask an organization administrator to confirm your programme access before continuing.
Getting started

Change the interface language

Switch CoverageTrackr between English and French.

Organization Administrator 1 min read Web

Before you start

  • You are signed in.

Find the language selector

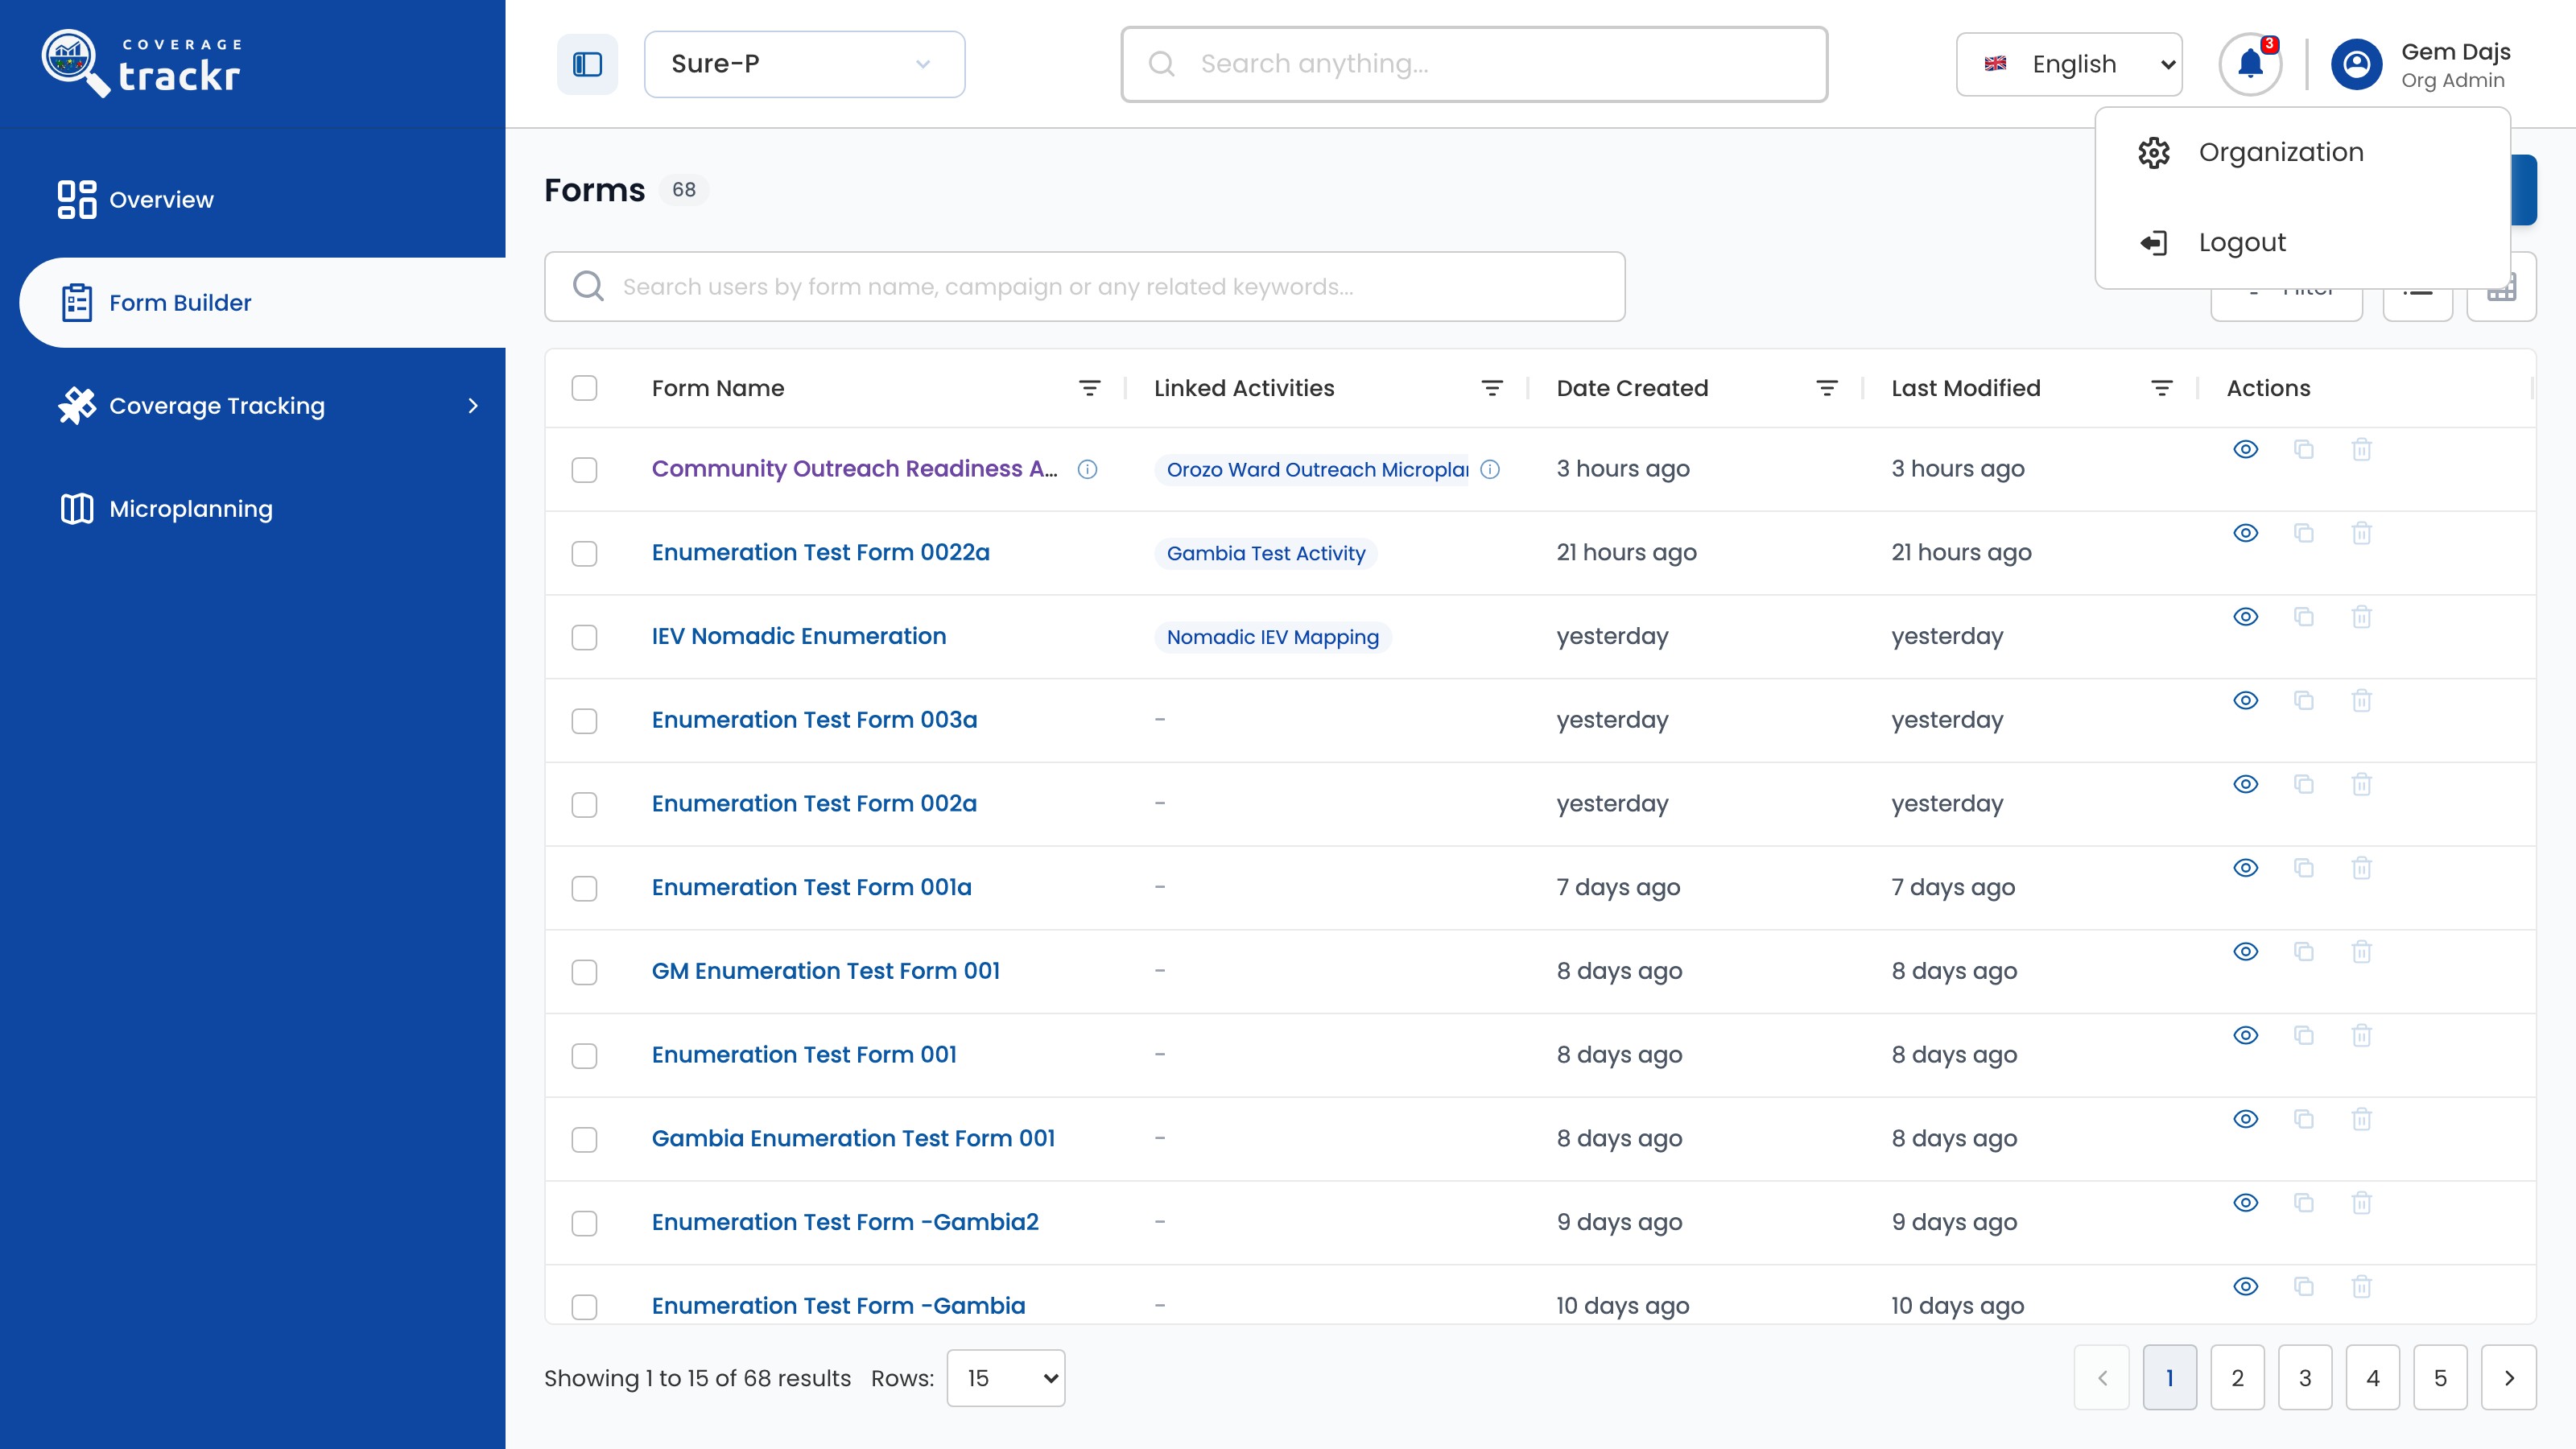
Use the language selector showing English at the top of the page, next to the notification bell.

Form Builder in English with the language selector in the header

1 — language selector.

Form Builder in English with the language selector in the header

Choose a language

Choose Français or English. The interface changes straight away.

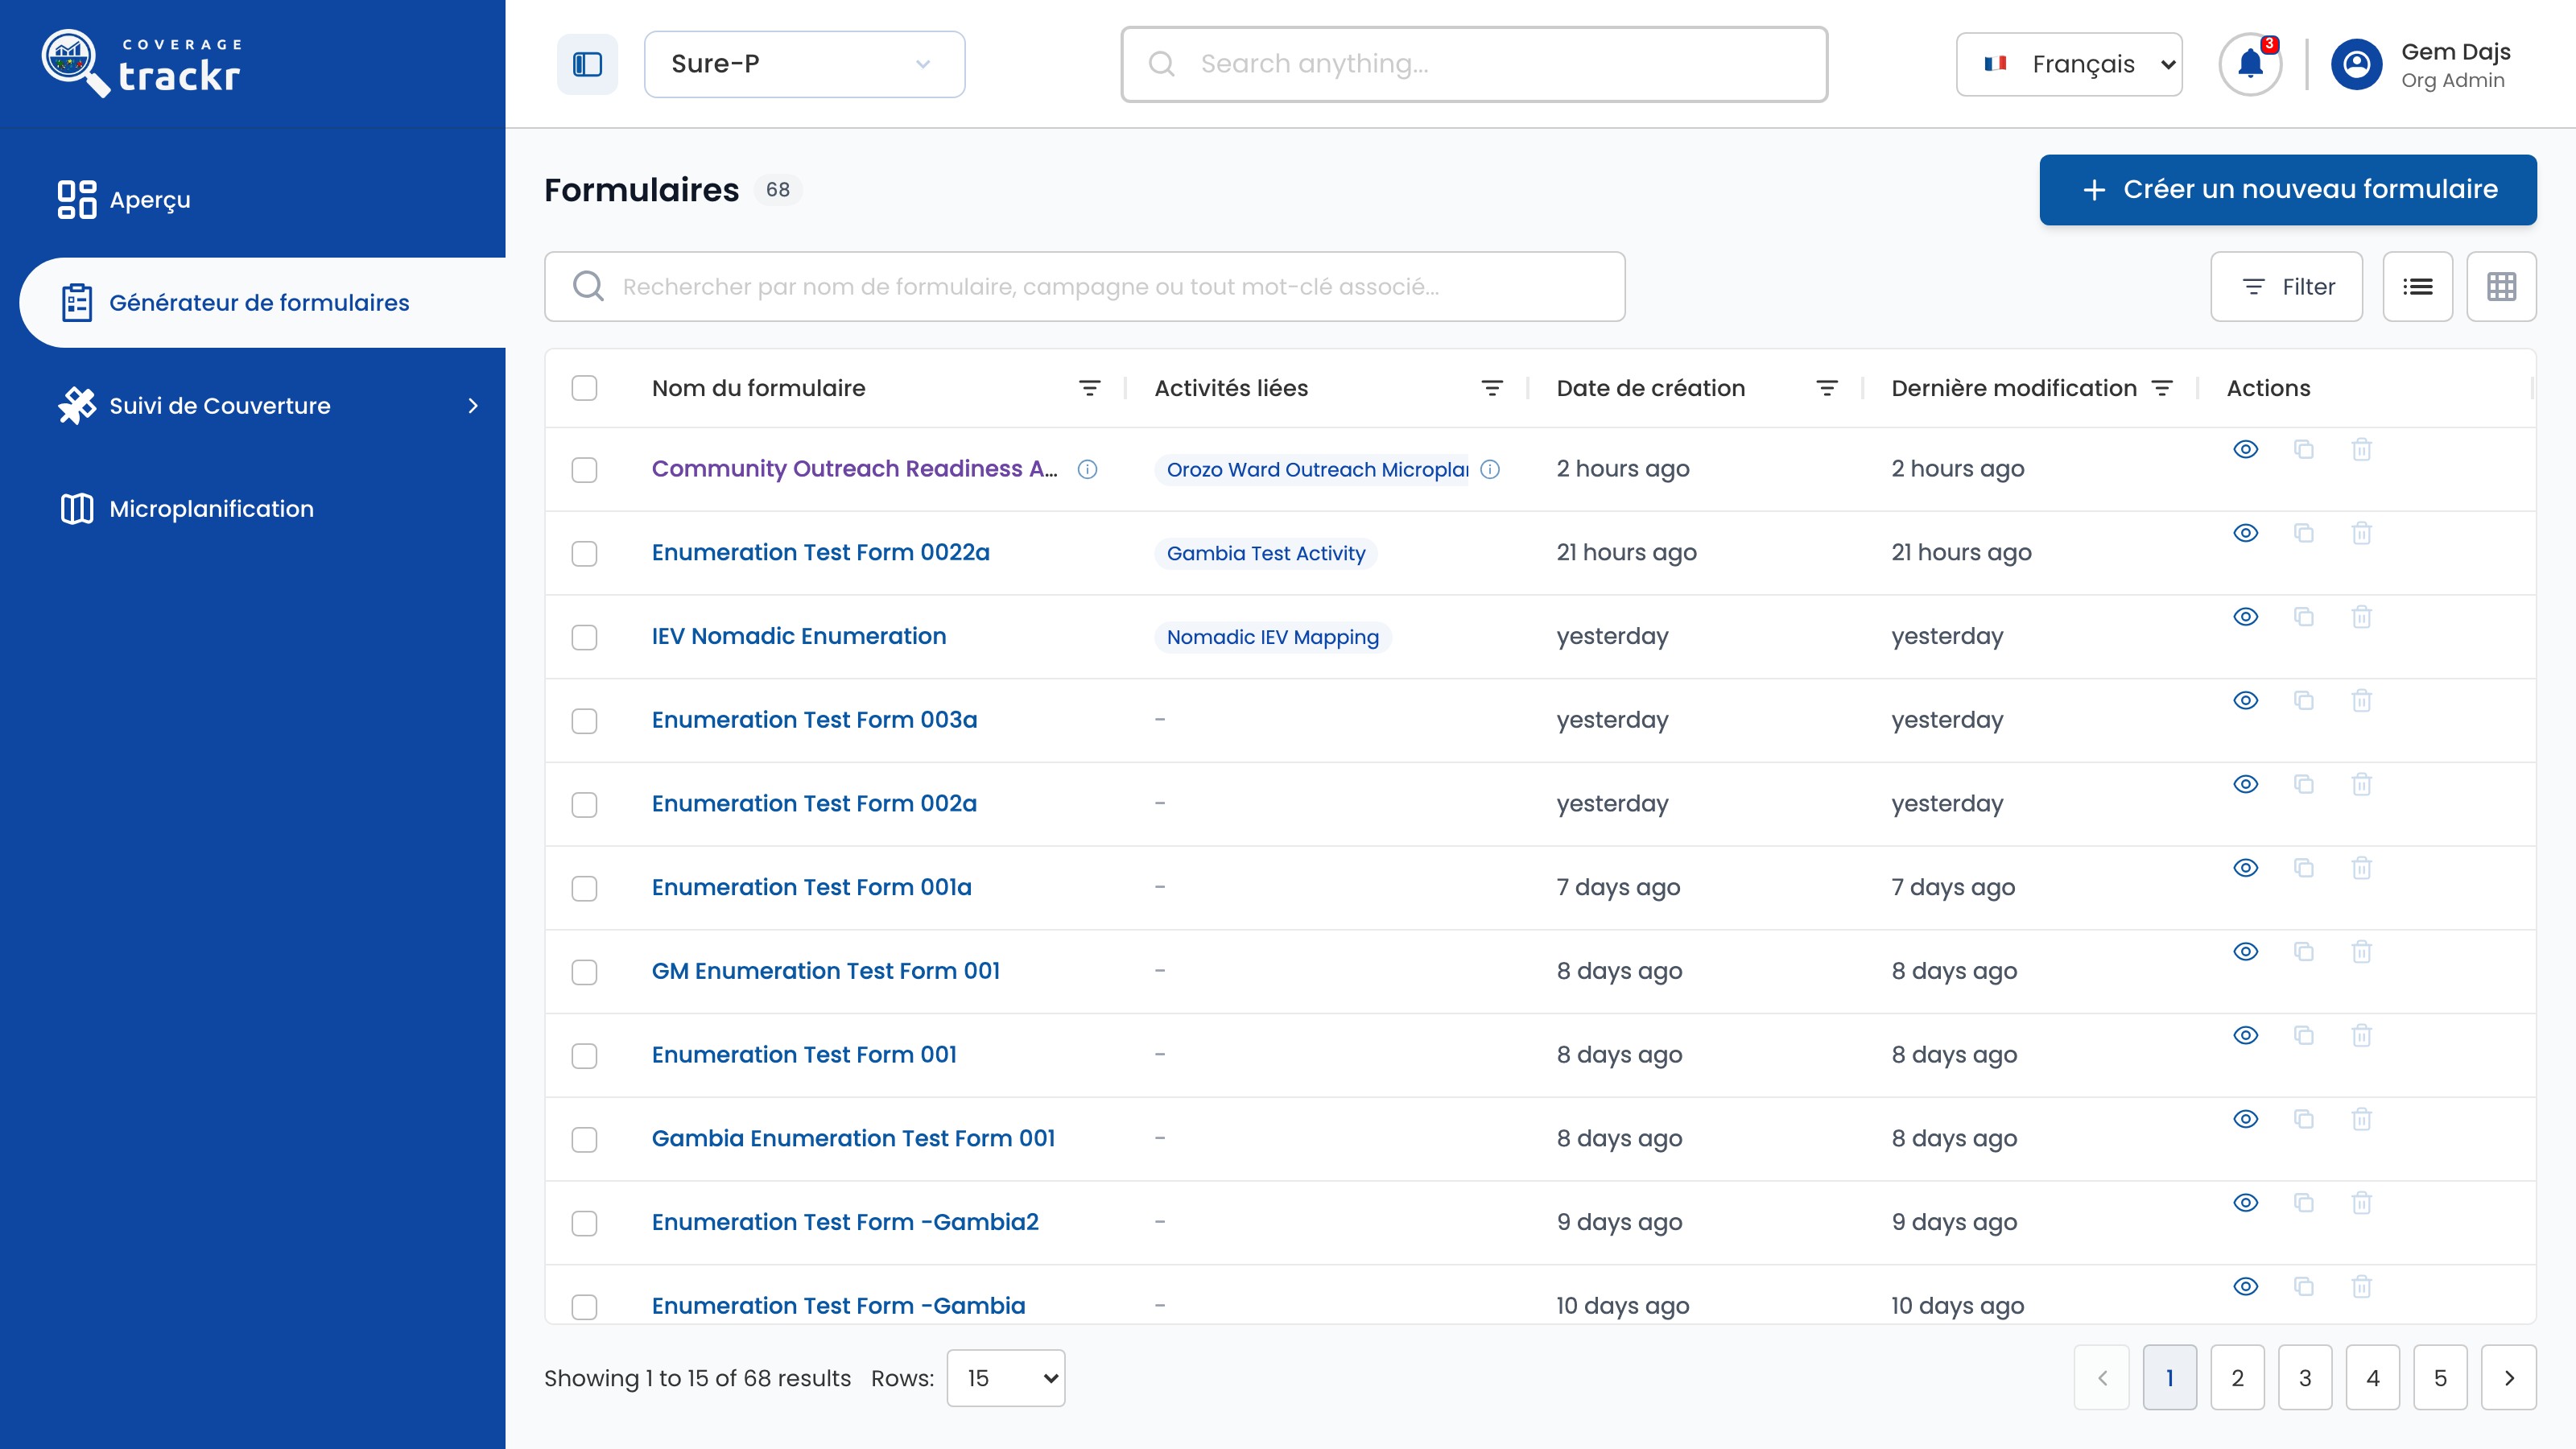
Form Builder shown in French after choosing Français

1 — selected language.

Form Builder shown in French after choosing Français

Done. Menus, page titles and buttons appear in the language you chose.

If something goes wrong

Why are some names still in English?

The language setting changes the interface only. Names entered by people, such as form and activity names, stay as they were typed.

Getting started

Reset a forgotten password

Request a verification code when you cannot remember your password.

Organization Administrator 3 min read Web

Before you start

  • You know the email address on your CoverageTrackr account.

Open Forgot password

On the Login page, select Forgot password?.

Login page with the Forgot password link

1 — forgot password link.

Login page with the Forgot password link

Request a code

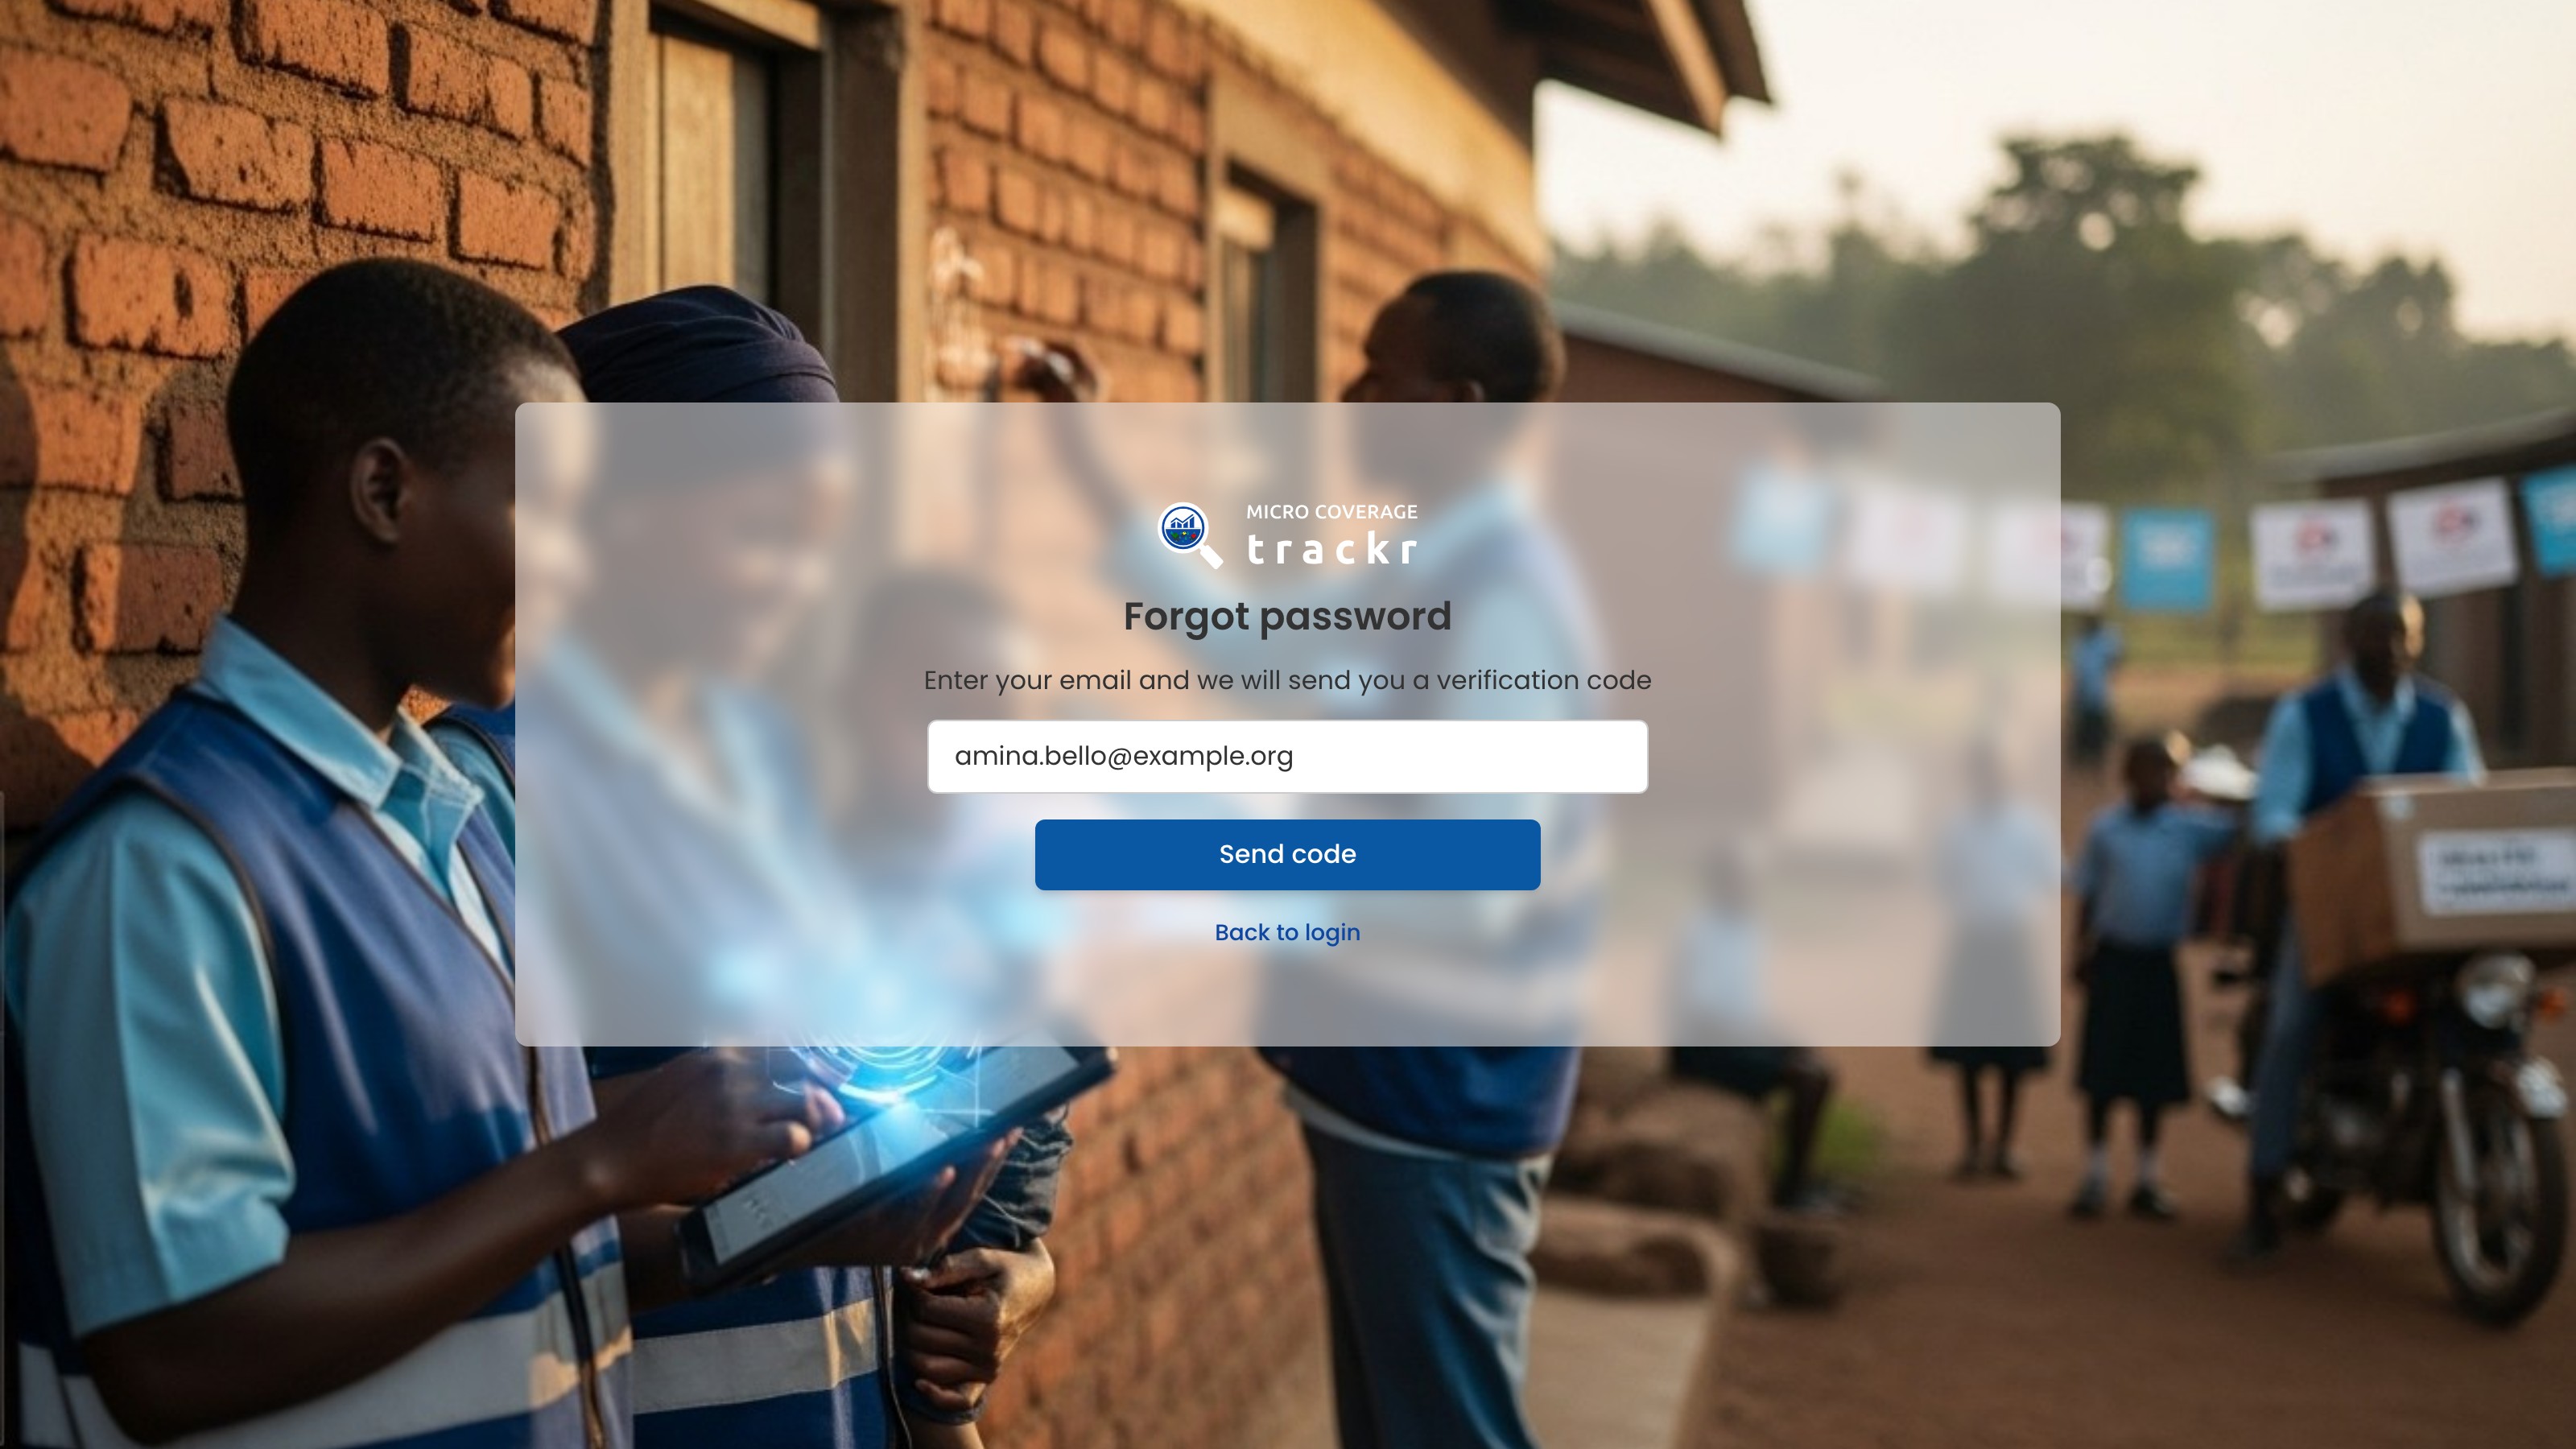
Enter your Email and select Send code.

Forgot password page with an email address entered

1 — email field · 2 — send code button.

Forgot password page with an email address entered

Done. After you select Send code, check your email for the verification code and follow its instructions to set a new password.

If something goes wrong

What if my account has no email address?

Ask an organization administrator to reset your password for you.

The code has not arrived. What should I do?

Check your spam folder, then request a new code from Forgot password?.

Getting started

Sign out

End your CoverageTrackr session on a shared or public computer.

Organization Administrator 1 min read Web

Before you start

  • You are signed in.

Open the account menu

Select your name at the top right, then select Logout.

Account menu open with Organization and Logout

1 — account menu · 2 — logout option.

Account menu open with Organization and Logout

Check that you are signed out

CoverageTrackr returns you to the Login page.

CoverageTrackr Login page after signing out

1 — login page.

CoverageTrackr Login page after signing out

Done. The Login page appears and your session has ended.

If something goes wrong

Do I need to sign out every time?

Always sign out on shared computers so nobody else can use your account.

Getting started

Create a programme

Create a programme workspace for a new campaign.

Organization Administrator 4 min read Web

Before you start

  • You are signed in with organization administration access.
  • The country and its levels are set up in Geography Setup.

Open the programme selector

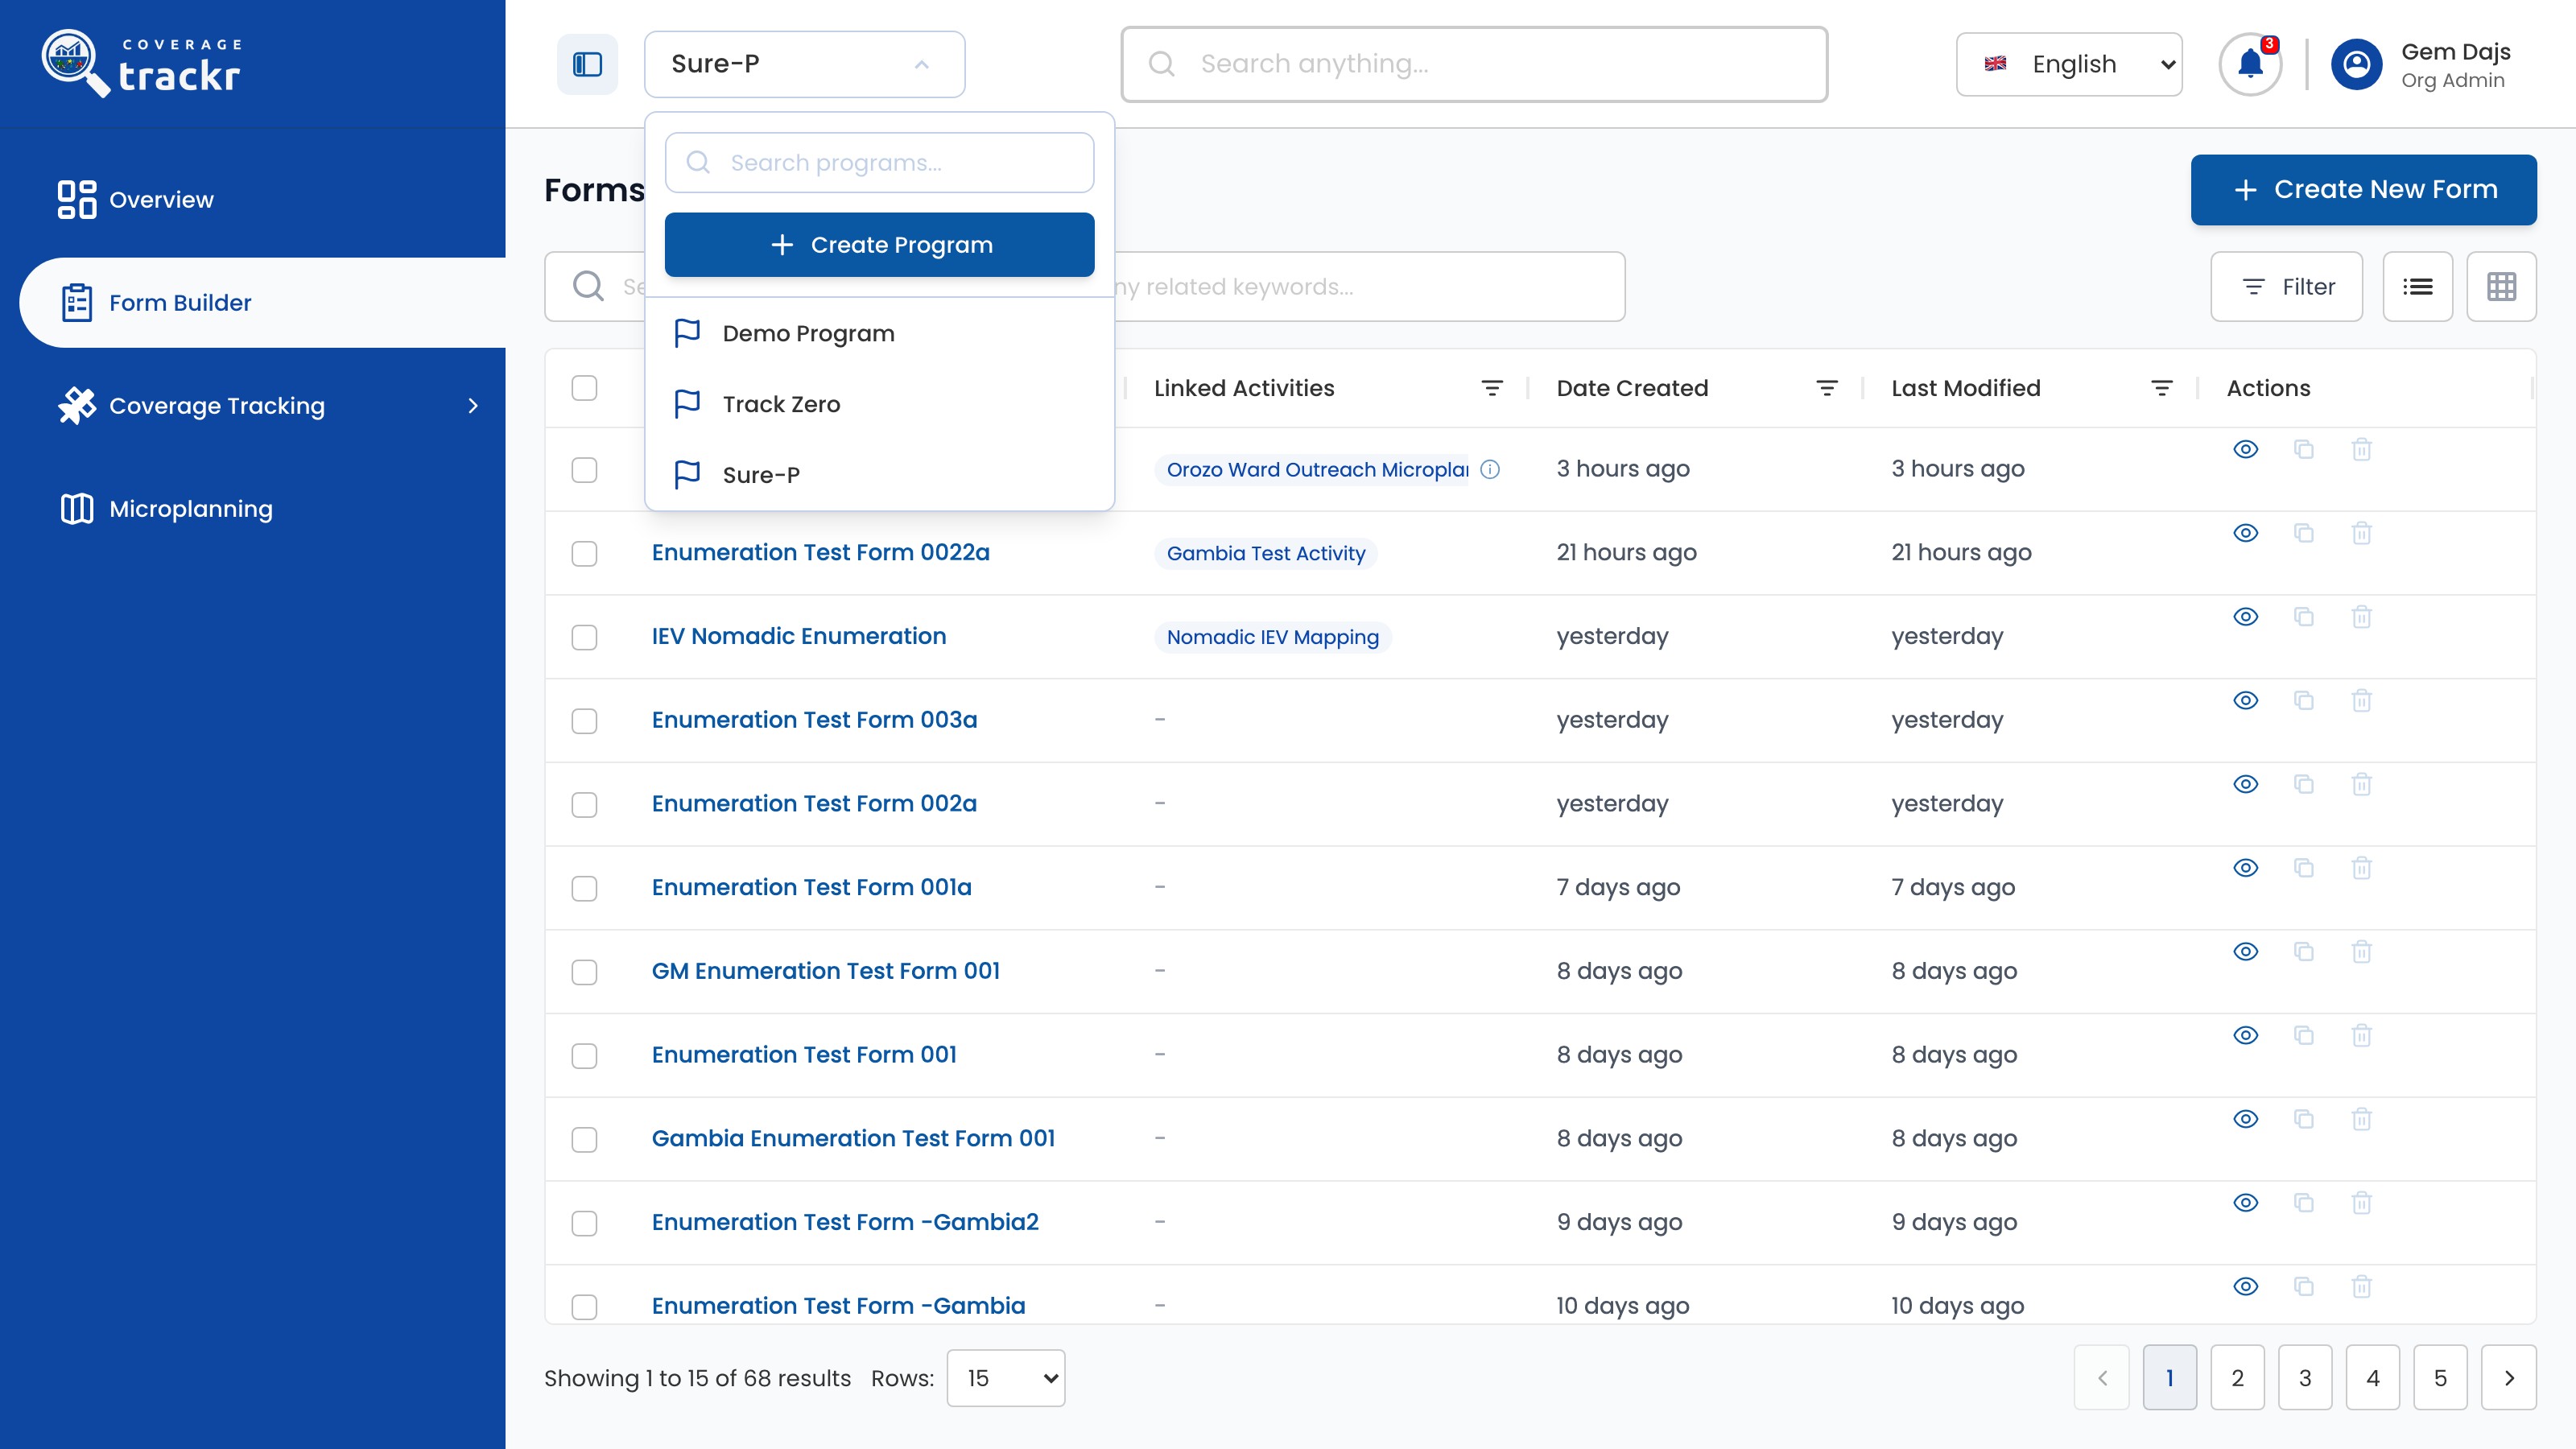
Select the programme name at the top of the page, then select Create Program.

Programme selector open with Create Program and the existing programmes

1 — programme selector · 2 — create program button.

Programme selector open with Create Program and the existing programmes

Enter the programme details

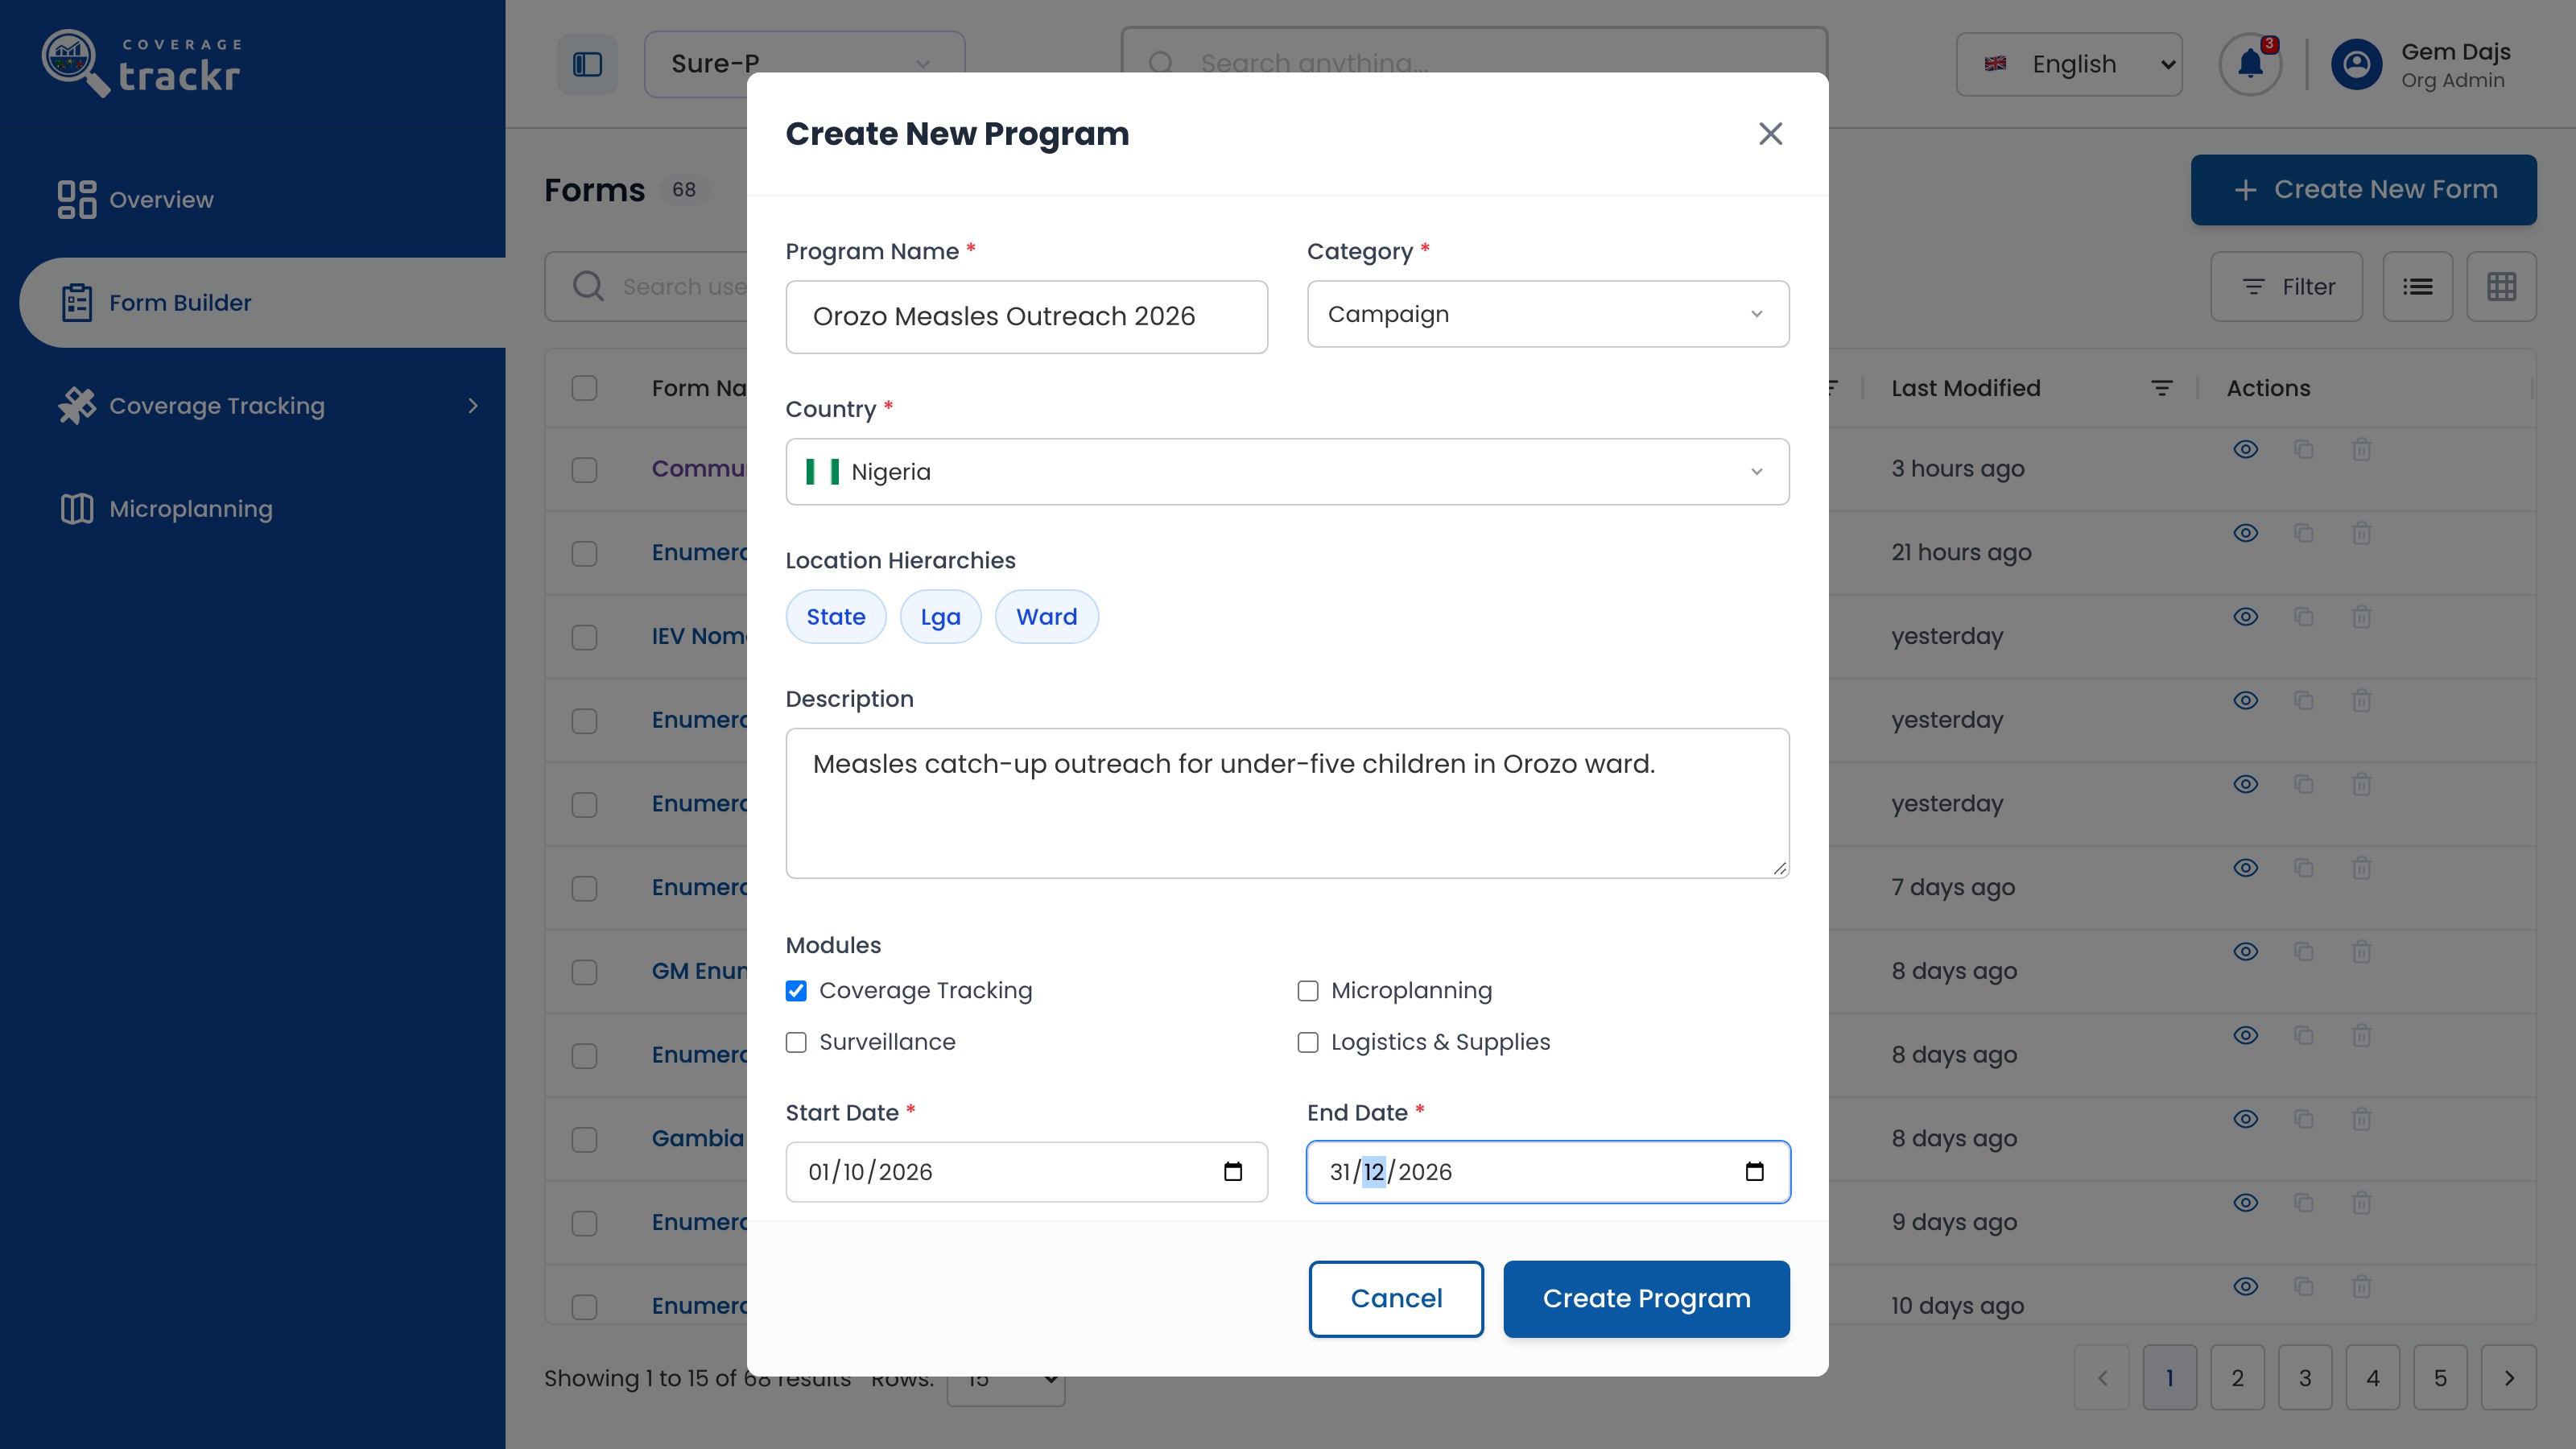
Enter the Program Name, choose the Category and Country, select the Location Hierarchies, add a Description, tick the Modules and set the dates. Select Create Program.

Create New Program form for Orozo Measles Outreach 2026

1 — programme details · 2 — modules and dates · 3 — create program button.

Create New Program form for Orozo Measles Outreach 2026

Find the new programme

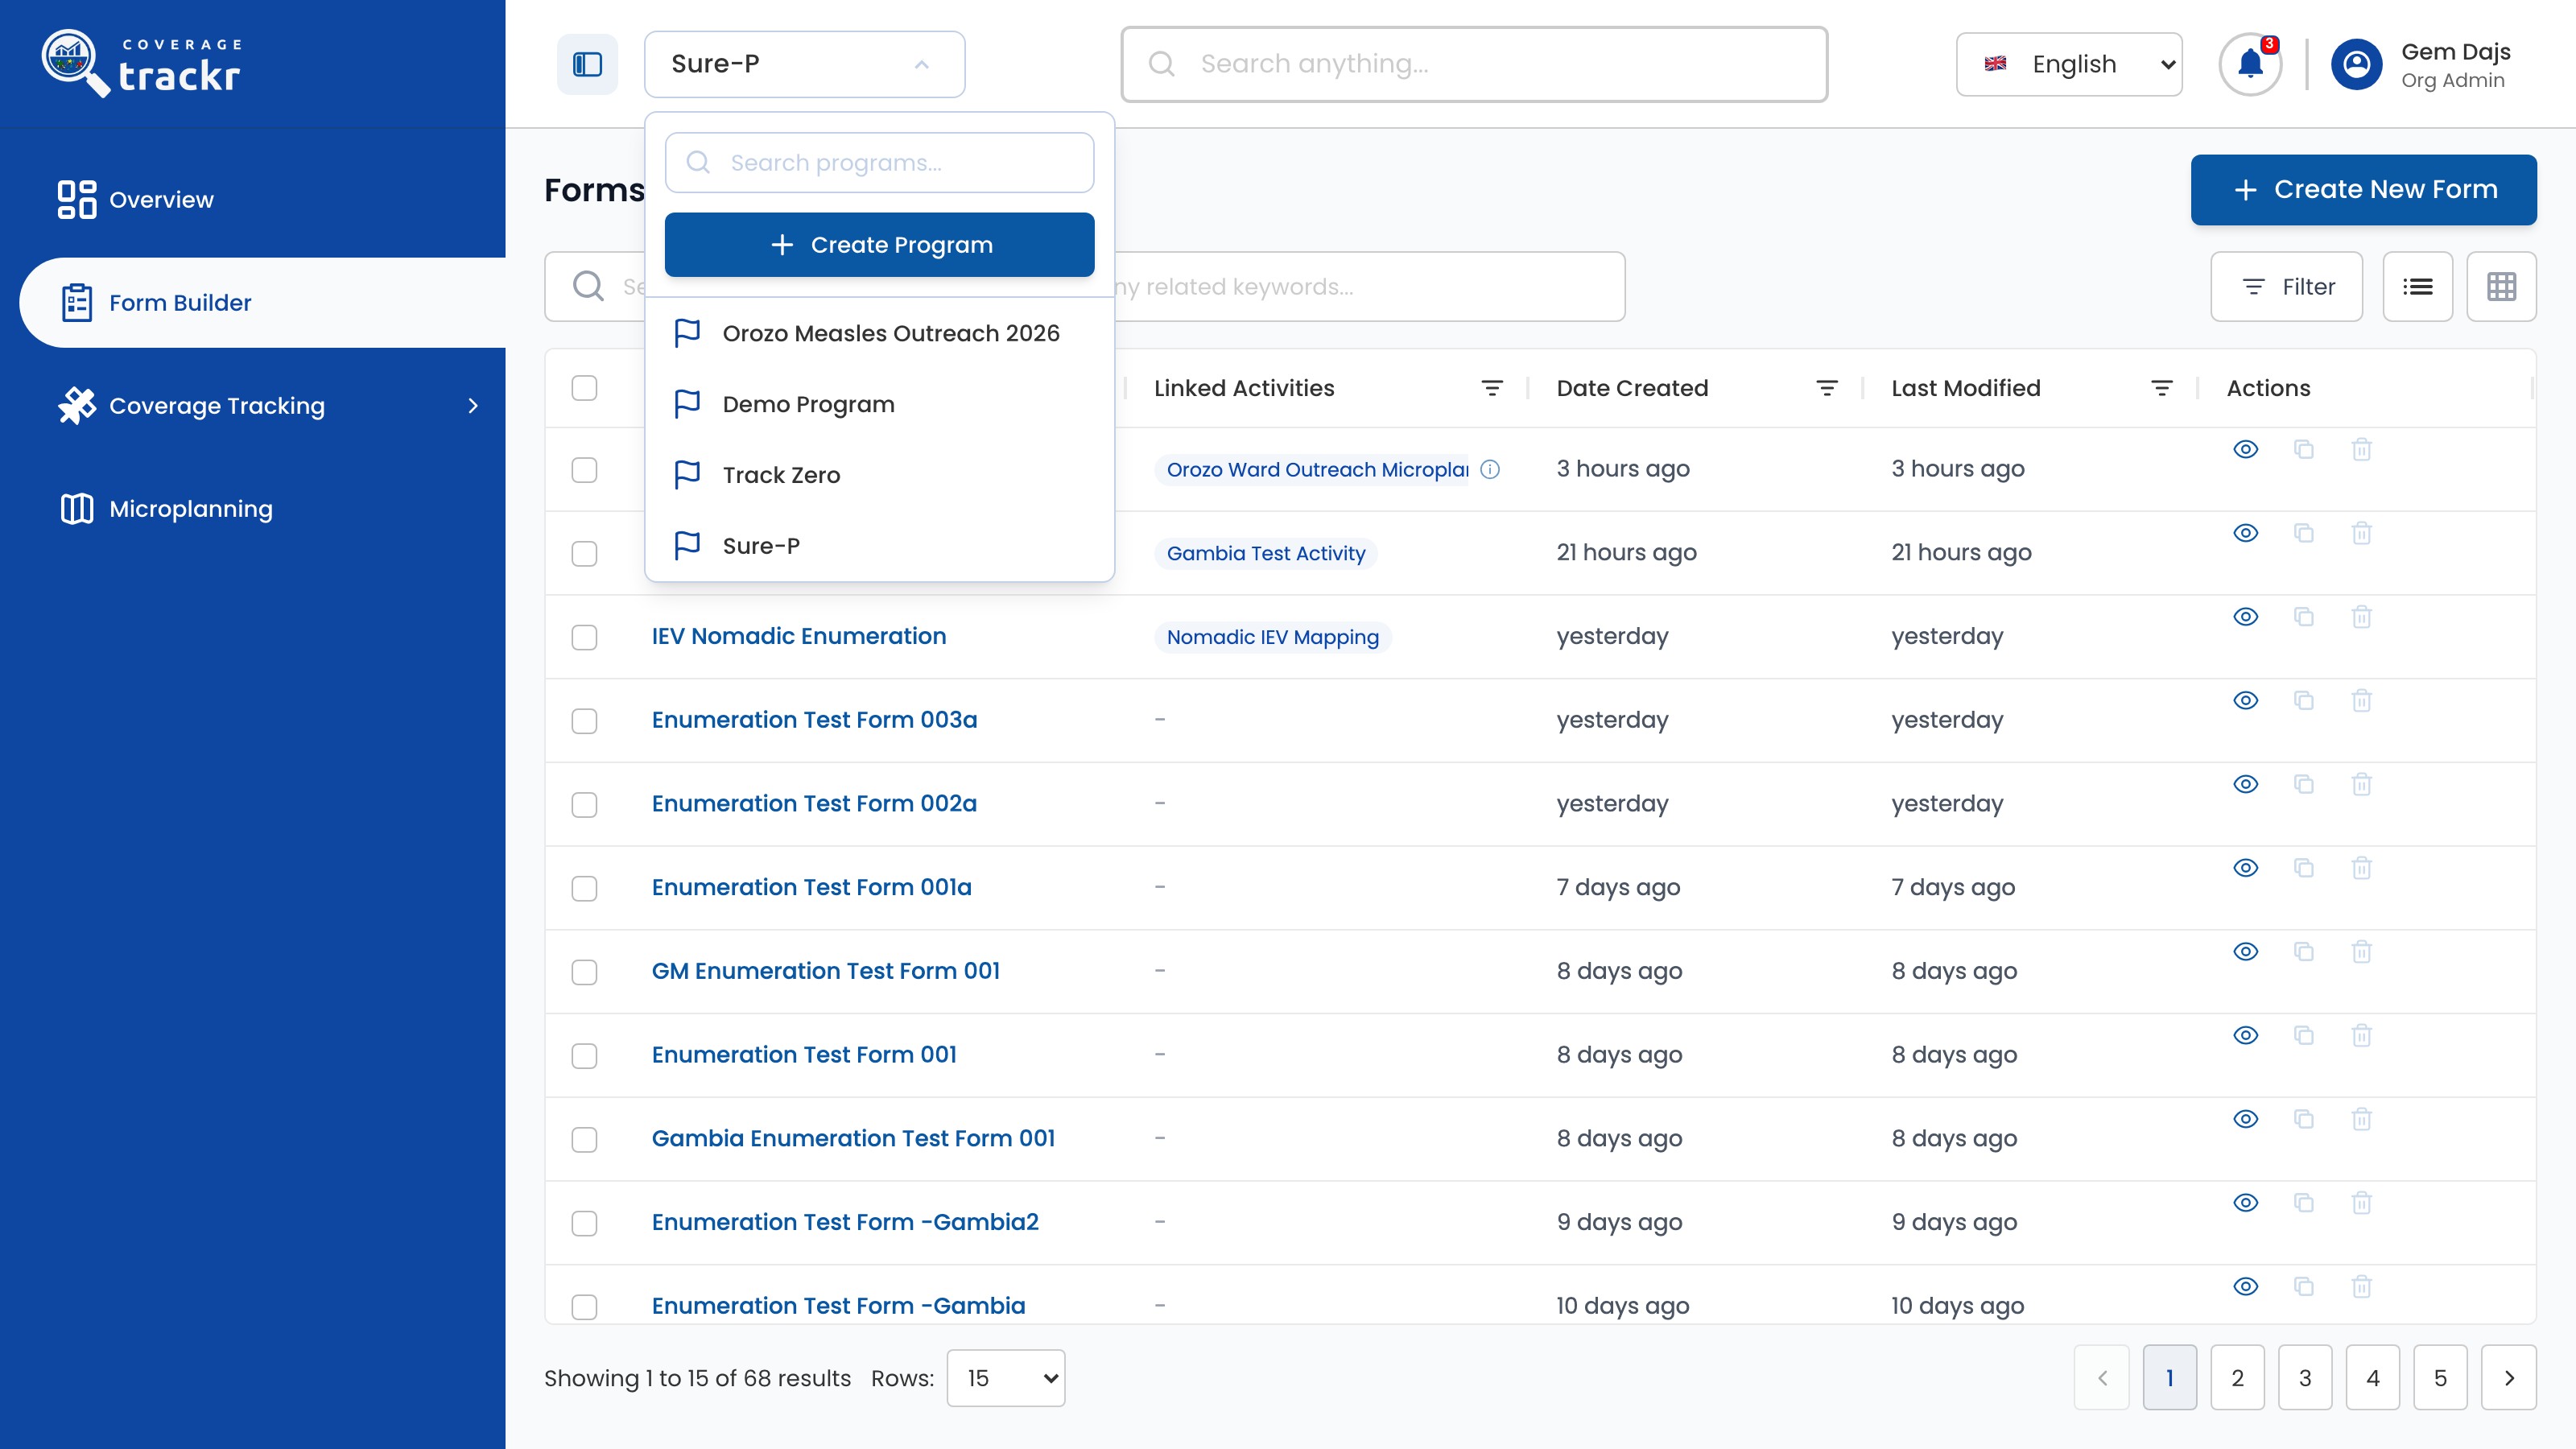
Open the programme selector again to see the new programme in the list, then select it to switch.

Programme selector listing Orozo Measles Outreach 2026

1 — new programme.

Programme selector listing Orozo Measles Outreach 2026

Done. CoverageTrackr confirms Program created successfully and the programme appears in the programme selector.

If something goes wrong

Why does Create Program say No valid location hierarchies?

Select at least one level under Location Hierarchies after choosing the country.

Organization administration

Update the organization profile

Keep your organization's contact details, address and time zone up to date.

Organization Administrator 3 min read Web

Before you start

  • You are signed in with organization administration access.
  • You have the organization's current phone number and address.

Open the organization profile

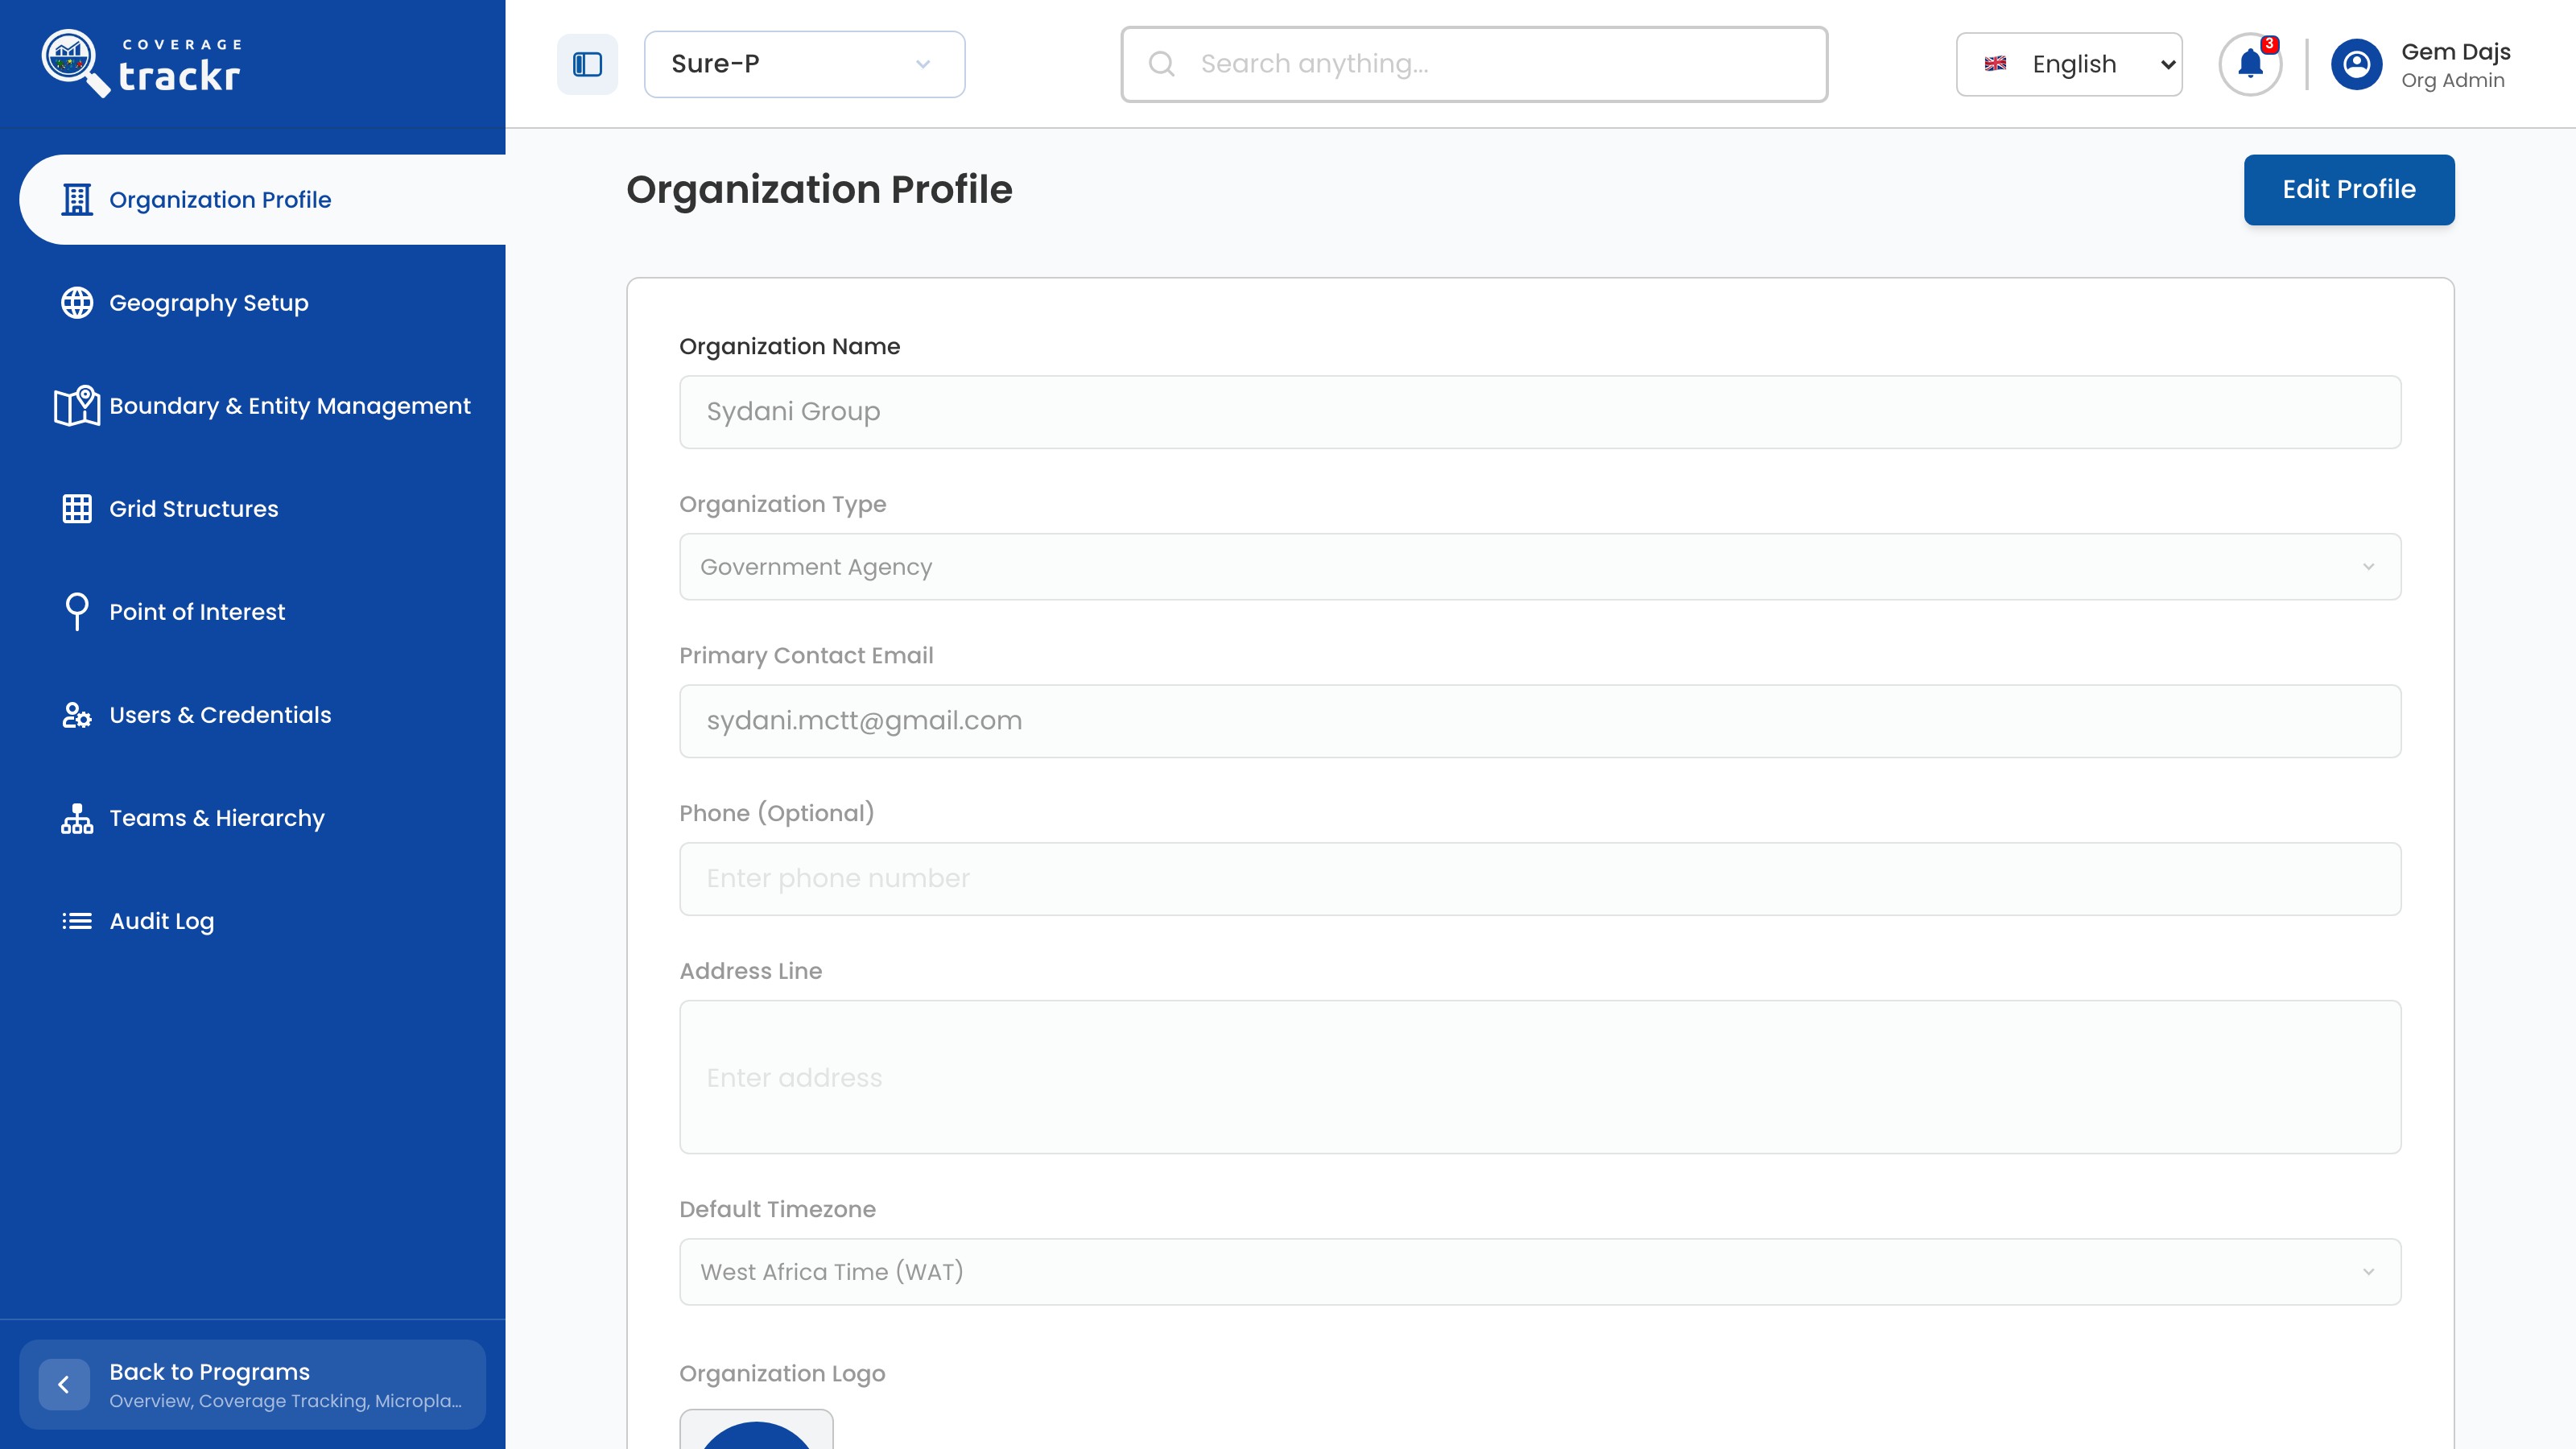
Open the account menu, select Organization, then select Organization Profile.

Read-only Organization Profile page with the Edit Profile button

1 — organization profile · 2 — edit profile button.

Read-only Organization Profile page with the Edit Profile button

Edit the details

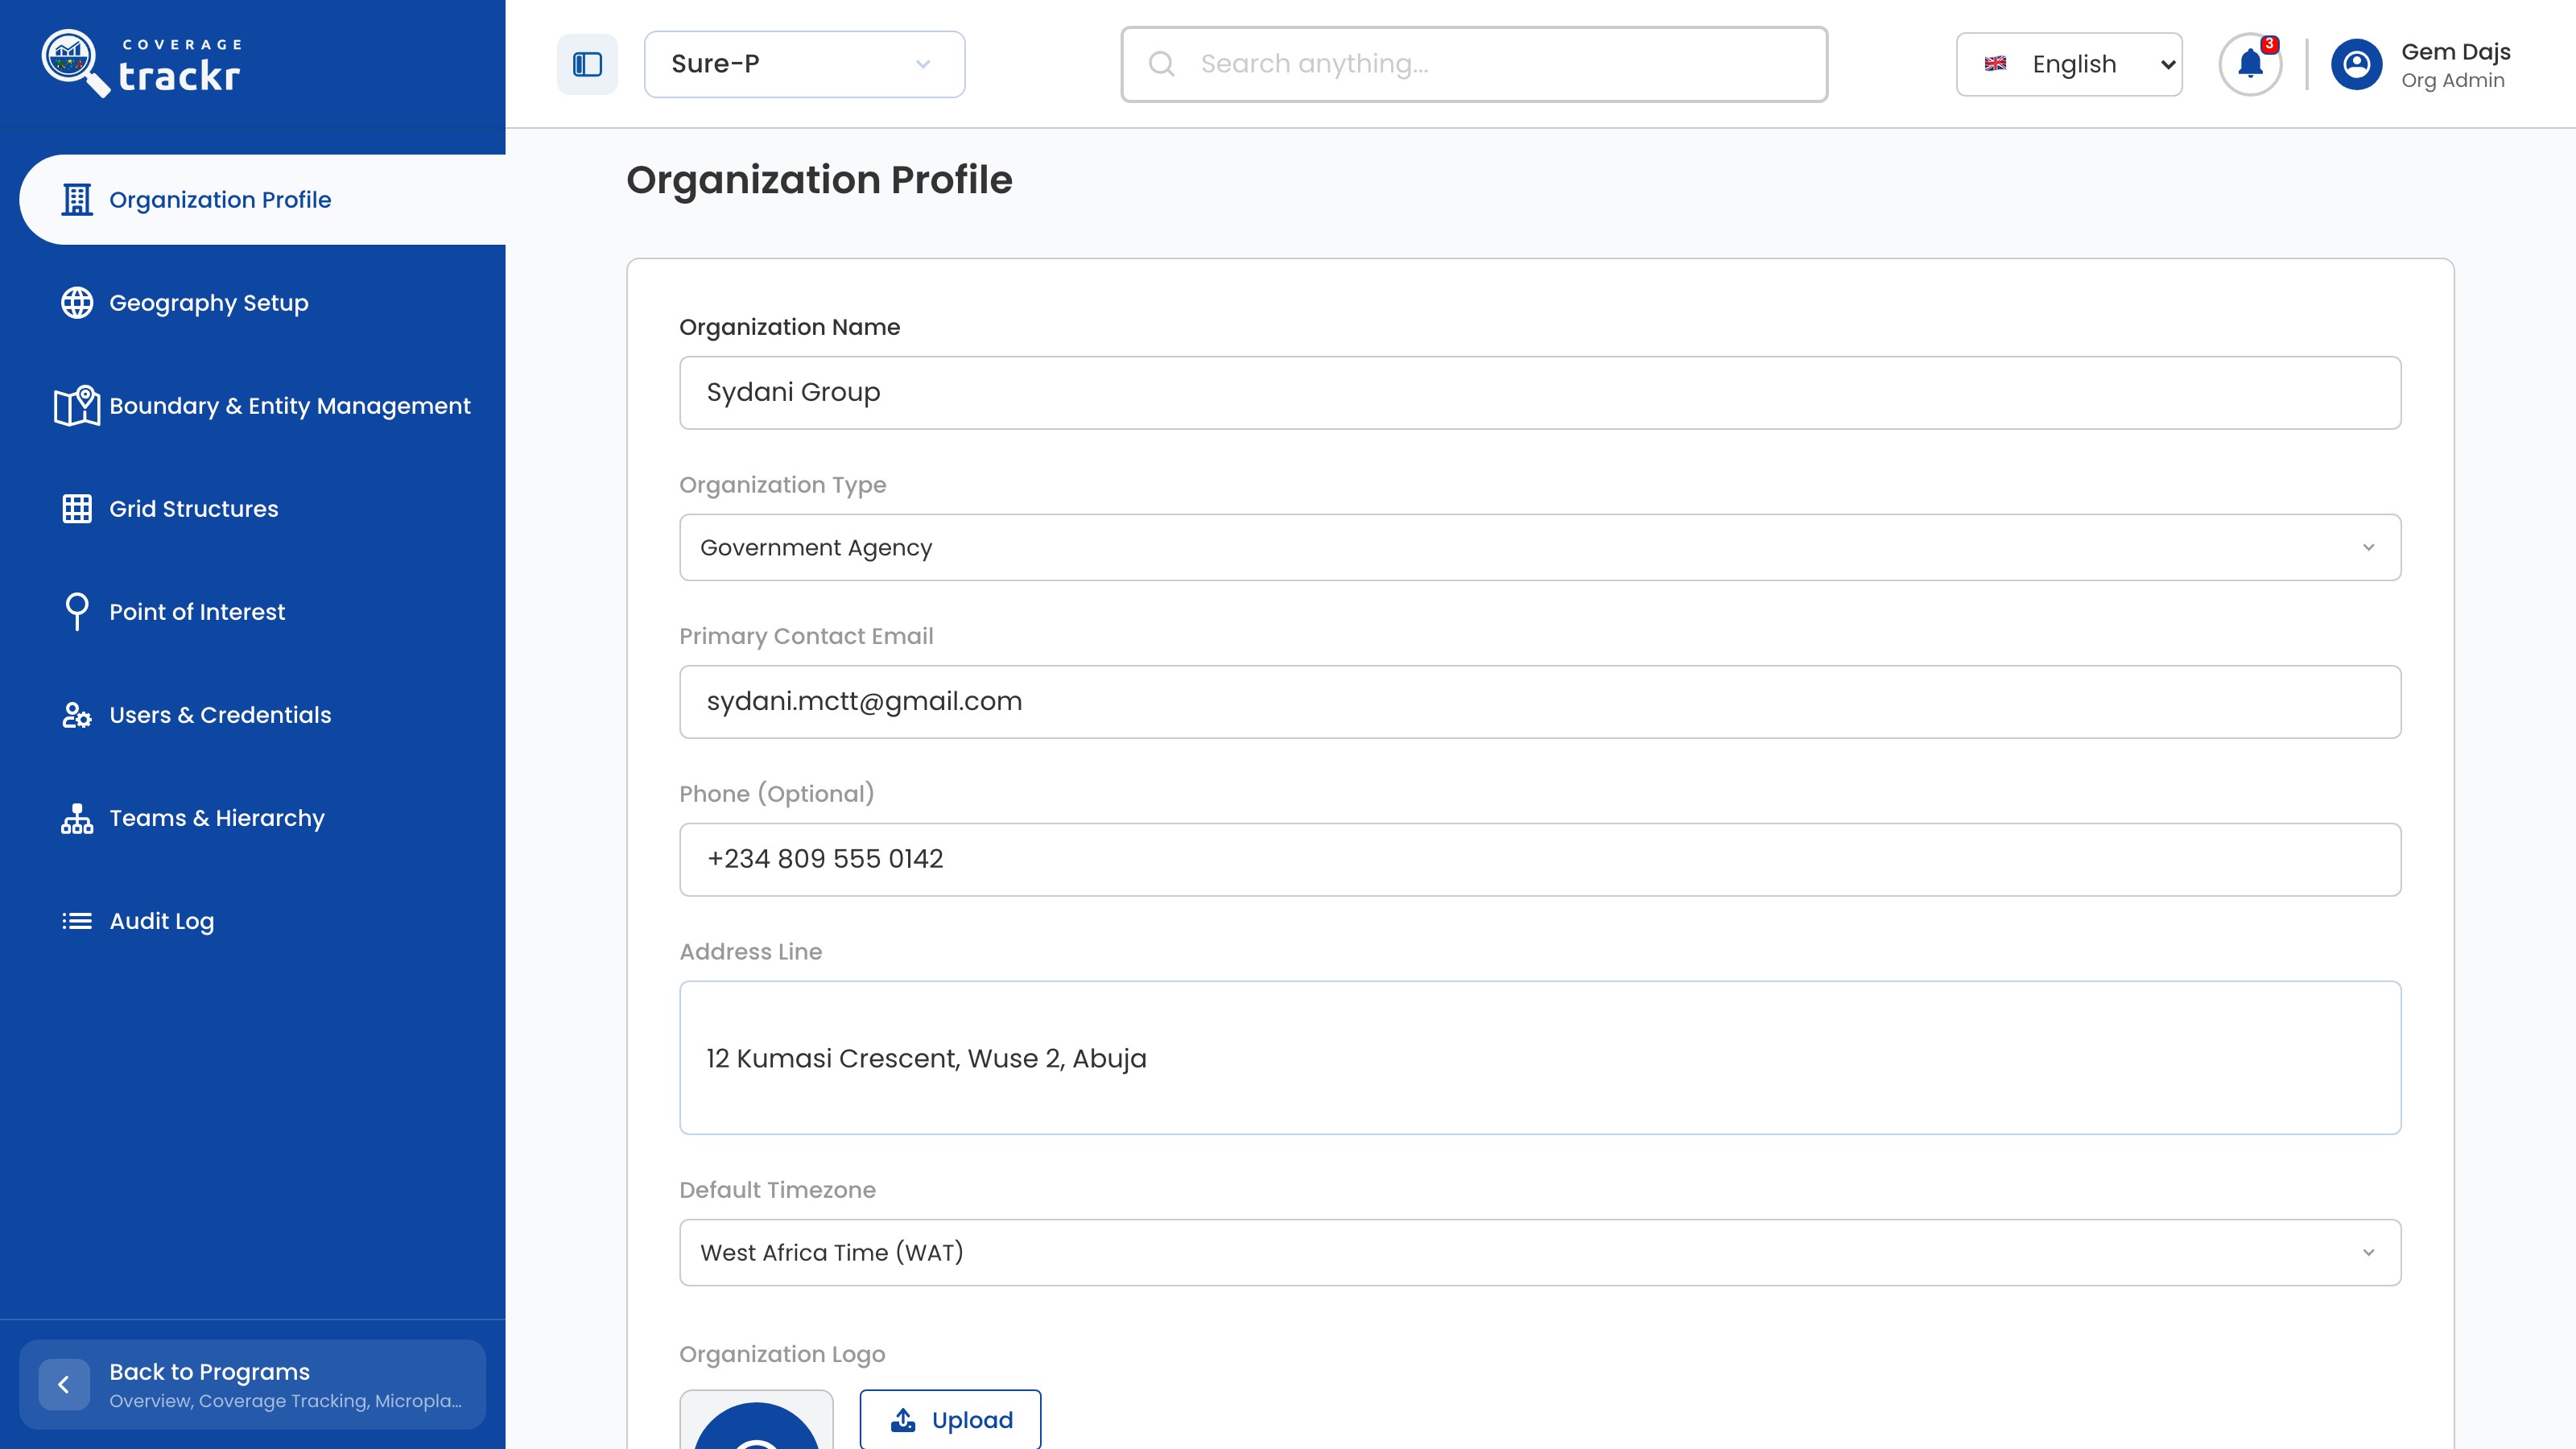
Select Edit Profile, then update the Phone (Optional), Address Line and Default Timezone fields as needed.

Organization Profile in edit mode with a phone number and address entered

1 — phone and address fields · 2 — default timezone.

Organization Profile in edit mode with a phone number and address entered

Save the changes

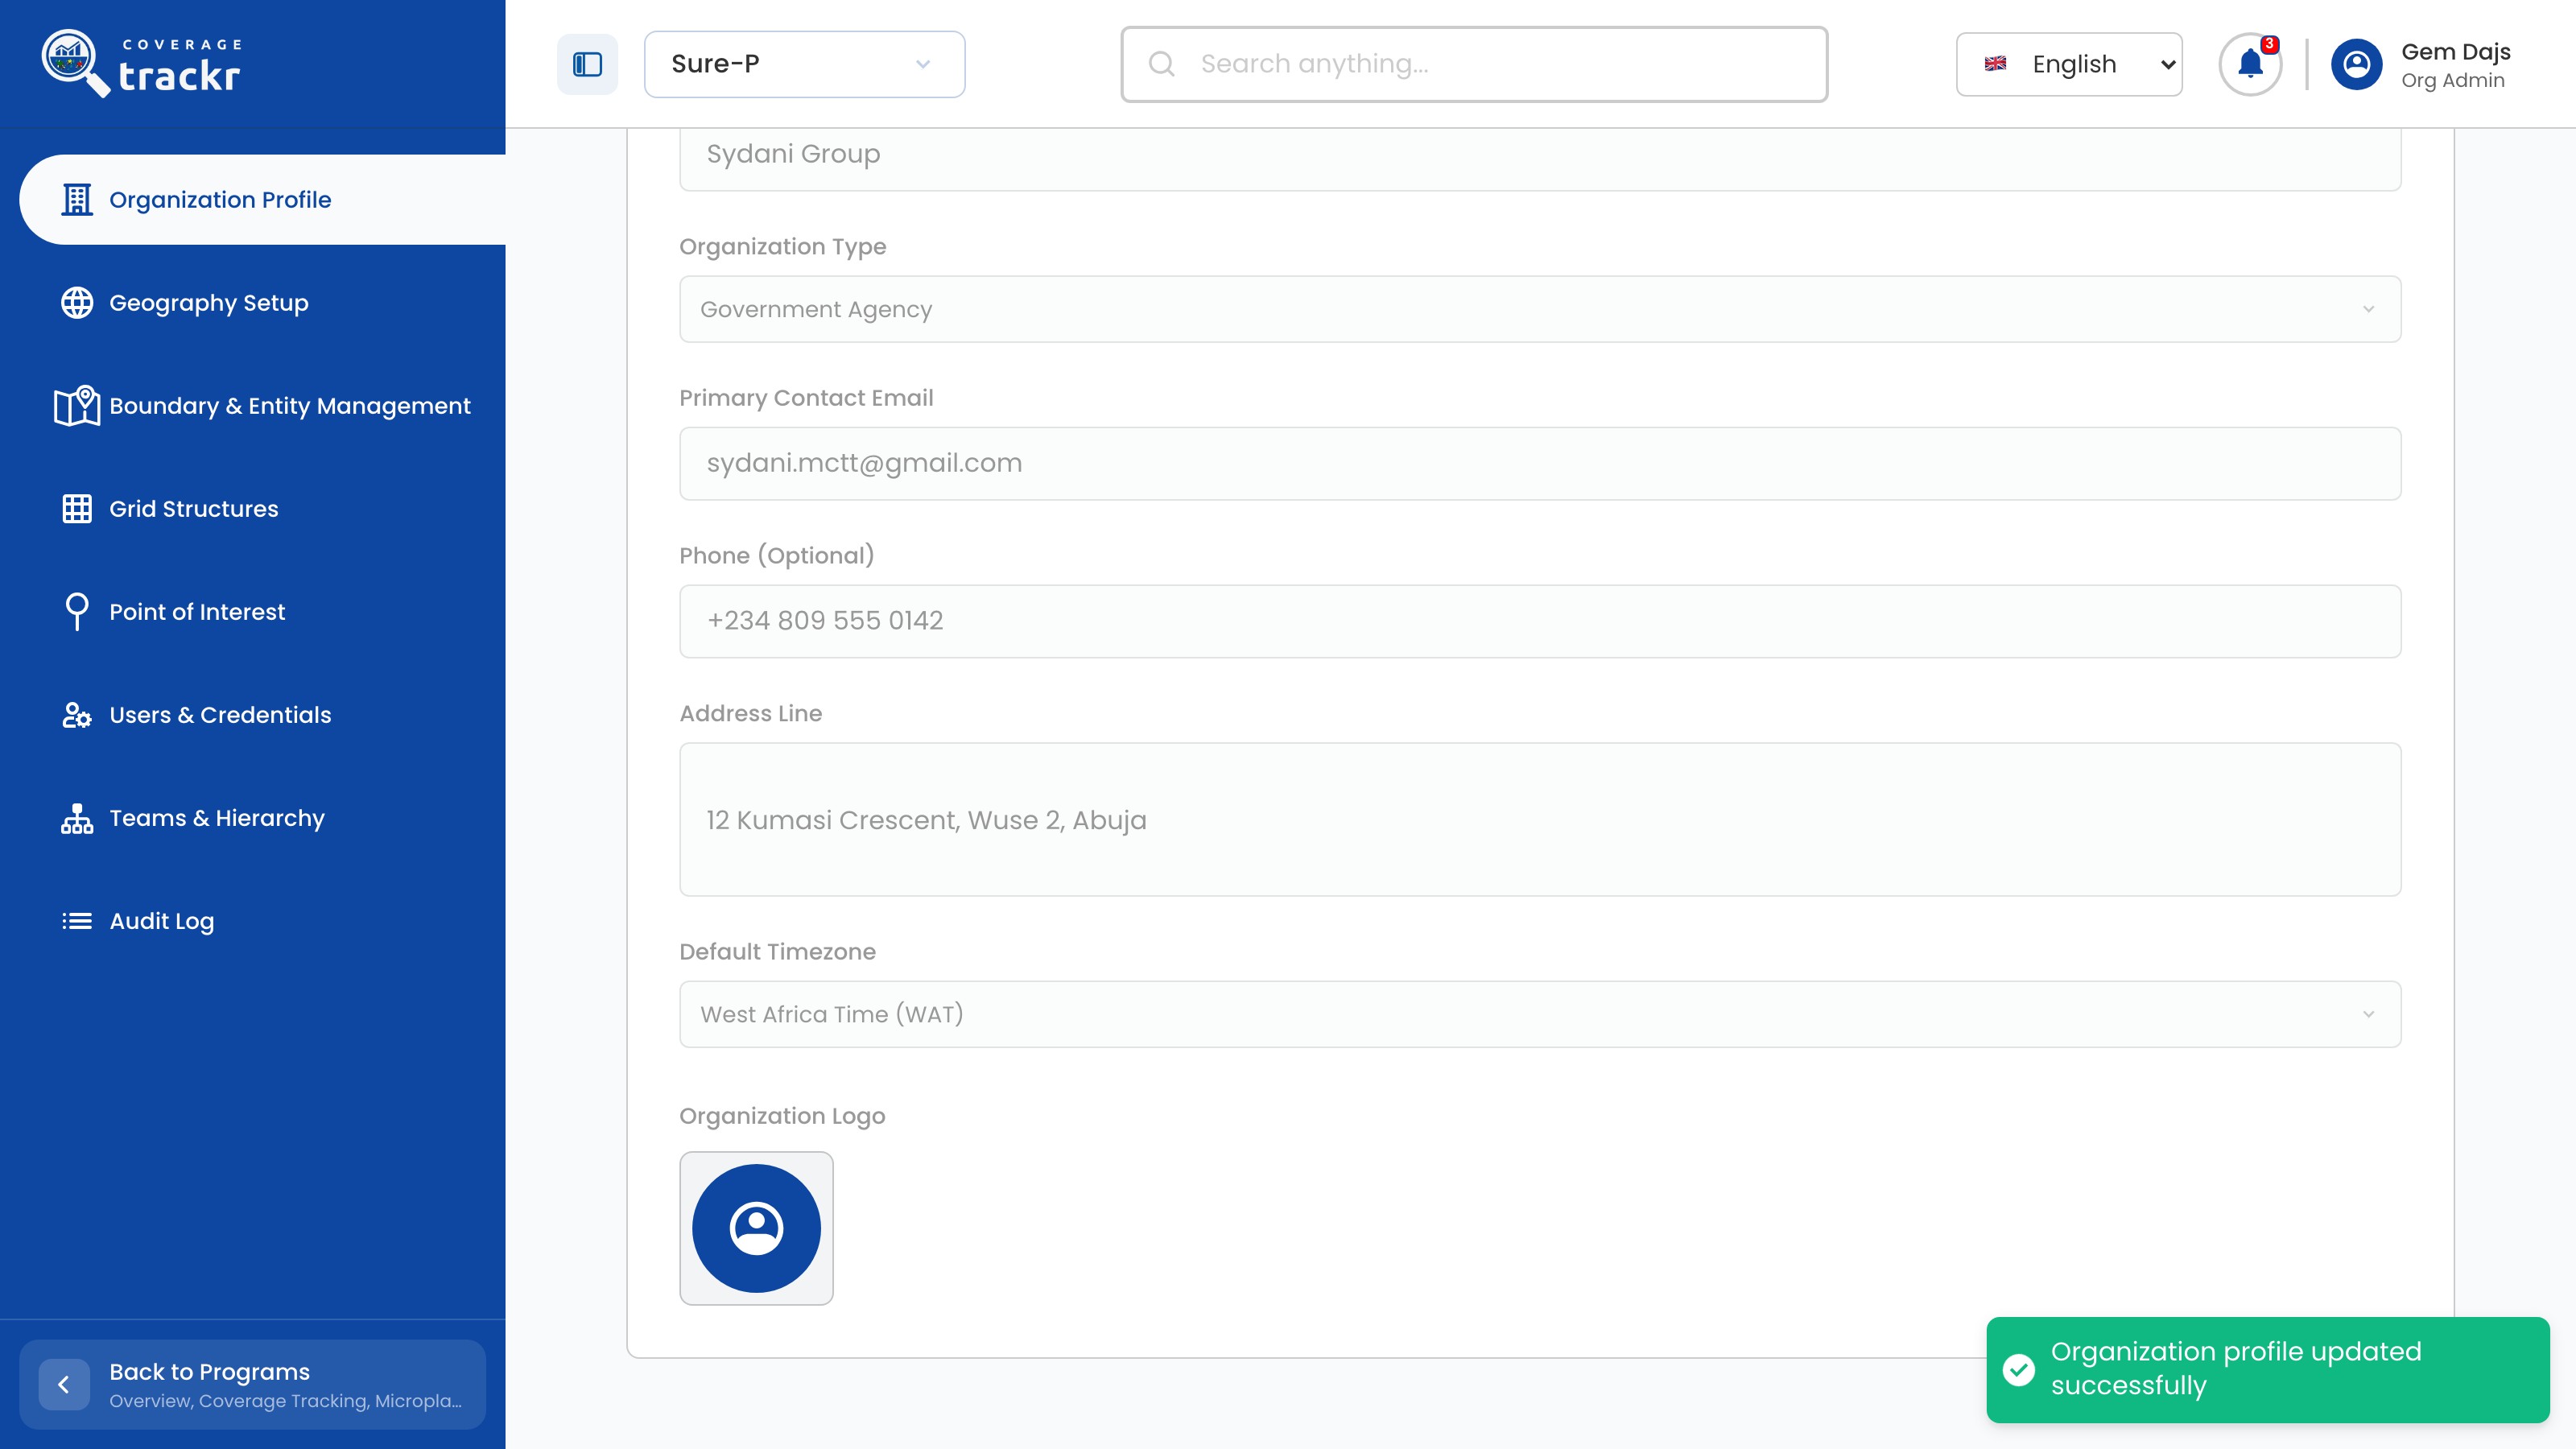
Select Save Changes and check that the confirmation message appears.

Organization Profile showing the saved phone number and address with a success message

1 — update confirmation.

Organization Profile showing the saved phone number and address with a success message

Done. The profile shows the new details and CoverageTrackr confirms Organization profile updated successfully.

If something goes wrong

Why can I not change the fields?

The profile is read-only until you select Edit Profile.

Which time zone should I choose?

Choose the time zone your field teams work in so activity dates and times read correctly.

Organization administration

Review the audit log

See who changed what in your organization, and when.

Organization Administrator 2 min read Web

Before you start

  • You are signed in with organization administration access.

Open the Audit Log

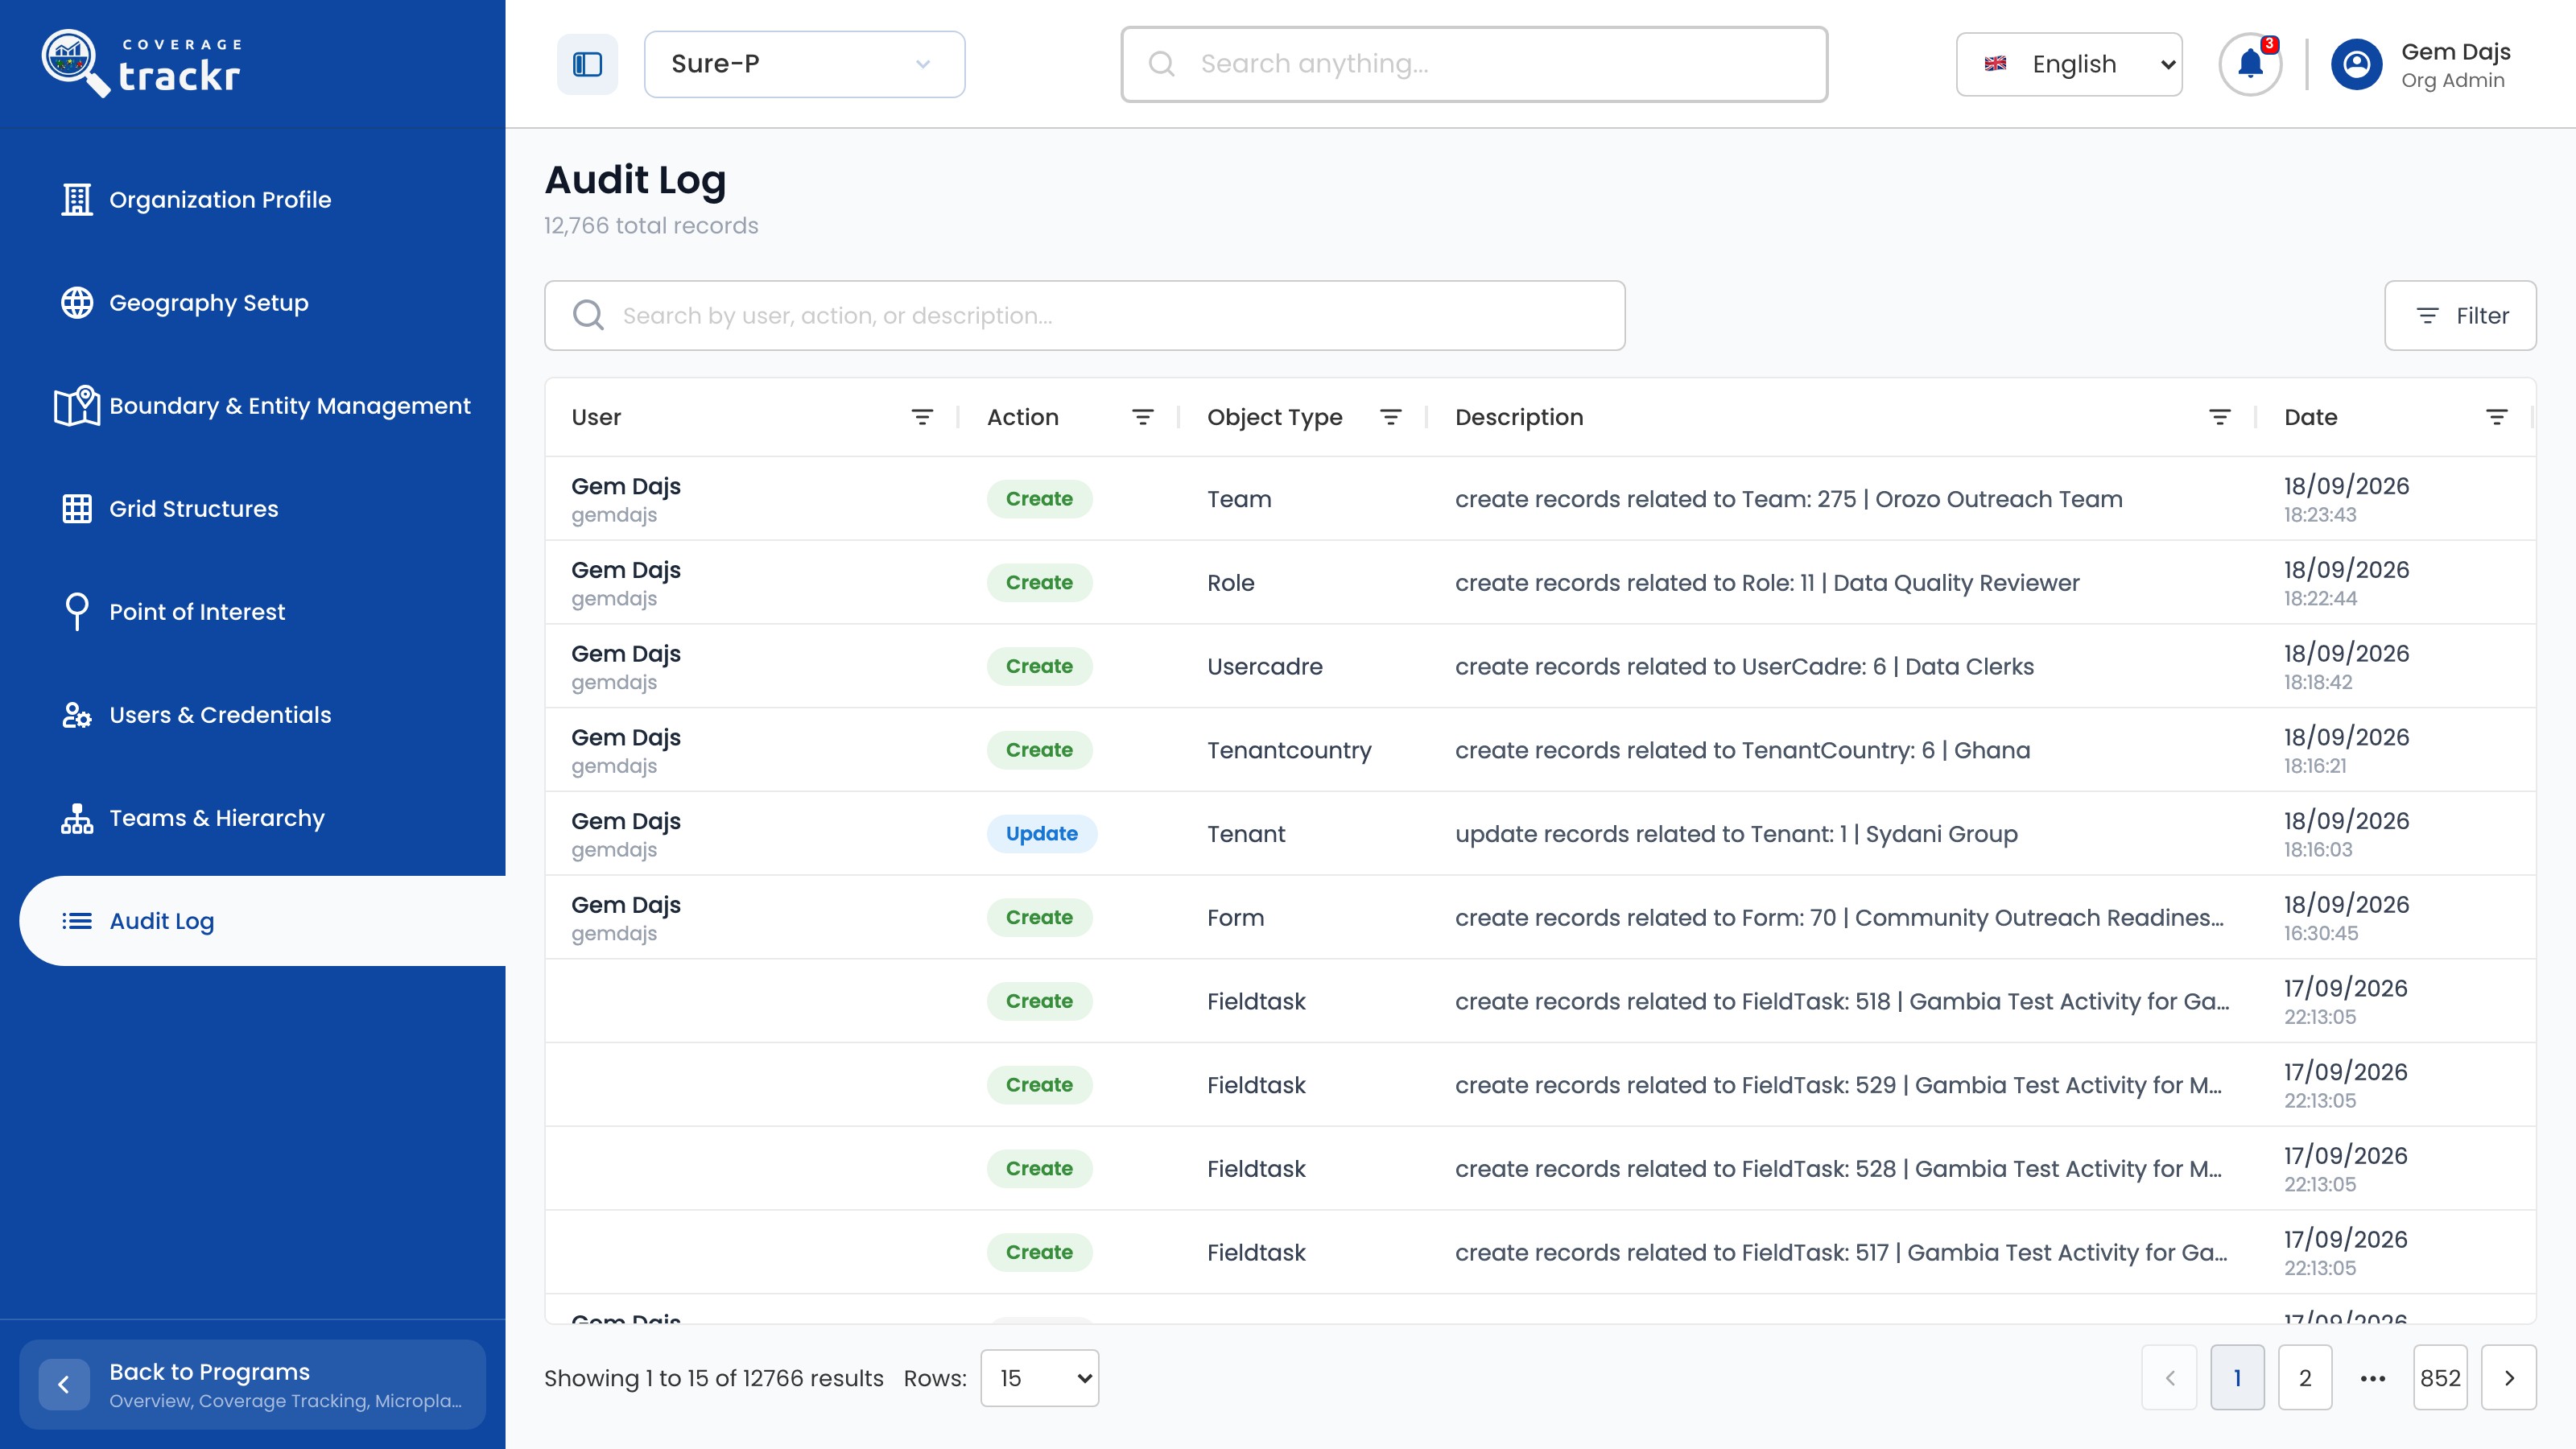
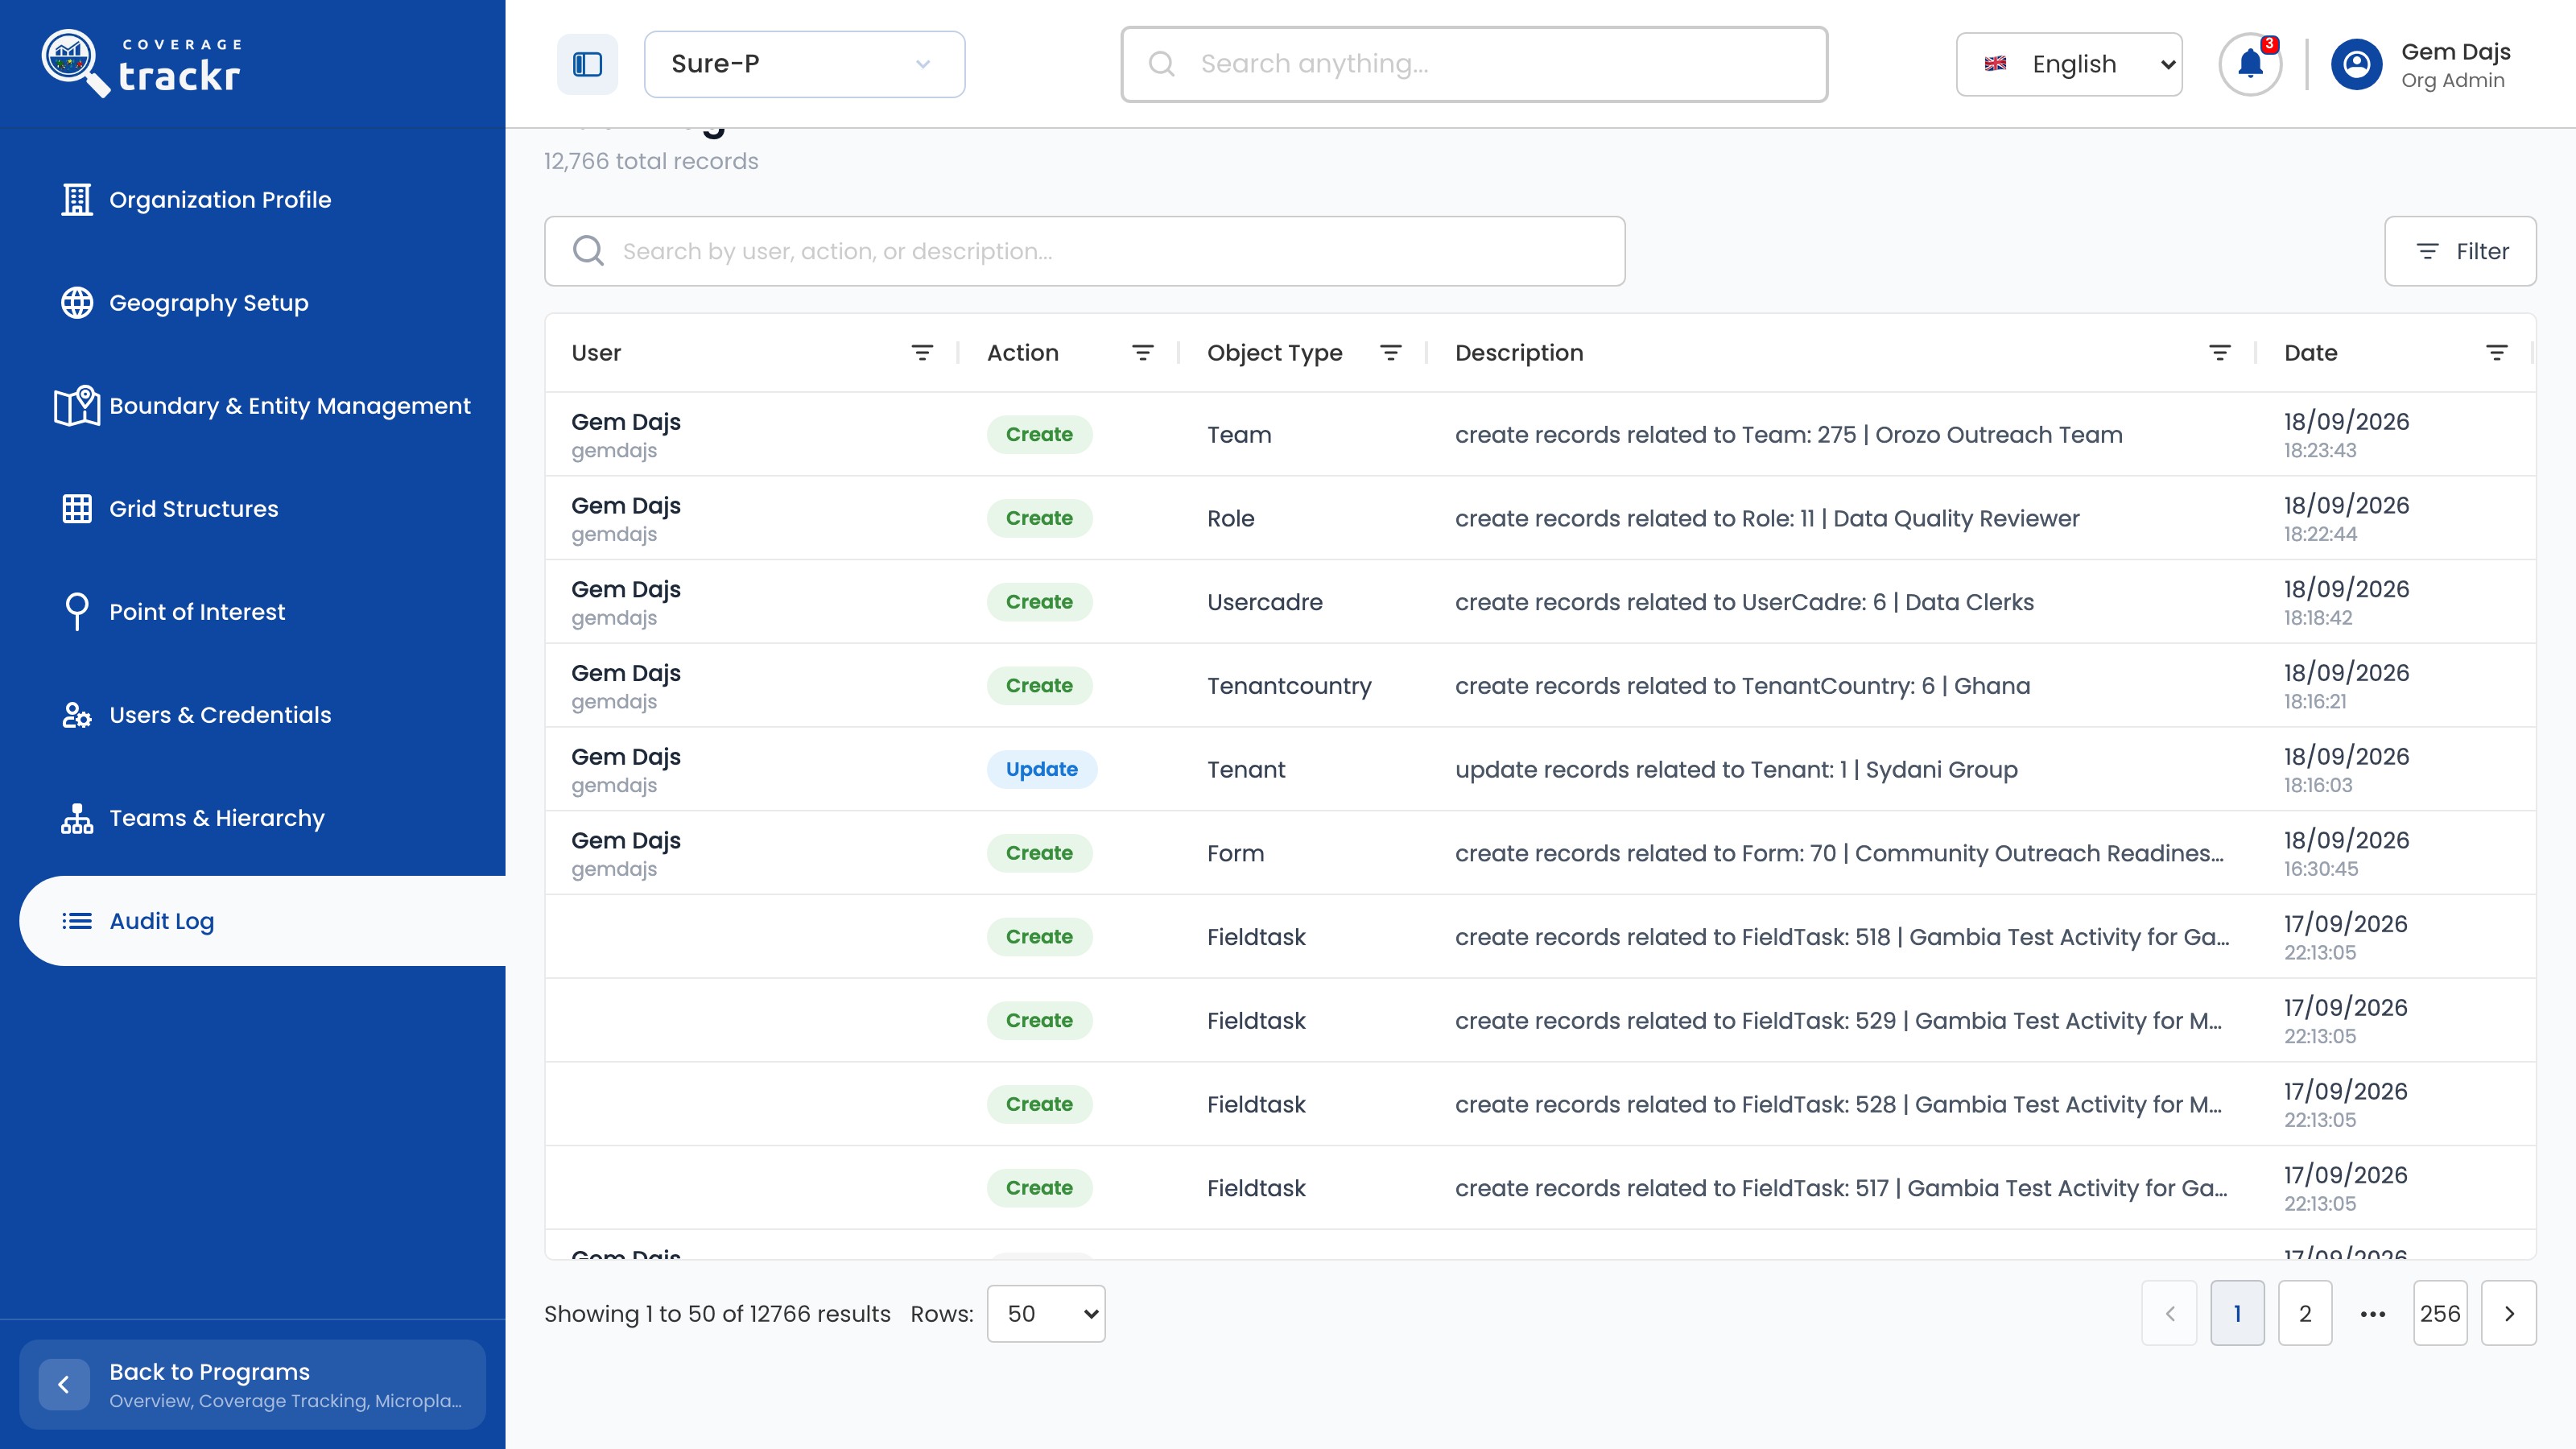
Select Audit Log. The newest changes are listed first, with the User, Action, Object Type, Description and Date.

Audit Log listing recent create and update actions

1 — audit log · 2 — audit records.

Audit Log listing recent create and update actions

Show more records

Set Rows to a larger number, such as 50, and use the page buttons to move back in time.

Audit Log showing 50 rows per page with the page controls

1 — rows selector · 2 — page controls.

Audit Log showing 50 rows per page with the page controls

Done. You have found the change you were looking for, with the person, action, record and time.

If something goes wrong

What do the descriptions mean?

Each description names the record type, its identifier and its name, for example Team: 275 | Orozo Outreach Team.

Geography and locations

Add a country and its administrative levels

Add a country your organization works in and name its administrative levels from the widest to the smallest.

Organization Administrator 4 min read Web

Before you start

  • You are signed in with organization administration access.
  • You know the country's administrative levels, for example Region then District.

Open Geography Setup

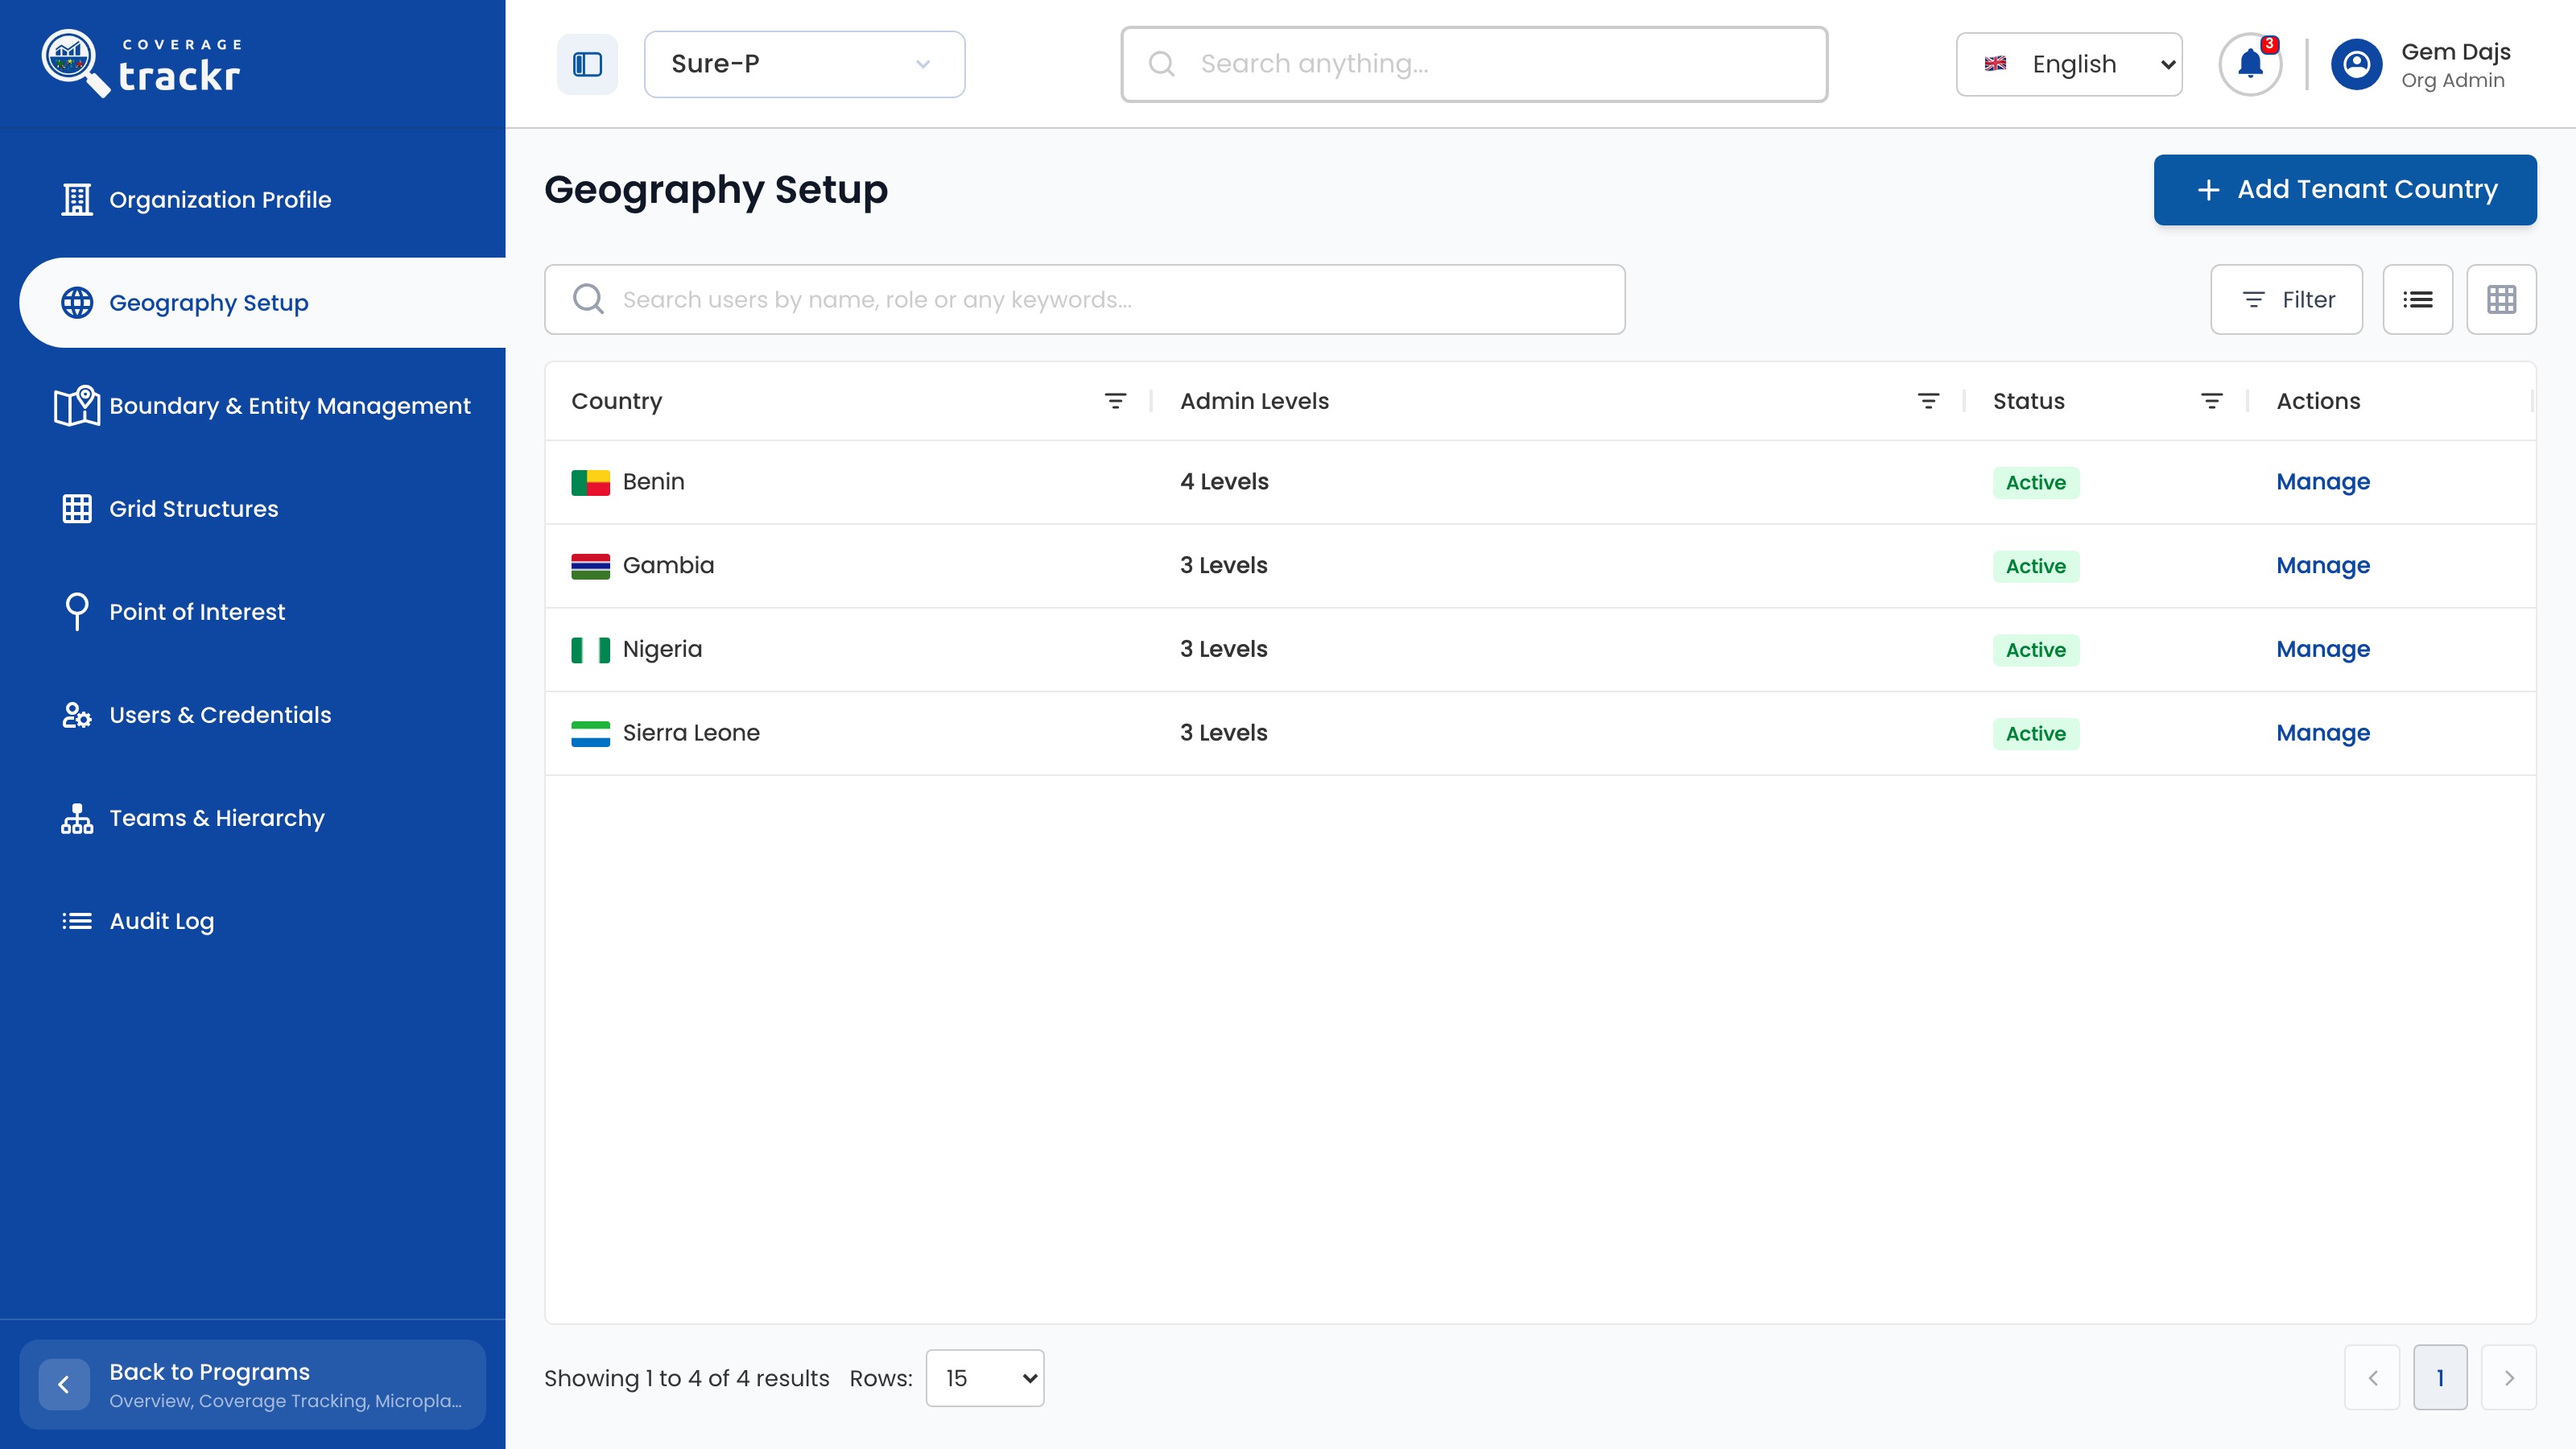
In the organization navigation, select Geography Setup to see the countries already configured.

Geography Setup list of countries with their administrative levels

1 — geography setup · 2 — configured countries.

Geography Setup list of countries with their administrative levels

Choose the country and levels

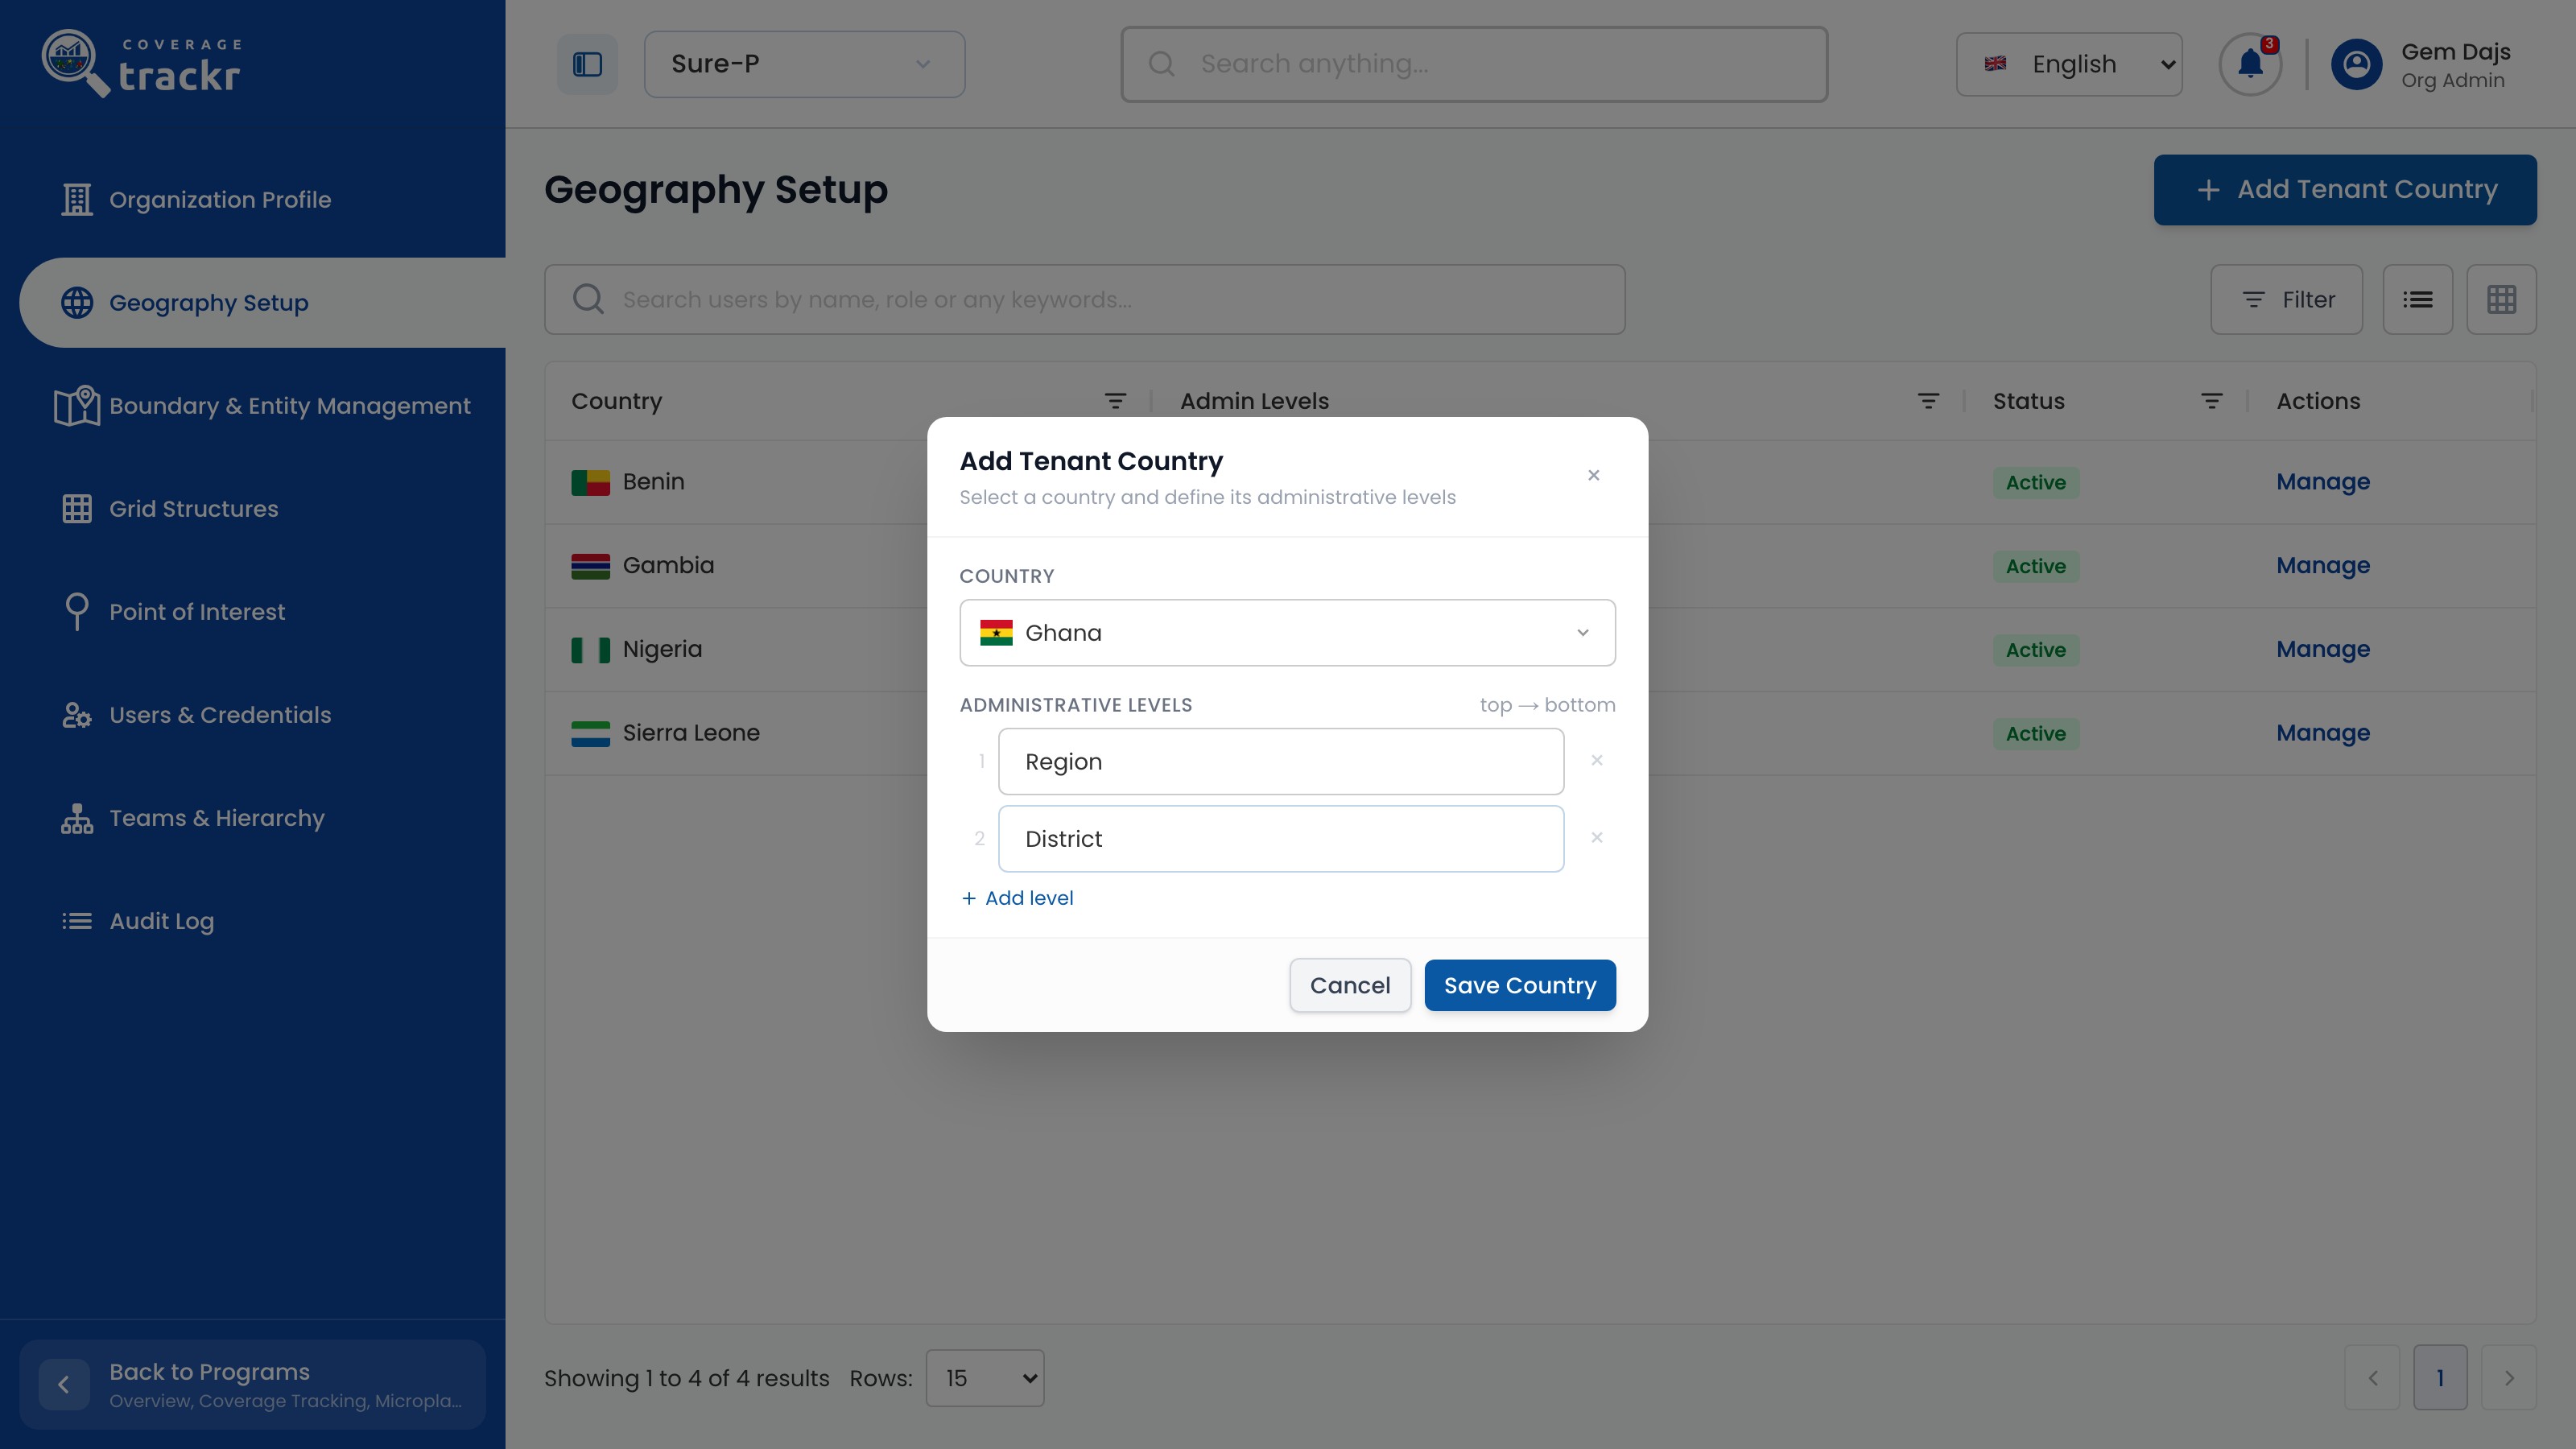
Select Add Tenant Country, search for and choose the country, then enter each administrative level from top to bottom. Use Add level for each extra level.

Add Tenant Country dialog with Ghana selected and the levels Region and District entered

1 — country selector · 2 — administrative levels · 3 — add level.

Add Tenant Country dialog with Ghana selected and the levels Region and District entered

Save the country

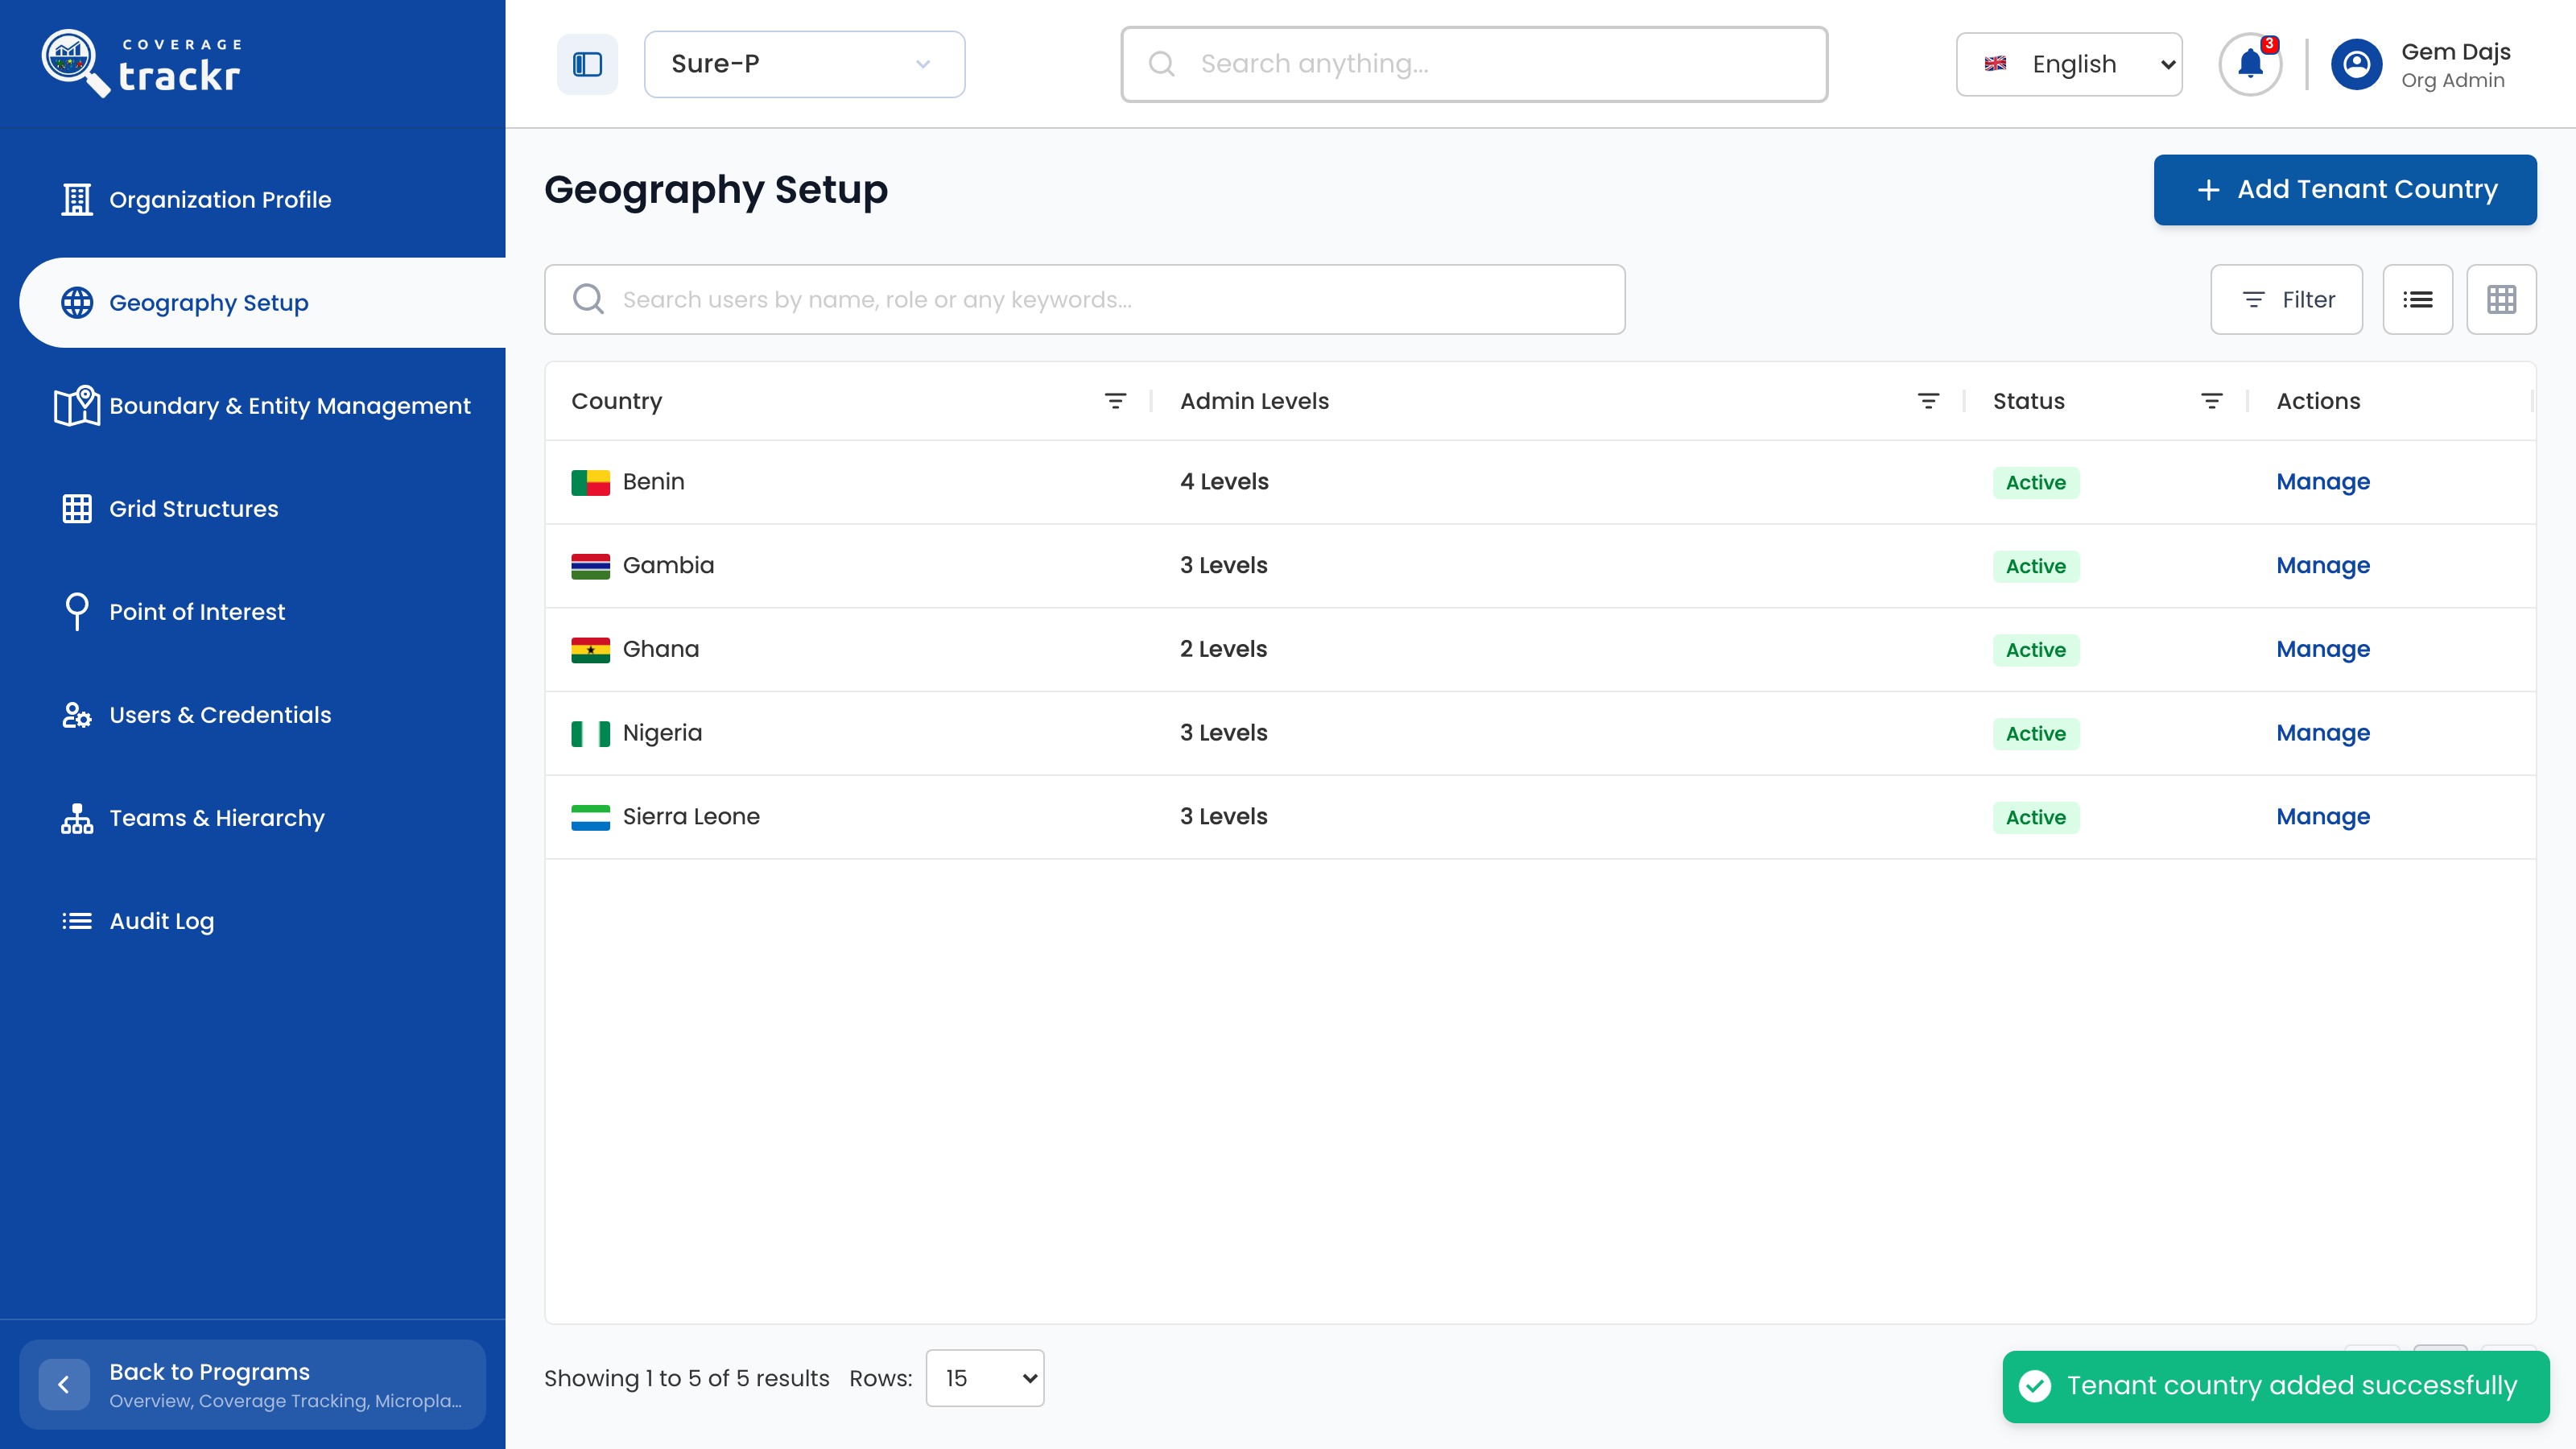
Select Save Country. The country is added to the list with its number of levels.

Geography Setup list including Ghana with 2 levels and a success message

1 — new country · 2 — save confirmation.

Geography Setup list including Ghana with 2 levels and a success message

Check the levels

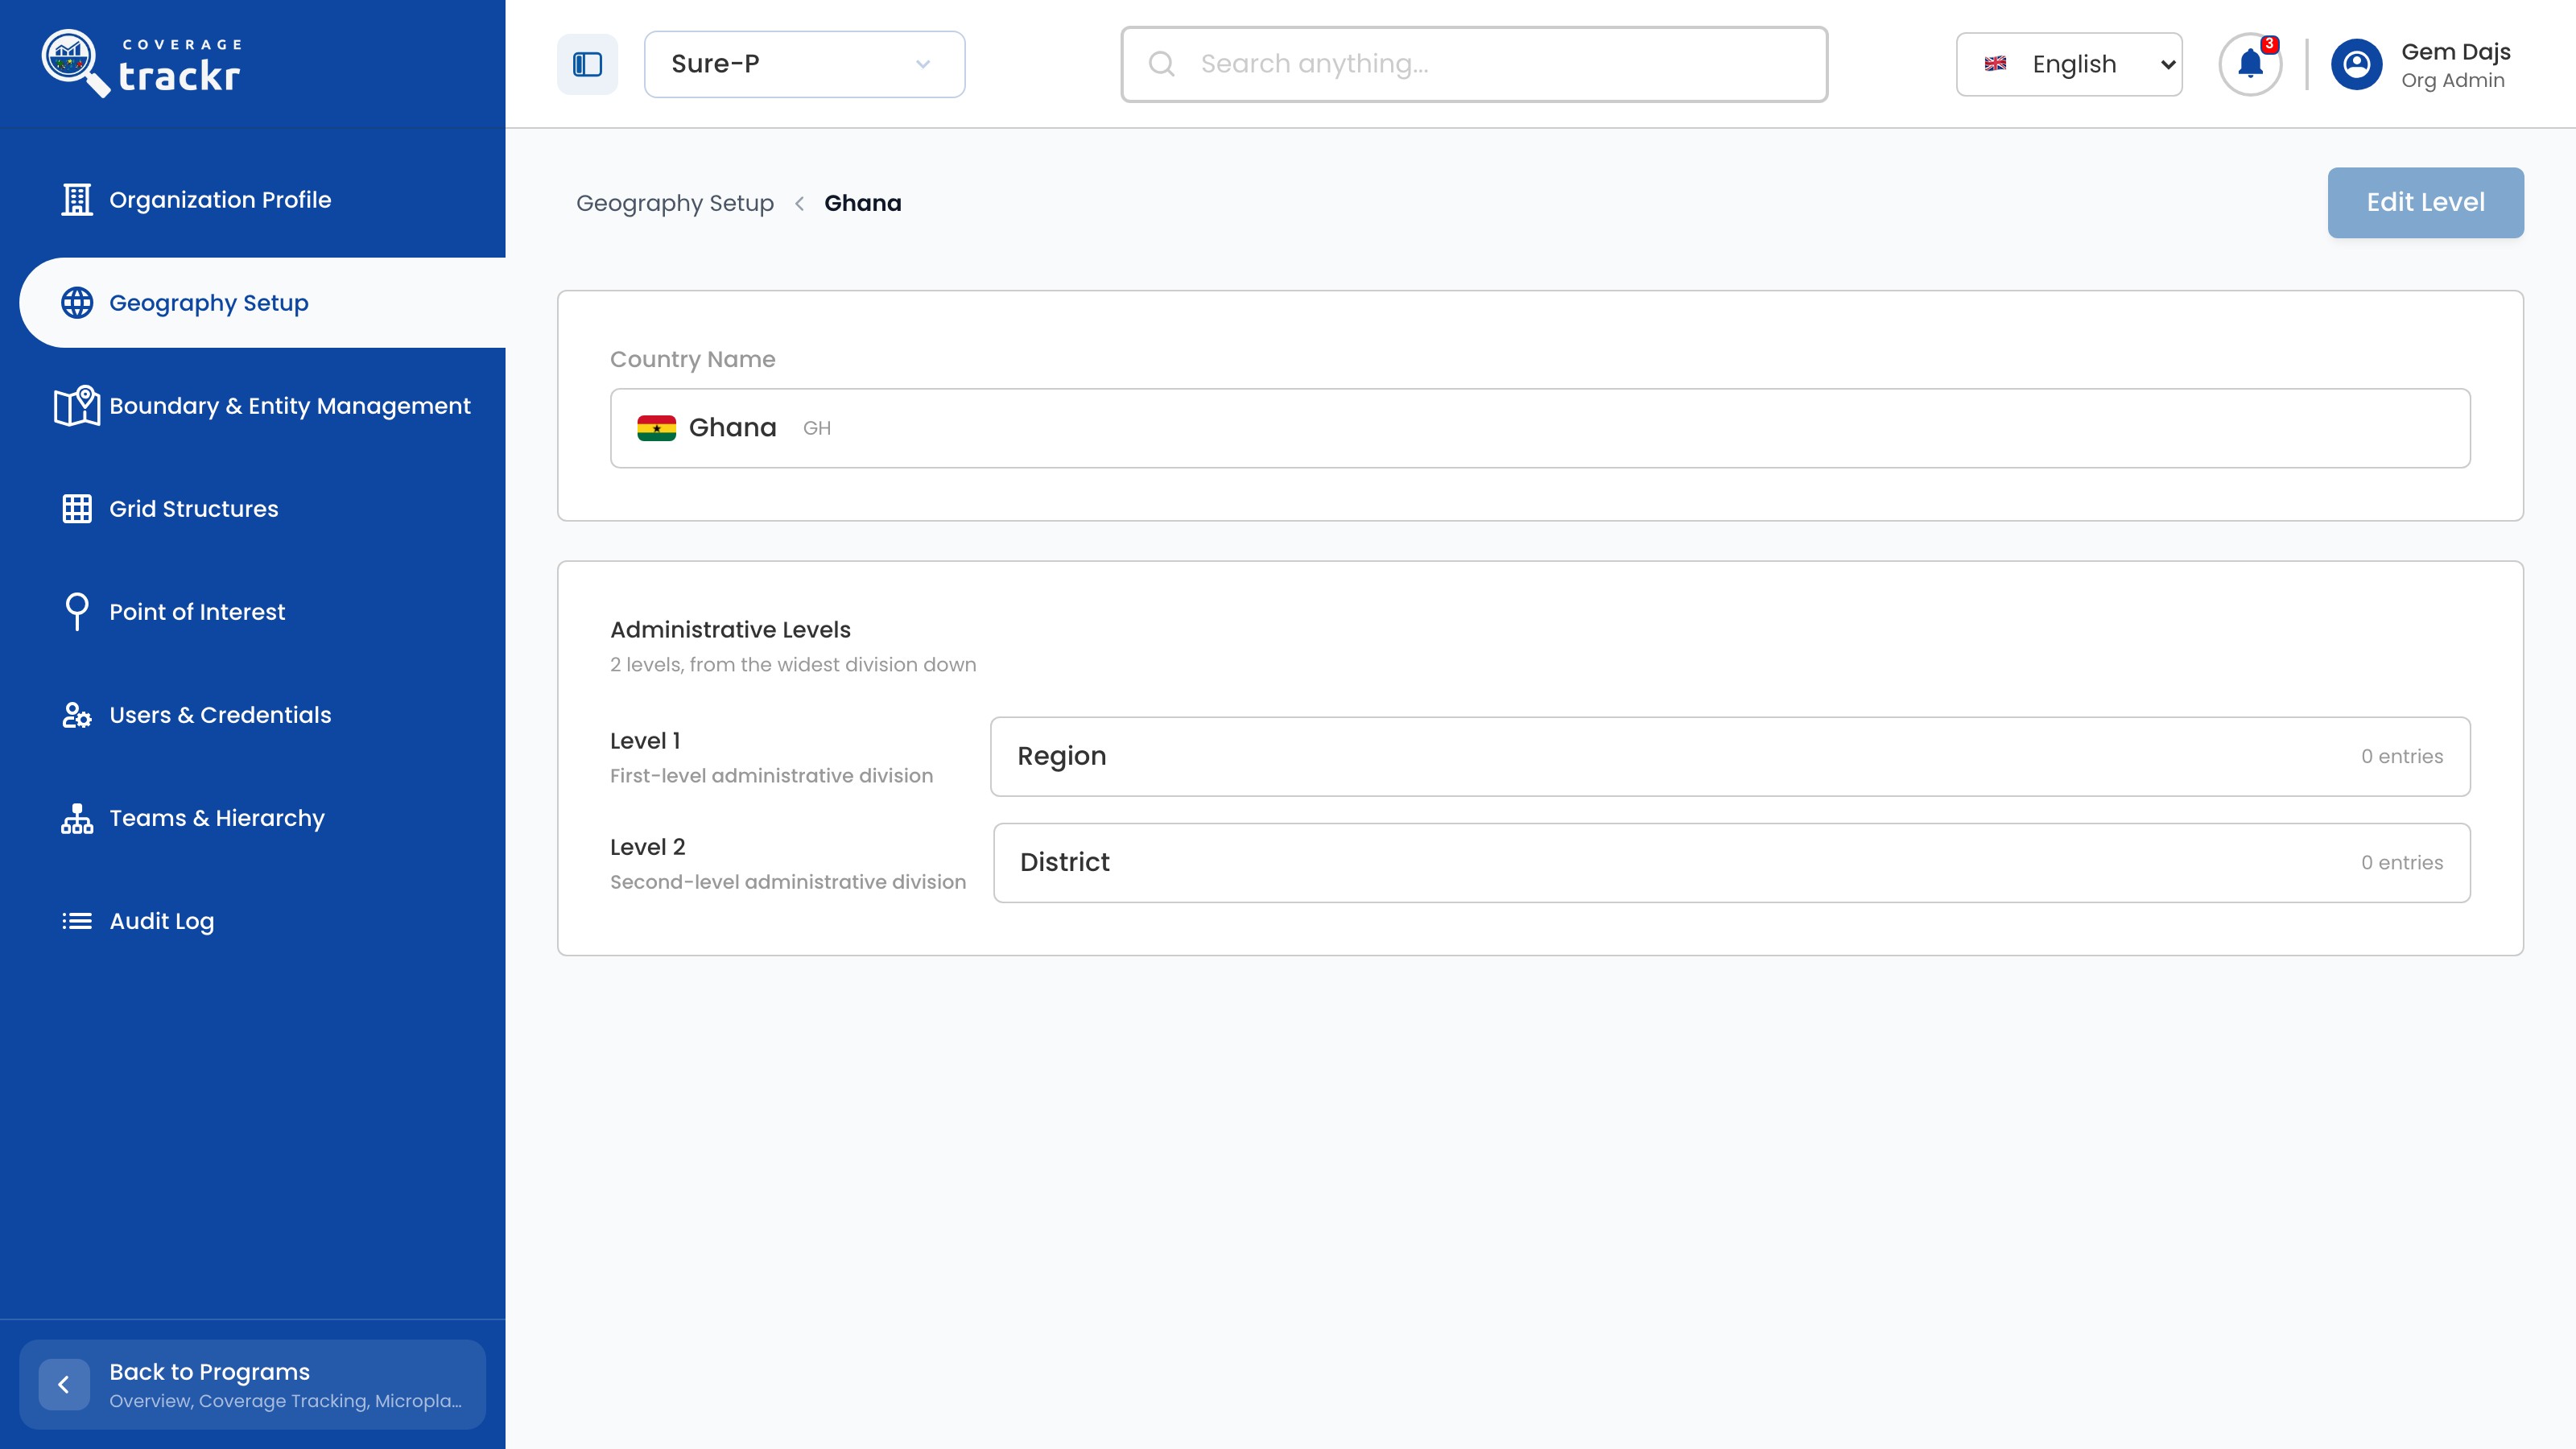
Select Manage on the new country to confirm the level names and their order.

Ghana country page listing Level 1 Region and Level 2 District

1 — administrative levels.

Ghana country page listing Level 1 Region and Level 2 District

Done. The country appears in Geography Setup as Active, with the levels you entered.

If something goes wrong

Why does each level show 0 entries?

Levels are empty until boundaries are uploaded for the country in Boundary & Entity Management.

Geography and locations

Review administrative boundaries

Check which administrative areas are loaded for a country and see what is needed to upload more.

Organization Administrator 3 min read Web

Before you start

  • You are signed in with organization administration access.
  • The country has been added in Geography Setup.

Open Boundary & Entity Management

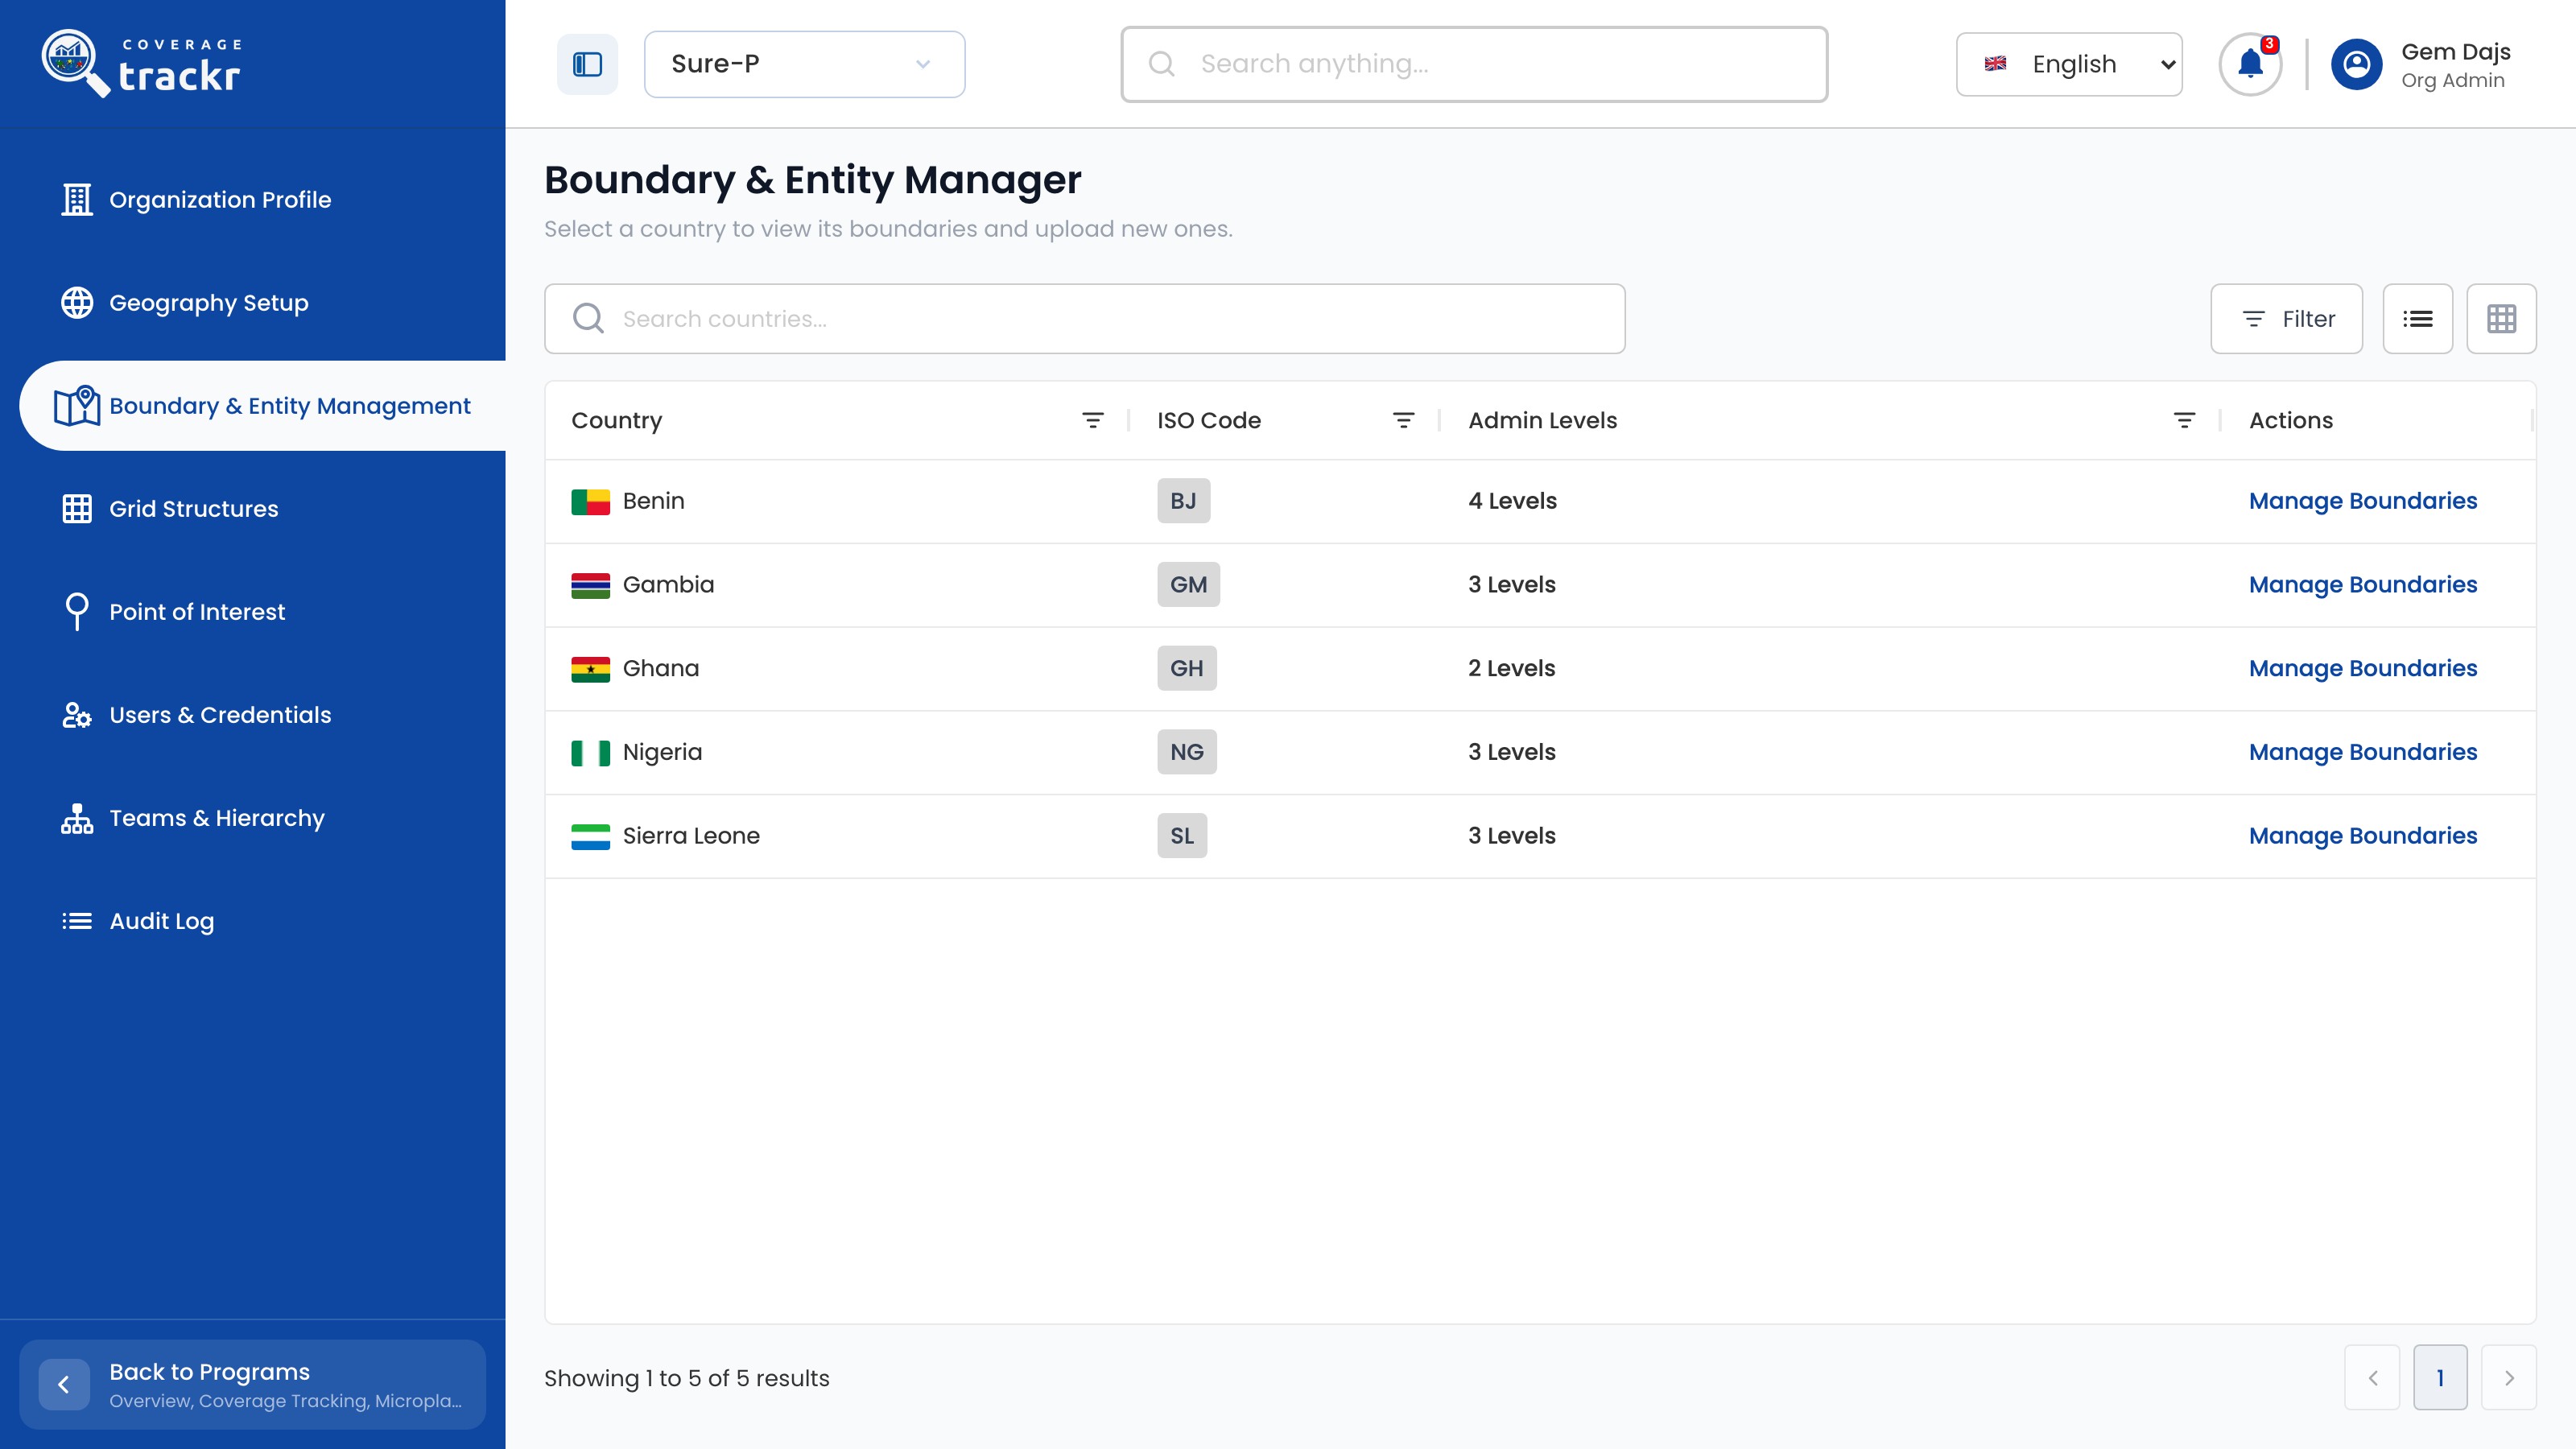
Select Boundary & Entity Management to see each country with its ISO code and levels.

Boundary & Entity Manager country list with Manage Boundaries actions

1 — boundary management · 2 — country boundaries.

Boundary & Entity Manager country list with Manage Boundaries actions

Review a country's areas

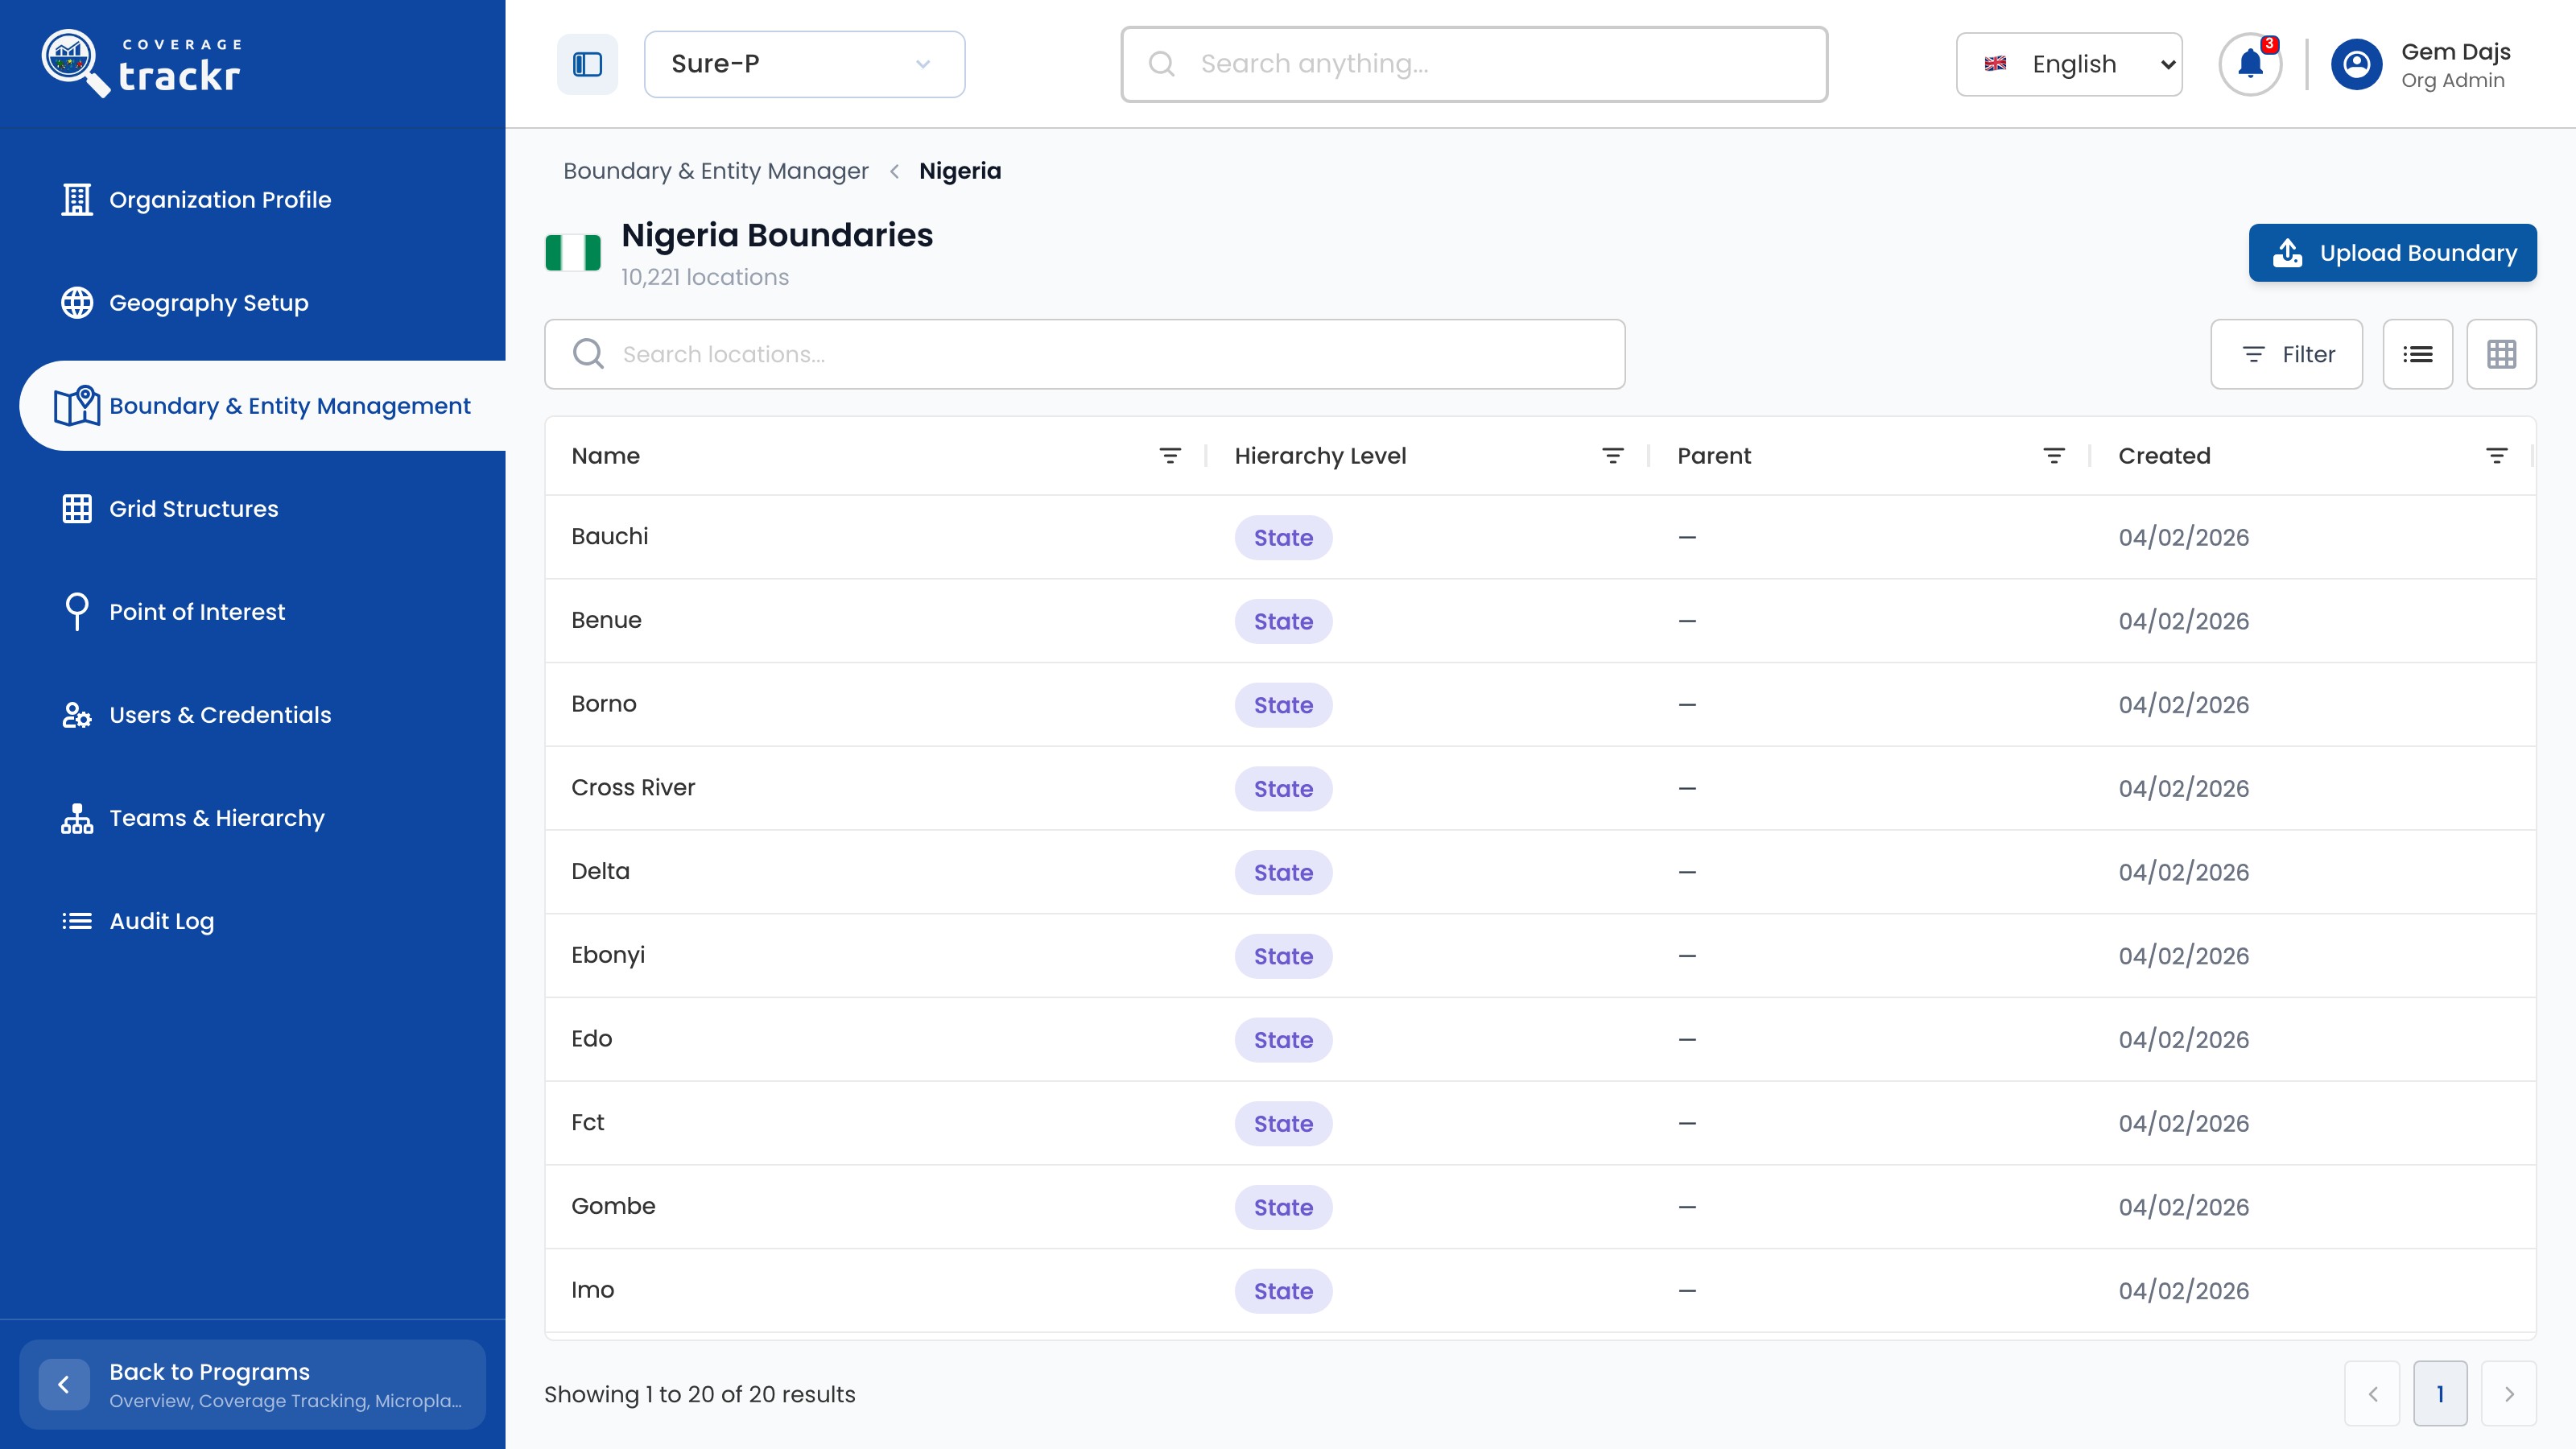
Select Manage Boundaries for the country. Check each area's Hierarchy Level and Parent.

Nigeria Boundaries list of states with their hierarchy level

1 — manage boundaries · 2 — hierarchy and parent.

Nigeria Boundaries list of states with their hierarchy level

Prepare an upload

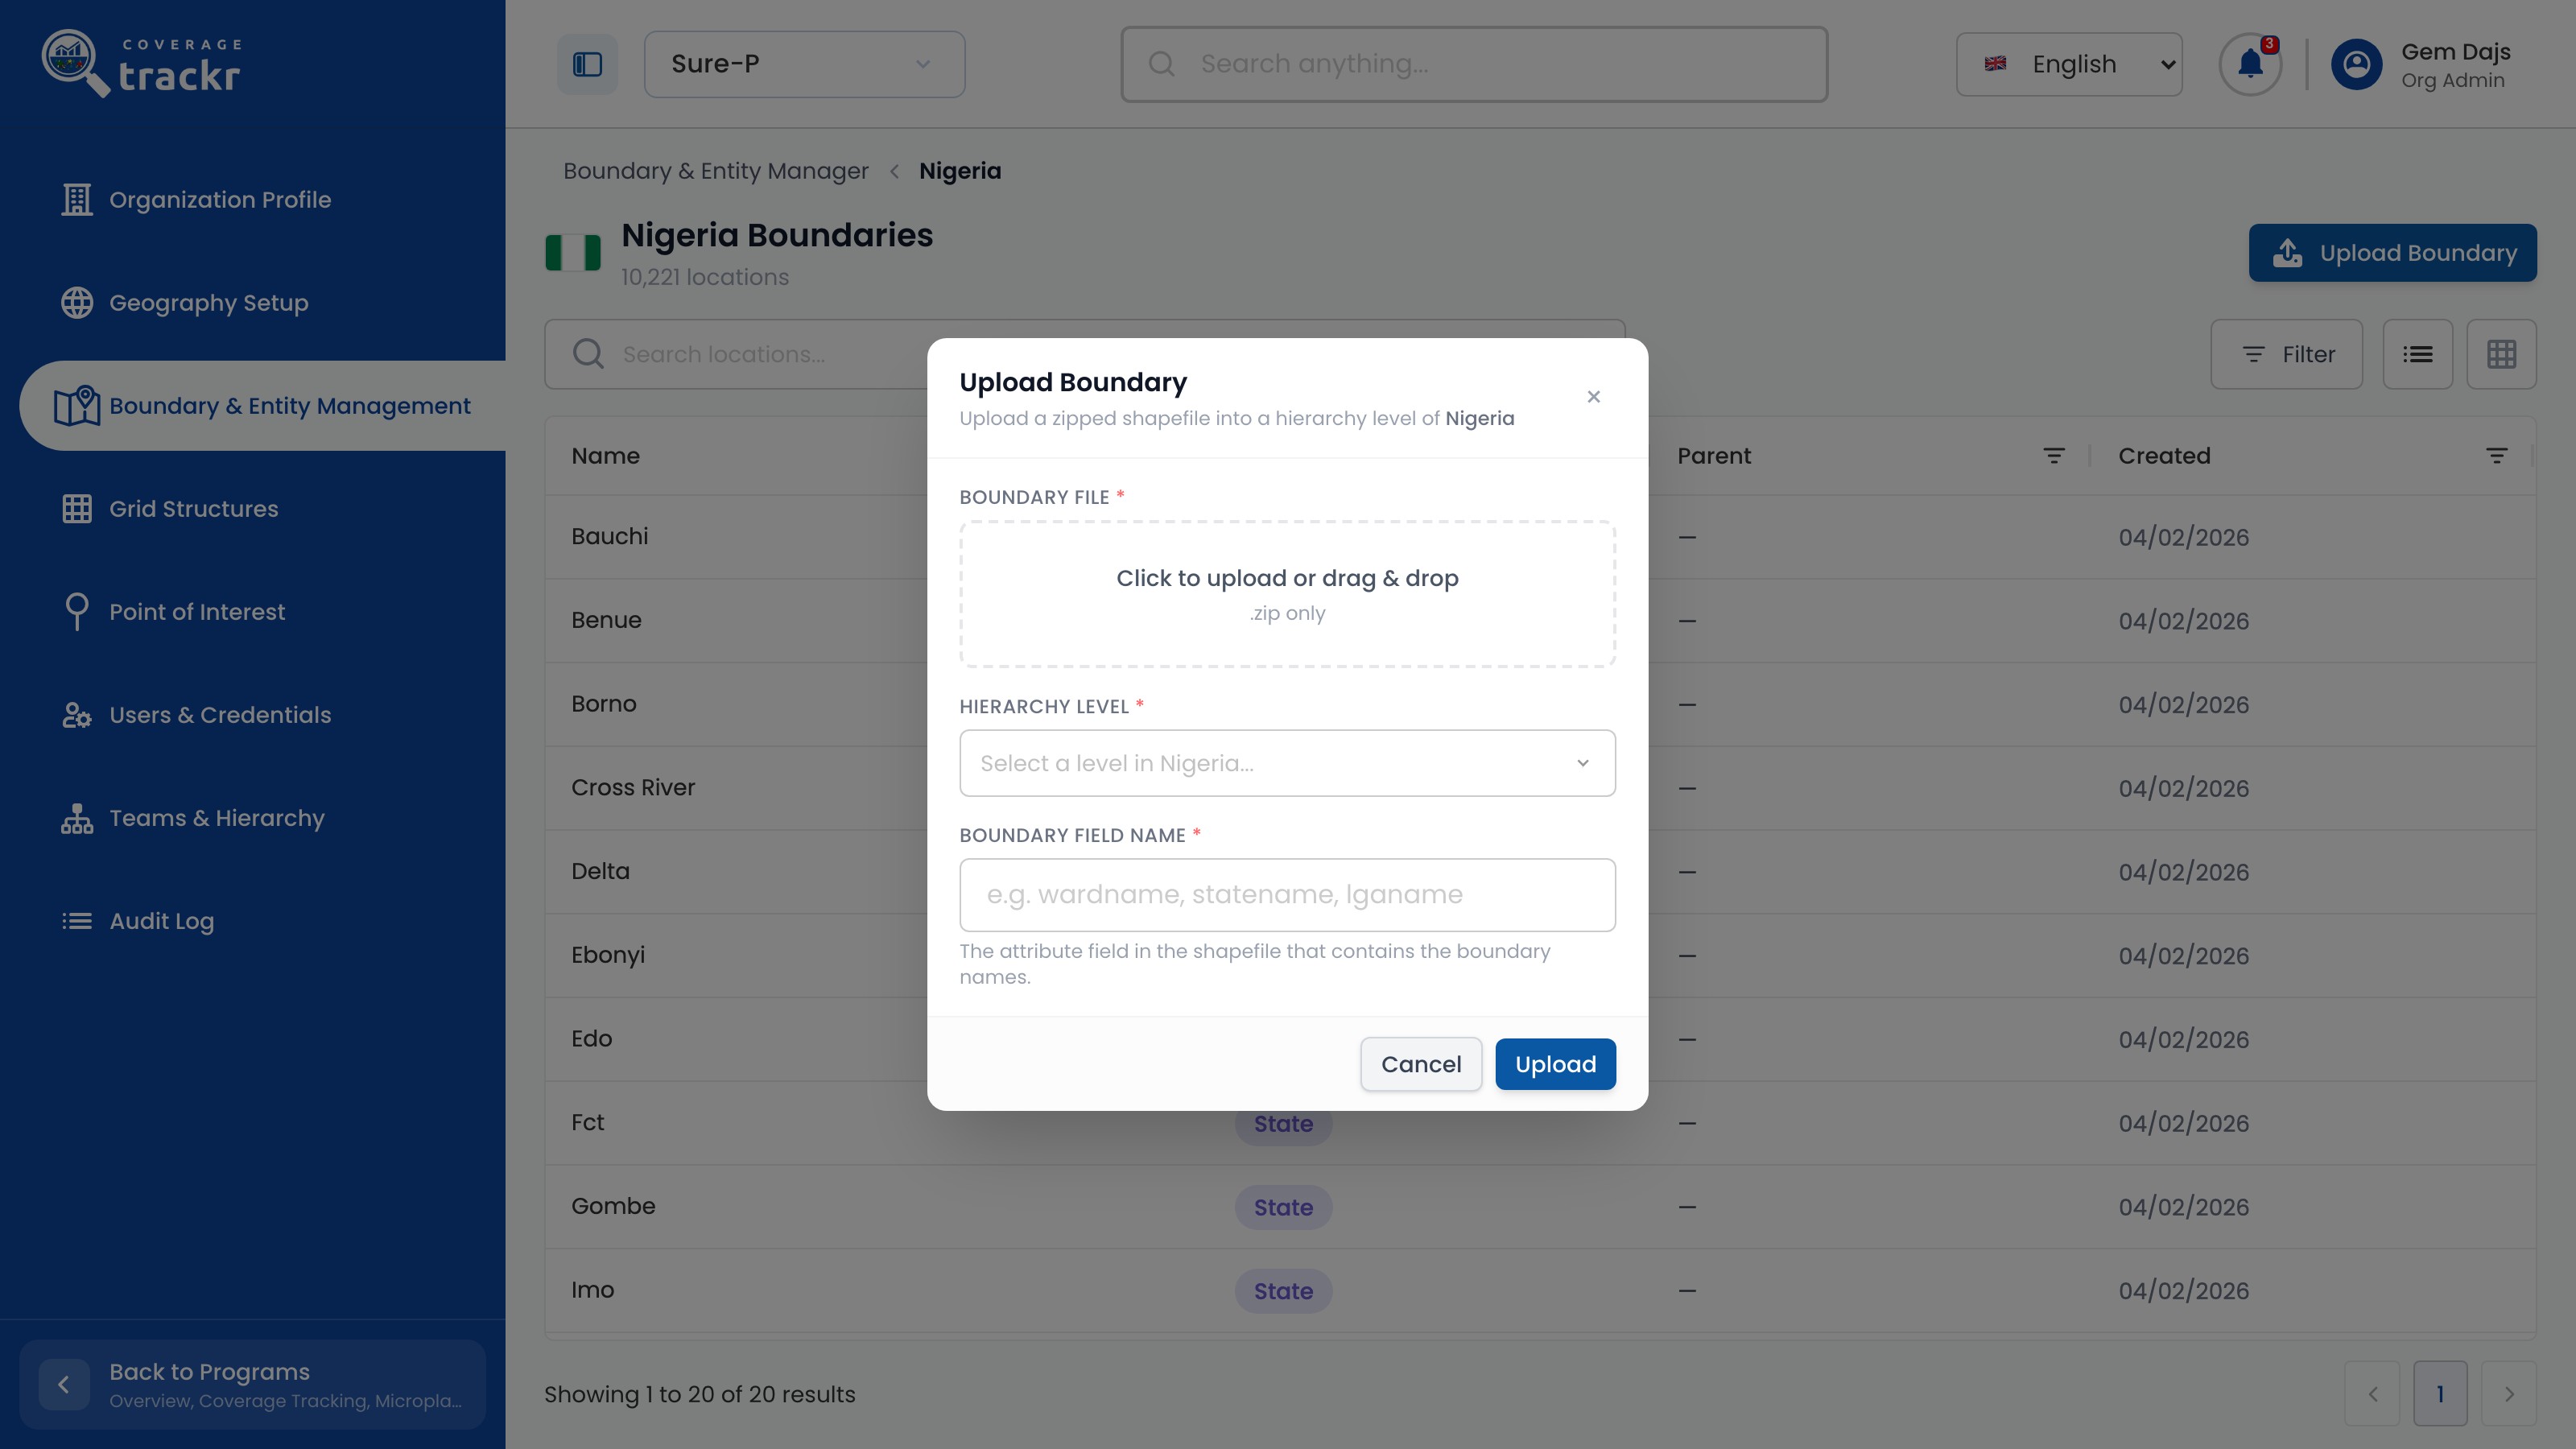
To add areas, select Upload Boundary. Provide the zipped shapefile, choose the Hierarchy Level and enter the Boundary Field Name, then select Upload.

Upload Boundary dialog asking for a boundary file, hierarchy level and boundary field name

1 — boundary file · 2 — boundary settings · 3 — upload button.

Upload Boundary dialog asking for a boundary file, hierarchy level and boundary field name

Done. You have reviewed the country's loaded areas and know which file, level and field name an upload needs.

If something goes wrong

What file does Upload Boundary accept?

A zipped shapefile, plus the hierarchy level it belongs to and the name of the shapefile field that holds each area's name.

Why is a country's list empty?

No boundaries have been uploaded for it yet.

Geography and locations

Review a grid set

Find a grid set and check its country, level, zones and linked points of interest.

Organization Administrator 2 min read Web

Before you start

  • You are signed in with organization administration access.

Open Grid Structures

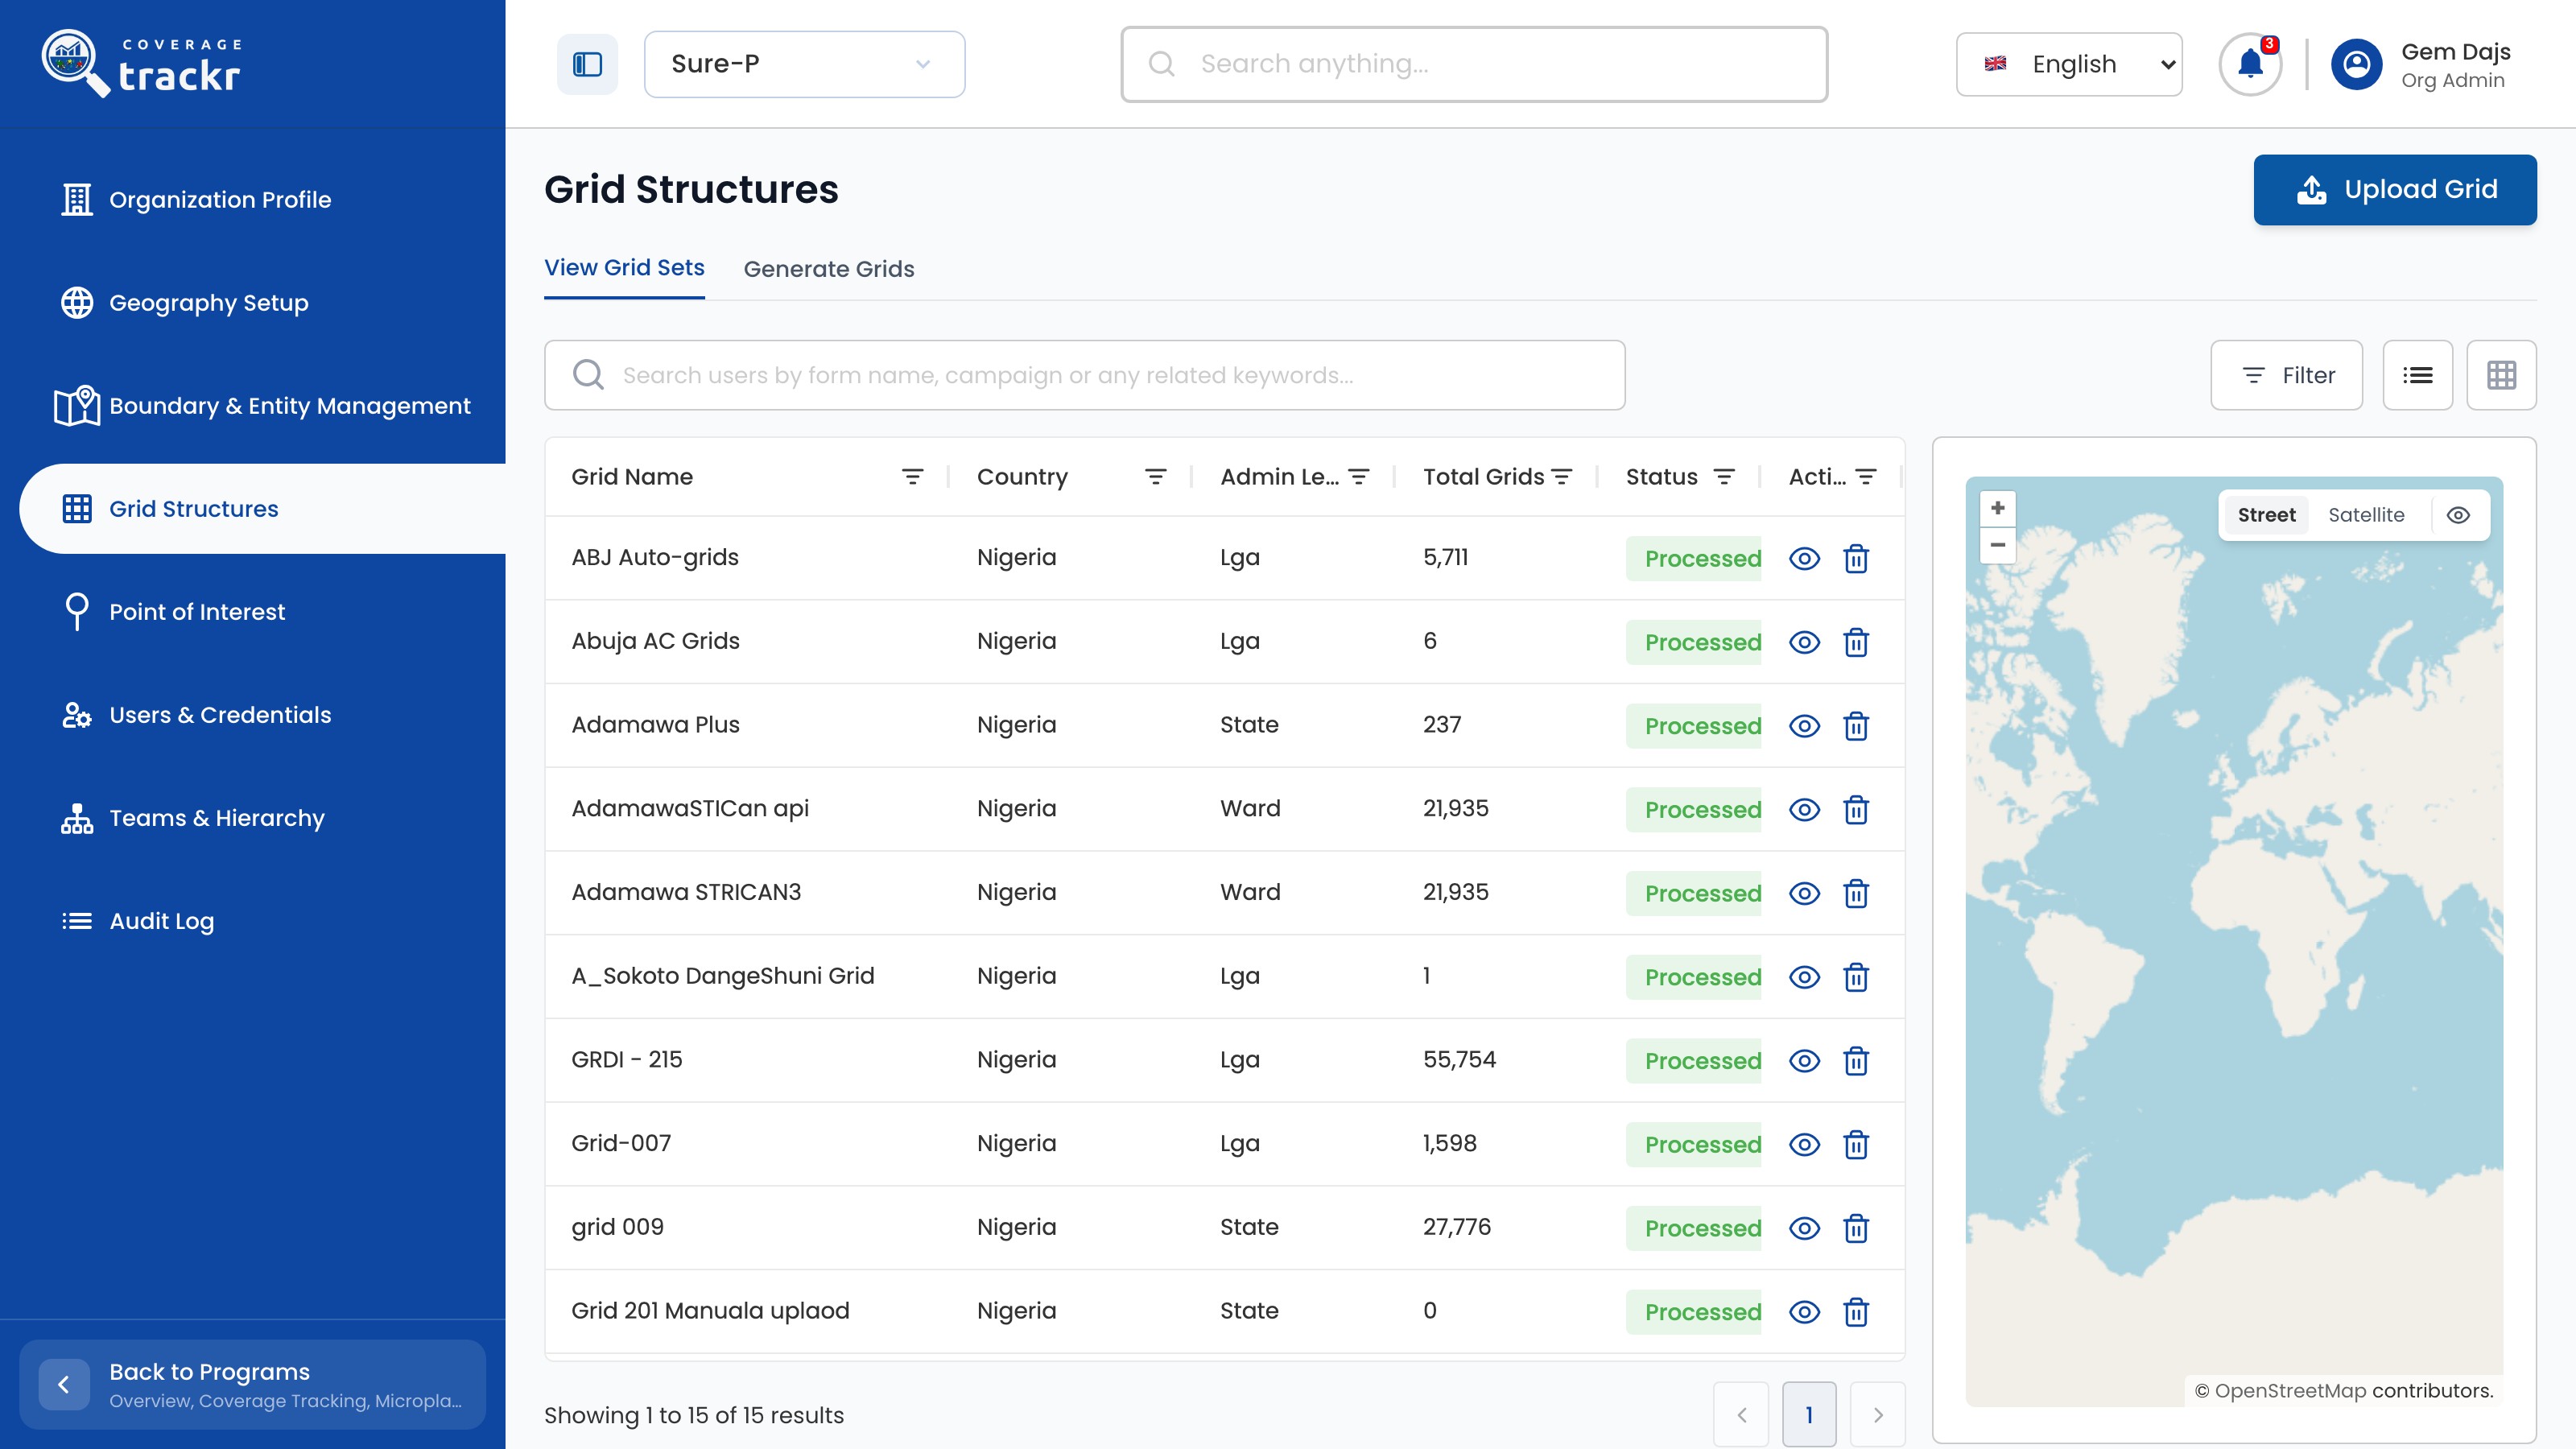
Select Grid Structures. Each grid set shows its country, administrative level, total grids and status, with a map beside the list.

Grid Structures list with grid totals, Processed status and a map

1 — grid structures · 2 — grid sets · 3 — grid map.

Grid Structures list with grid totals, Processed status and a map

Open the grid set

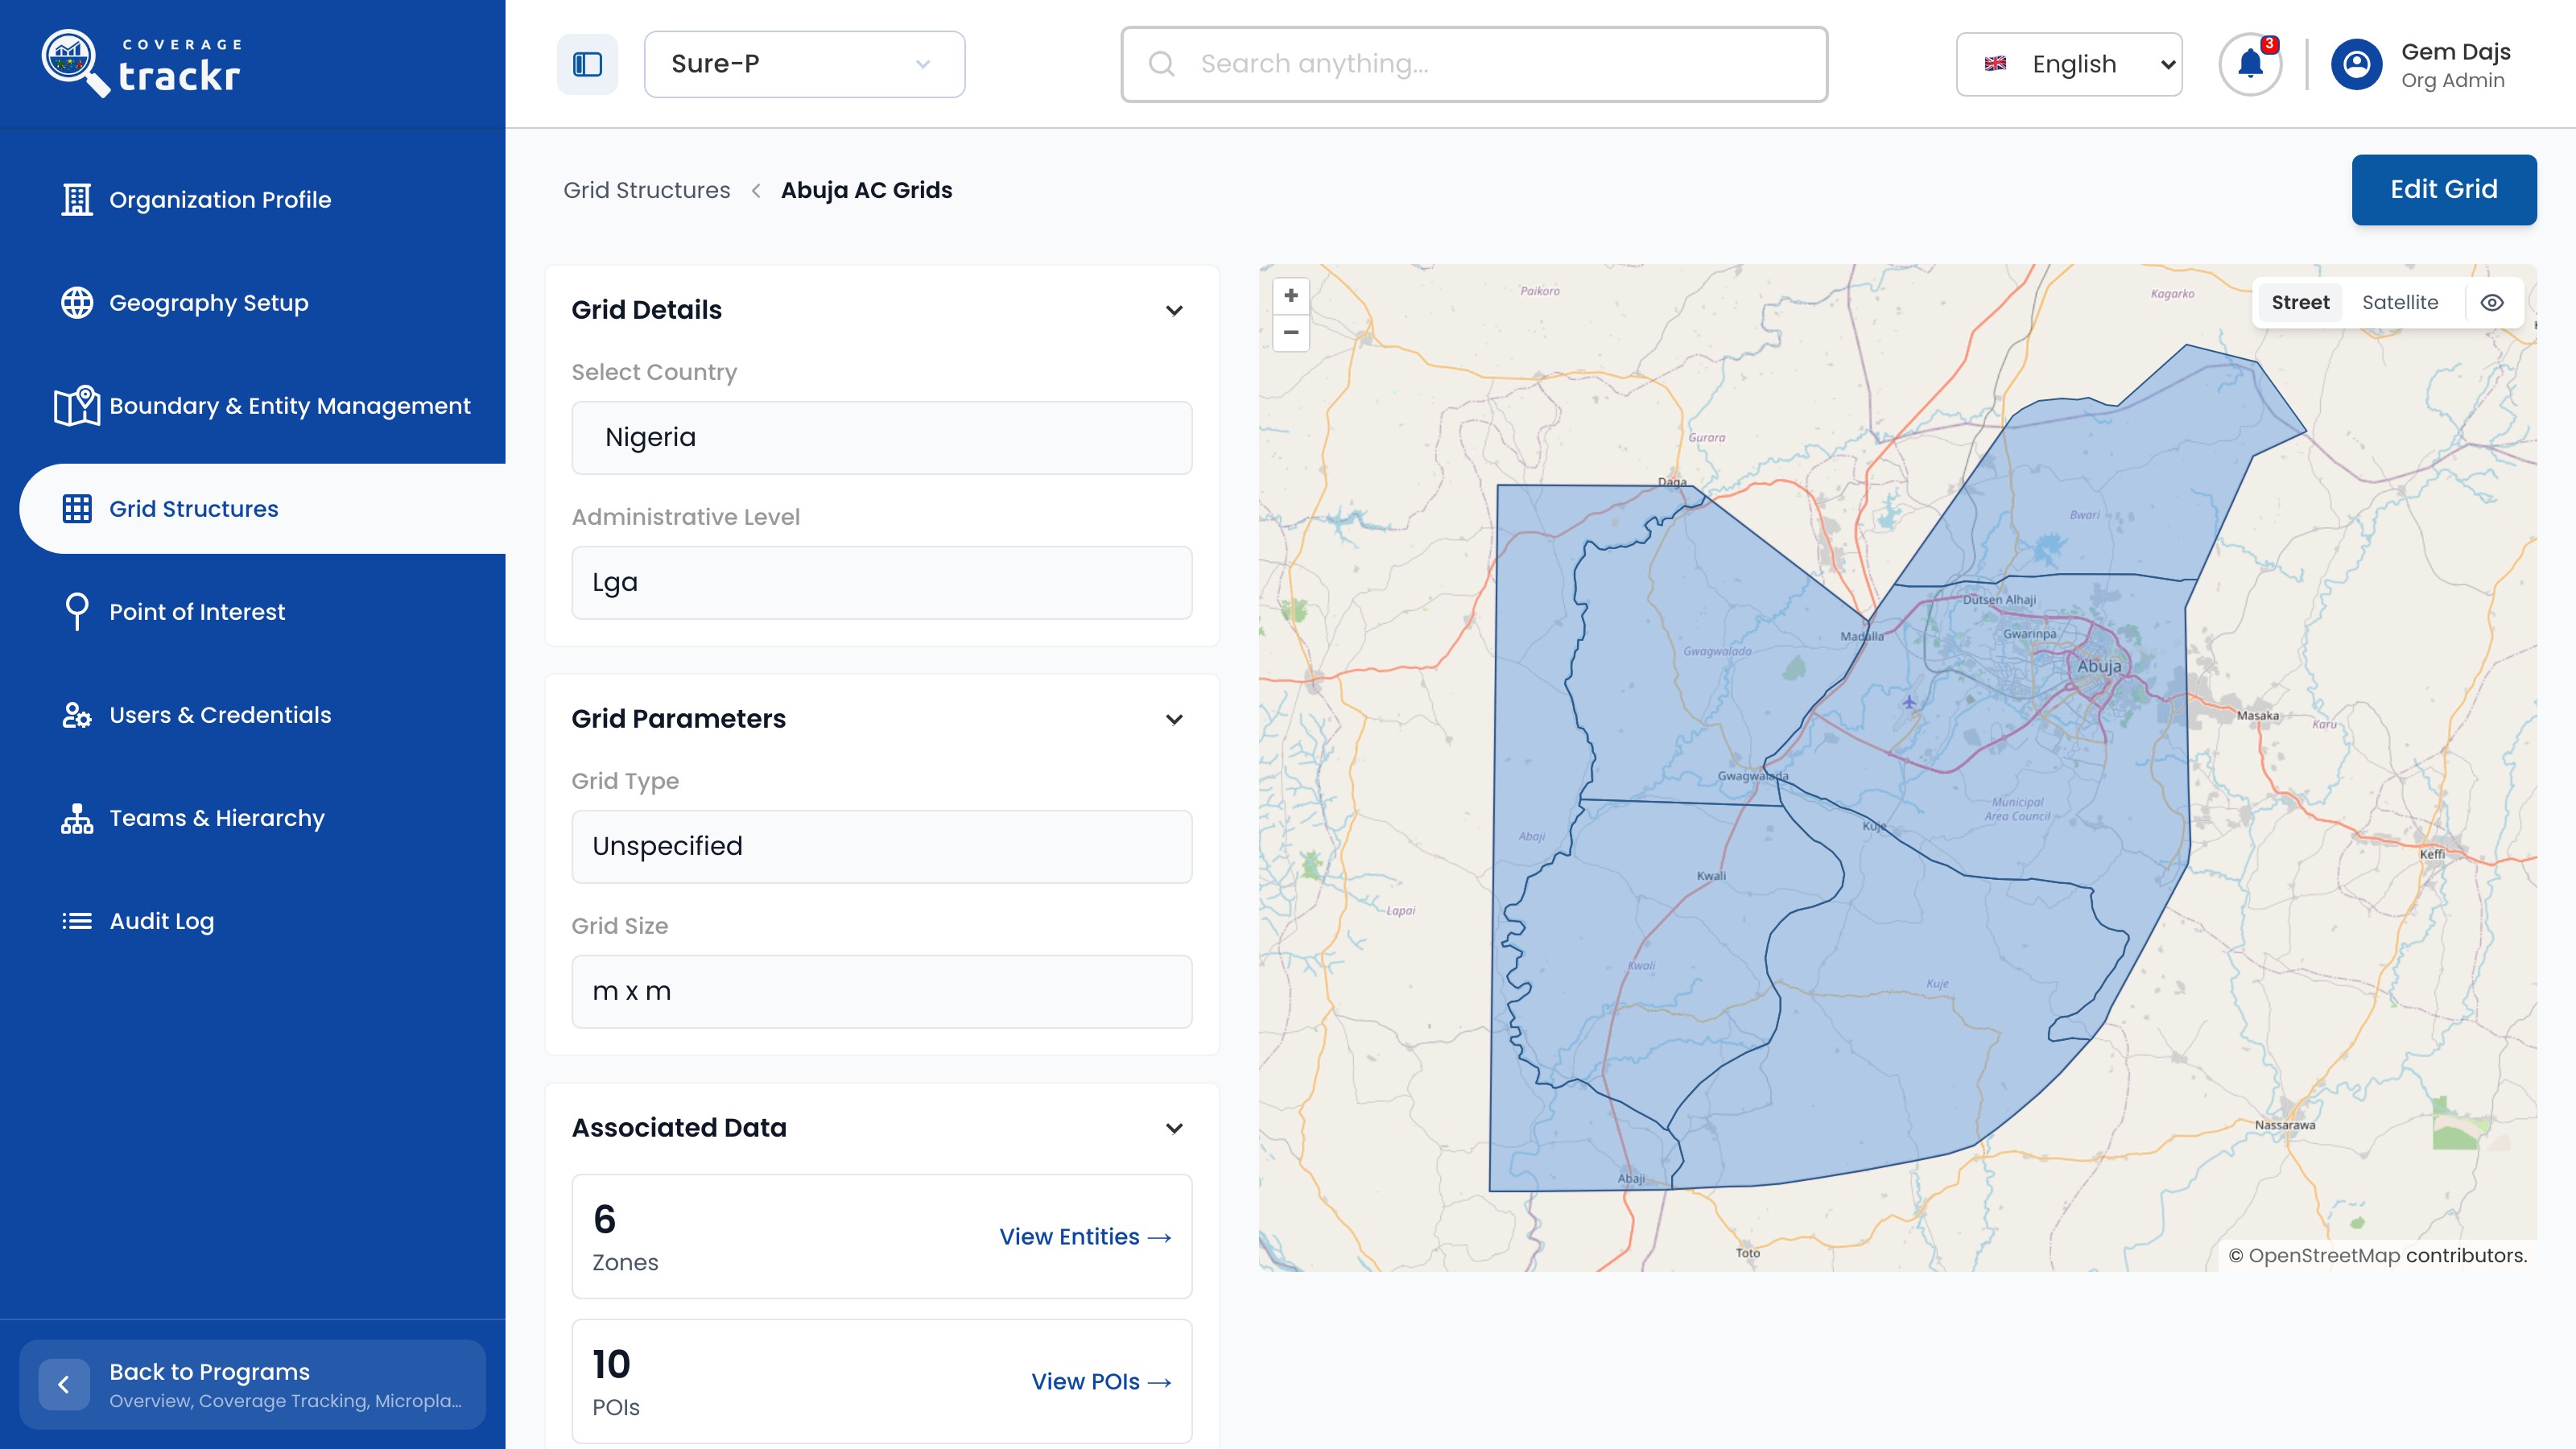
Select View Grid for the set. Review Grid Details, Grid Parameters and Associated Data beside the map.

Abuja AC Grids detail with grid details, zones, points of interest and a map

1 — grid details · 2 — grid parameters · 3 — associated data.

Abuja AC Grids detail with grid details, zones, points of interest and a map

Done. You have confirmed the grid set's scope and what is linked to it.

If something goes wrong

What does Processed mean?

The grid set has been uploaded or generated and is ready to use.

Geography and locations

Add a point of interest

Add a named point of interest, such as a group of health facilities, for use in planning.
Organization Administrator 3 min read Web

Before you start

  • You are signed in with organization administration access.

Open Point of Interest

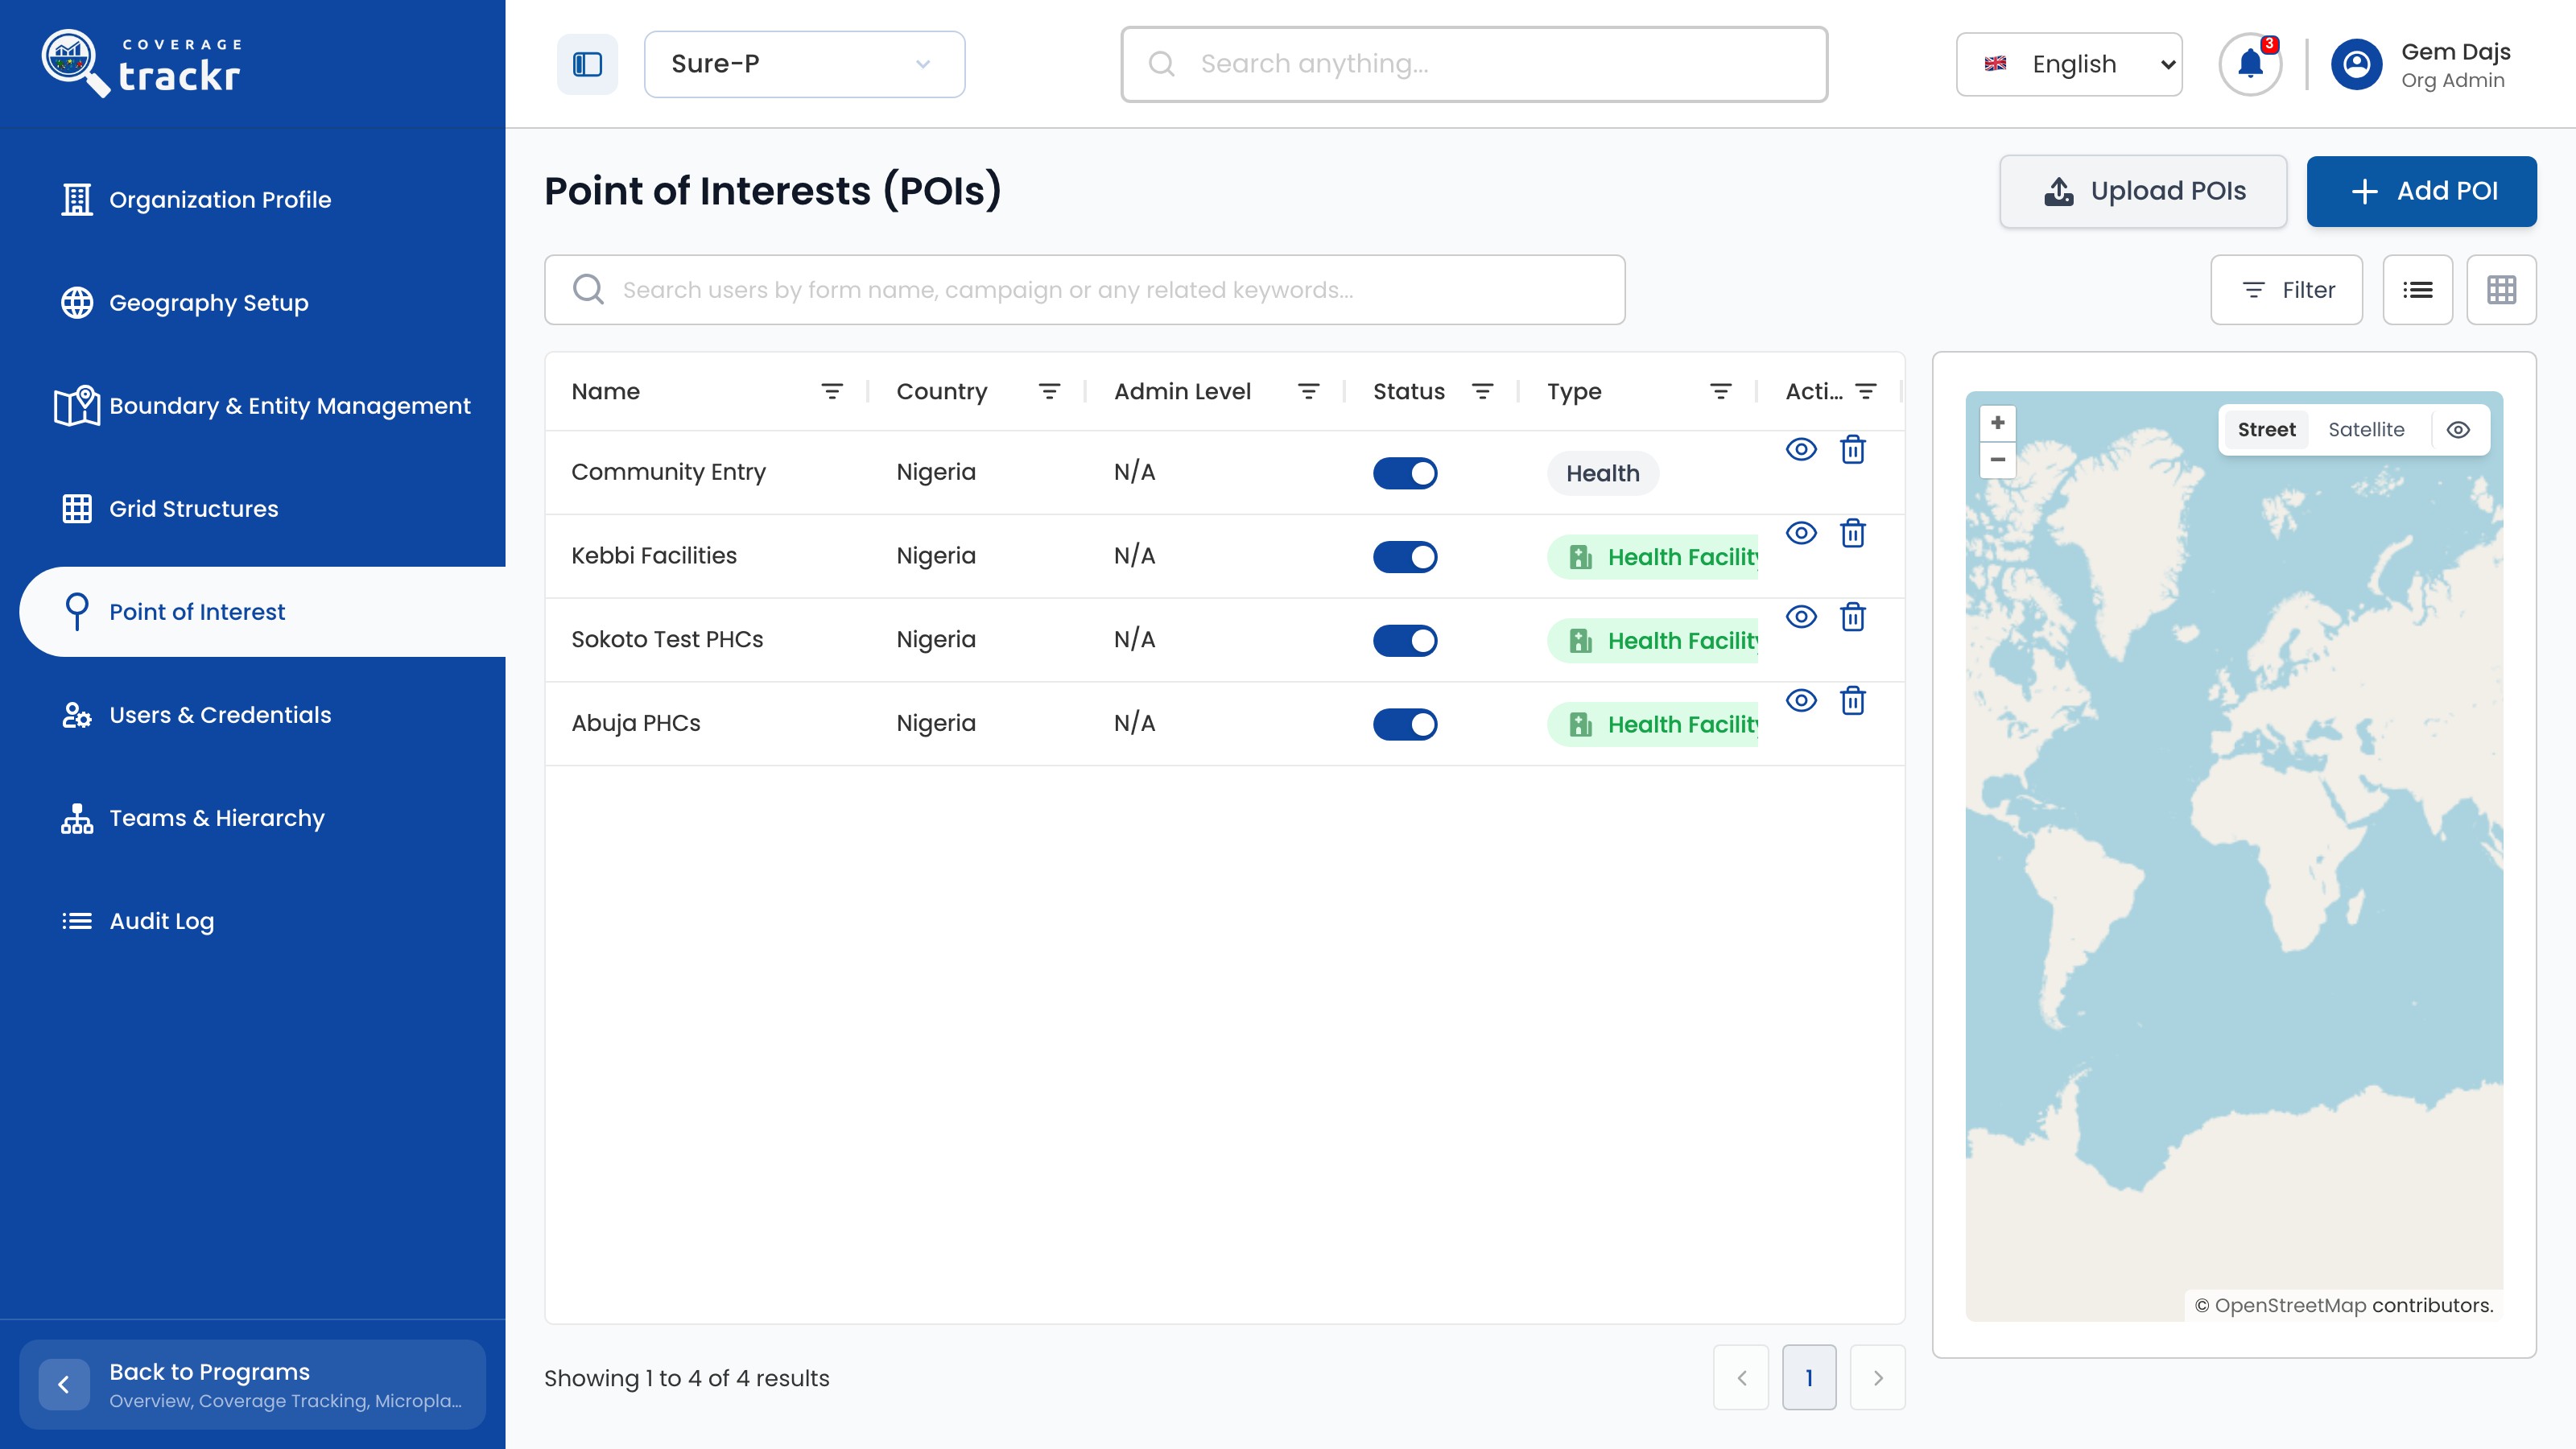
Select Point of Interest in the organization navigation.

Point of Interests list with a map

1 — point of interest.

Point of Interests list with a map

Enter the details

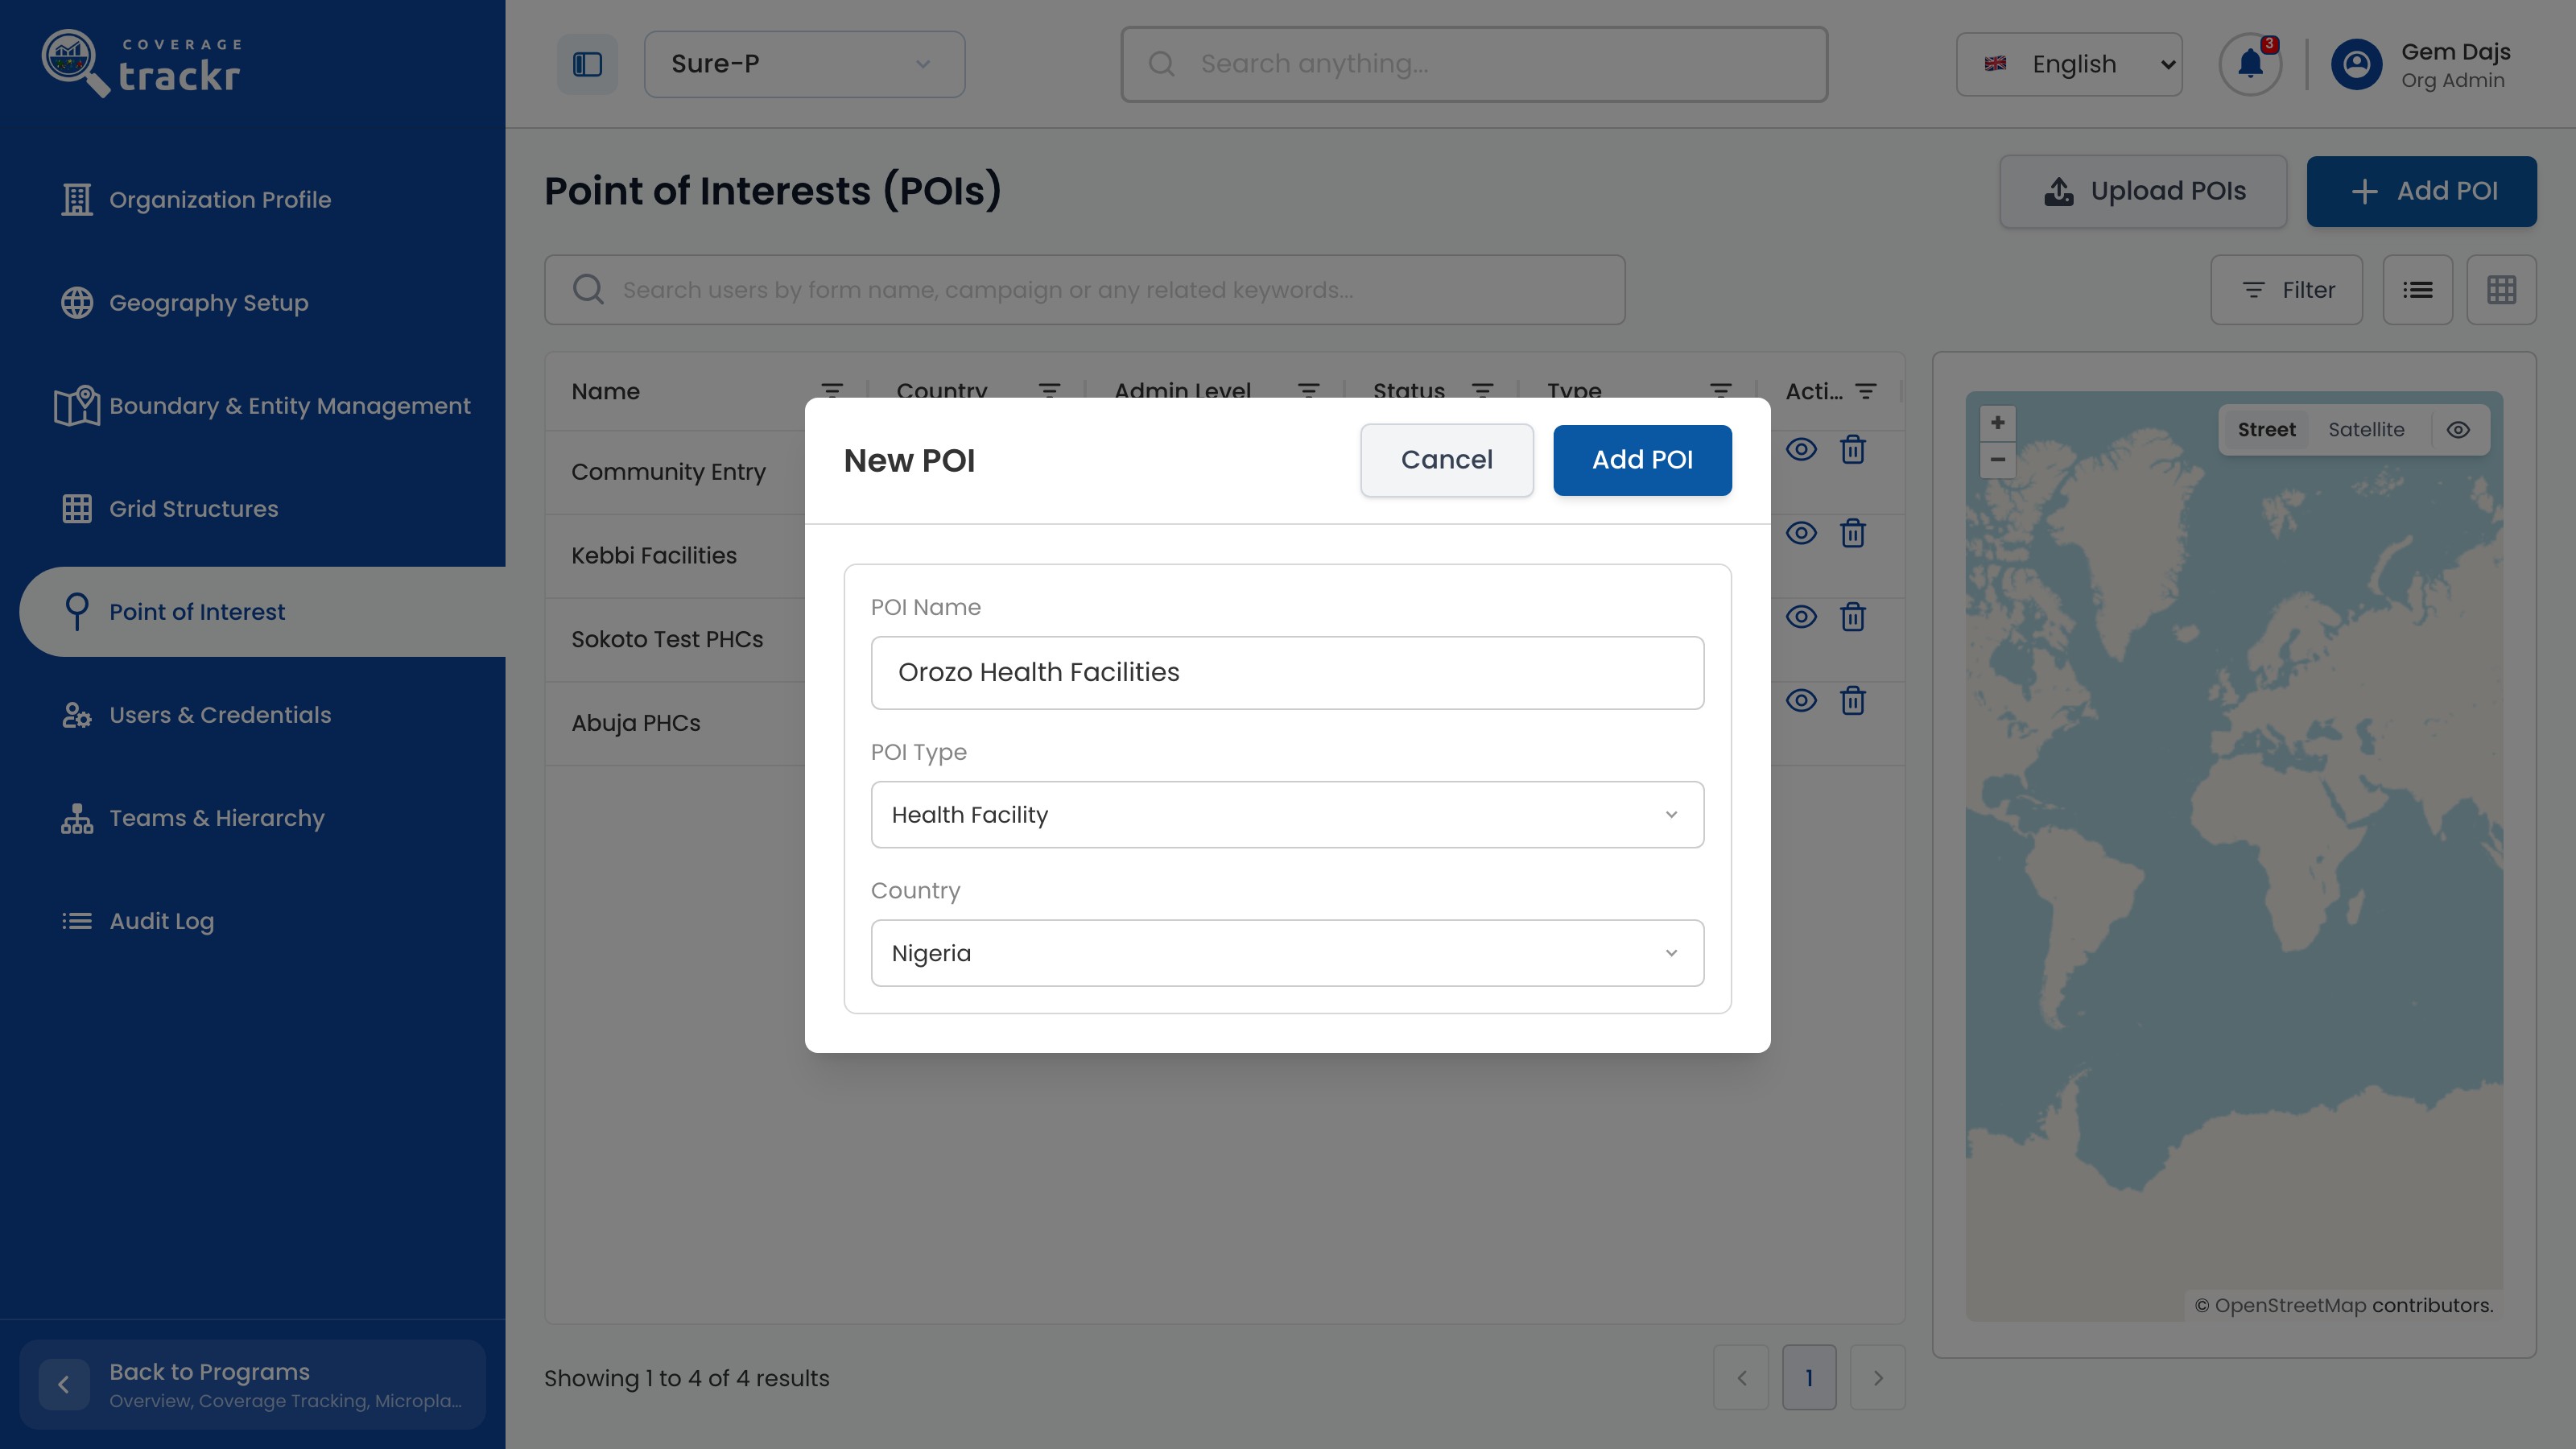
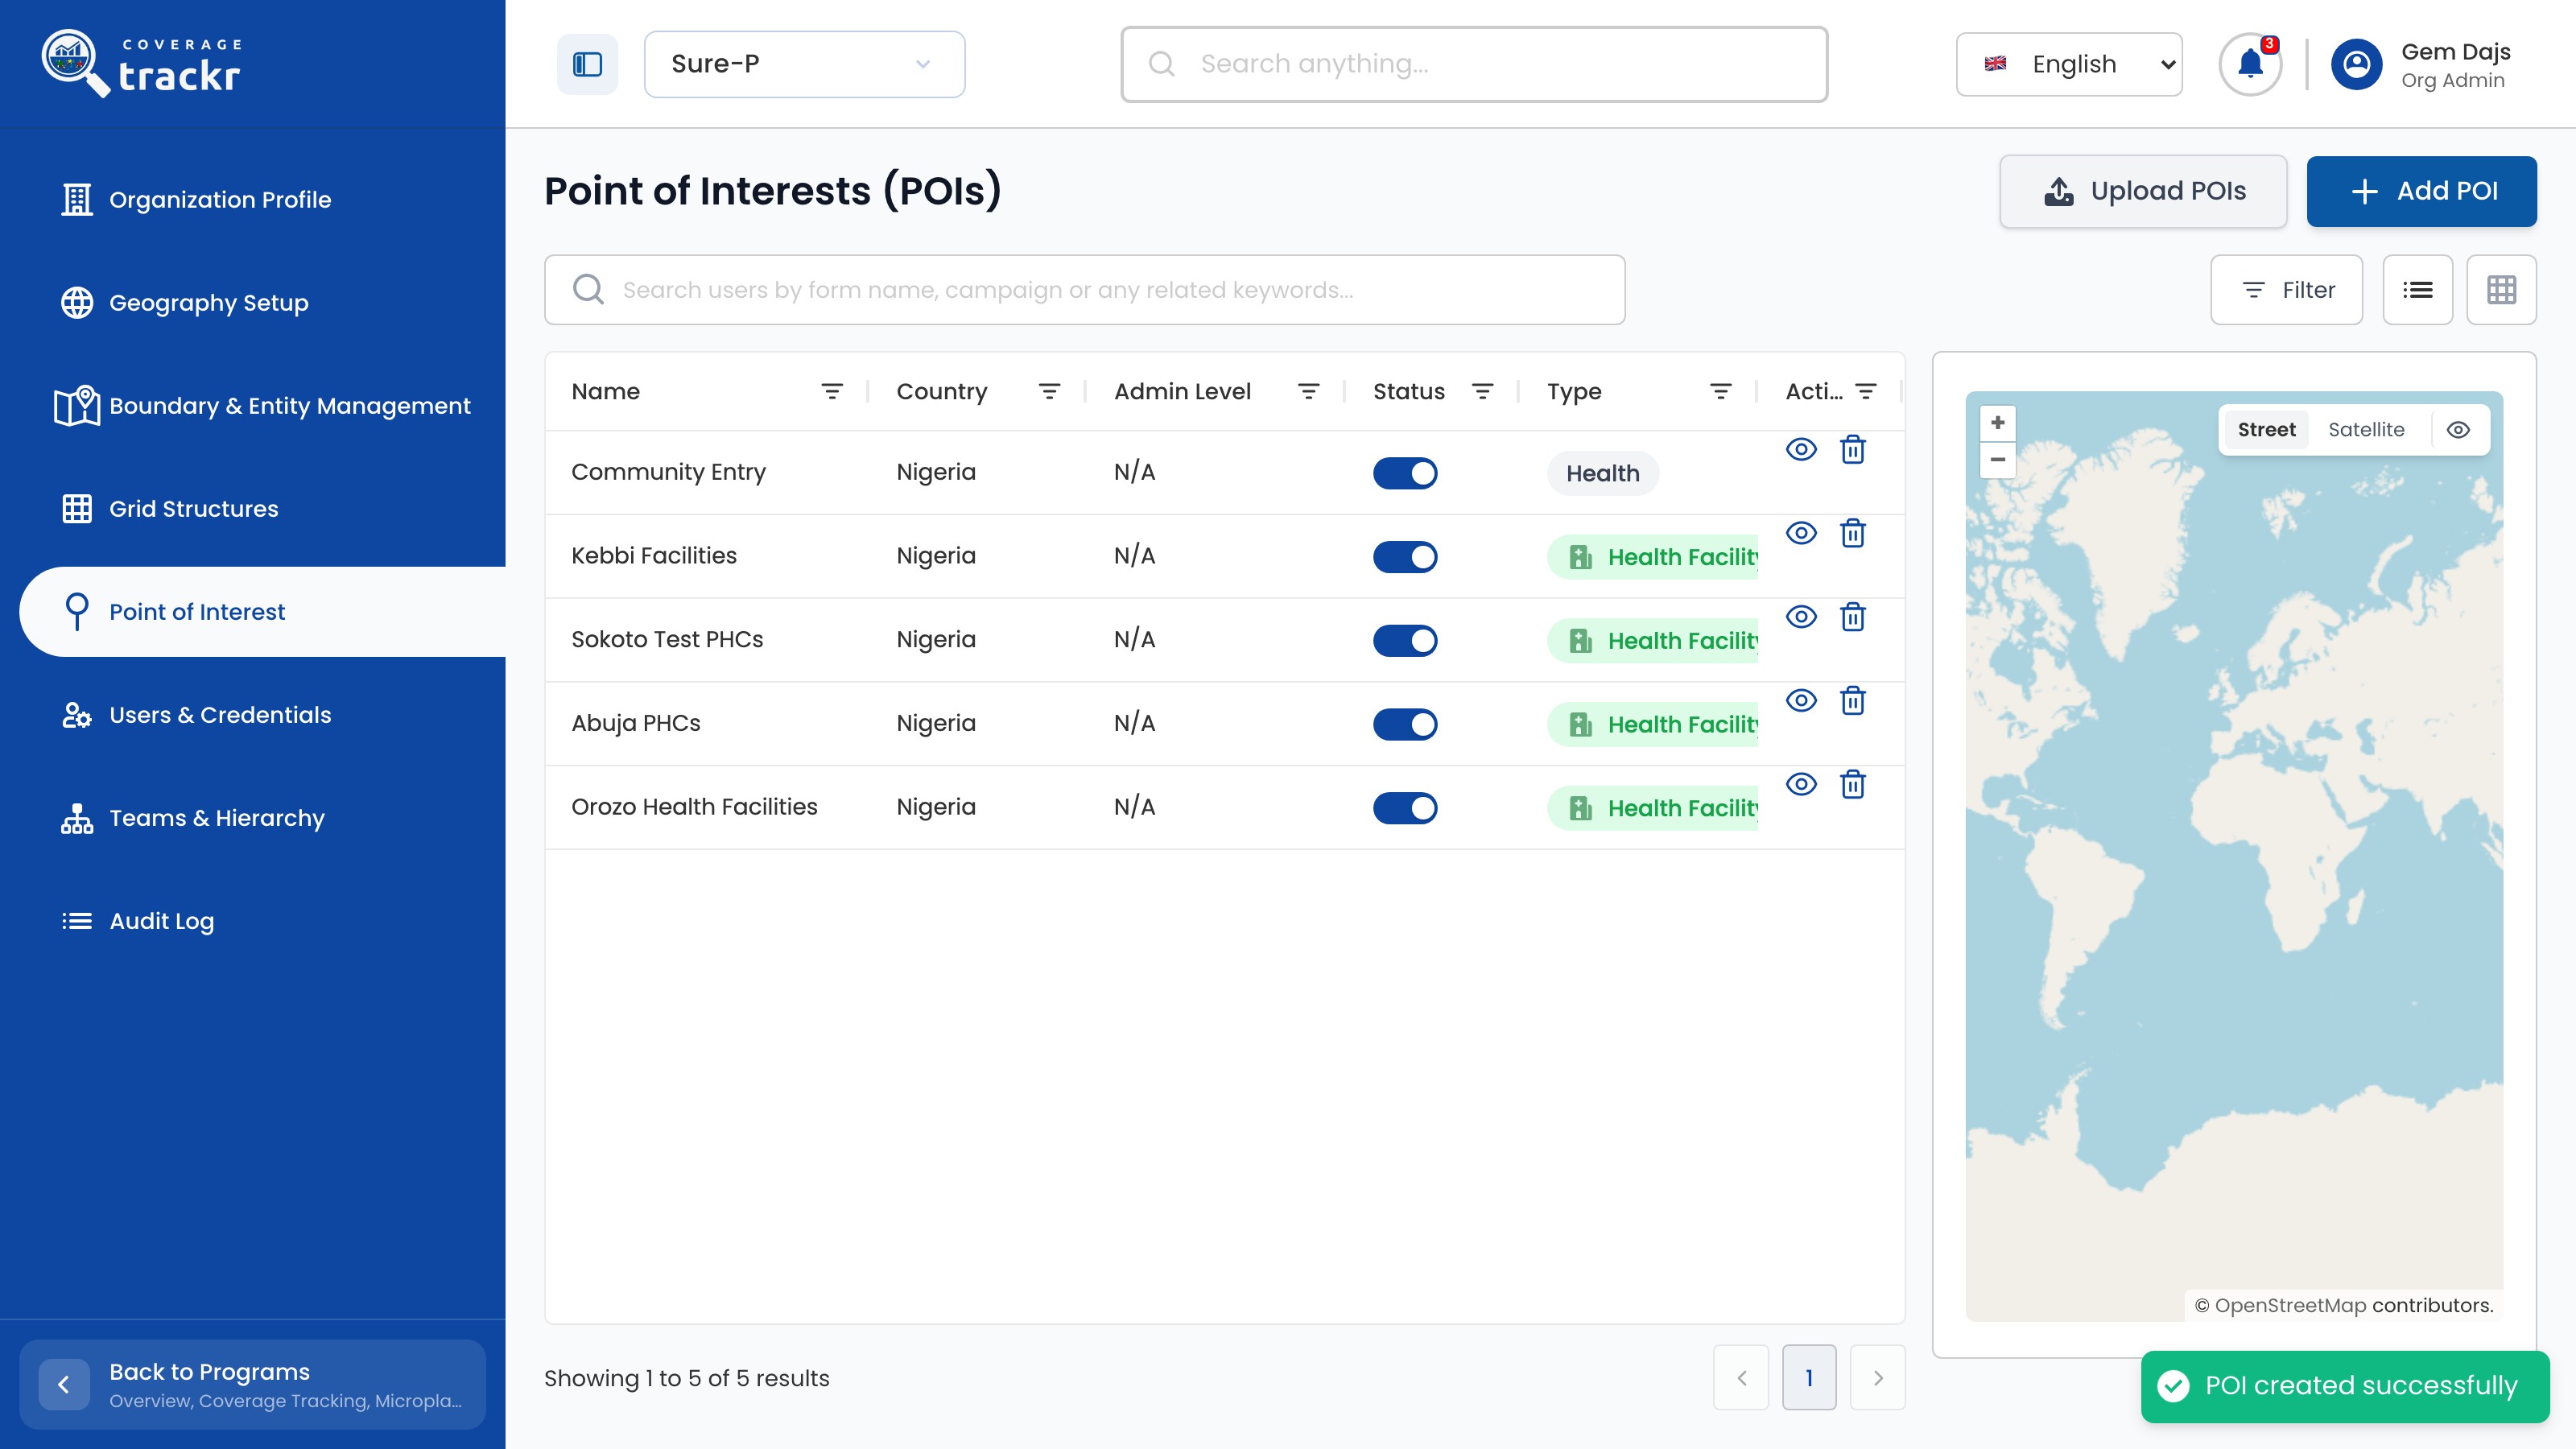
Select Add POI, enter the POI Name, choose the POI Type and select the Country.

New POI dialog with a name, Health Facility type and Nigeria selected

1 — poi details · 2 — add poi button.

New POI dialog with a name, Health Facility type and Nigeria selected

Add the point of interest

Select Add POI. The new entry is added to the list.

Point of Interests list including Orozo Health Facilities with a success message

1 — new point of interest · 2 — save confirmation.

Point of Interests list including Orozo Health Facilities with a success message

Check the new entry

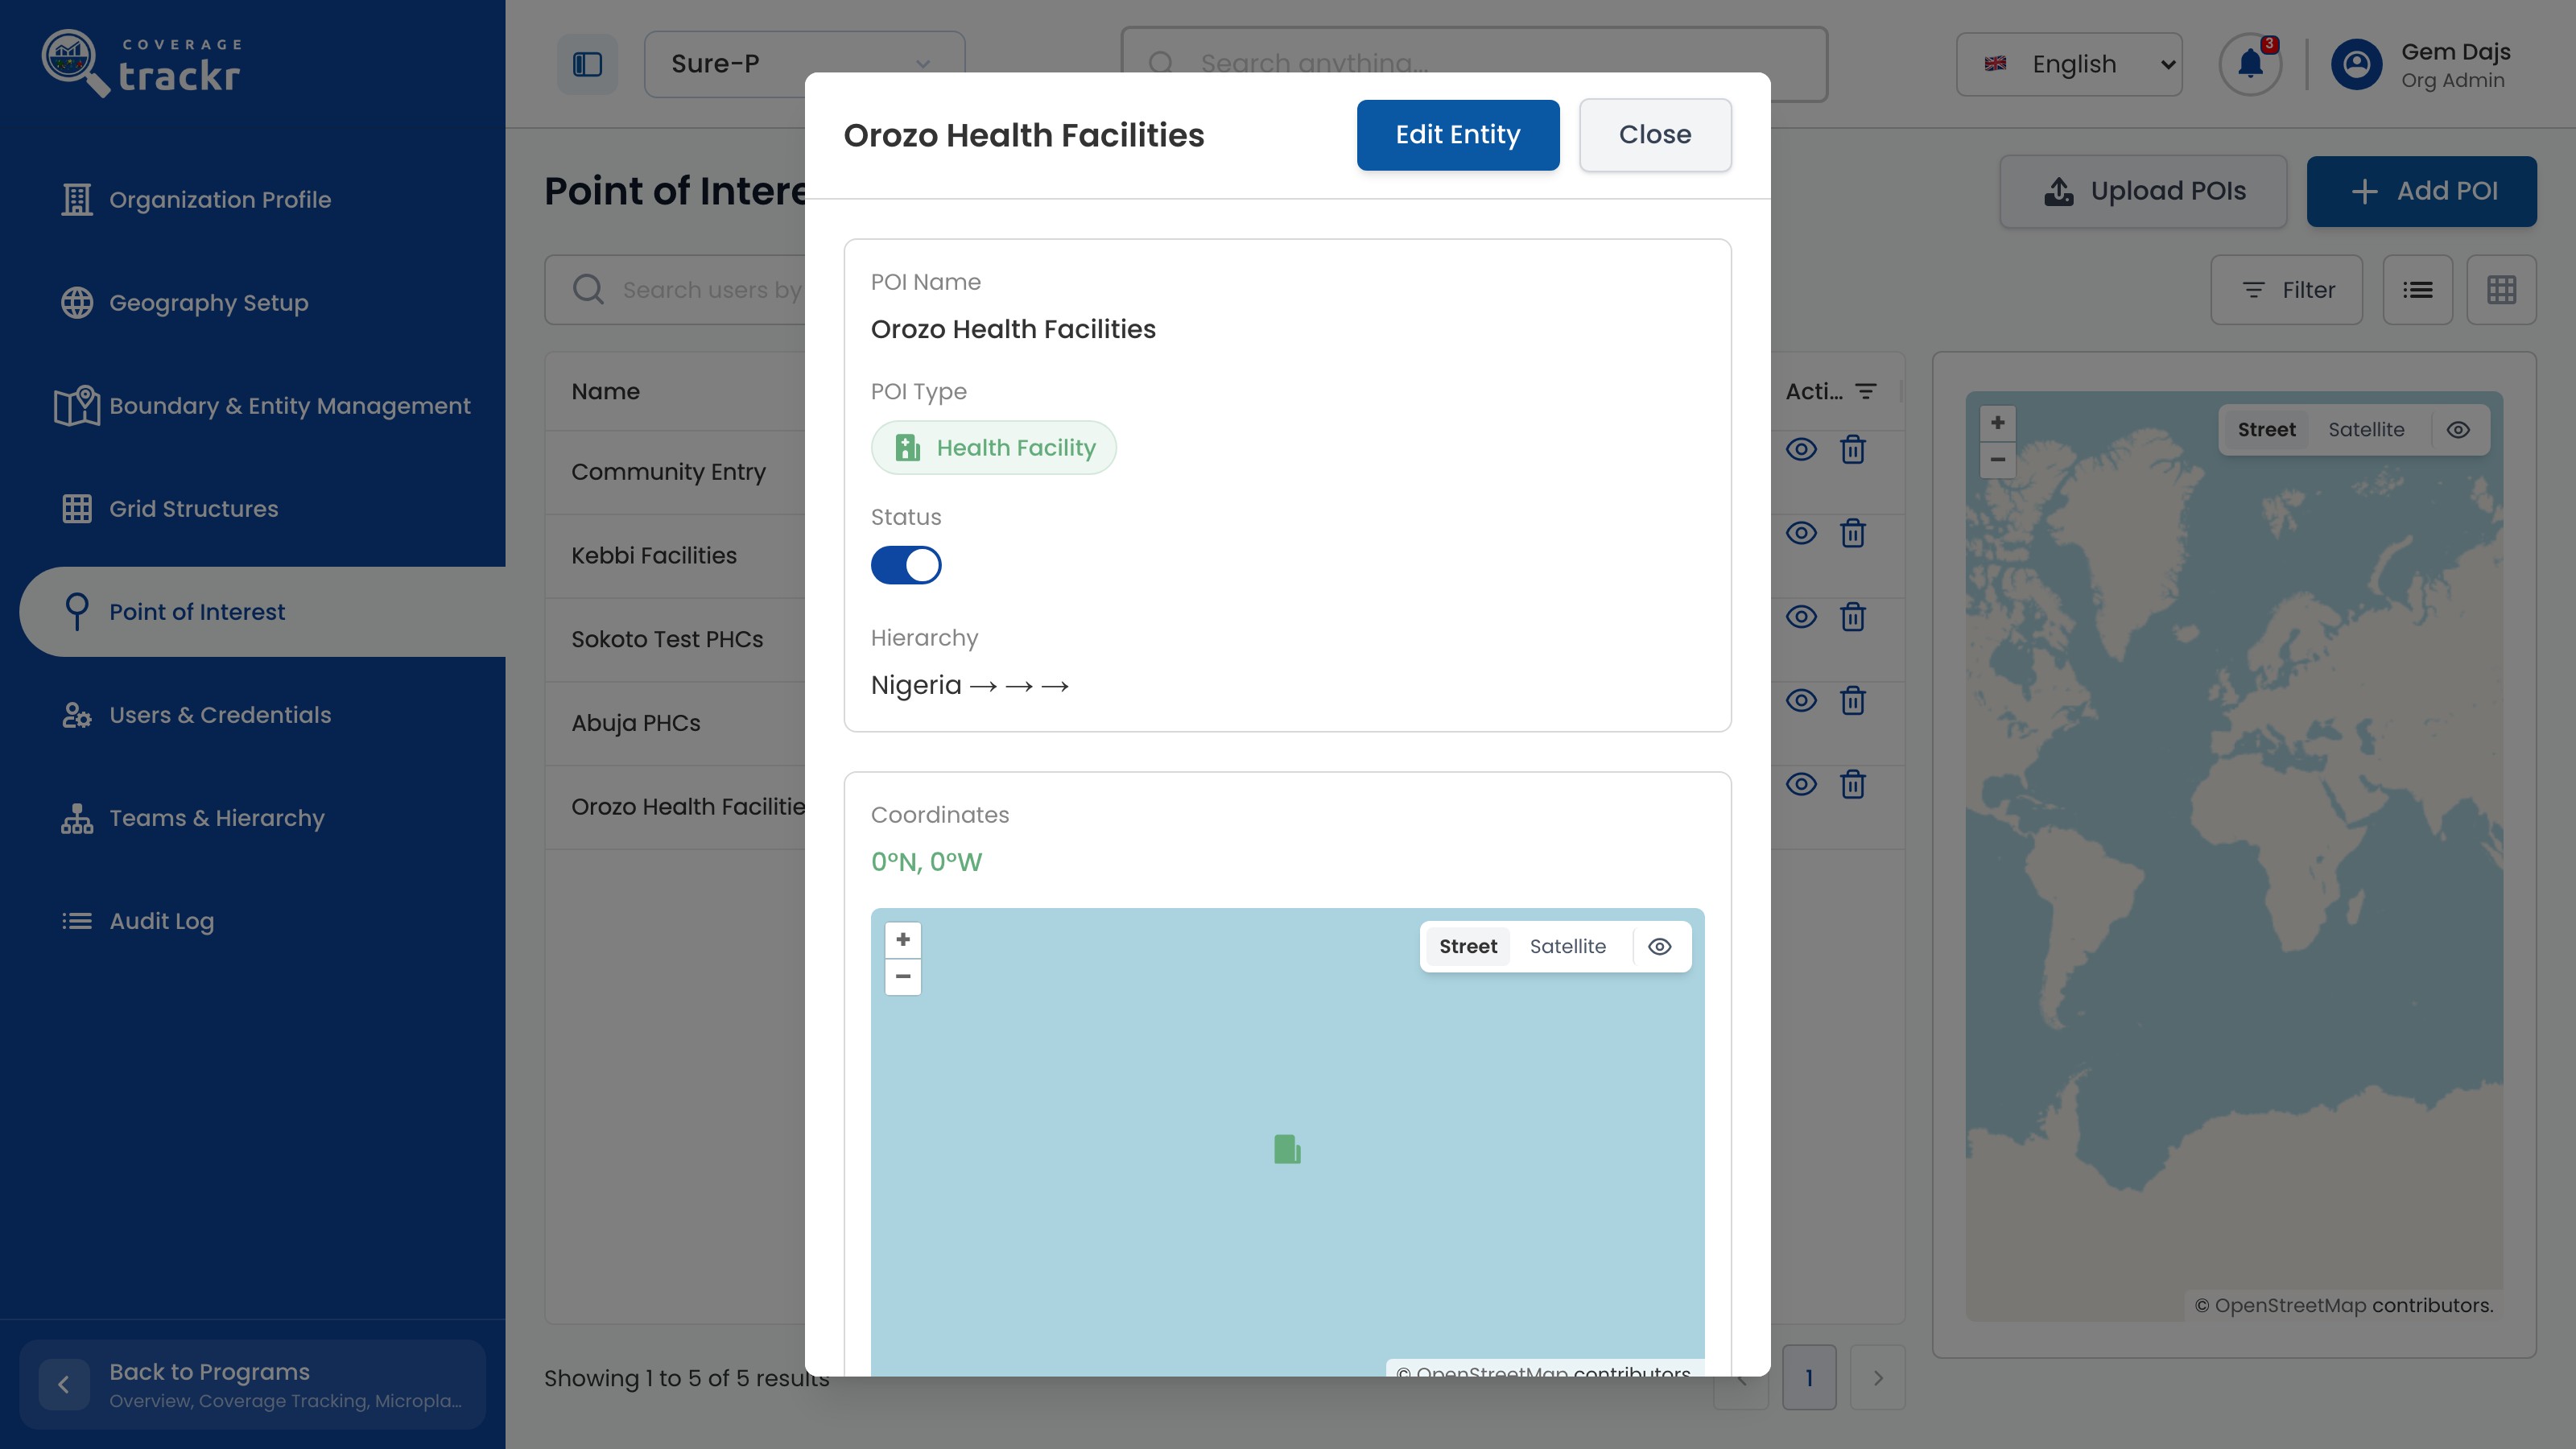
Select View POI on the new entry to confirm its name, type, status and hierarchy.

Orozo Health Facilities detail showing type, status and hierarchy

1 — poi details · 2 — poi location.

Orozo Health Facilities detail showing type, status and hierarchy

Done. The point of interest appears in the list as active with its type.

If something goes wrong

Which types are available?

School, Market and Health Facility.

Users and teams

Invite a user

Create an account for a new team member with the right role and location, then share their sign-in details.

Organization Administrator 4 min read Web

Before you start

  • You are signed in with organization administration access.
  • You have the person's name, email address and the role they need.

Open Users & Credentials

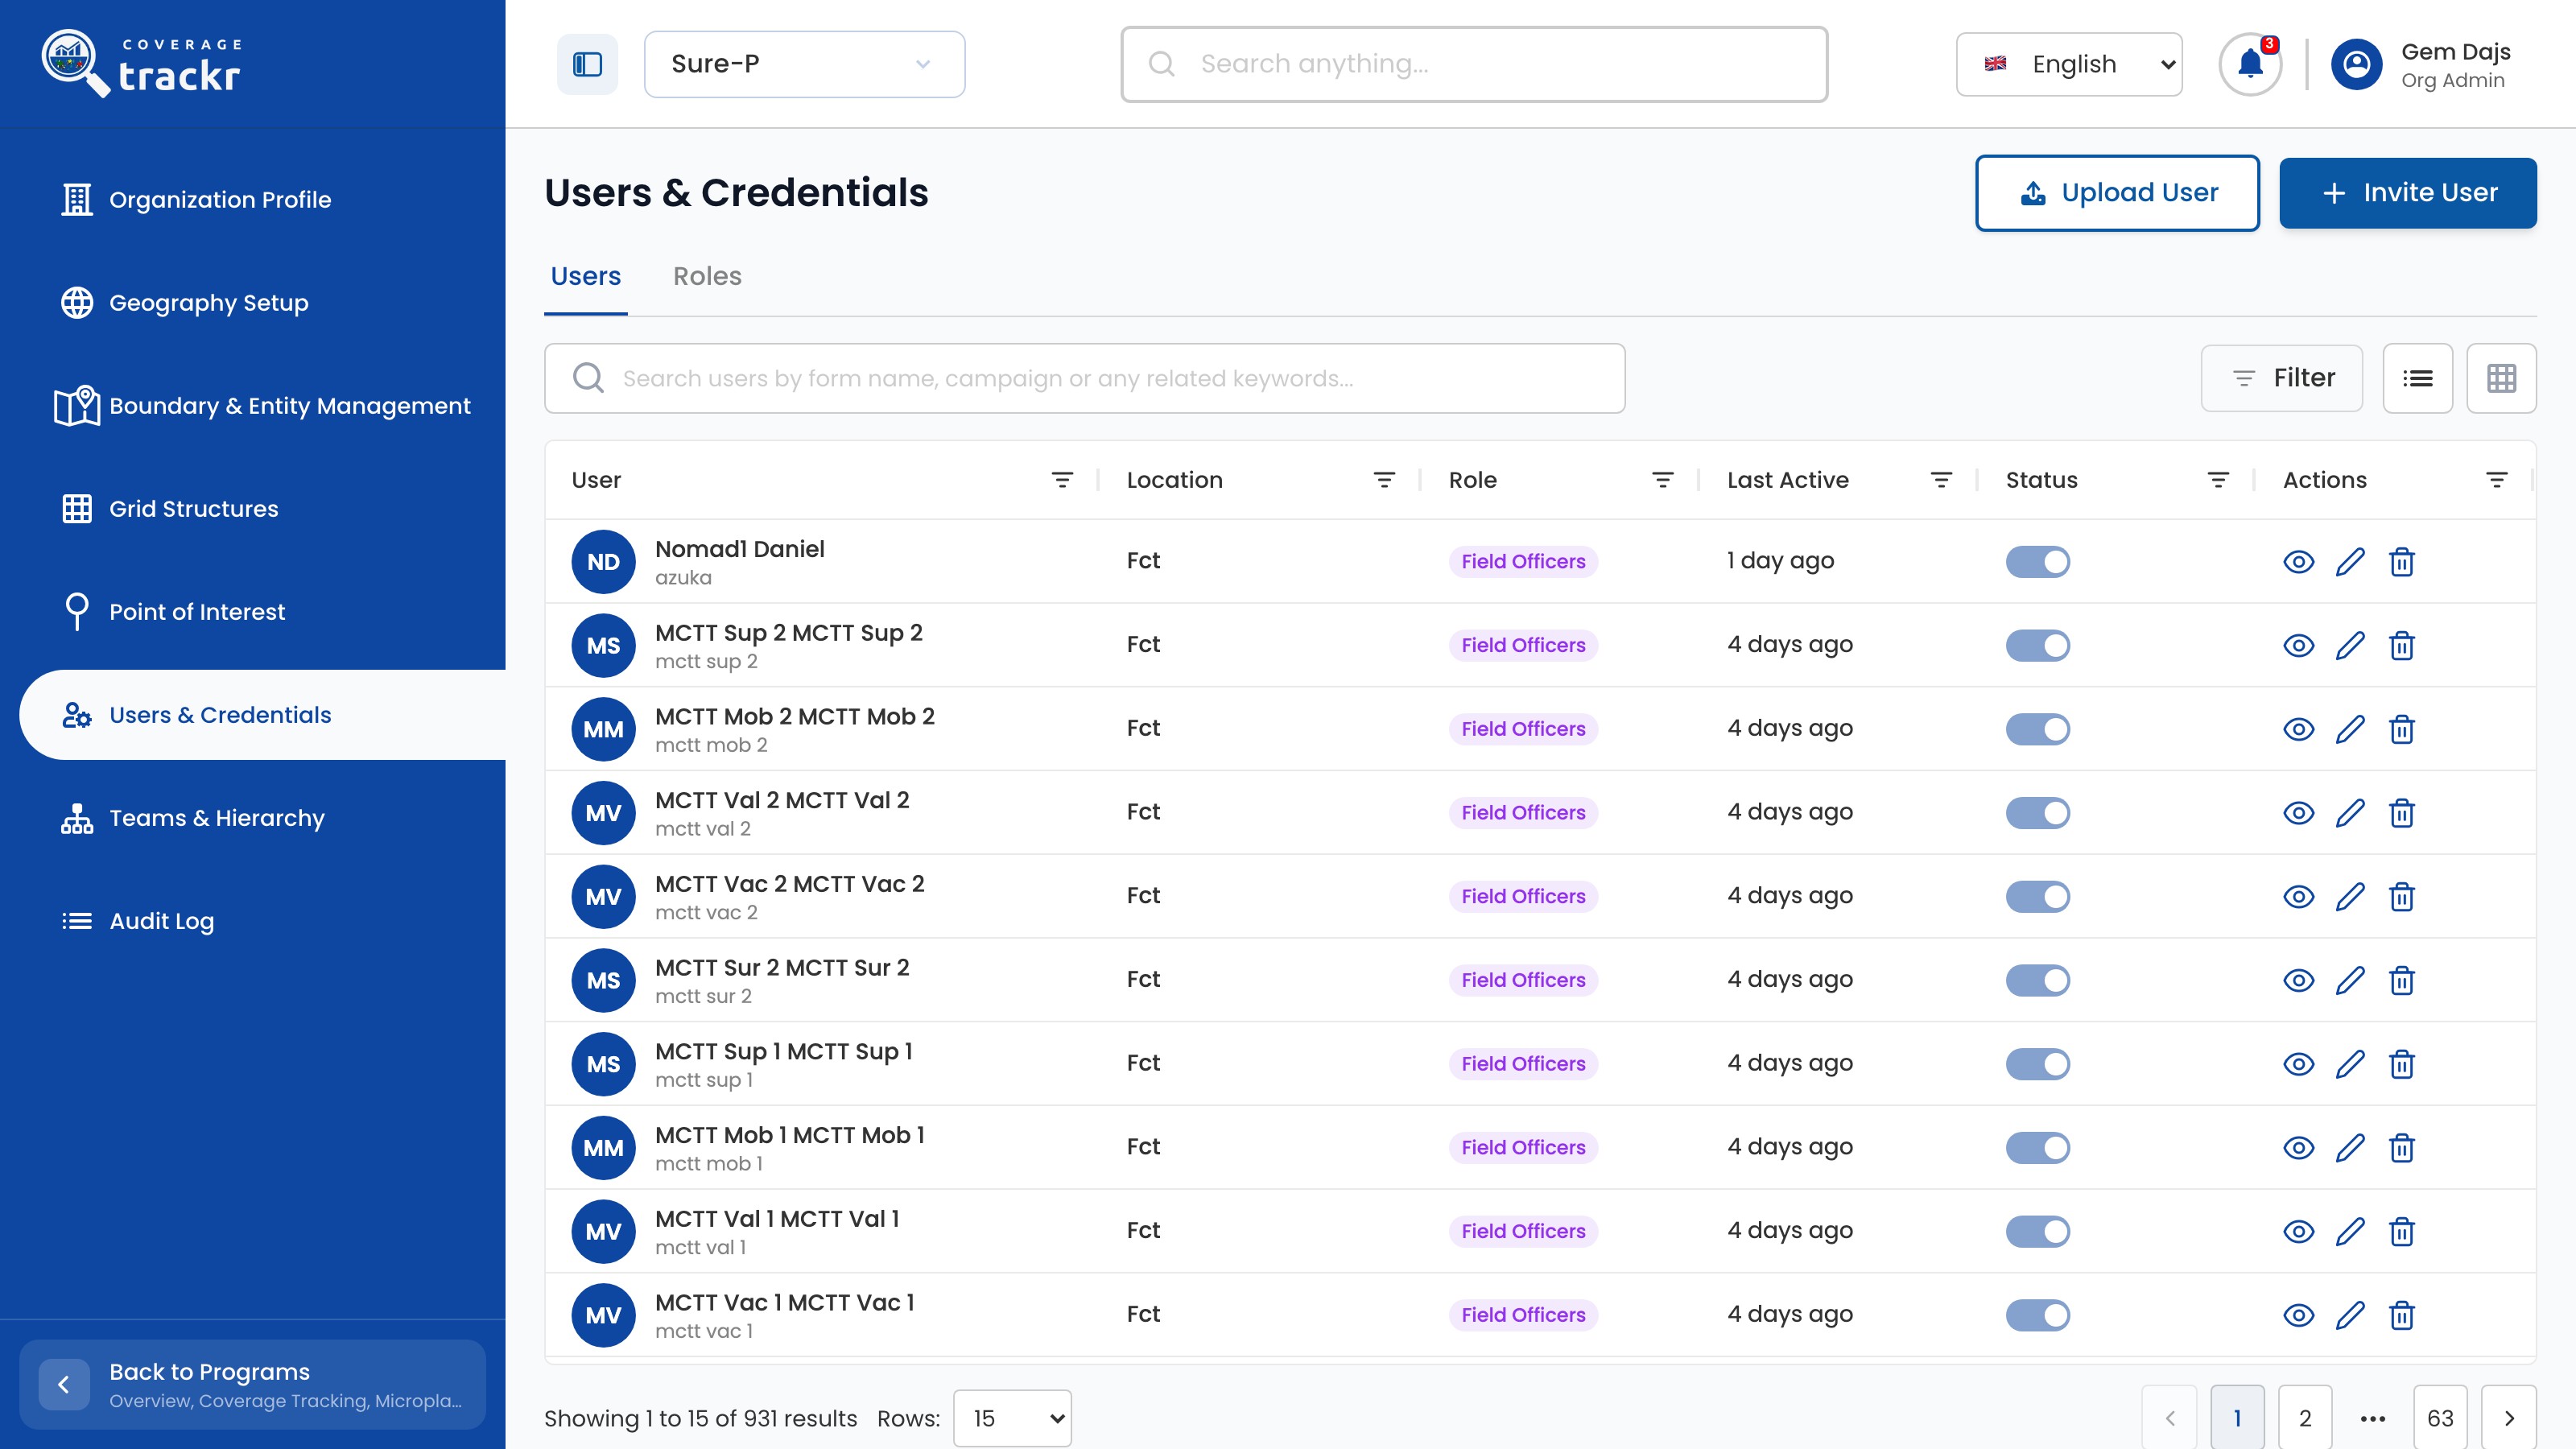
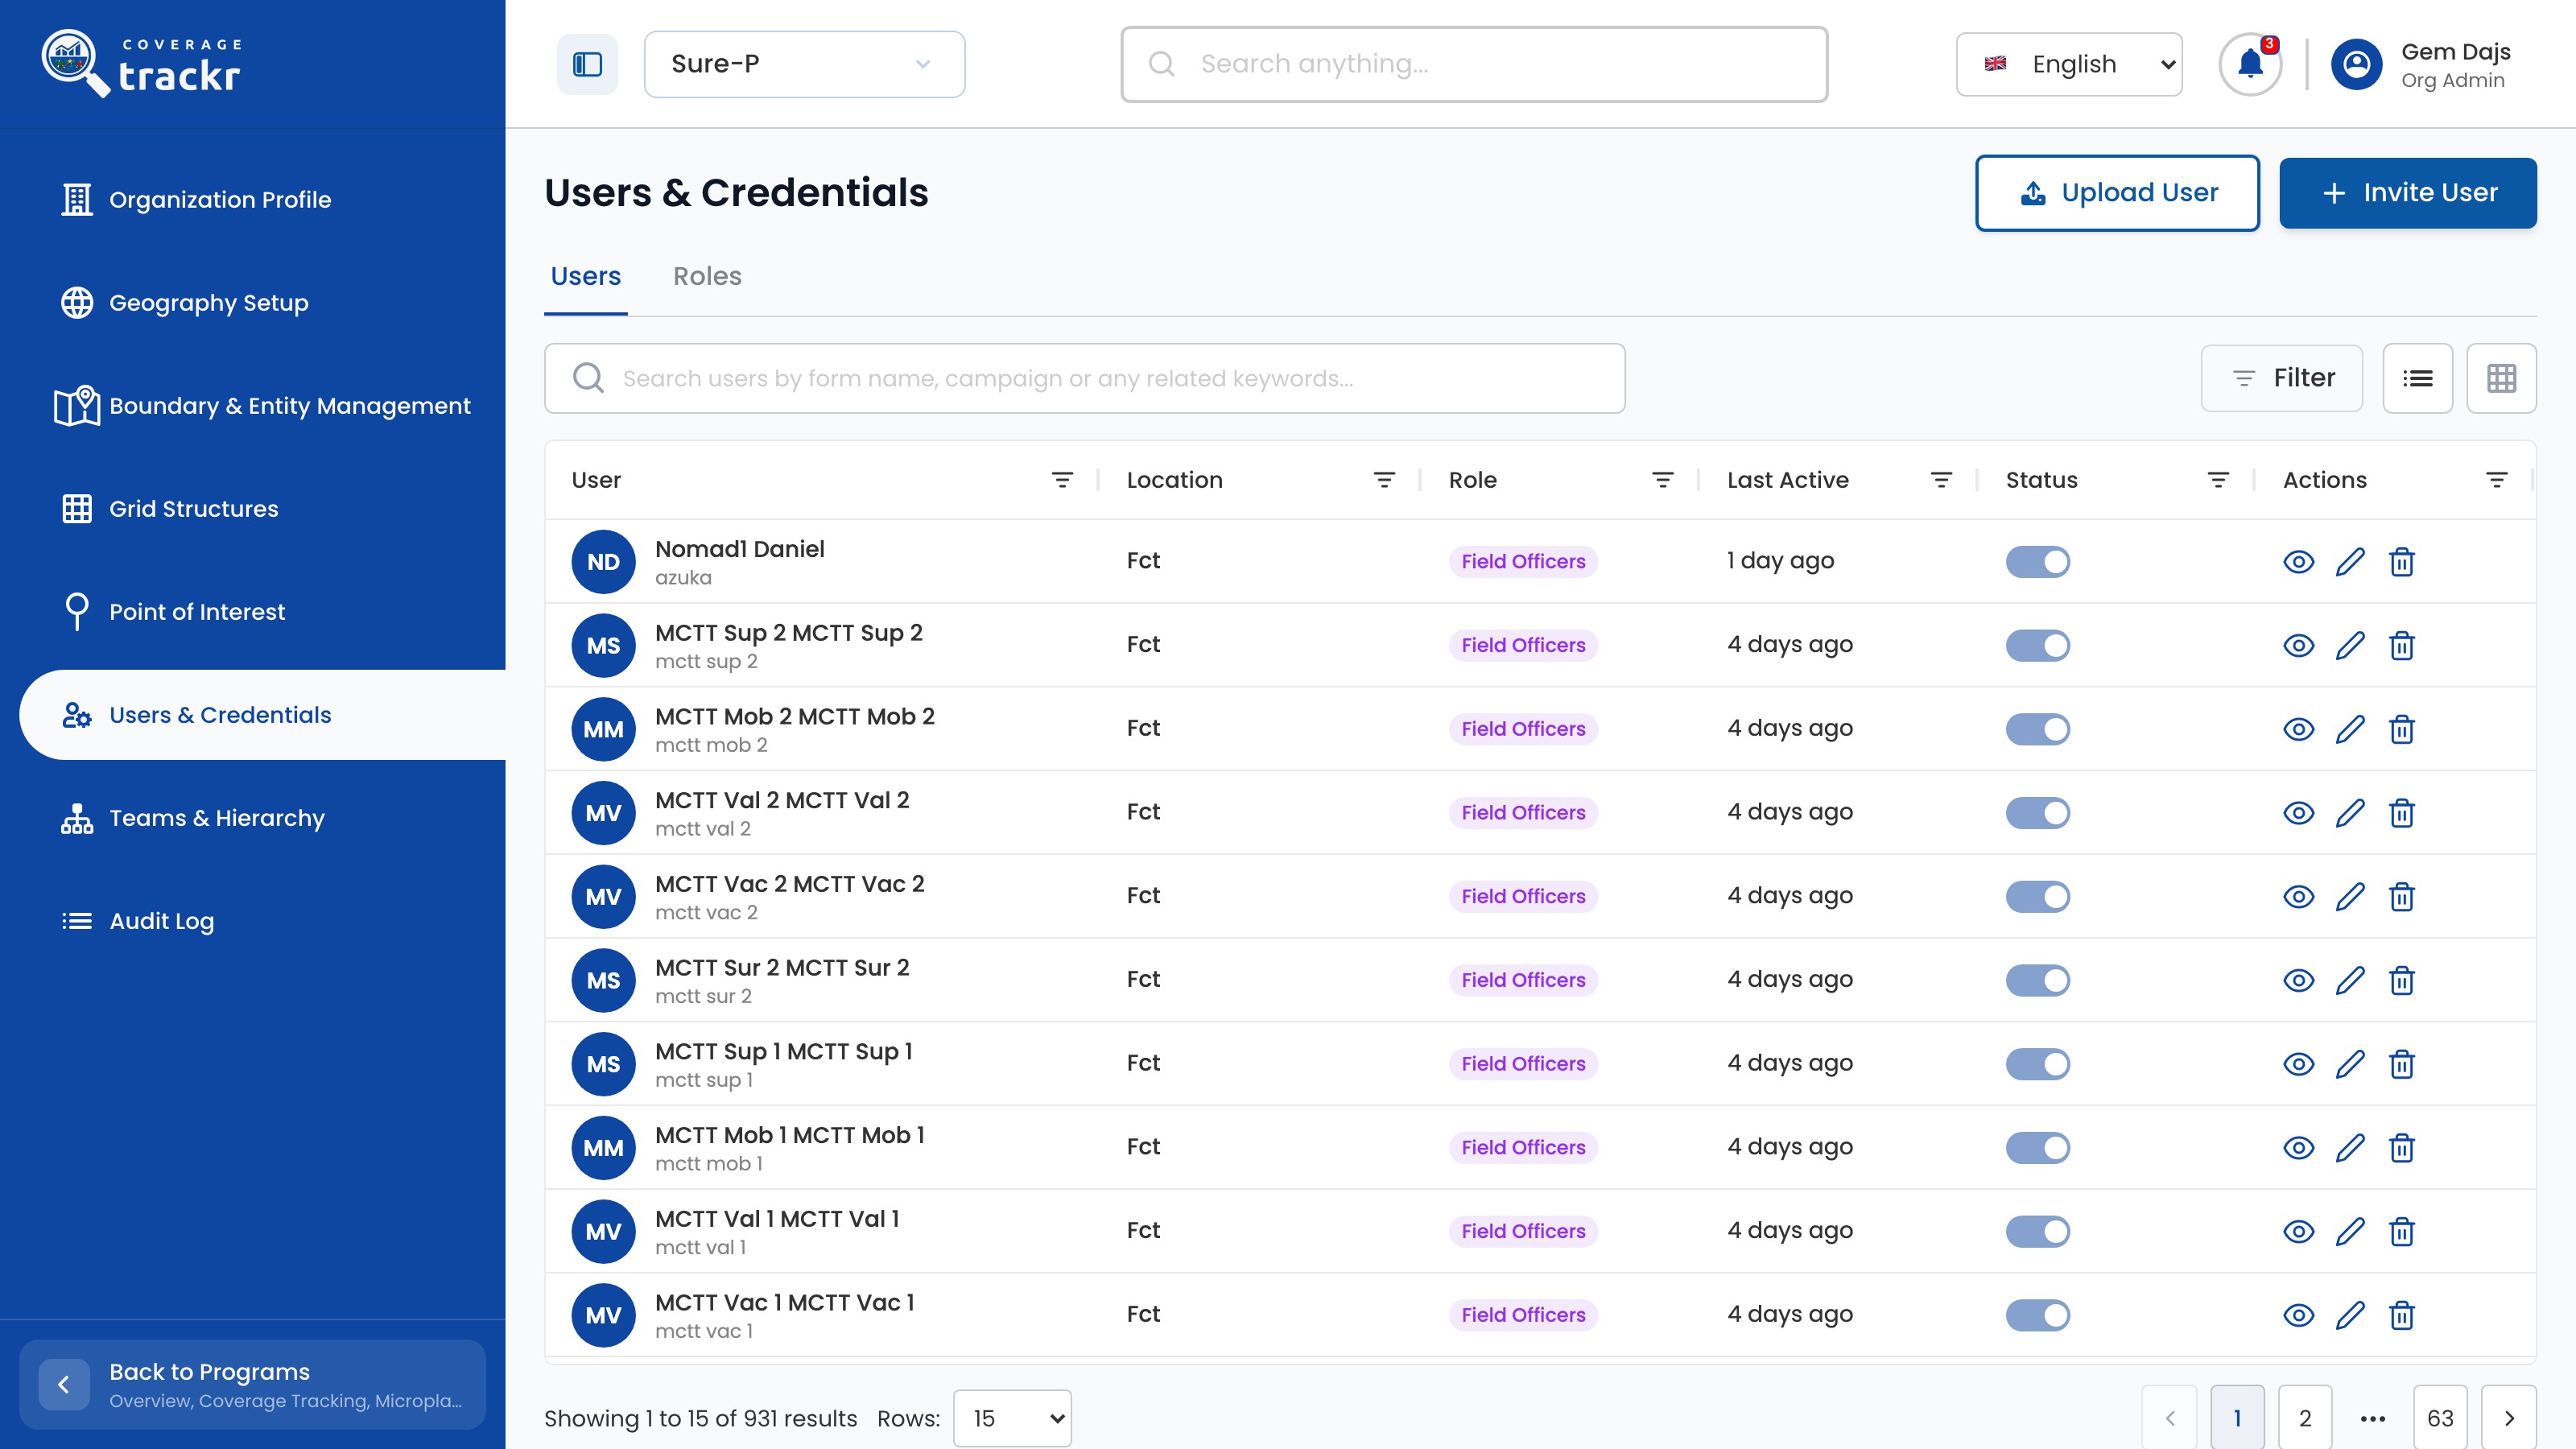
Select Users & Credentials, then select Invite User.

Users & Credentials list with the Invite User button

1 — users and credentials · 2 — invite user button.

Users & Credentials list with the Invite User button

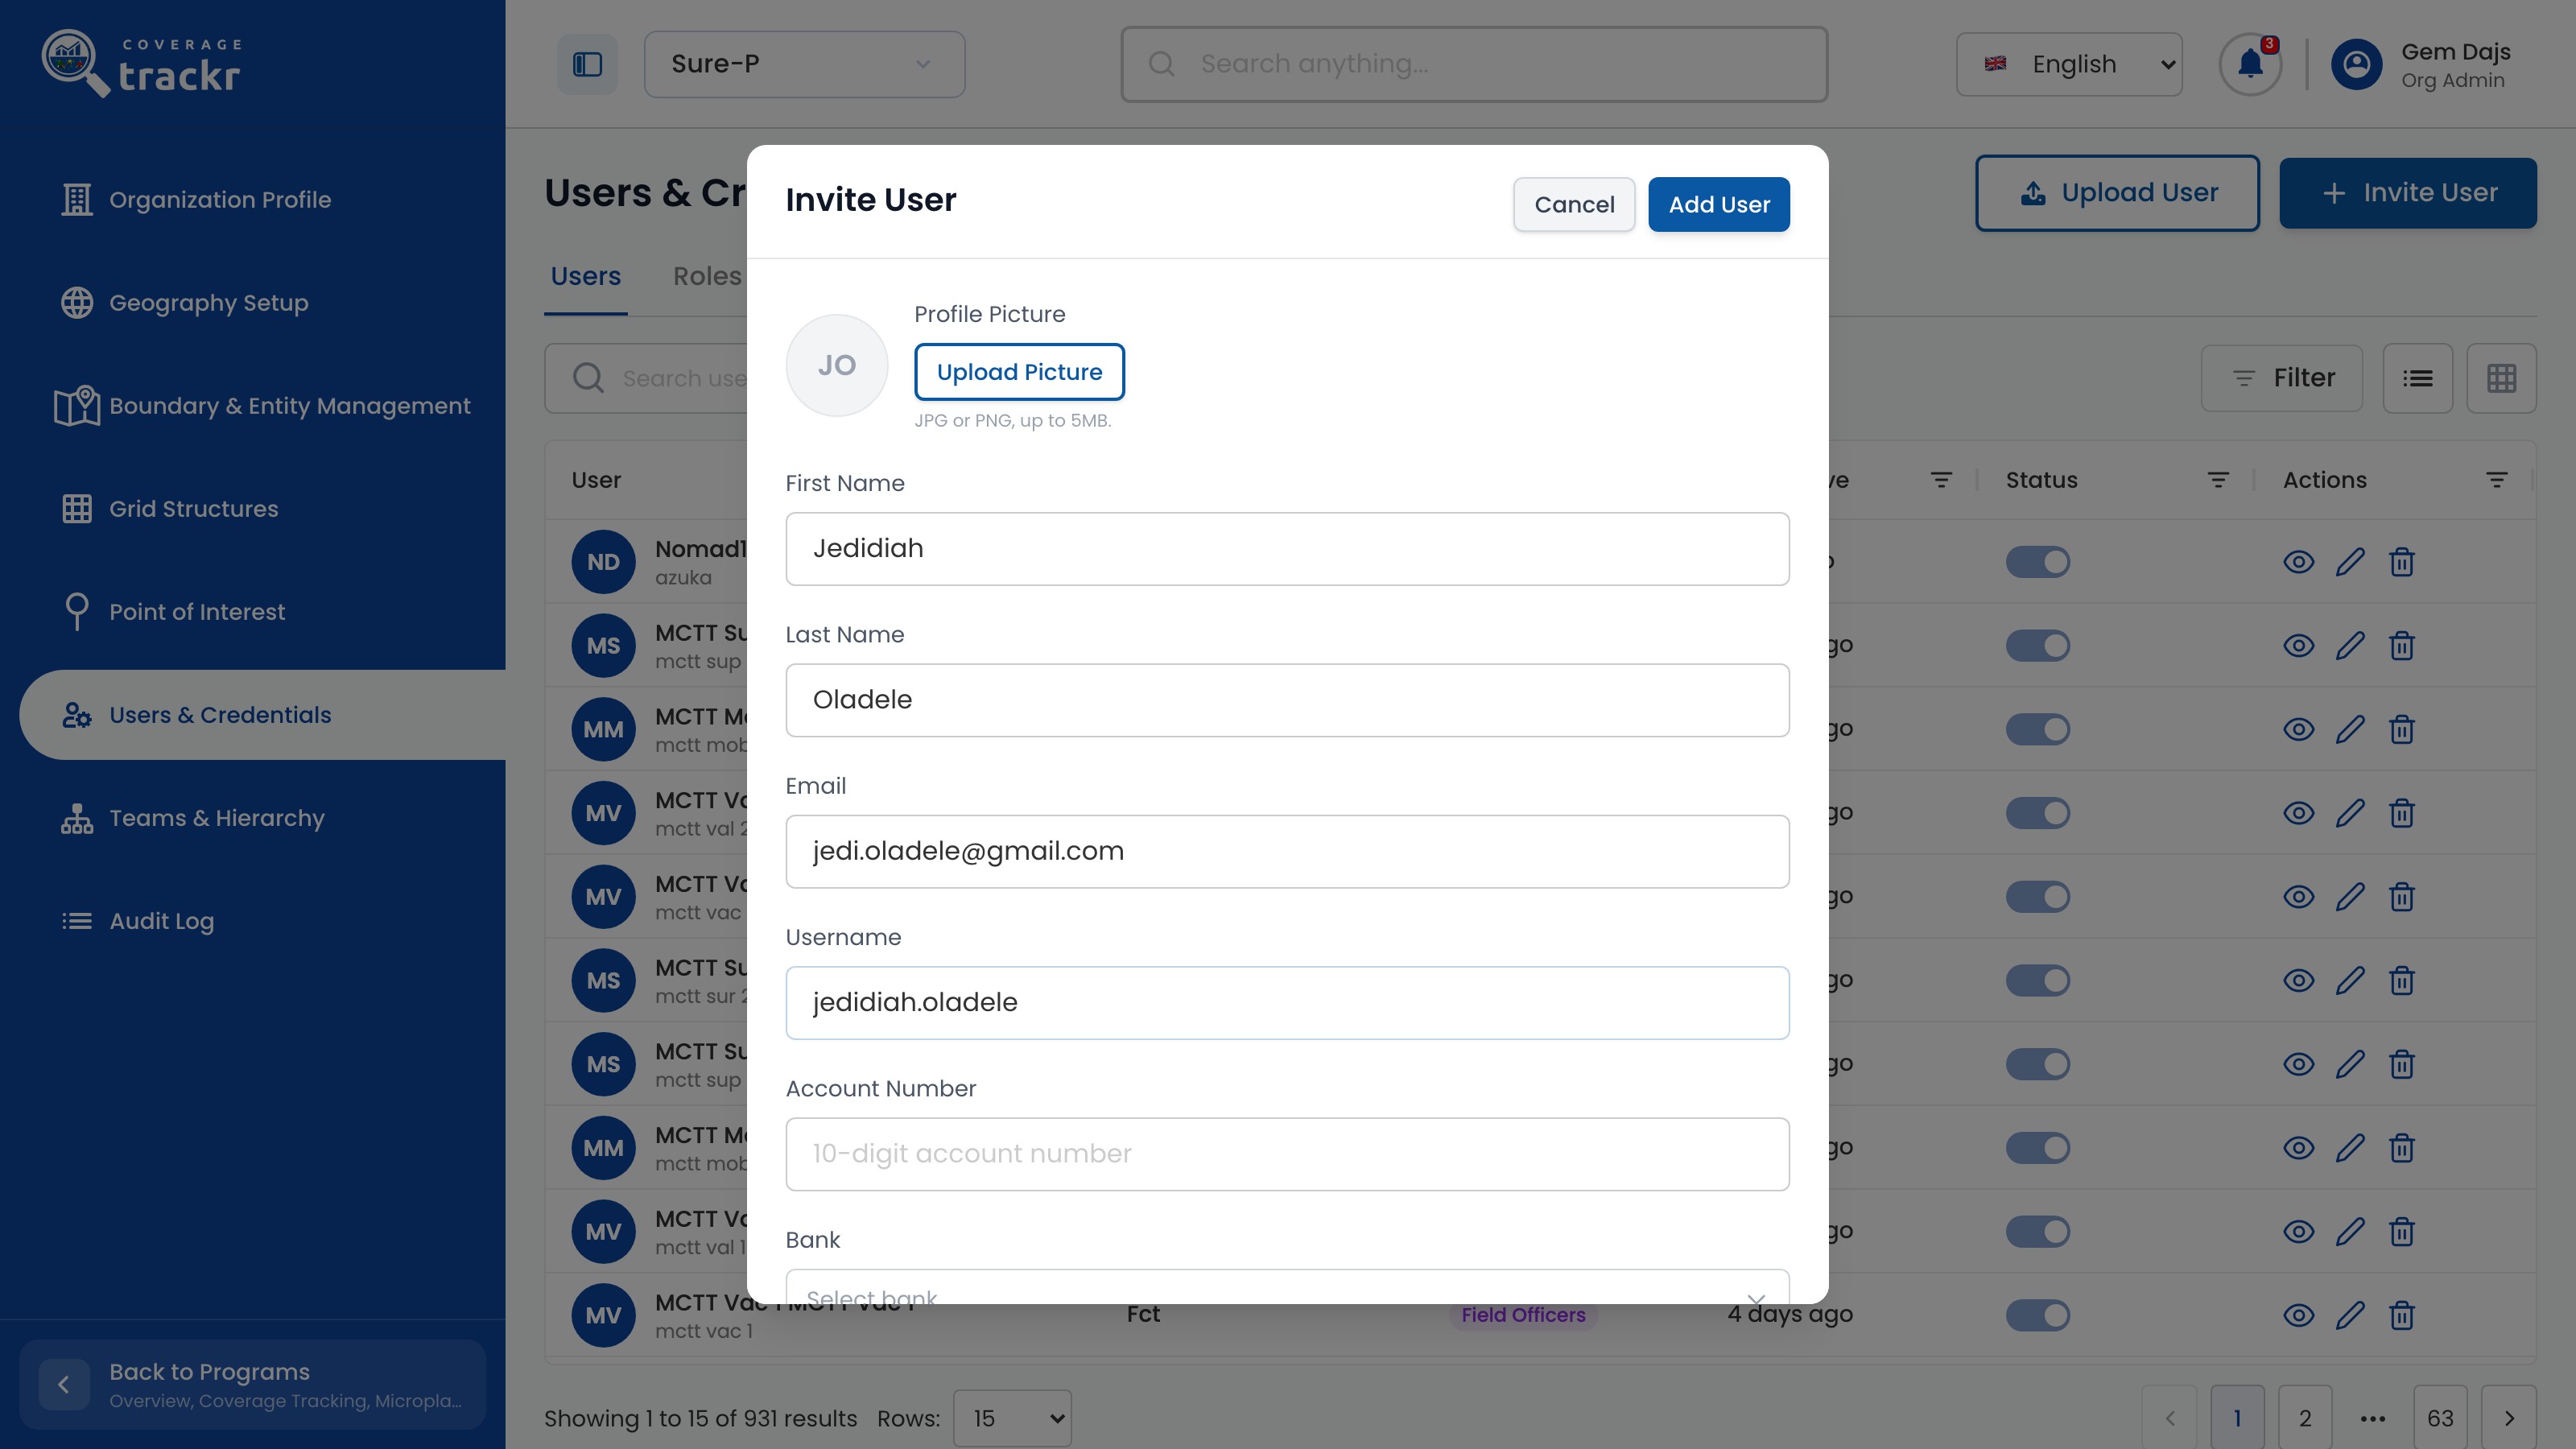
Enter the person's details

Enter the First Name, Last Name, Email and Username.

Invite User form with first name, last name, email address and username entered

1 — personal details.

Invite User form with first name, last name, email address and username entered

Set the role and location

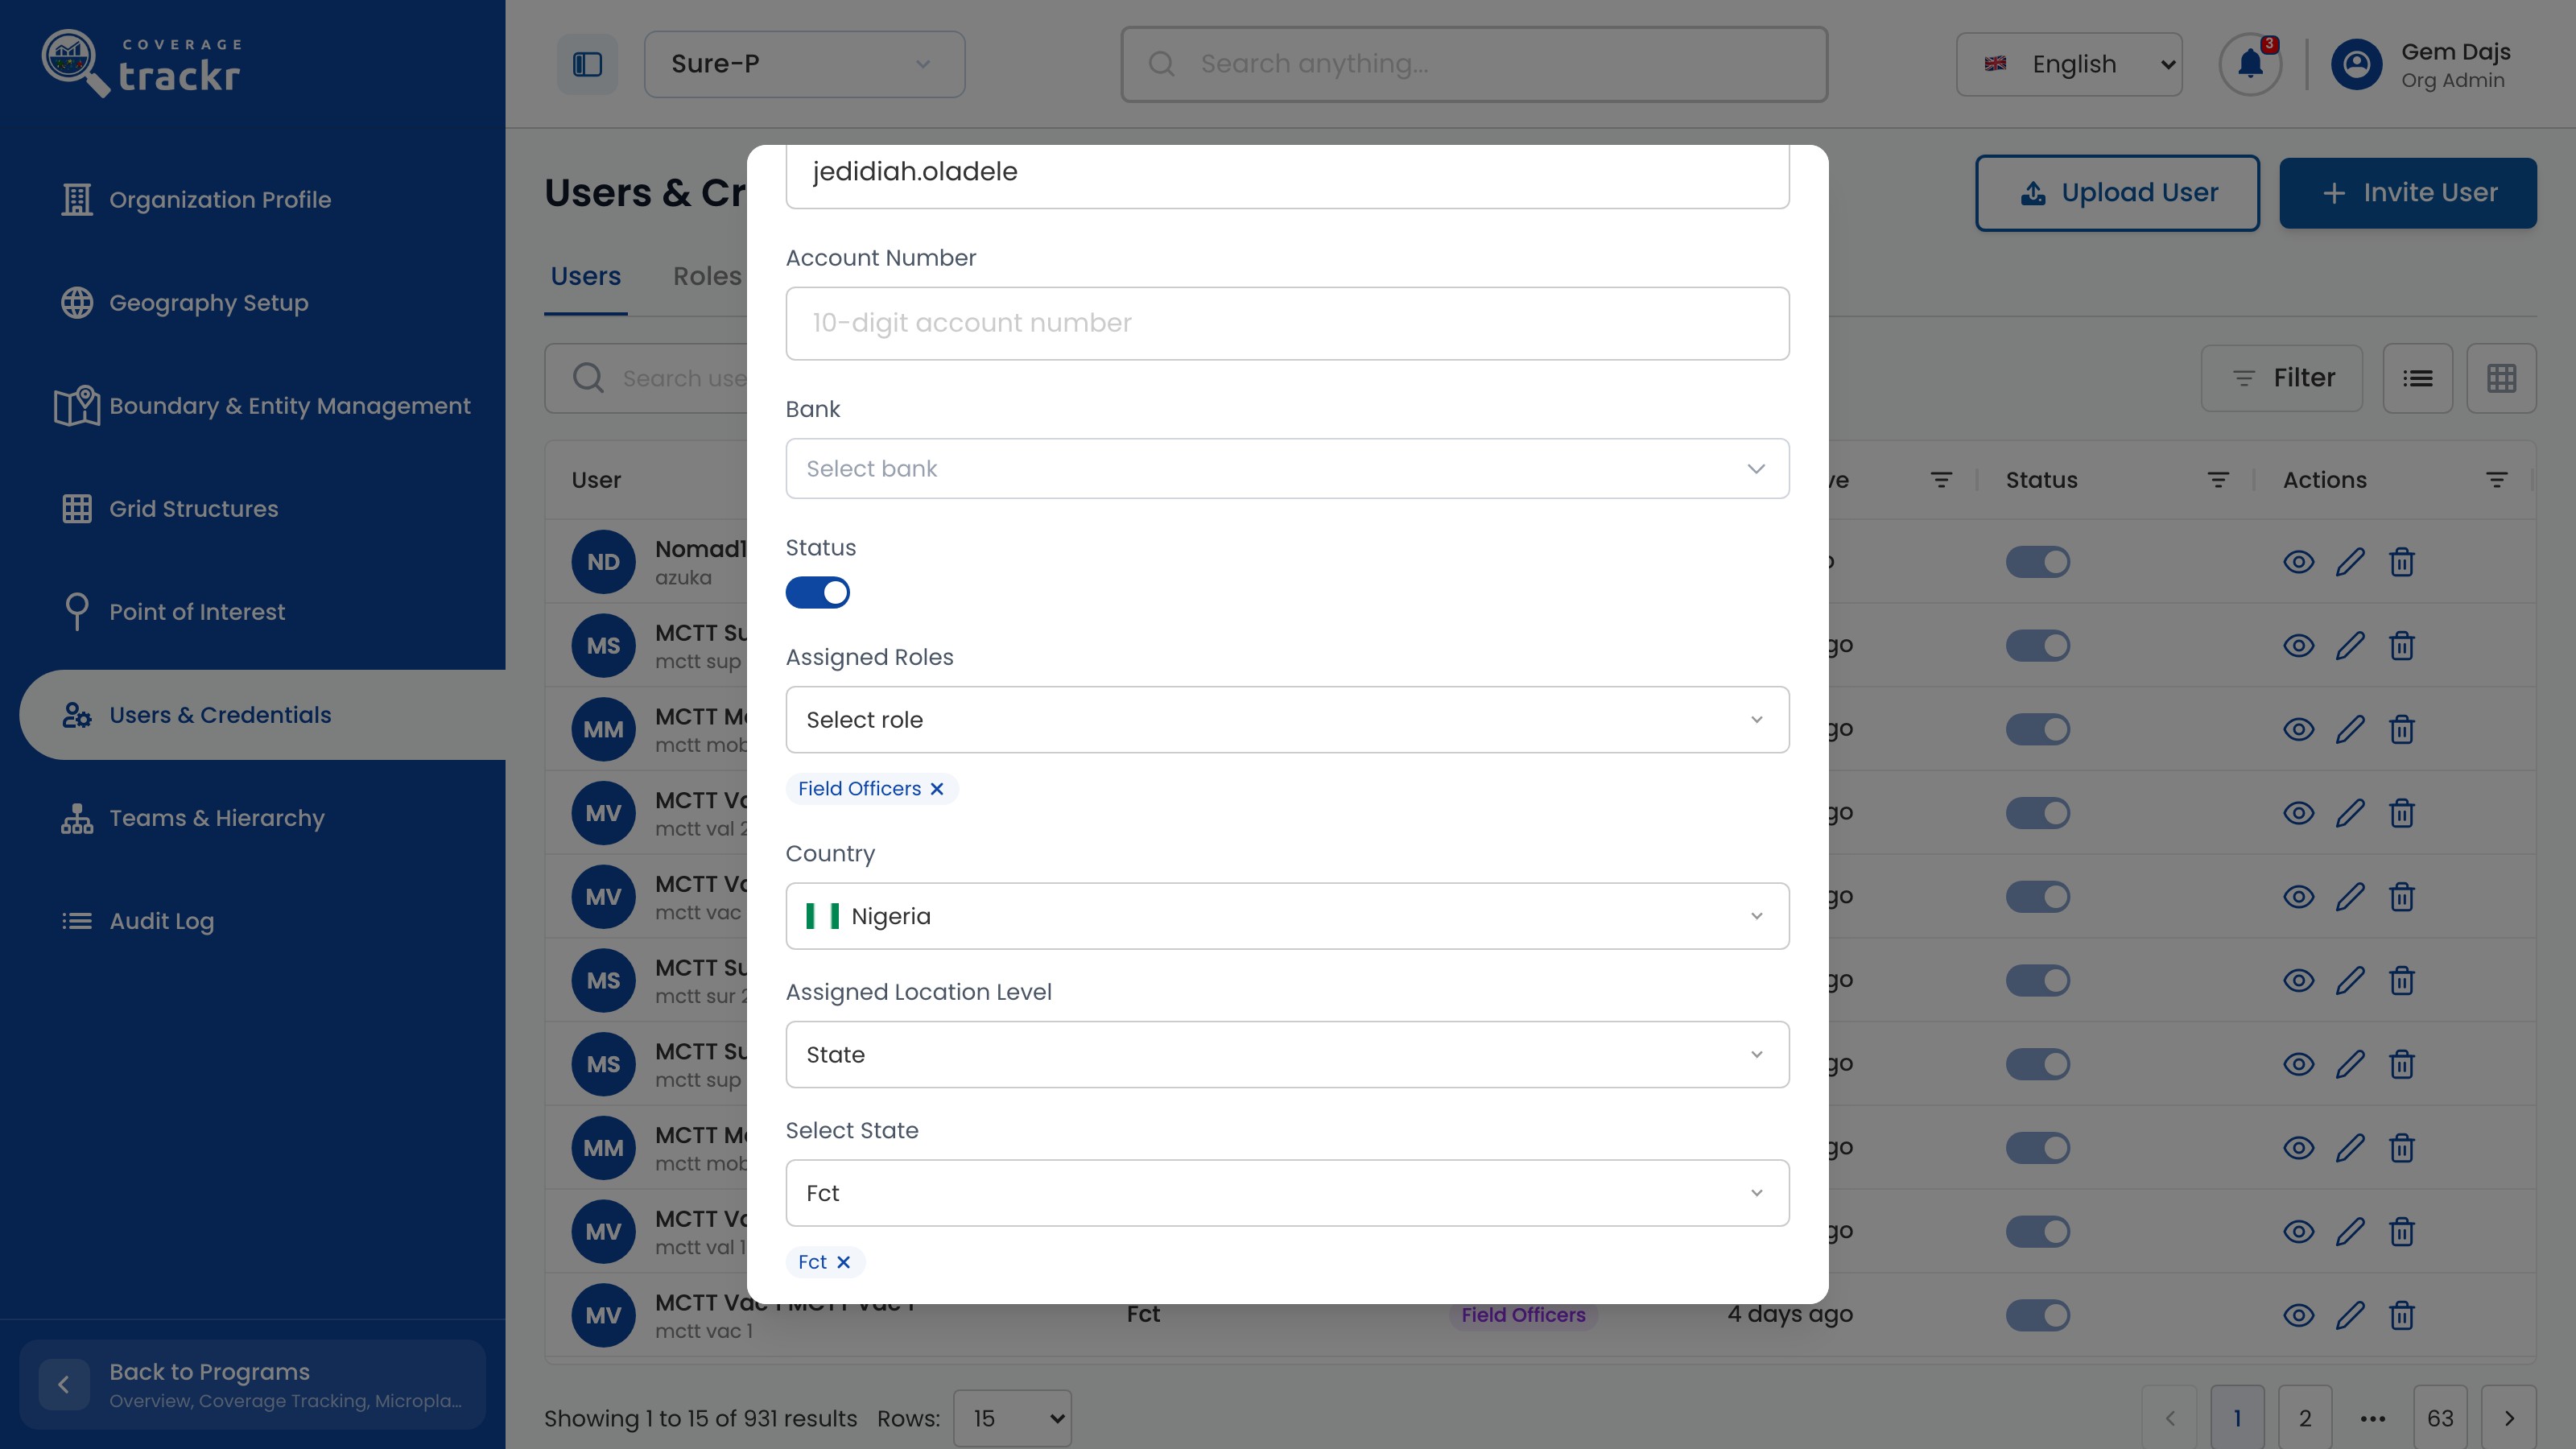
Under Assigned Roles, choose the role. Select the Country, the Assigned Location Level and the area, then select Add User.

Invite User form with Field Officers role, Nigeria, State level and Fct selected

1 — assigned role · 2 — location assignment.

Invite User form with Field Officers role, Nigeria, State level and Fct selected

Share the sign-in details

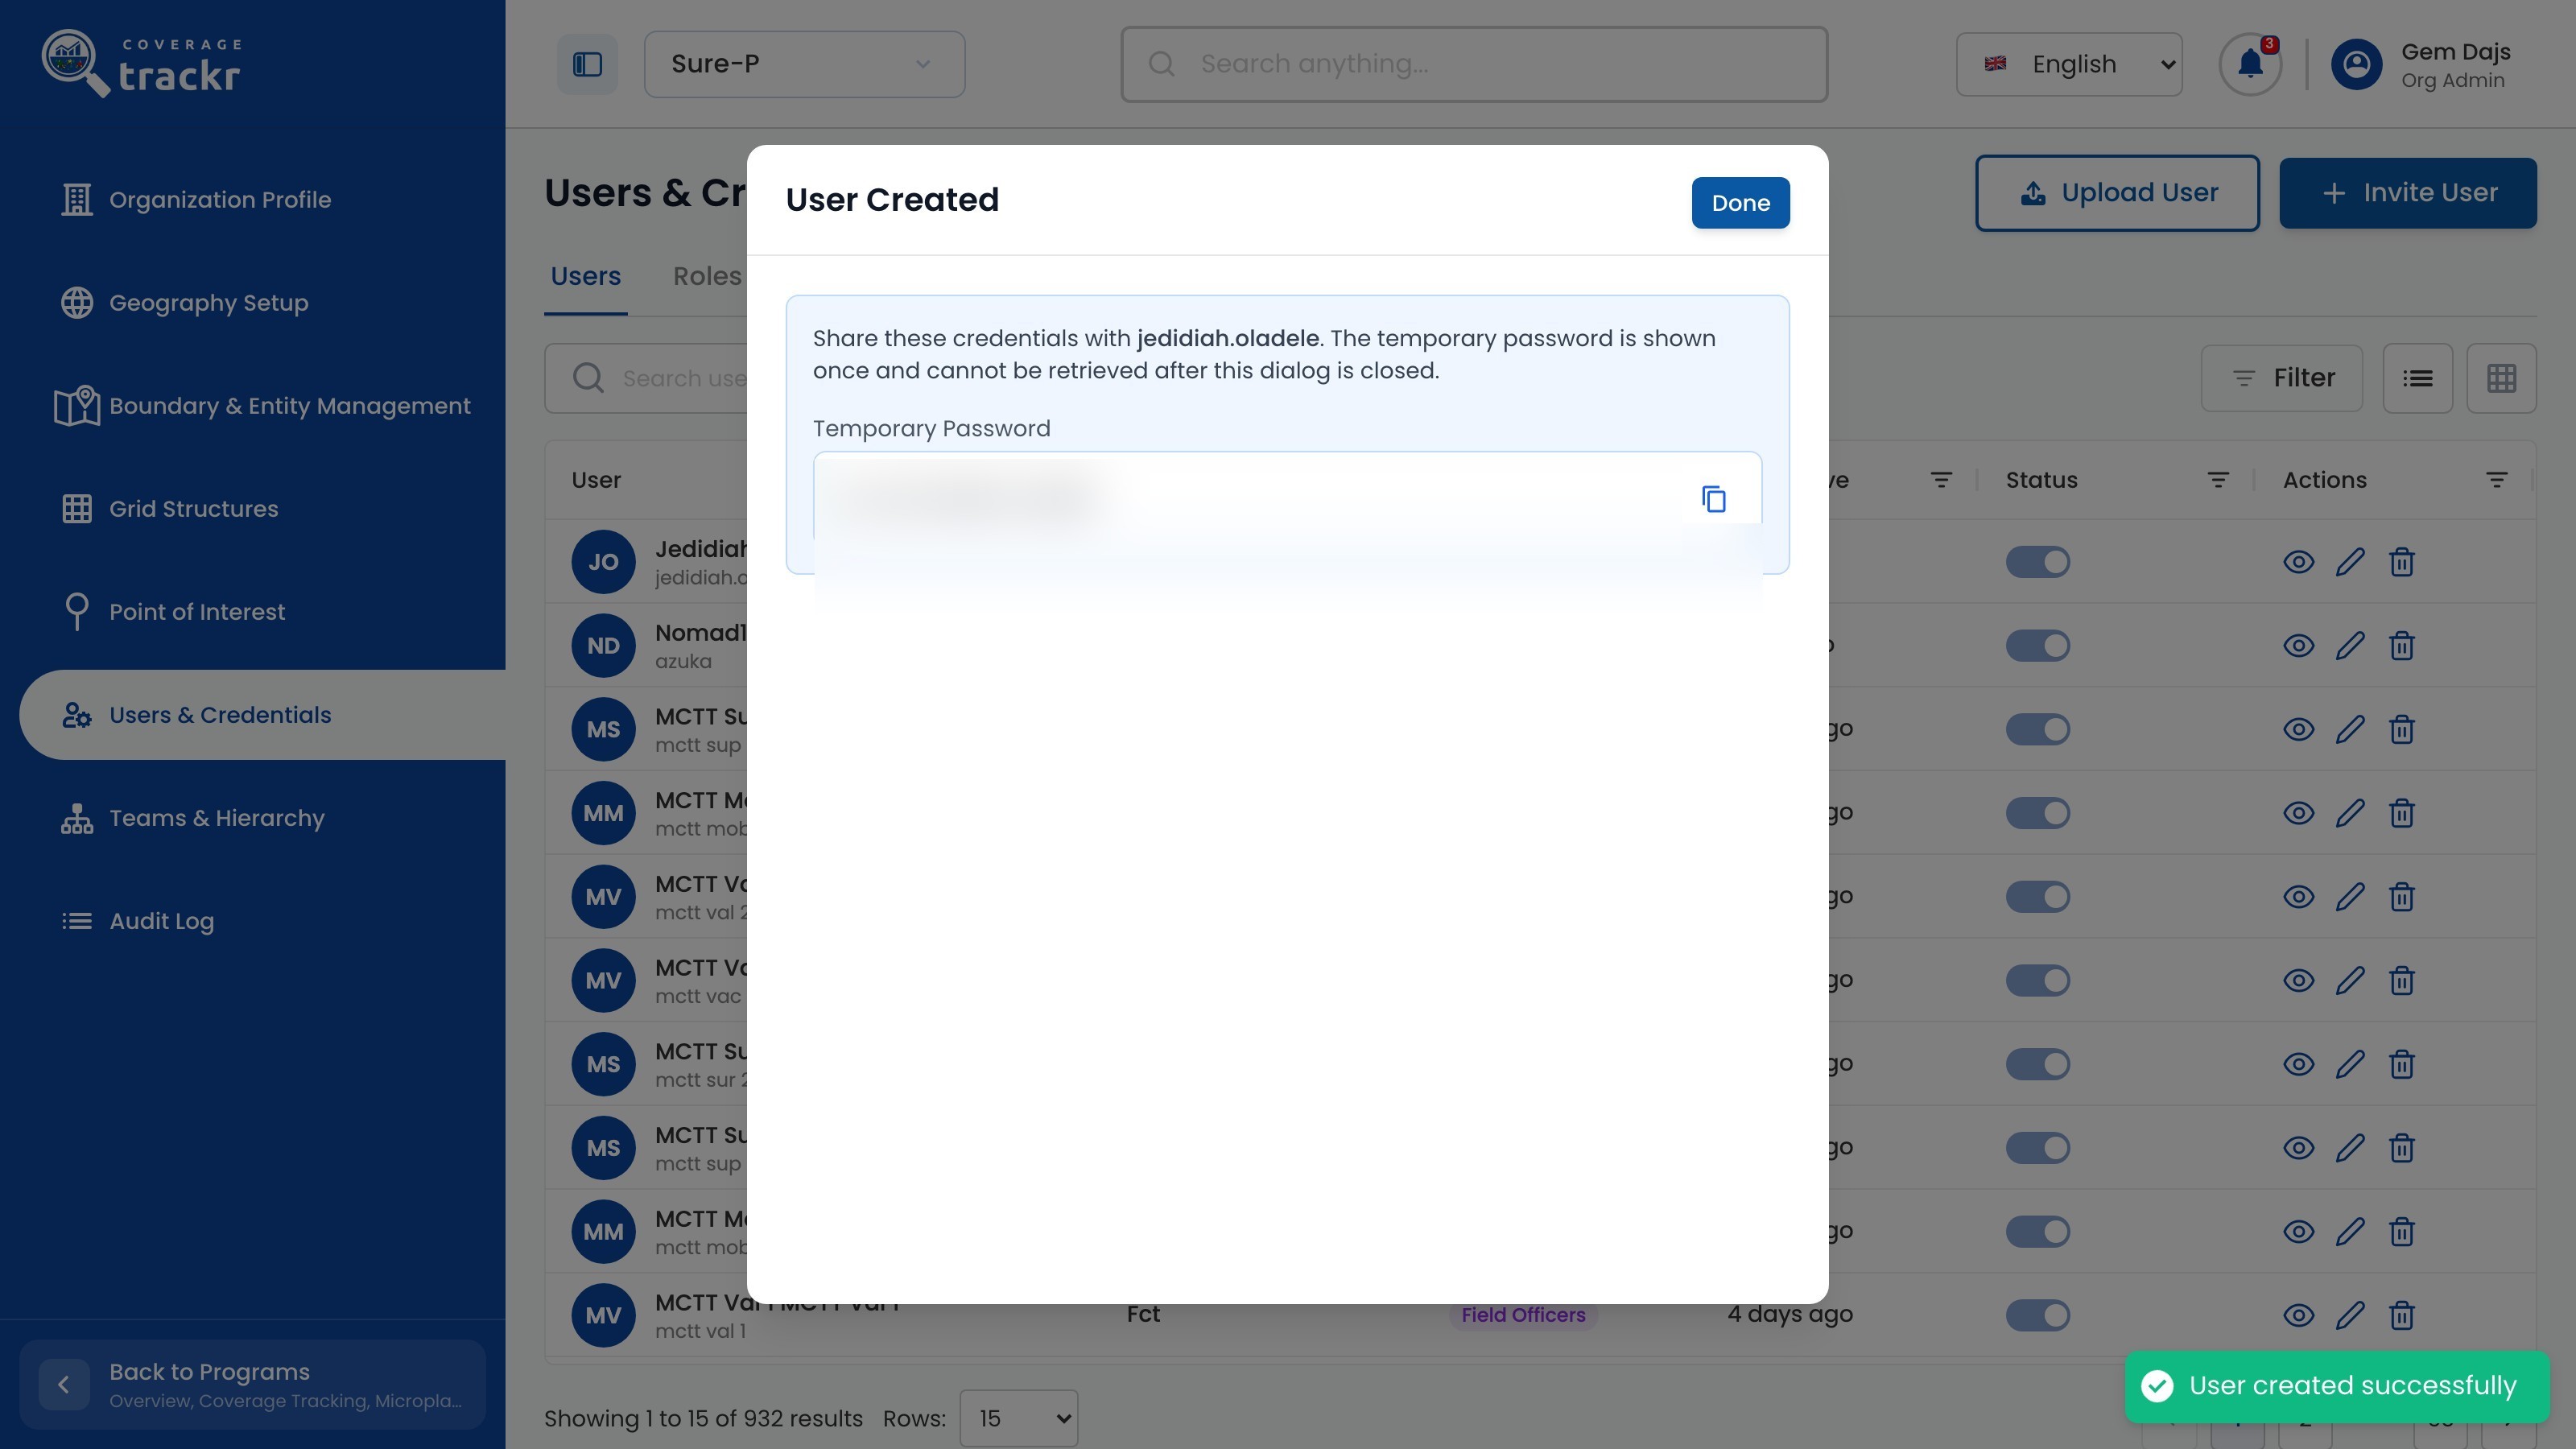
User Created shows the Temporary Password once. Copy it, share it with the person with their username, then select Done.

User Created dialog with the temporary password hidden

1 — temporary password · 2 — done button.

User Created dialog with the temporary password hidden

Check the new user

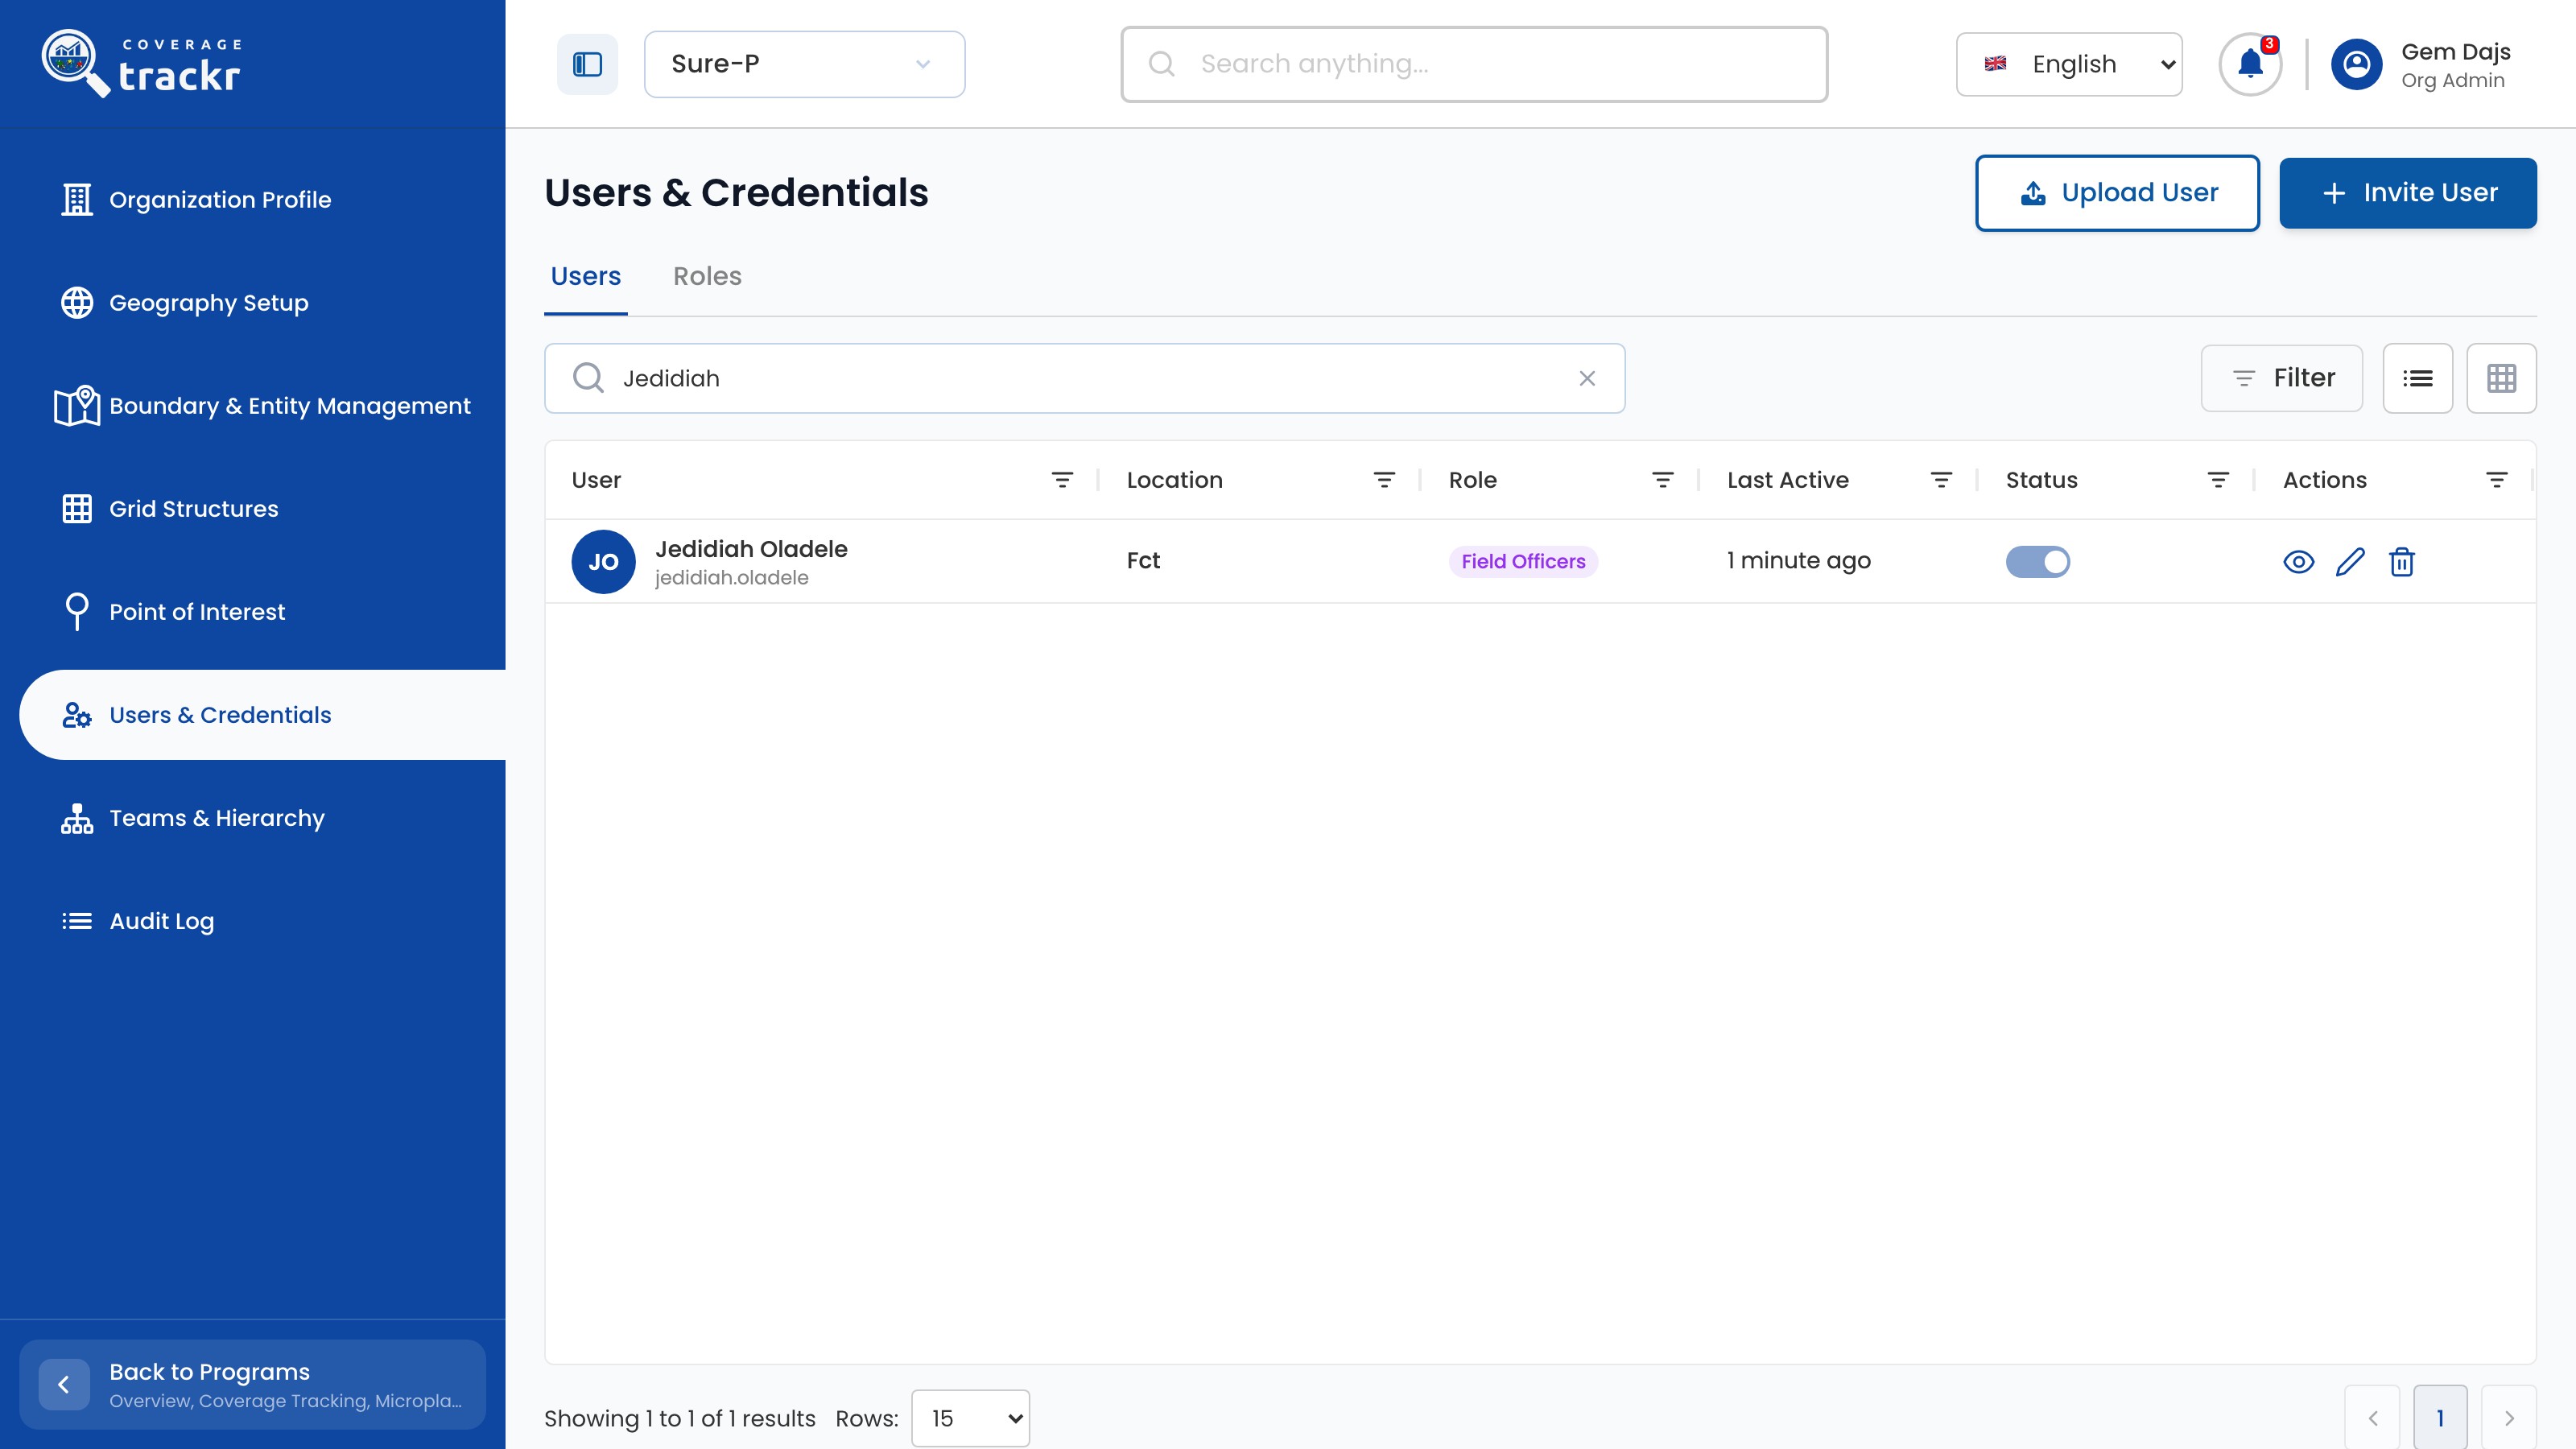
Search for the person to confirm their Role, Location and Status.

User list showing Jedidiah Oladele with the Field Officers role in Fct

1 — user search · 2 — user assignment.

User list showing Jedidiah Oladele with the Field Officers role in Fct

Done. The person appears in the user list with their role and location, and you have shared their username and temporary password with them.

If something goes wrong

Do I need the account number and bank?

Only when the person will receive payments through CoverageTrackr.

How should I share the temporary password?

Use the copy button in User Created and send it privately to the person, together with their username.

Organization administration

Review users and roles

Find a user, review the user's assignment, and inspect the roles available in the organization.

Organization Administrator 3 min read Web

Before you start

  • You are signed in with organization administration access.

Find the user

Open Organization, select Users & Credentials, and use search or Filter to find the account.

CoverageTrackr Users tab with search, filters and user records

1 — user search and filter.

CoverageTrackr Users tab with search, filters and user records

Review the account assignment

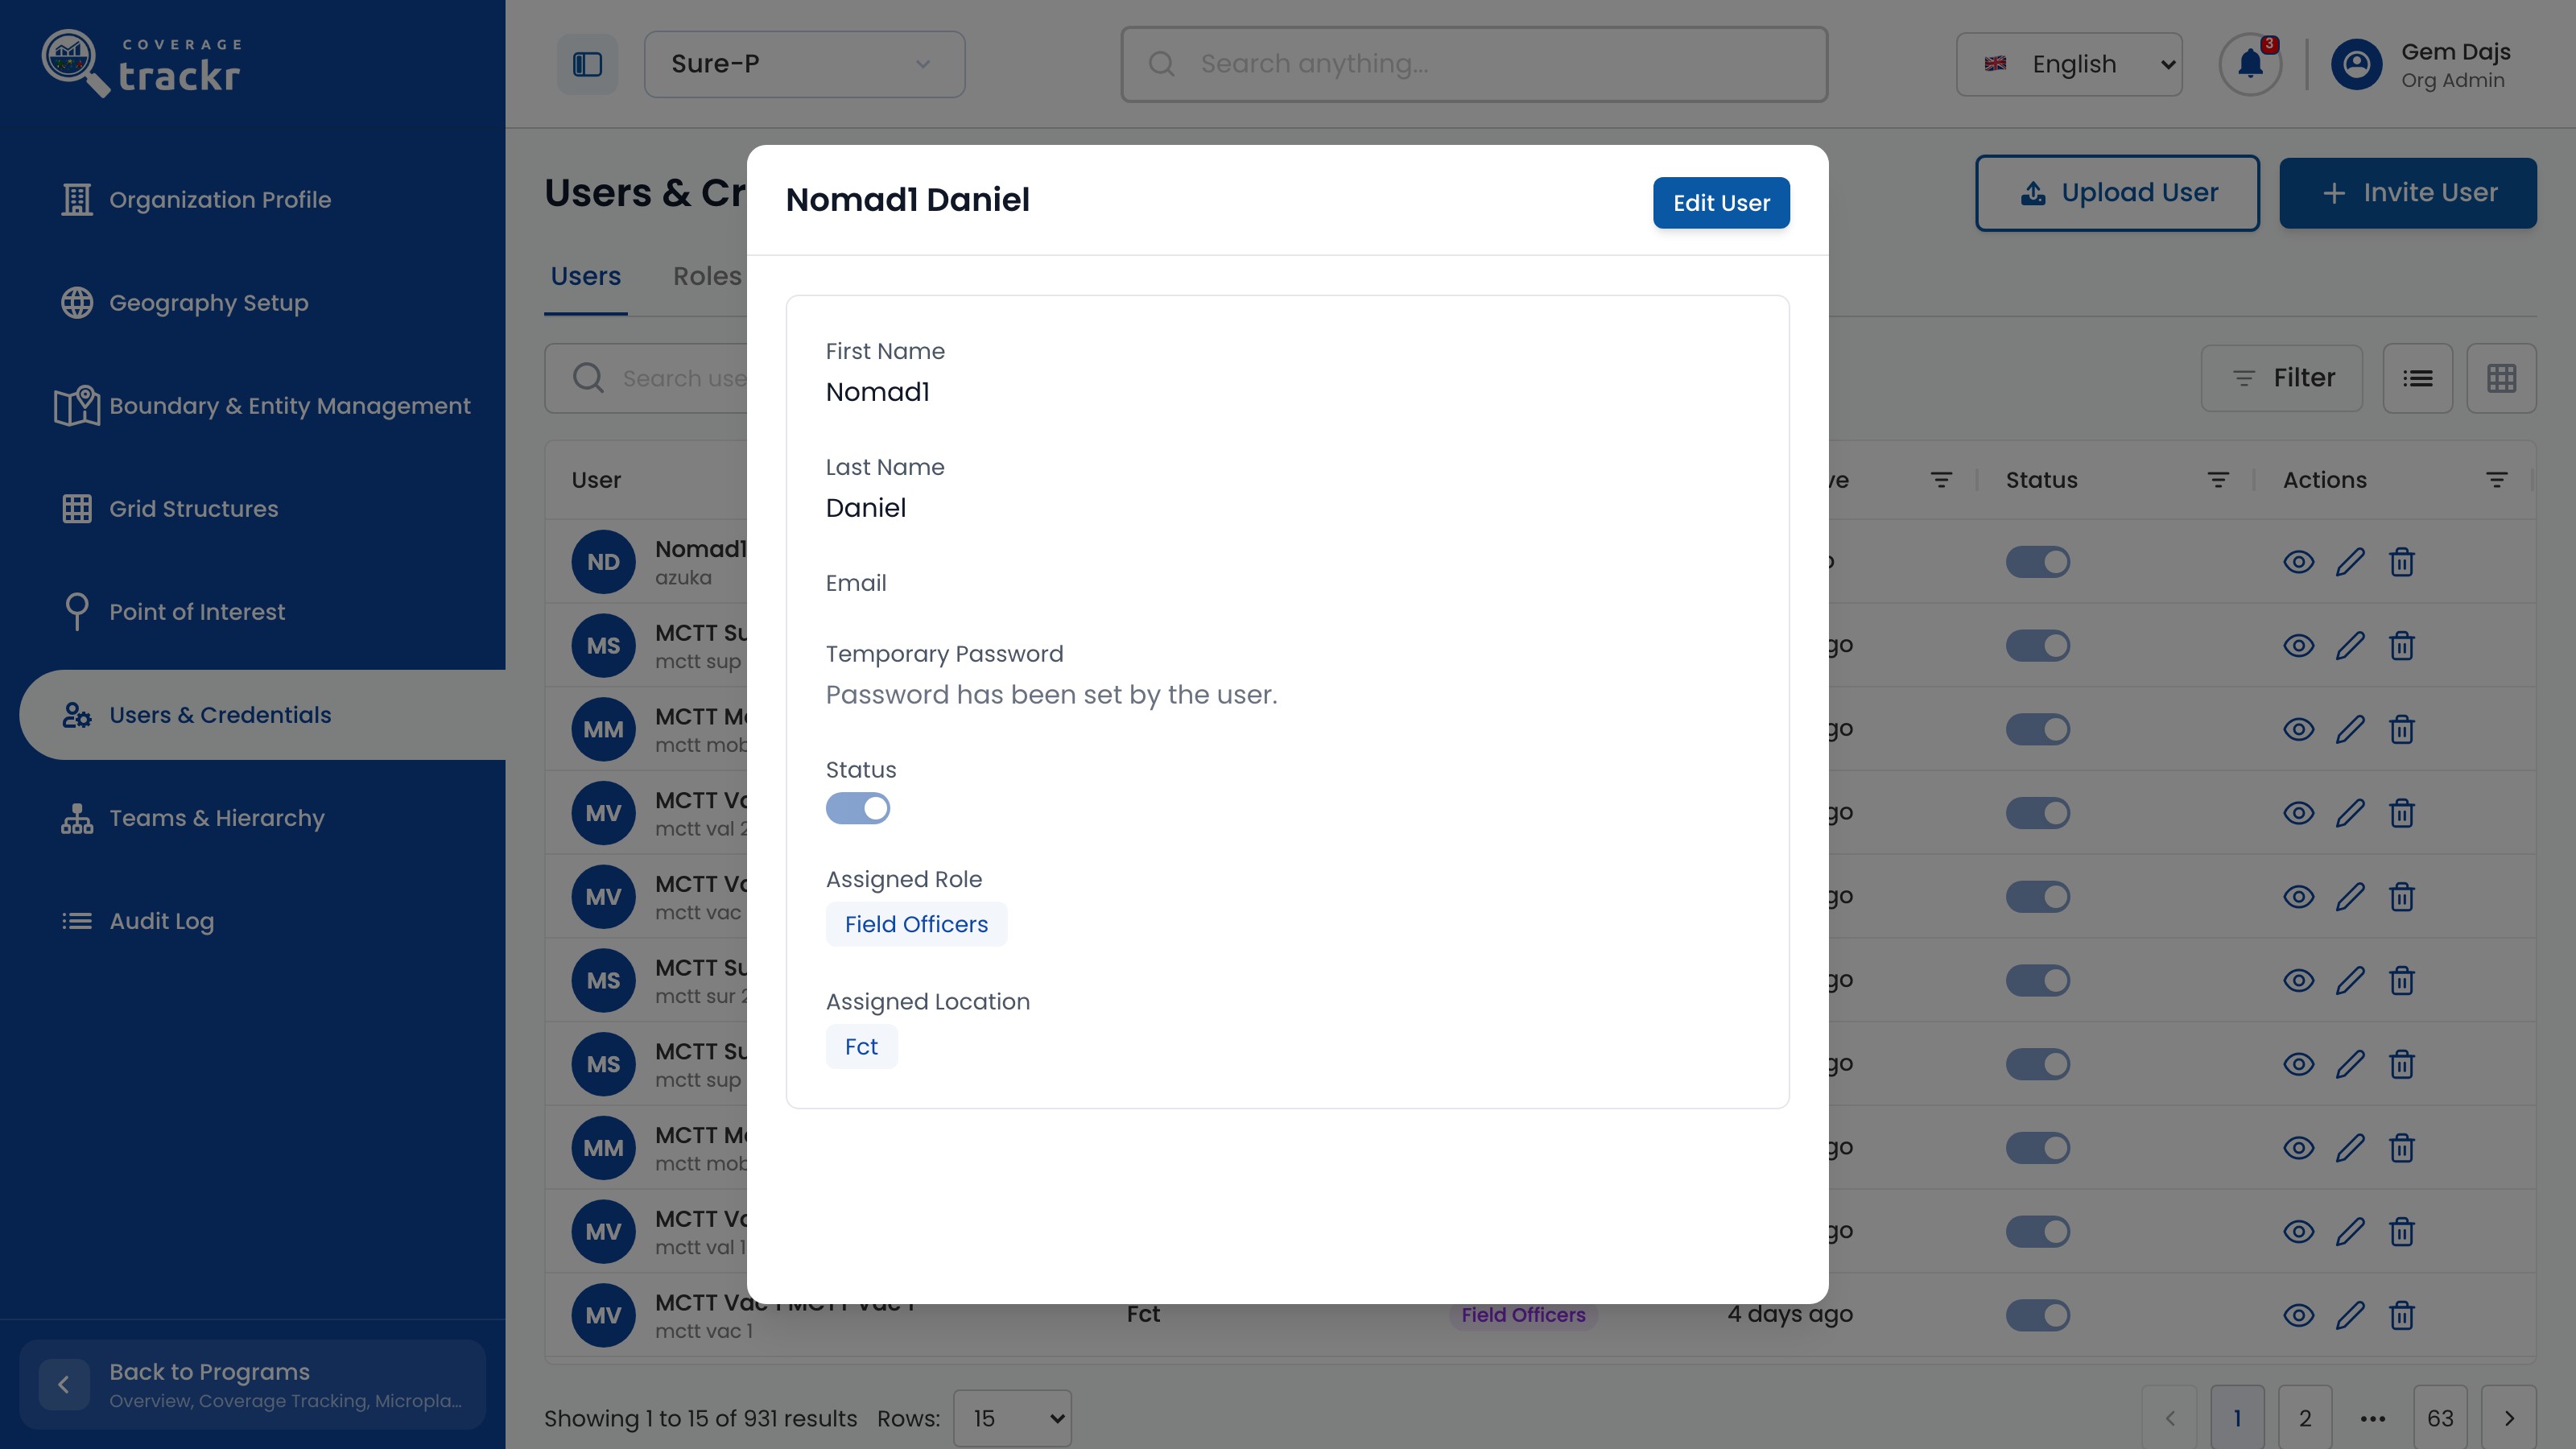
Select the View User eye icon for the account and confirm its Status, Assigned Role and Assigned Location.

CoverageTrackr user detail showing status, role and location

1 — account assignment.

CoverageTrackr user detail showing status, role and location

Review the available roles

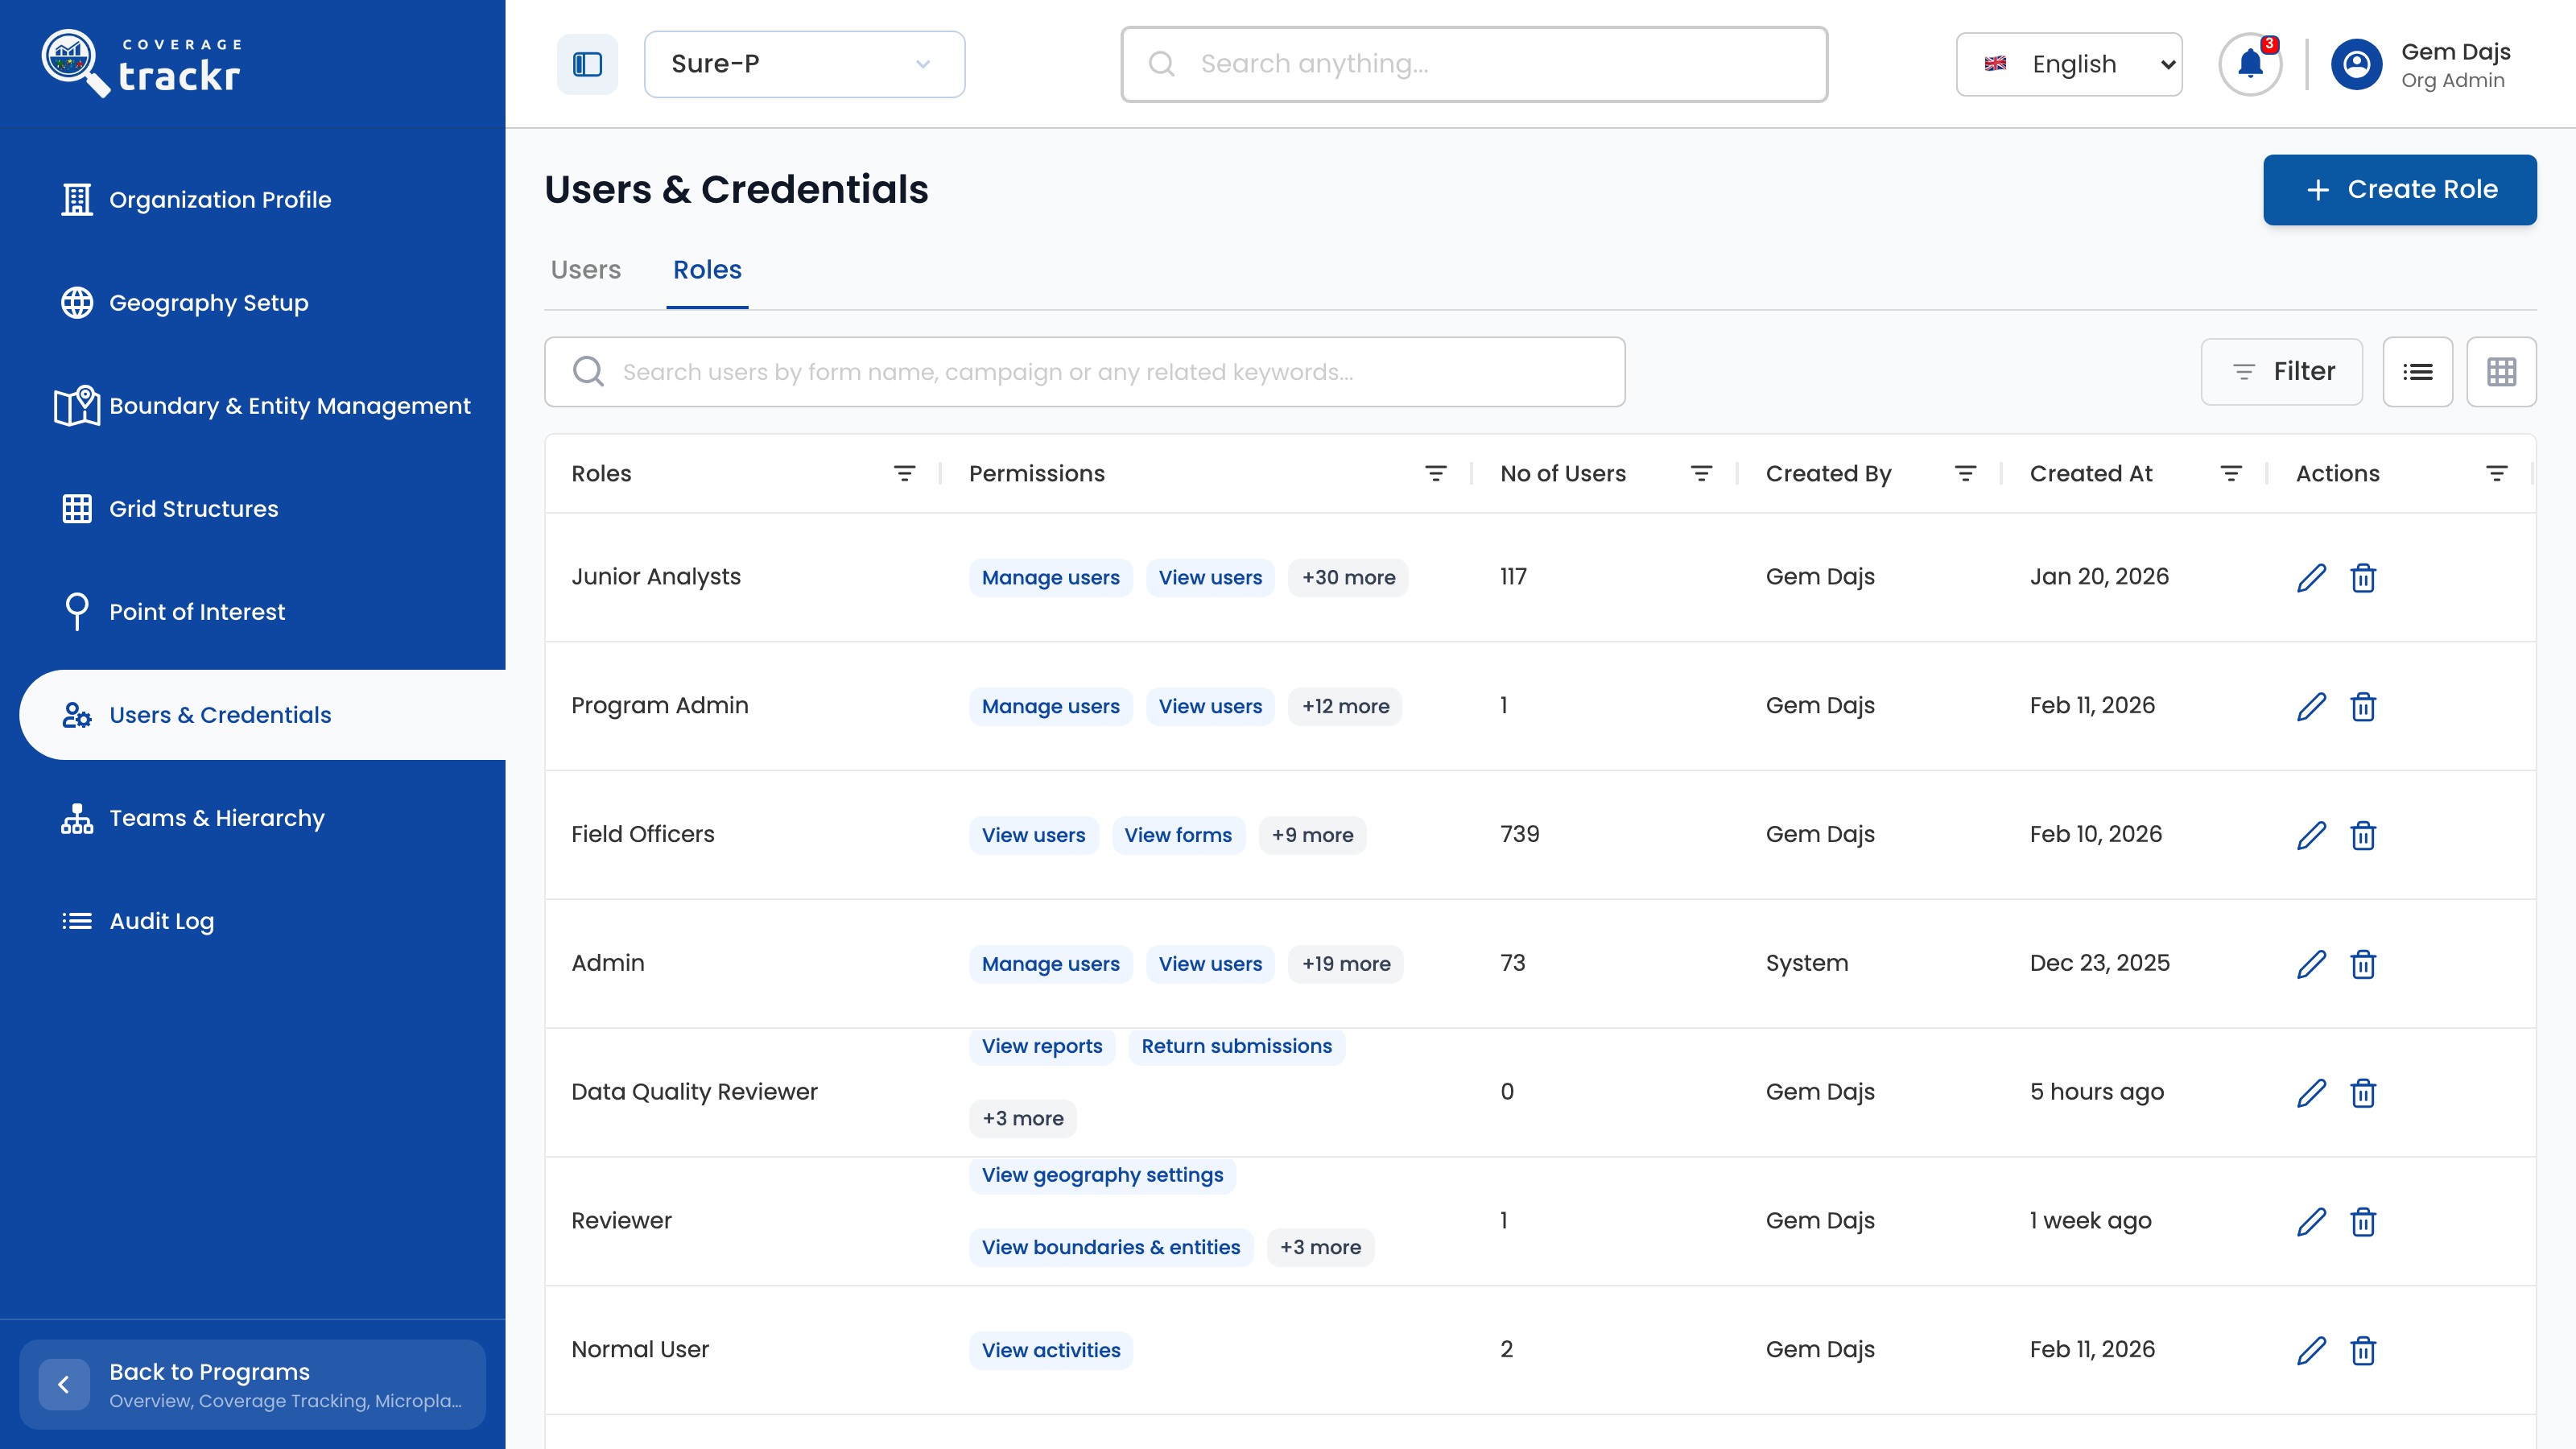
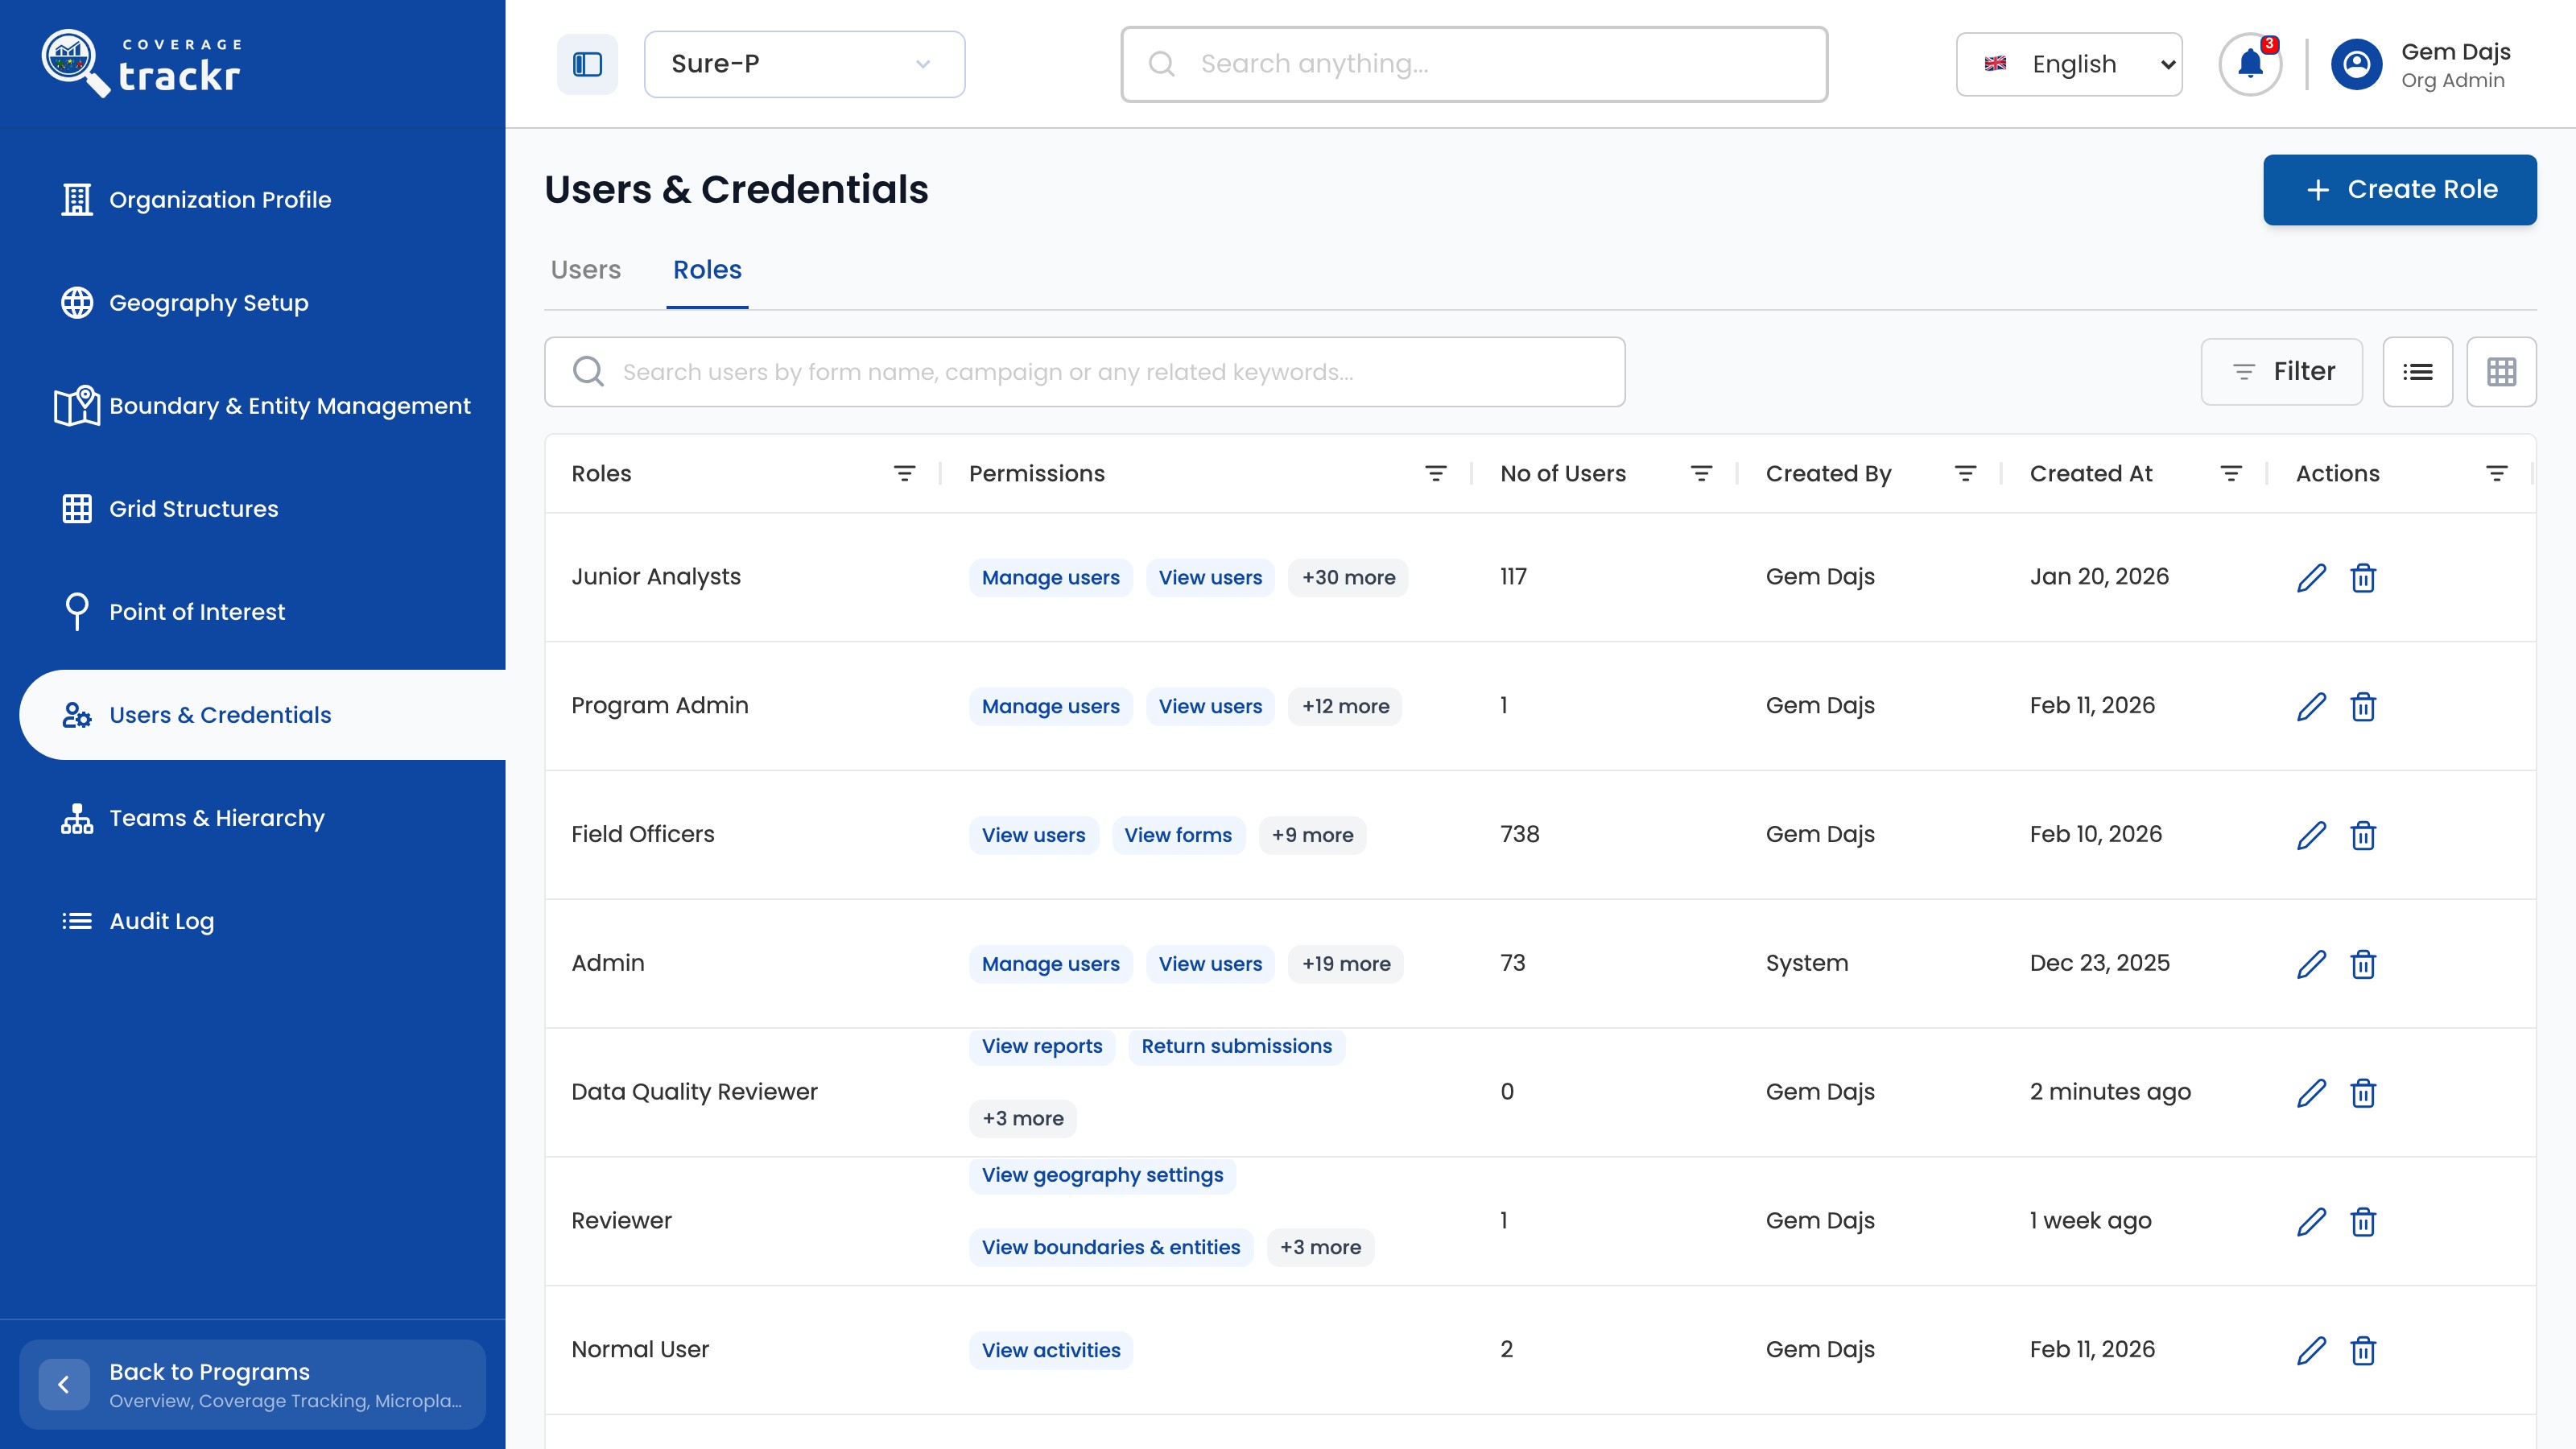
Close the user detail, open the Roles tab, and check the relevant role's Permissions and No of Users.

CoverageTrackr Roles tab with permission summaries and assigned user counts

1 — roles tab · 2 — permissions and users.

CoverageTrackr Roles tab with permission summaries and assigned user counts

Done. The user's status and assignment have been checked, and the relevant role's permissions and user count have been reviewed.

If something goes wrong

Why can I not see Users & Credentials?

Users & Credentials is available to accounts with organization administration access.

Users and teams

Create a role

Create a role that gives people only the permissions their work needs.

Organization Administrator 4 min read Web

Before you start

  • You are signed in with organization administration access.
  • You know which areas the role must view or manage.

Open the Roles tab

In Users & Credentials, select the Roles tab to see the existing roles and their permissions.

Roles tab listing roles with permissions and user counts

1 — roles tab · 2 — create role button.

Roles tab listing roles with permissions and user counts

Name the role and choose permissions

Select Create Role, enter the Role Name and a short Description (optional), then tick each permission the role needs.

Create Role dialog for Data Quality Reviewer with view and return permissions ticked

1 — role details · 2 — permissions · 3 — create button.

Create Role dialog for Data Quality Reviewer with view and return permissions ticked

Create the role

Select Create. Check the new role's permissions in the list.

Roles tab including Data Quality Reviewer with its permissions

1 — new role.

Roles tab including Data Quality Reviewer with its permissions

Done. The role appears in the Roles tab with its permissions and a user count of 0.

If something goes wrong

What is the difference between View and Manage?

View permissions let people see an area. Manage permissions let them change it.

How do I give the role to someone?

Edit the user in Users & Credentials and add the role under Assigned Roles.

Users and teams

Create a team

Create a field team for an area, with its members, supervisor and validator.

Organization Administrator 5 min read Web

Before you start

  • You are signed in with organization administration access.
  • The team's members, supervisor and validator already have user accounts.

Open Teams & Hierarchy

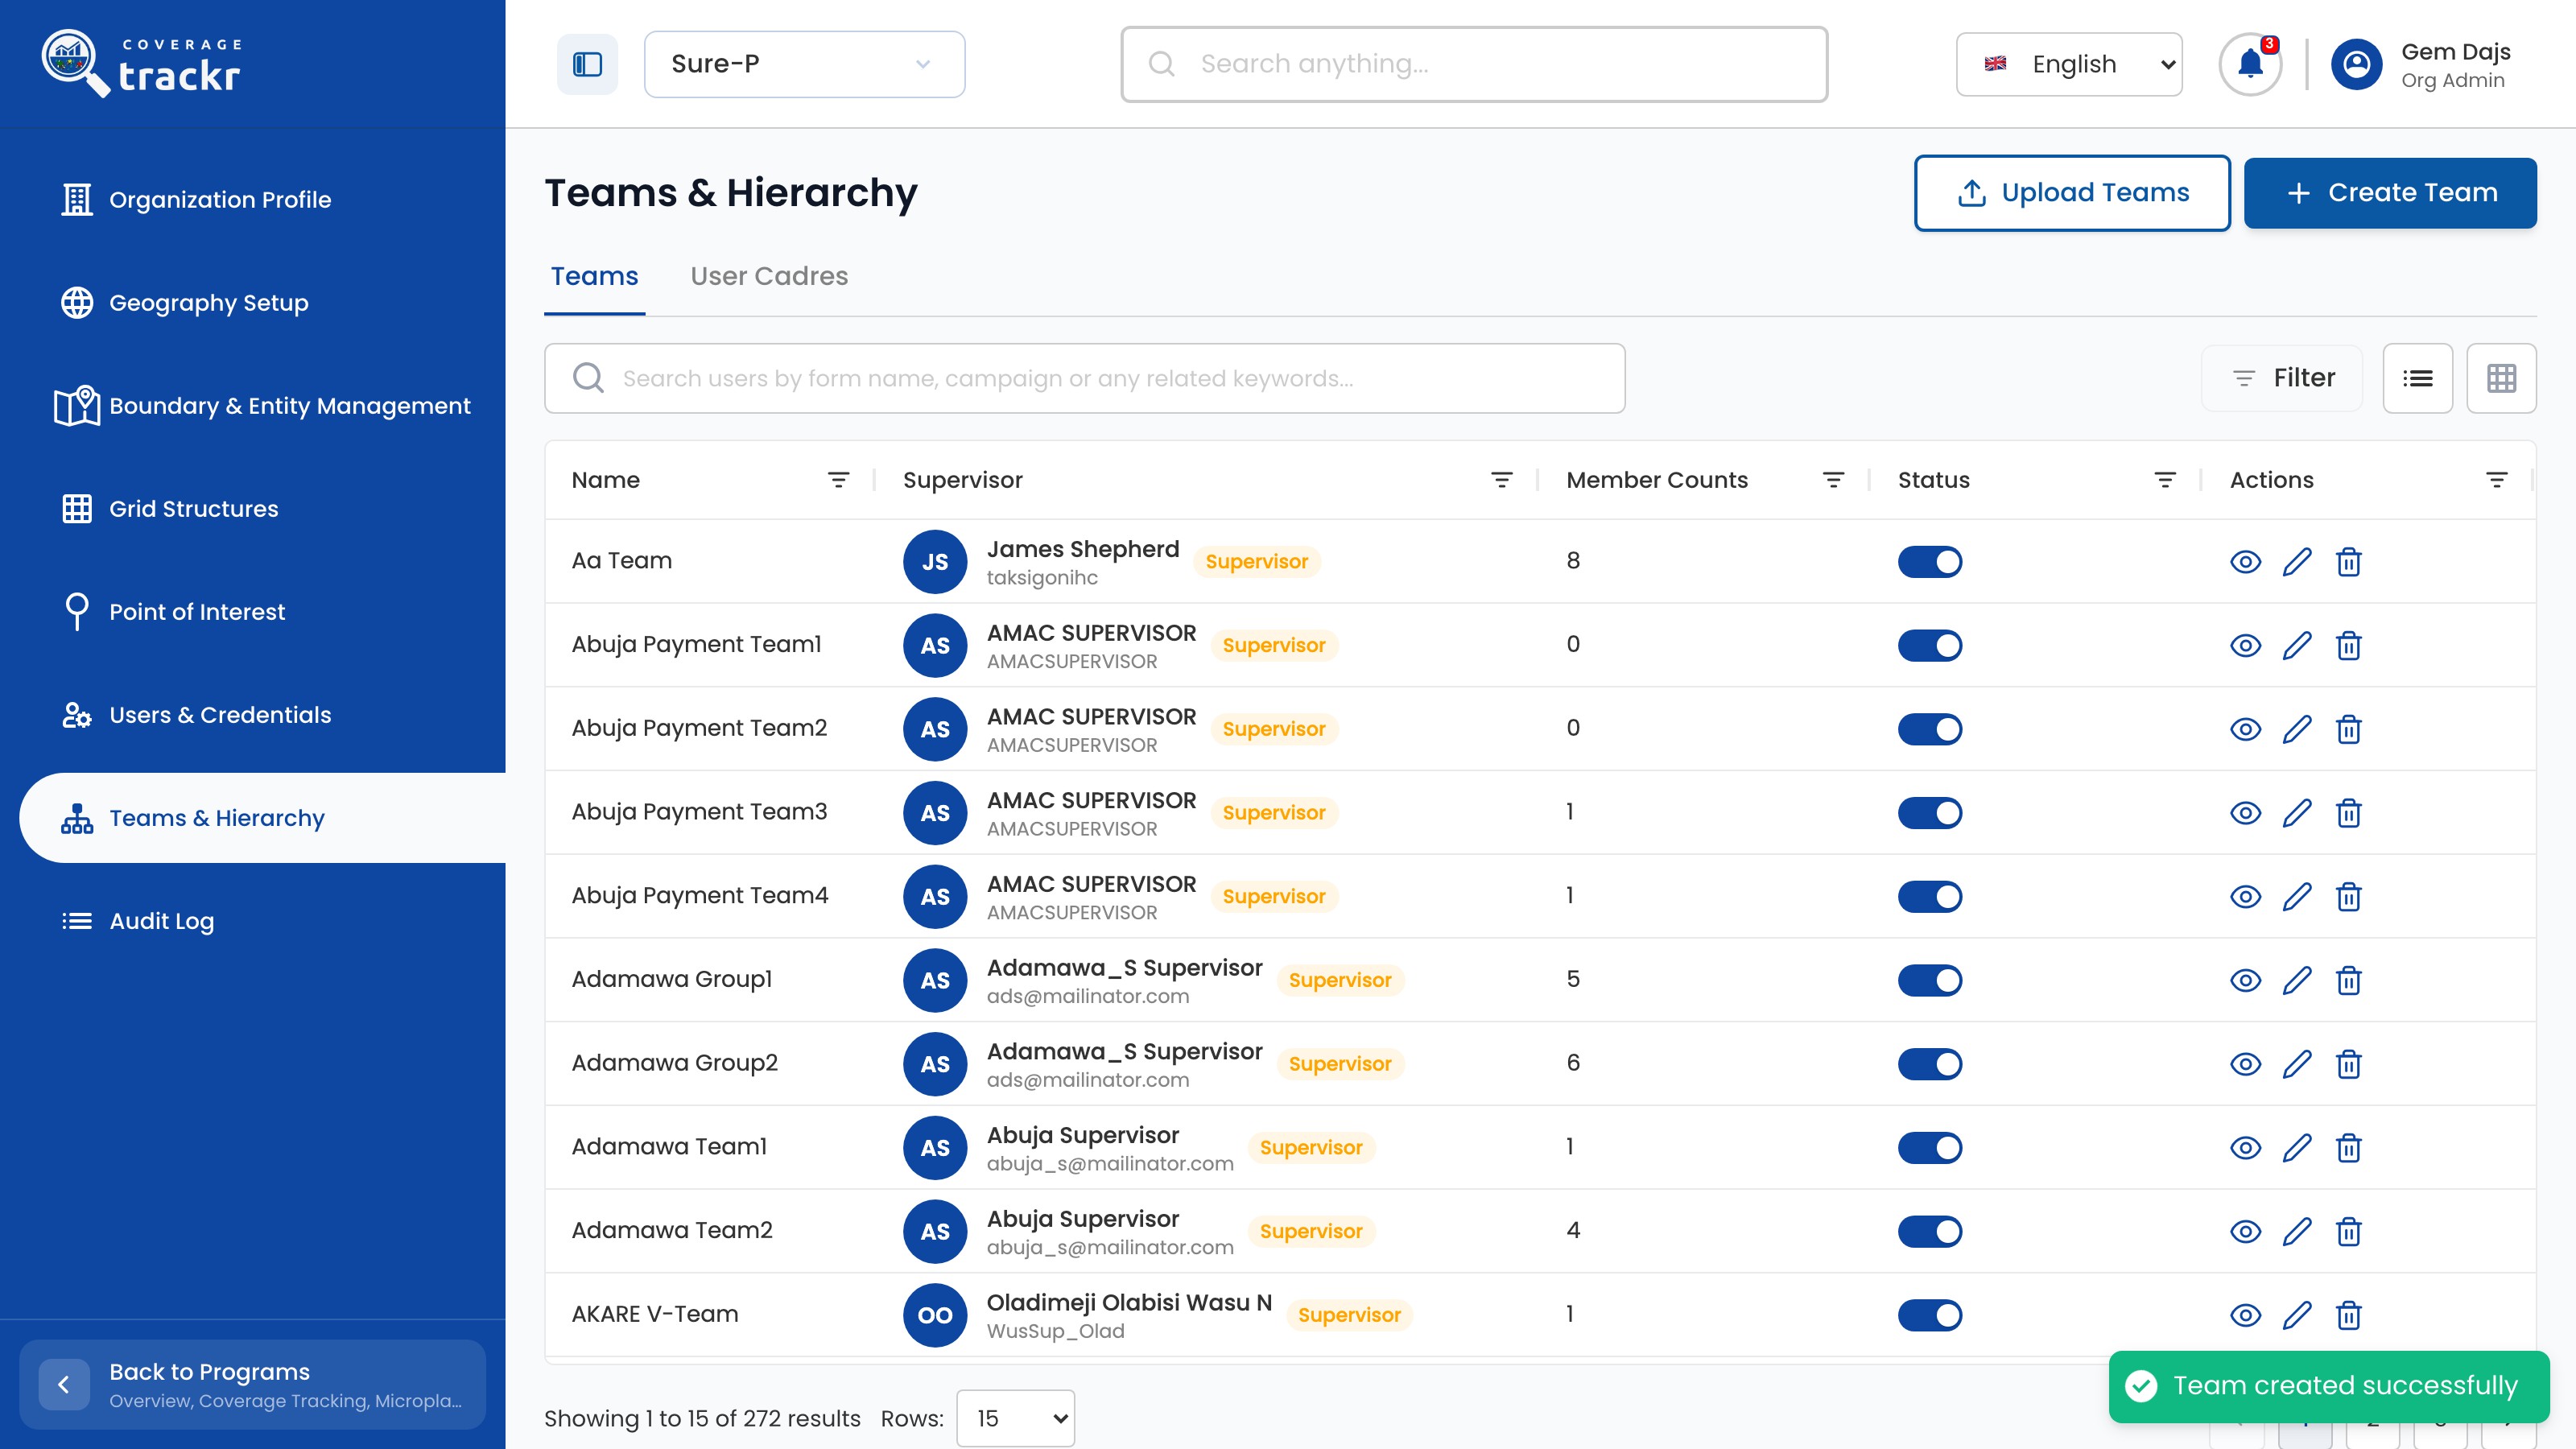
Select Teams & Hierarchy to see existing teams, then select Create Team.

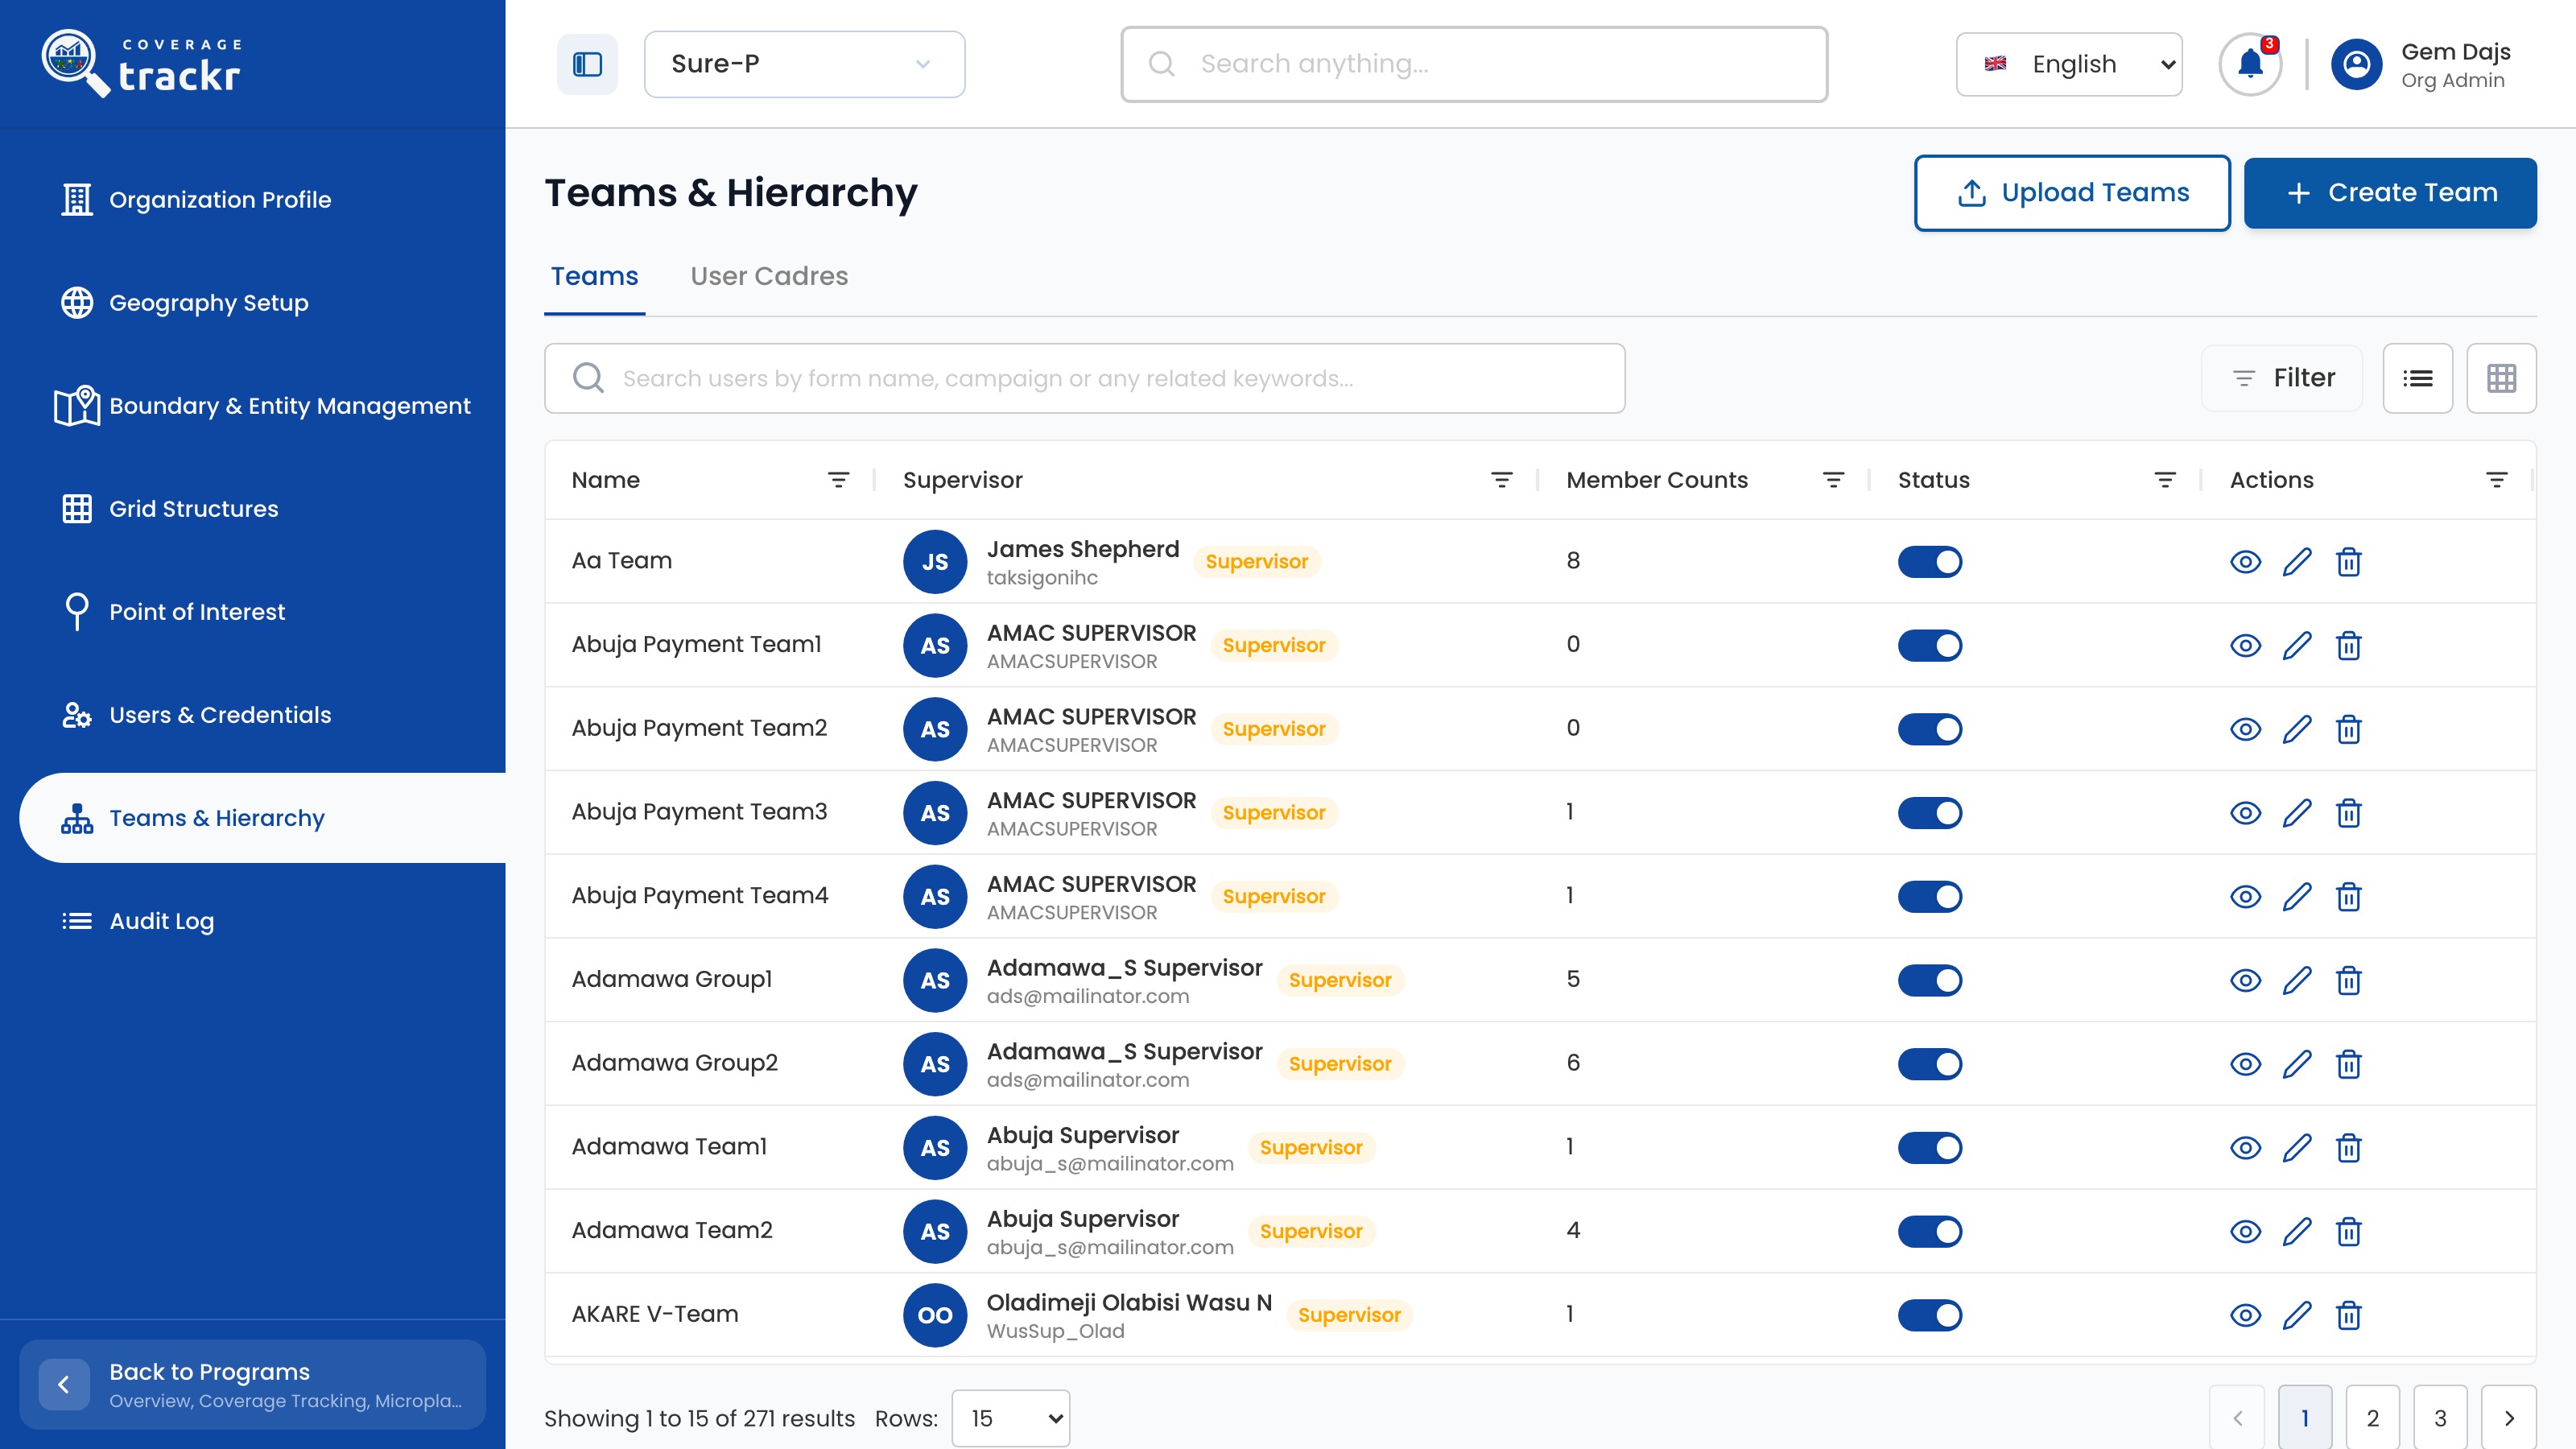
Teams & Hierarchy list of teams with supervisors and member counts

1 — teams and hierarchy · 2 — create team button.

Teams & Hierarchy list of teams with supervisors and member counts

Name the team and choose its area

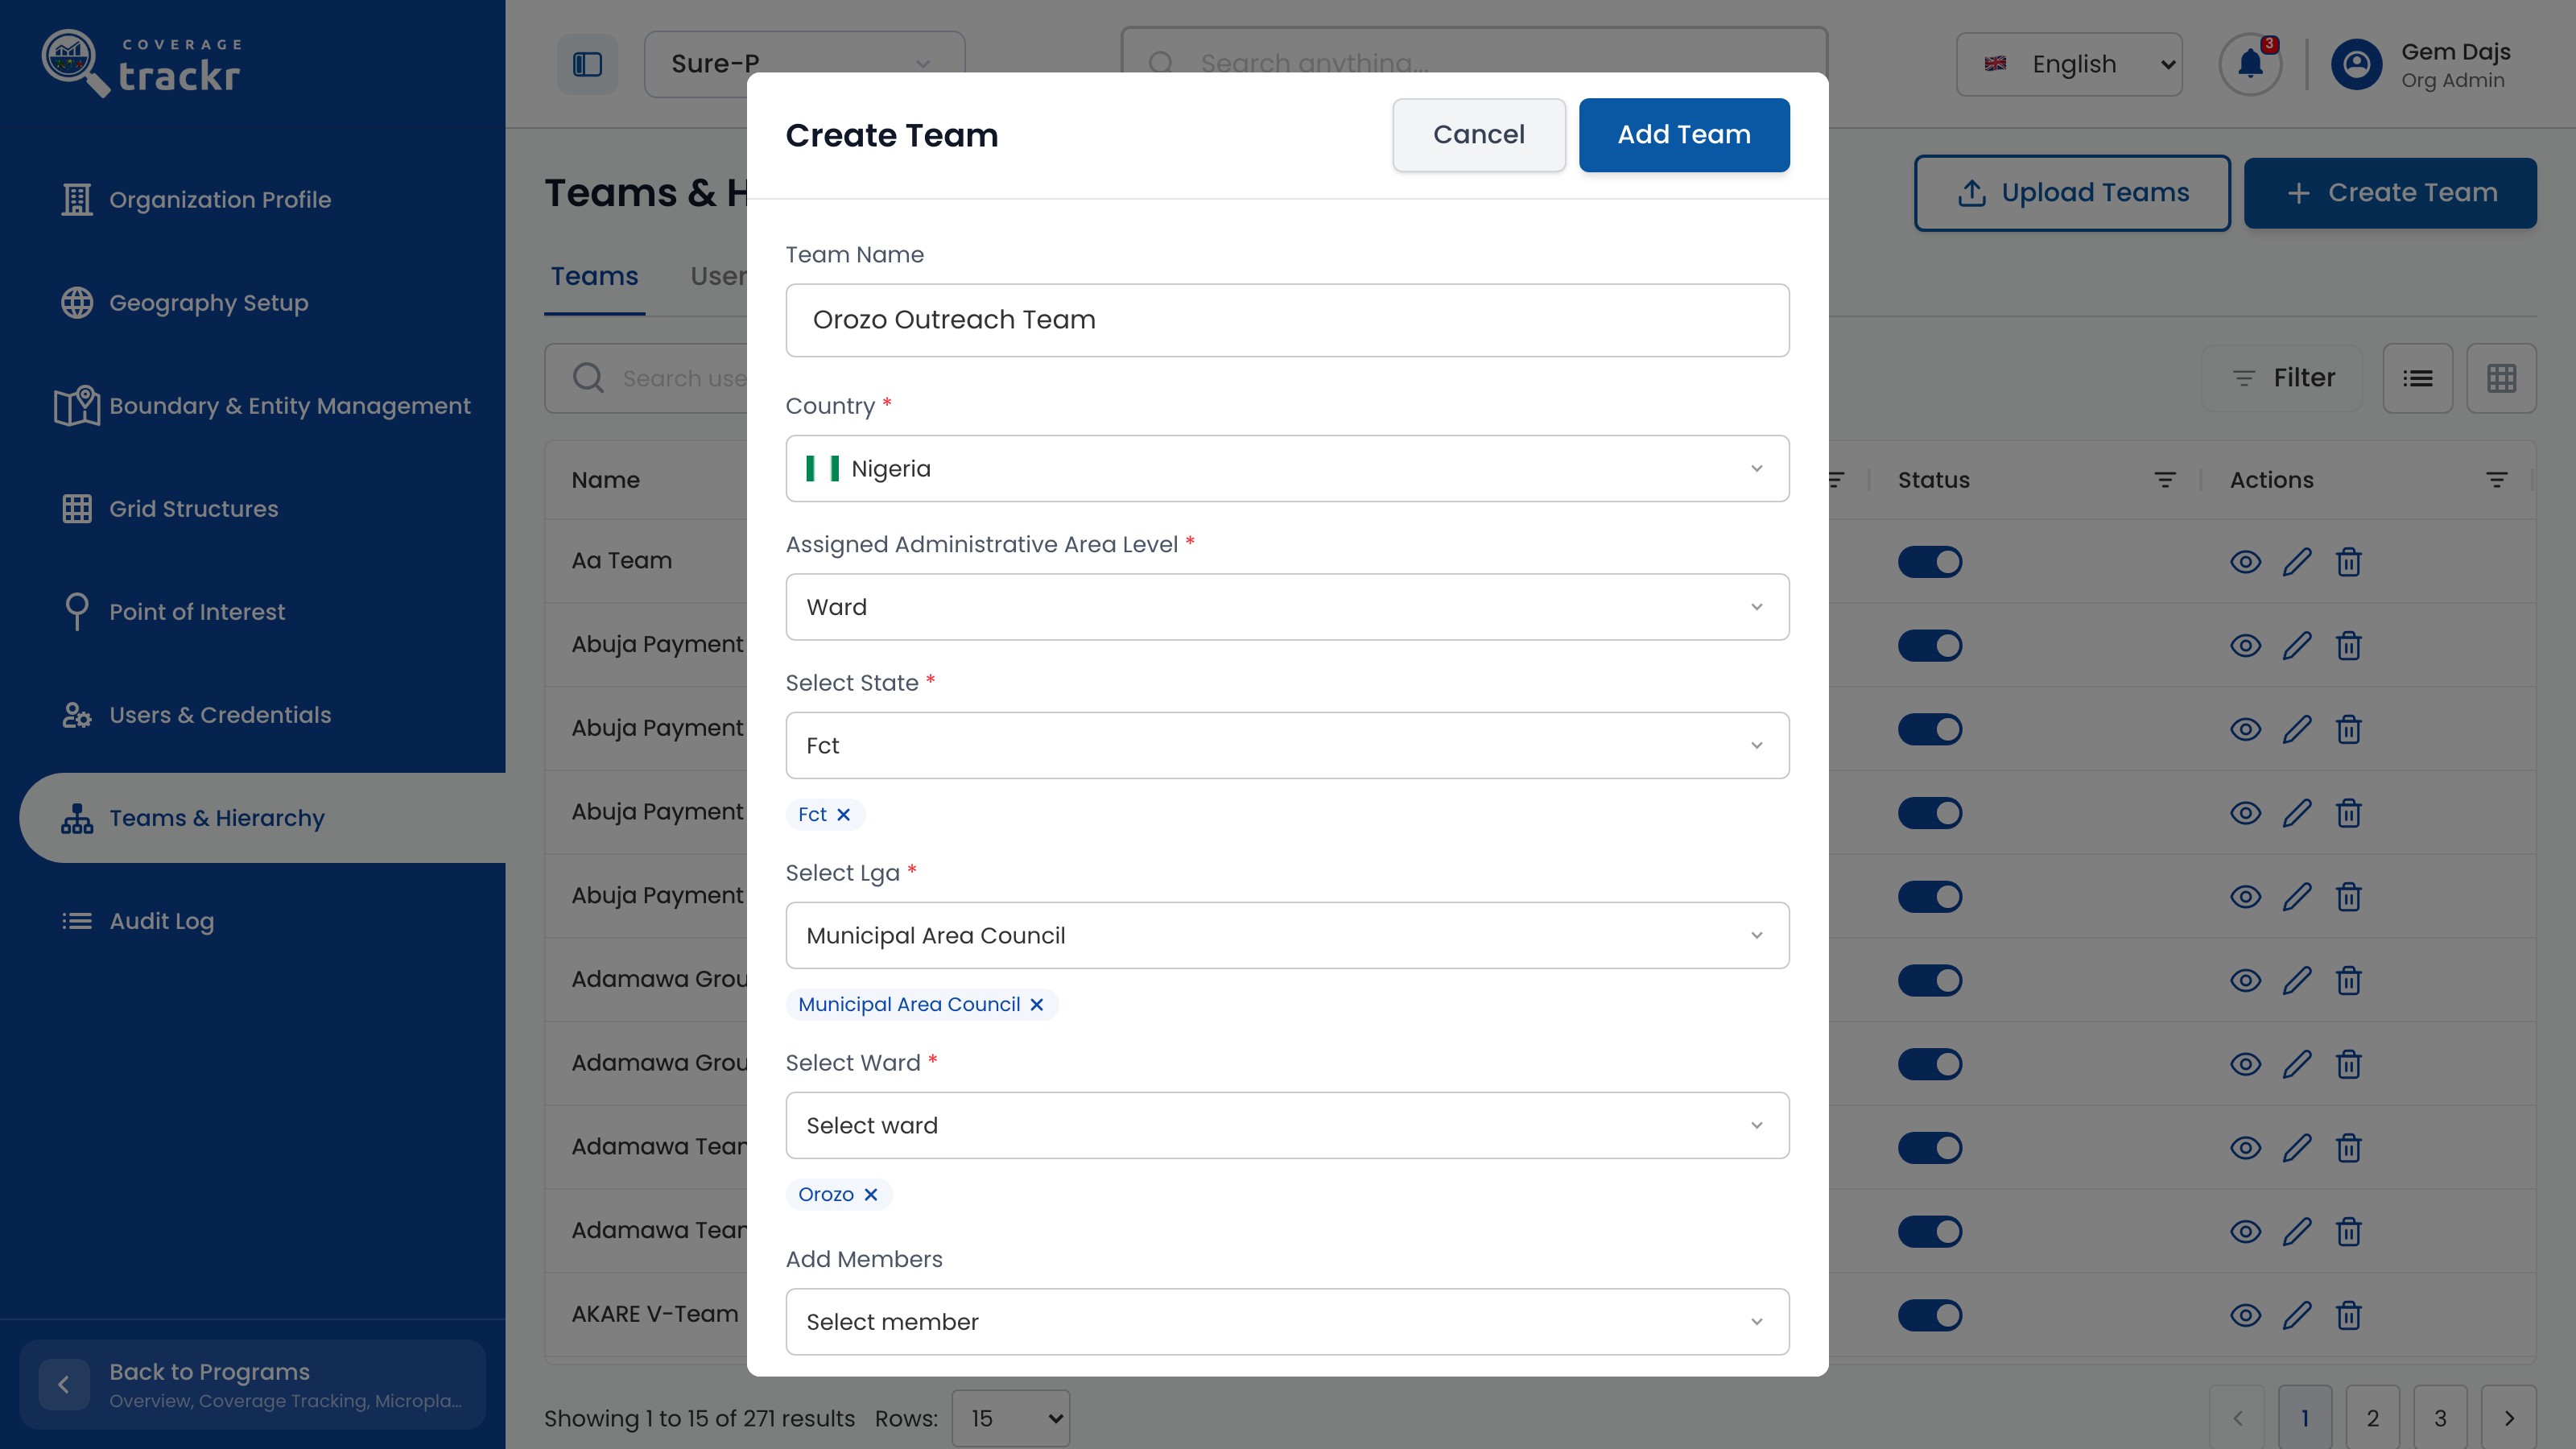
Enter the Team Name, choose the Country and Assigned Administrative Area Level, then select the state, LGA and ward.

Create Team dialog with the team name, Nigeria, Ward level, Fct, Municipal Area Council and Orozo selected

1 — team and country · 2 — administrative area.

Create Team dialog with the team name, Nigeria, Ward level, Fct, Municipal Area Council and Orozo selected

Add the people

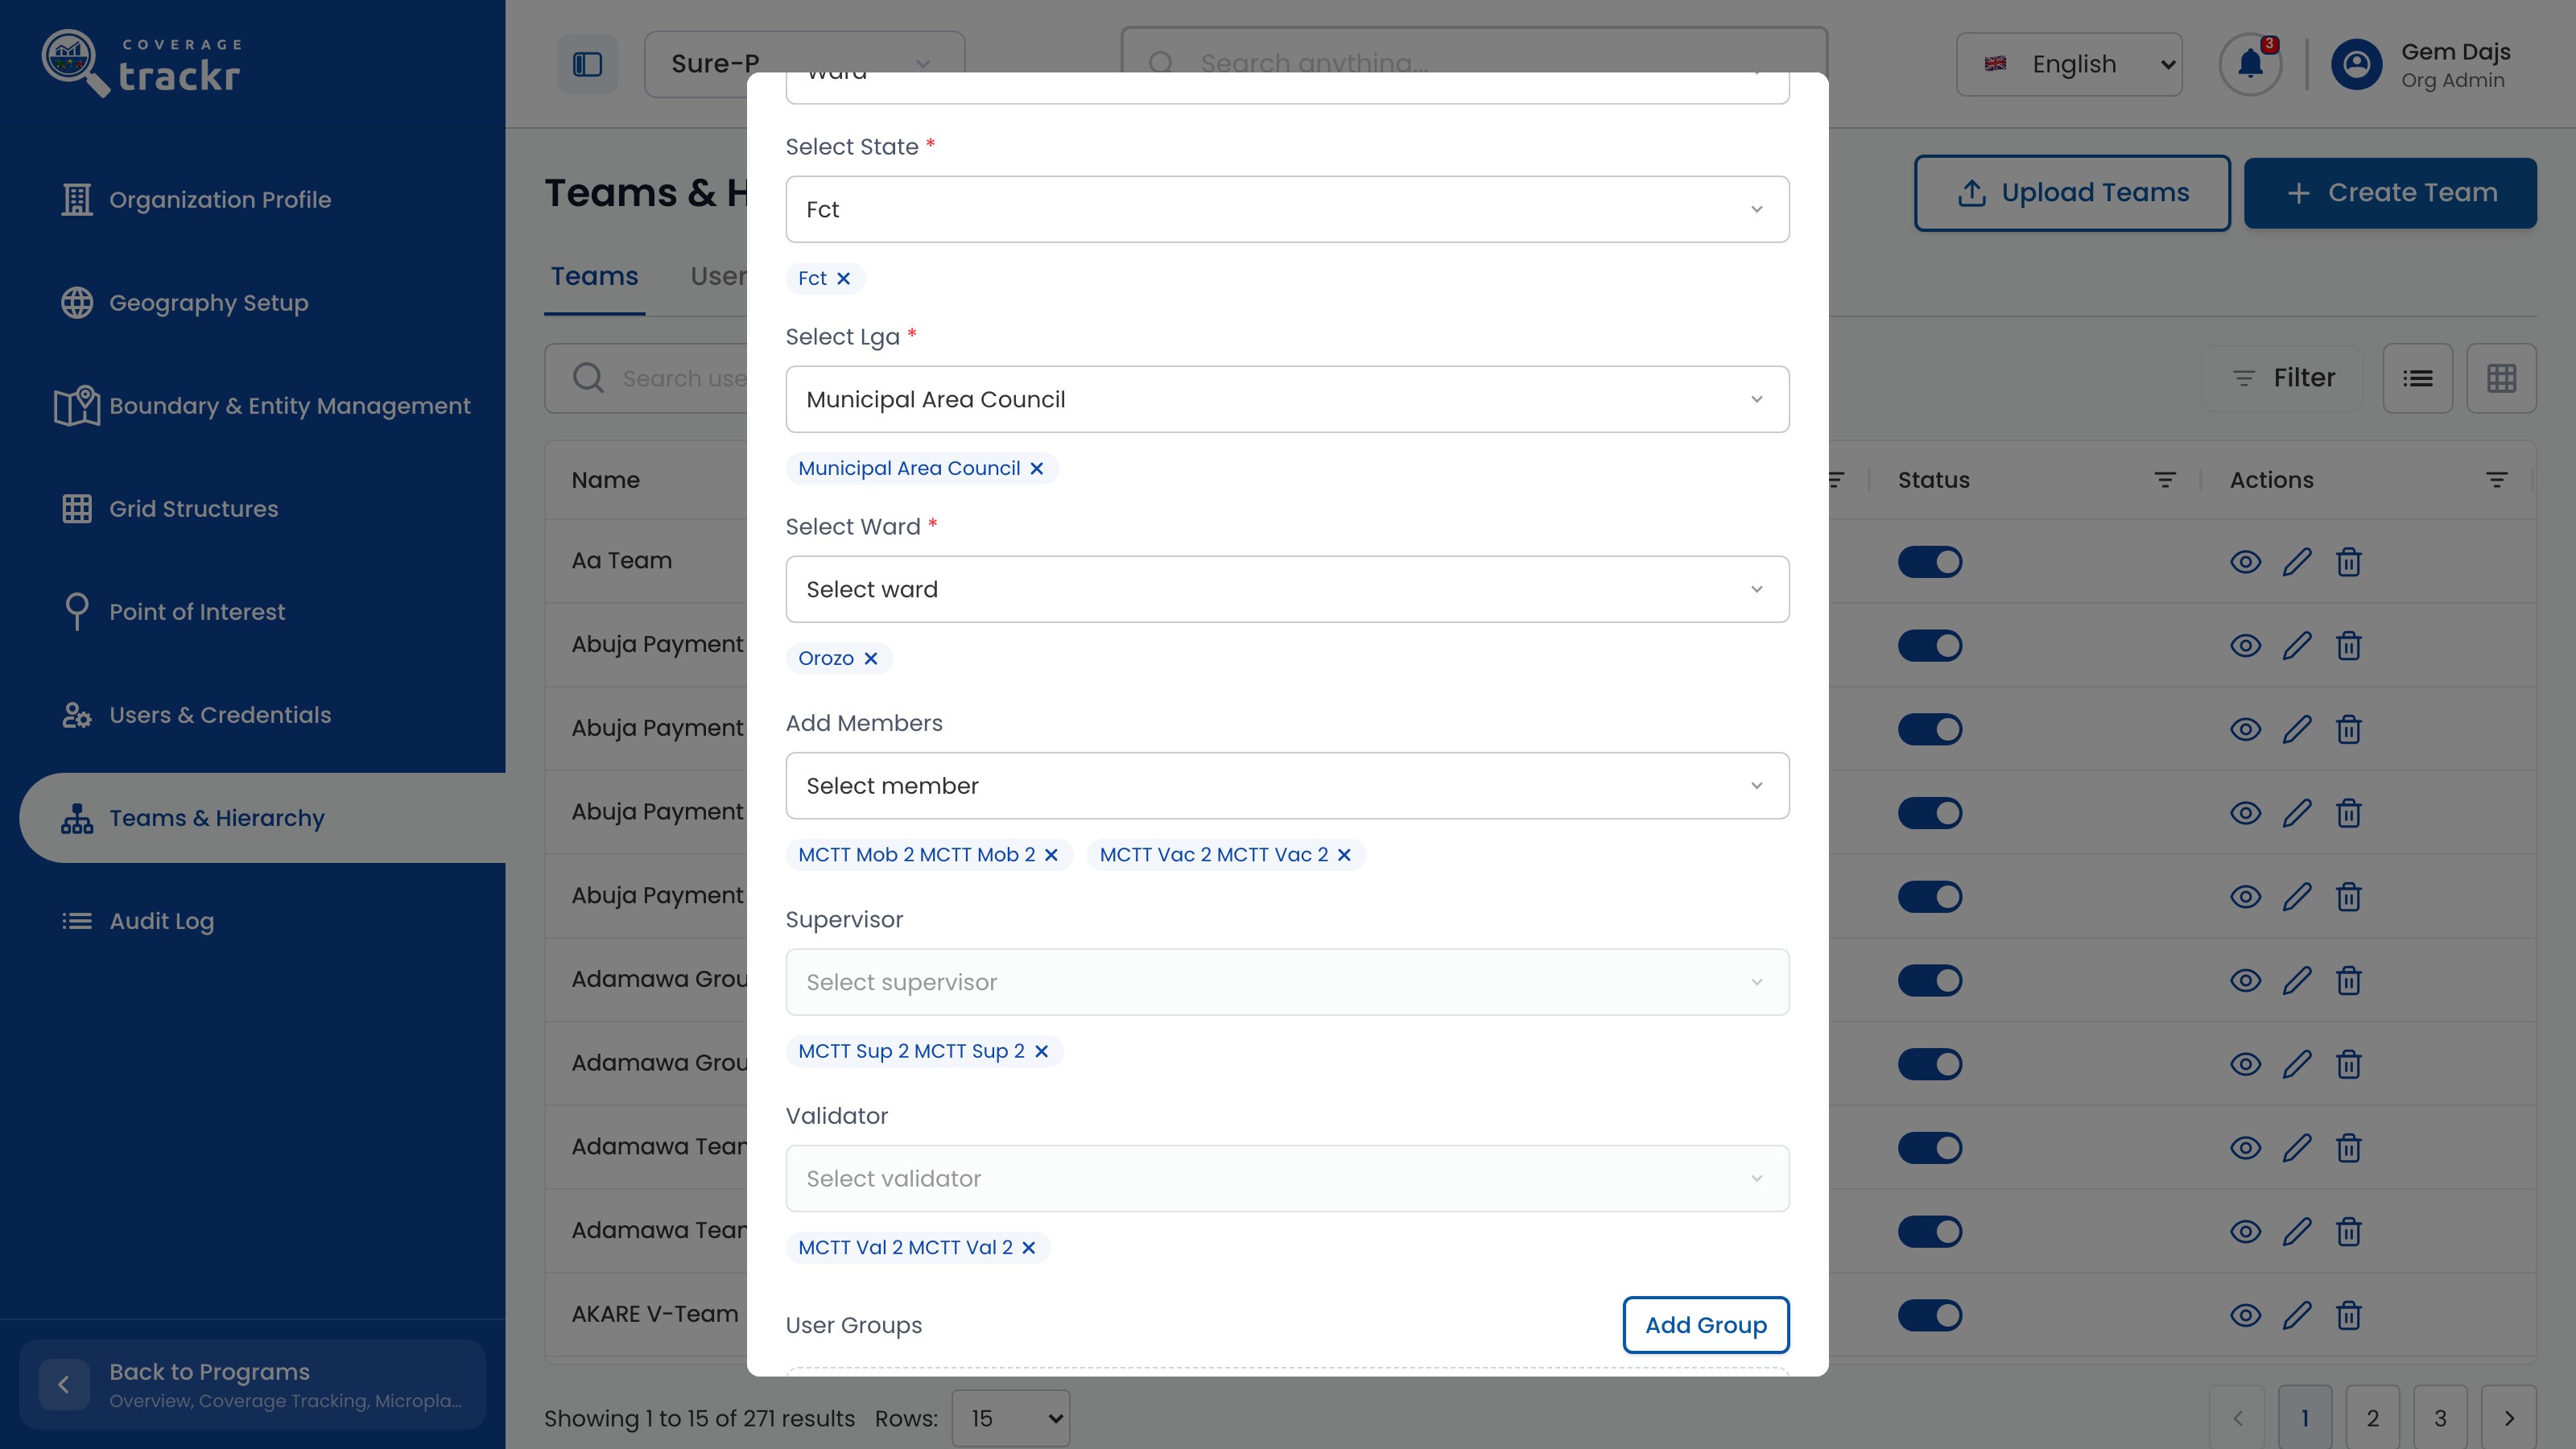
Use Add Members, Supervisor and Validator to choose the team's people.

Create Team dialog with two members, a supervisor and a validator selected

1 — team members · 2 — supervisor and validator.

Create Team dialog with two members, a supervisor and a validator selected

Add the team

Select Add Team. The team is added to the list.

Teams list with a Team created successfully message

1 — new team · 2 — save confirmation.

Teams list with a Team created successfully message

Check the team

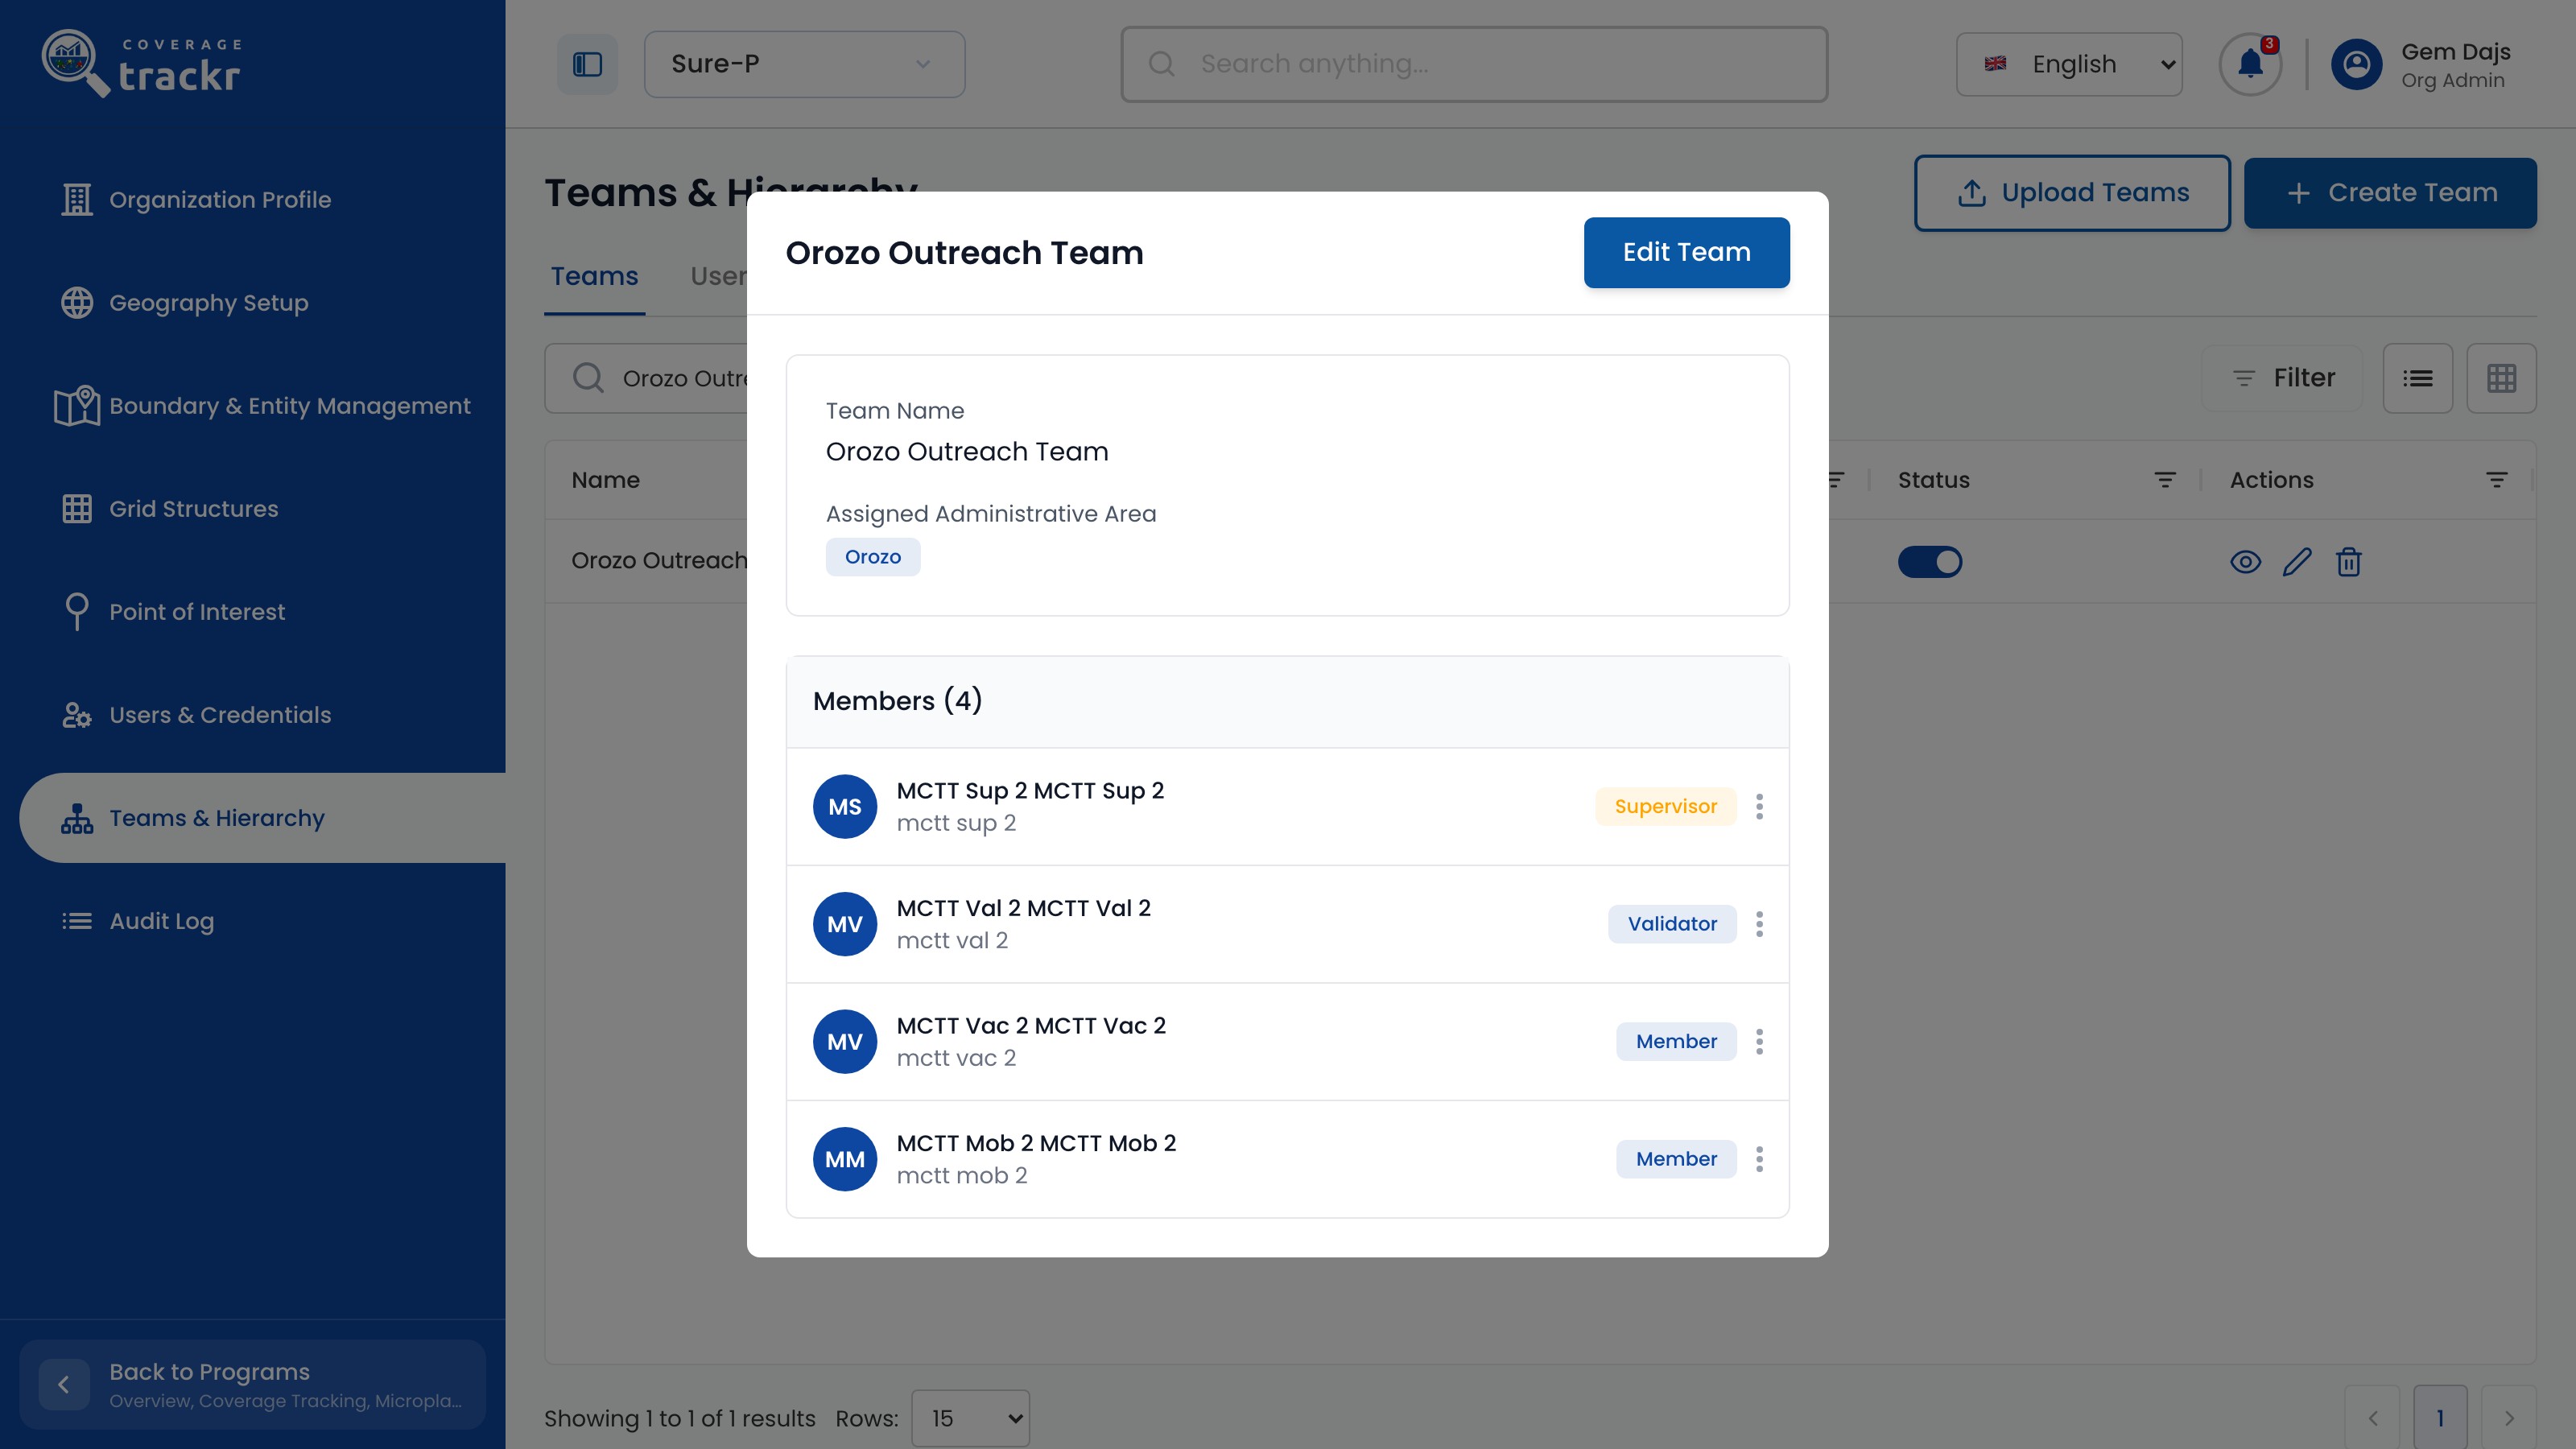
Search for the team and select View Team to confirm its area and each member's role.

Orozo Outreach Team detail listing its supervisor, validator and members

1 — team area · 2 — team members and roles.

Orozo Outreach Team detail listing its supervisor, validator and members

Done. The team appears in Teams & Hierarchy and its detail lists every member with their team role.

If something goes wrong

Why are the area lists empty?

Choose the Country and Assigned Administrative Area Level first. The state, LGA and ward lists fill in order.

Can someone be both a member and the supervisor?

Choose each person once, in the role they will hold in the team.

Users and teams

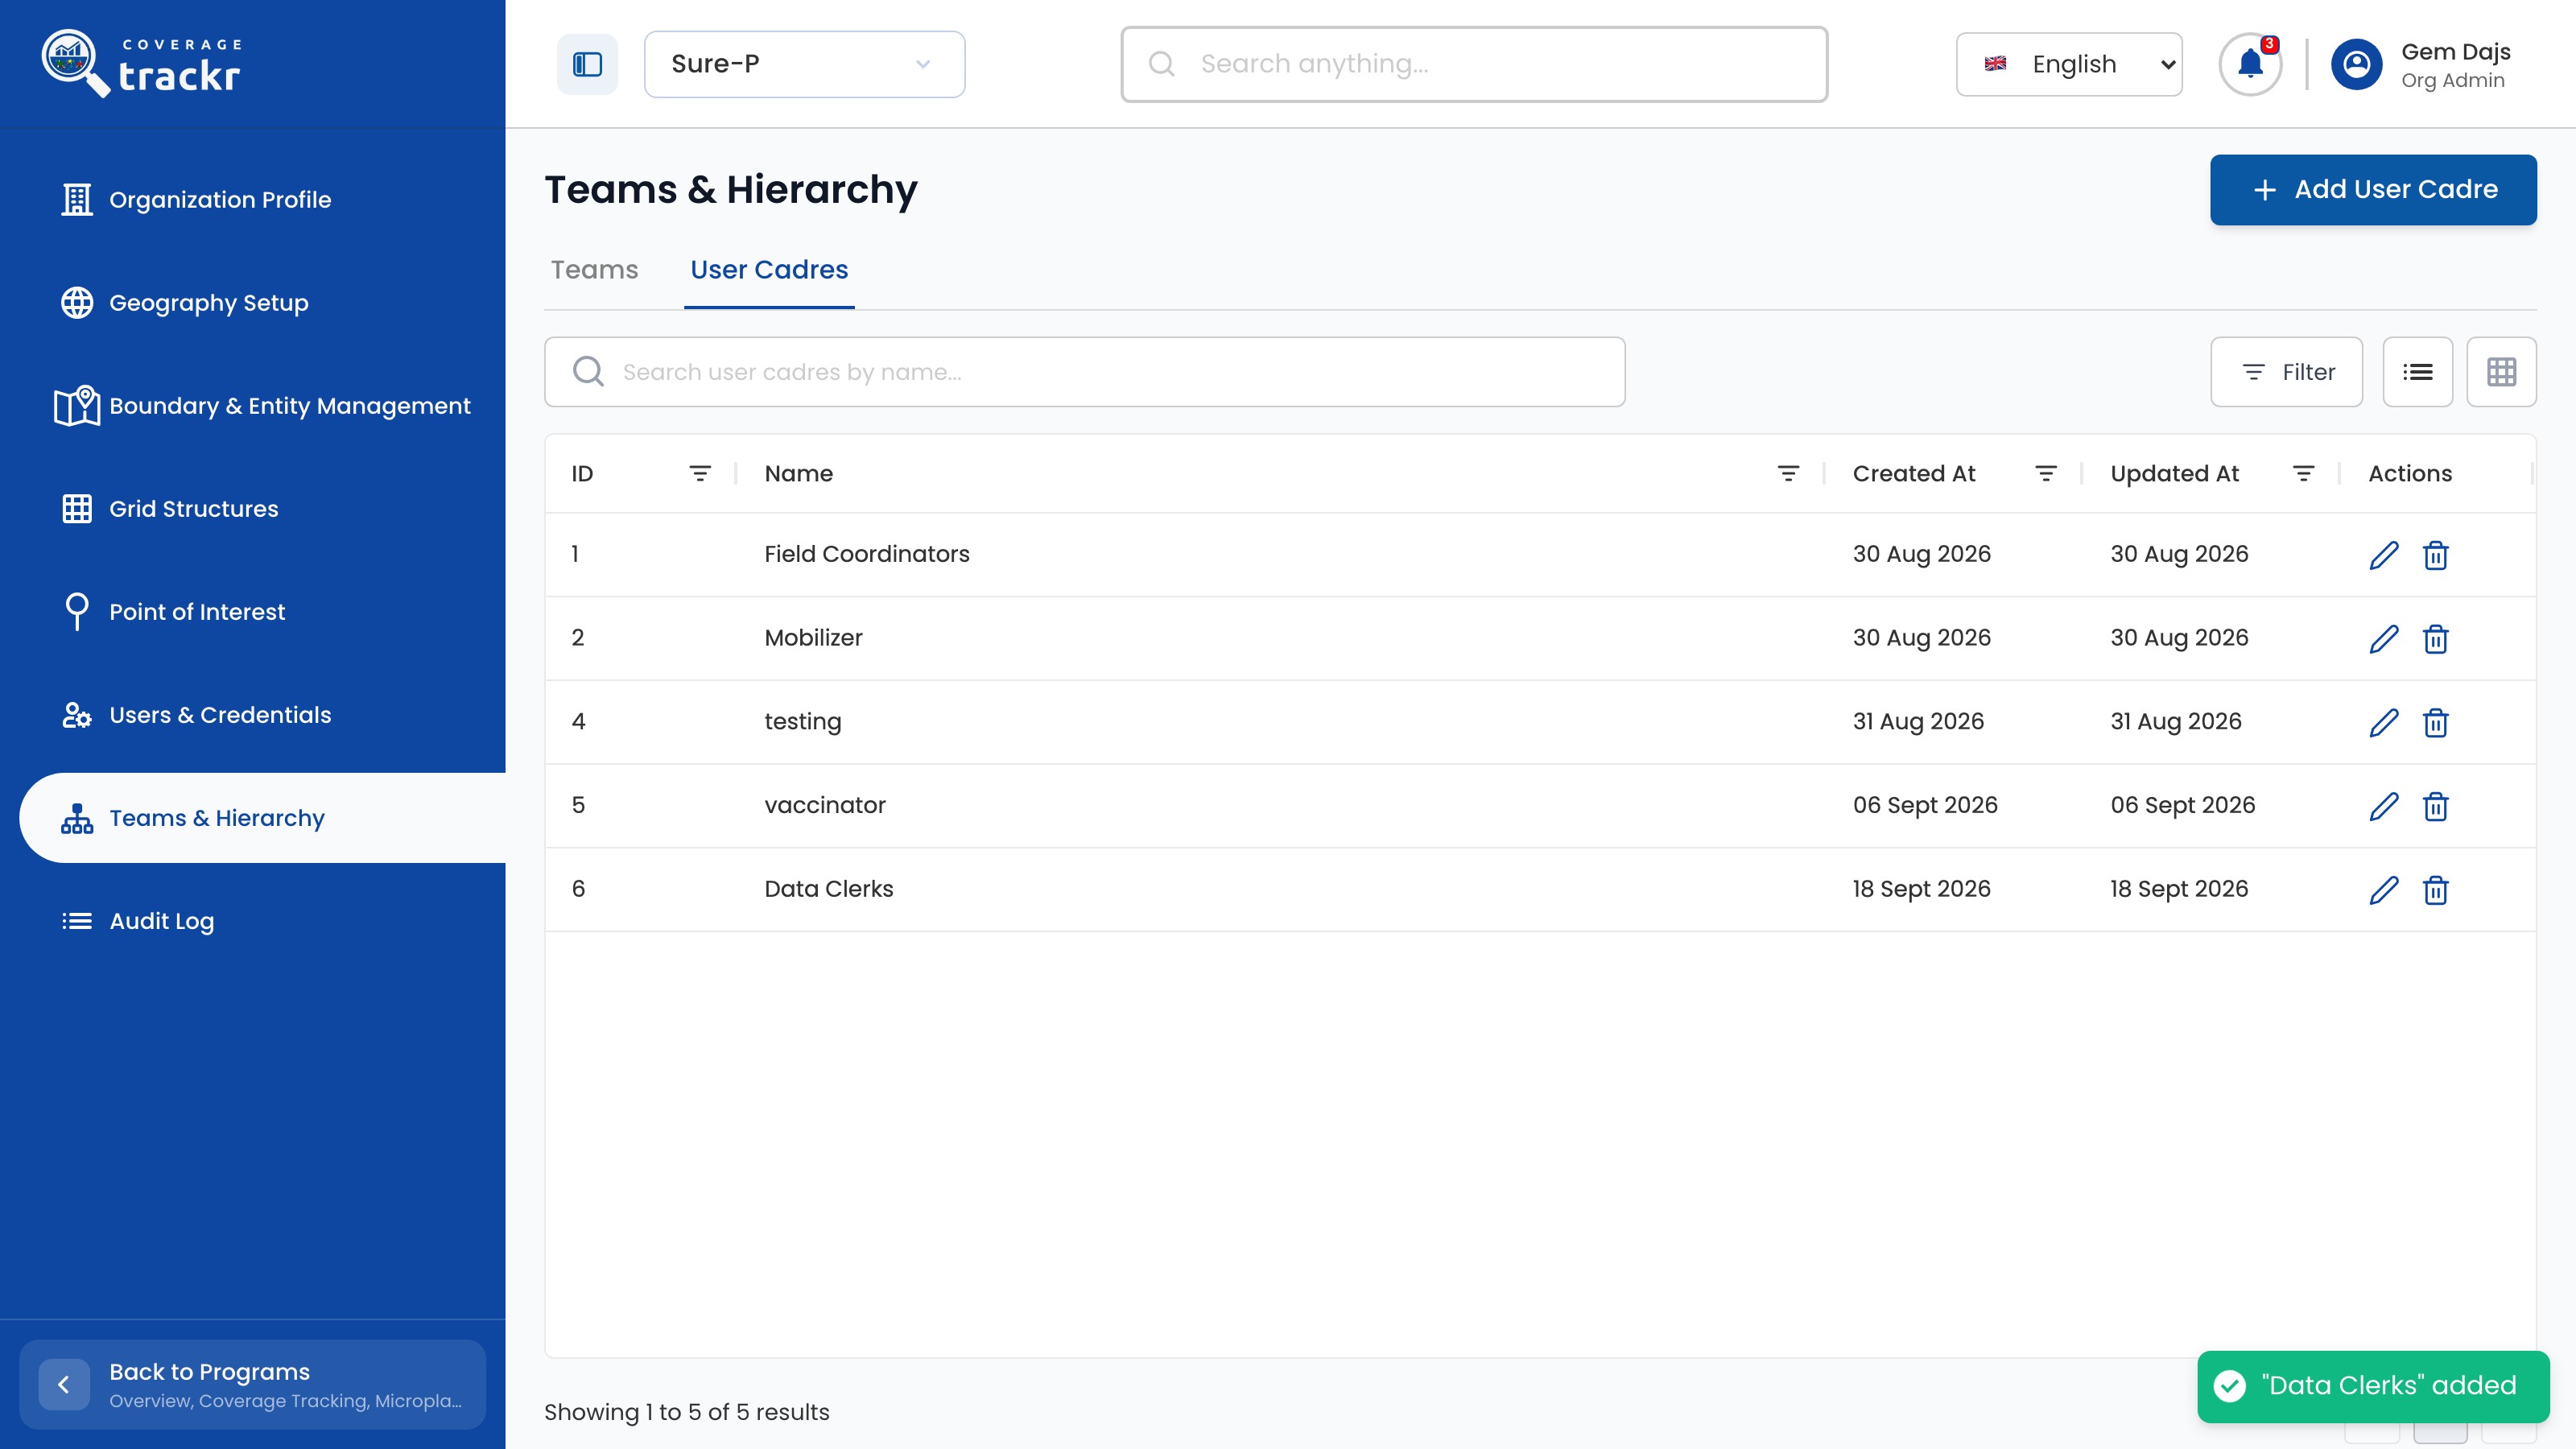
Add a user cadre

Add a cadre, such as Data Clerks, so team members can be grouped by the work they do.

Organization Administrator 2 min read Web

Before you start

  • You are signed in with organization administration access.

Open User Cadres

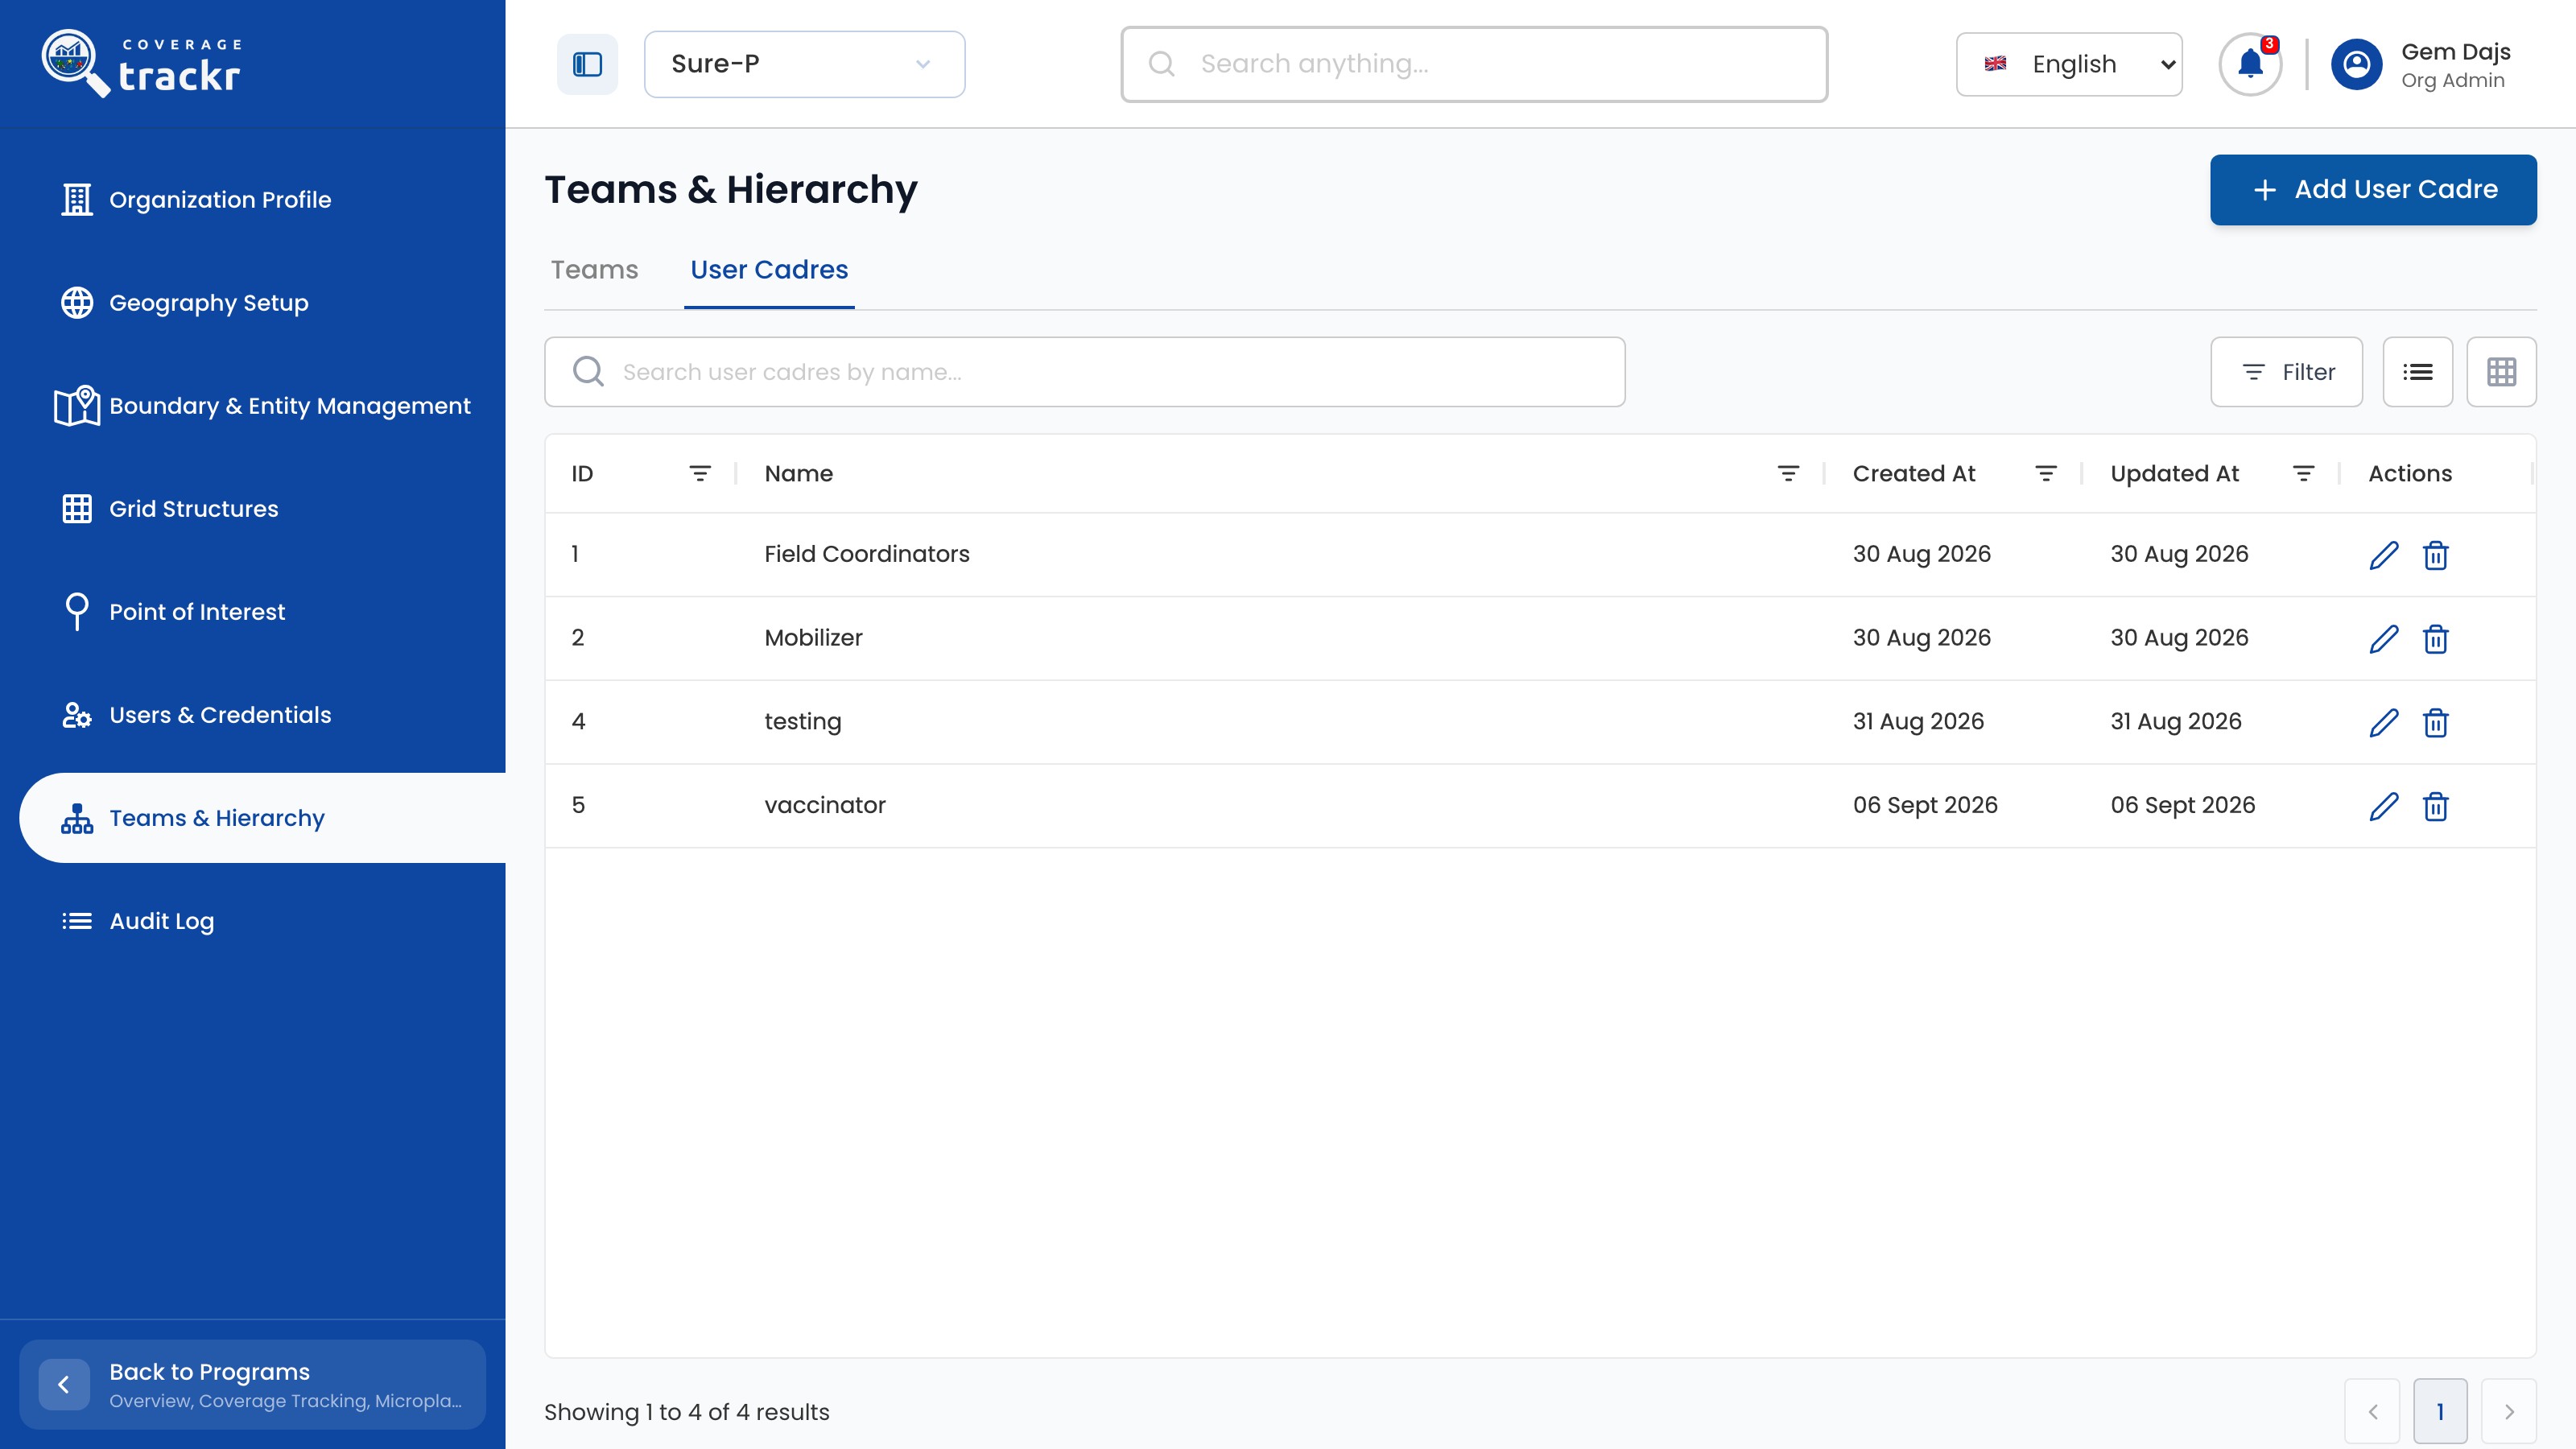
In Teams & Hierarchy, select the User Cadres tab.

User Cadres list with existing cadres

1 — user cadres tab.

User Cadres list with existing cadres

Name the cadre

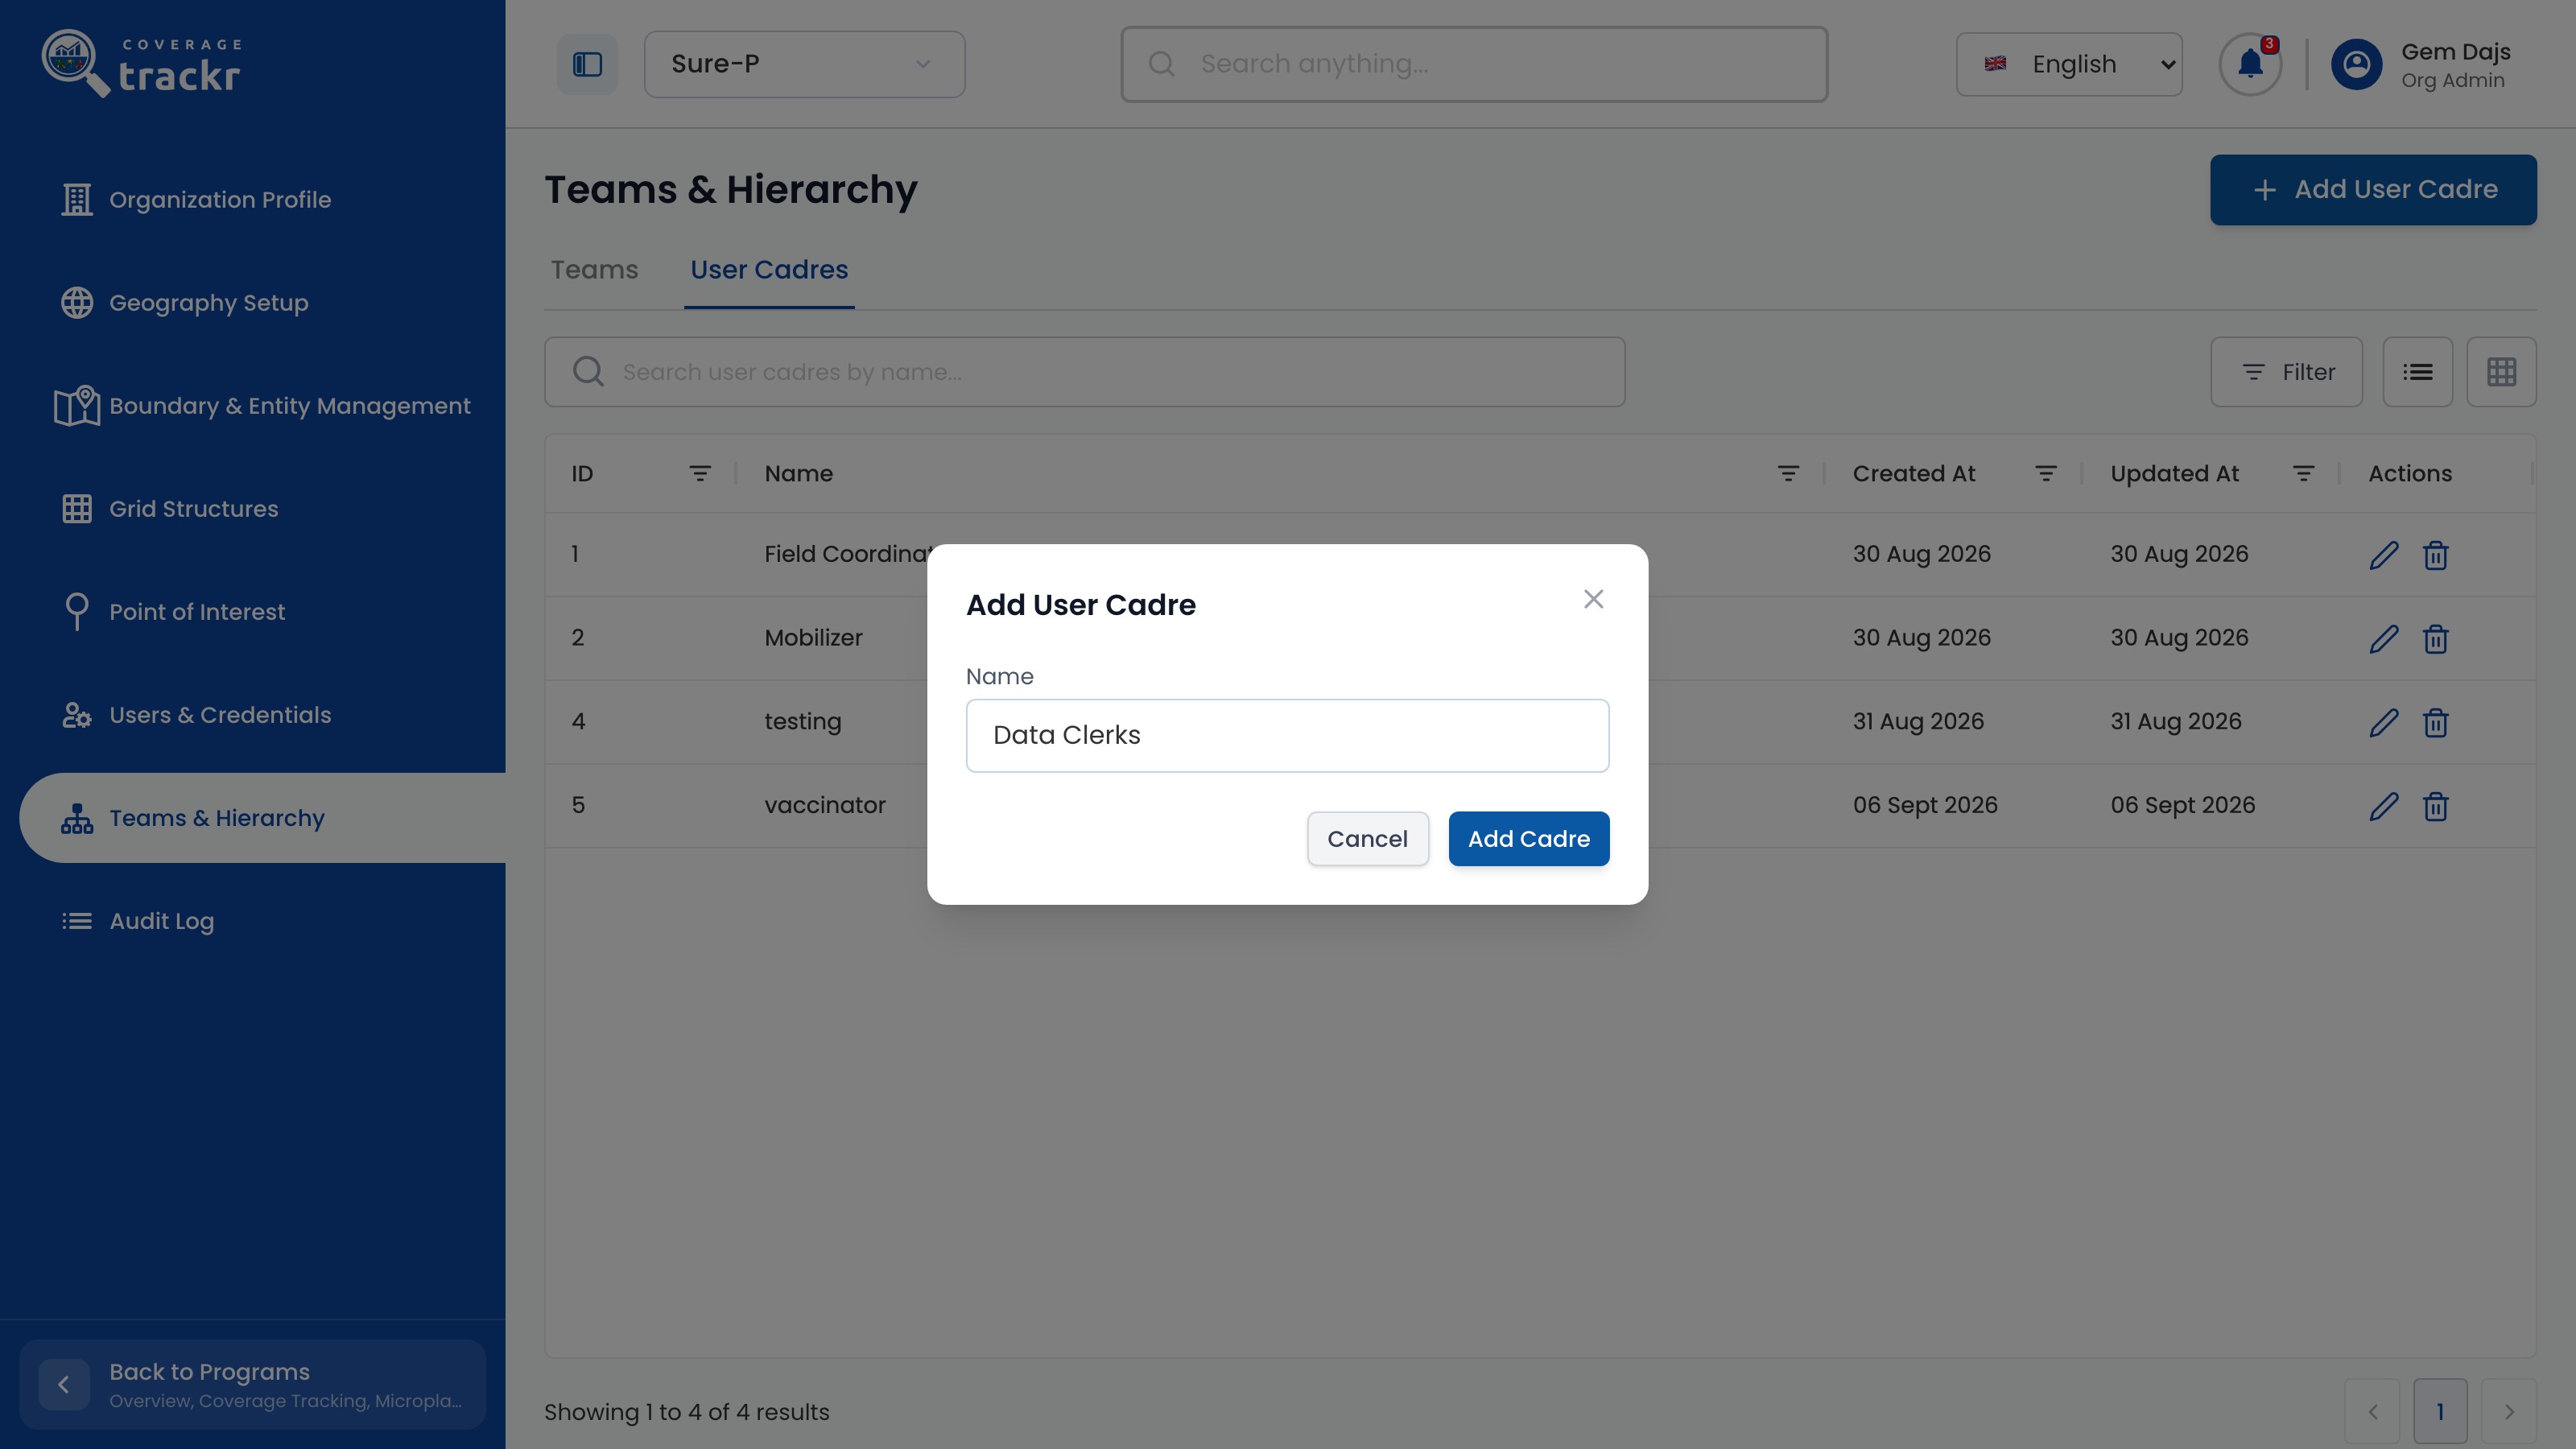
Select Add User Cadre and enter the cadre's Name.

Add User Cadre dialog with the name Data Clerks entered

1 — cadre name · 2 — add cadre button.

Add User Cadre dialog with the name Data Clerks entered

Add the cadre

Select Add Cadre. The new cadre is added to the list.

User Cadres list including Data Clerks with a confirmation message

1 — new cadre · 2 — save confirmation.

User Cadres list including Data Clerks with a confirmation message

Done. The cadre appears in the User Cadres list with today's date.

If something goes wrong

Where are cadres used?

When you create or edit a team, use Add Group to place members in a cadre.

Forms

Create a data collection form

Build, preview and save a form that field teams can use in an activity.

Organization Administrator 5 min read Web

Before you start

  • The programme that will own the form is active.
  • You know the questions, response types and required fields for the workflow.

Start a new form

Open Form Builder and select Create New Form. Replace Untitled Form with a clear operational name, then enter the Page Title and Description for the first page.

CoverageTrackr new form workspace with the question palette and first page

1 — form name · 2 — page details · 3 — create form.

CoverageTrackr new form workspace with the question palette and first page

Add and configure the questions

Choose each question type under Question Type. For every field, set the Field Label, Field ID and Description, and switch on Required where an answer is needed.

Configured CoverageTrackr form with text, select and location questions

1 — question types · 2 — form questions · 3 — field properties.

Configured CoverageTrackr form with text, select and location questions

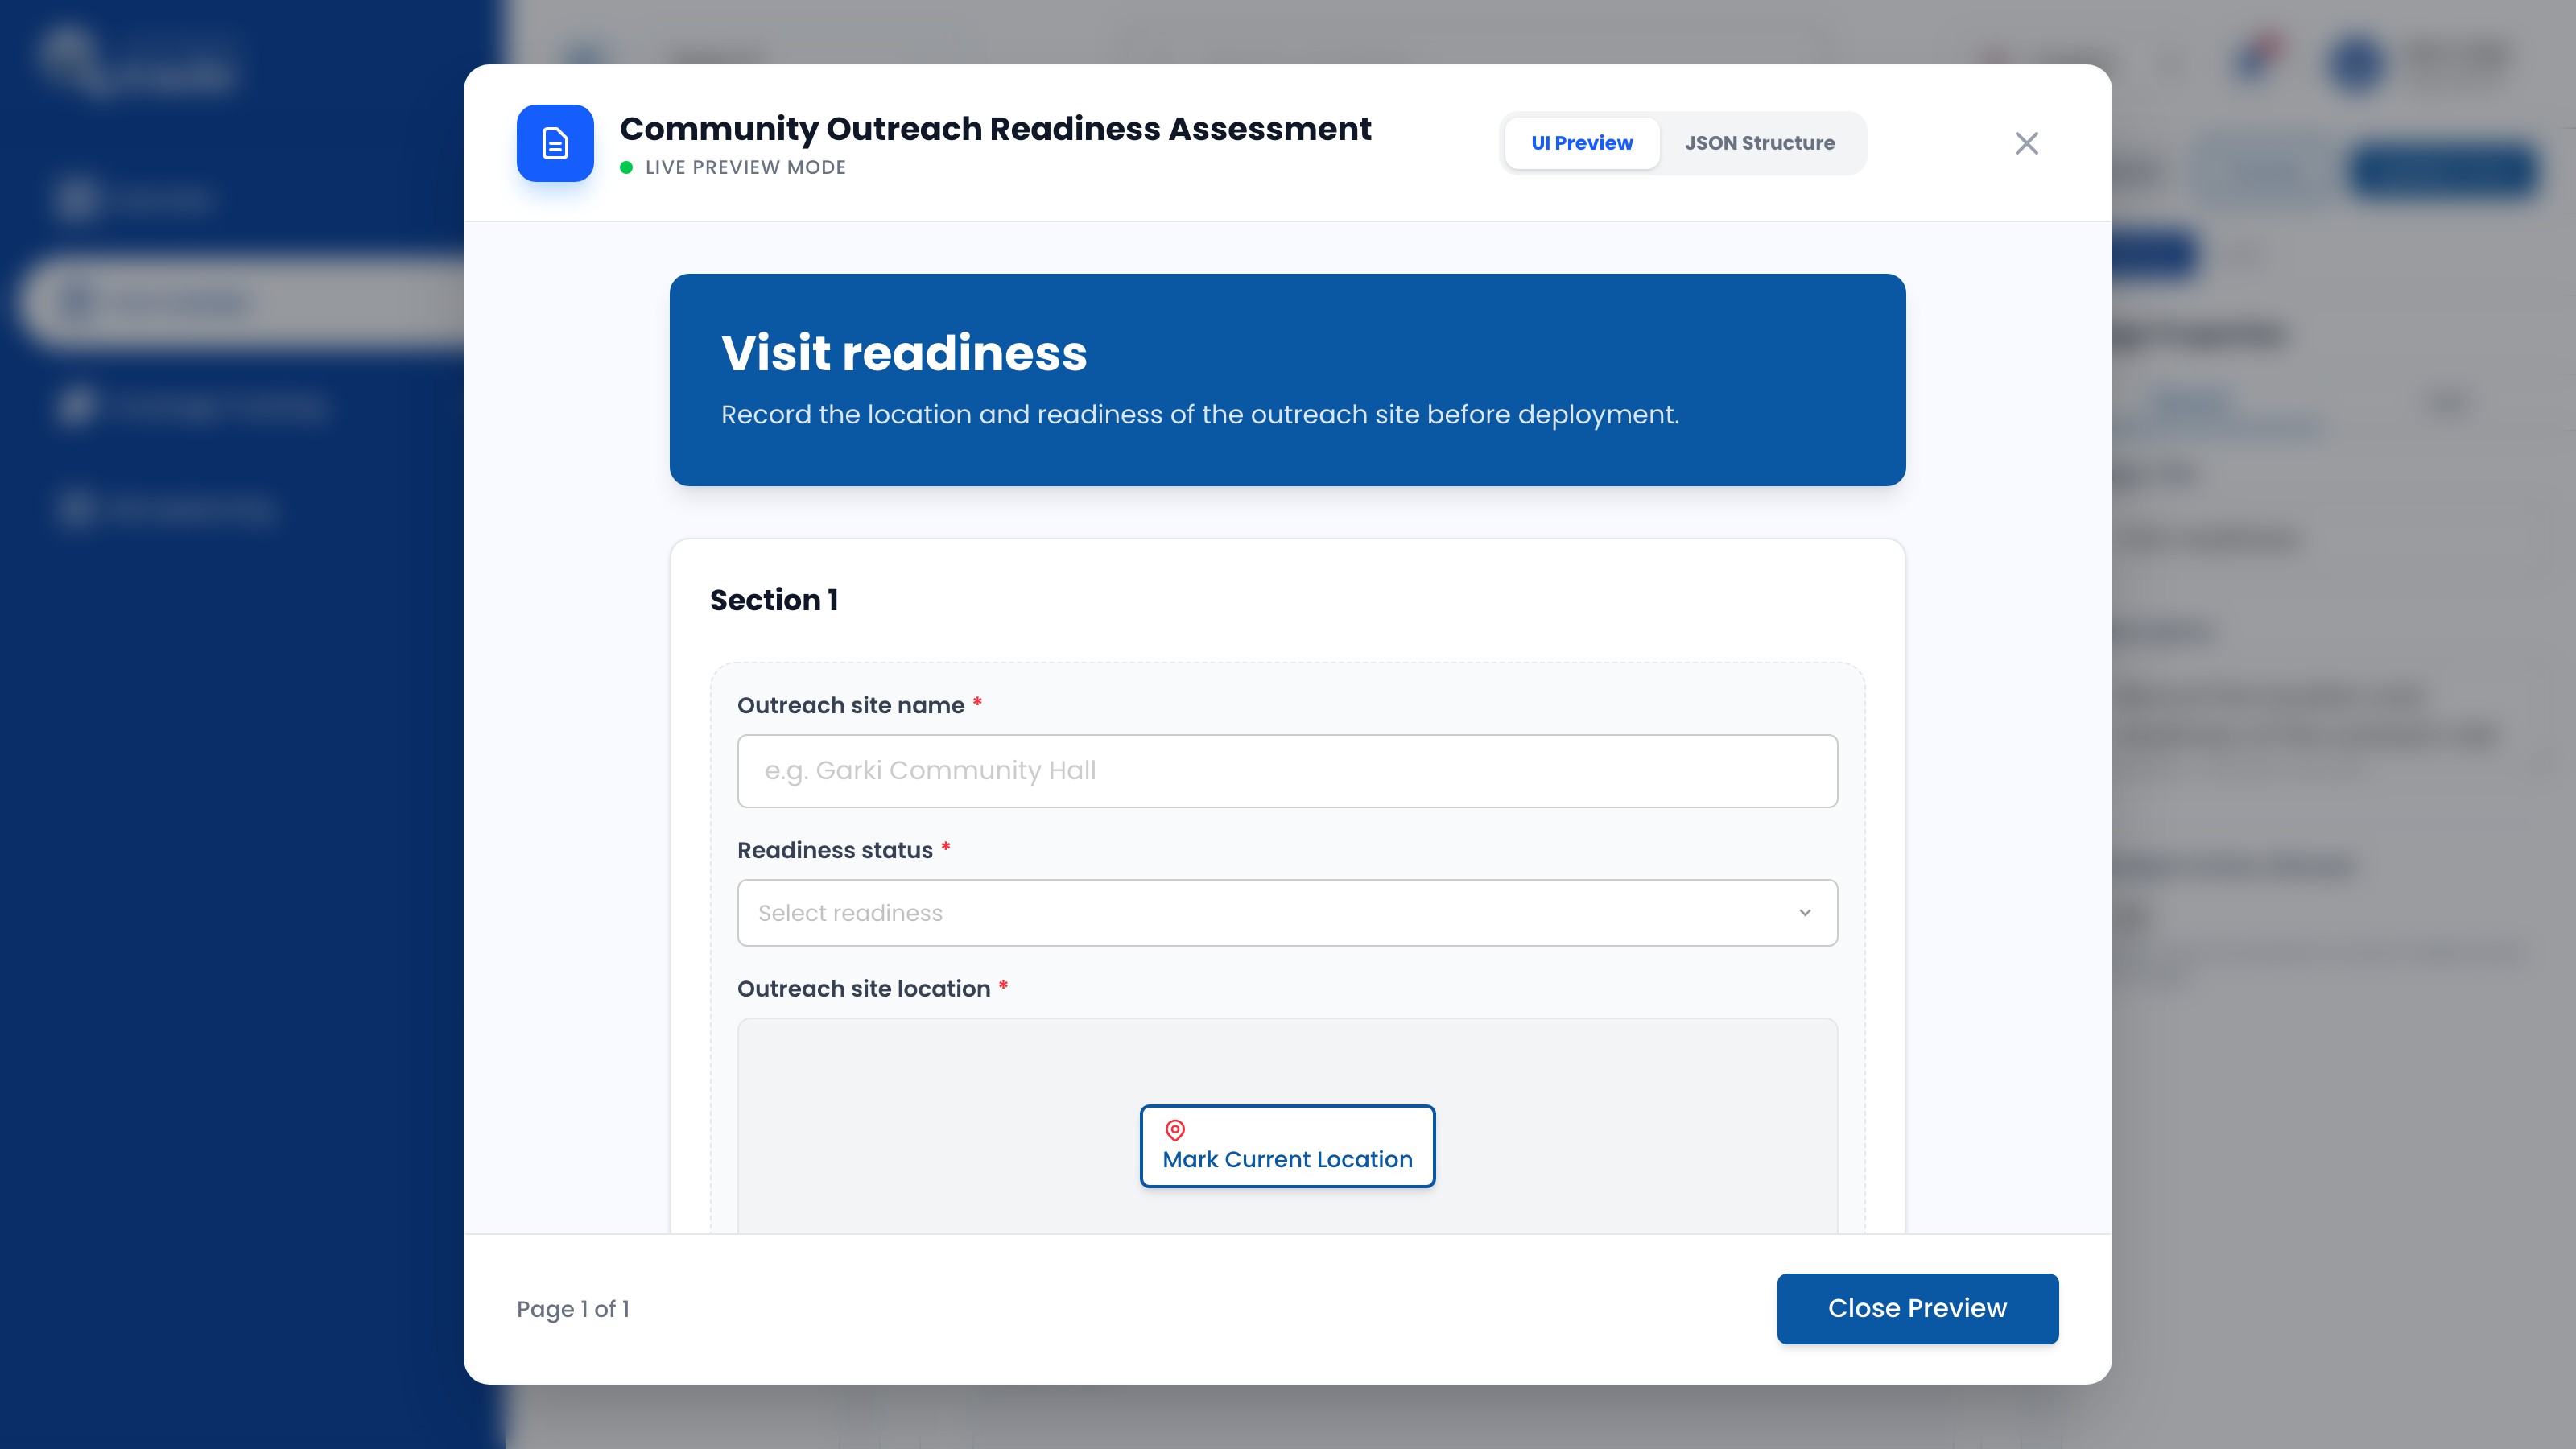
Preview the form

Select Preview and review the form exactly as a field user will see it. Select Close Preview if anything needs correction.

Live Preview Mode for the Community Outreach Readiness Assessment form

1 — form preview · 2 — close preview.

Live Preview Mode for the Community Outreach Readiness Assessment form

Create the form

Close the preview, select Create Form, and confirm the new form appears in Form Builder.

Form Builder showing the newly created Community Outreach Readiness Assessment

1 — new form.

Form Builder showing the newly created Community Outreach Readiness Assessment

Done. The form appears in Form Builder and can be previewed or selected for a field activity.

If something goes wrong

Why should field IDs use lowercase letters and underscores?

Field IDs are backend identifiers. Keep them stable, unique and limited to lowercase letters, numbers and underscores.

How do I check the respondent experience before saving?

Select Preview and review every page in Live Preview Mode before creating the form.

Forms

Preview a data collection form

Find an existing form and review its pages and fields without editing it.

Organization Administrator 2 min read Web

Before you start

  • A programme containing at least one form is active.

Open Form Builder

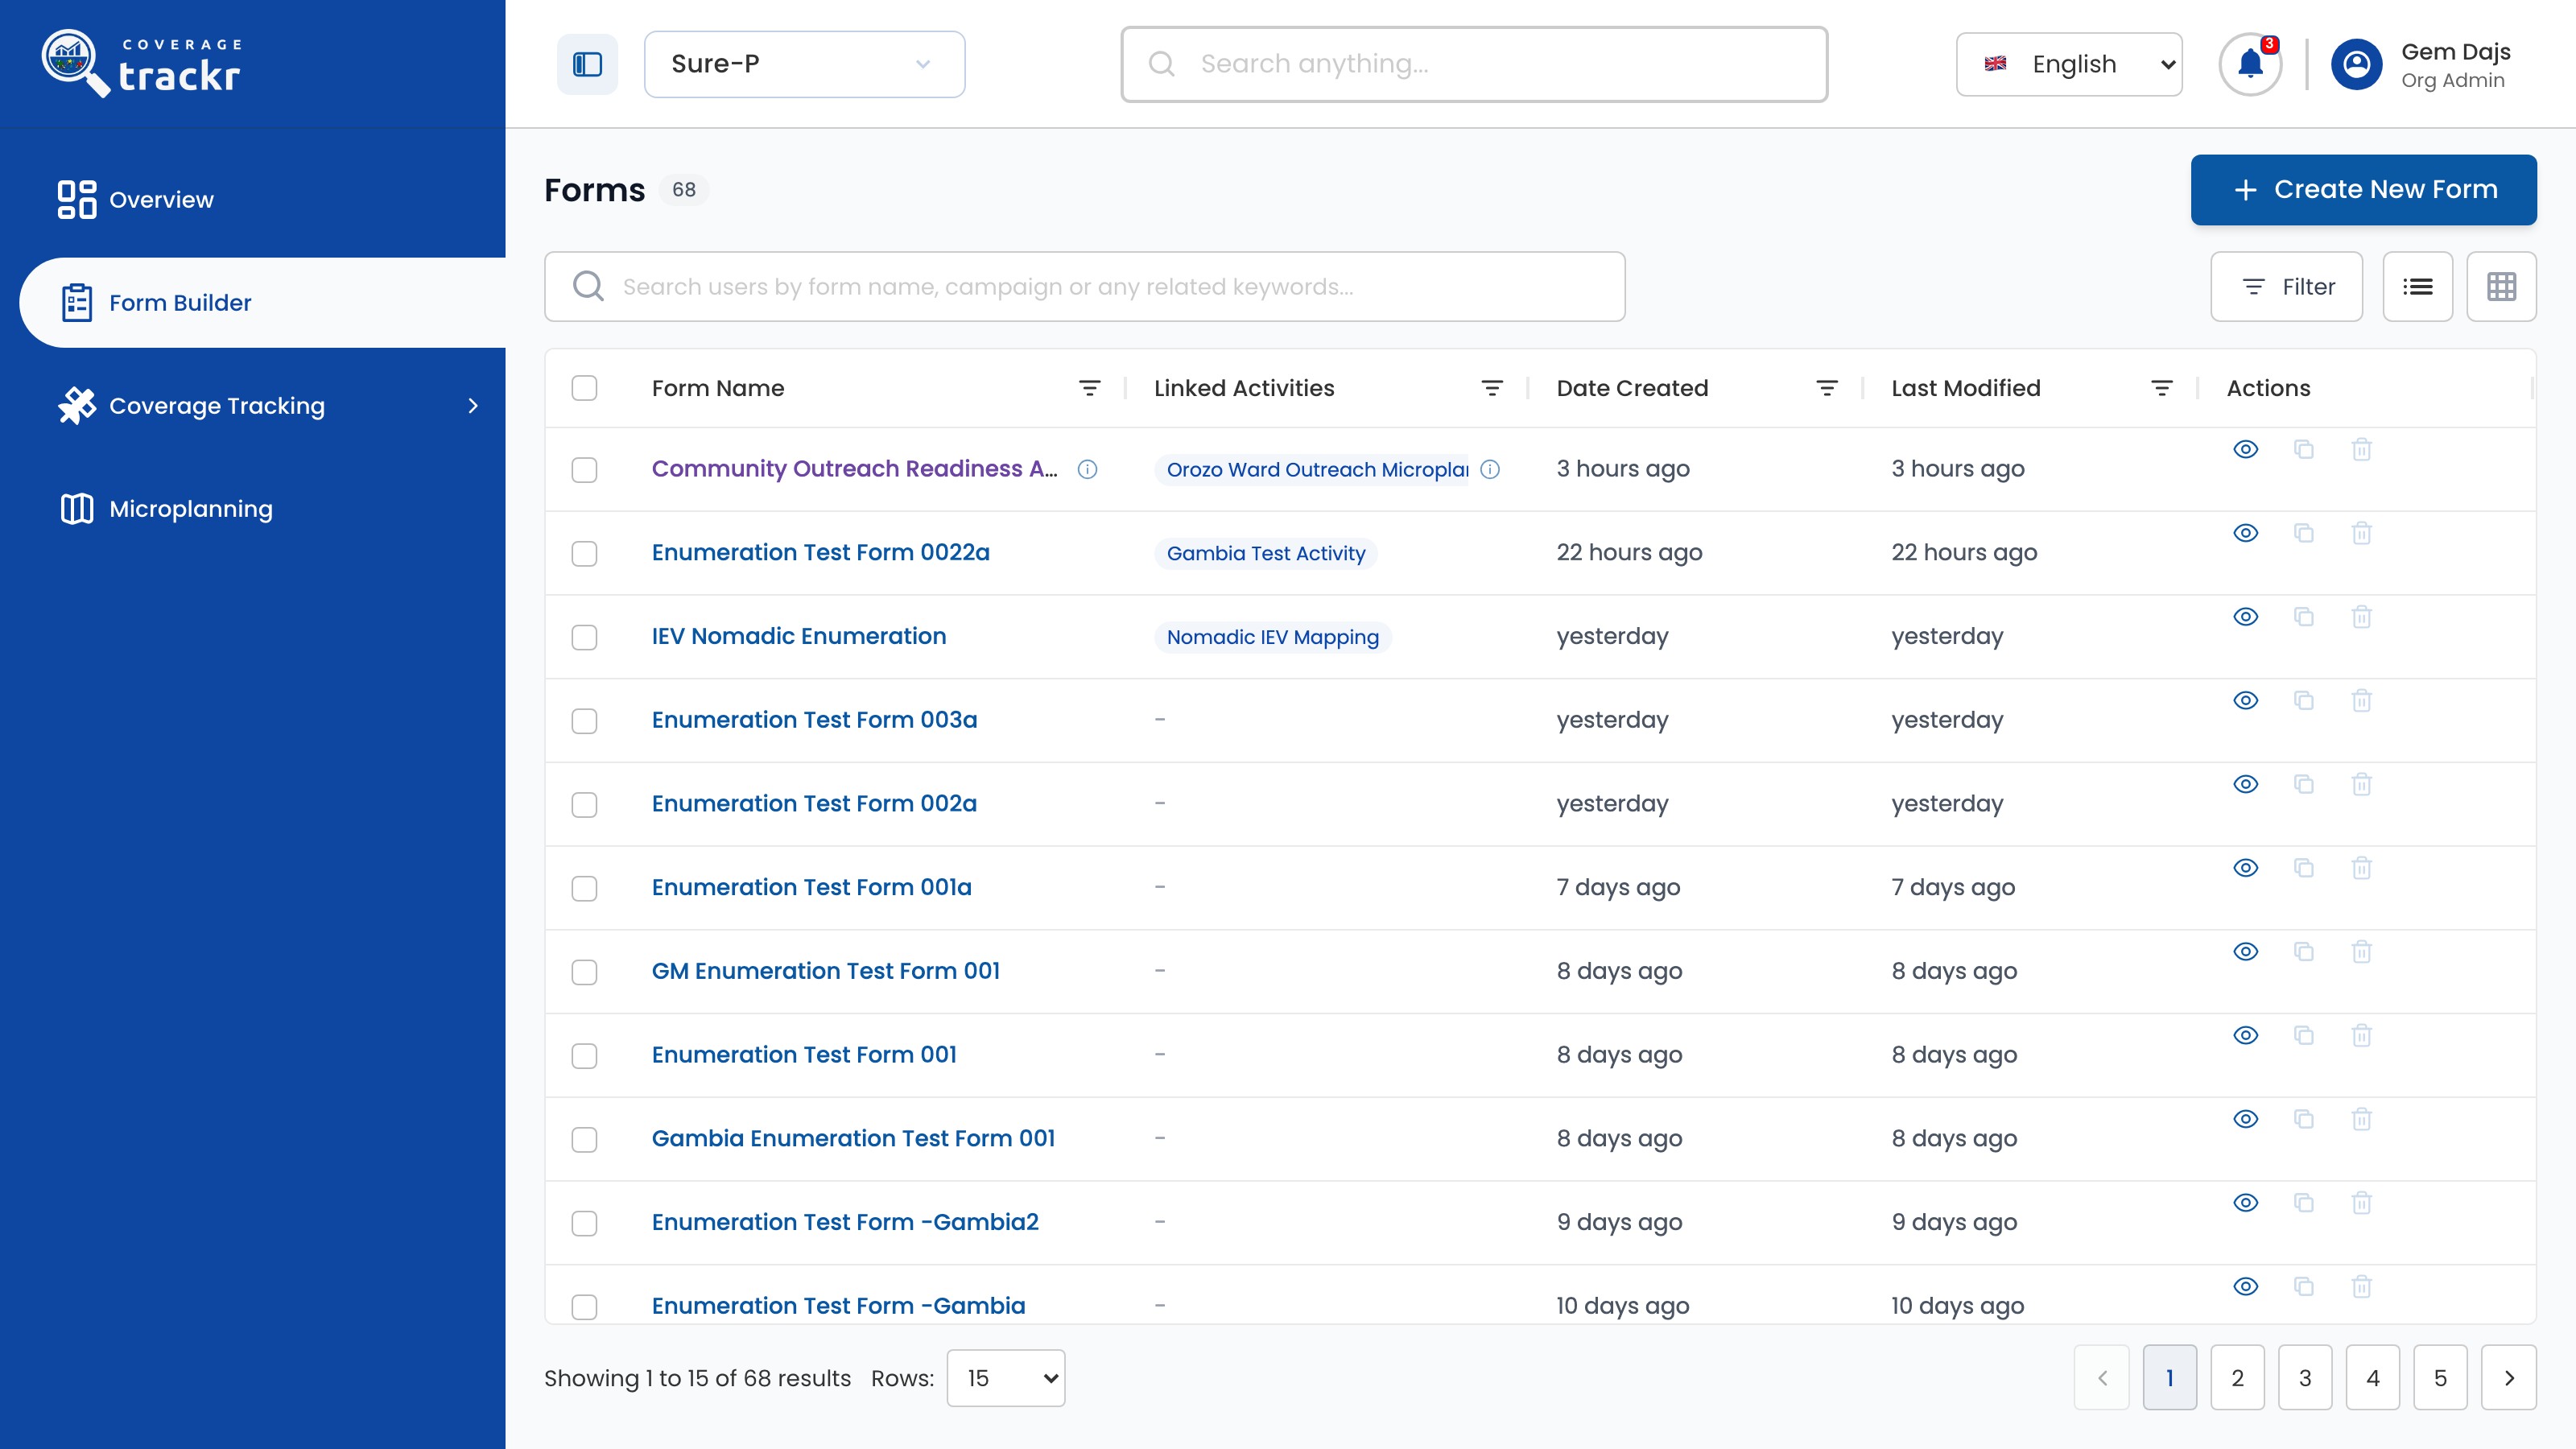
Select Form Builder, then use search or the list to find the form you want to review.

CoverageTrackr Form Builder list with search, filters and existing forms

1 — form search · 2 — forms list.

CoverageTrackr Form Builder list with search, filters and existing forms

Open the live preview

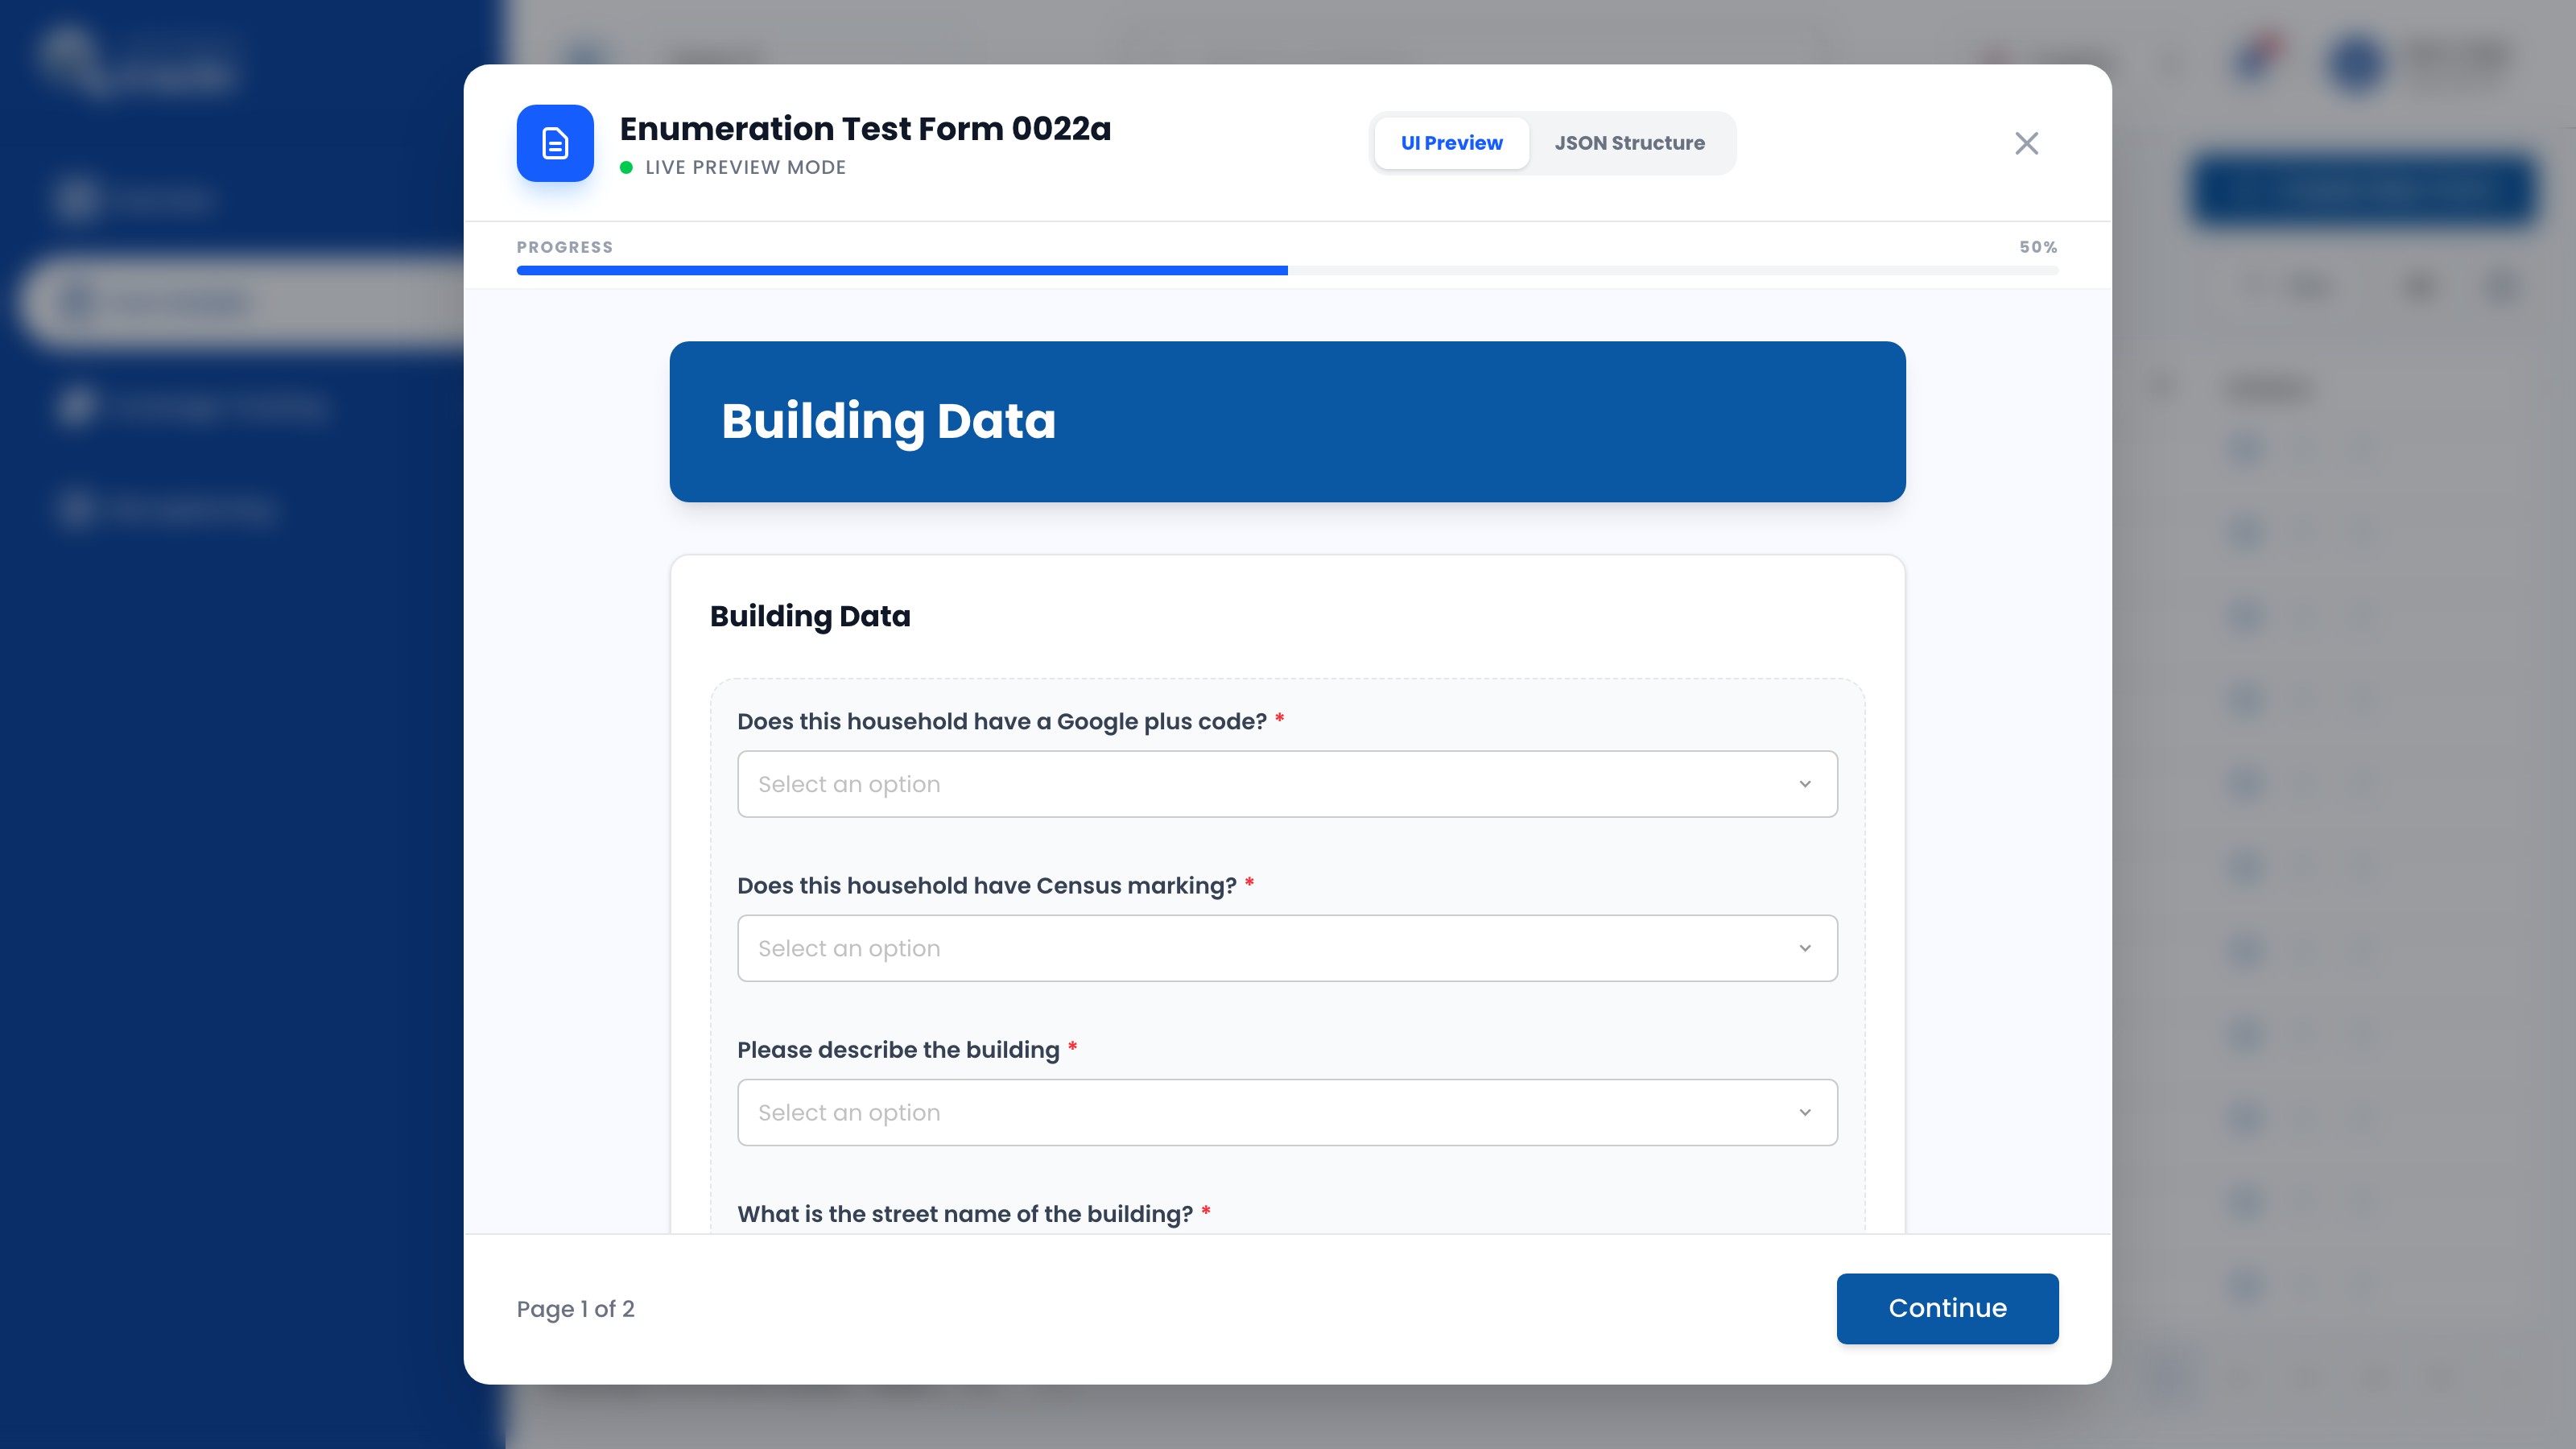
Select the Preview eye icon for the form, then use Continue to review its remaining pages.

Live Preview Mode showing the first page of an existing CoverageTrackr form

1 — live preview · 2 — continue.

Live Preview Mode showing the first page of an existing CoverageTrackr form

Done. The form is open in Live Preview Mode and its questions can be reviewed page by page.

If something goes wrong

What does JSON Structure show?

It shows how the form's pages, sections and fields are stored. Use UI Preview to see the form as respondents will.

Forms

Edit a data collection form

Add or change questions on an existing form.

Organization Administrator 4 min read Web

Before you start

  • You are signed in and the programme that owns the form is active.

Open the form

In Form Builder, select the form's name.

Forms list in Form Builder

1 — form name.

Forms list in Form Builder

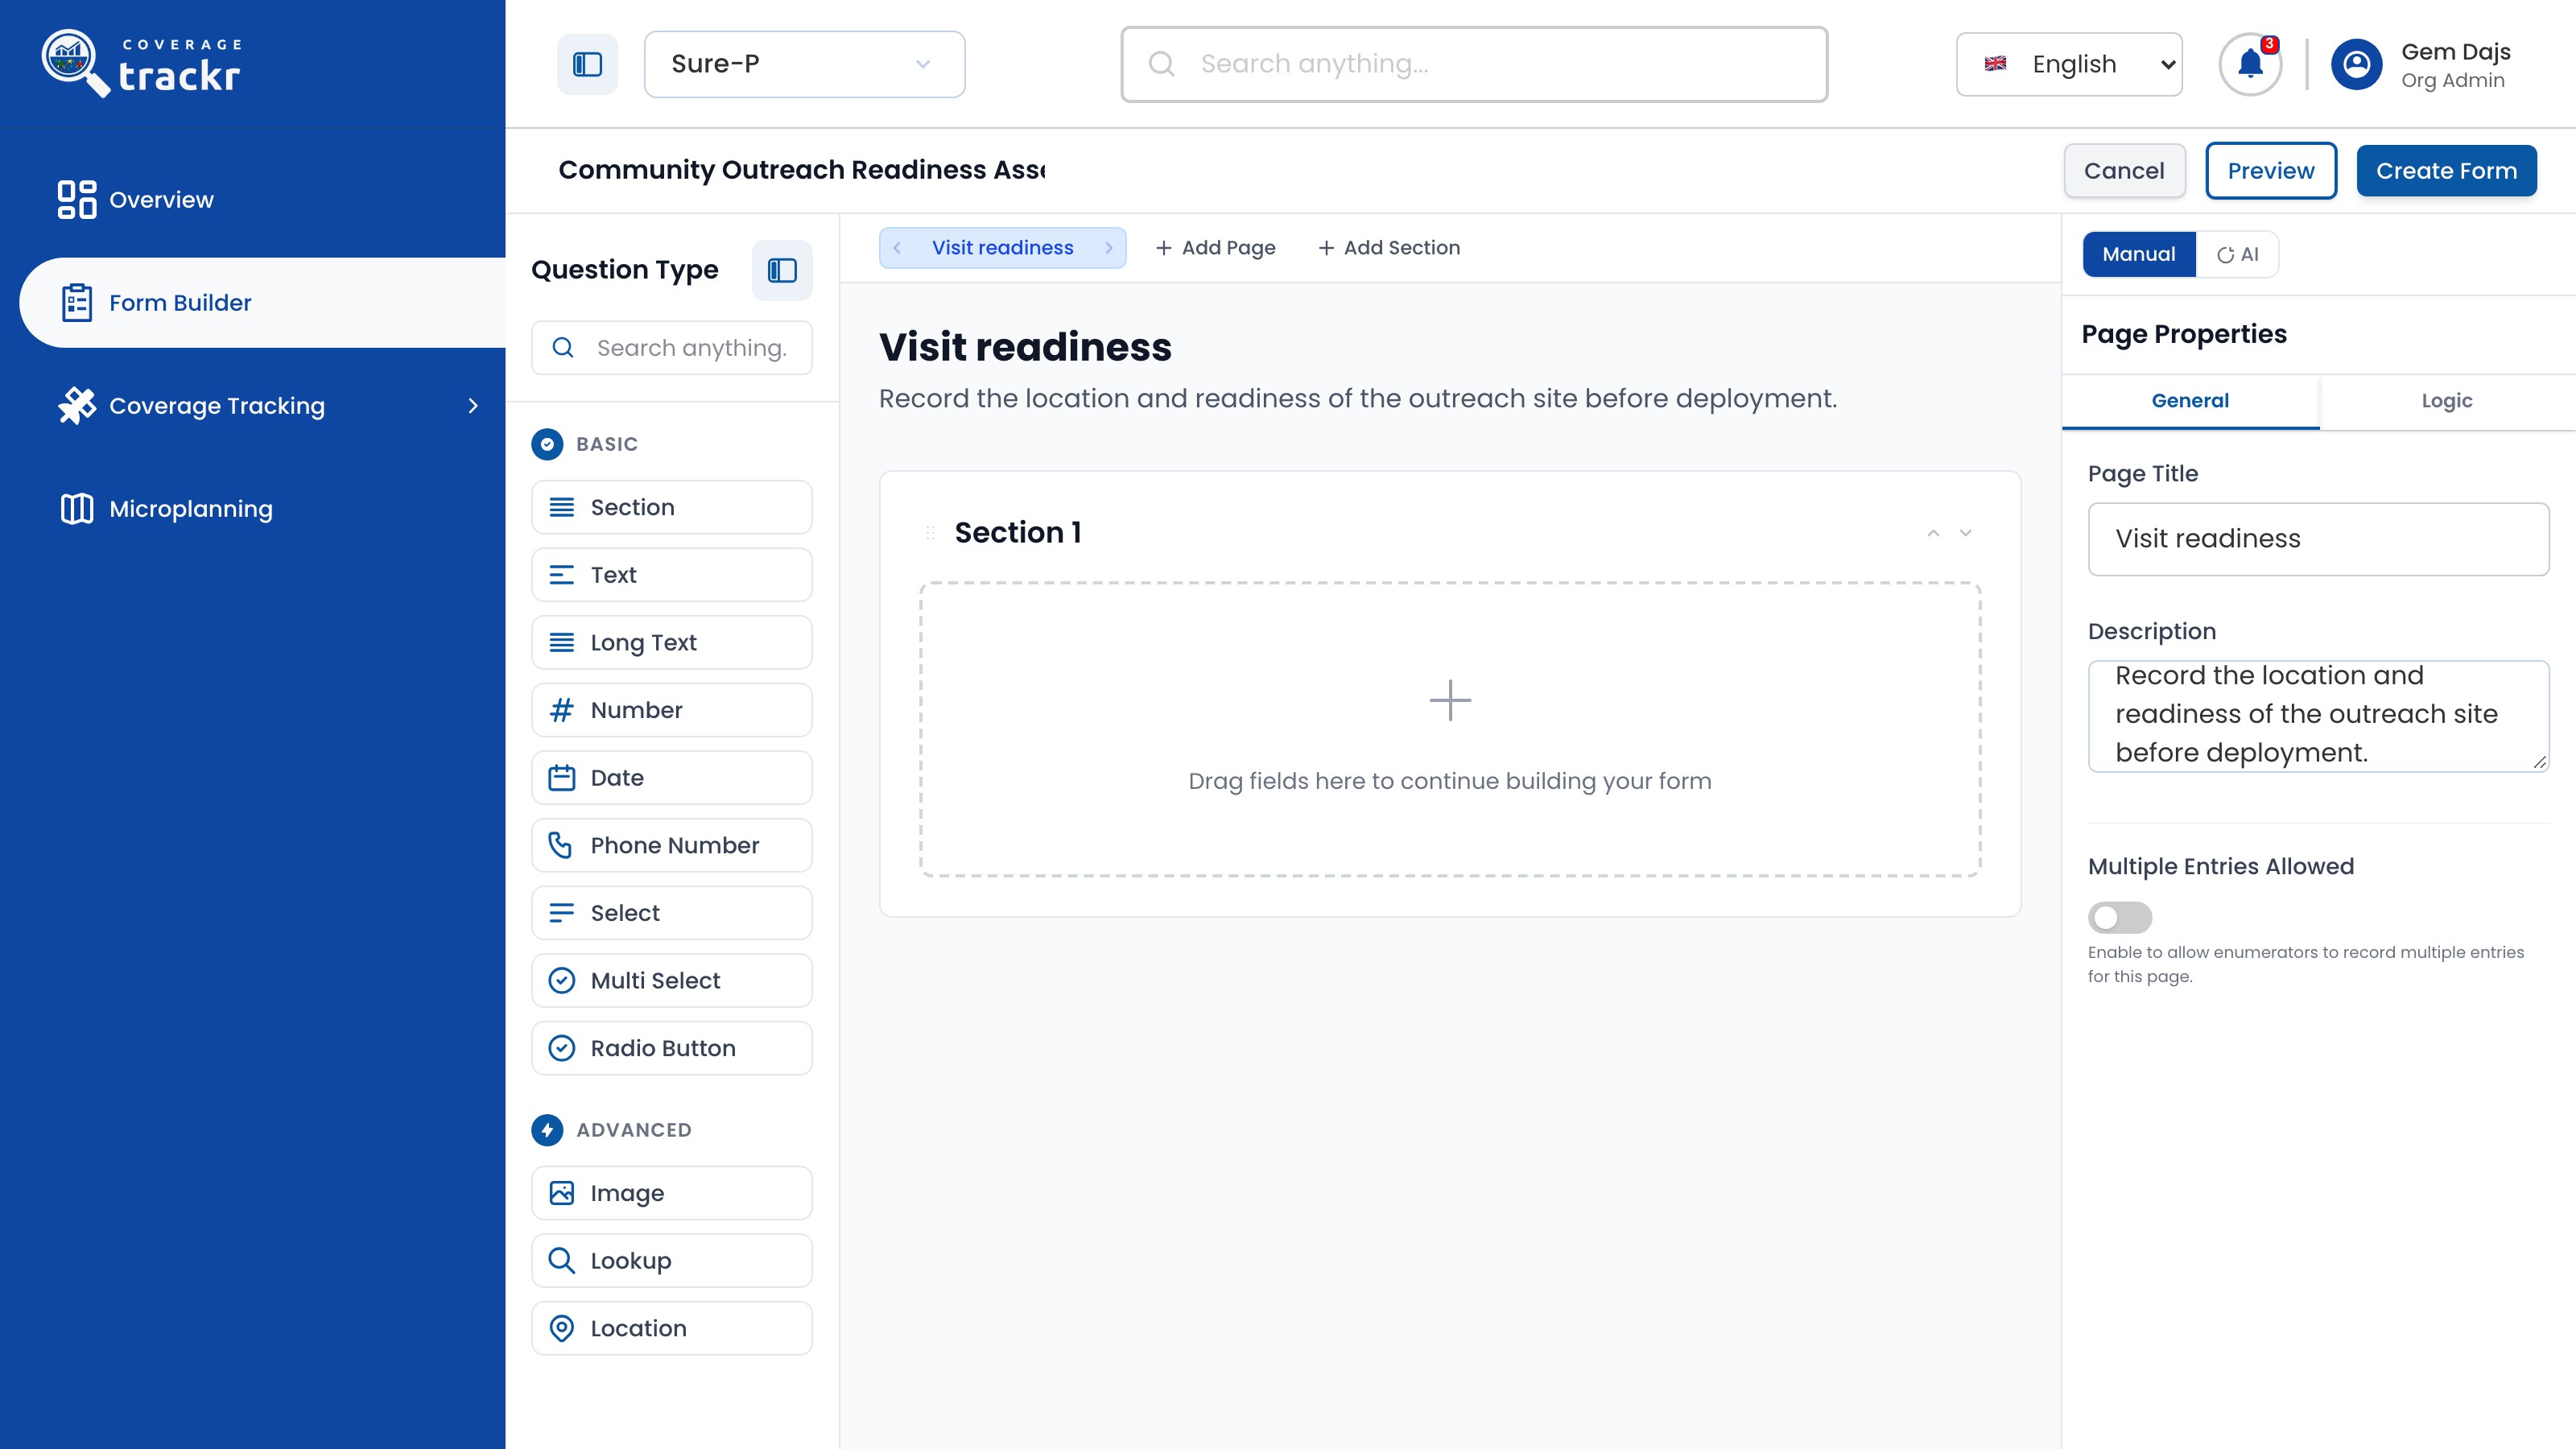
Review the current questions

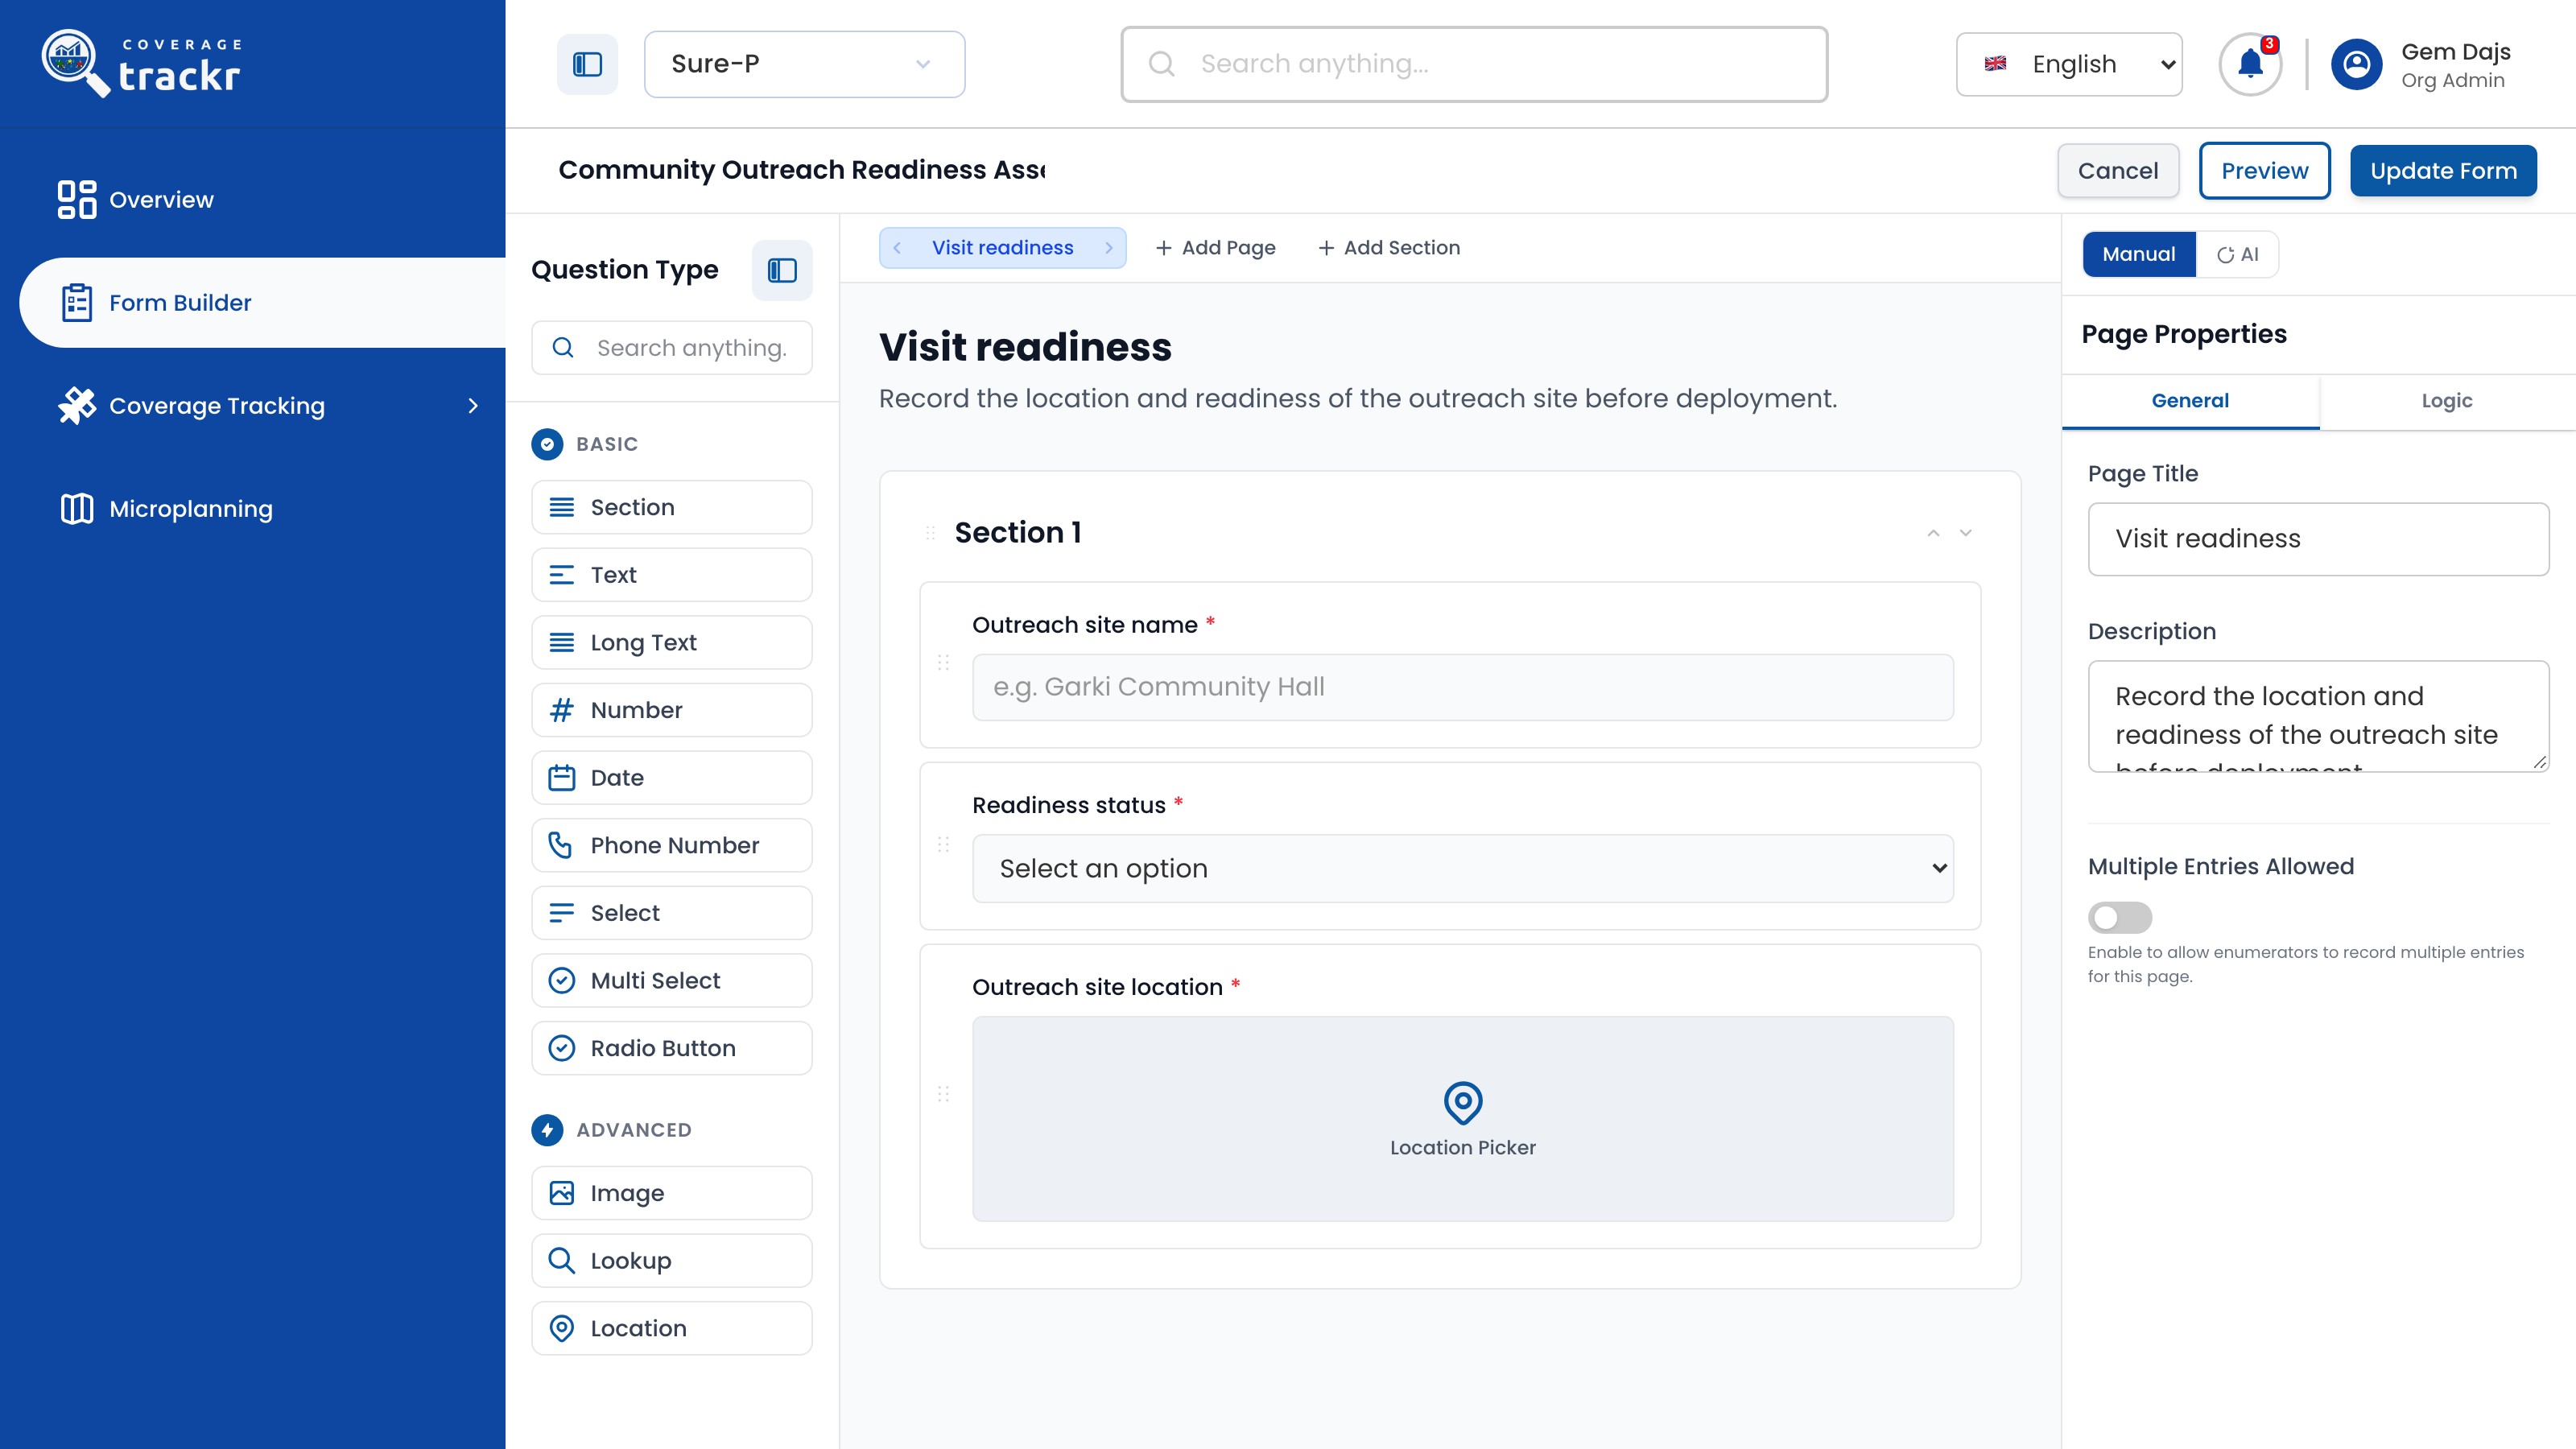
The editor shows the form's pages and sections, with Question Type on the left and the properties panel on the right.

Form editor showing the Visit readiness page and its questions

1 — question types · 2 — current questions · 3 — properties panel.

Form editor showing the Visit readiness page and its questions

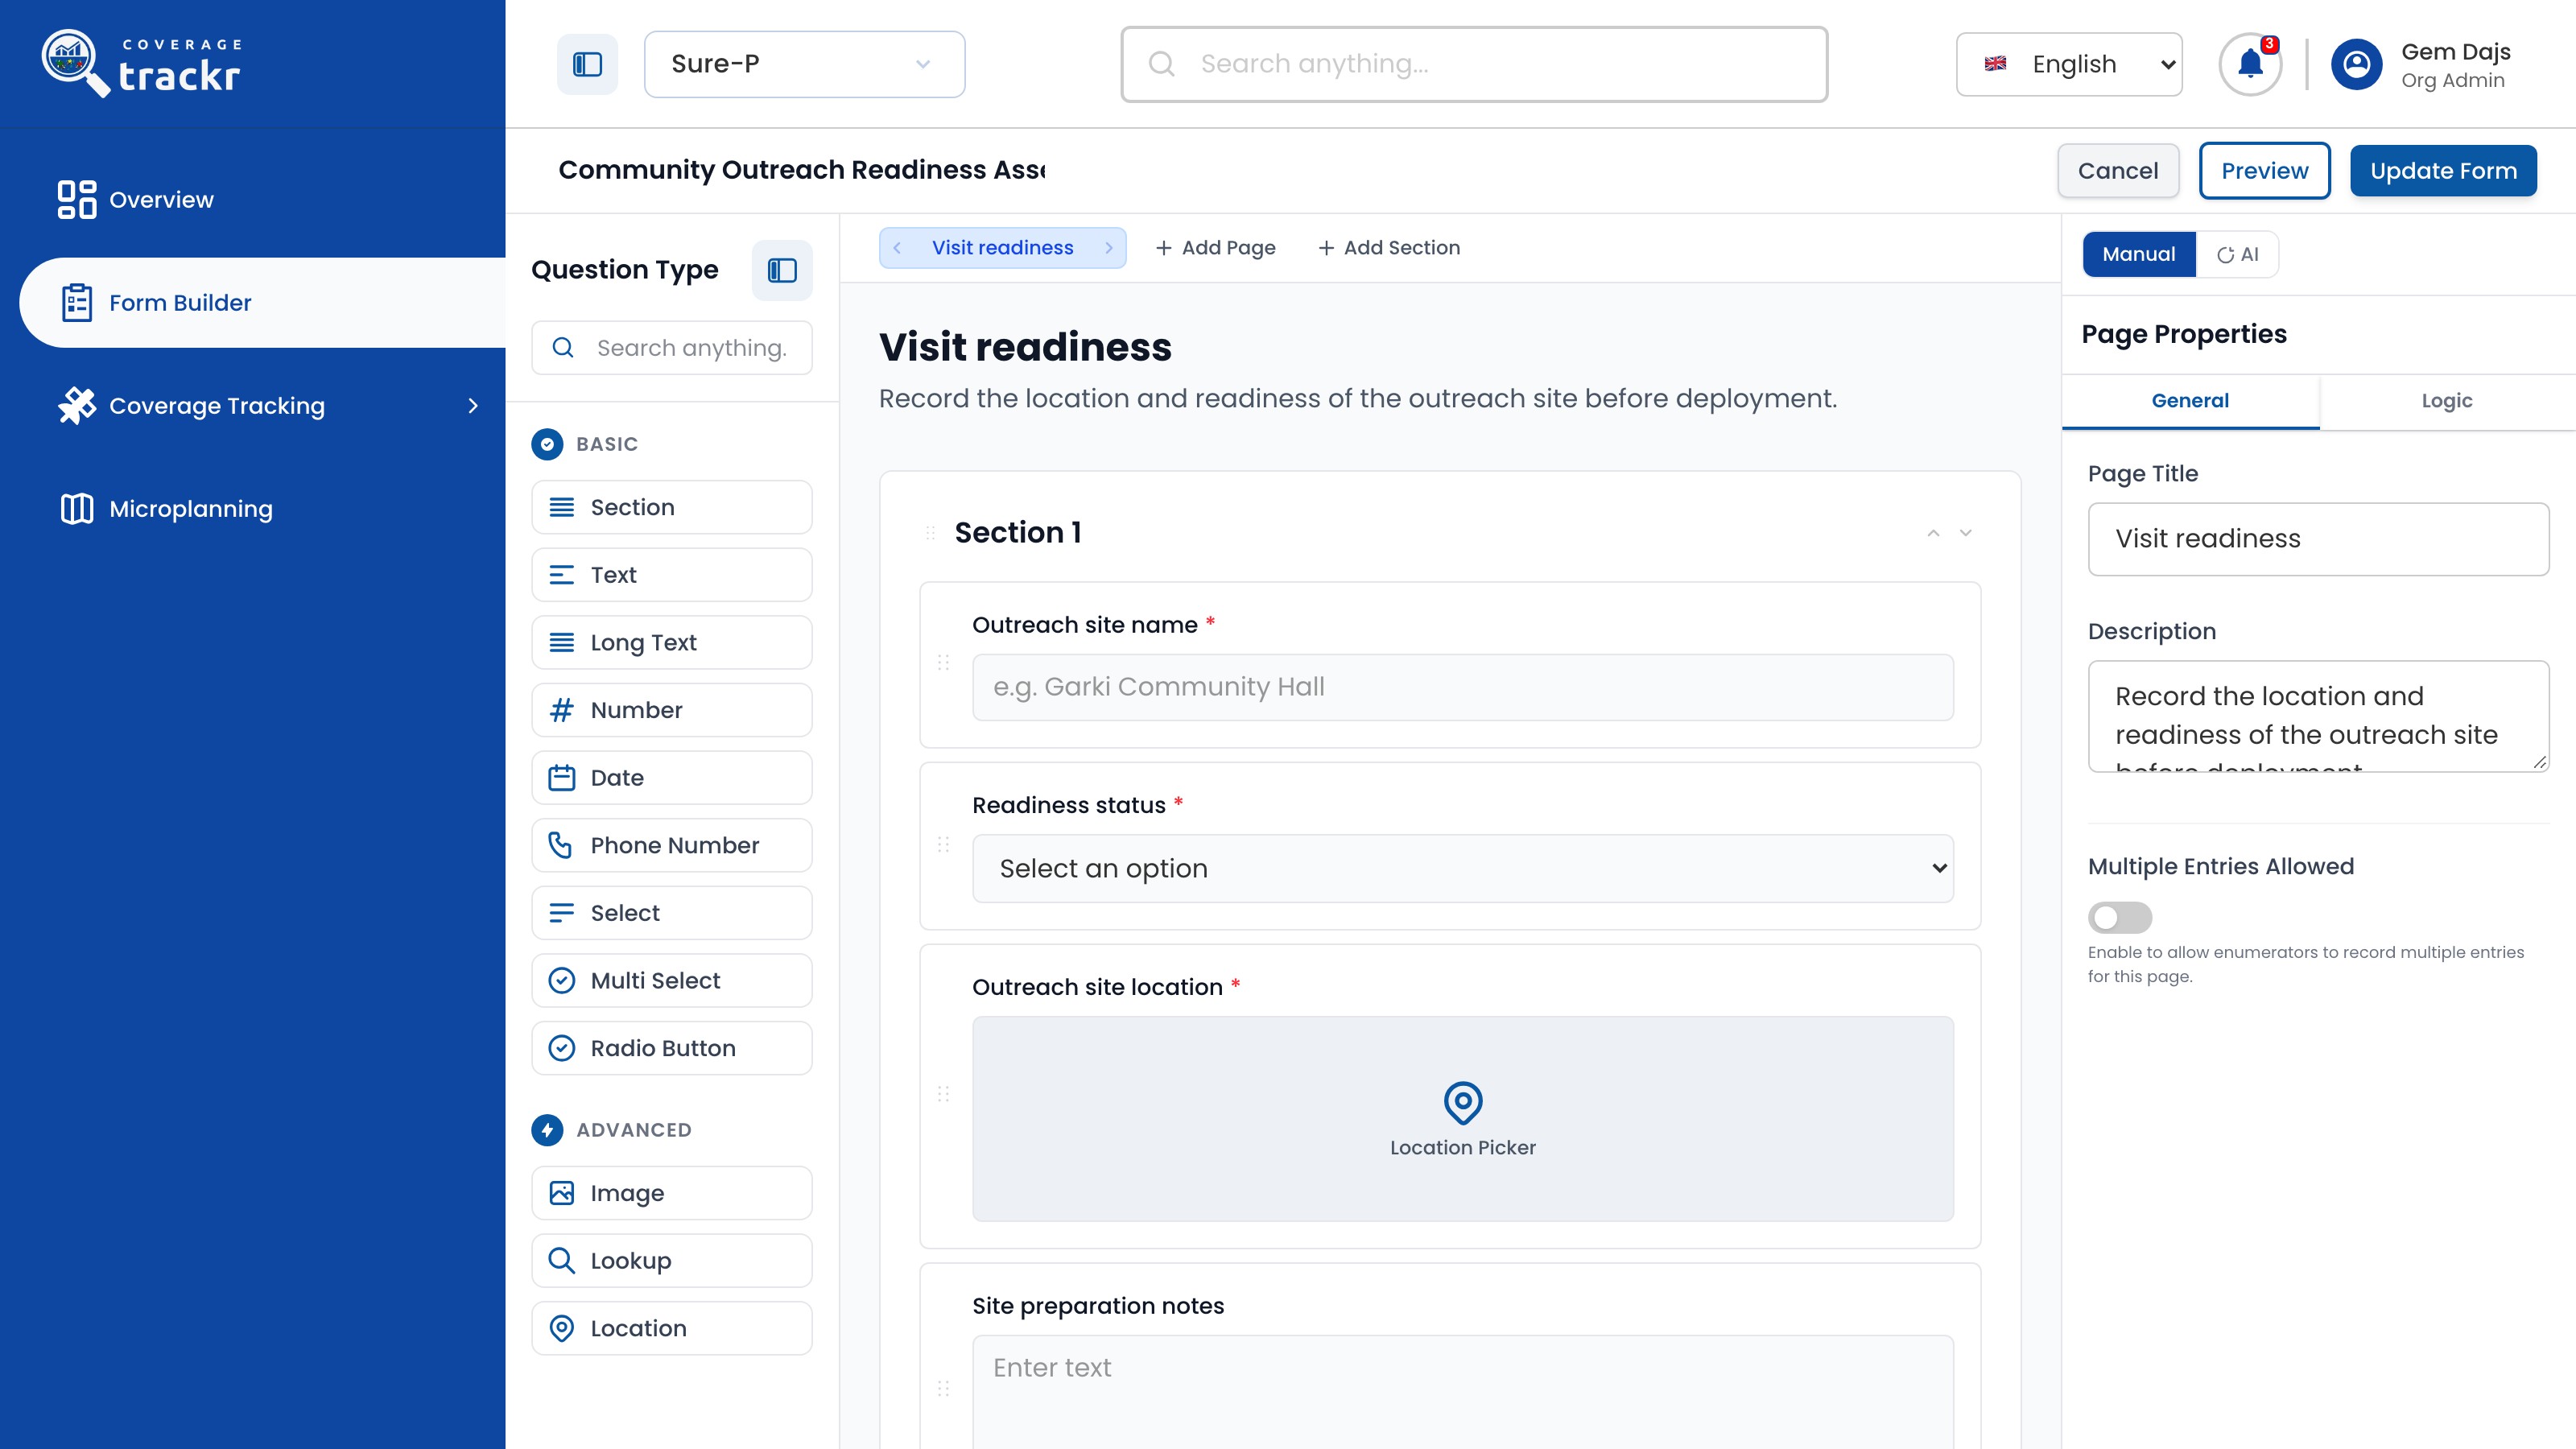
Add and describe a question

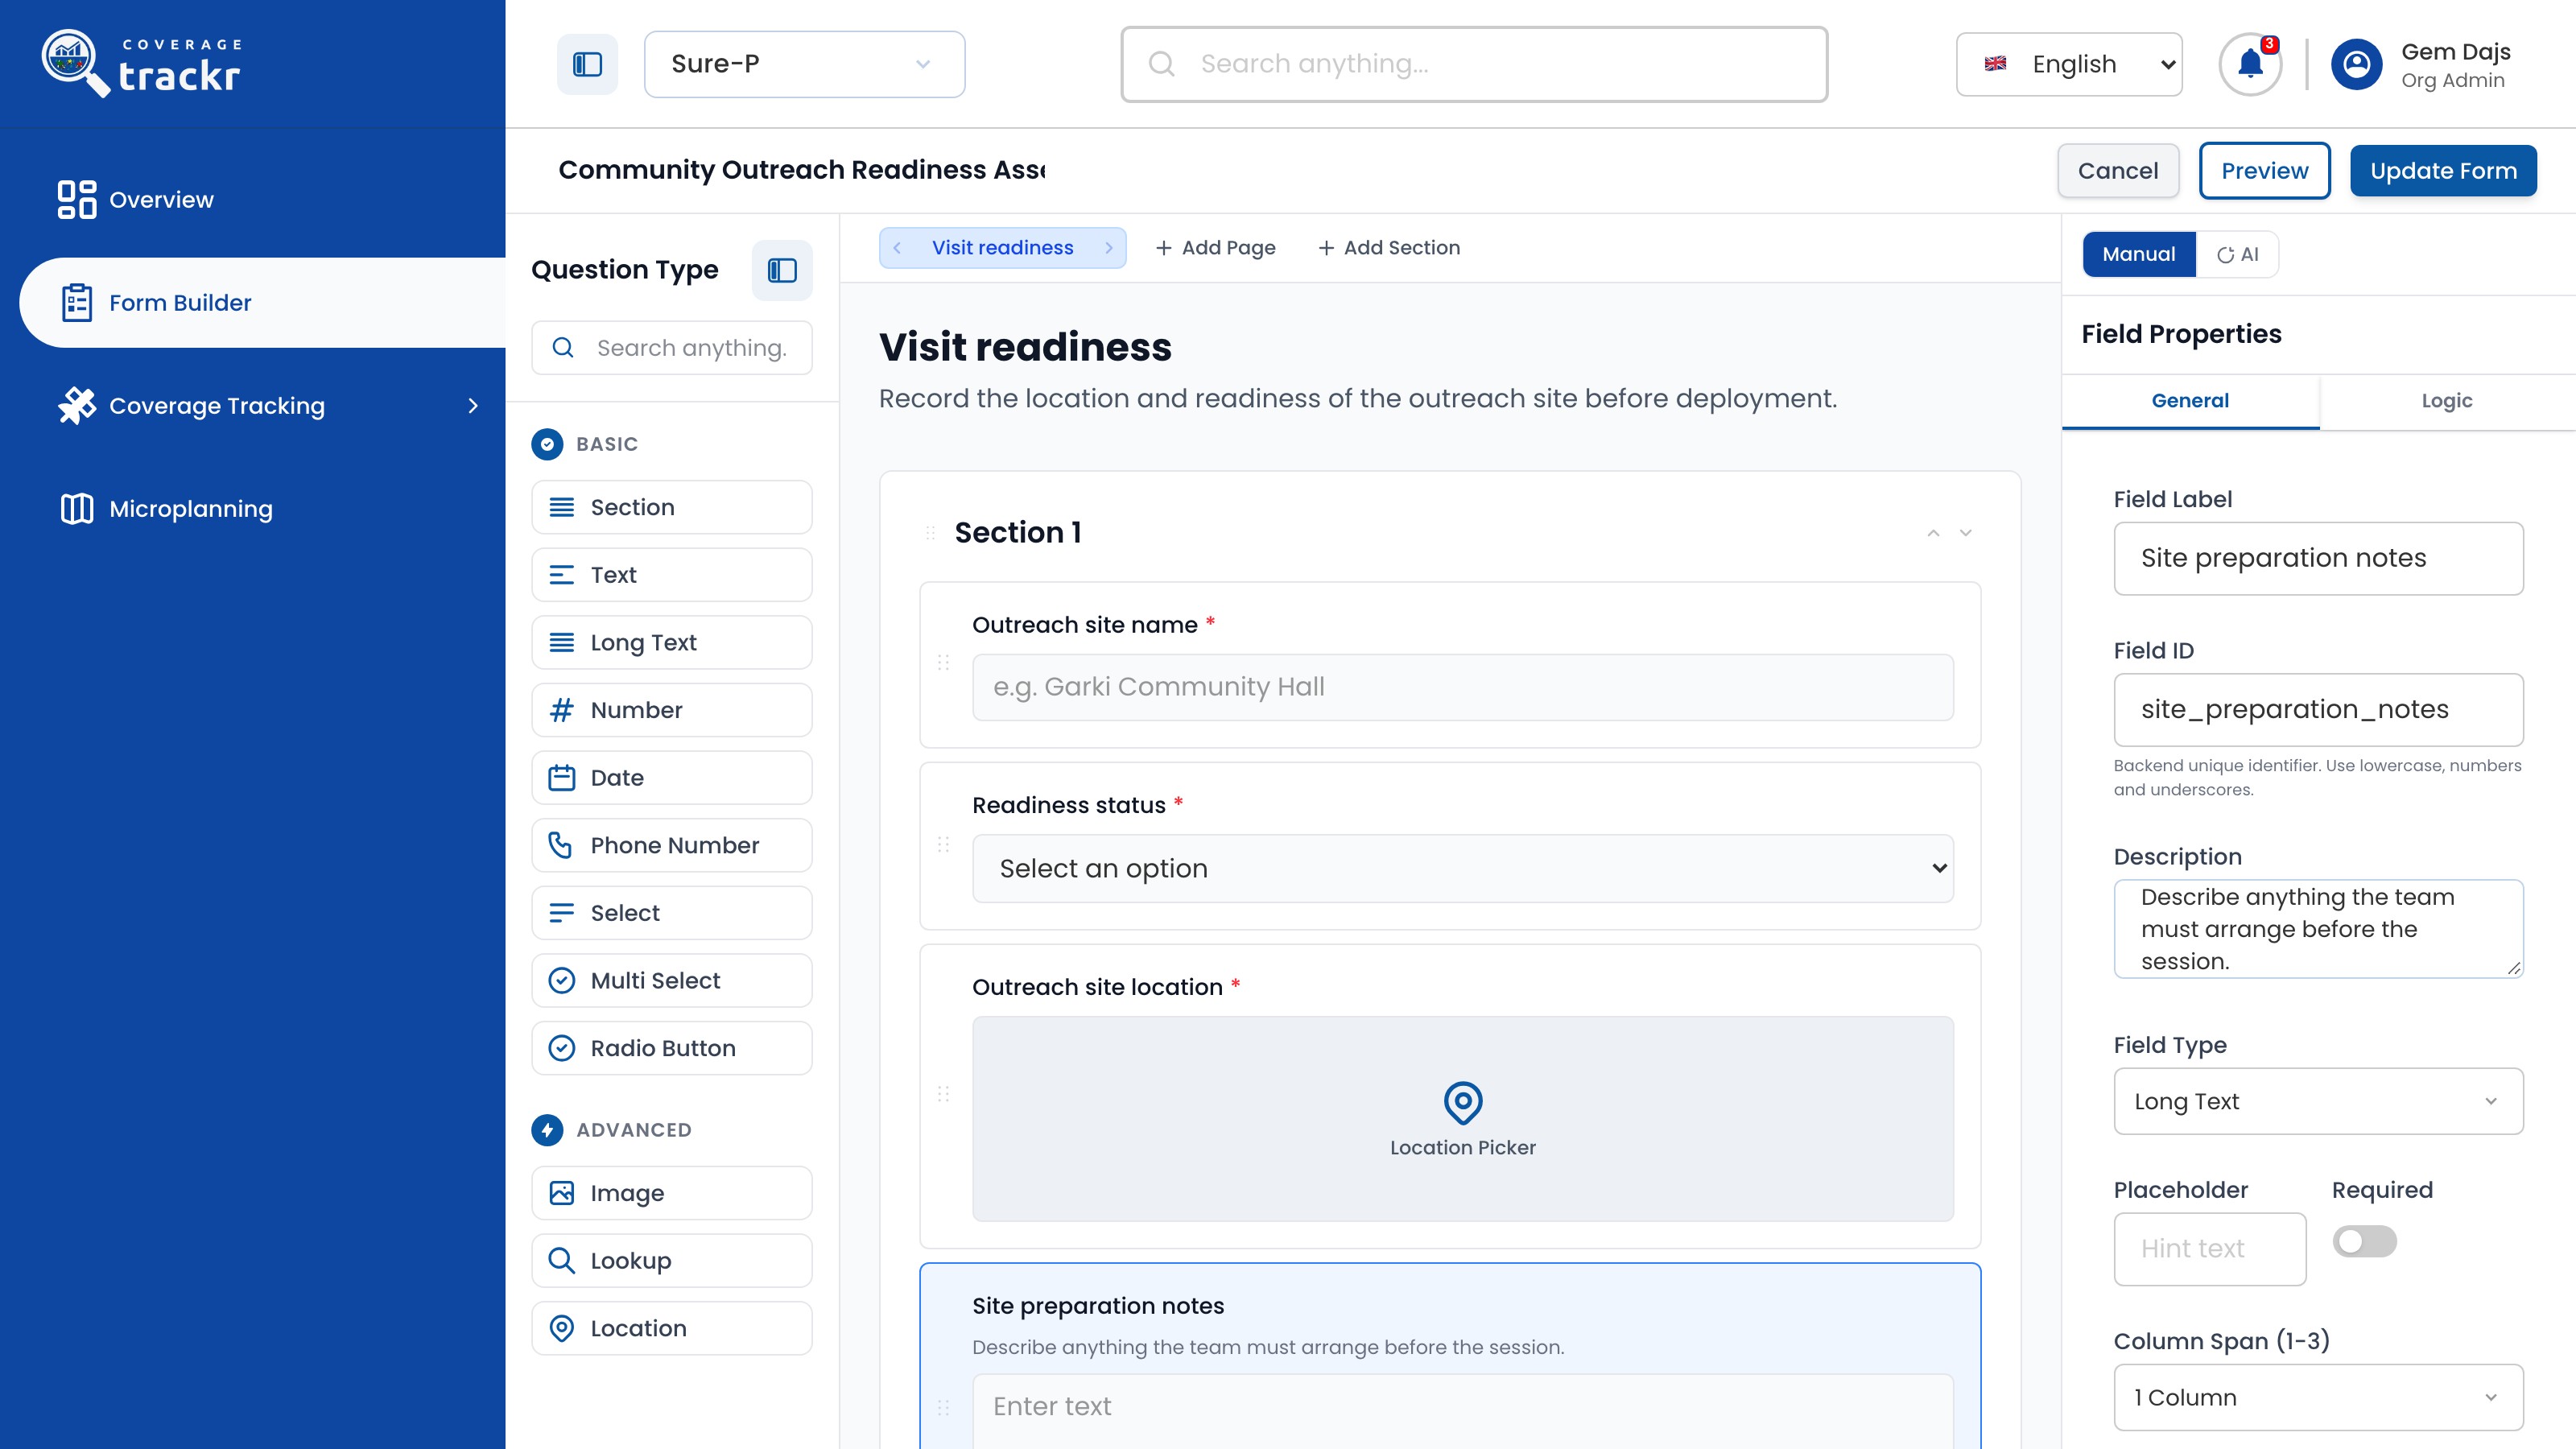
Select a question type, such as Long Text, to add it. In Field Properties, enter the Field Label, Field ID and Description, and switch on Required if needed.

New Long Text question Site preparation notes with its field ID and description

1 — long text · 2 — field properties · 3 — required switch.

New Long Text question Site preparation notes with its field ID and description

Save the form

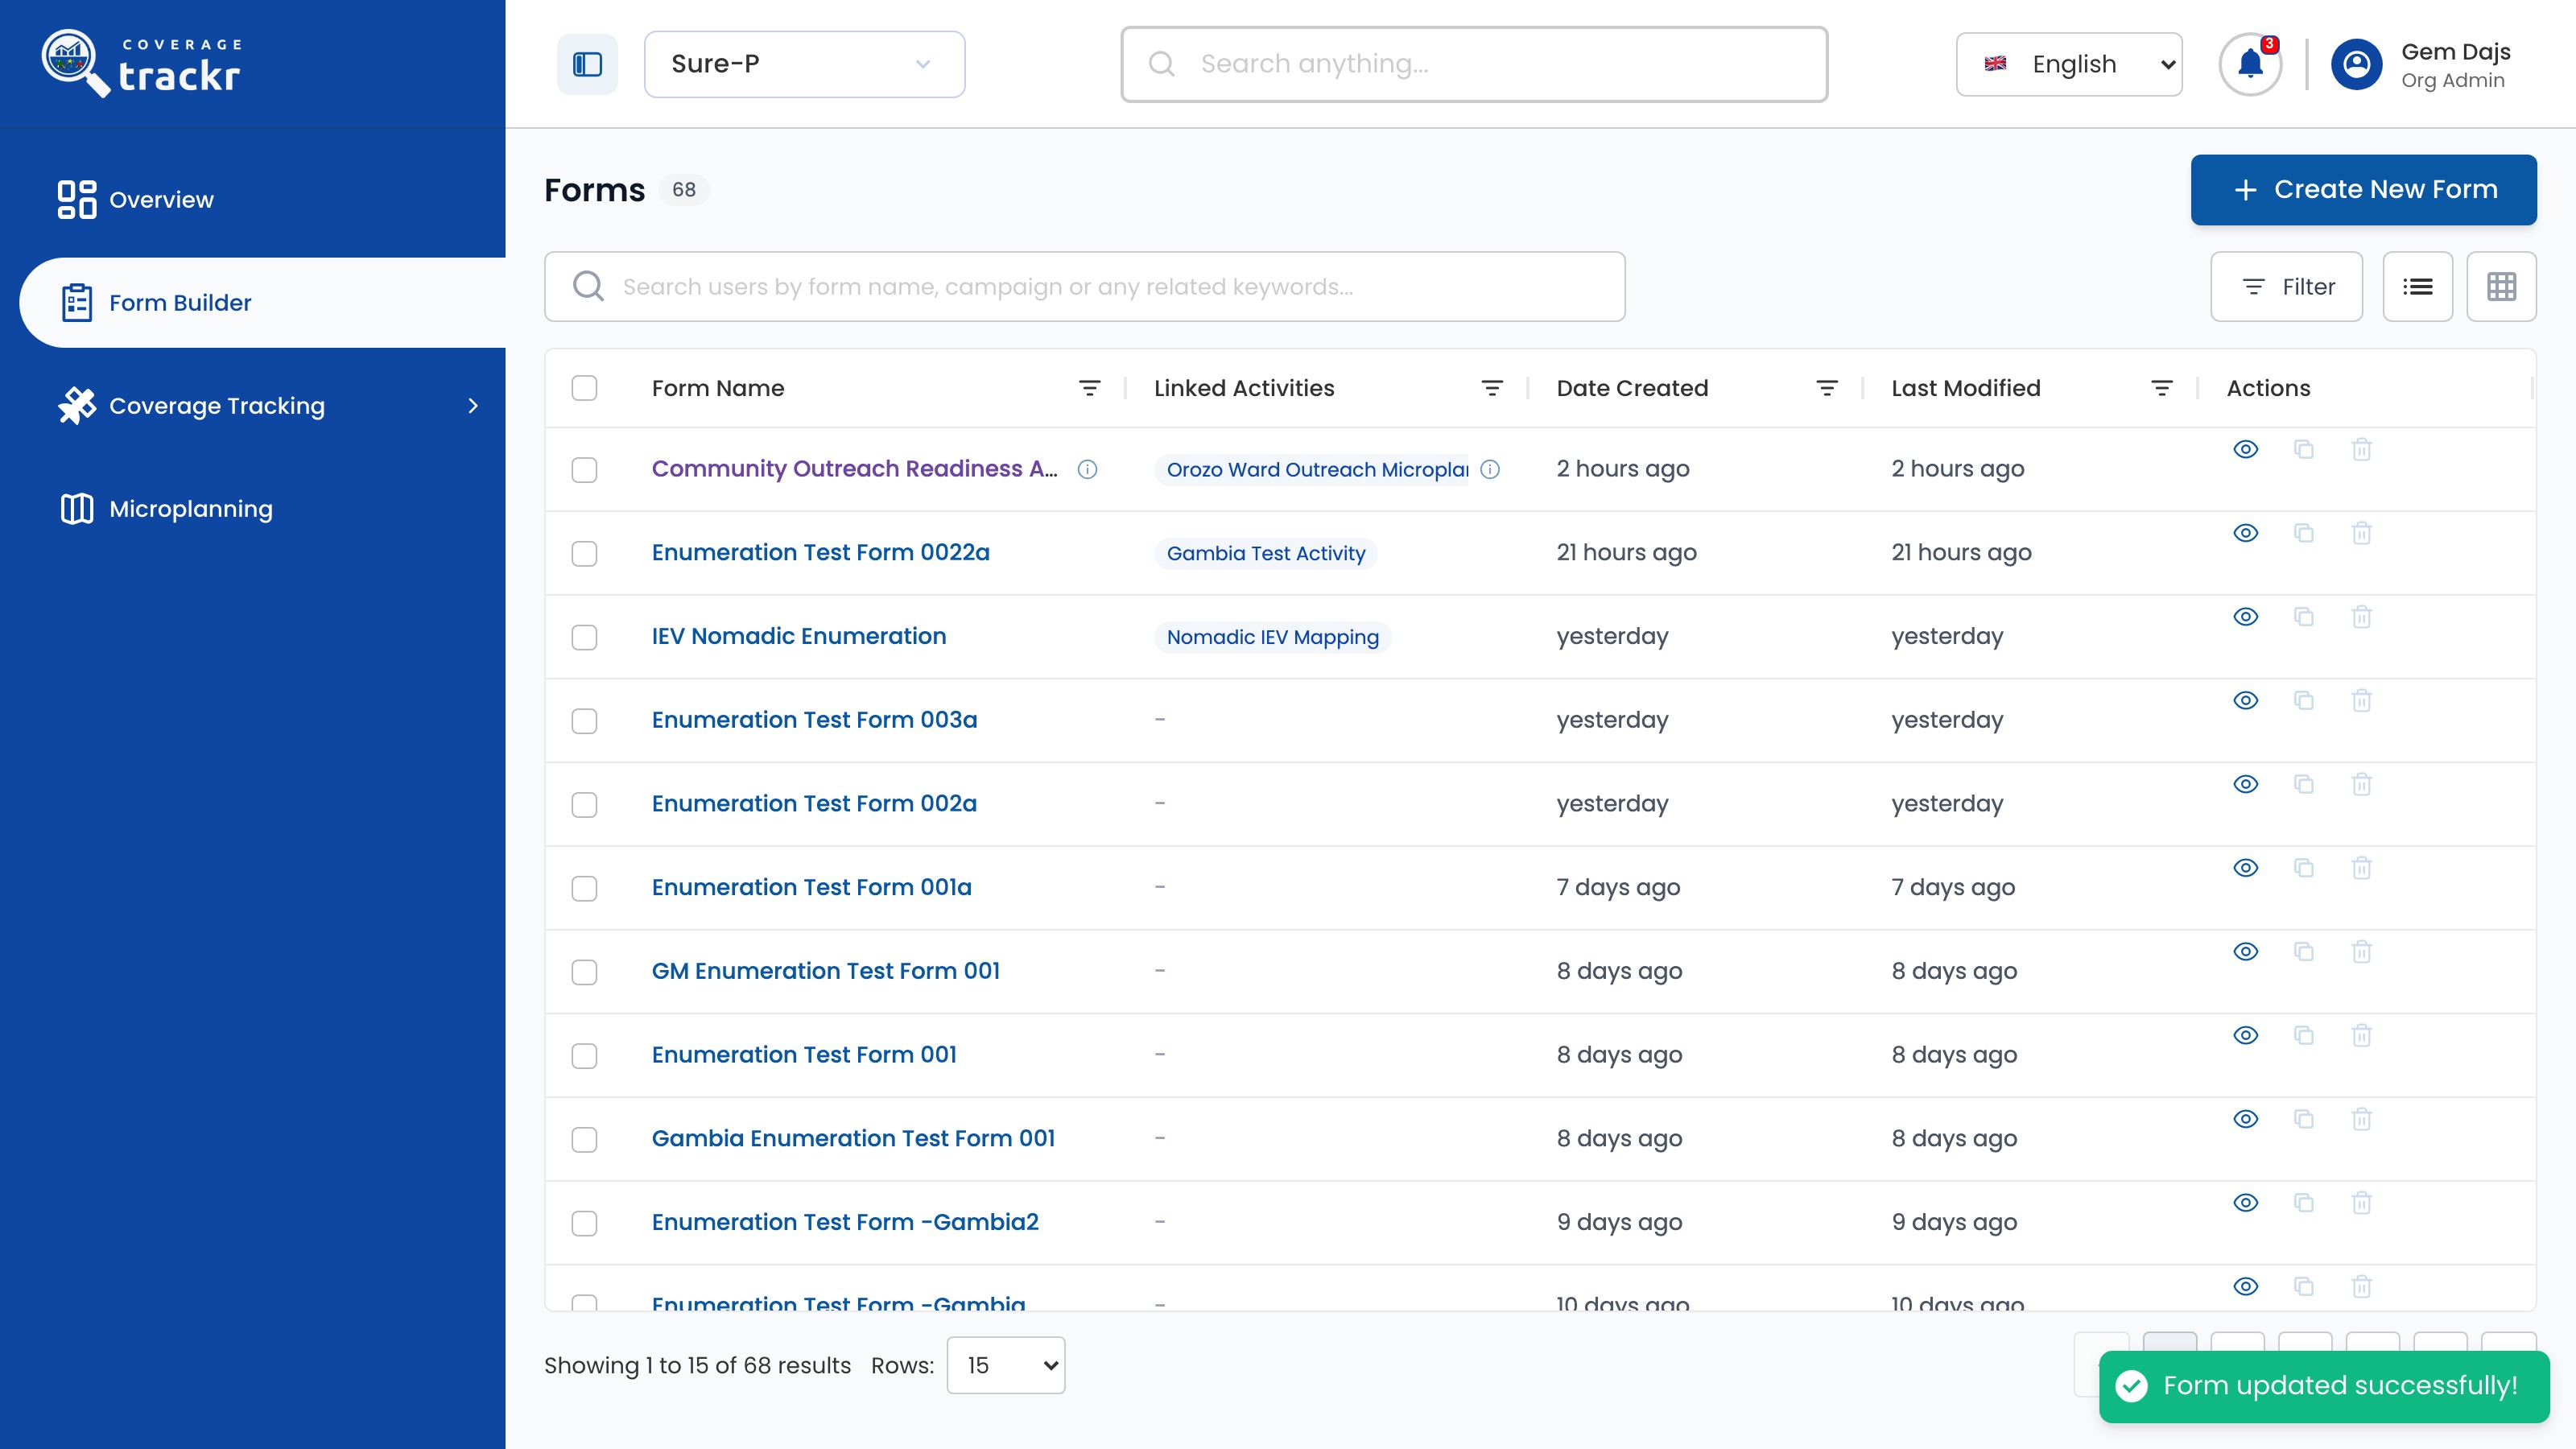
Select Update Form. You return to the forms list with a confirmation.

Forms list with a Form updated successfully message

1 — updated form · 2 — update confirmation.

Forms list with a Form updated successfully message

Done. CoverageTrackr confirms Form updated successfully! and the form's Last Modified time changes.

If something goes wrong

Will field workers see the change?

Activities and microplans that use the form pick up the updated questions. Check with field teams before changing a form that is already in use.

What should I use for Field ID?

A short, stable name in lowercase with underscores, such as site_preparation_notes. Avoid changing it after data has been collected.

Field activities

Create a field activity

Set up a new field activity with its form, deployment area and team.

Organization Administrator 8 min read Web

Before you start

  • You are signed in and the correct programme is active.
  • The data collection form exists in Form Builder.
  • The team for the area has been created in Teams & Hierarchy.

Open Field Activities

Open Coverage Tracking, select Field Activities, then select Create New Activity.

Field Activities list with the Create New Activity button

1 — field activities · 2 — create new activity.

Field Activities list with the Create New Activity button

Enter the activity details

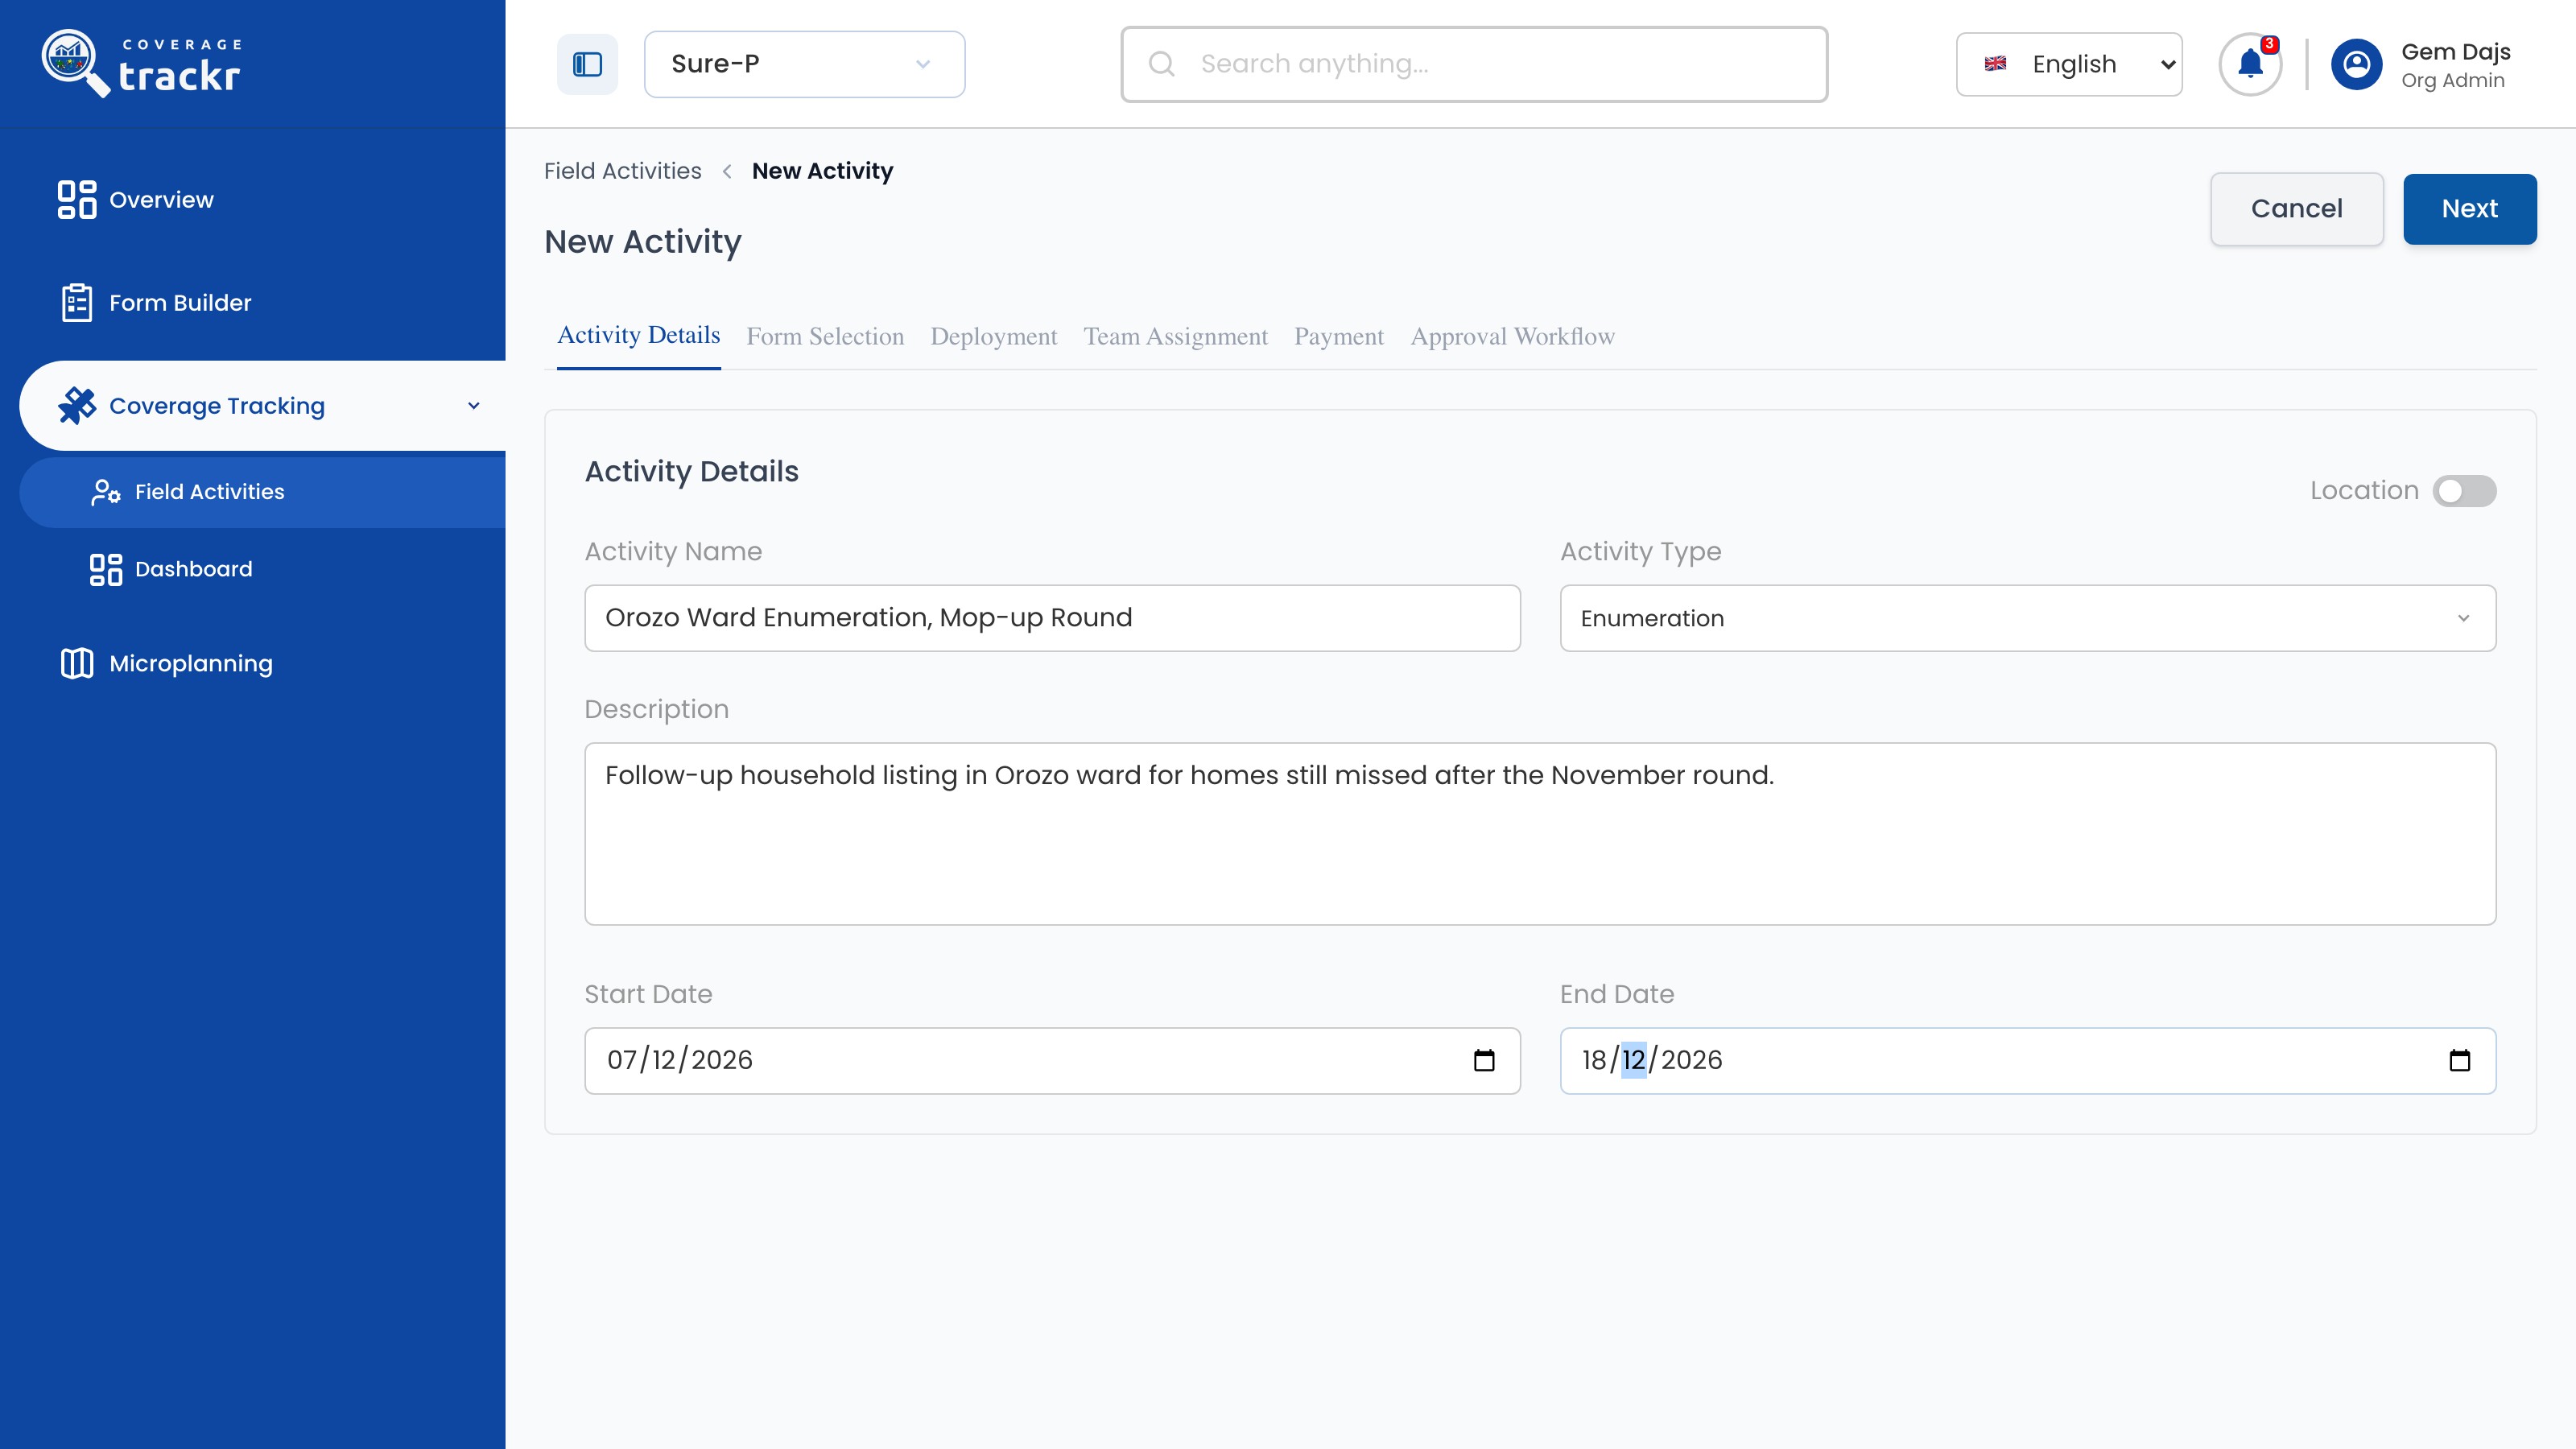
Enter the Activity Name, choose the Activity Type, add a Description and set the Start Date and End Date. Select Next to save them.

New Activity details with name, Enumeration type, description and dates entered

1 — activity details · 2 — next.

New Activity details with name, Enumeration type, description and dates entered

Choose the form

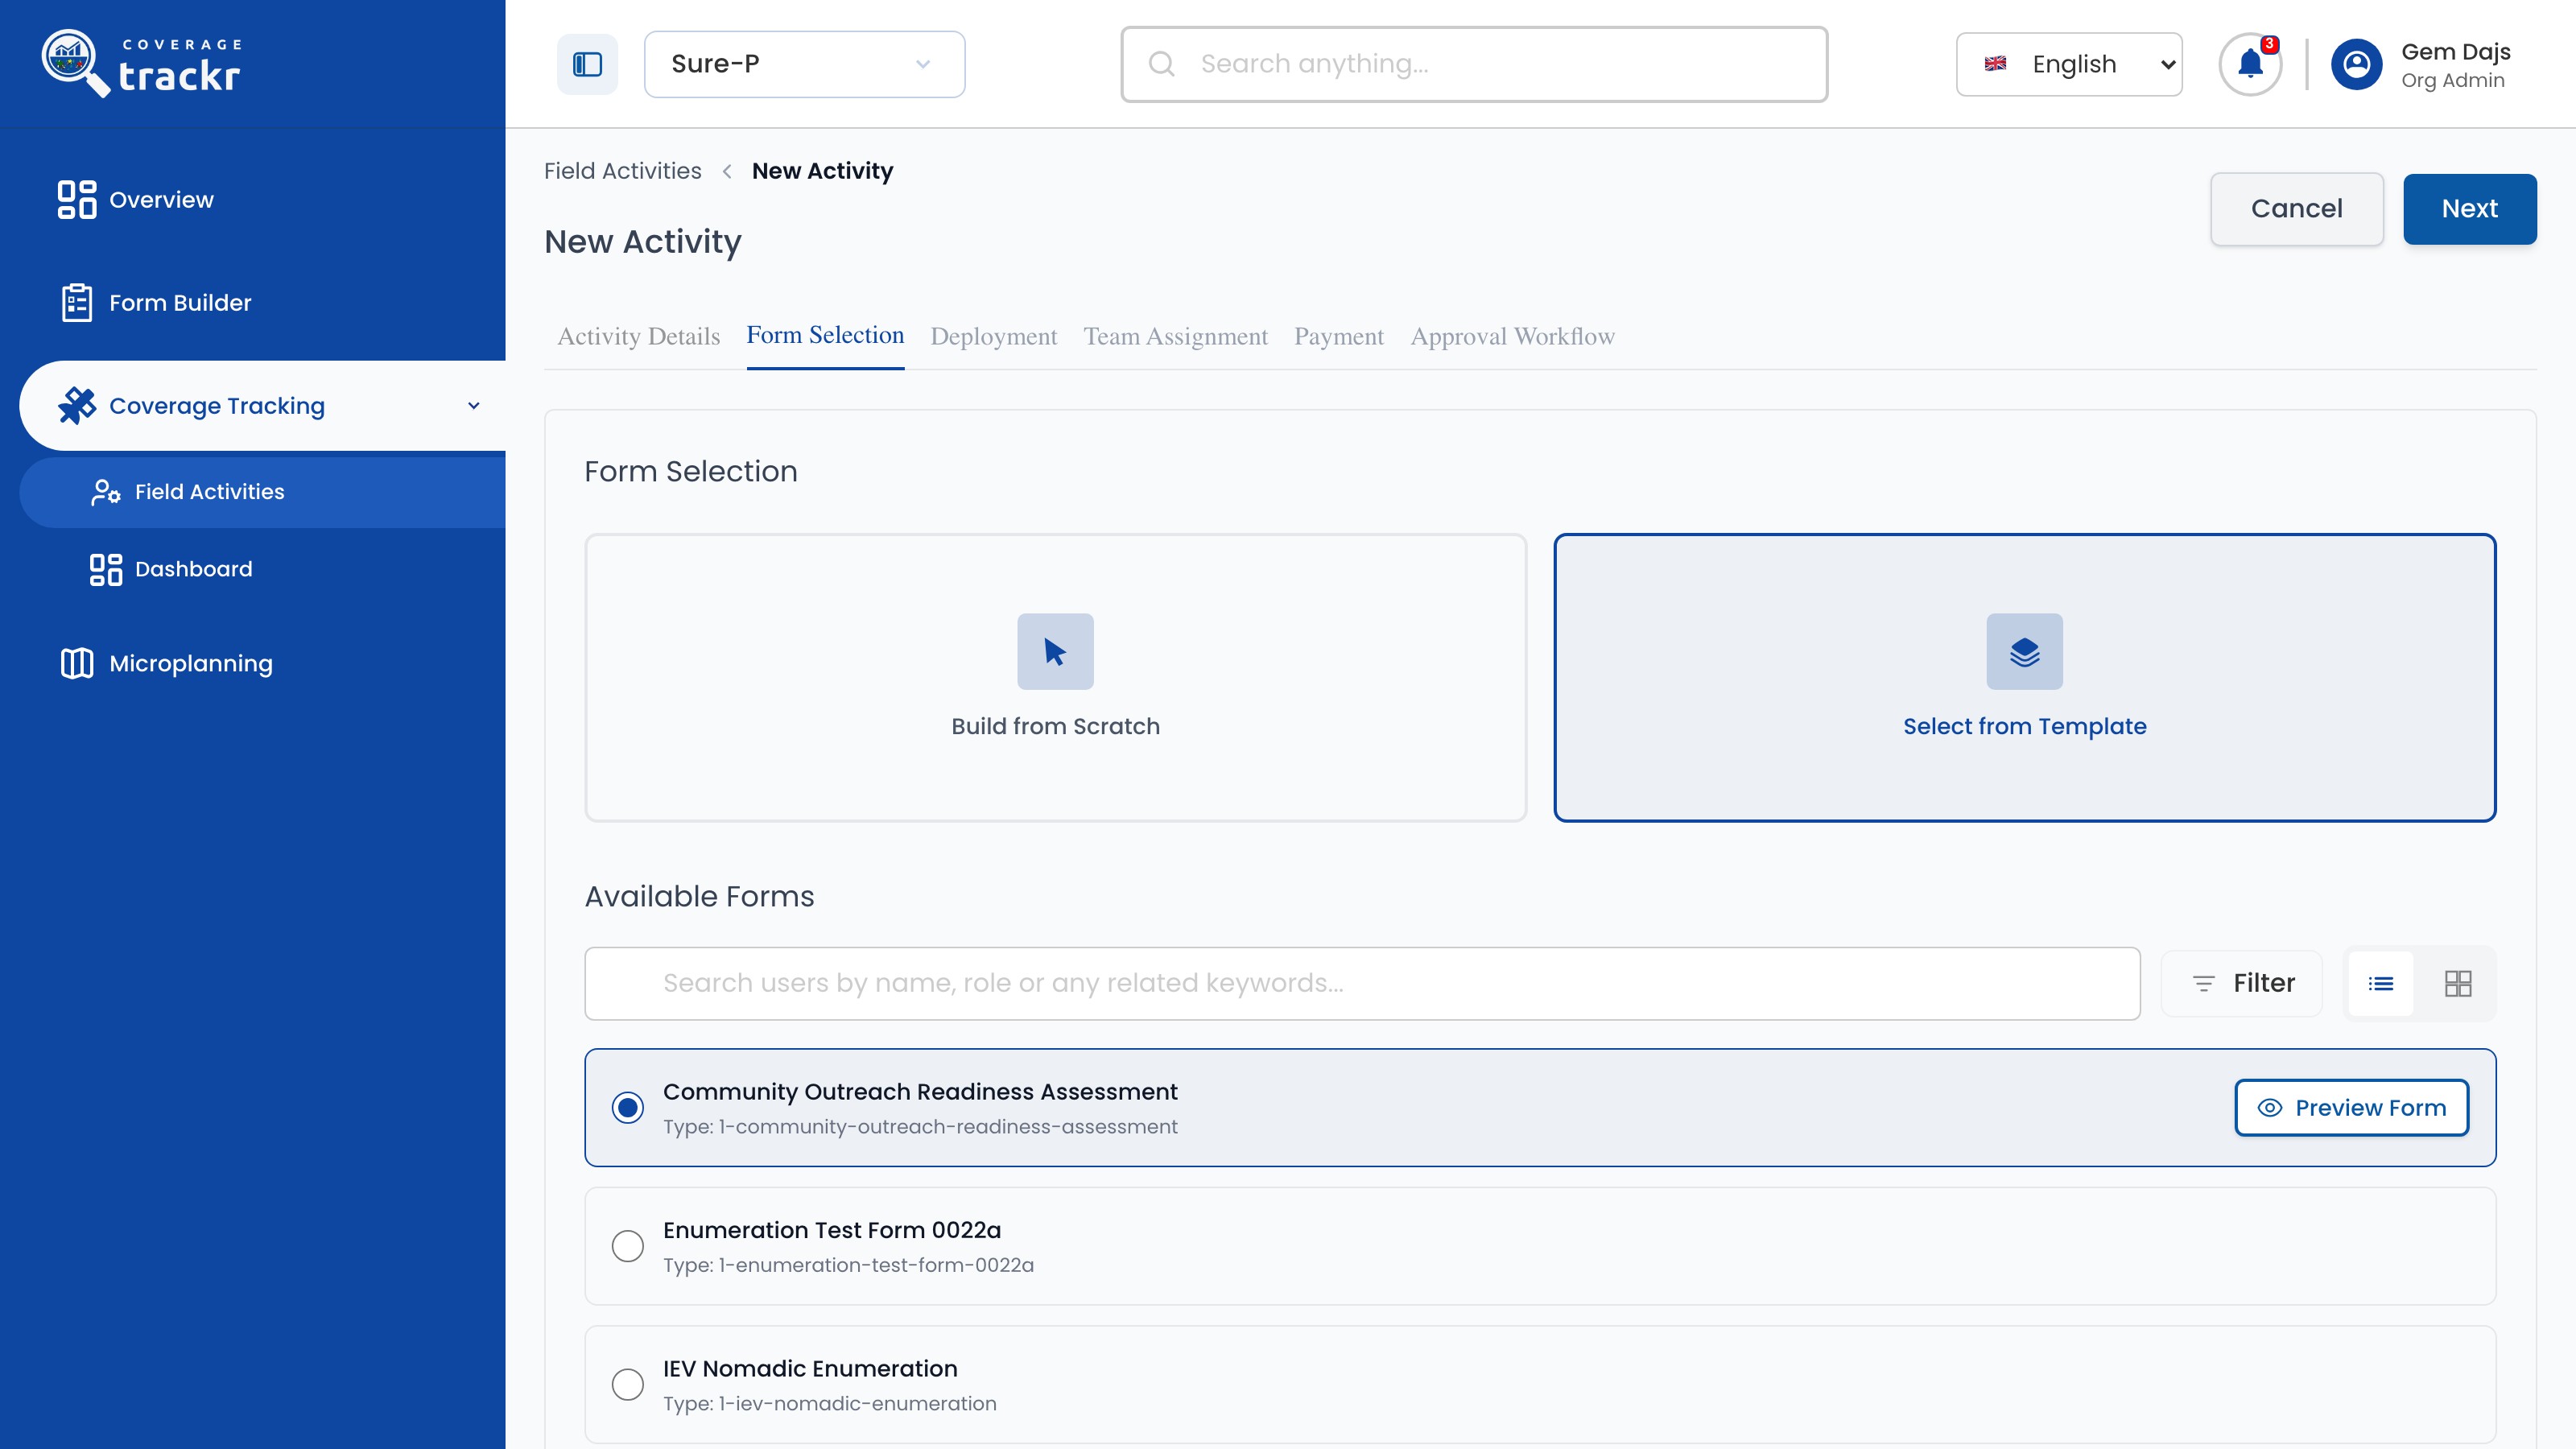
Select Select from Template, choose the form field workers will complete, then select Next. Use Preview Form to check it first.

Form Selection with Community Outreach Readiness Assessment chosen

1 — select from template · 2 — selected form · 3 — preview form.

Form Selection with Community Outreach Readiness Assessment chosen

Set the deployment area

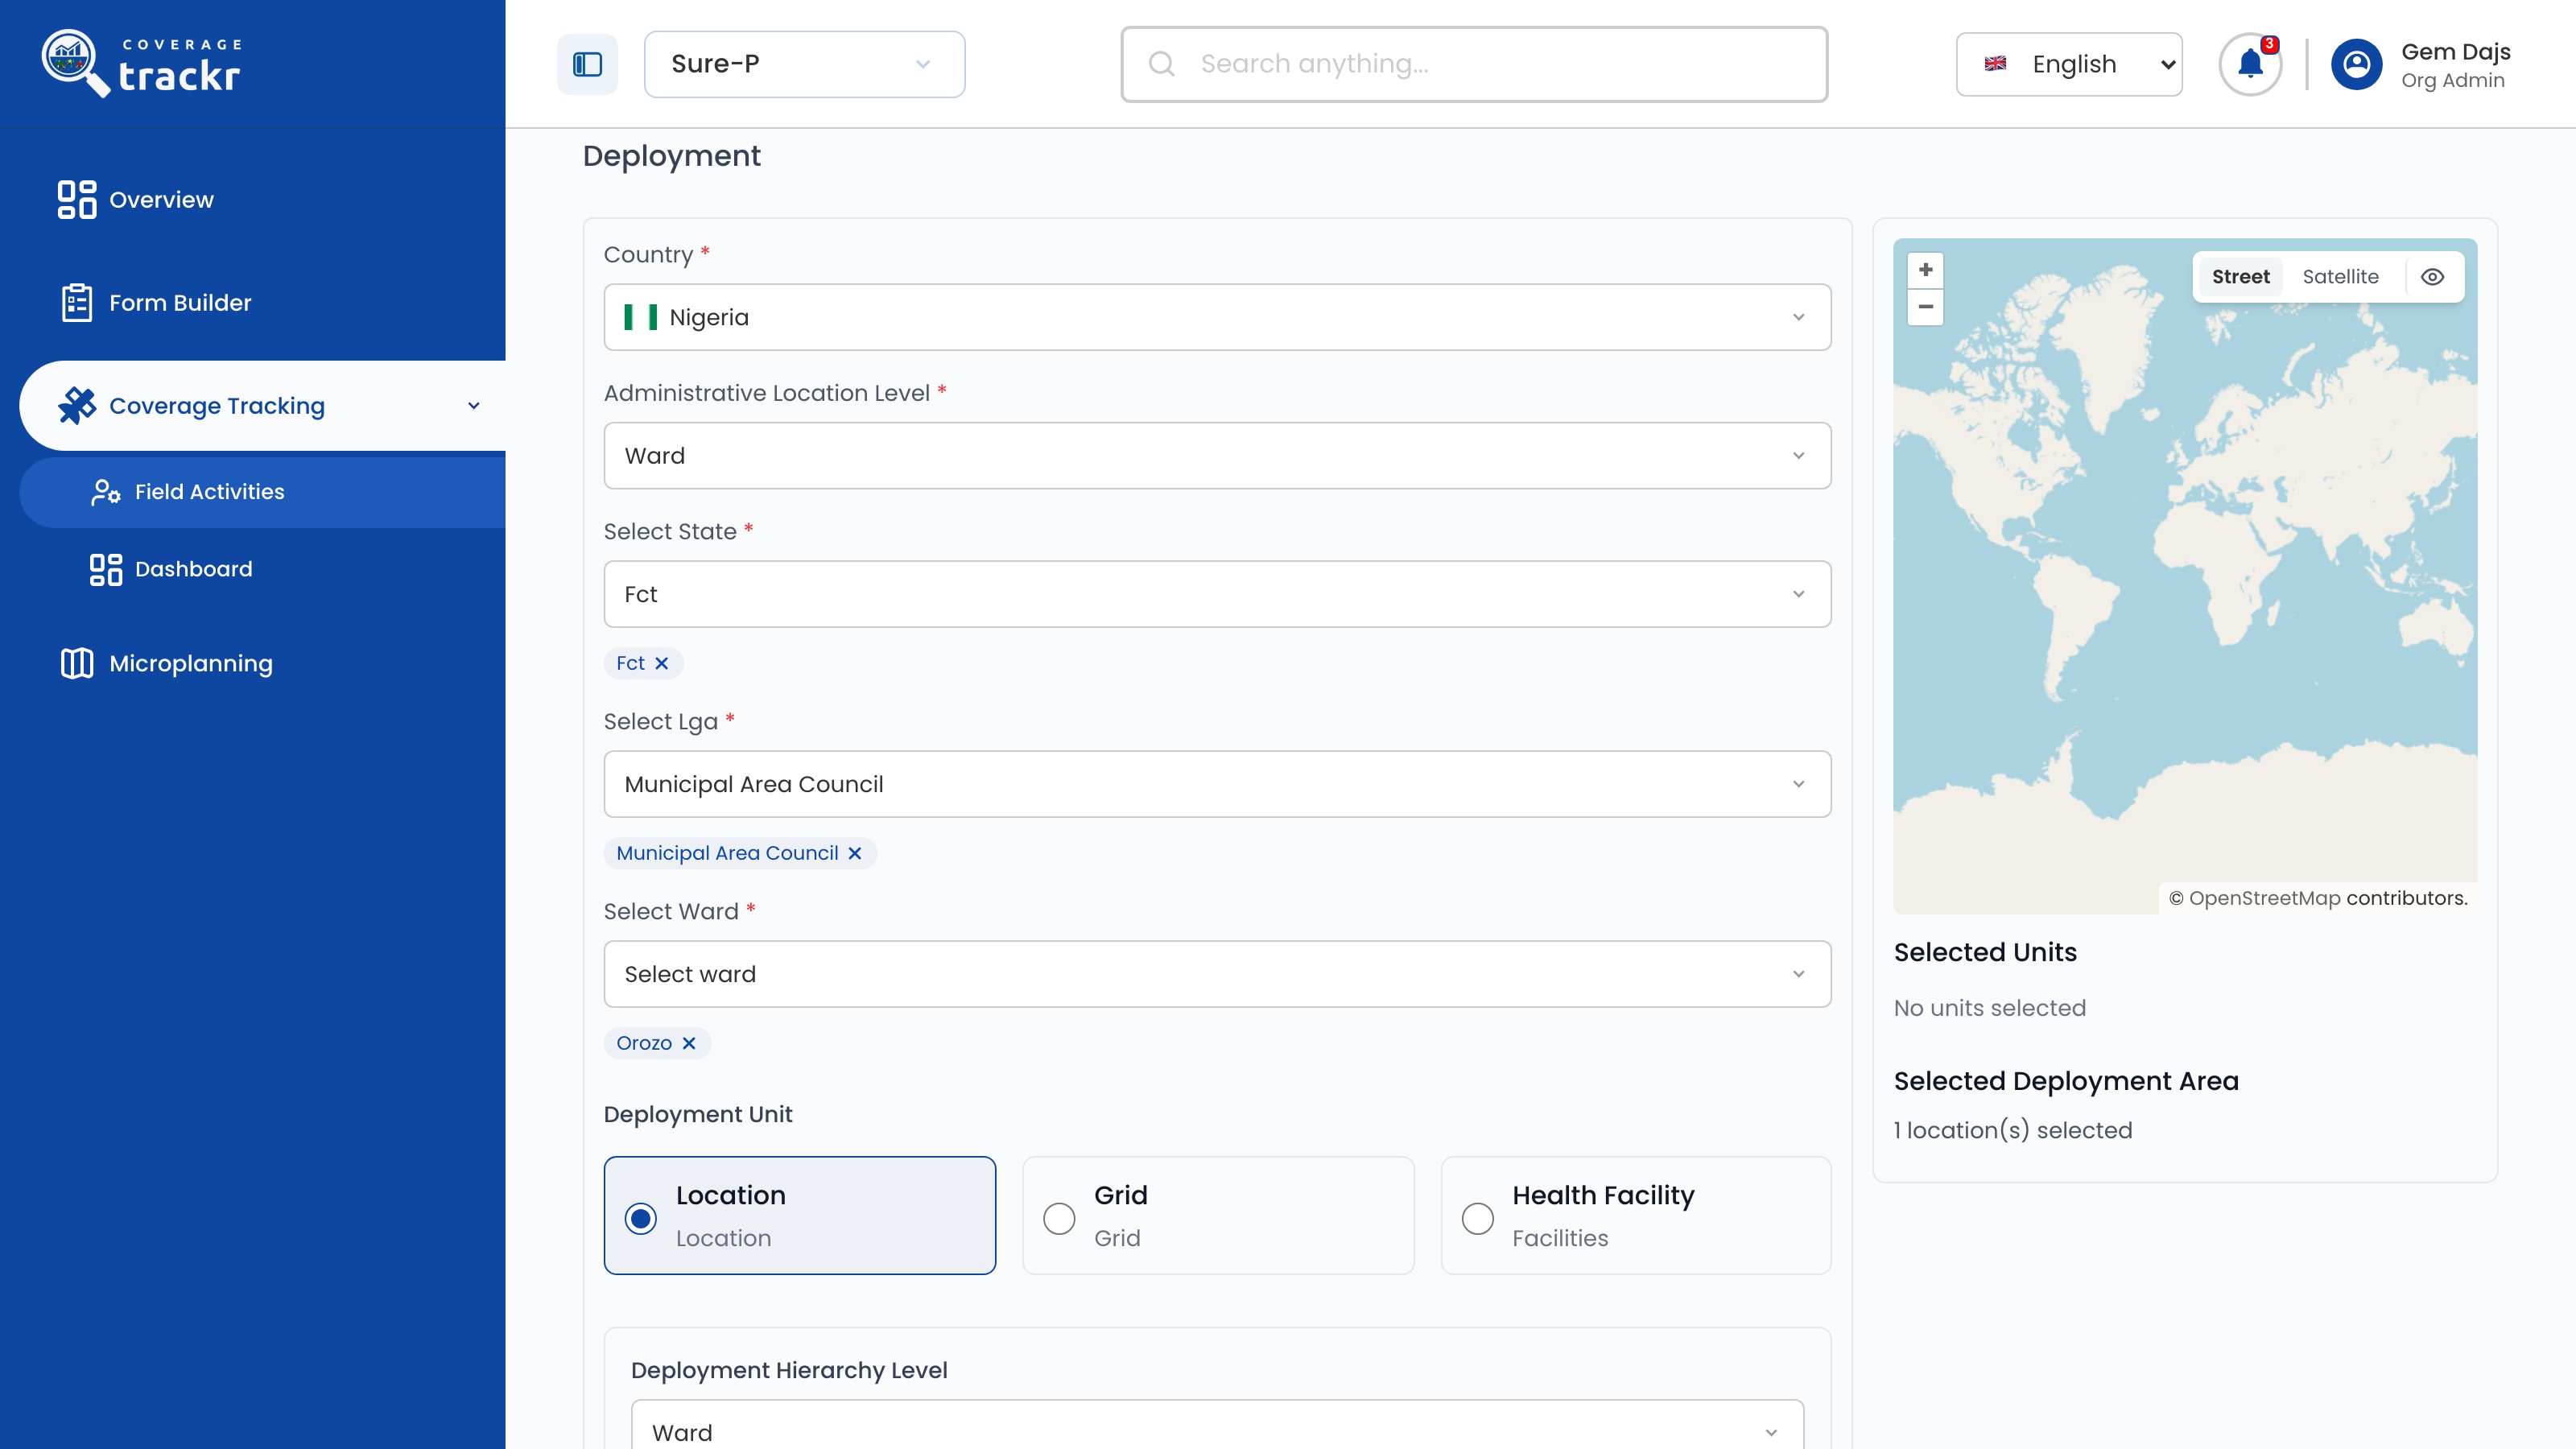
Choose the Country and Administrative Location Level, then the state, LGA and ward. Under Deployment Unit, select Location and choose the Deployment Hierarchy Level. Select Next.

Deployment with Nigeria, Ward level, Fct, Municipal Area Council and Orozo selected and Location as the unit

1 — administrative area · 2 — deployment unit · 3 — selected deployment area.

Deployment with Nigeria, Ward level, Fct, Municipal Area Council and Orozo selected and Location as the unit

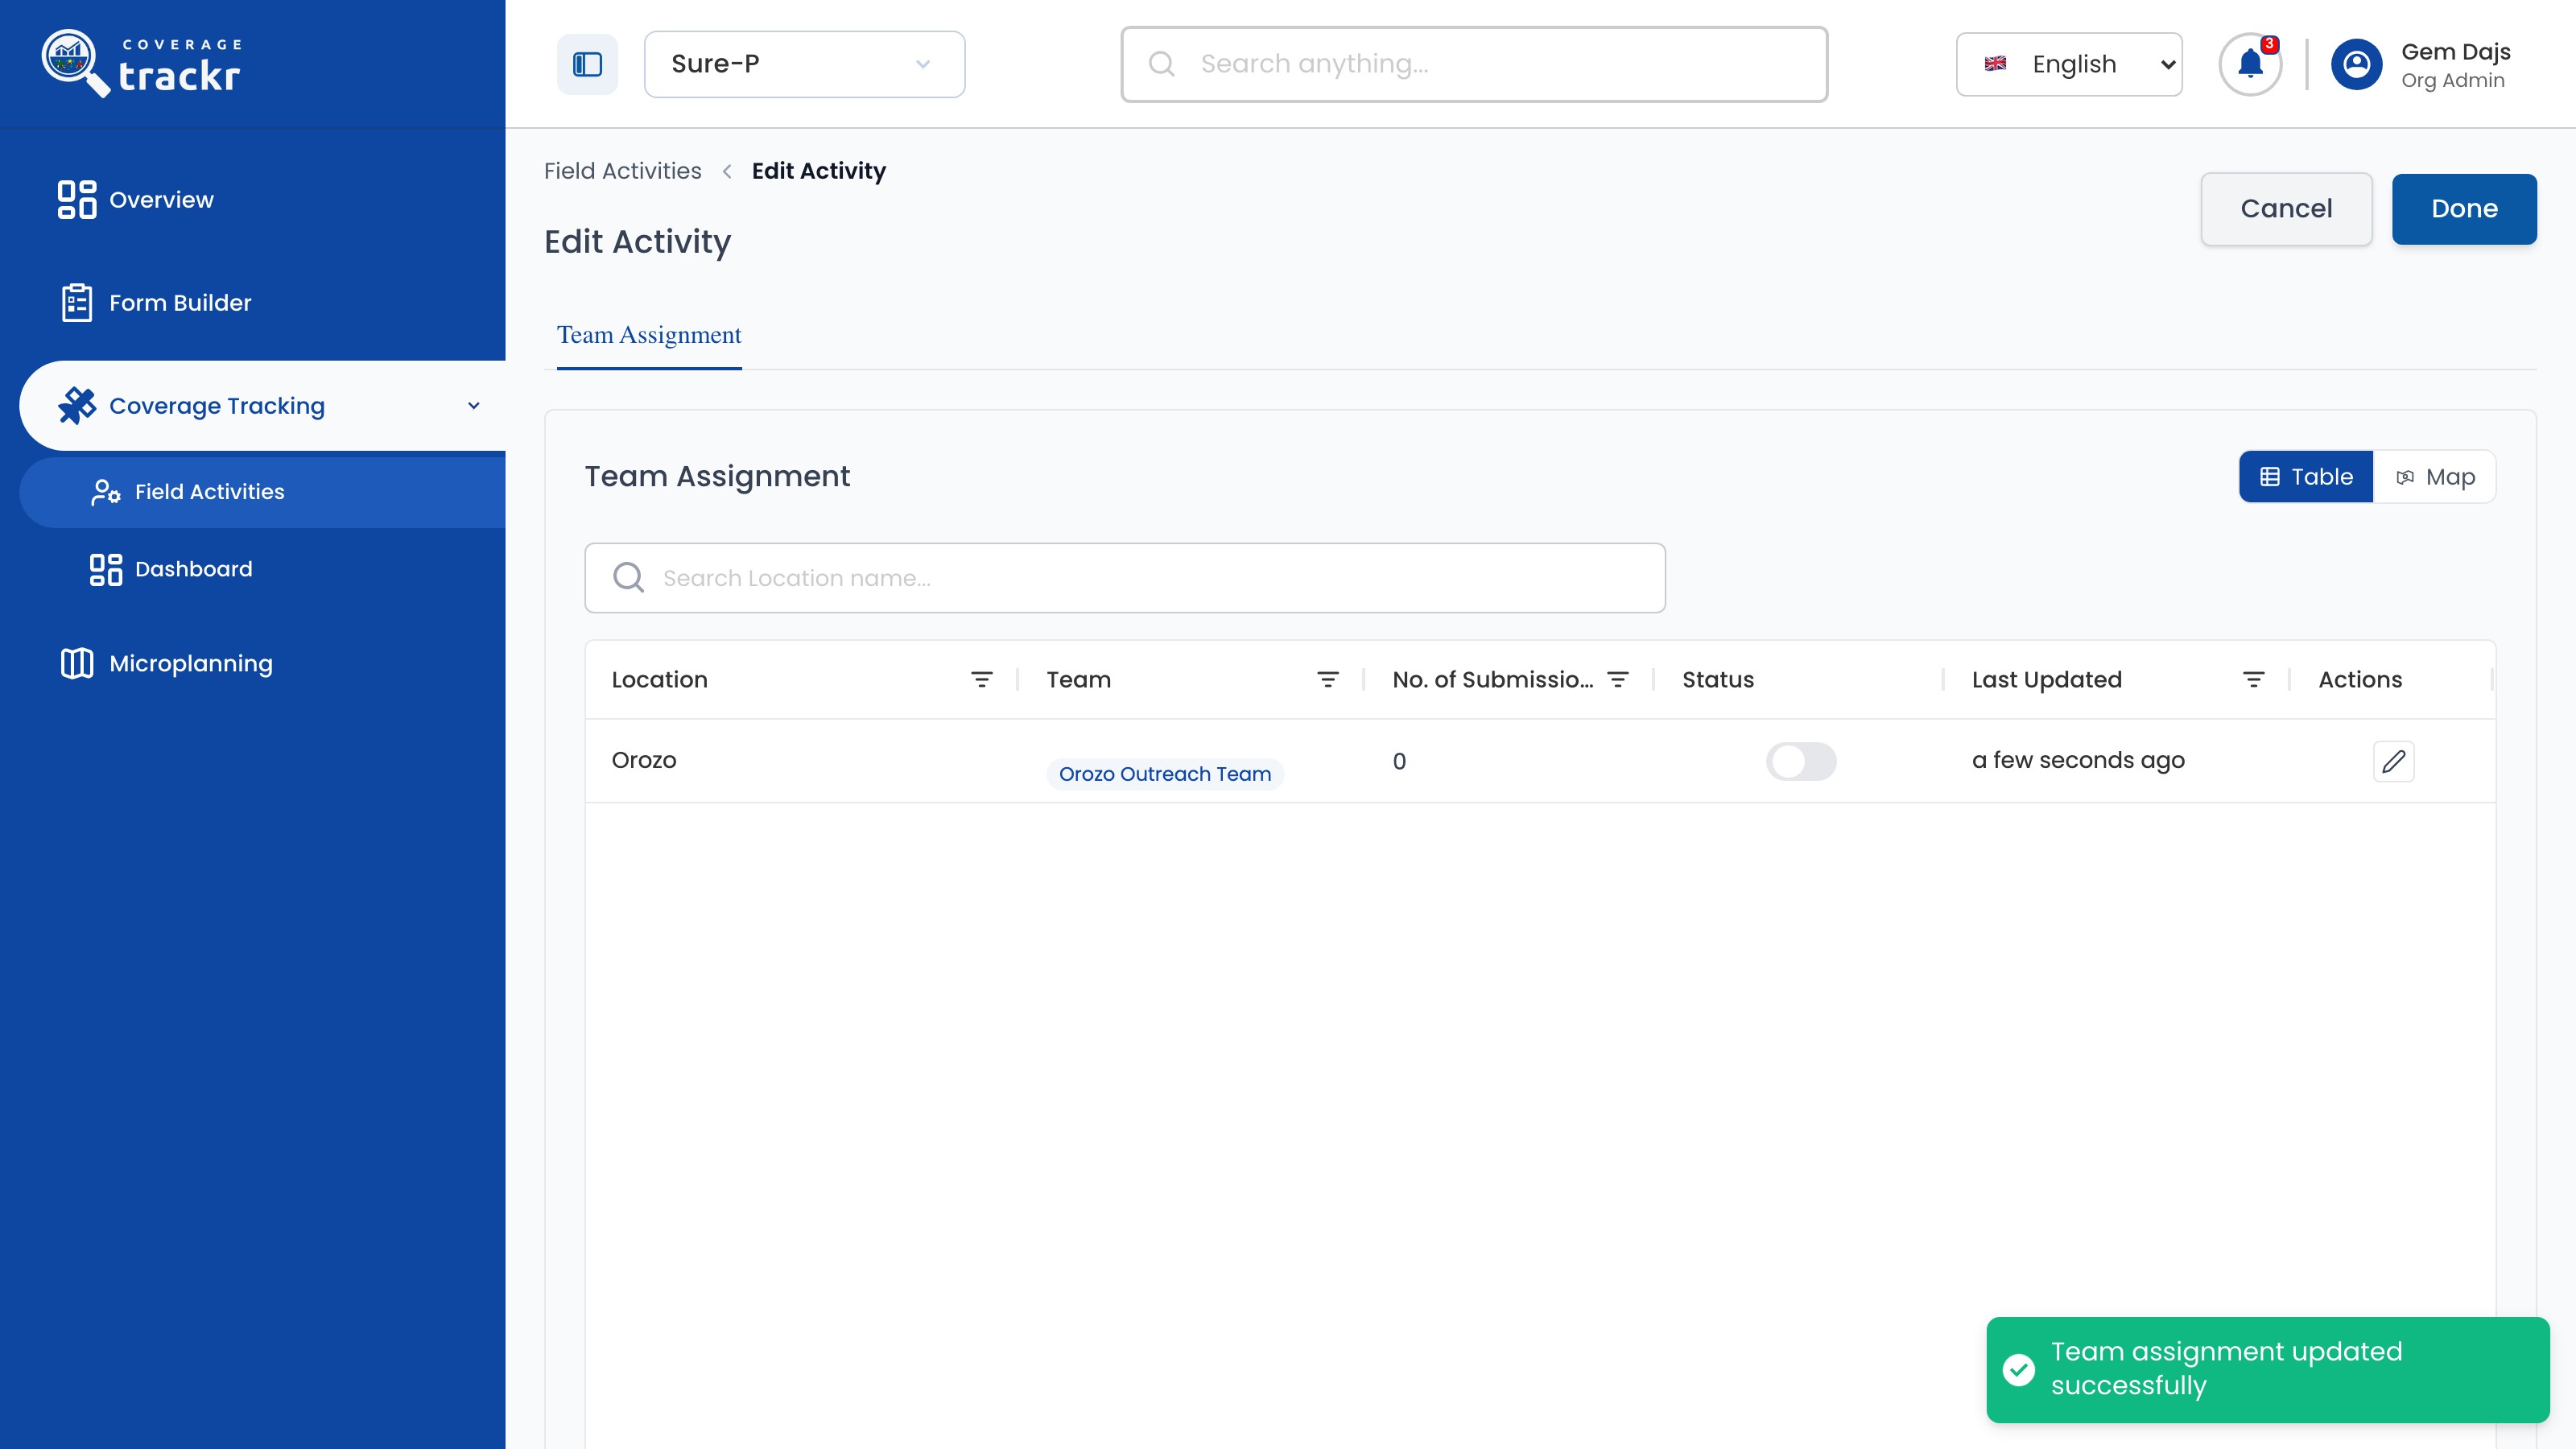
Assign a team

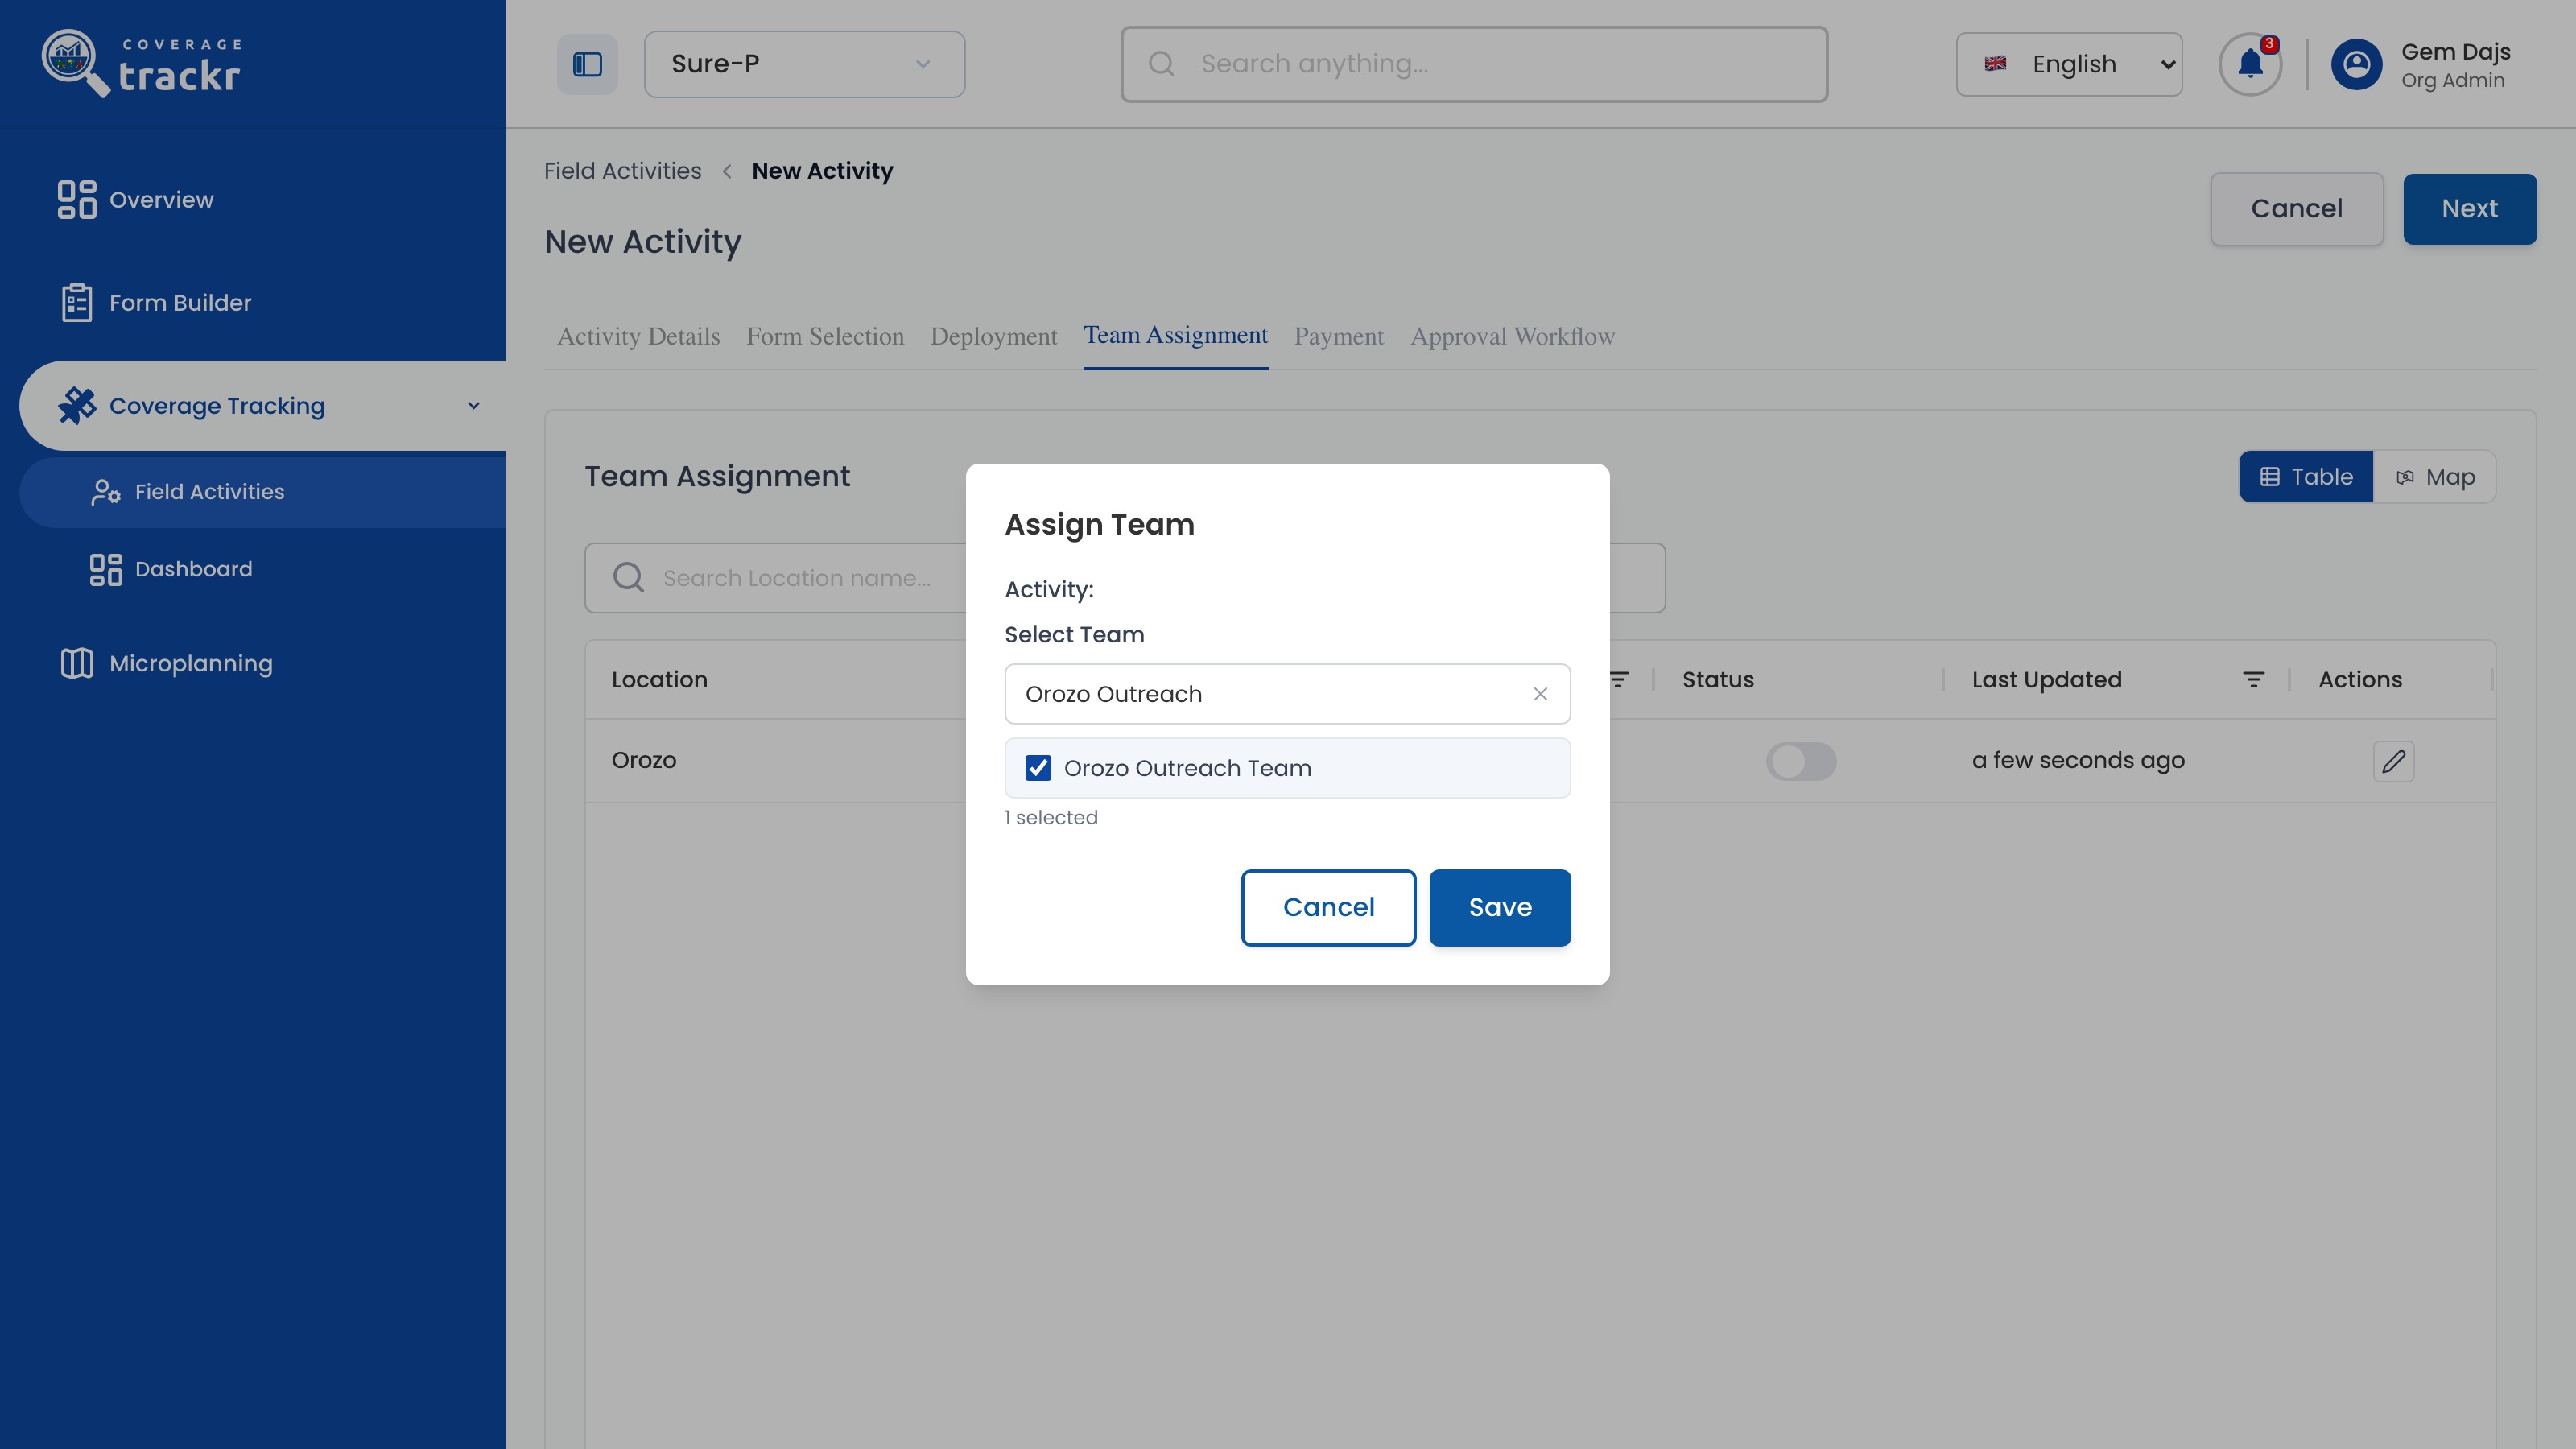
On Team Assignment, select Edit for the location, search for the team, tick it and select Save.

Assign Team dialog with Orozo Outreach Team ticked

1 — team selection · 2 — save assignment.

Assign Team dialog with Orozo Outreach Team ticked

Check the assignment

Check that the team appears against the location, then select Next to continue.

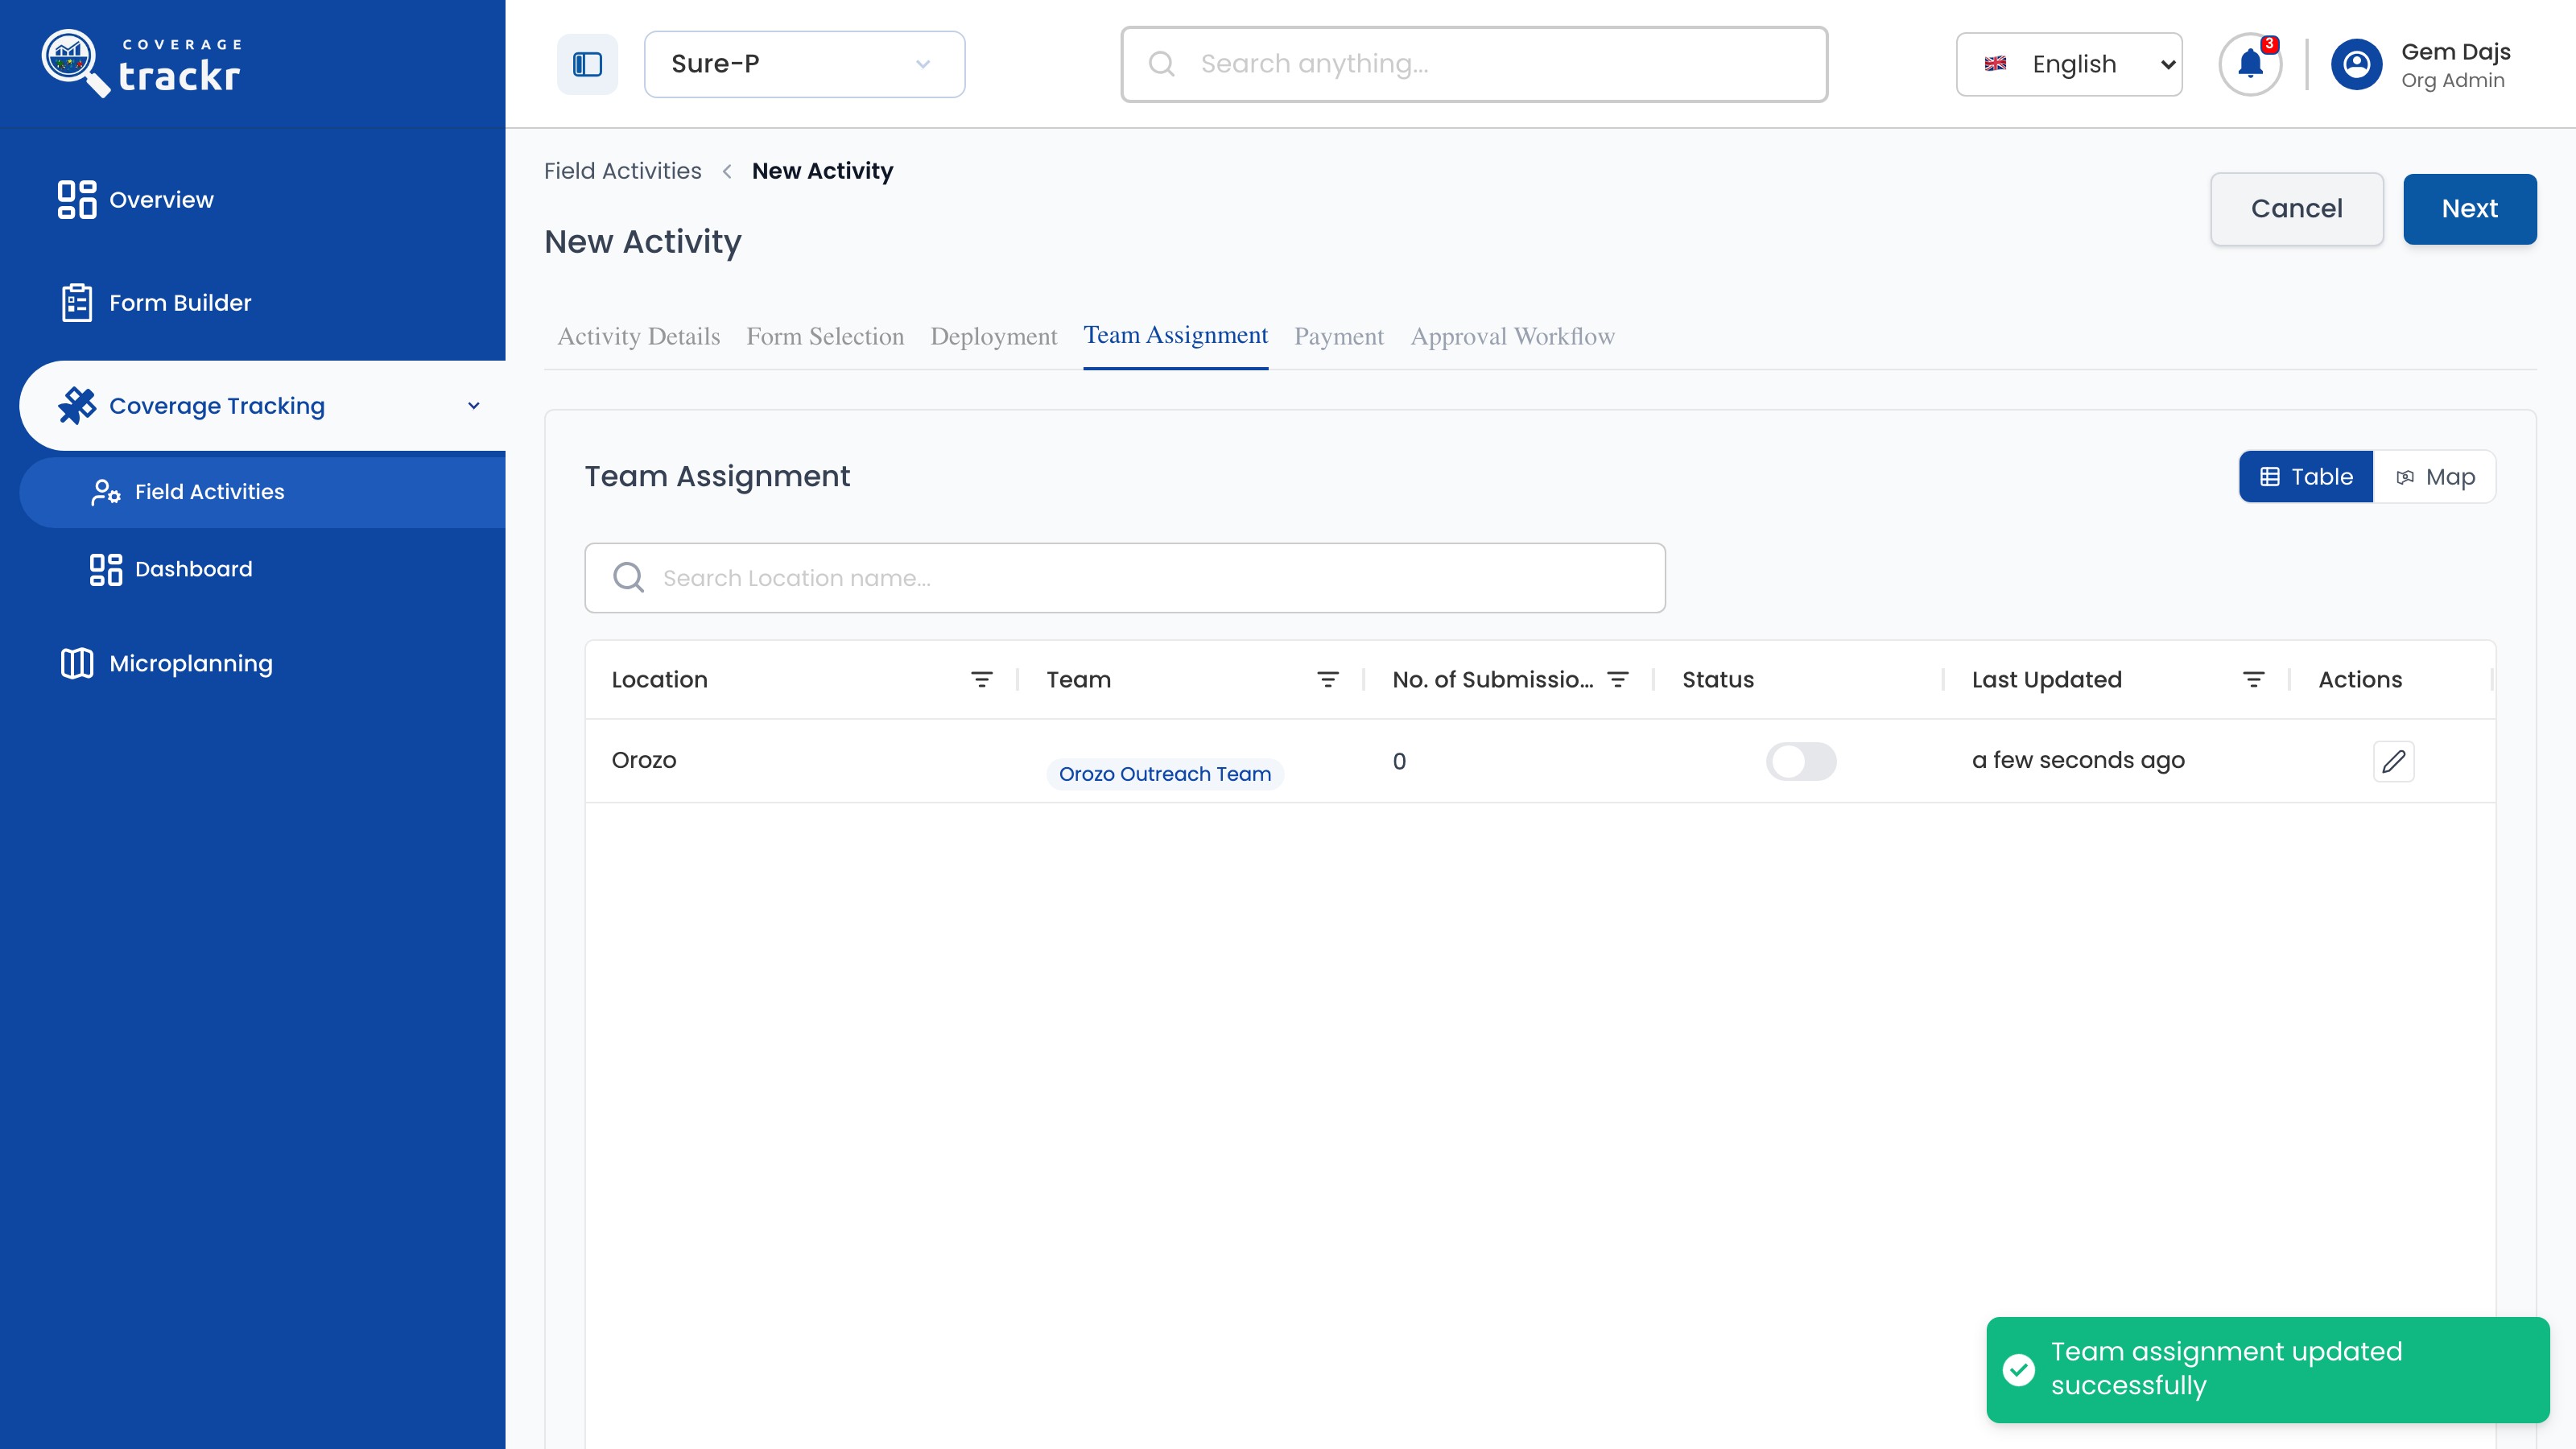
Team Assignment showing Orozo with Orozo Outreach Team and a success message

1 — assigned team · 2 — assignment confirmation · 3 — next.

Team Assignment showing Orozo with Orozo Outreach Team and a success message

Done. The activity is saved as a Draft with its form, deployment area and team. Add payment and approval settings, then publish it when it is ready for the field.

If something goes wrong

Why does Next show Similar activity already exists?

An activity with the same details is already saved. Open it from the list with Edit instead of creating it again.

Why does Team Assignment say No team activities available?

Save a deployment area first. Team Assignment lists the areas chosen on the Deployment step.

When is the activity saved?

Each Next saves the current step, so the activity appears in the list as a Draft after the first step.

Field activities

Set payment for a field activity

Set the daily submission target and what each cadre is paid on an activity.

Organization Administrator 4 min read Web

Before you start

  • The activity is a Draft or Unpublished.
  • You know the allowance amounts for each cadre.

Enter the target and allowances

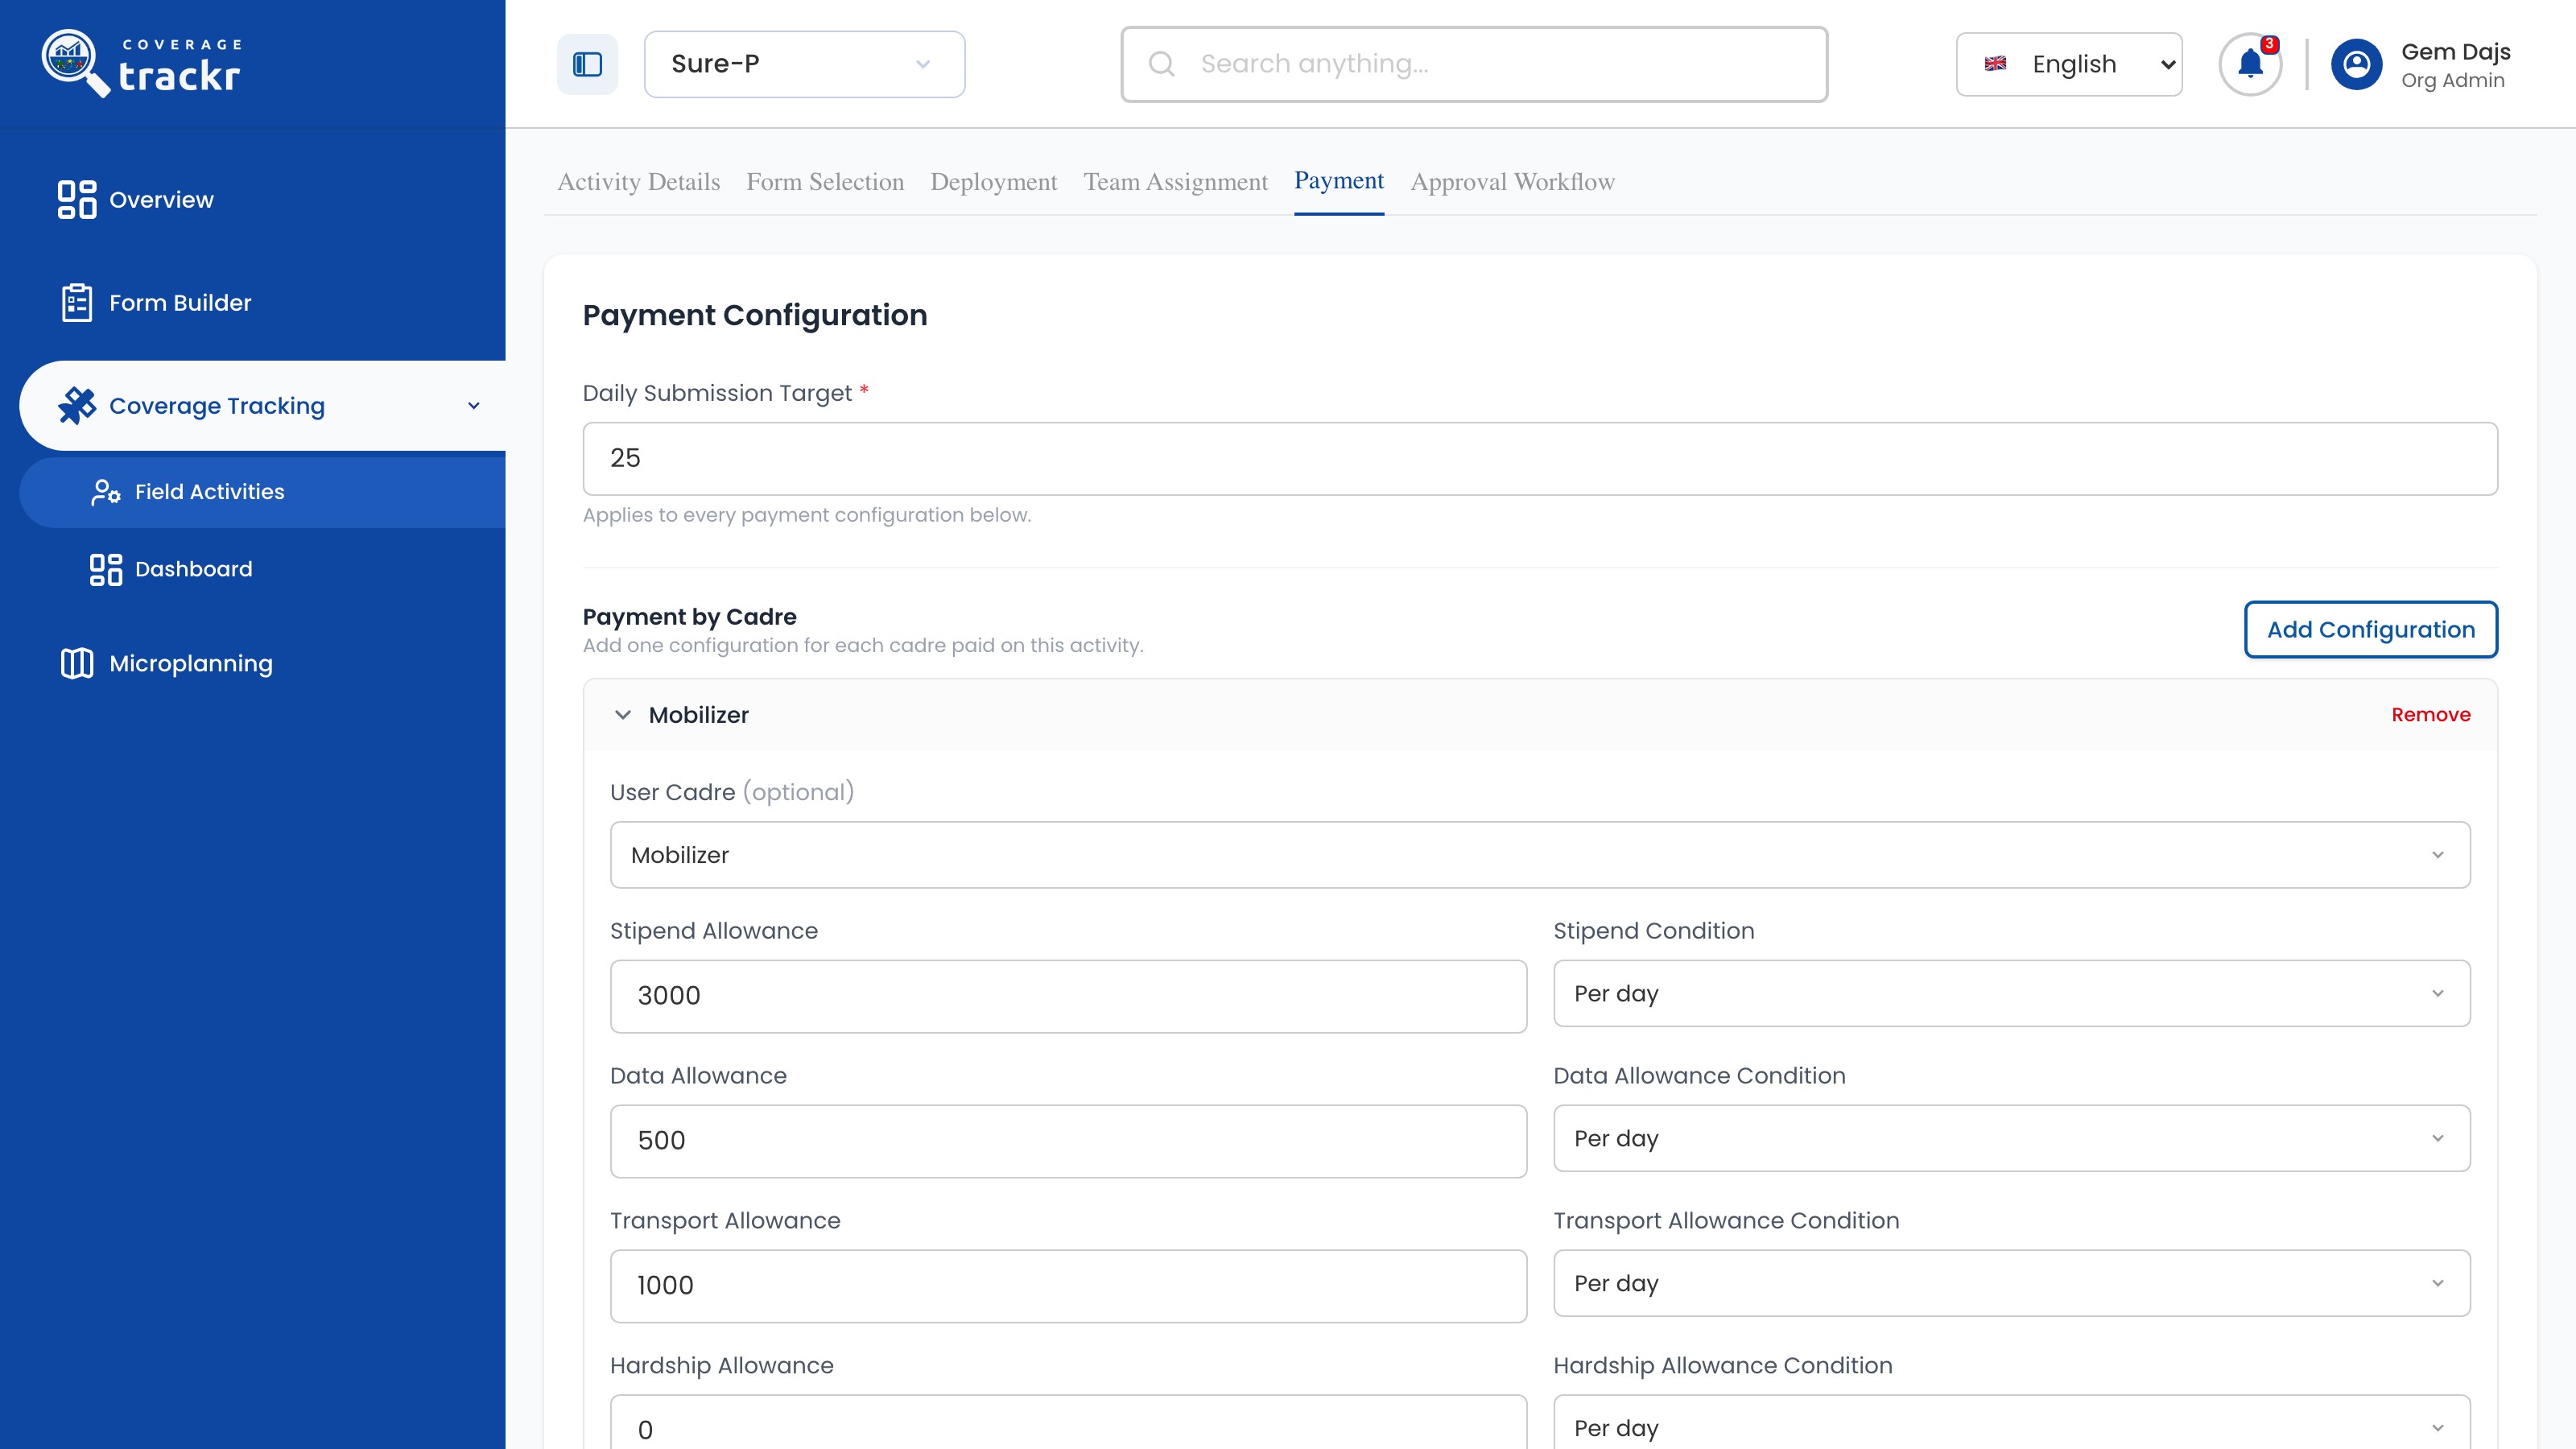
Select Edit on the activity and open Payment. Enter the Daily Submission Target, select Add Configuration, choose the User Cadre, then enter each allowance with its condition. Select Update.

Payment Configuration with a target of 25 and Mobilizer allowances set per day

1 — daily submission target · 2 — payment configuration · 3 — add configuration.

Payment Configuration with a target of 25 and Mobilizer allowances set per day

Check the saved payment

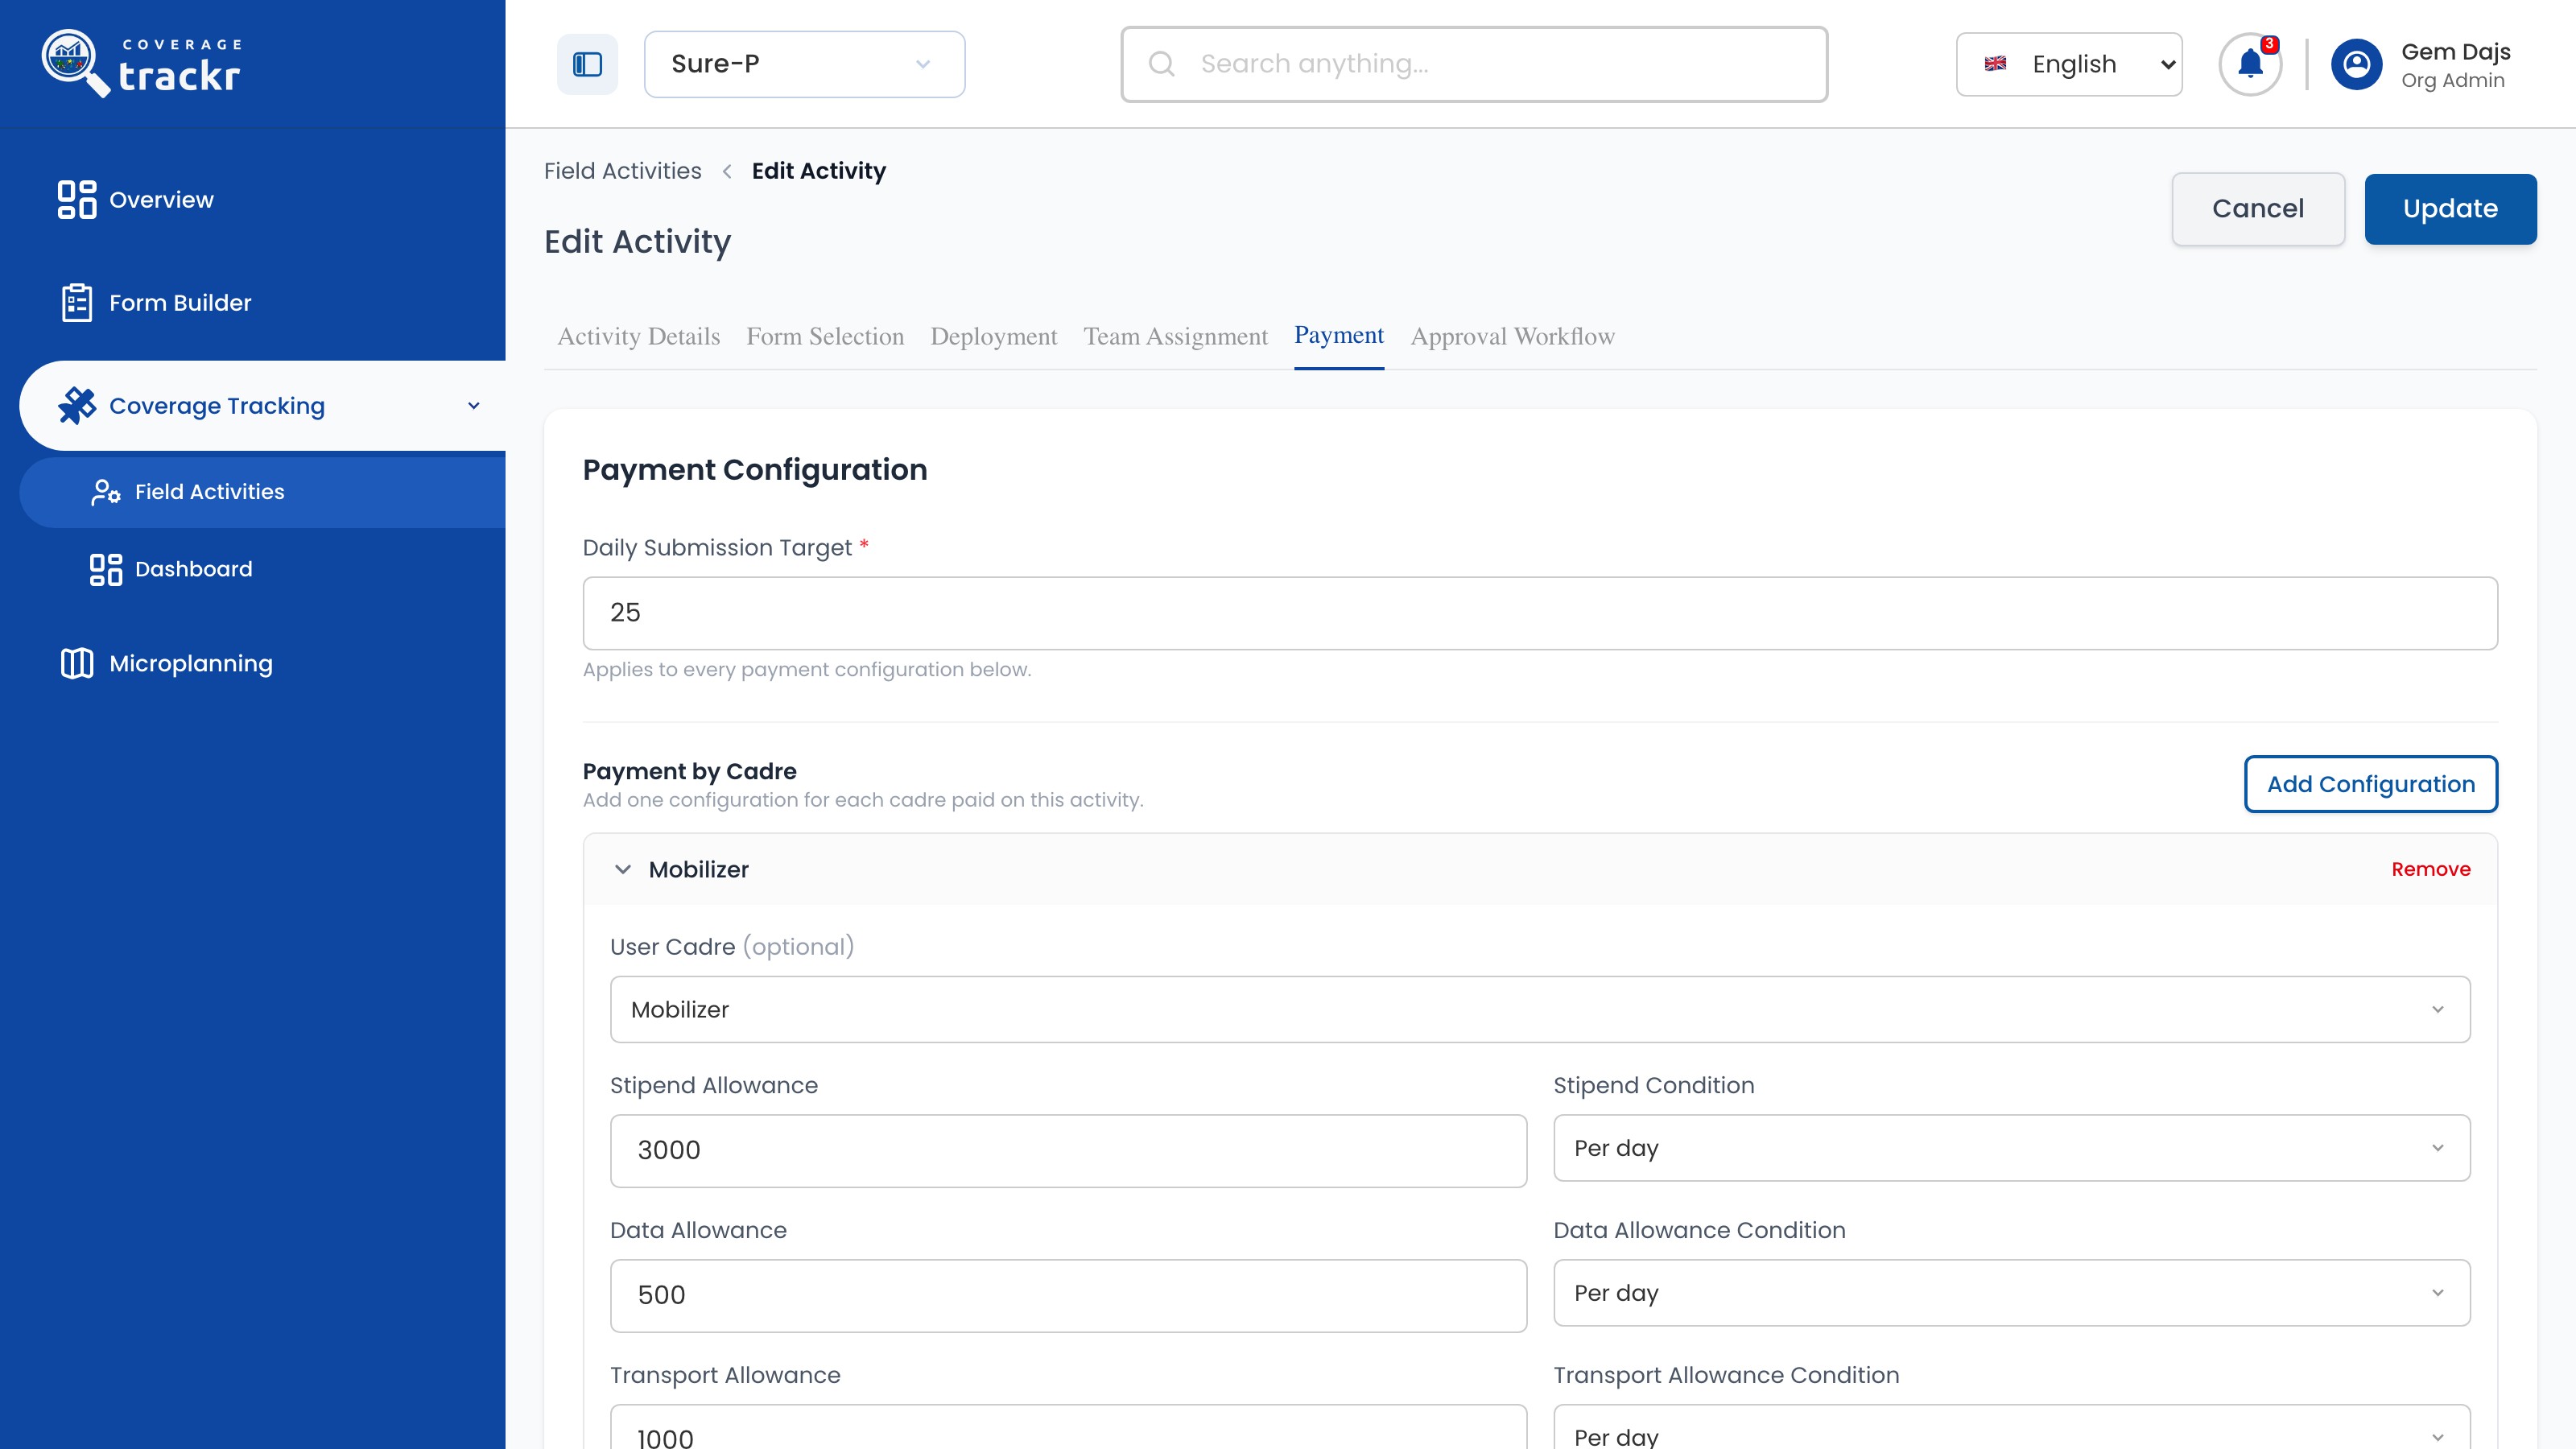
Reopen the activity with Edit and open Payment to confirm the target and configuration were saved.

Reopened Payment tab showing the saved target and Mobilizer configuration

1 — saved target · 2 — saved payment configuration.

Reopened Payment tab showing the saved target and Mobilizer configuration

Done. The target and cadre allowances are saved and appear when you reopen Payment.

If something goes wrong

Do I need to fill in every allowance?

Yes. Enter an amount and a condition for each allowance, using 0 where an allowance does not apply.

How do I save the payment settings?

Select Update while the Payment tab is open.

Field activities

Set up an approval workflow

Decide who reviews an activity's submissions before they are accepted.

Organization Administrator 3 min read Web

Before you start

  • The activity is a Draft or Unpublished.
  • The reviewing role or users already exist.

Open Approval Workflow

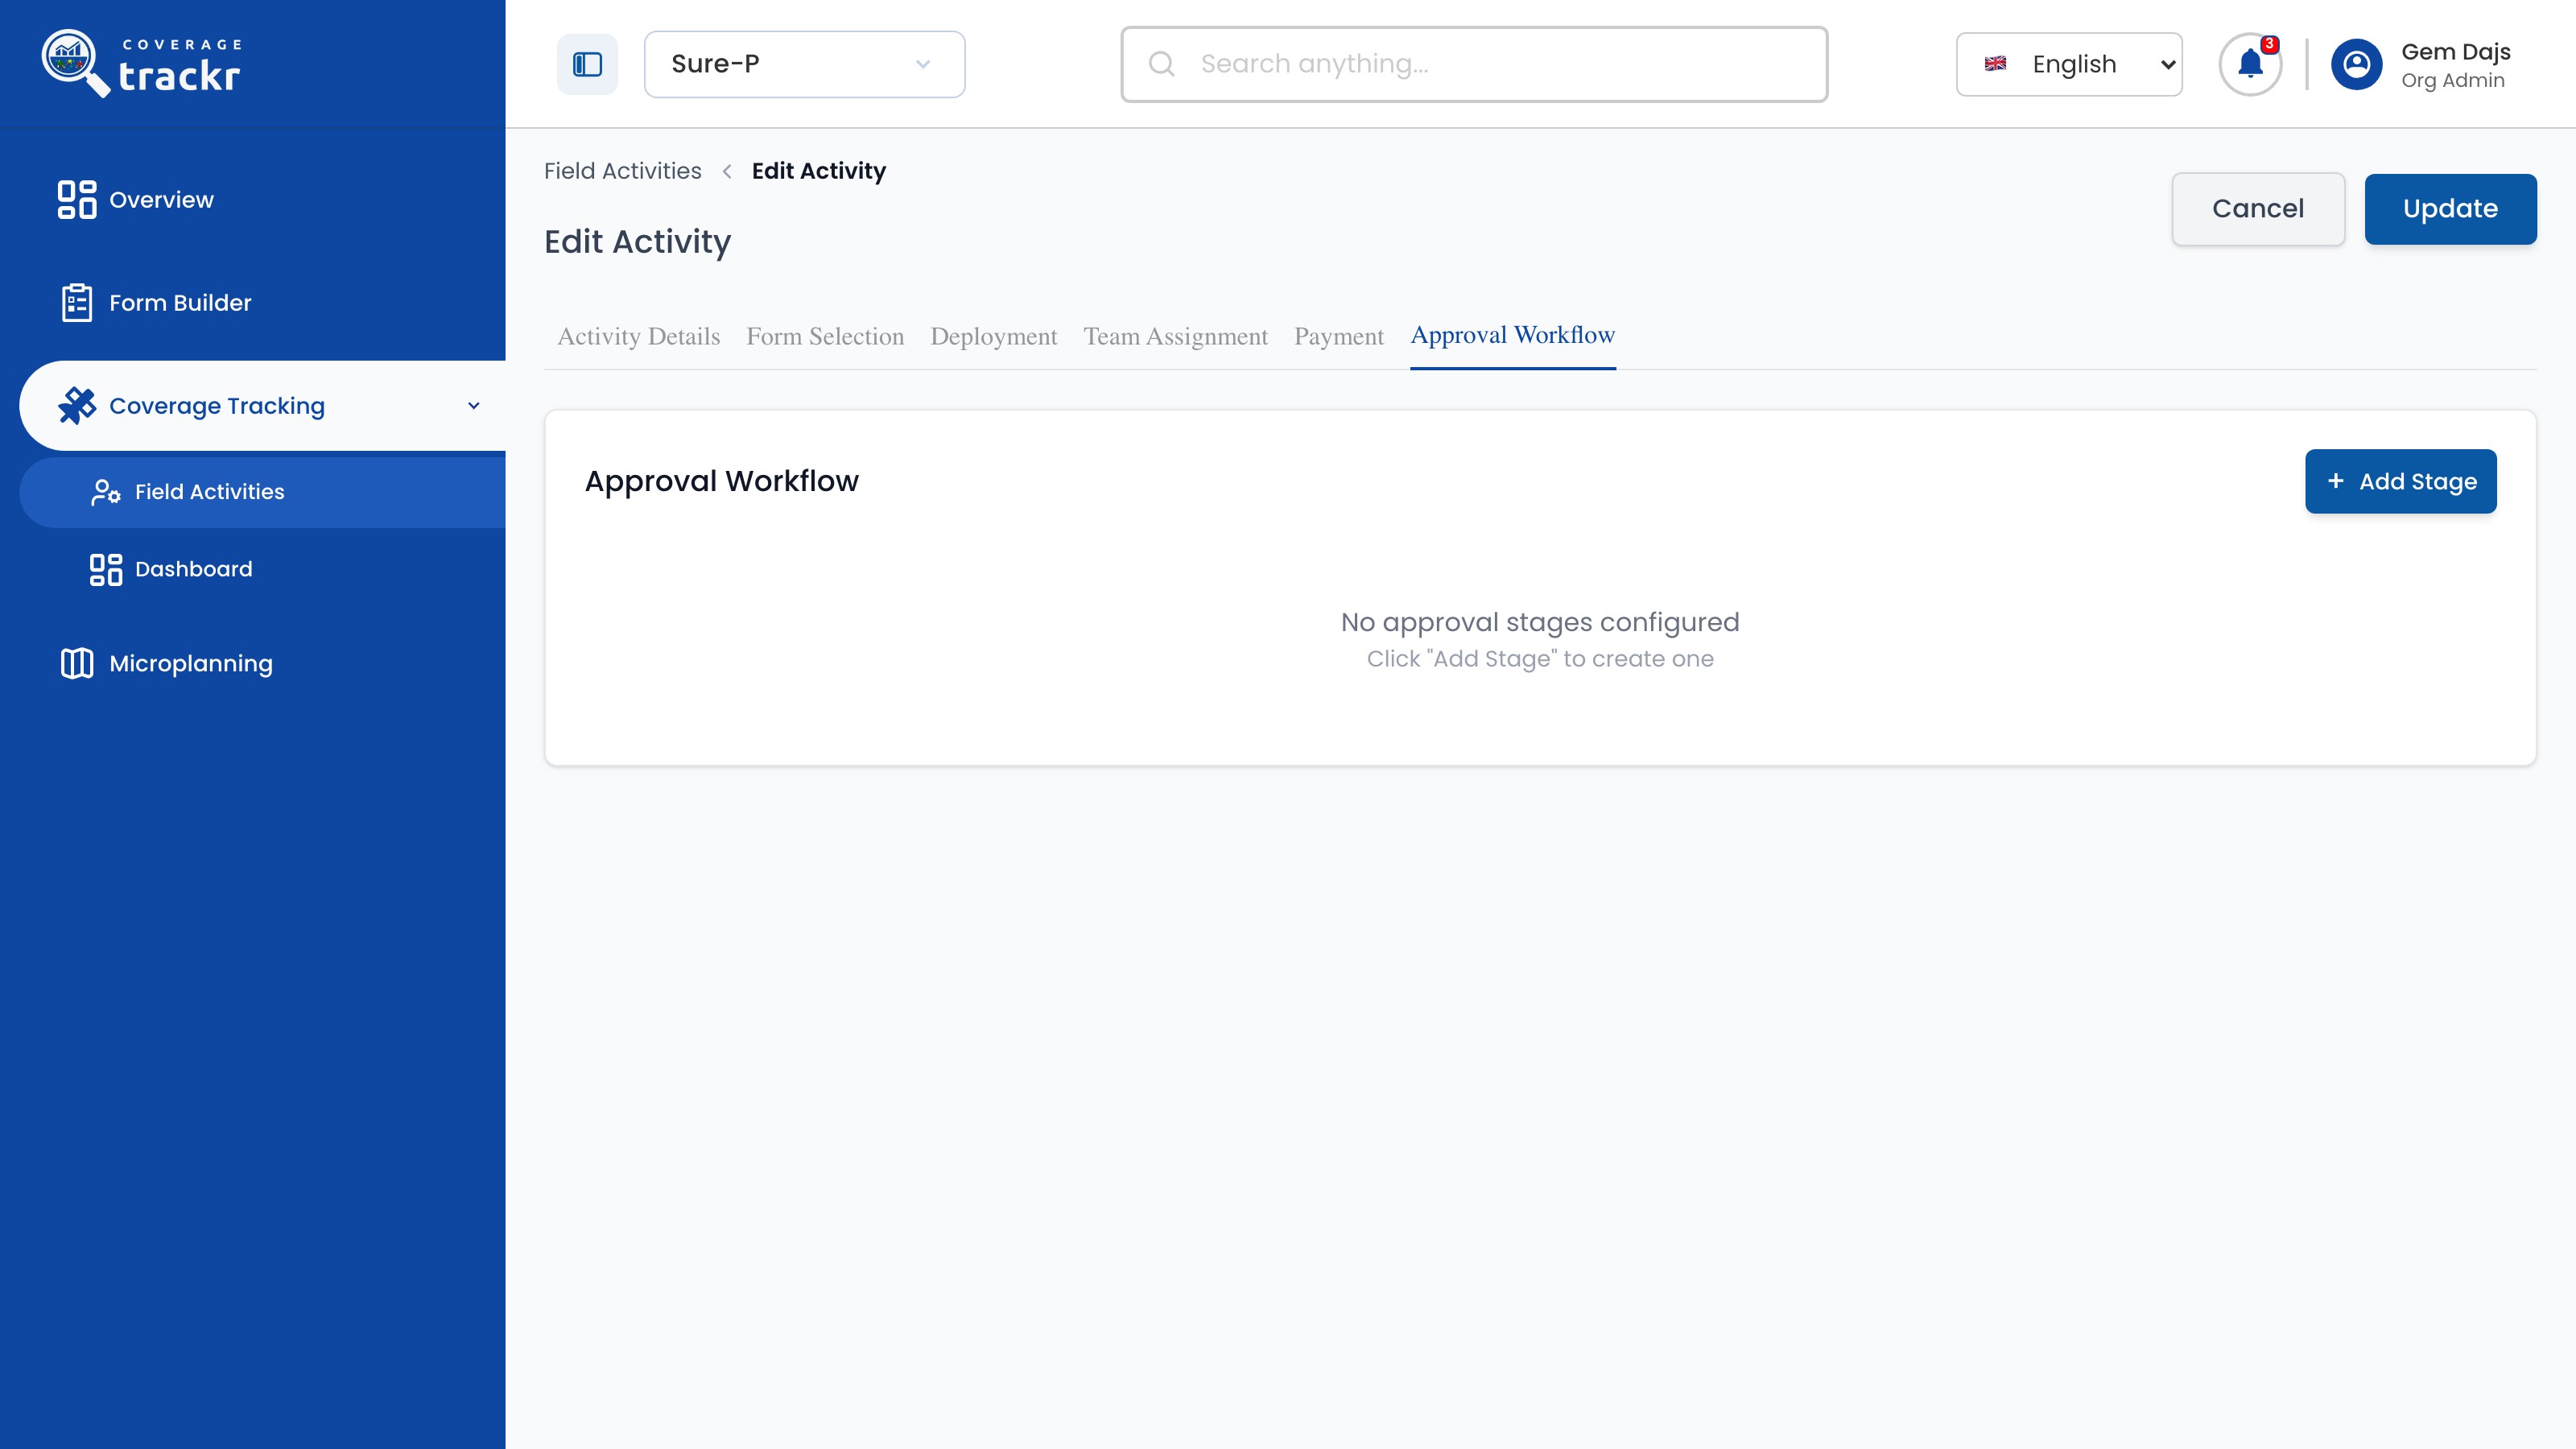
Select Edit on the activity and open Approval Workflow.

Approval Workflow tab with no stages configured

1 — approval workflow tab · 2 — add stage.

Approval Workflow tab with no stages configured

Add a stage

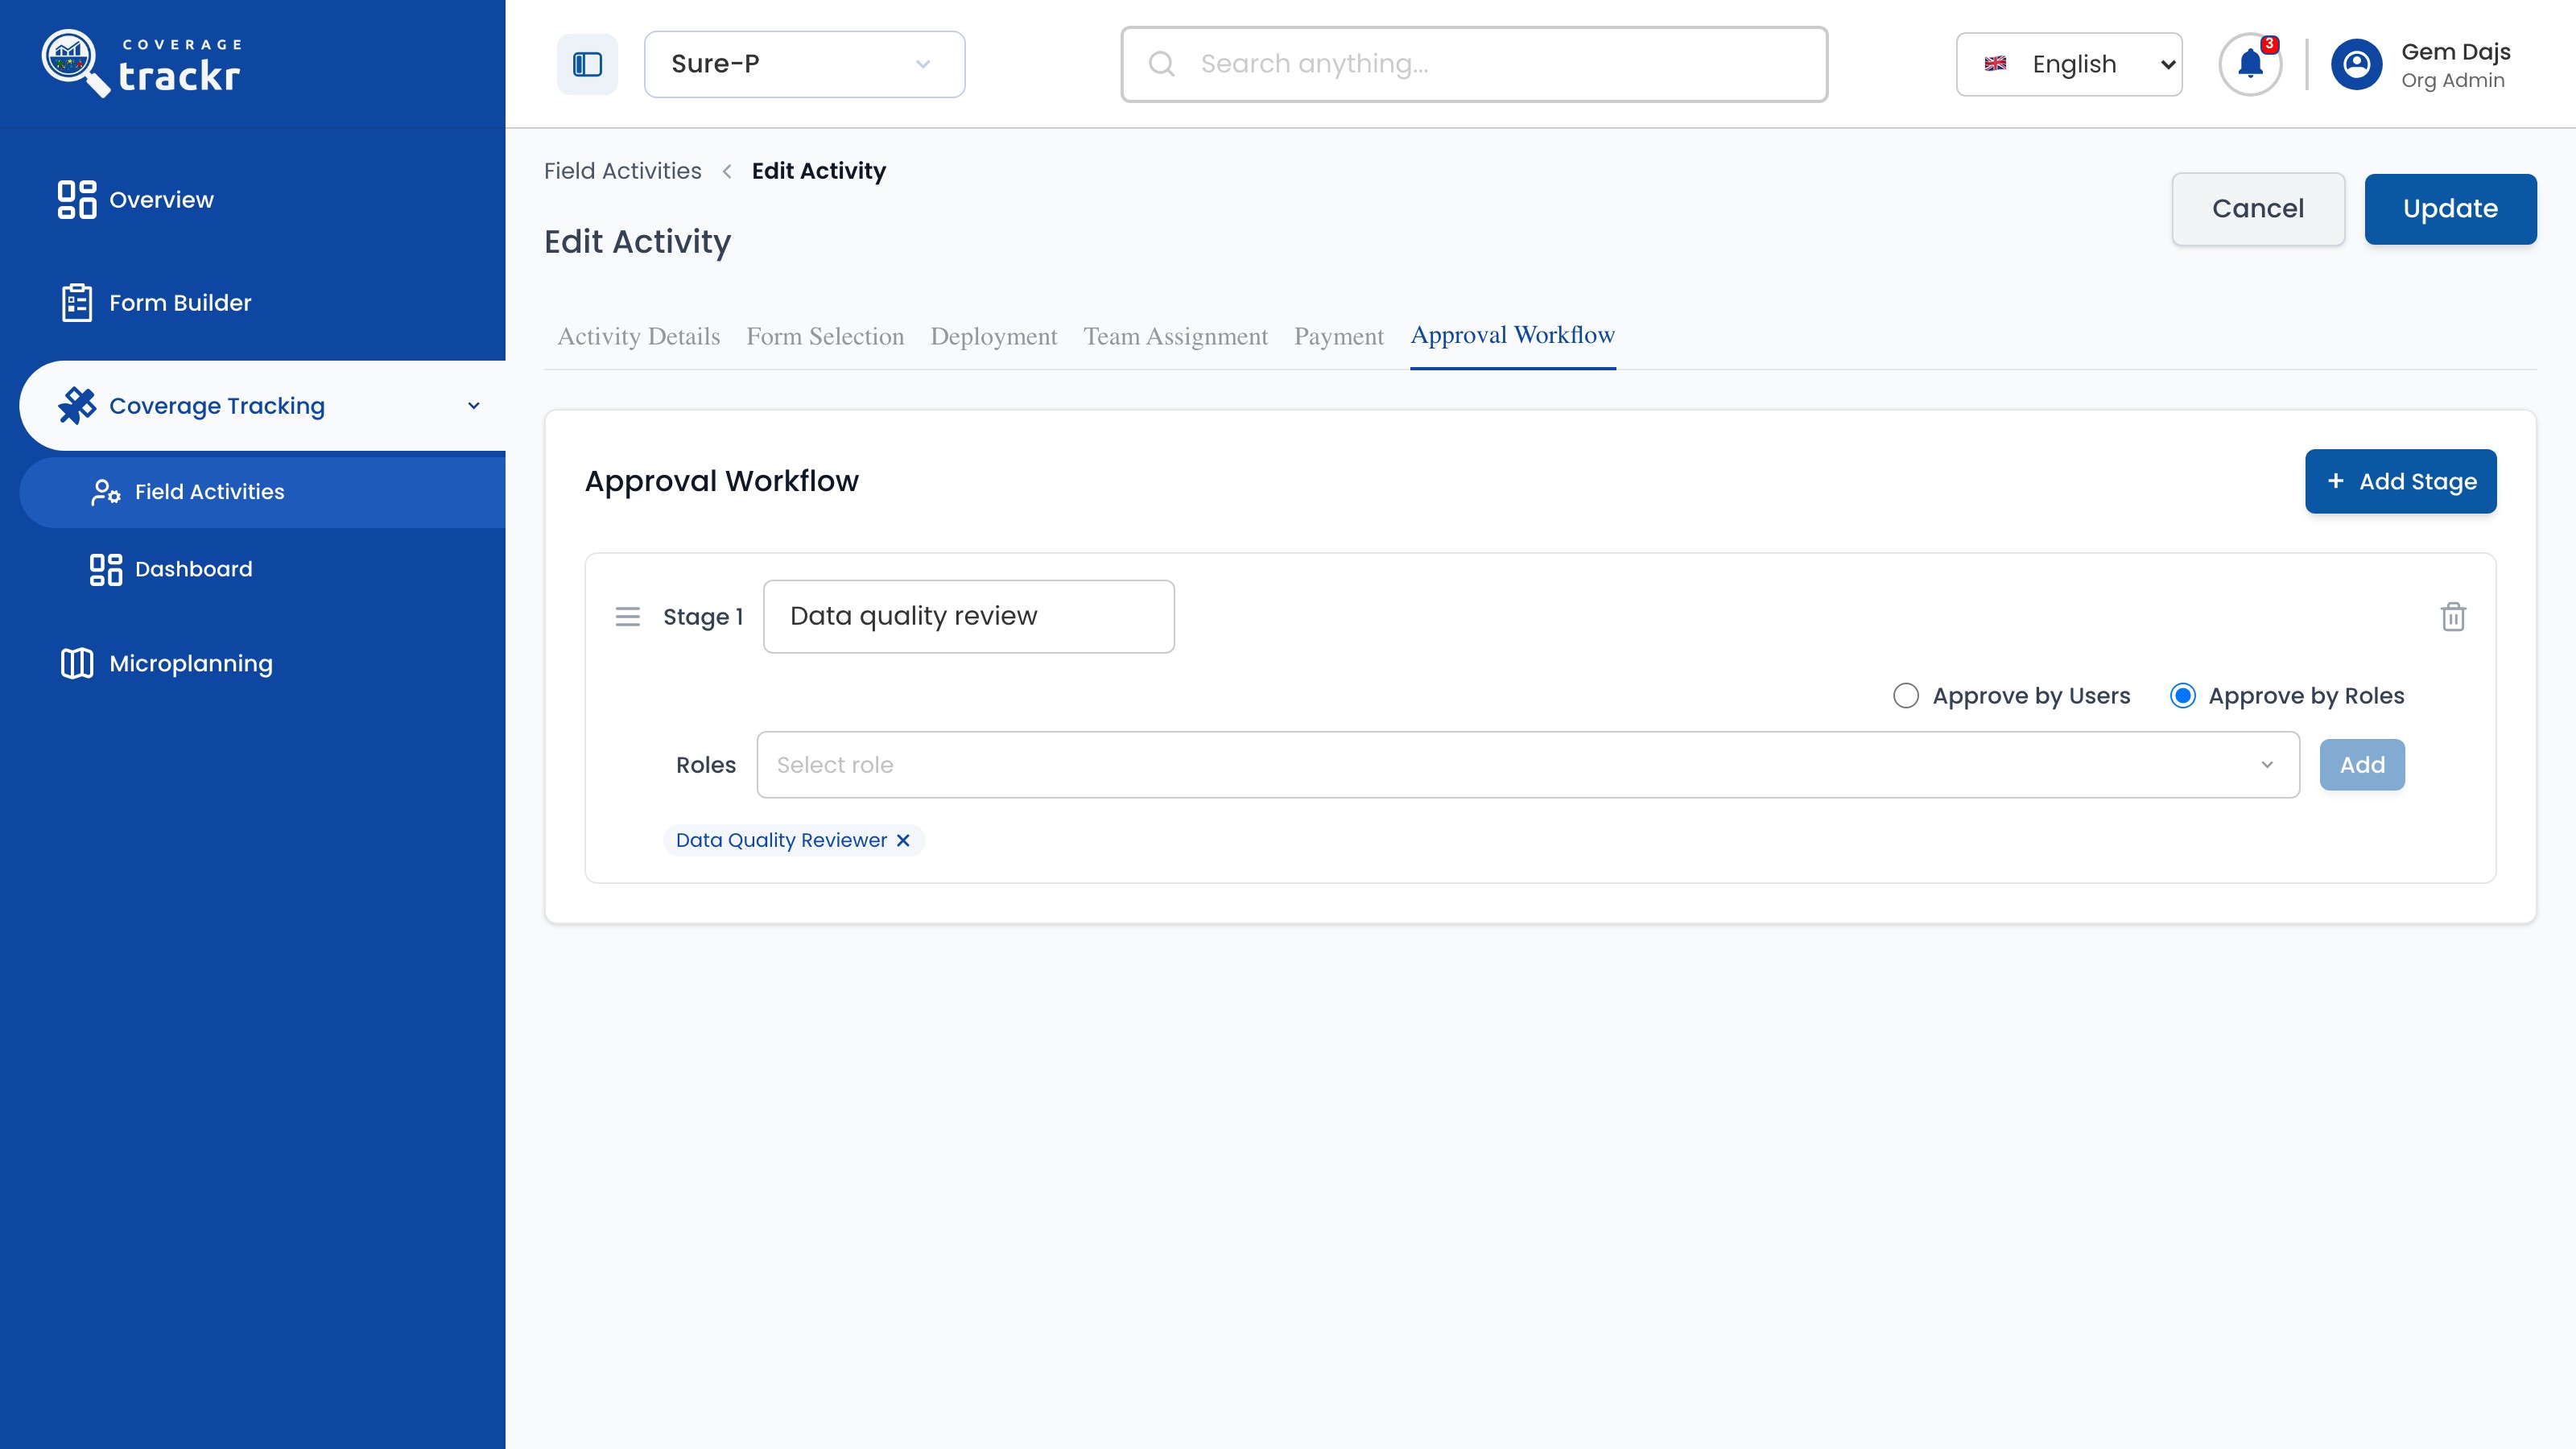
Select Add Stage, name the stage, choose Approve by Roles, pick the role and select Add.

Stage 1 named Data quality review with the Data Quality Reviewer role added

1 — stage name · 2 — approve by roles · 3 — role selection.

Stage 1 named Data quality review with the Data Quality Reviewer role added

Save the workflow

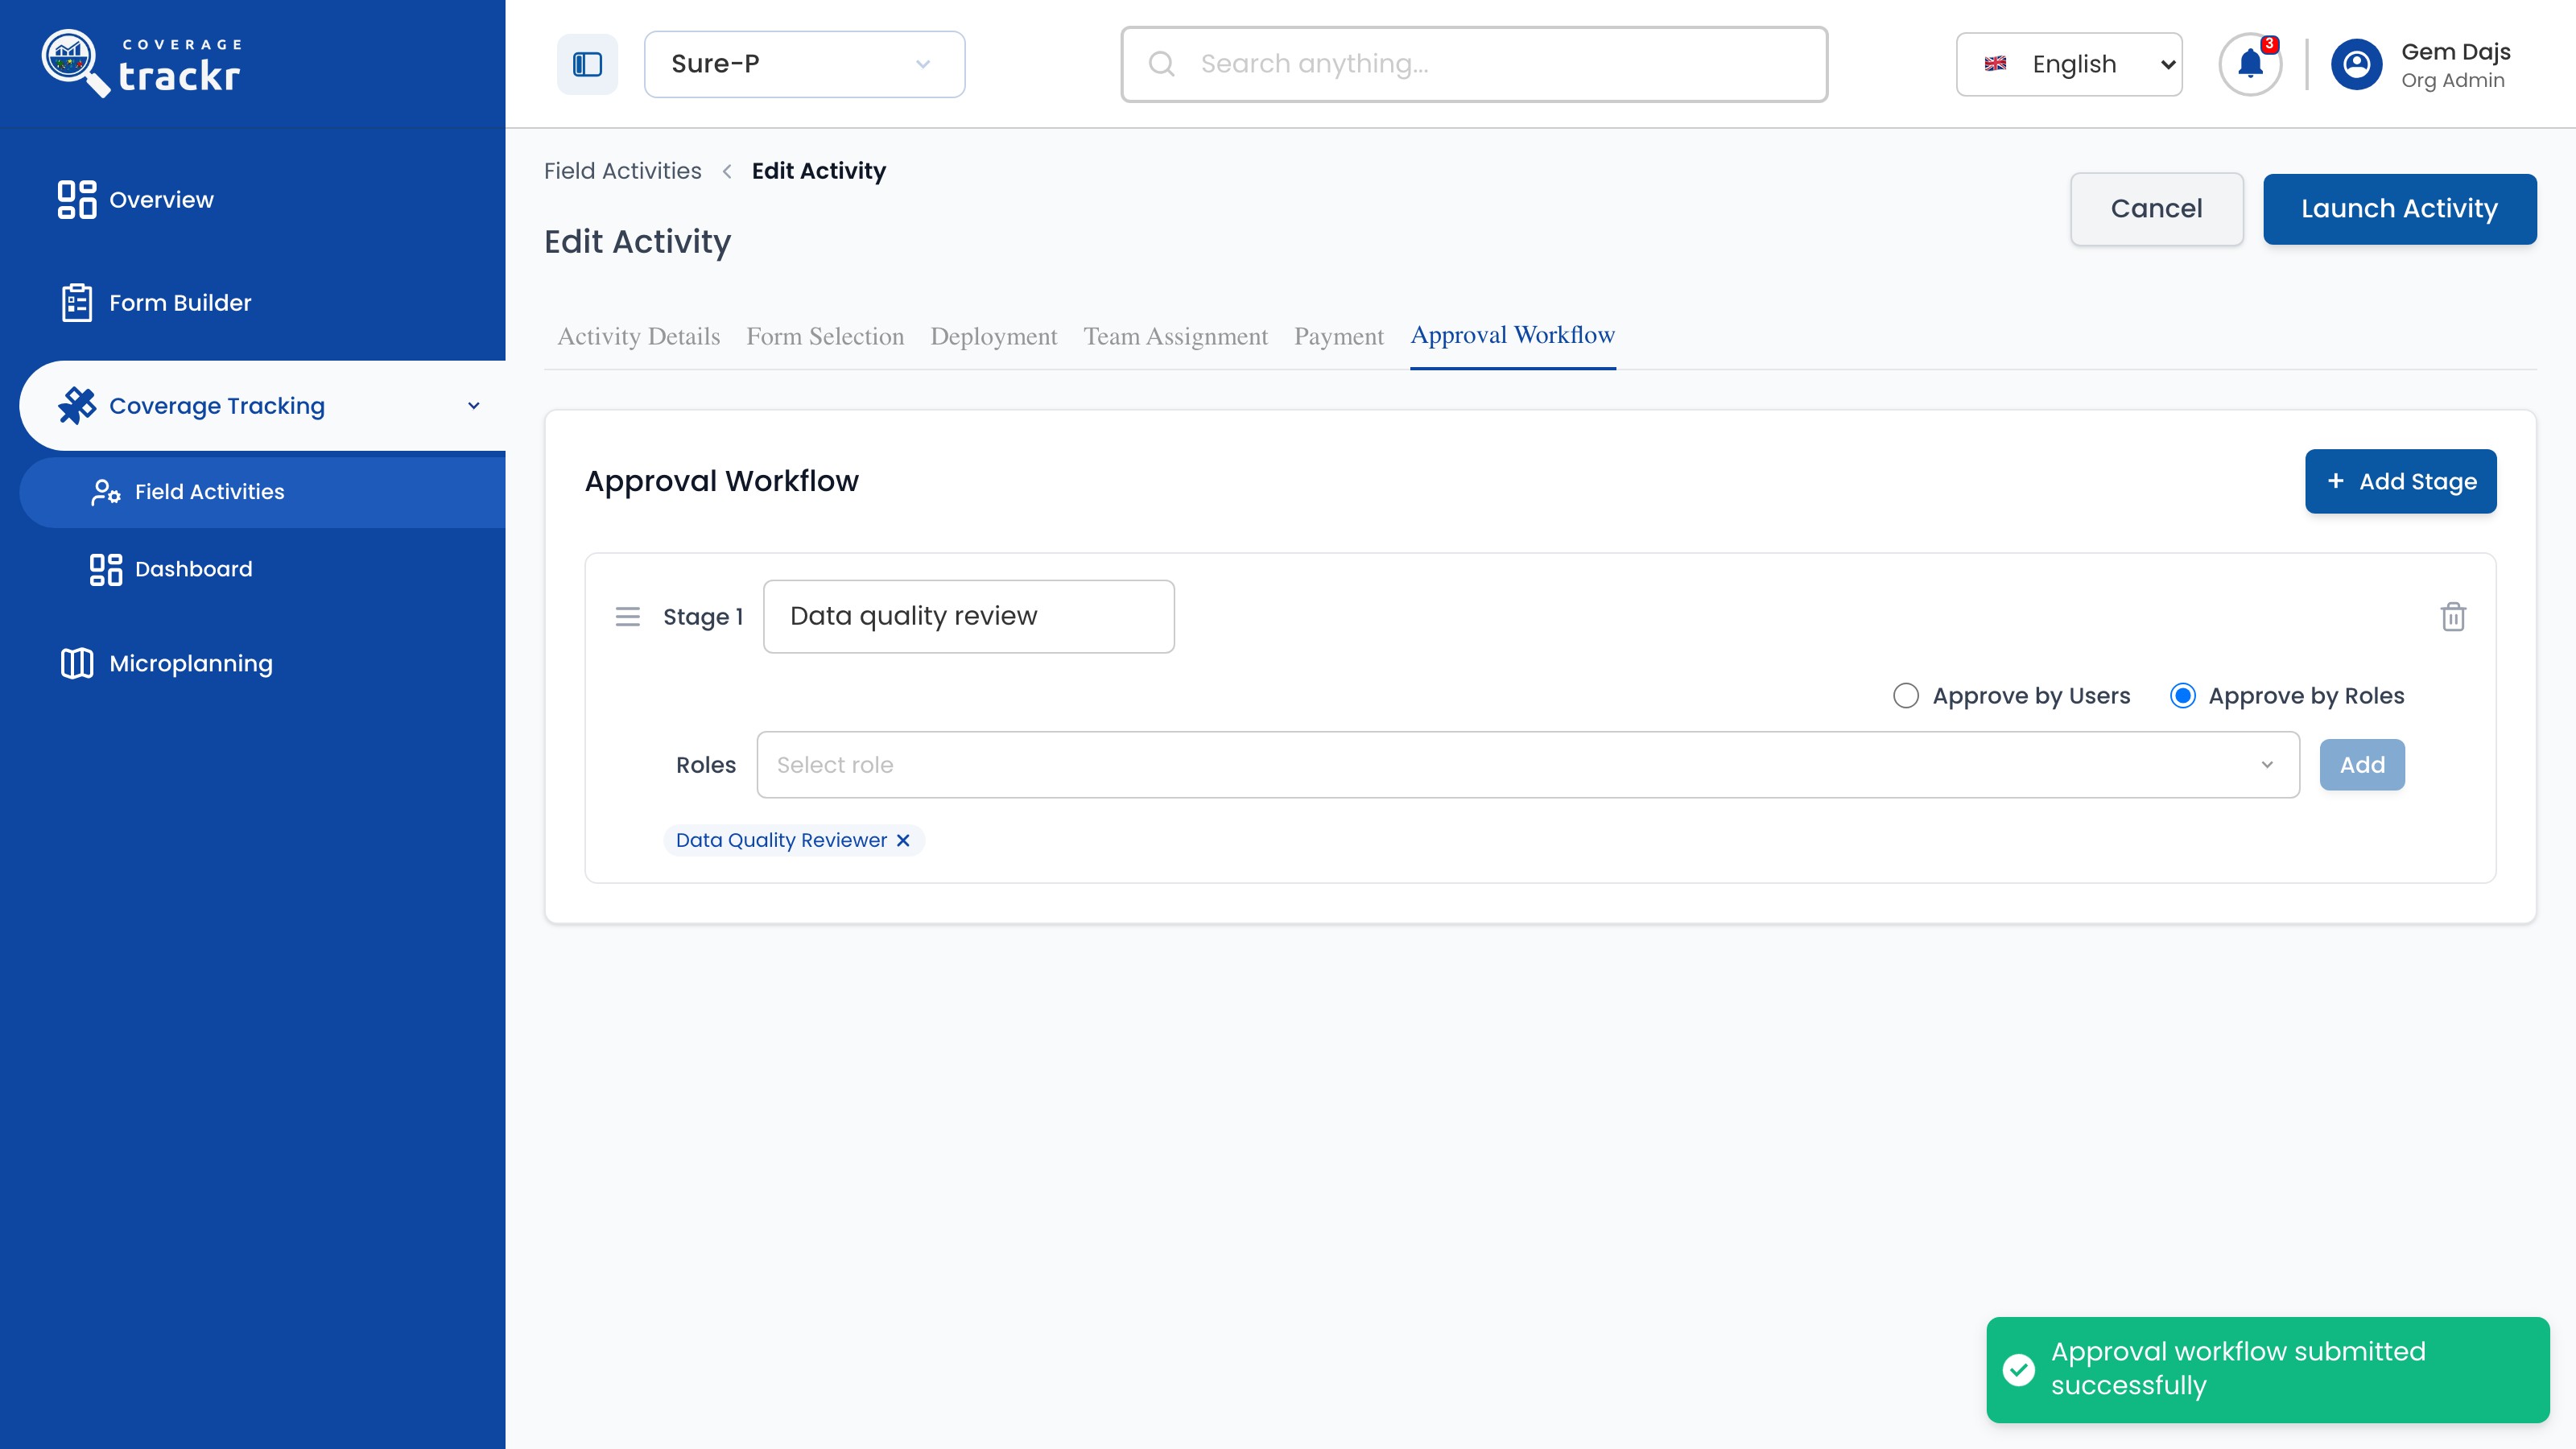
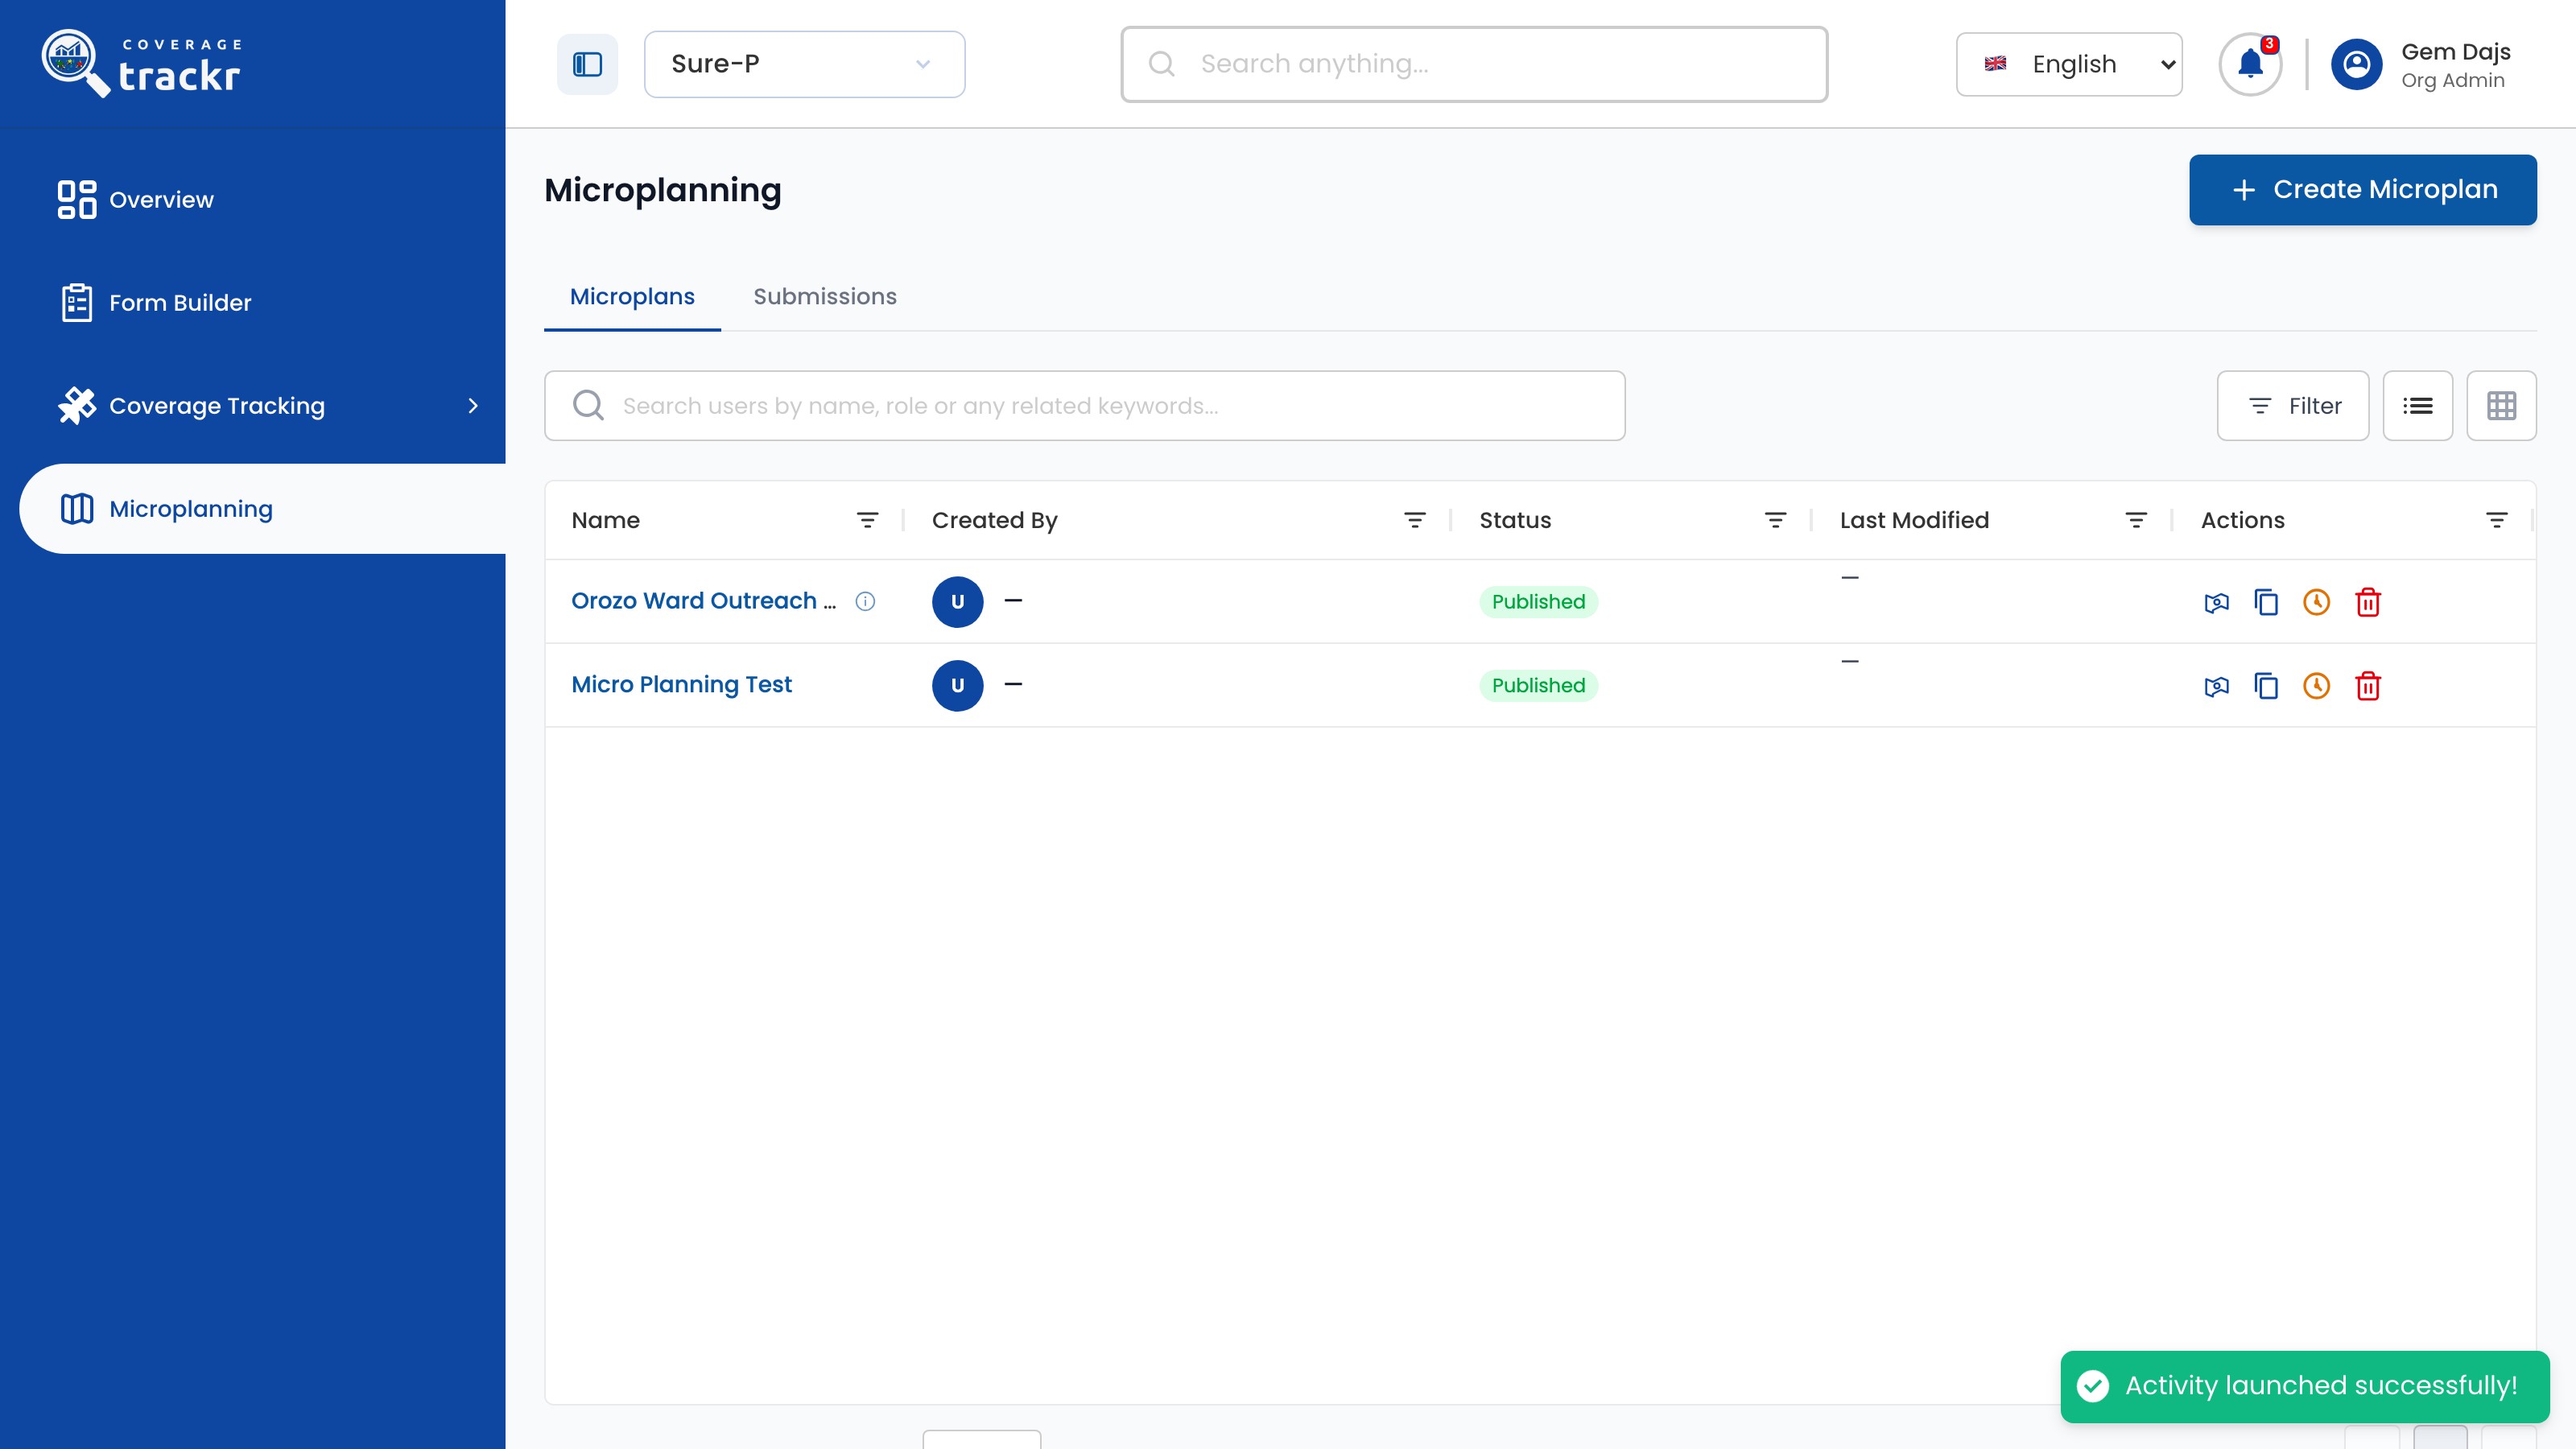
Select Update. A confirmation appears and the button changes to Launch Activity.

Saved approval stage with a success message and the Launch Activity button

1 — launch activity · 2 — workflow confirmation.

Saved approval stage with a success message and the Launch Activity button

Done. The stage is saved and Launch Activity becomes available.

If something goes wrong

Should I approve by users or by roles?

Choose Approve by Roles so the stage keeps working when people change. Choose Approve by Users only for named reviewers.

Can I add more than one stage?

Yes. Select Add Stage again for each extra level of review.

Field activities

Create a validation activity

Set up an independent back-check of a sample of submissions from another activity.

Organization Administrator 6 min read Web

Before you start

  • The activity you want to check already exists.
  • You have agreed the sample size and which questions validators should see.

Start a new activity

In Field Activities, select Create New Activity.

Field Activities list with the Create New Activity button

1 — create new activity.

Field Activities list with the Create New Activity button

Enter the details

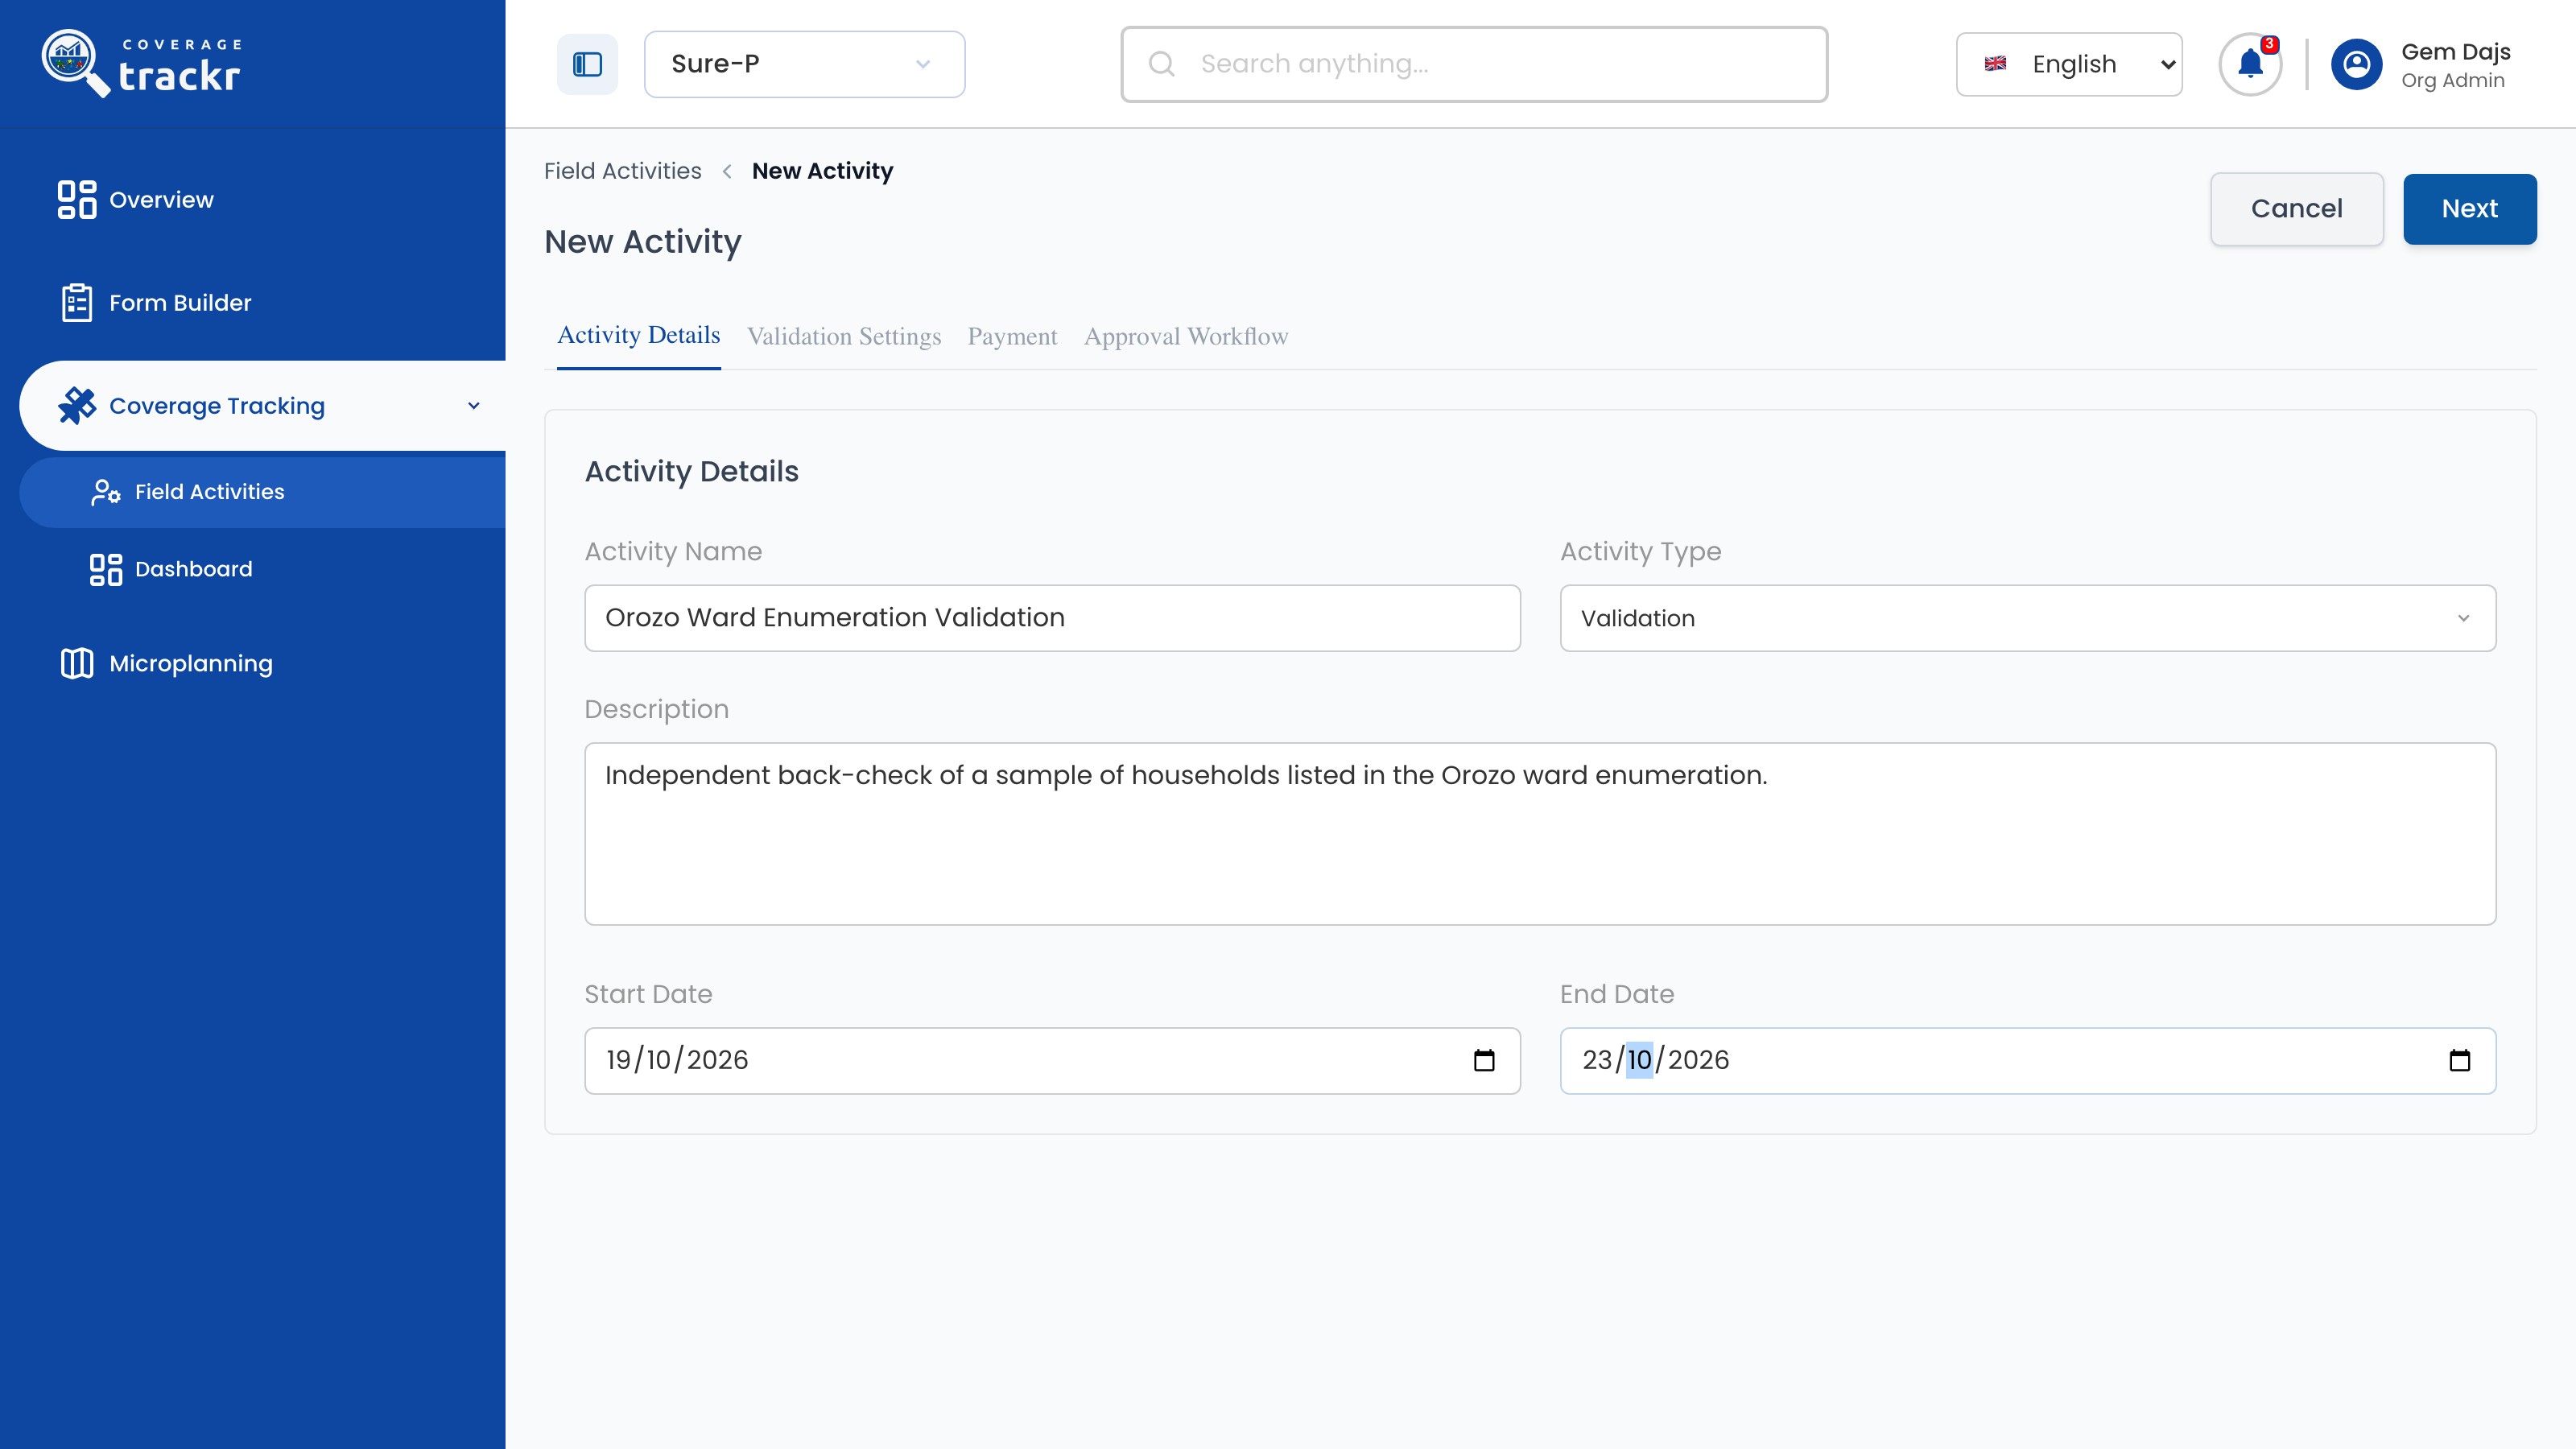
Enter the Activity Name, choose Validation as the Activity Type, add a Description and the dates, then select Next.

New Activity details for a Validation activity

1 — validation details · 2 — next.

New Activity details for a Validation activity

Choose the source and sample

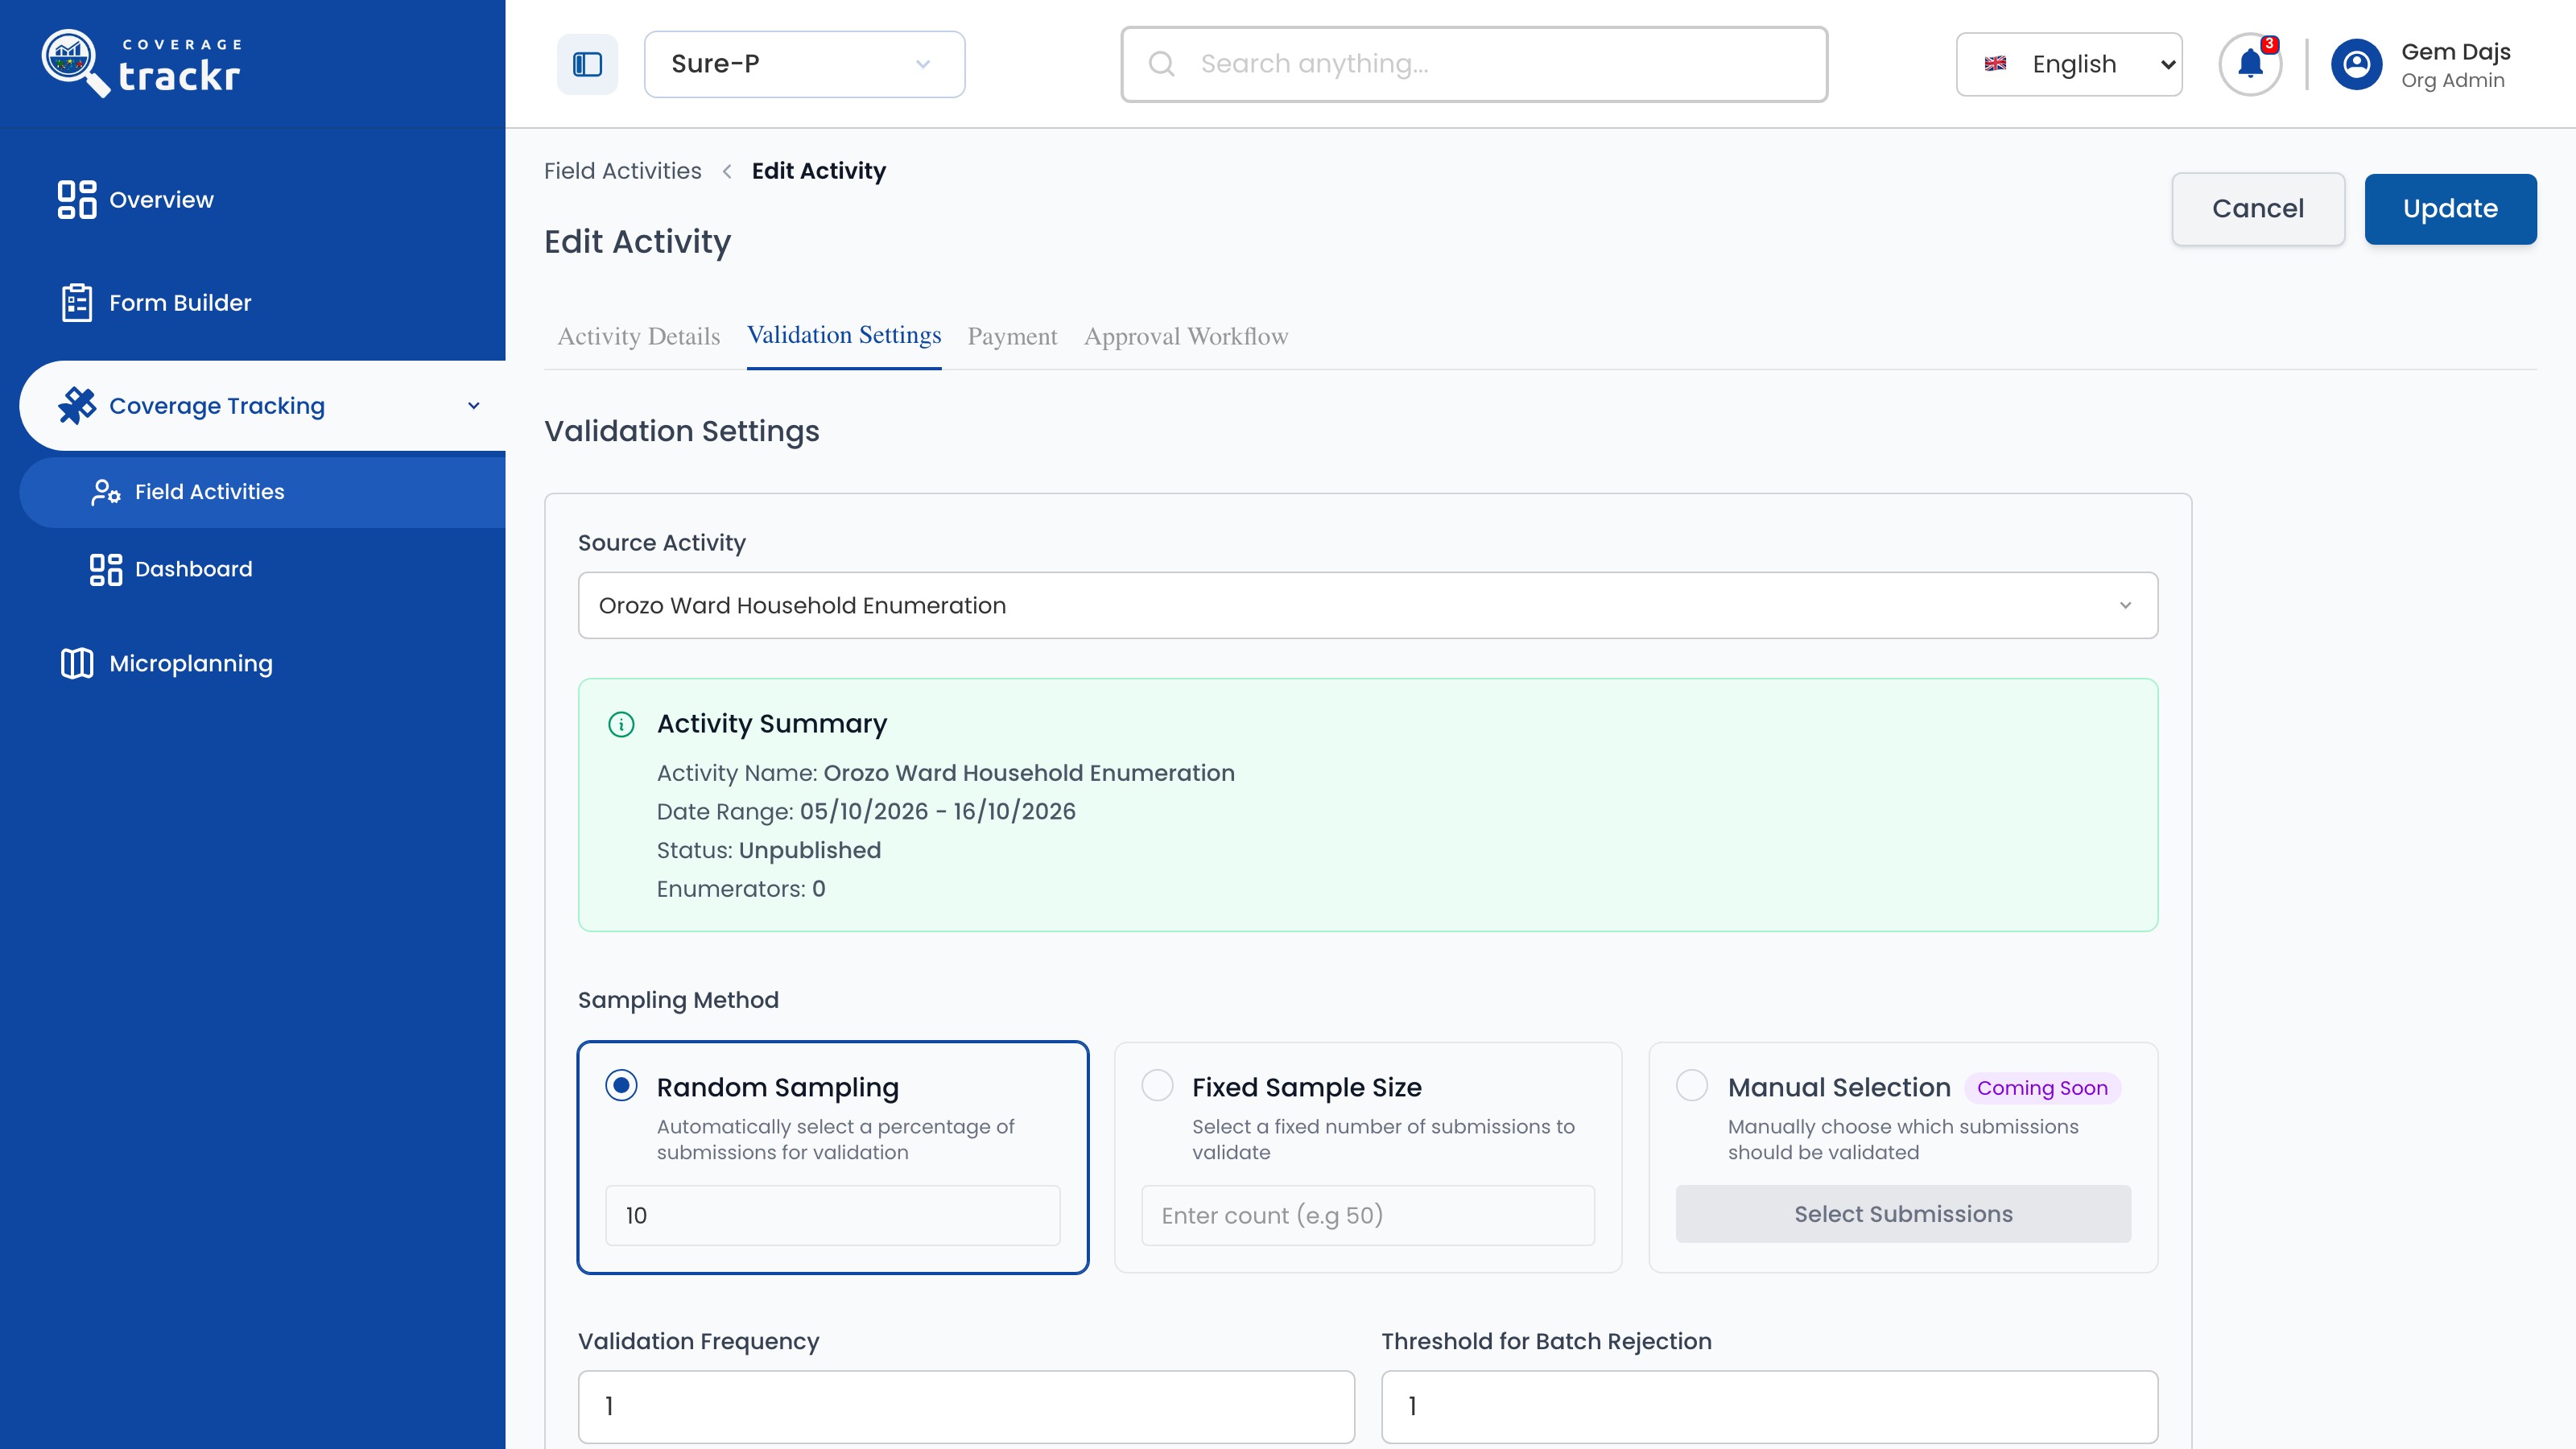
On Validation Settings, choose the Source Activity and check its Activity Summary. Choose the Sampling Method and enter the percentage or count, then set Validation Frequency and Threshold for Batch Rejection.

Validation Settings with Orozo Ward Household Enumeration as the source and 10 percent random sampling

1 — source activity summary · 2 — sampling method · 3 — validation thresholds.

Validation Settings with Orozo Ward Household Enumeration as the source and 10 percent random sampling

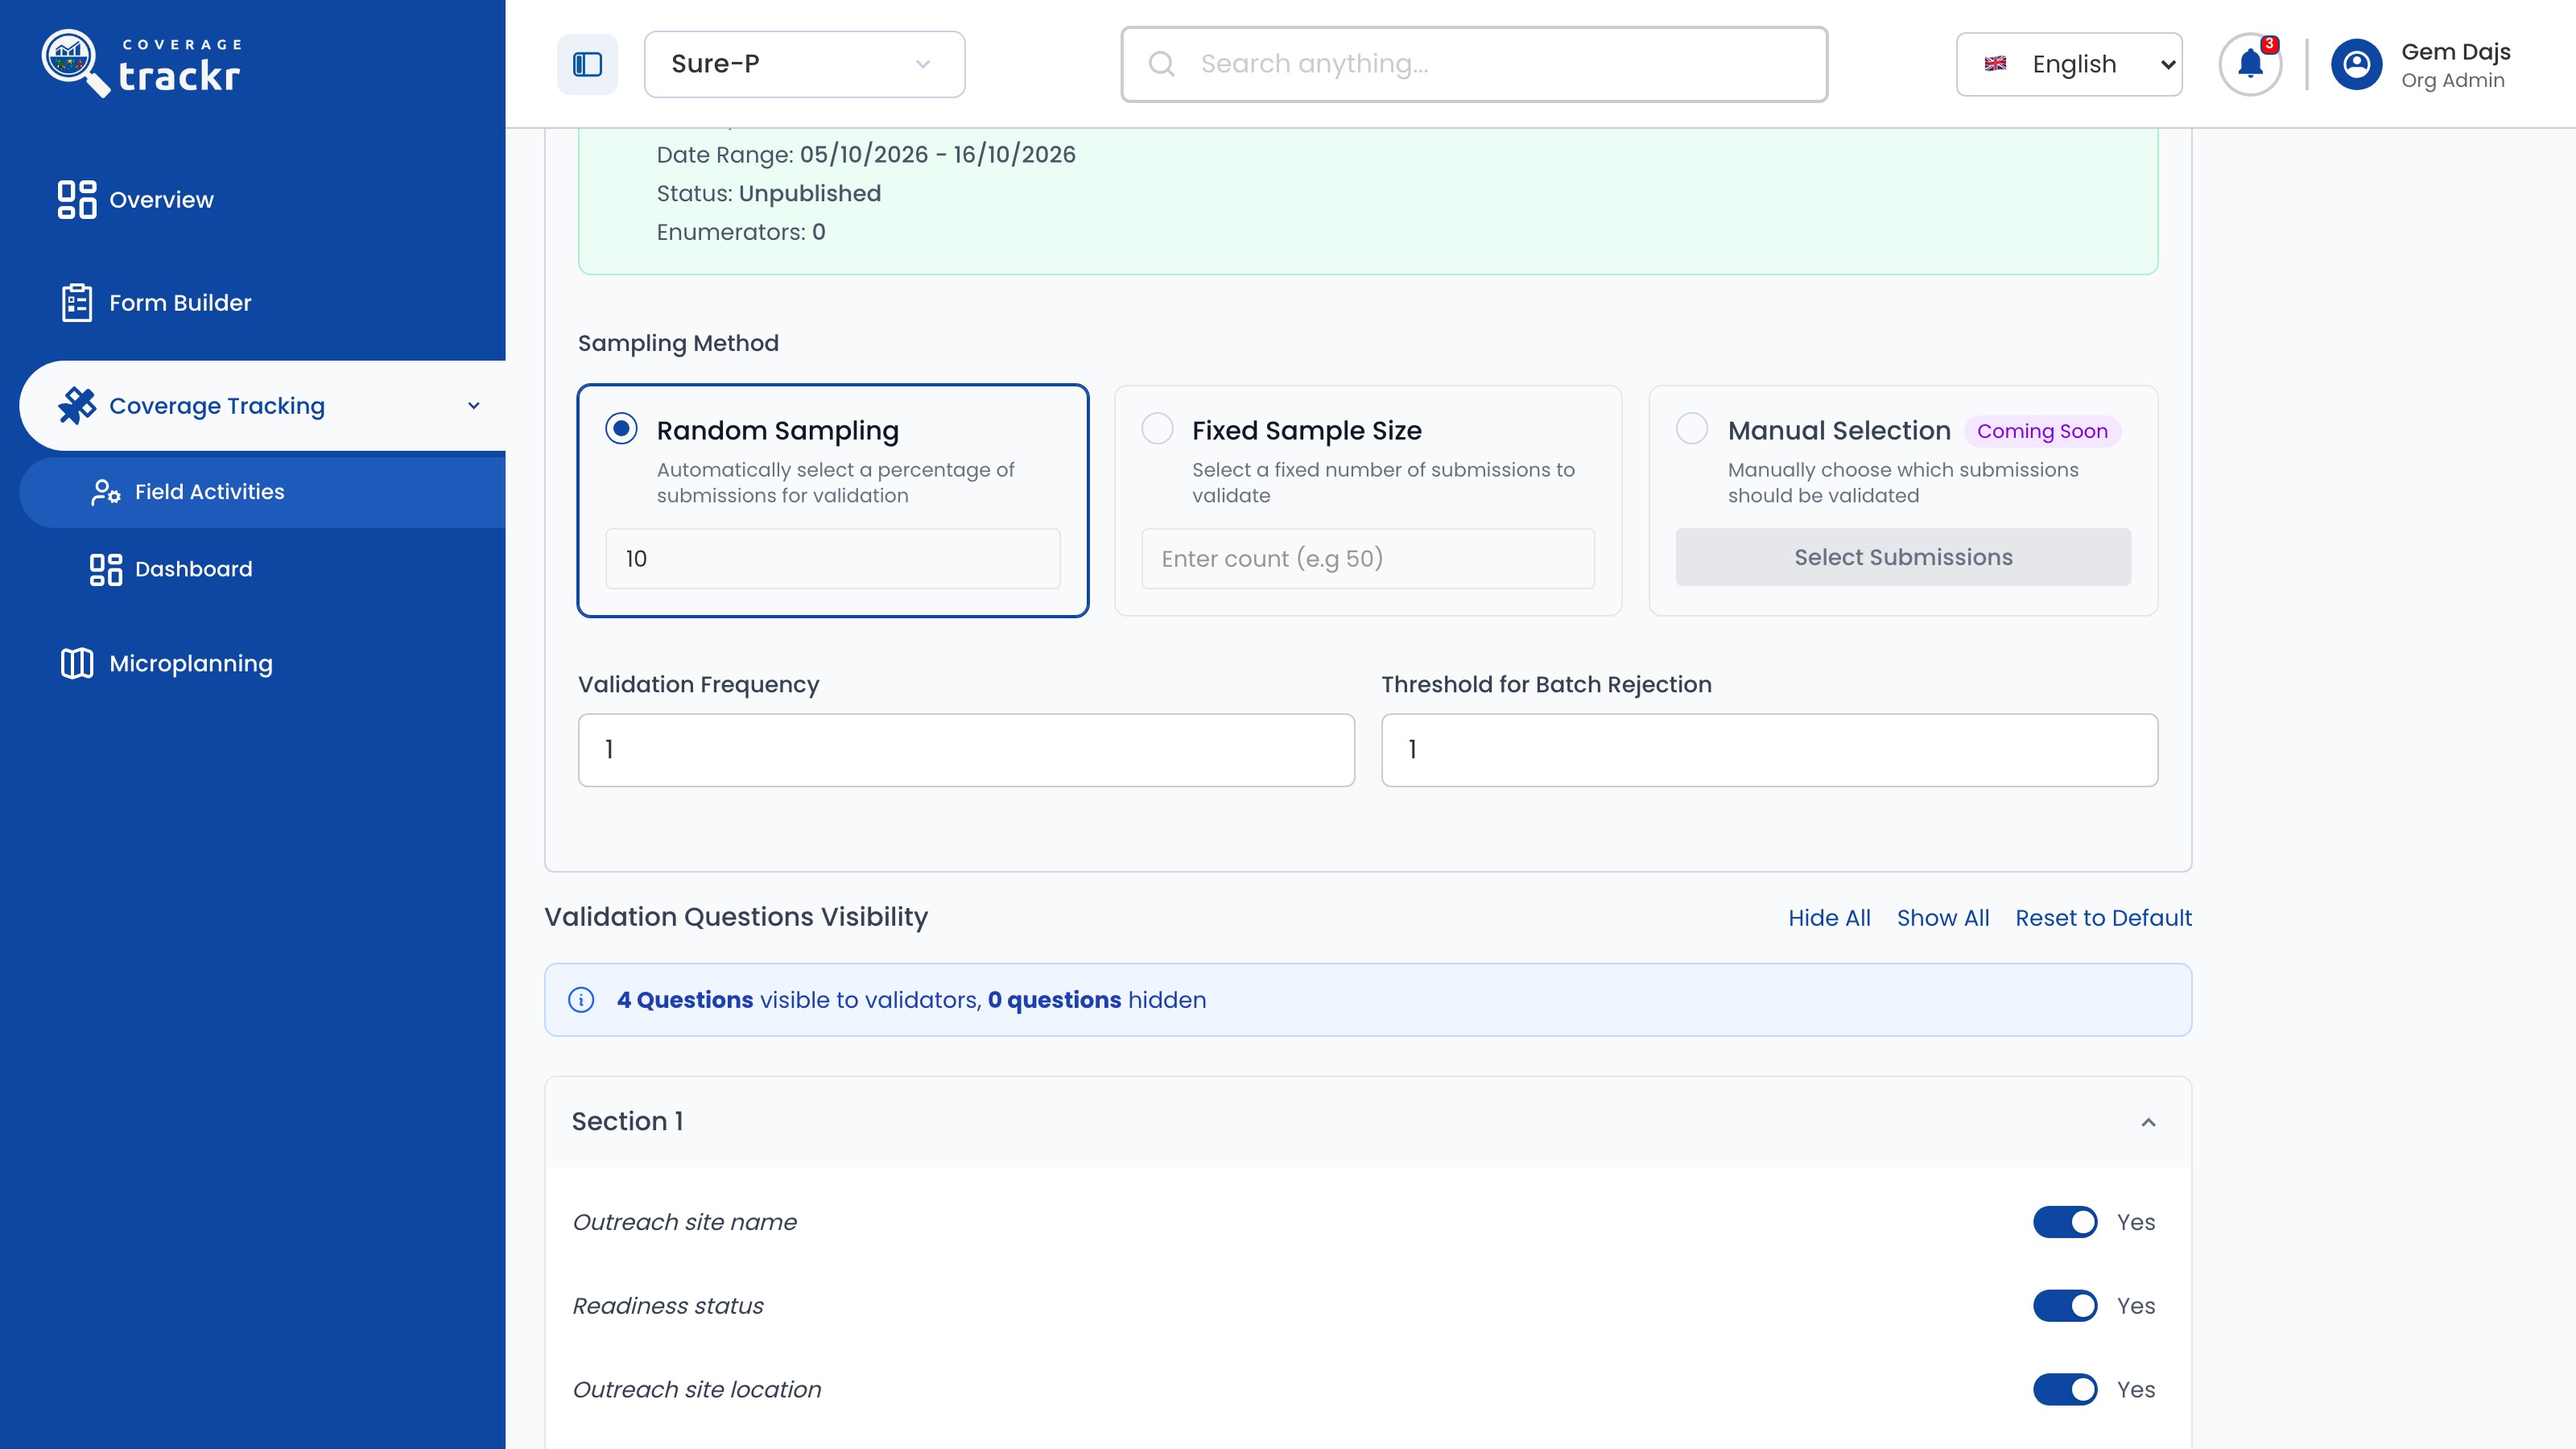
Choose what validators see

Under Validation Questions Visibility, switch off any question validators should not see. Use Show All or Reset to Default to start again.

Validation Questions Visibility listing the form's questions

1 — visibility controls · 2 — question switches.

Validation Questions Visibility listing the form's questions

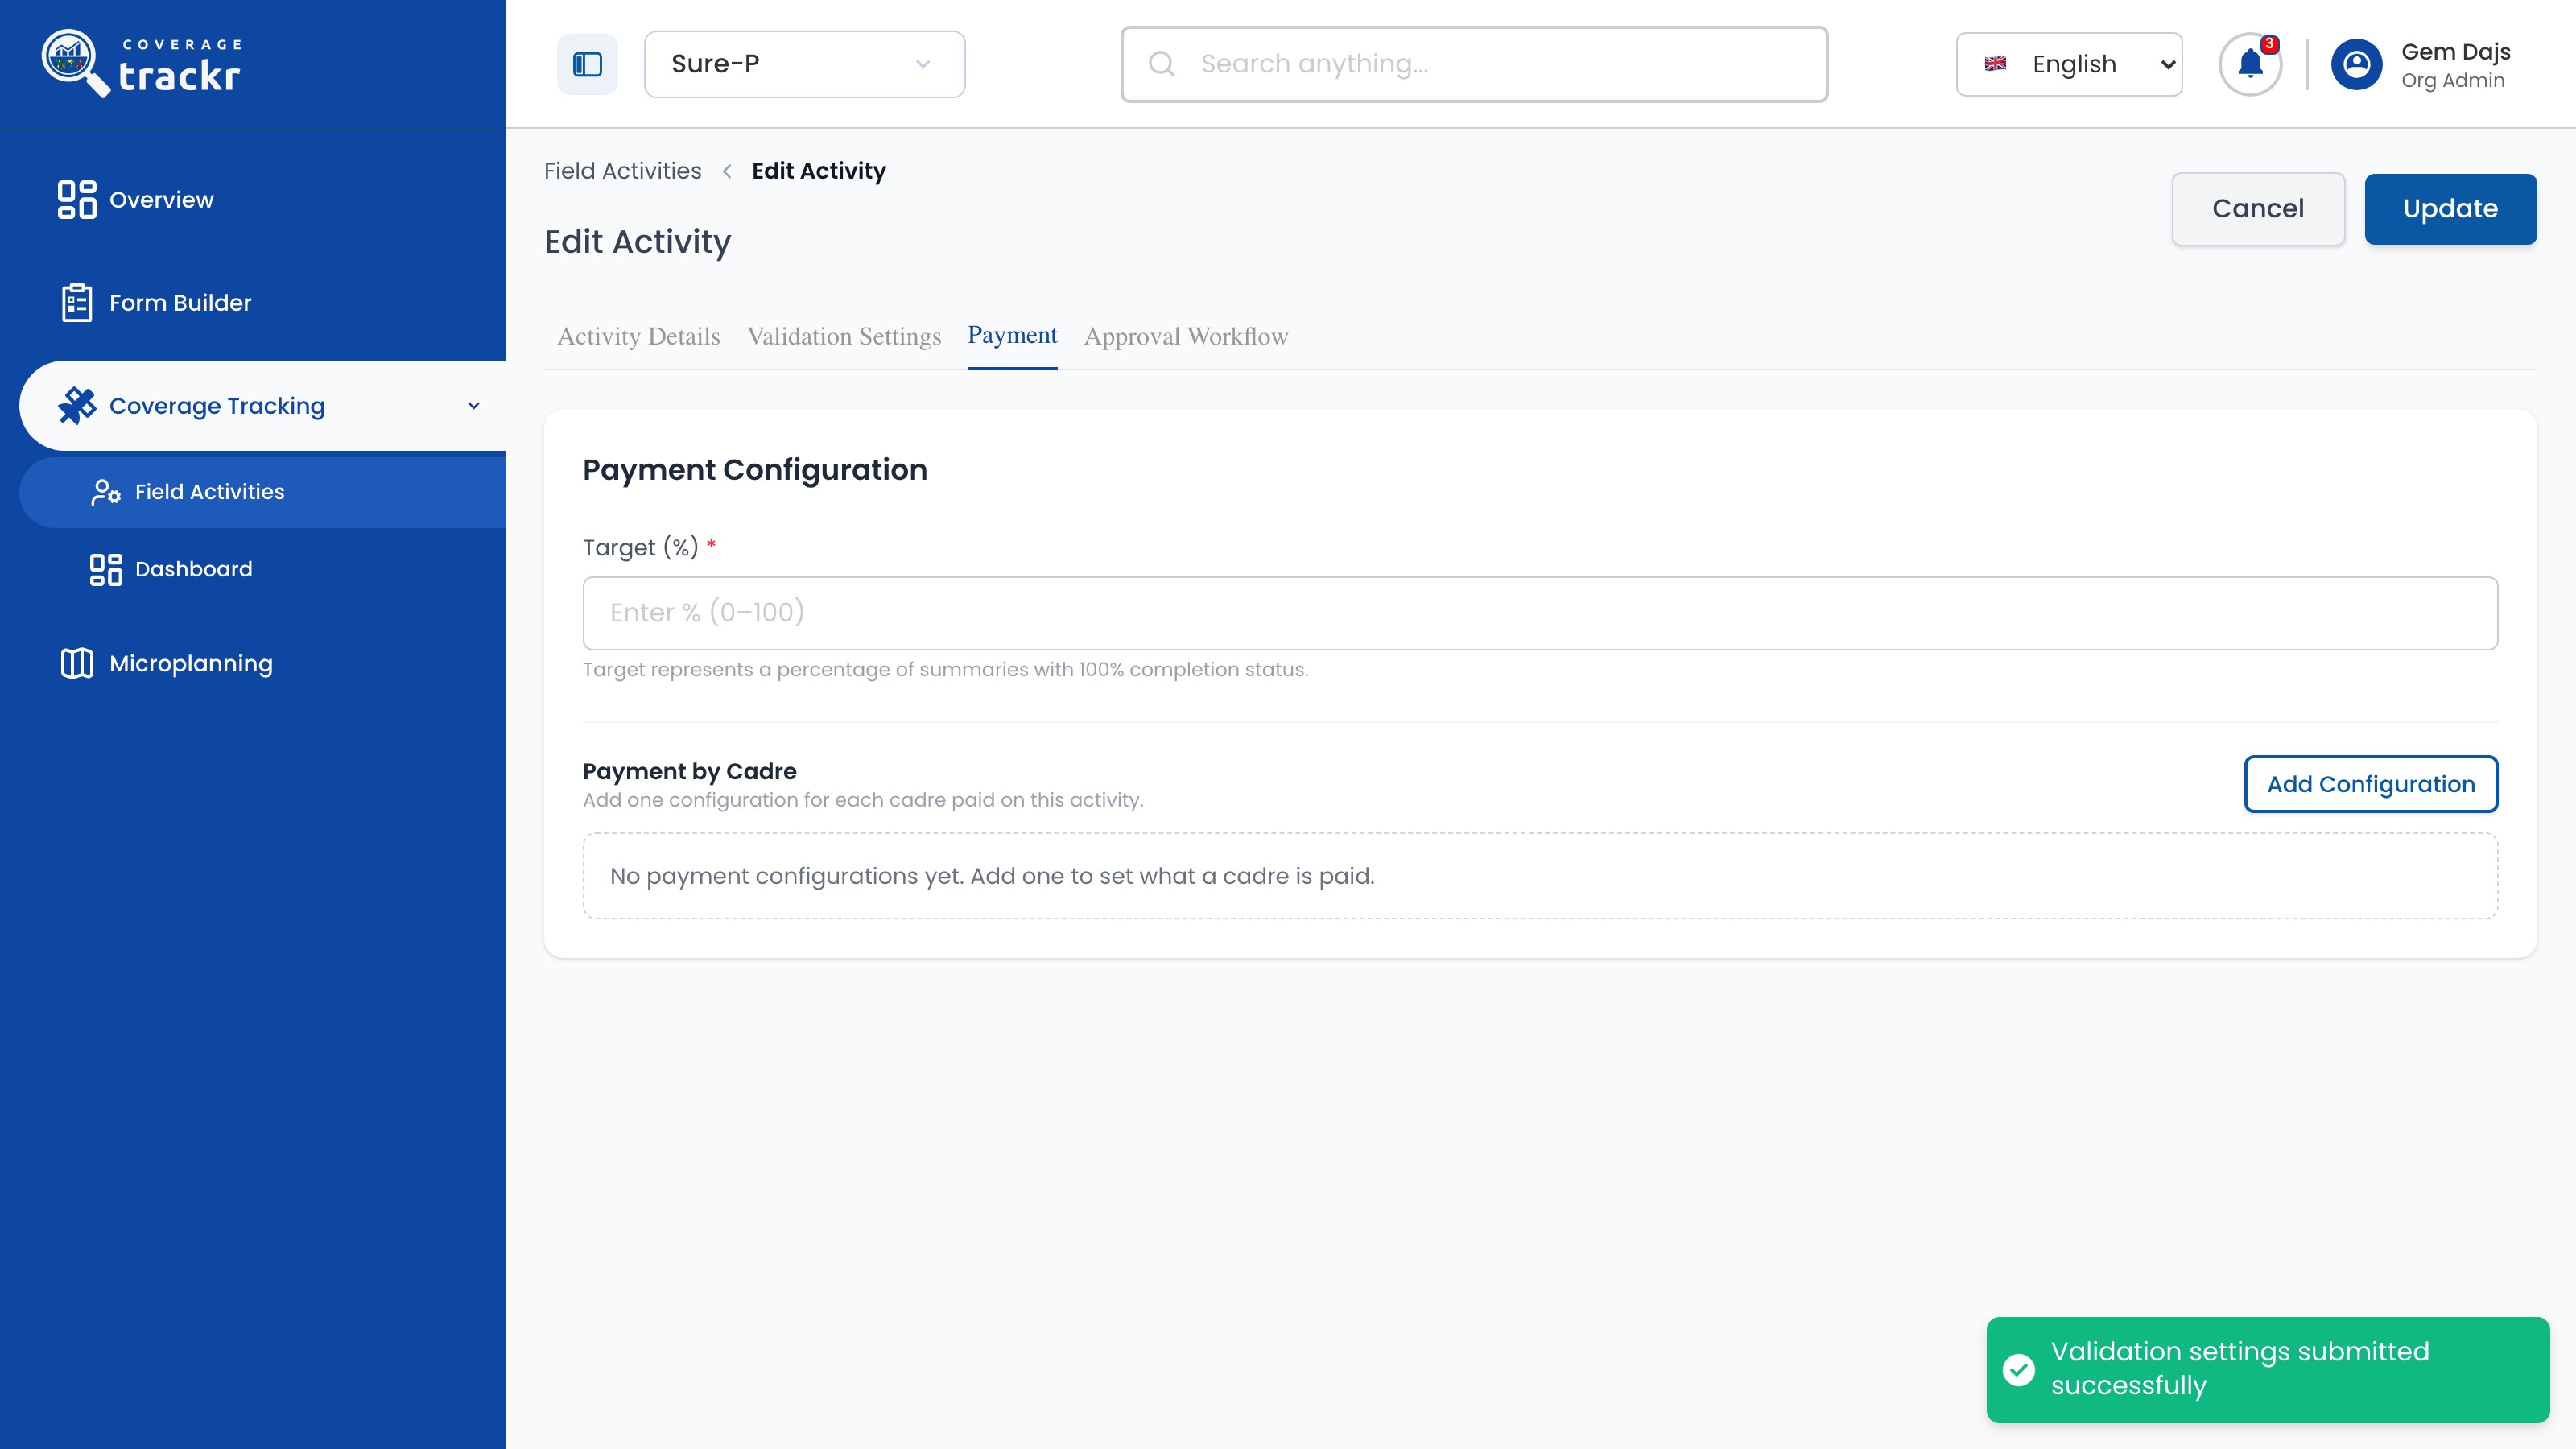
Save the settings

Select Update. A confirmation appears and the Payment step opens.

Payment step with a Validation settings submitted successfully message

1 — payment step · 2 — validation confirmation.

Payment step with a Validation settings submitted successfully message

Done. The validation settings are saved and the activity moves on to Payment. Finish payment and approval, then publish it.

If something goes wrong

What does Threshold for Batch Rejection mean?

It is the number of failed checks in a batch that causes the whole batch to be rejected. Agree it with your data team before publishing.
Field activities

Publish a field activity

Make a ready activity available to its field teams.

Organization Administrator 1 min read Web

Before you start

  • The activity's form, deployment, team and approval settings are complete.

Find the activity

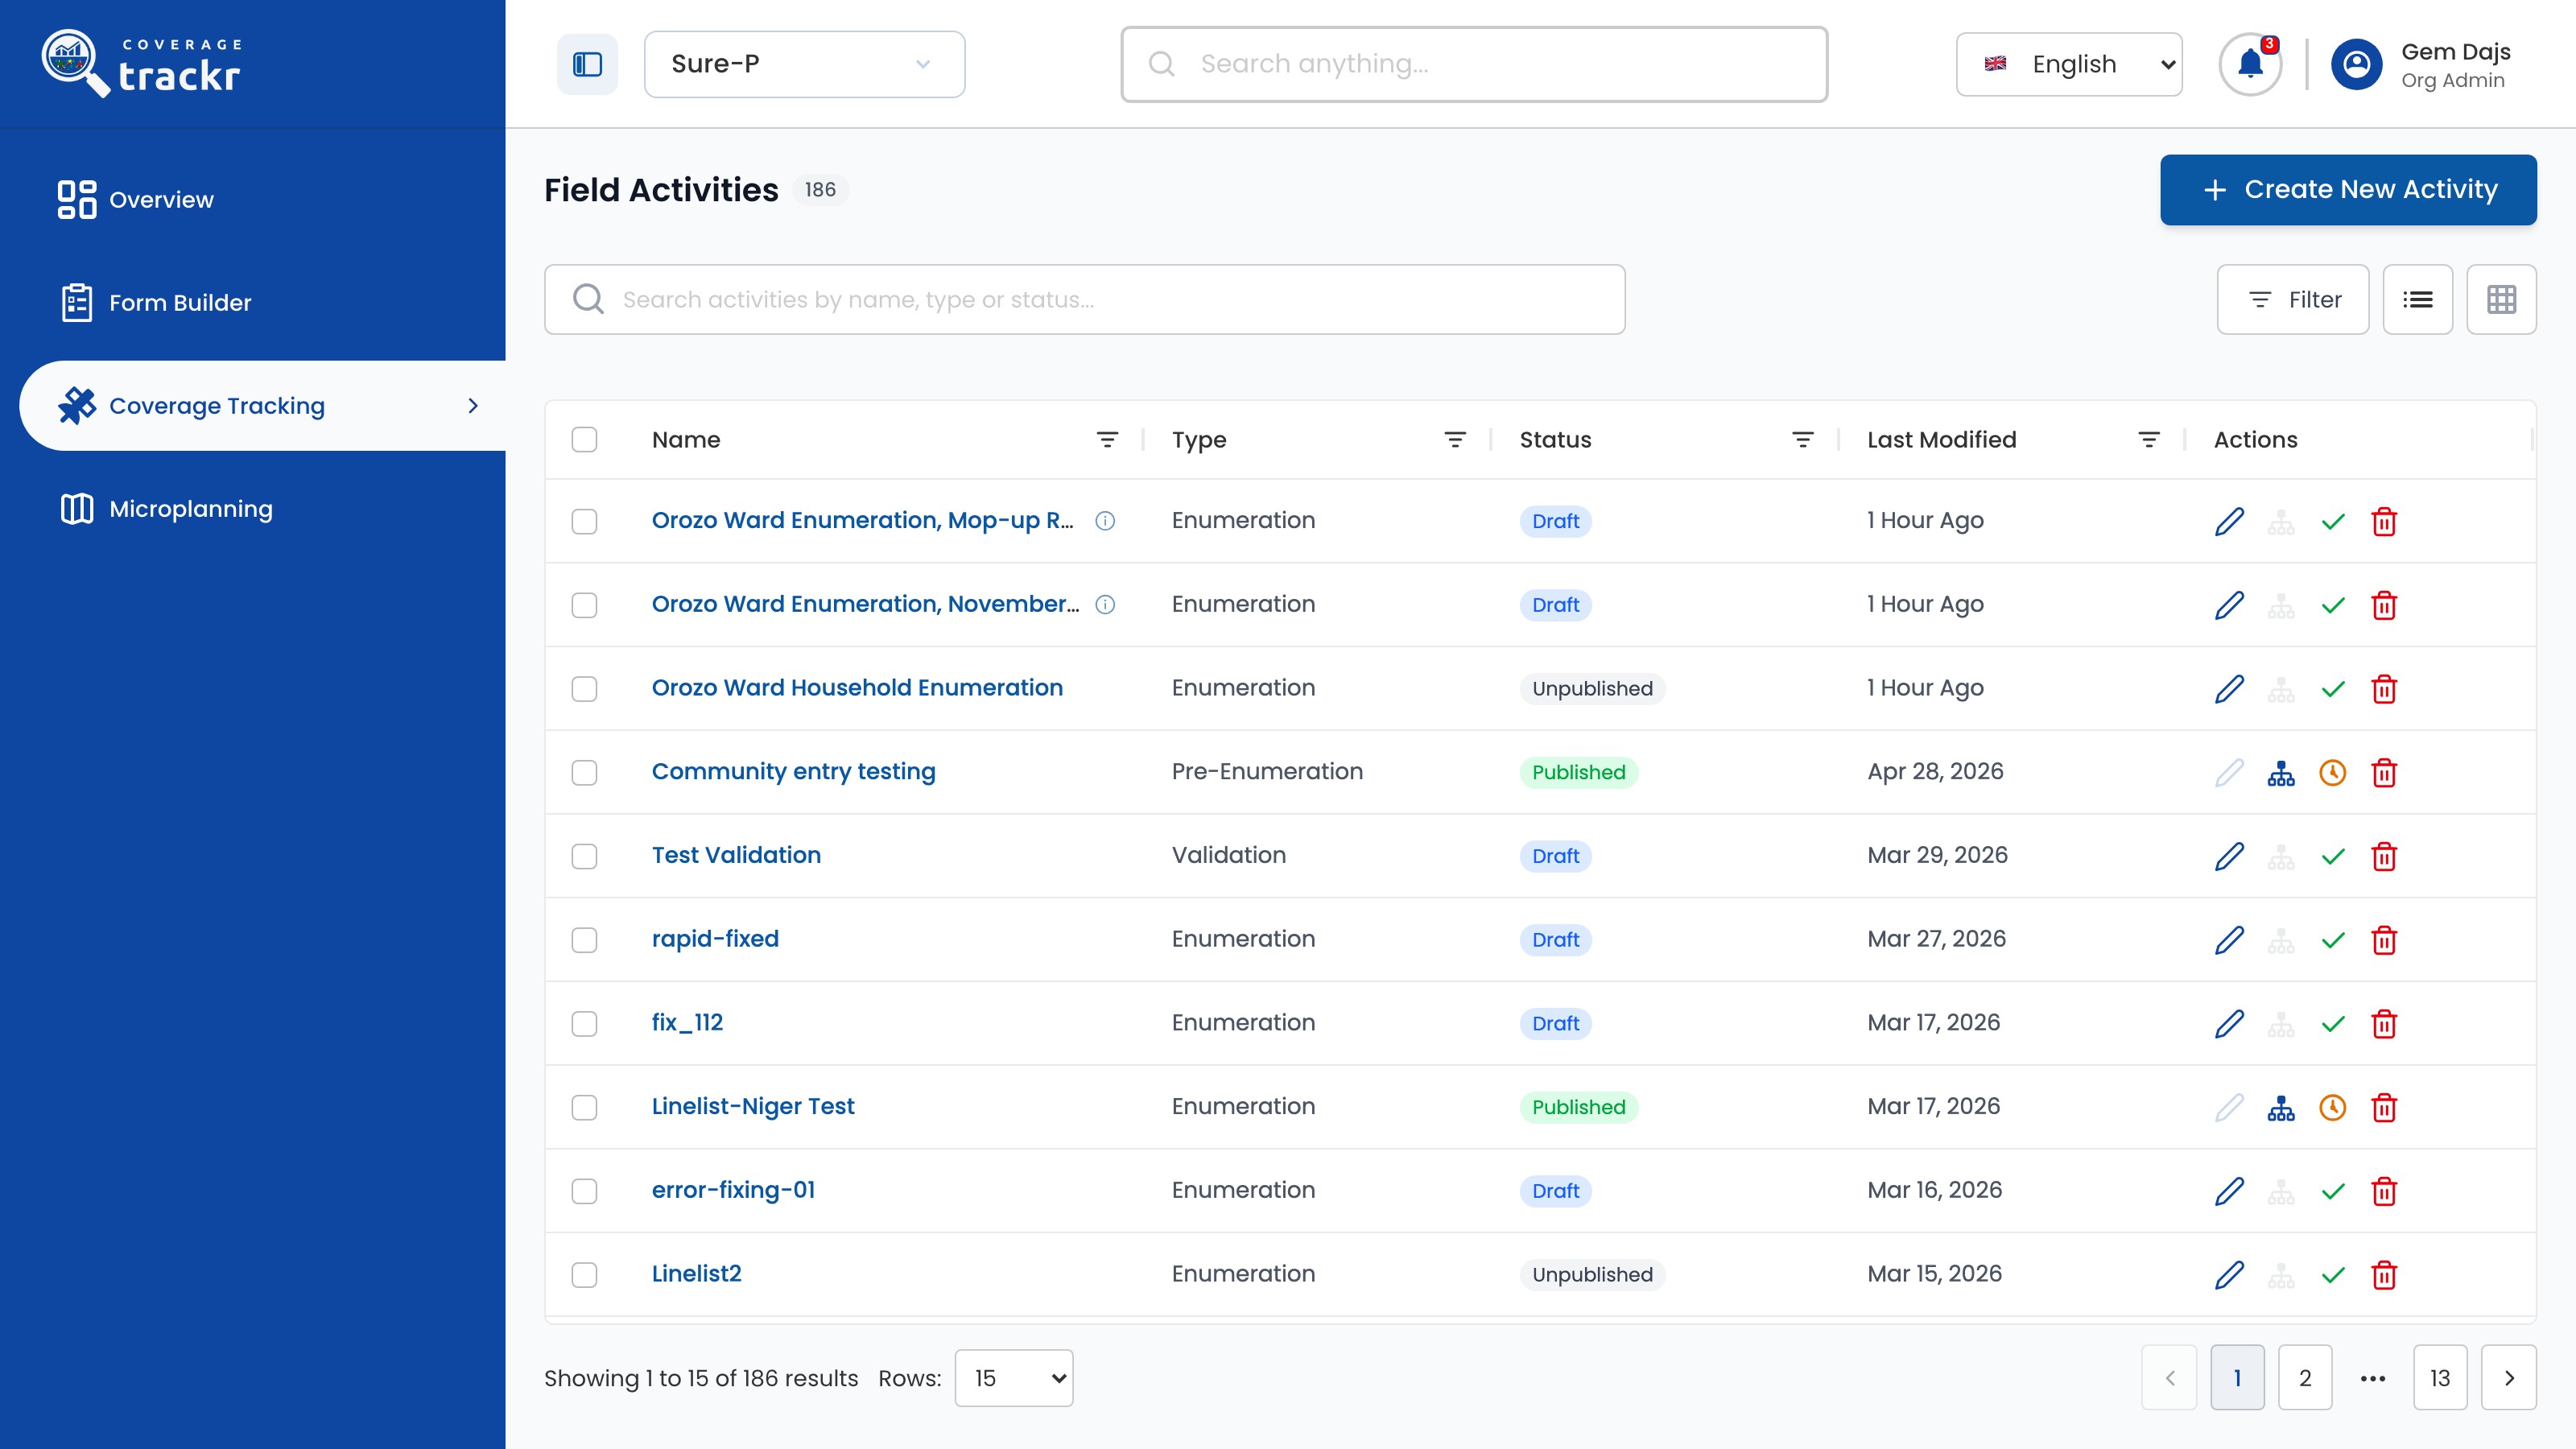
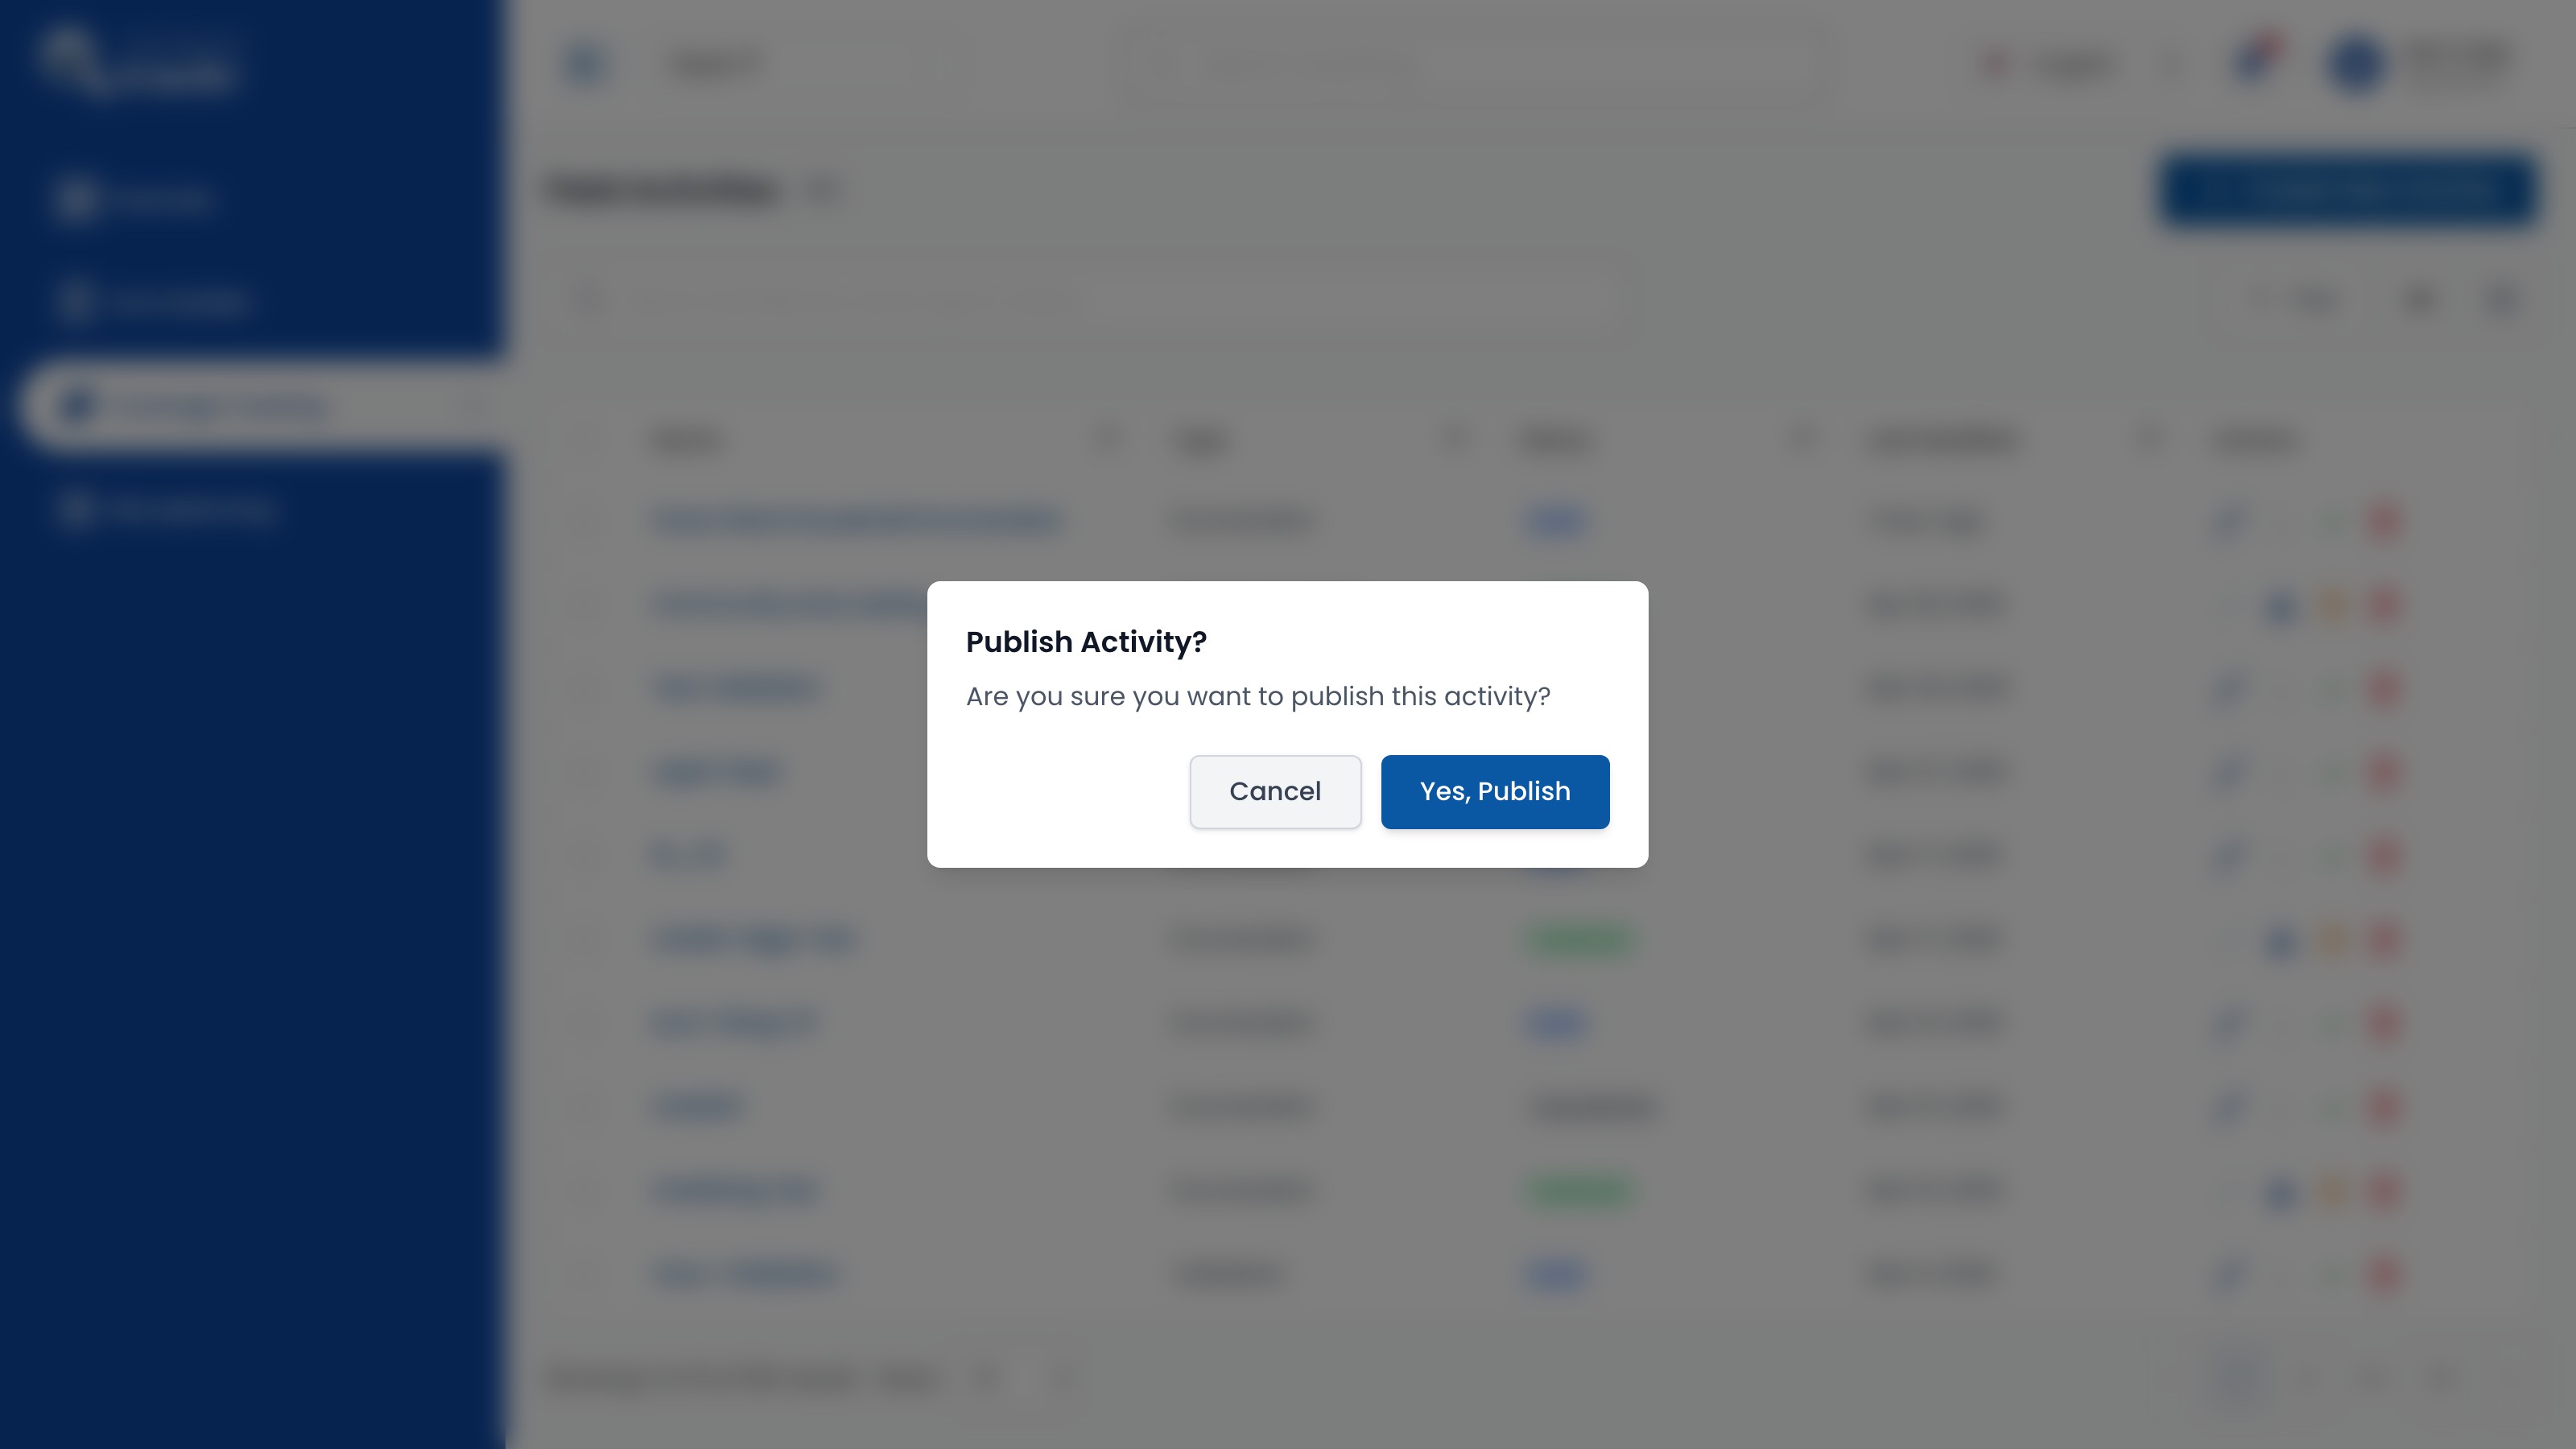
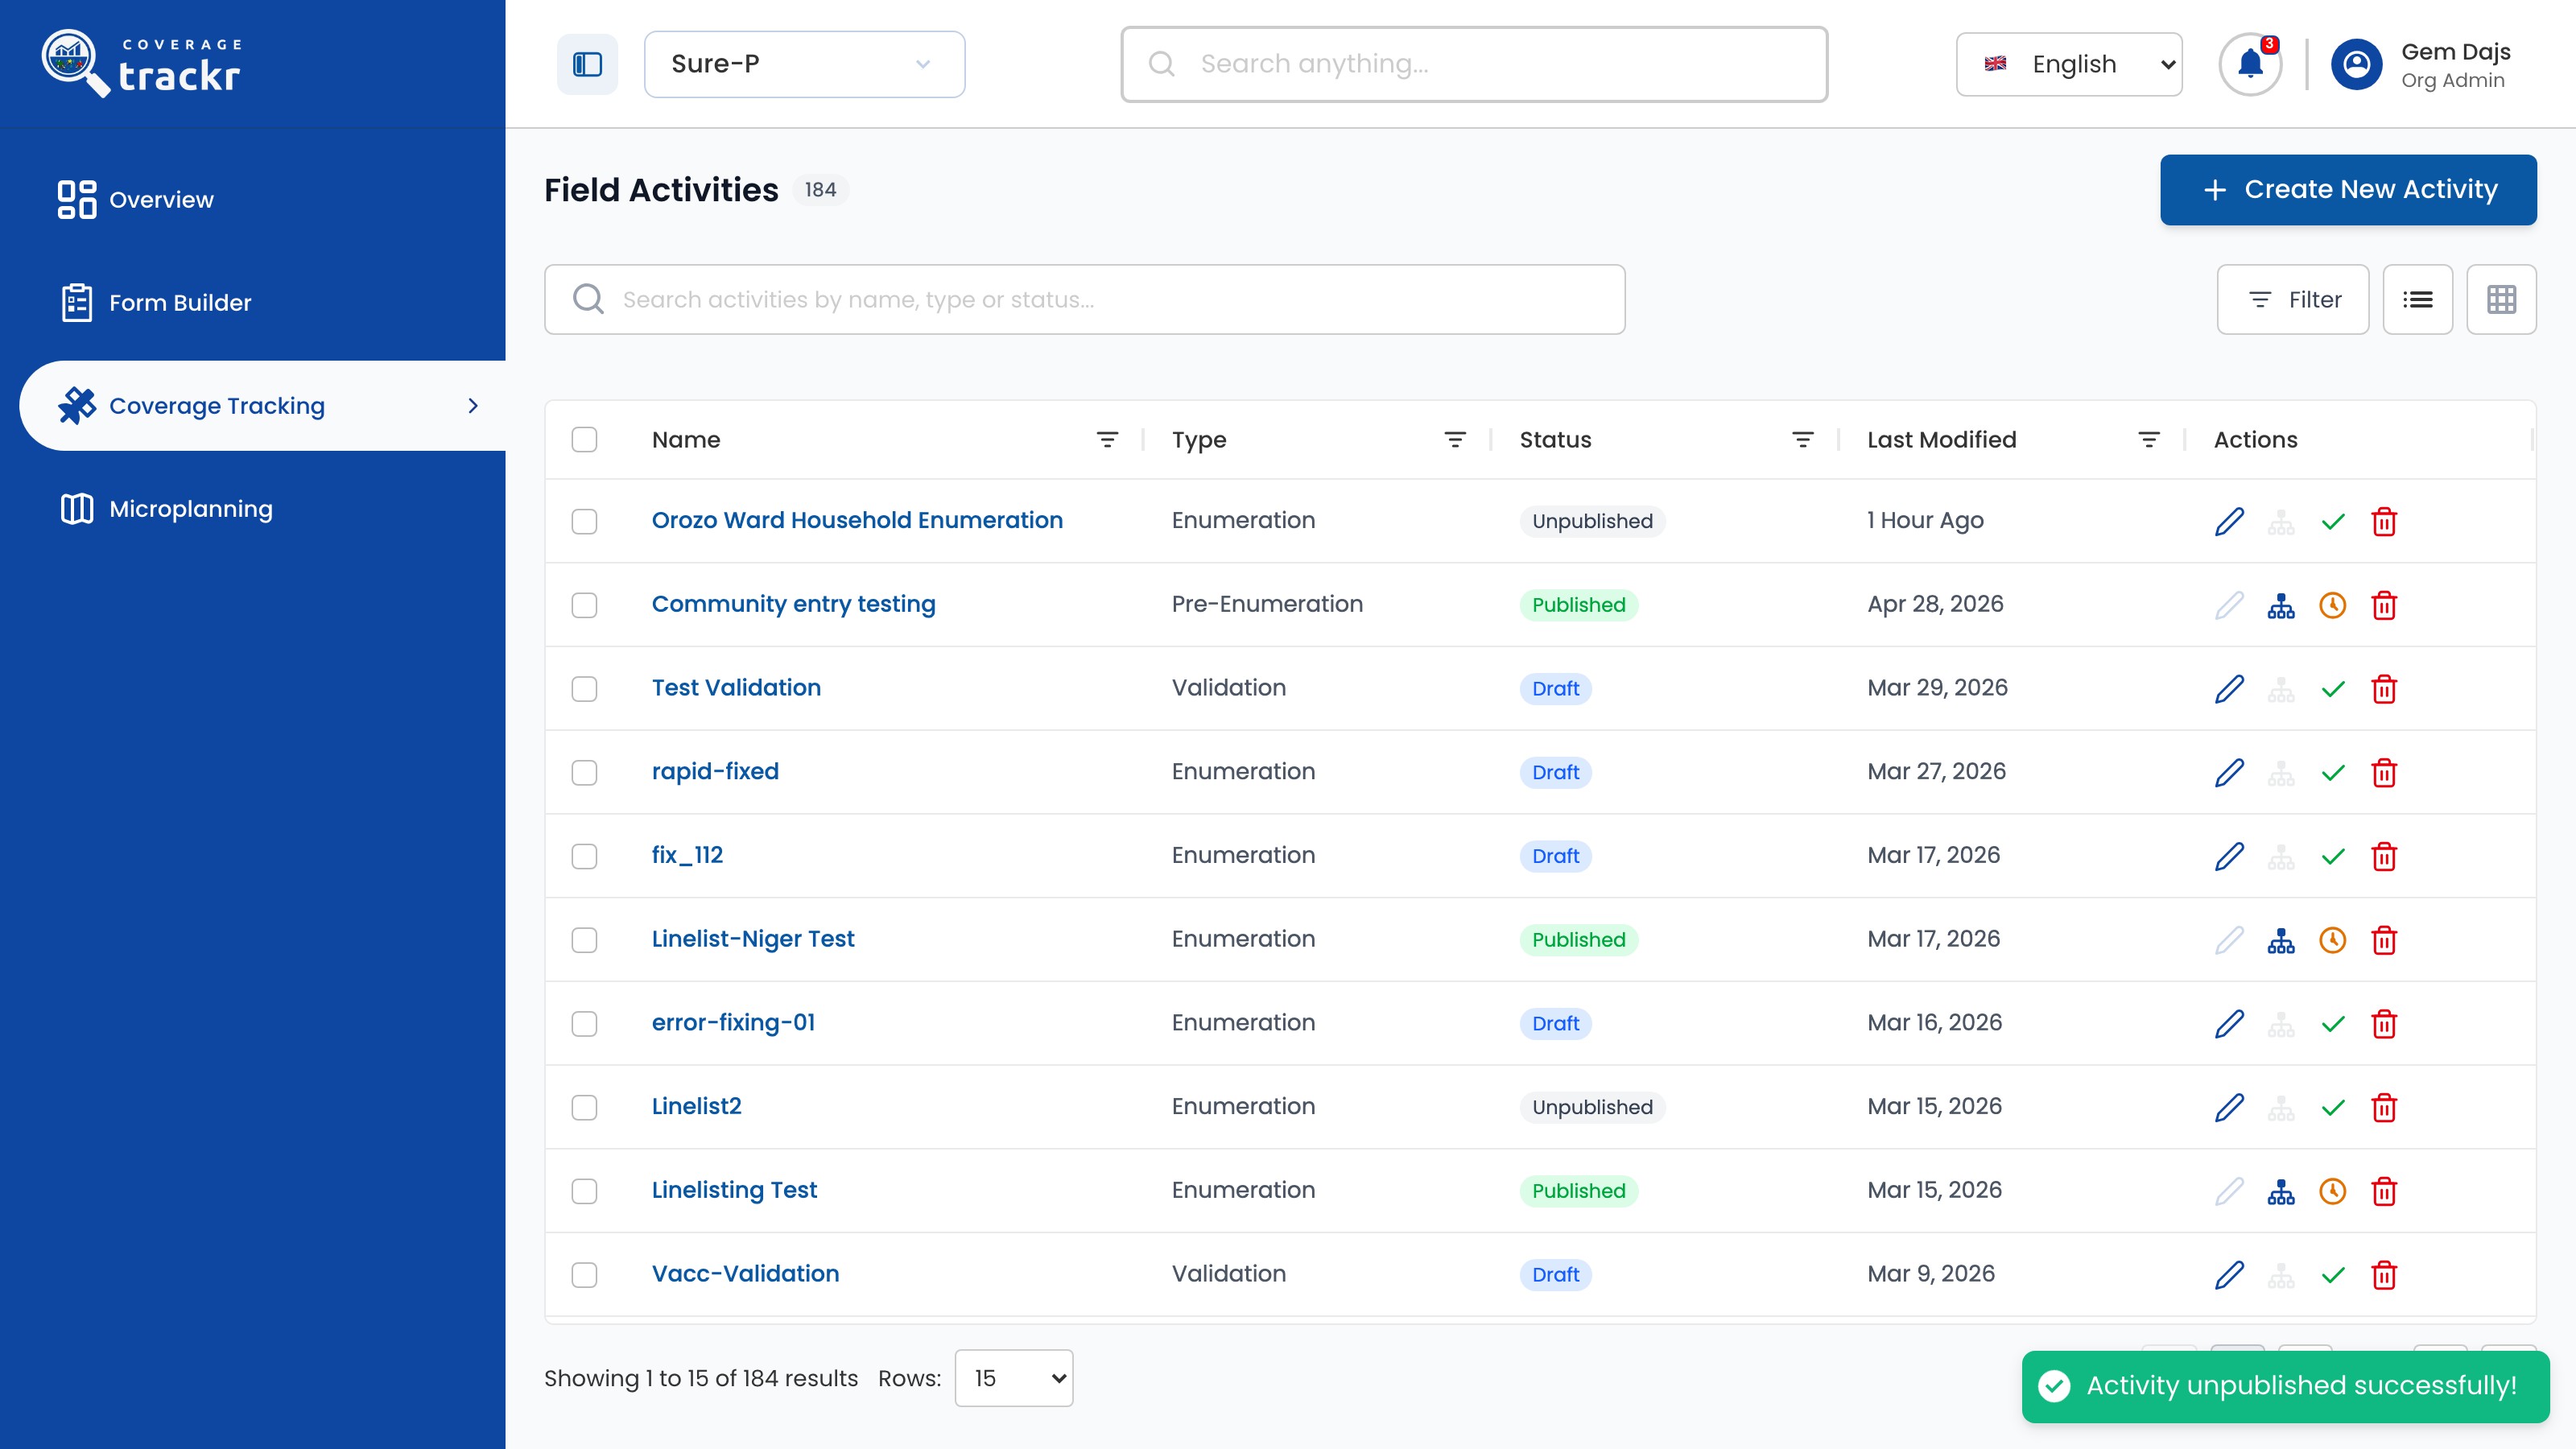
In Field Activities, find the Draft or Unpublished activity and select its Publish tick.

Field Activities list with the activity's Publish action

1 — draft activity · 2 — publish action.

Field Activities list with the activity's Publish action

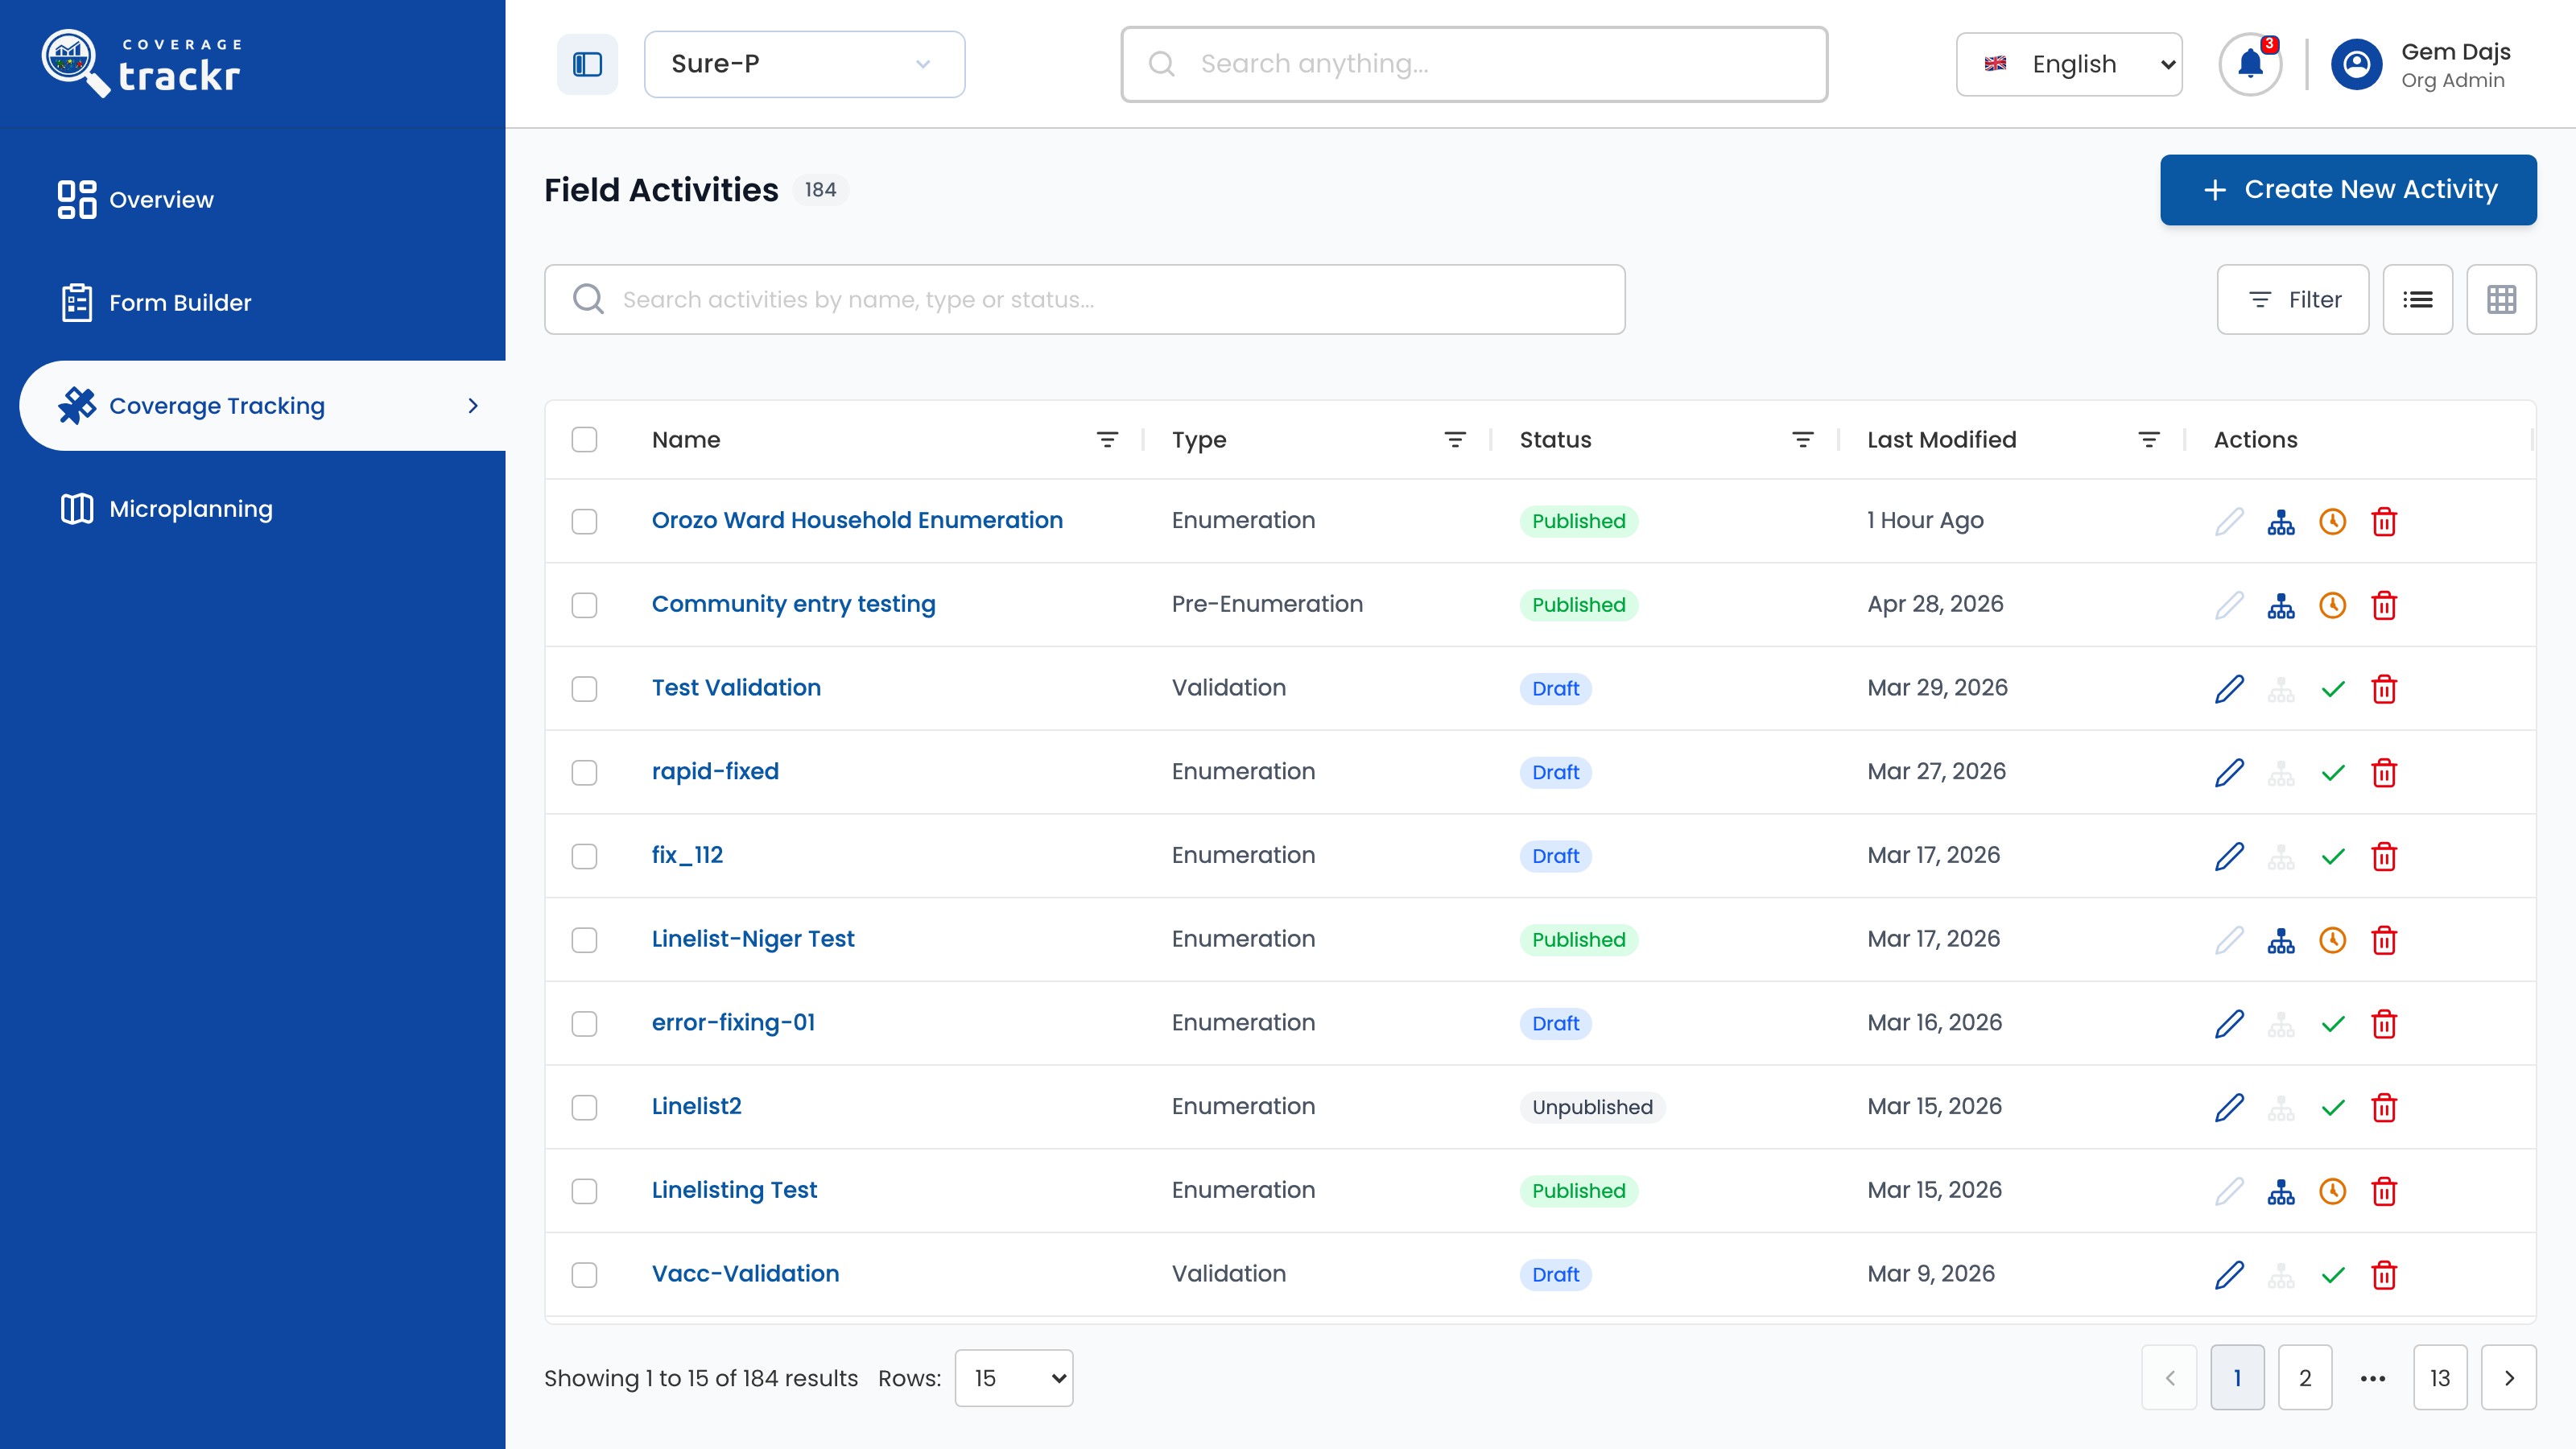
Confirm publishing

In Publish Activity?, select Yes, Publish.

Publish Activity confirmation dialog

1 — publish confirmation · 2 — yes publish.

Publish Activity confirmation dialog

Check the status

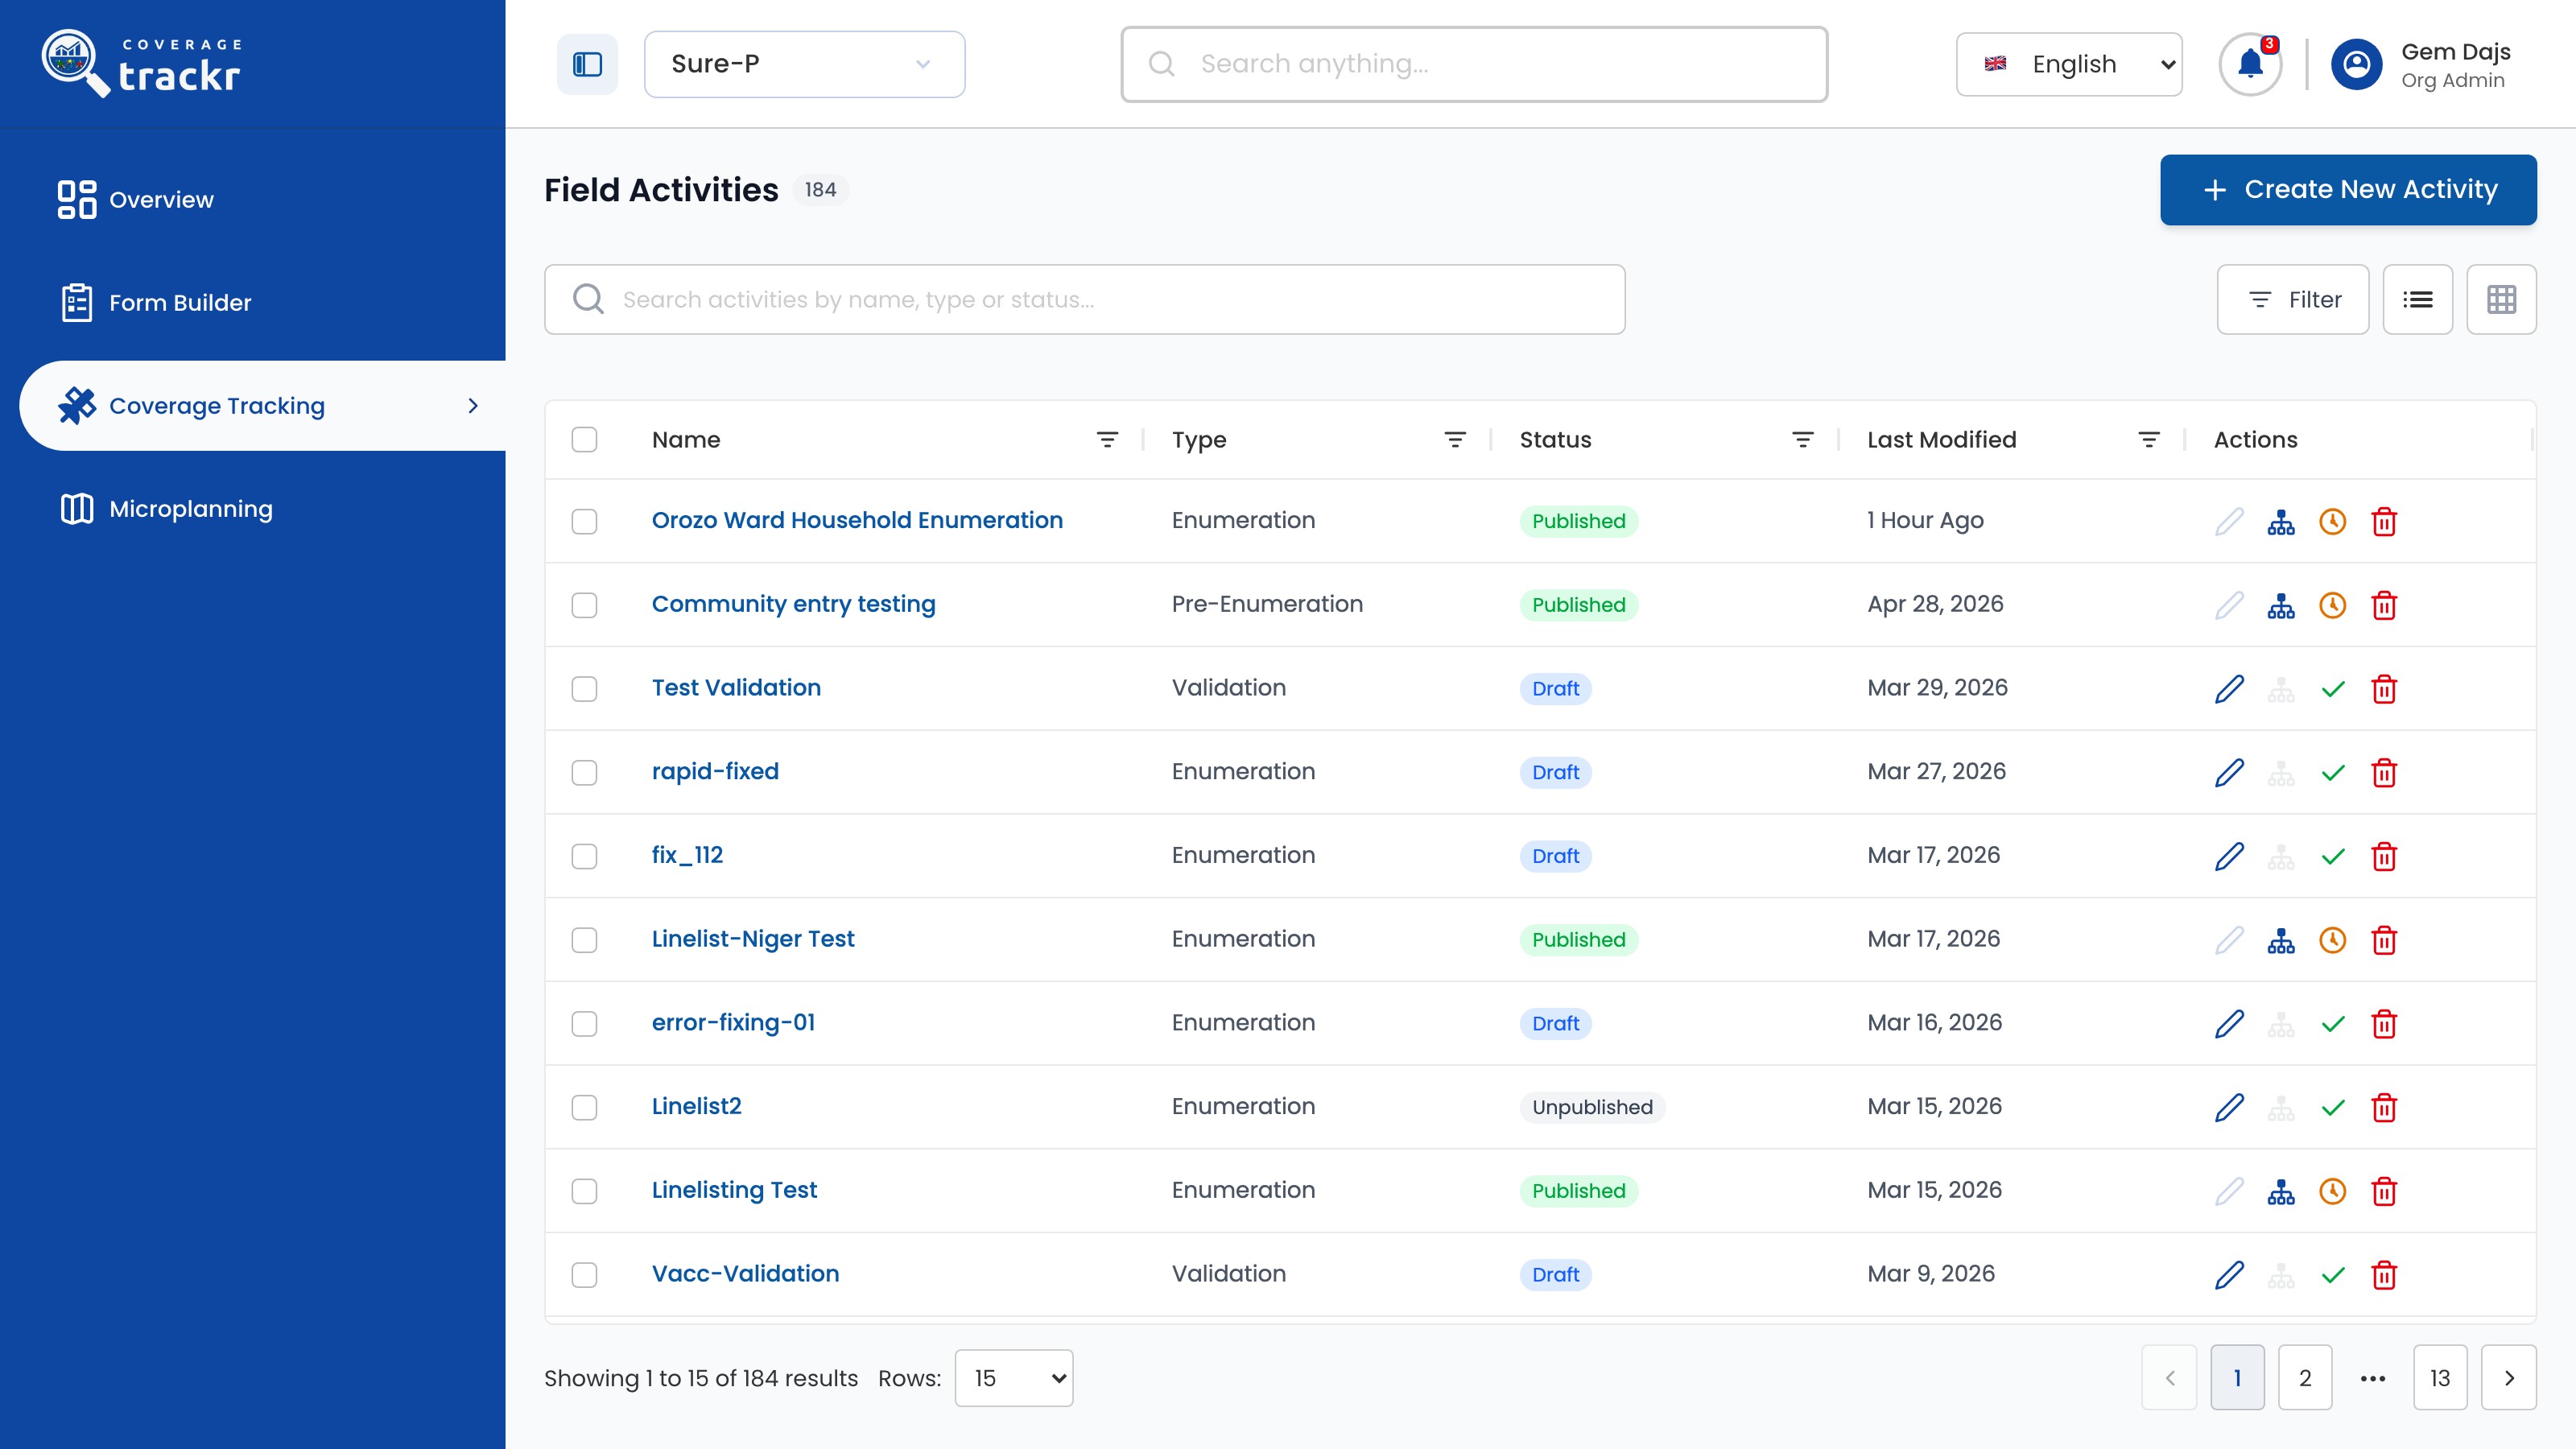
Check that the activity now shows Published.

Field Activities list with the activity marked Published

1 — published status.

Field Activities list with the activity marked Published

Done. The activity shows Published and its teams can start work on their devices.

If something goes wrong

How do I change a published activity?

Unpublish it, make the change with Edit, then publish it again.

Field activities

Unpublish a field activity

Take an activity out of the field so you can change it.

Organization Administrator 1 min read Web

Before you start

  • The activity is Published.
  • Field teams know the activity will pause.

Find the published activity

In Field Activities, find the activity and select its Unpublish action.

Field Activities list with a published activity and its Unpublish action

1 — published activity · 2 — unpublish action.

Field Activities list with a published activity and its Unpublish action

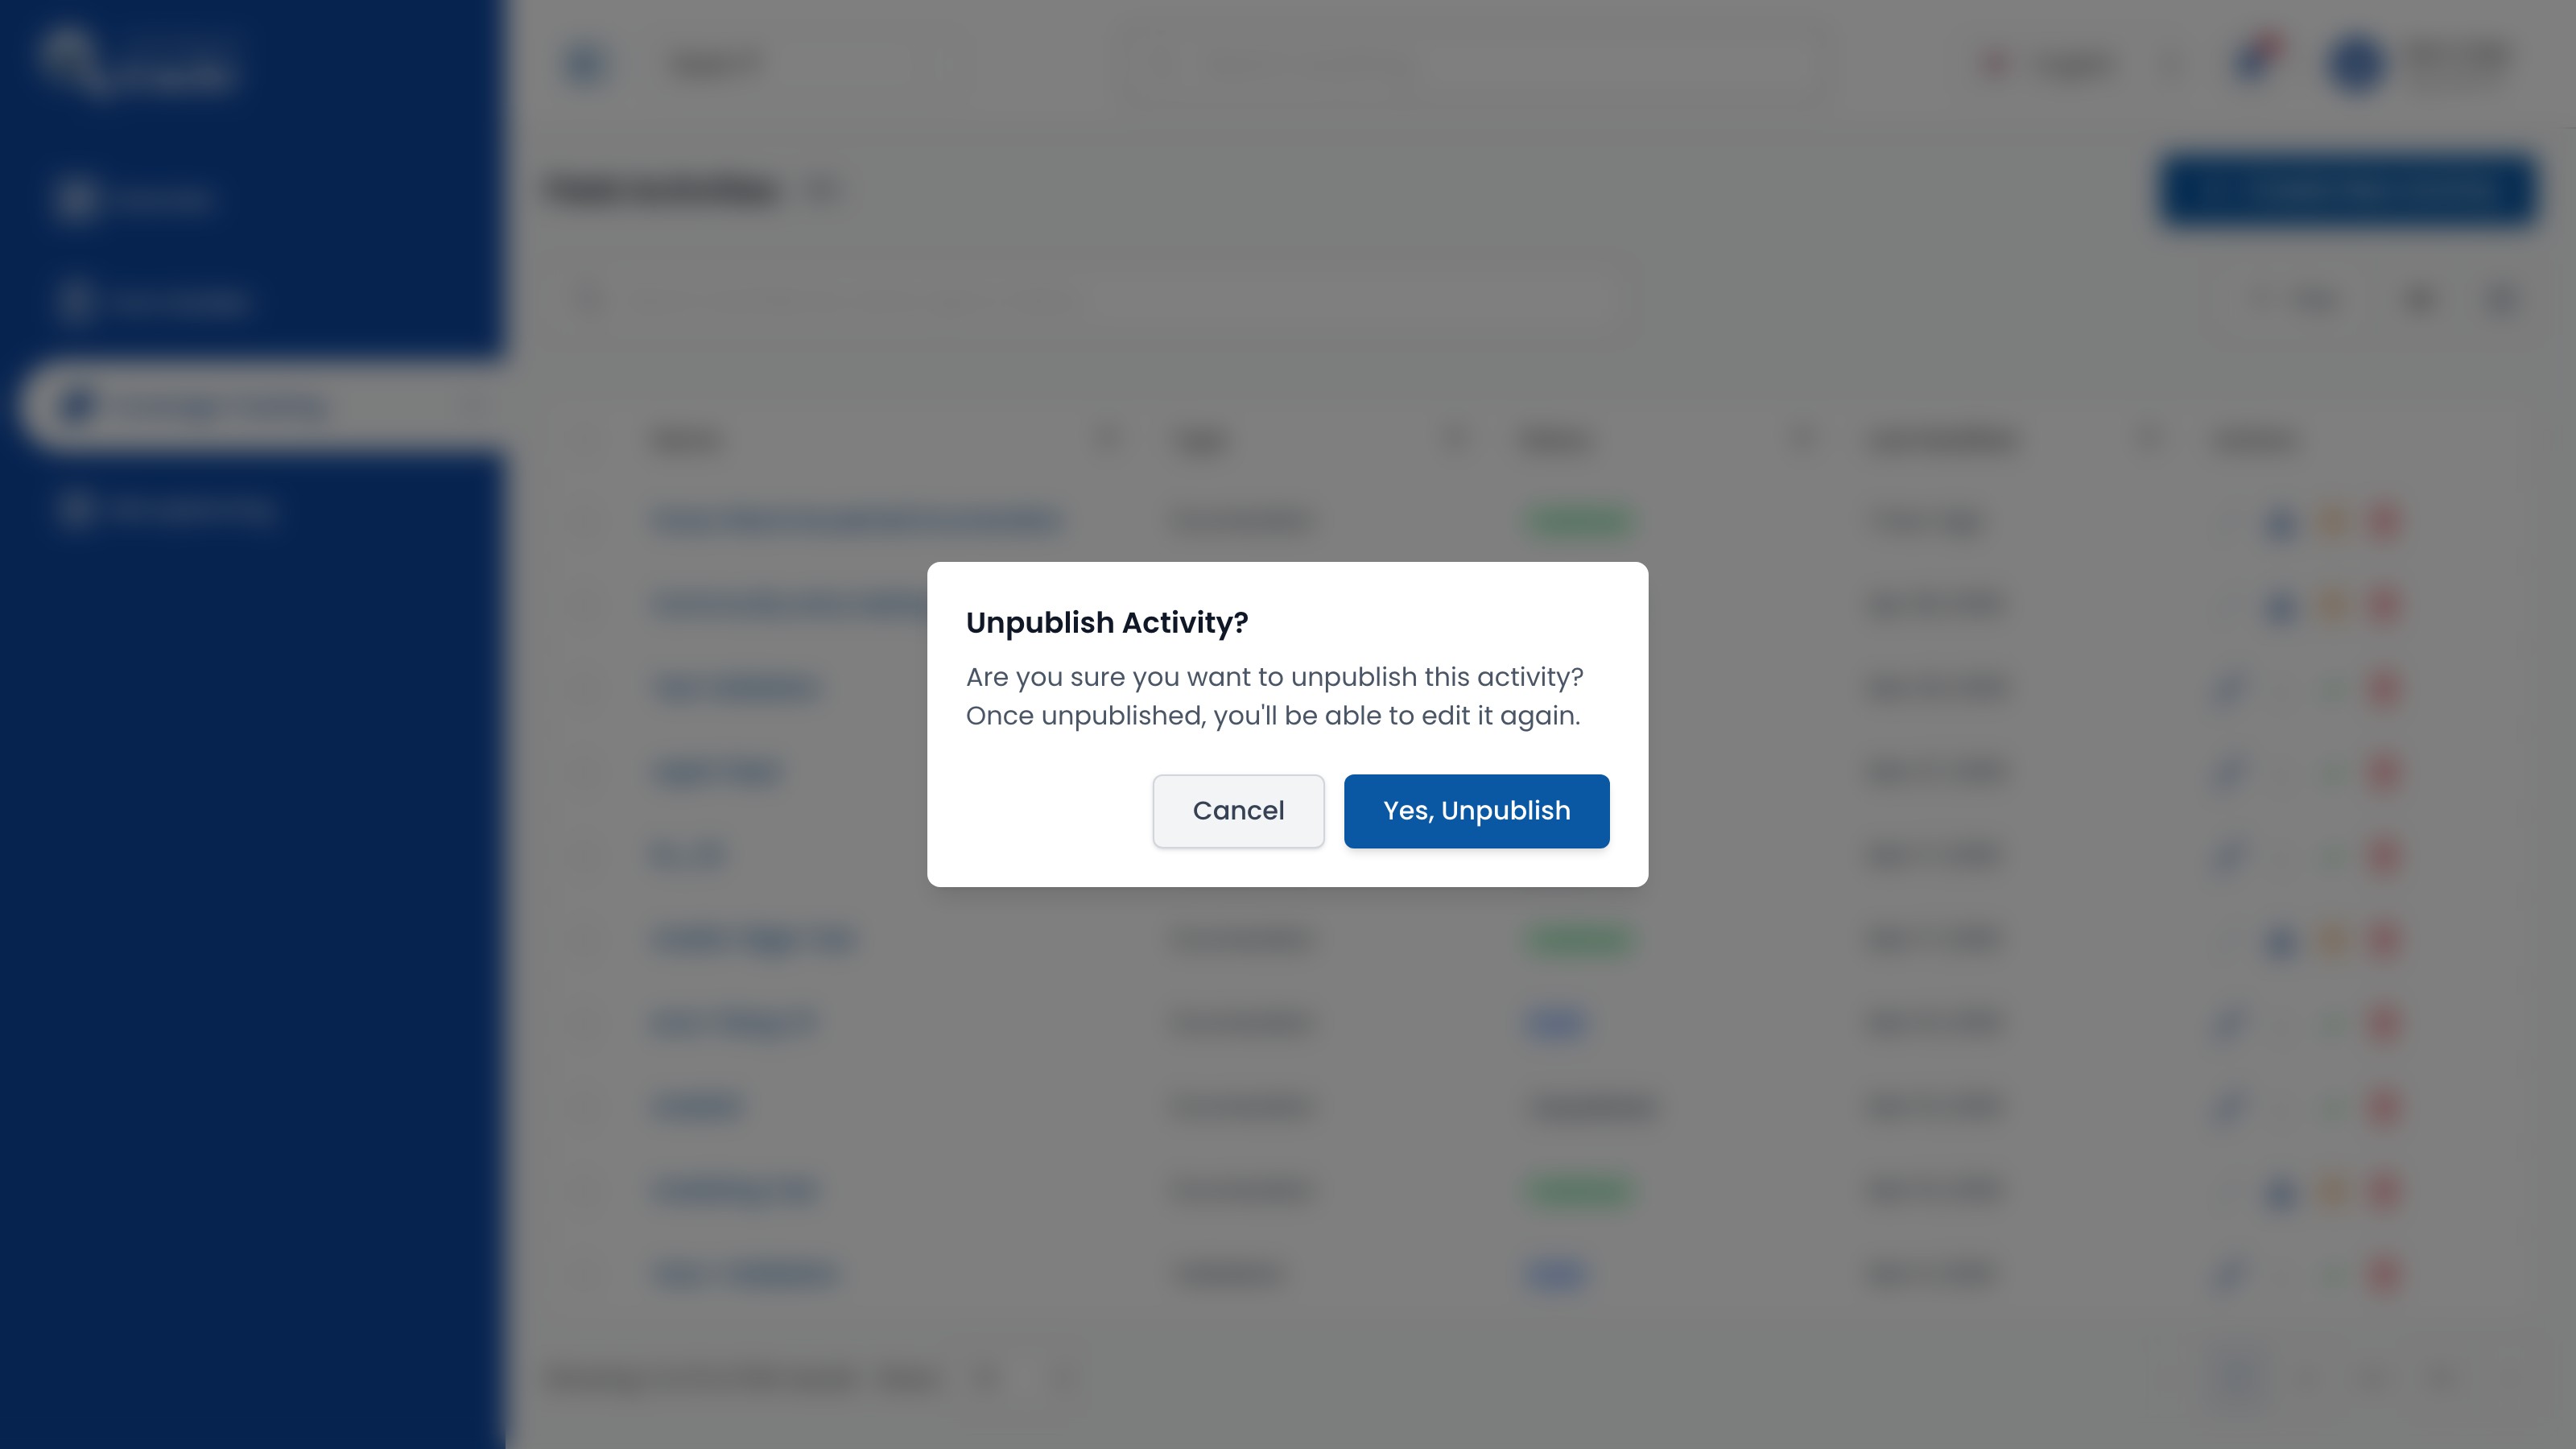
Confirm unpublishing

In Unpublish Activity?, select Yes, Unpublish.

Unpublish Activity confirmation dialog

1 — unpublish confirmation · 2 — yes unpublish.

Unpublish Activity confirmation dialog

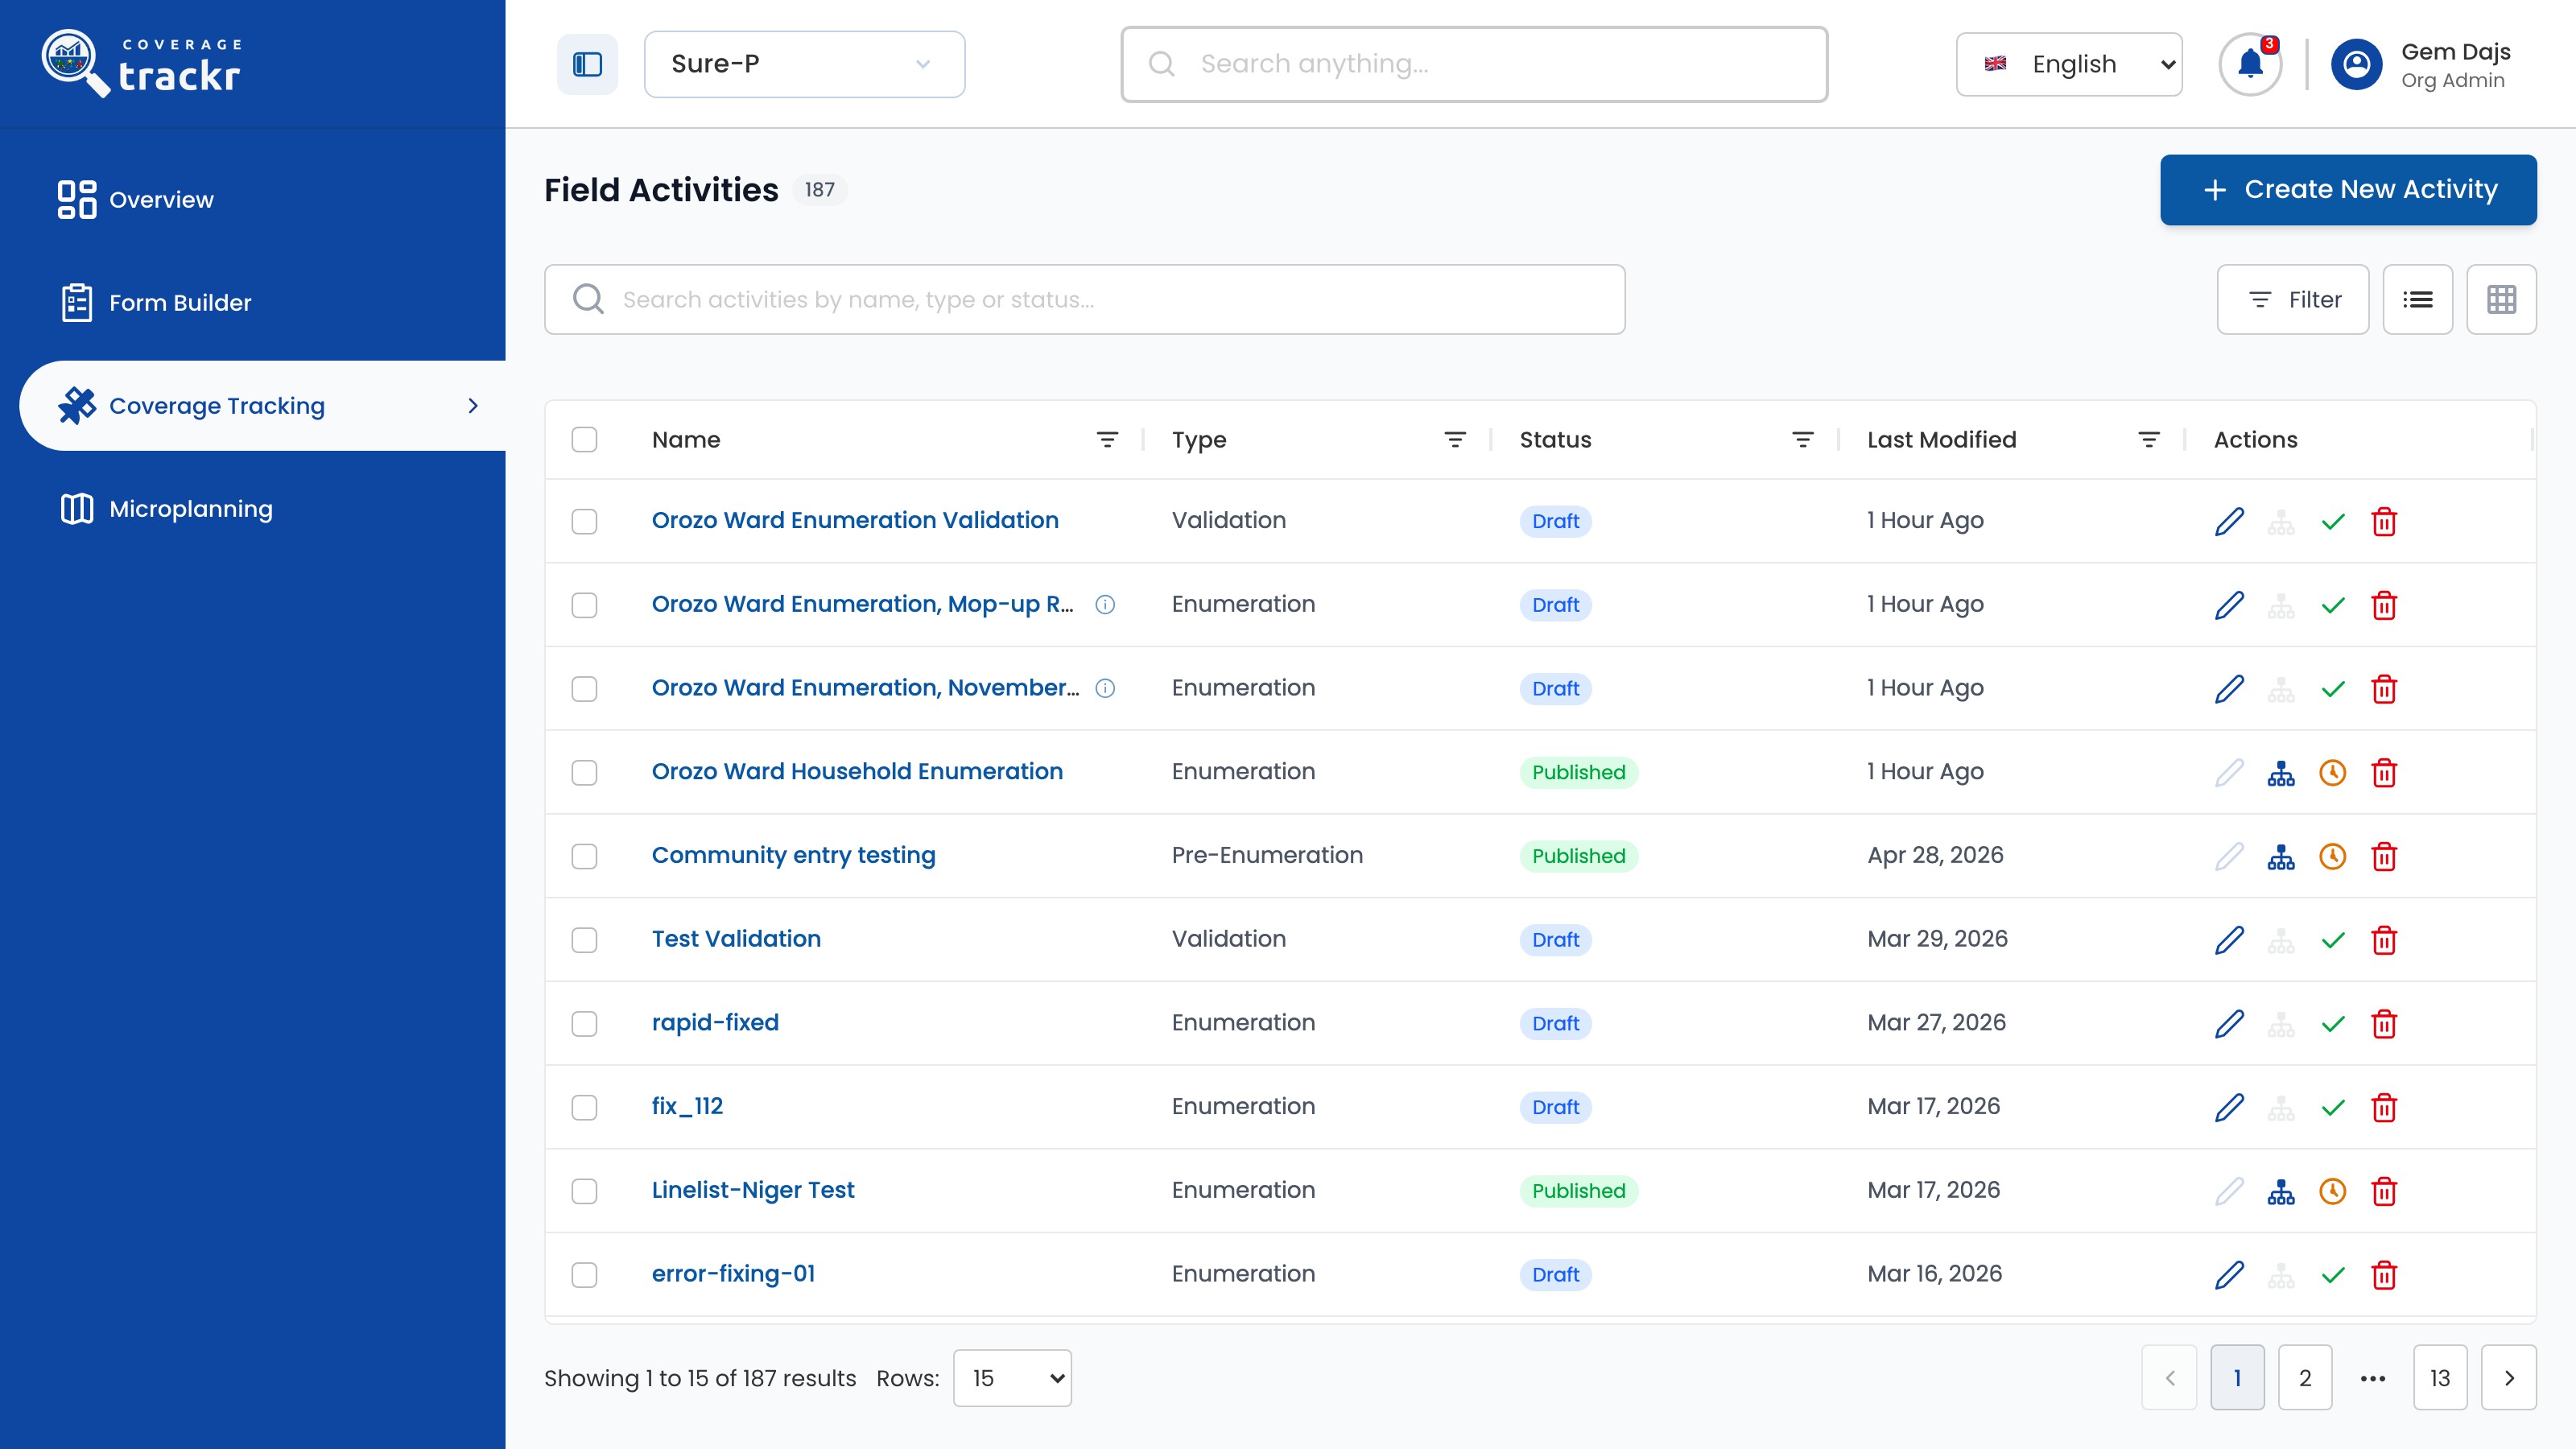
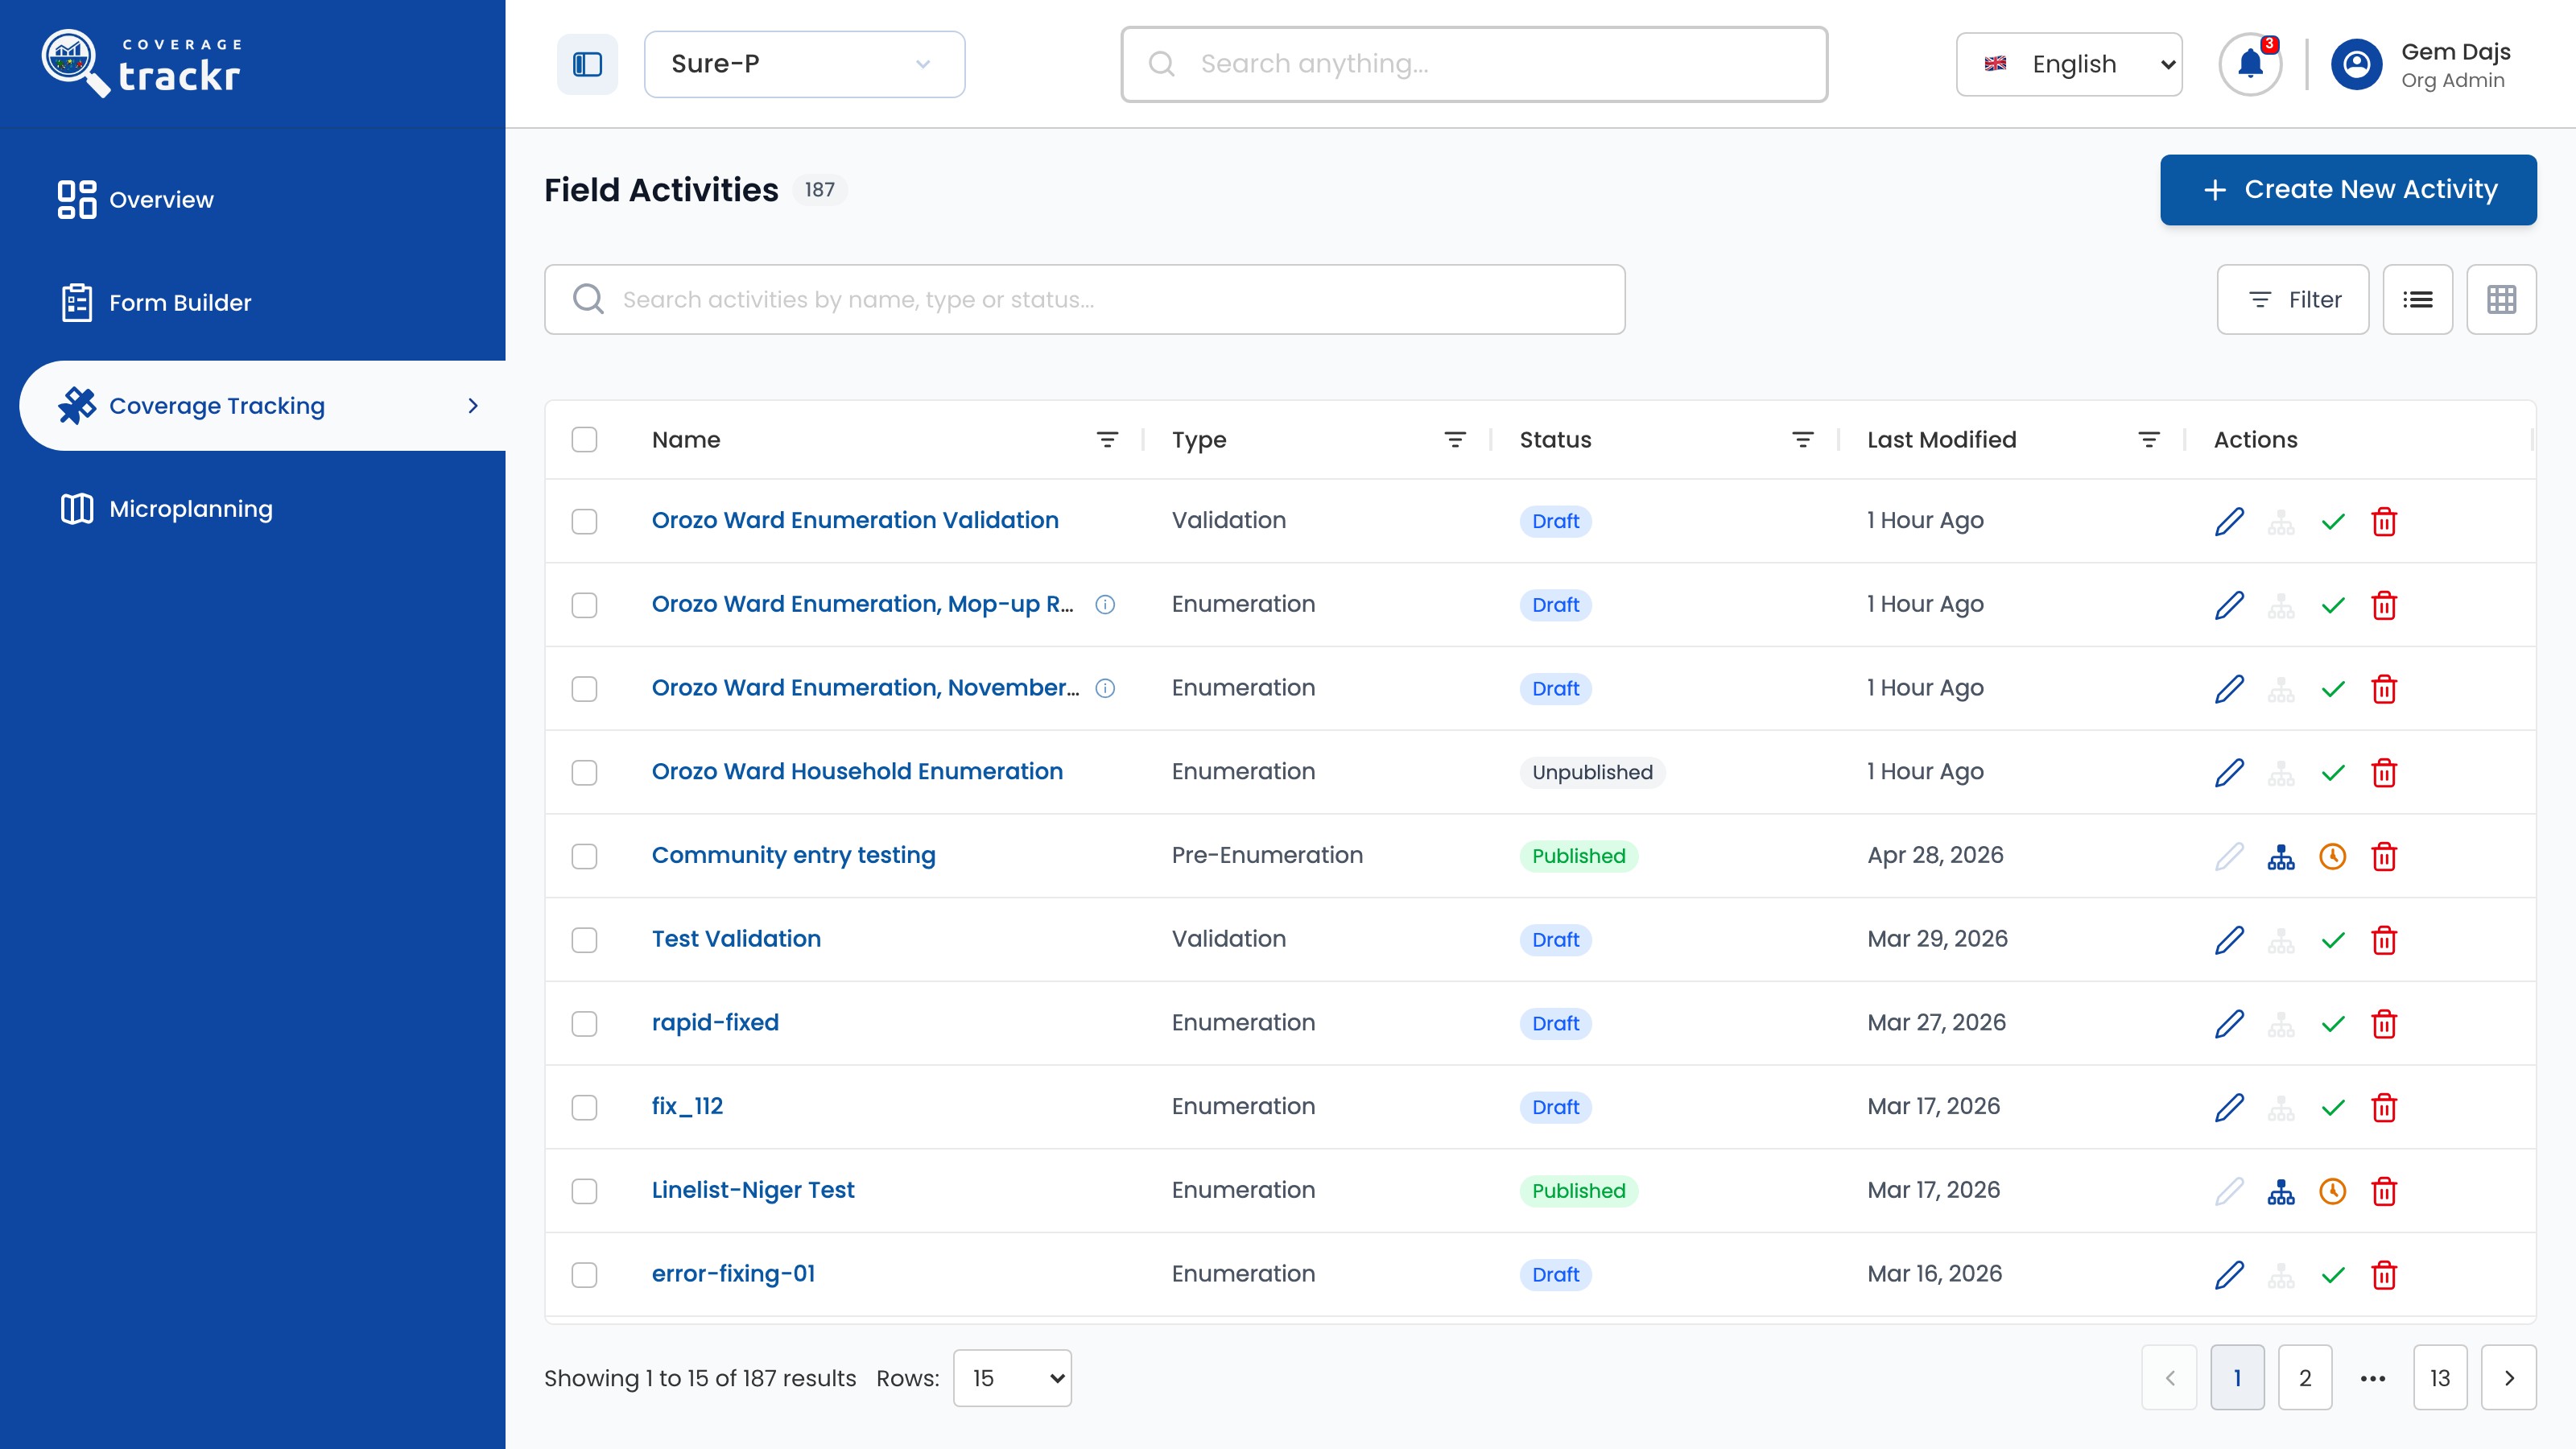
Check the status

Check that the activity shows Unpublished and the confirmation message appears.

Field Activities list with the activity marked Unpublished and a success message

1 — unpublished status · 2 — unpublish confirmation.

Field Activities list with the activity marked Unpublished and a success message

Done. The activity shows Unpublished and Edit is available again.

If something goes wrong

What happens to submissions already made?

They stay on the activity. Unpublishing stops new work until you publish again.

Field activities

Update teams on a published activity

Change which team covers each location while an activity stays published.

Organization Administrator 2 min read Web

Before you start

  • The activity is Published.
  • The team has been created in Teams & Hierarchy.

Open Update Teams

In Field Activities, find the Published activity and select its Update Teams action.

Field Activities list with Orozo Ward Household Enumeration published and its Update Teams action

1 — published activity · 2 — update teams action.

Field Activities list with Orozo Ward Household Enumeration published and its Update Teams action

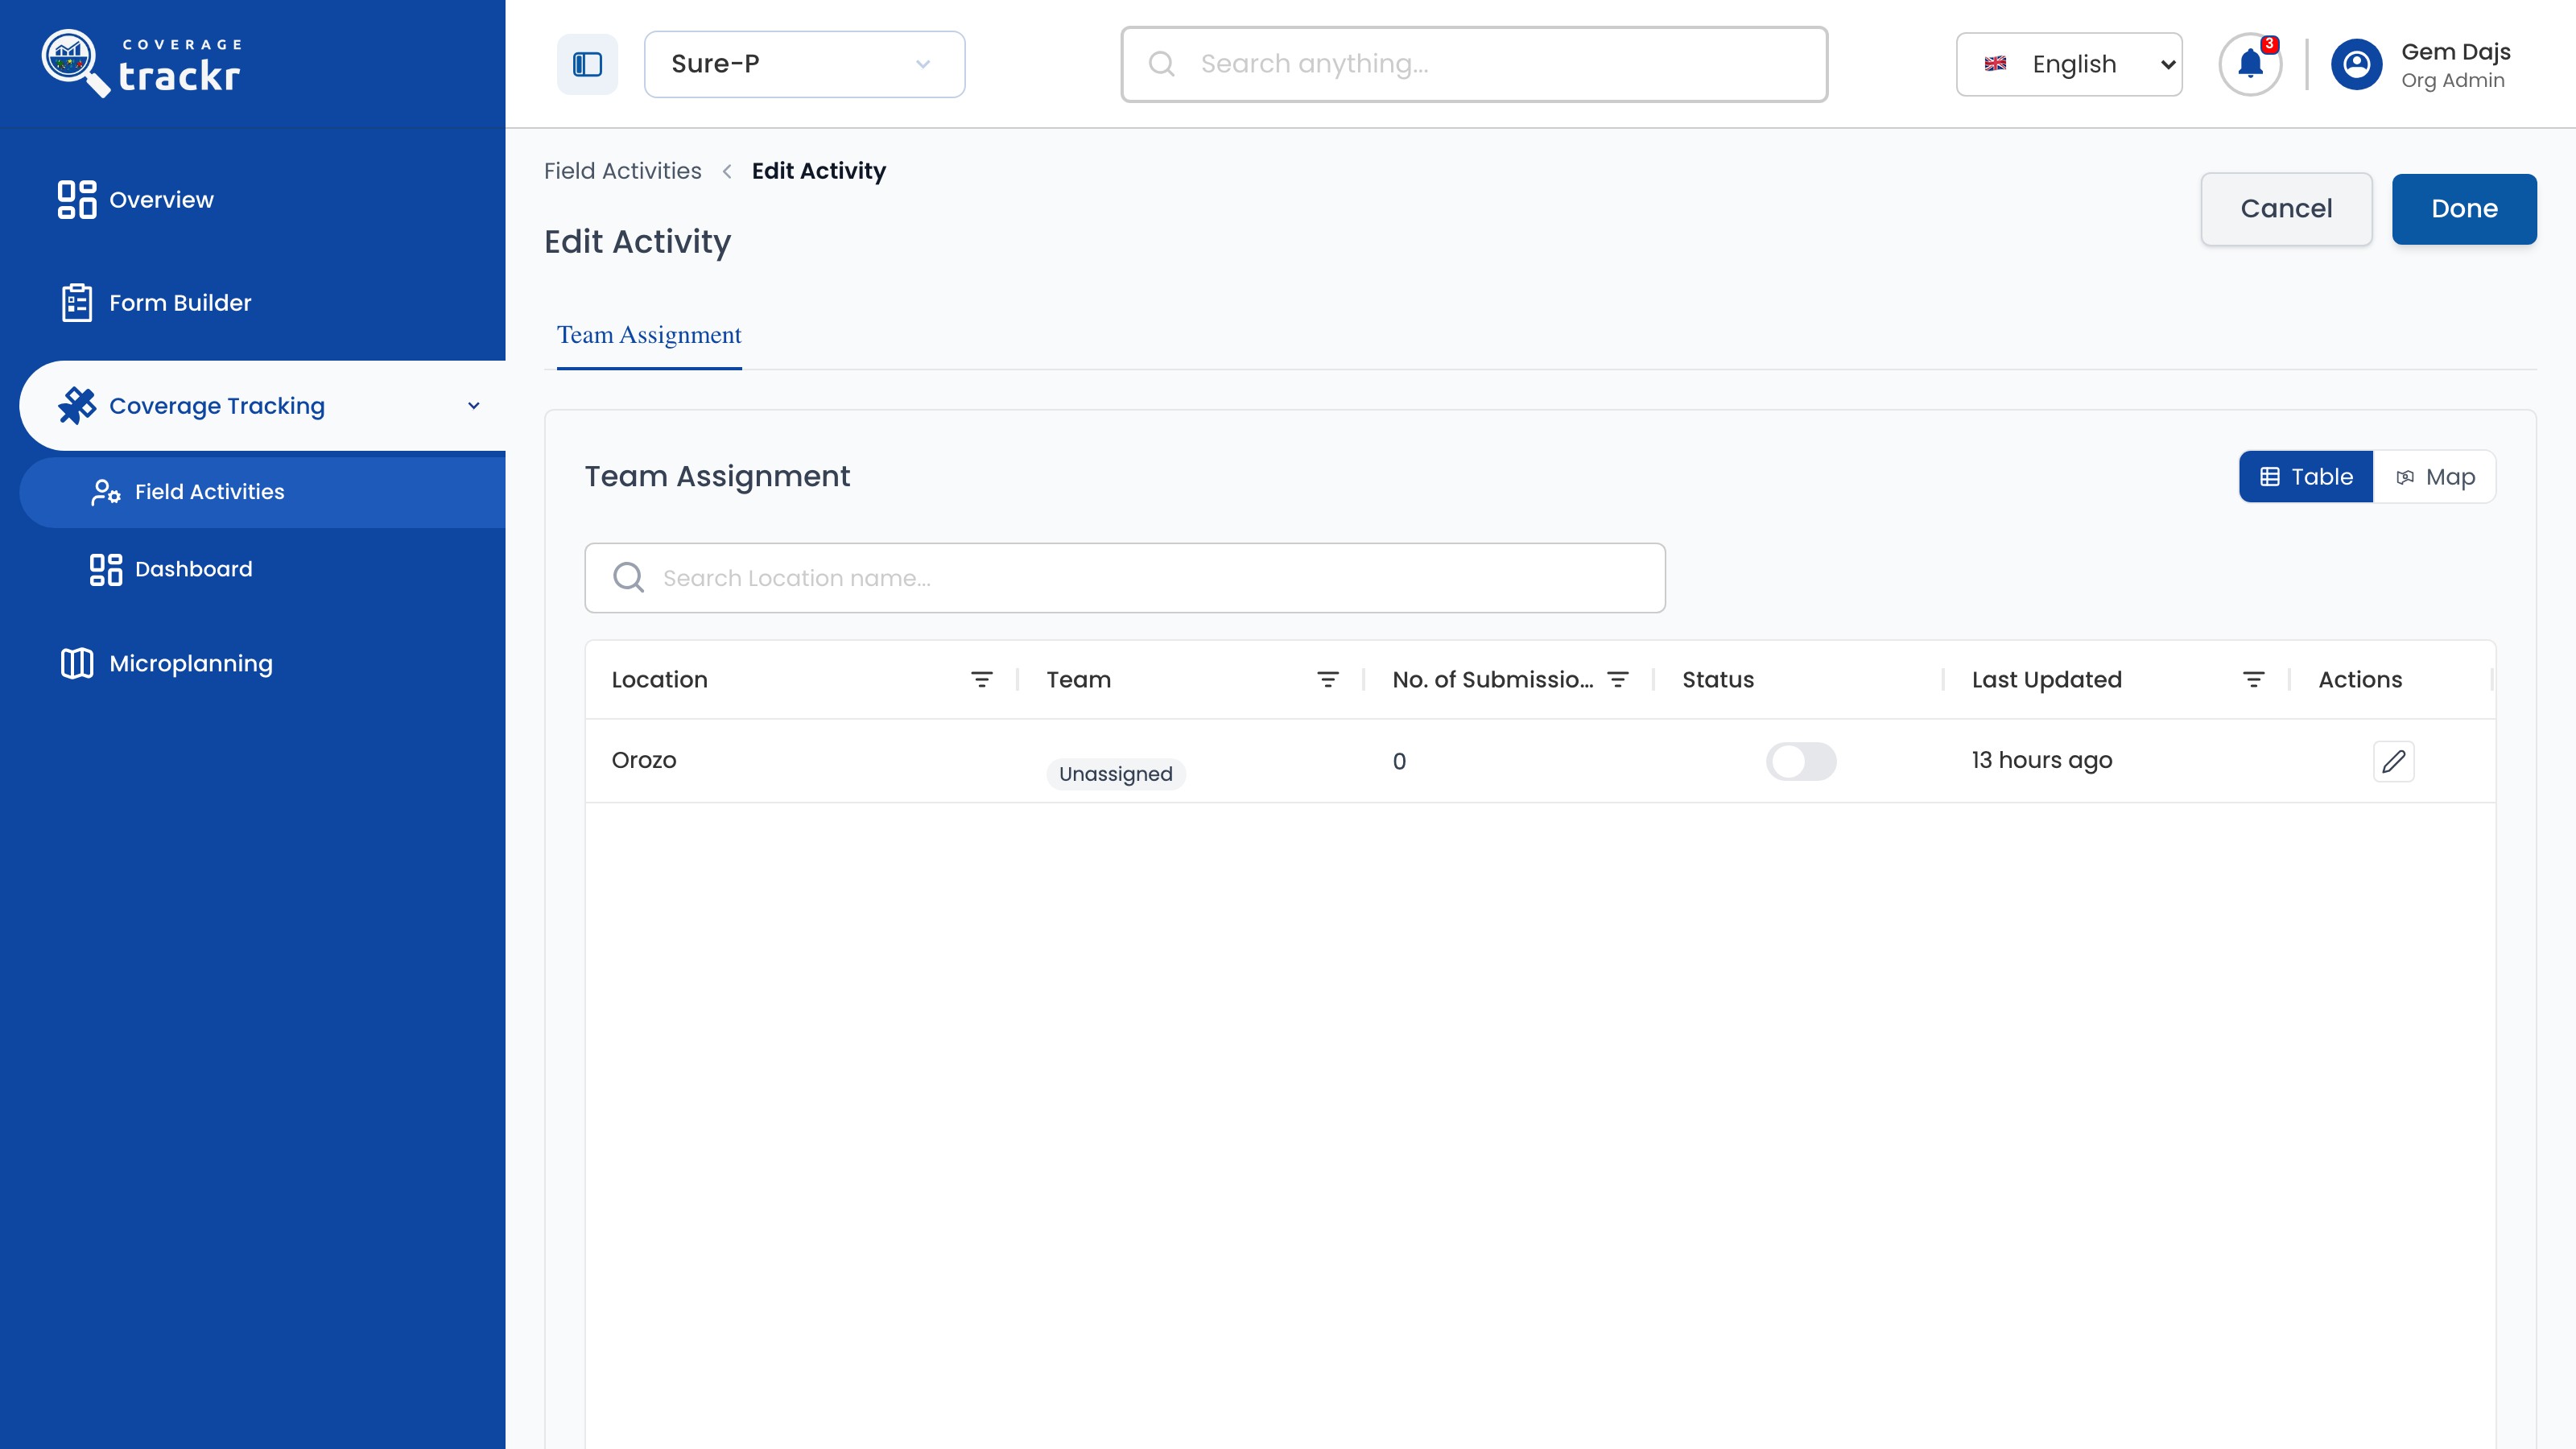
Find the location

On Team Assignment, find the location and select its Edit action. Use Search Location name... when the list is long.
Team Assignment with Orozo unassigned and its Edit action

1 — location row · 2 — edit action · 3 — location search.
Team Assignment with Orozo unassigned and its Edit action

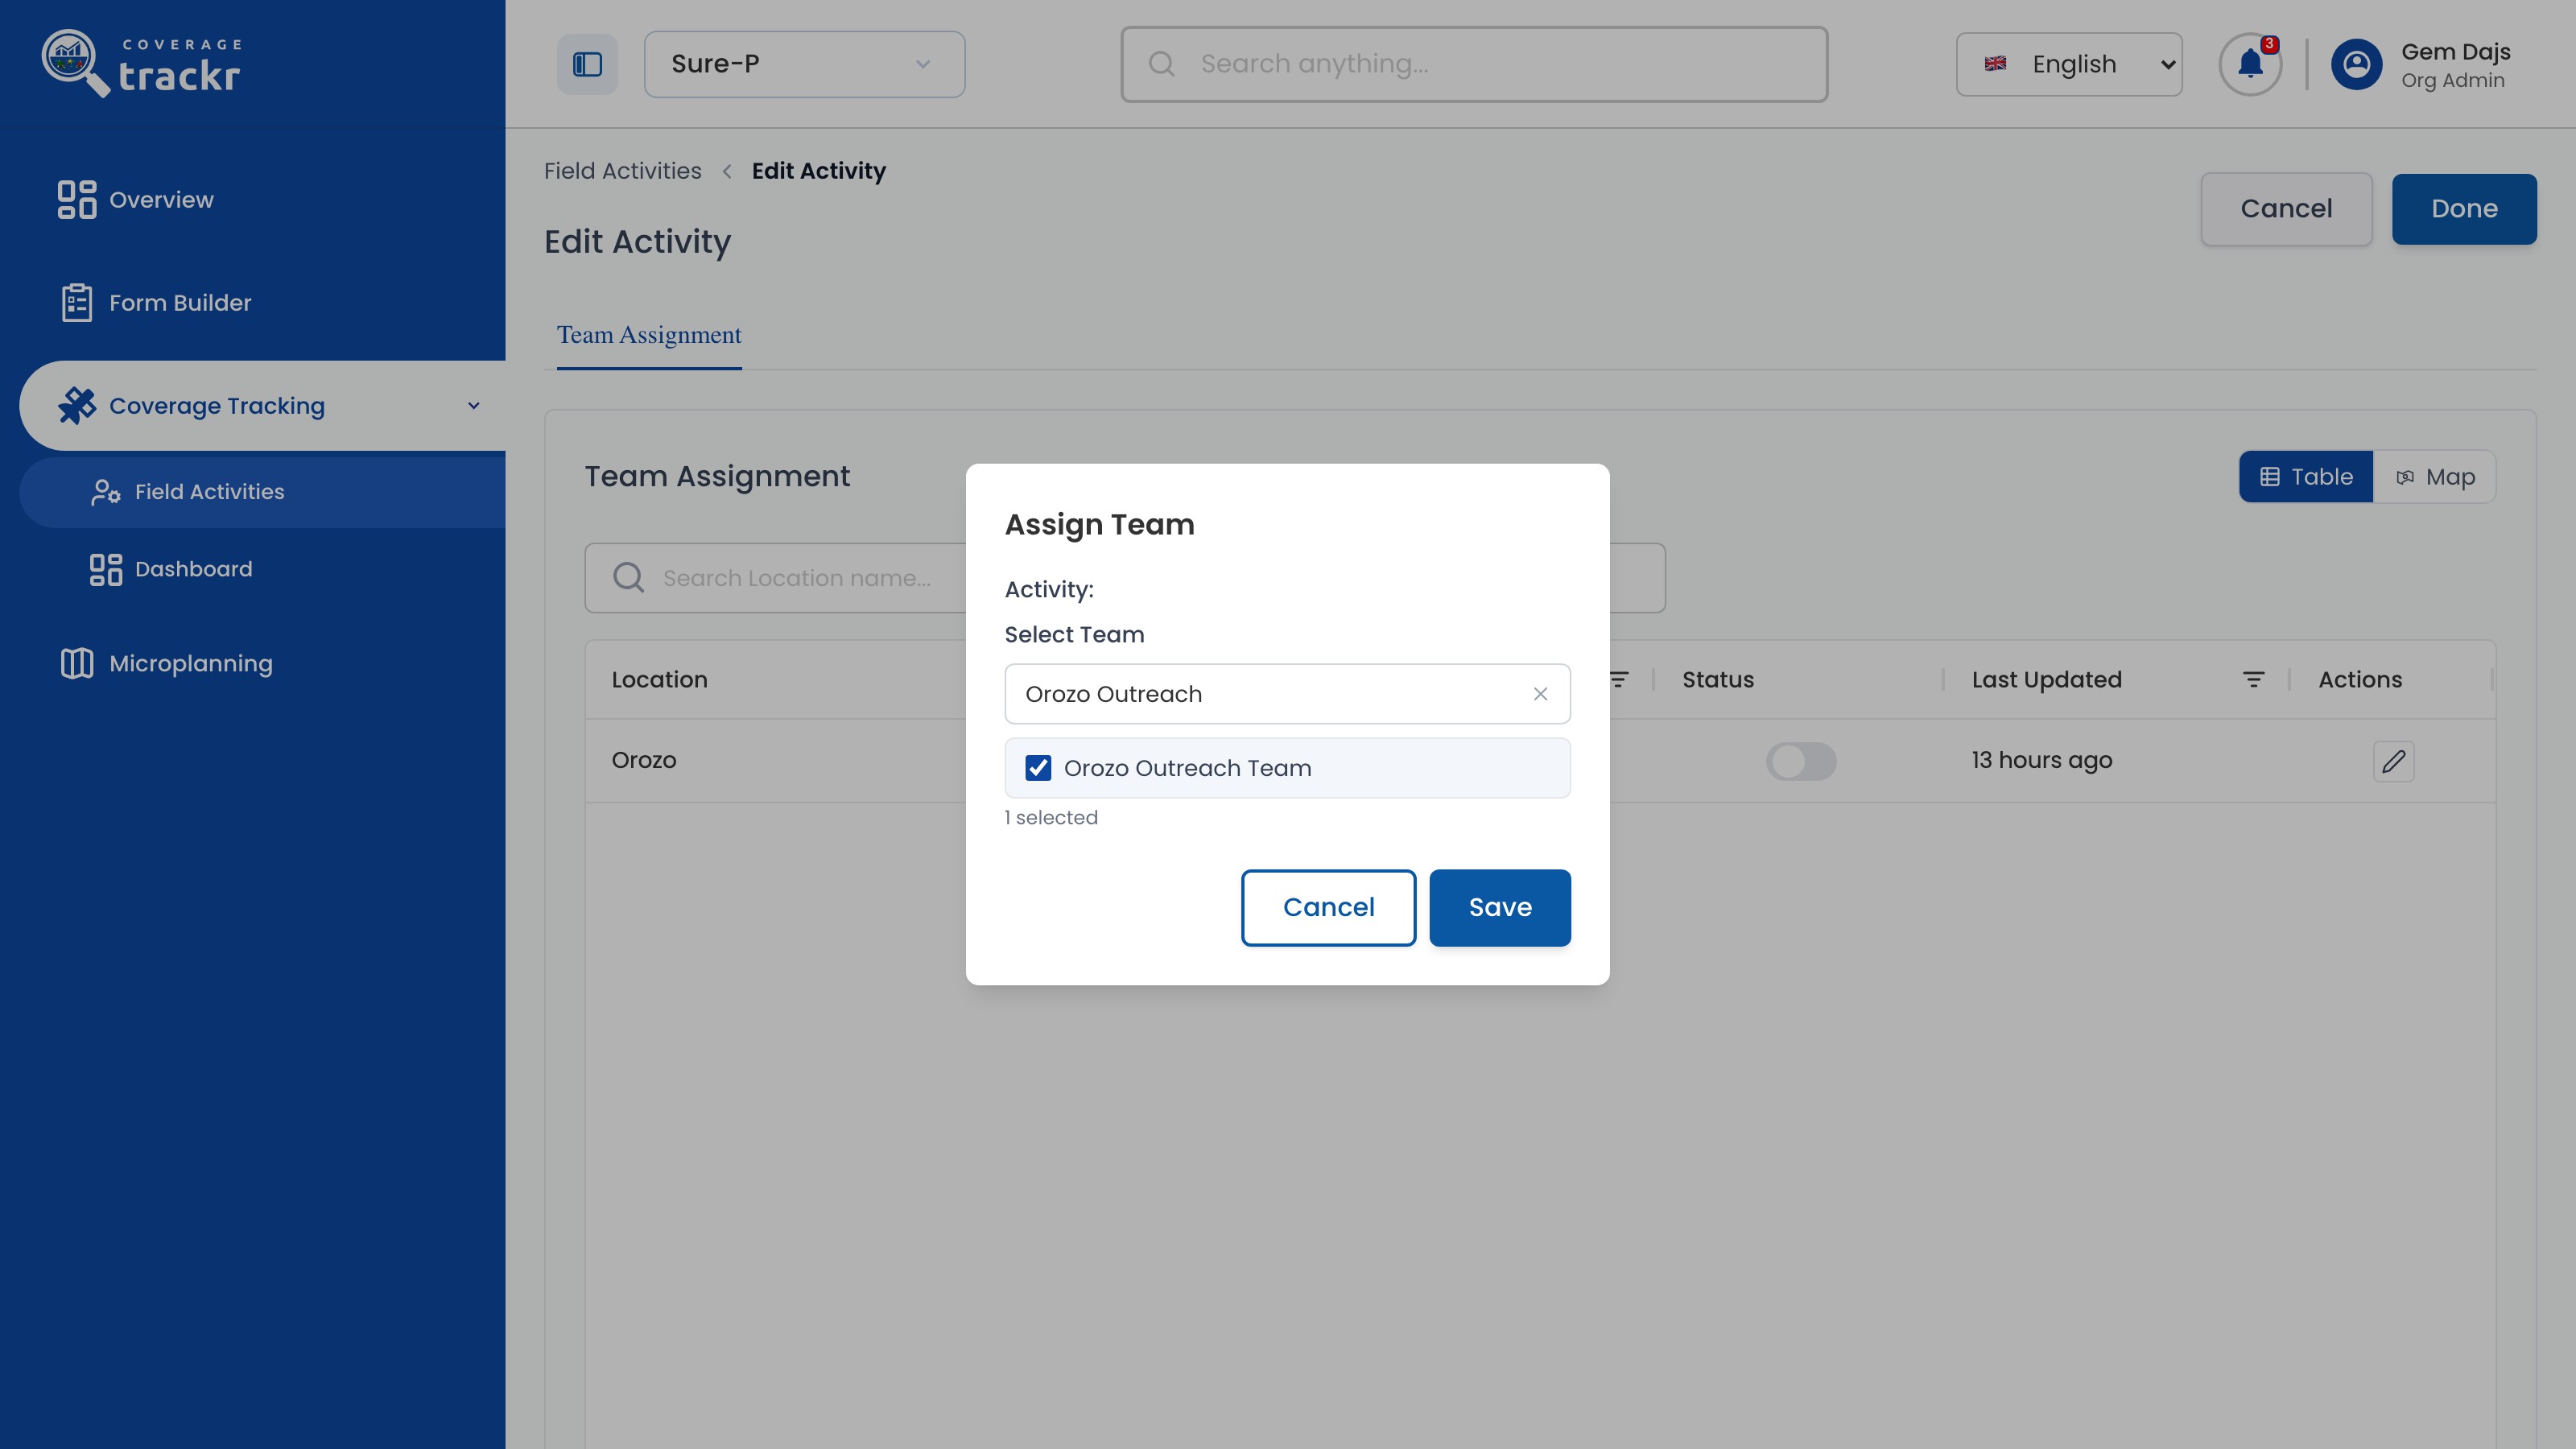
Choose the team

In Assign Team, search for the team, tick it and select Save.

Assign Team dialog with Orozo Outreach Team ticked

1 — team selector · 2 — selected team · 3 — save assignment.

Assign Team dialog with Orozo Outreach Team ticked

Check the assignment

Check that the team now shows against the location and that Team assignment updated successfully appears.

Team Assignment showing Orozo with Orozo Outreach Team and a success message

1 — assigned team · 2 — assignment confirmation.

Team Assignment showing Orozo with Orozo Outreach Team and a success message

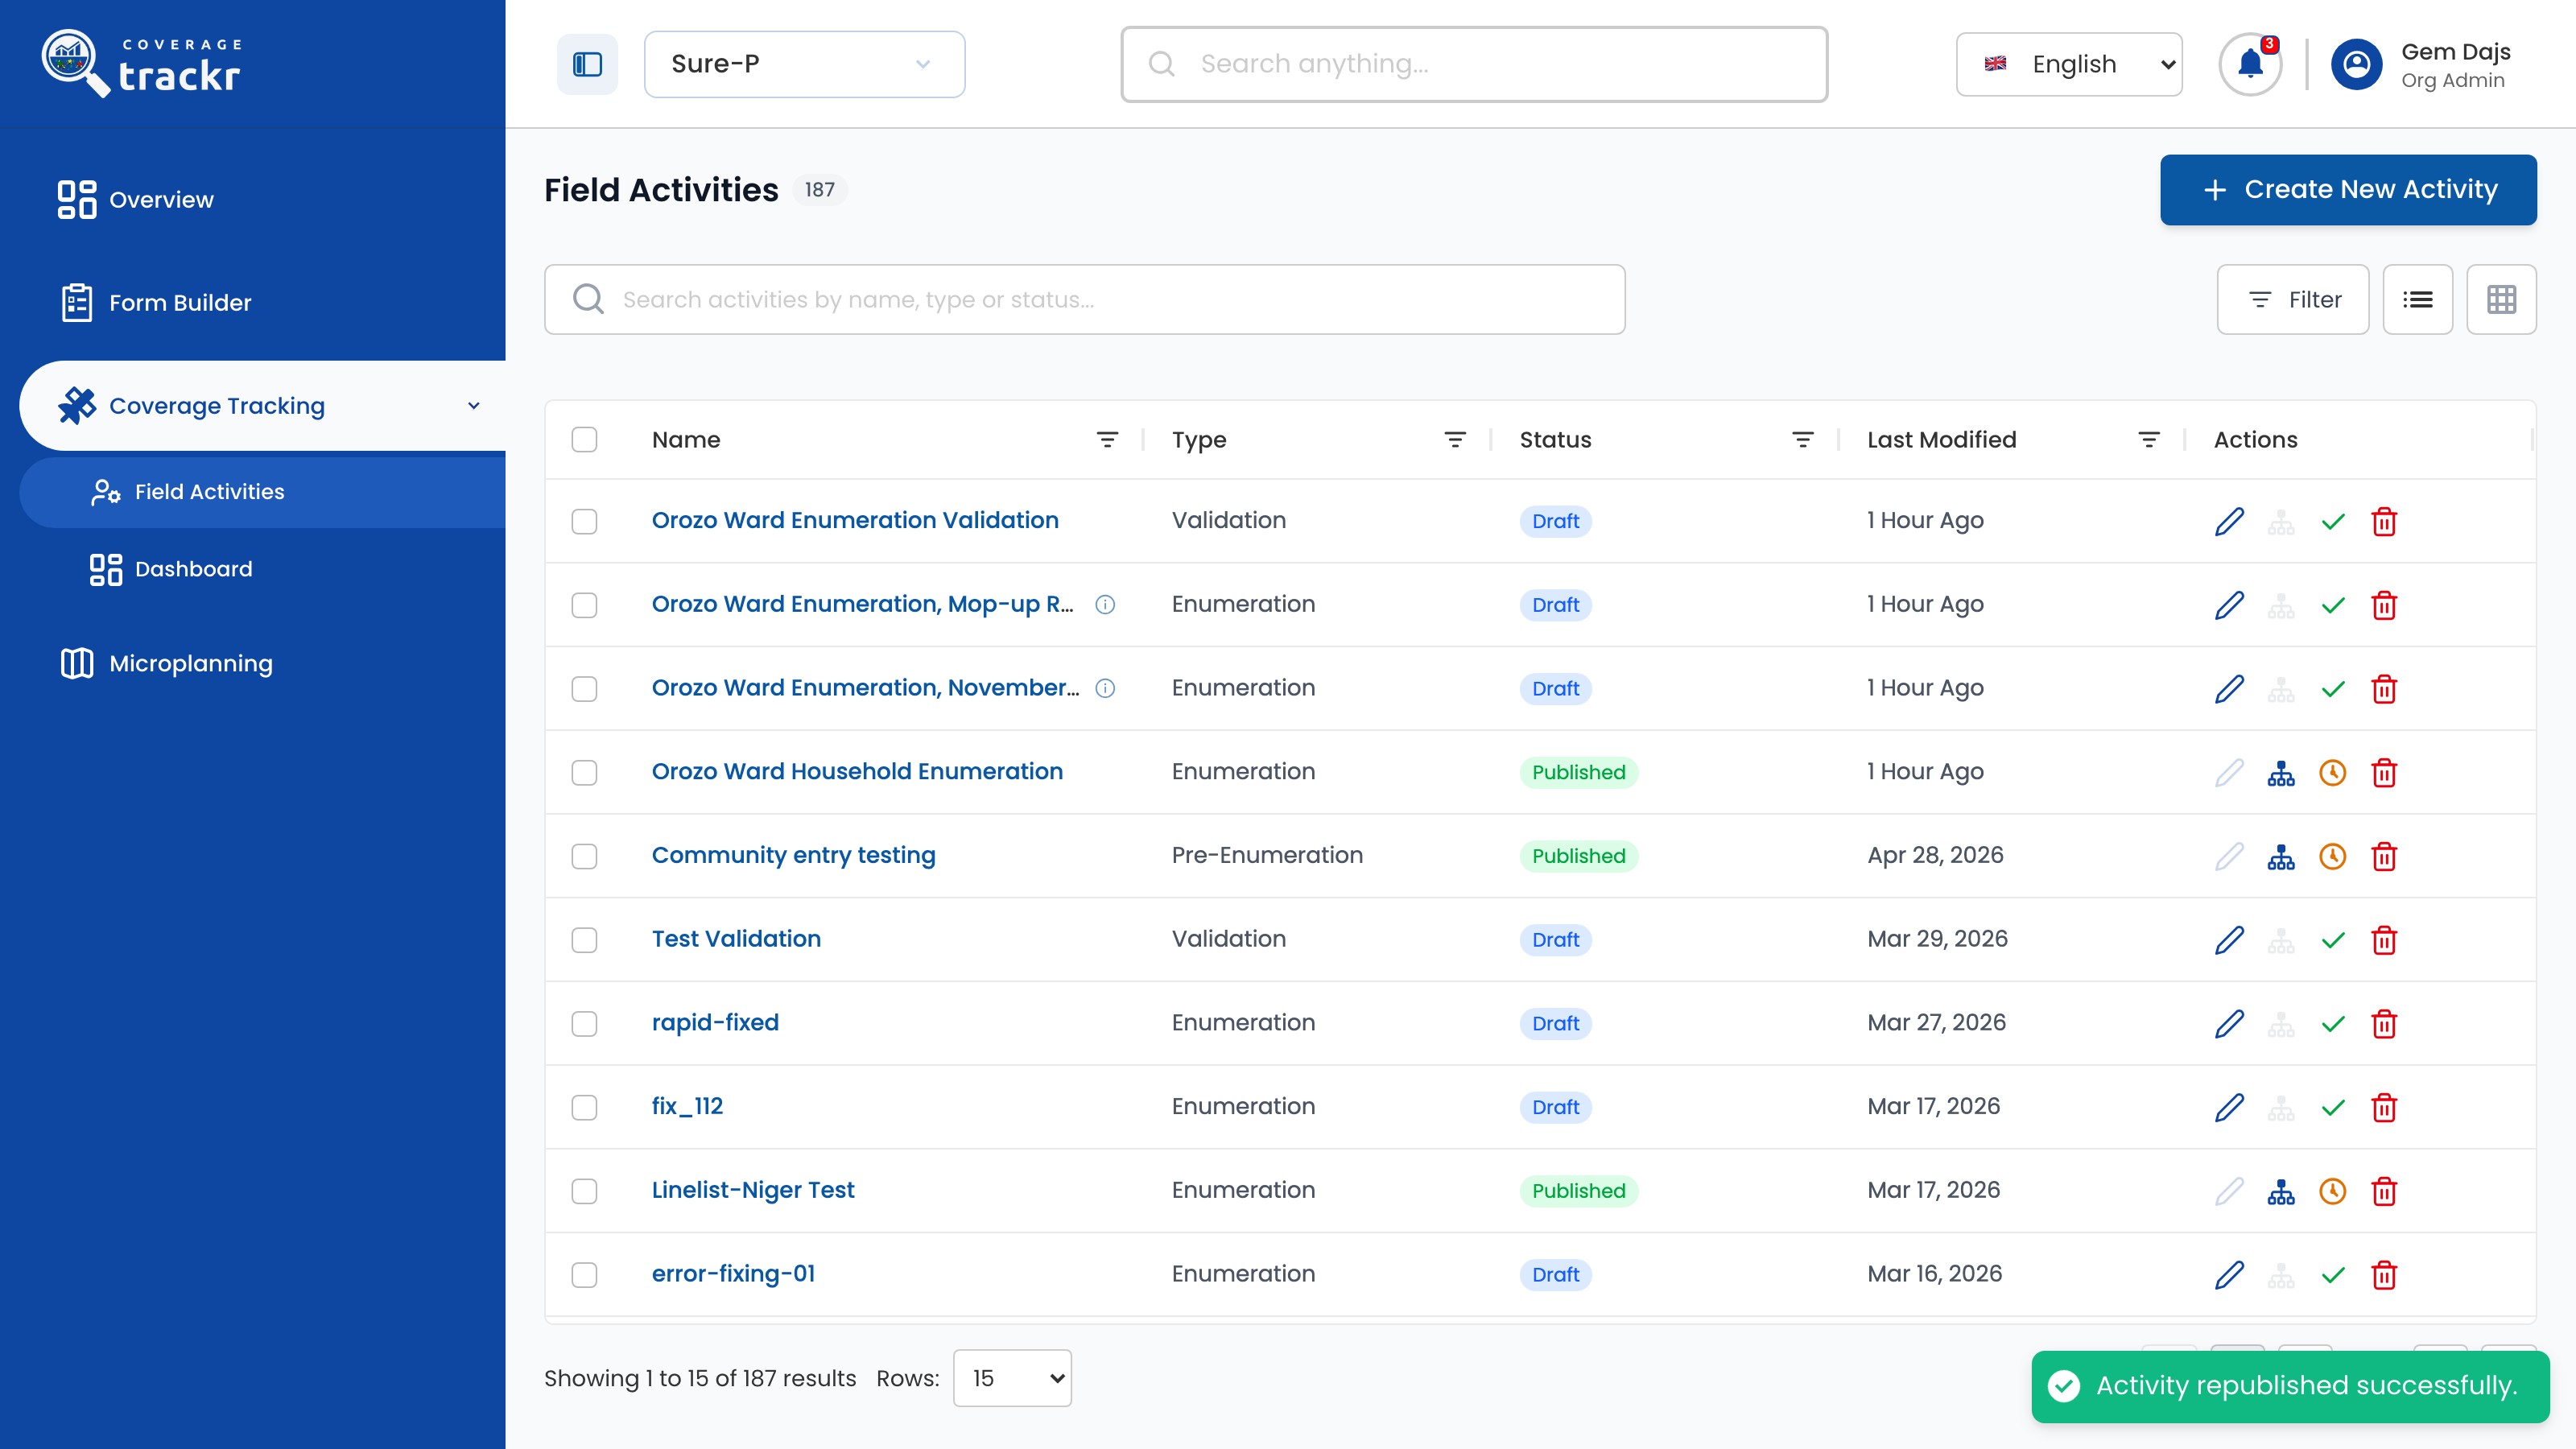
Republish the activity

Select Done. Activity republished successfully appears and the activity is still Published.

Field Activities list with the activity still published and a republished message

1 — published status · 2 — republish confirmation.

Field Activities list with the activity still published and a republished message

Done. The team shows against the location and the activity is republished with the change, still Published.

If something goes wrong

Do I need to unpublish the activity first?

No. Update Teams changes team assignments while the activity stays Published.

What is saved when I select Save?

The team for that location is saved straight away. Select Done to republish the activity with the change.

Field activities

Review a field activity

Review an activity's type, status, schedule and available actions before making operational changes.

Organization Administrator 2 min read Web

Before you start

  • The required programme is active.
  • At least one field activity exists in the programme.

Open Field Activities

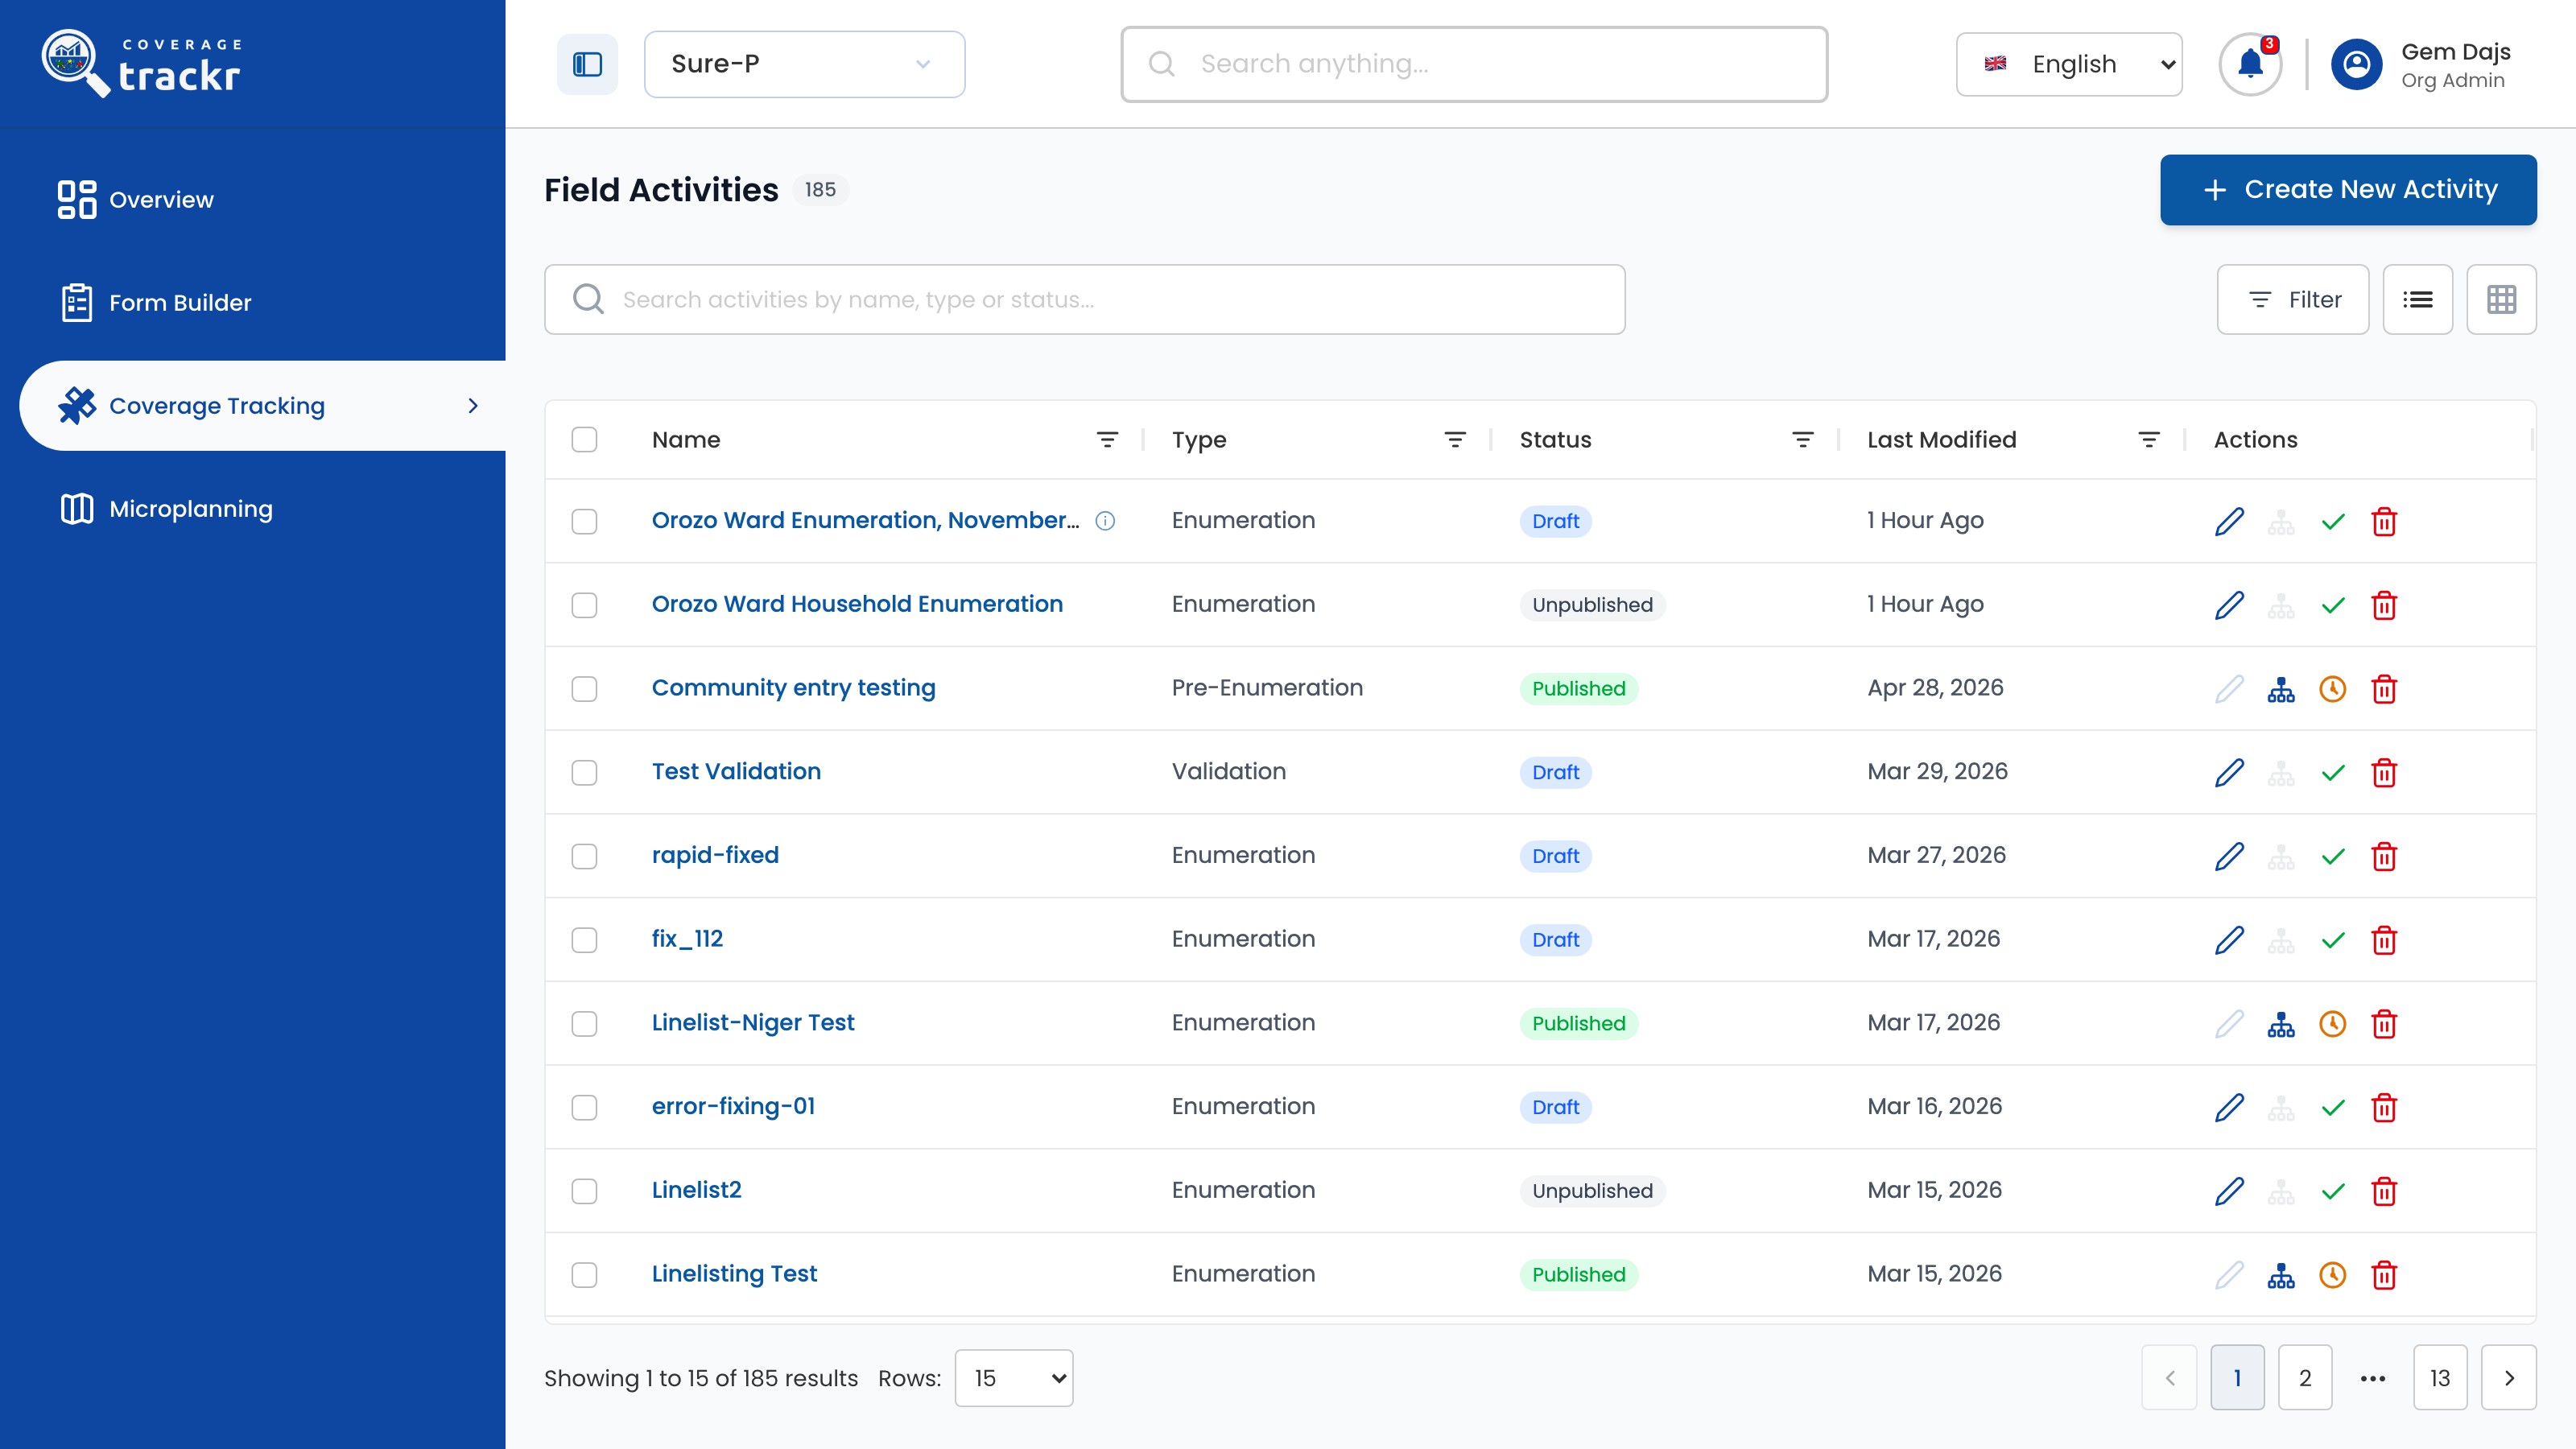
Expand Coverage Tracking, select Field Activities, and find the activity in the list.

CoverageTrackr field activity list with activity types, statuses and actions

1 — field activities · 2 — activity list.

CoverageTrackr field activity list with activity types, statuses and actions

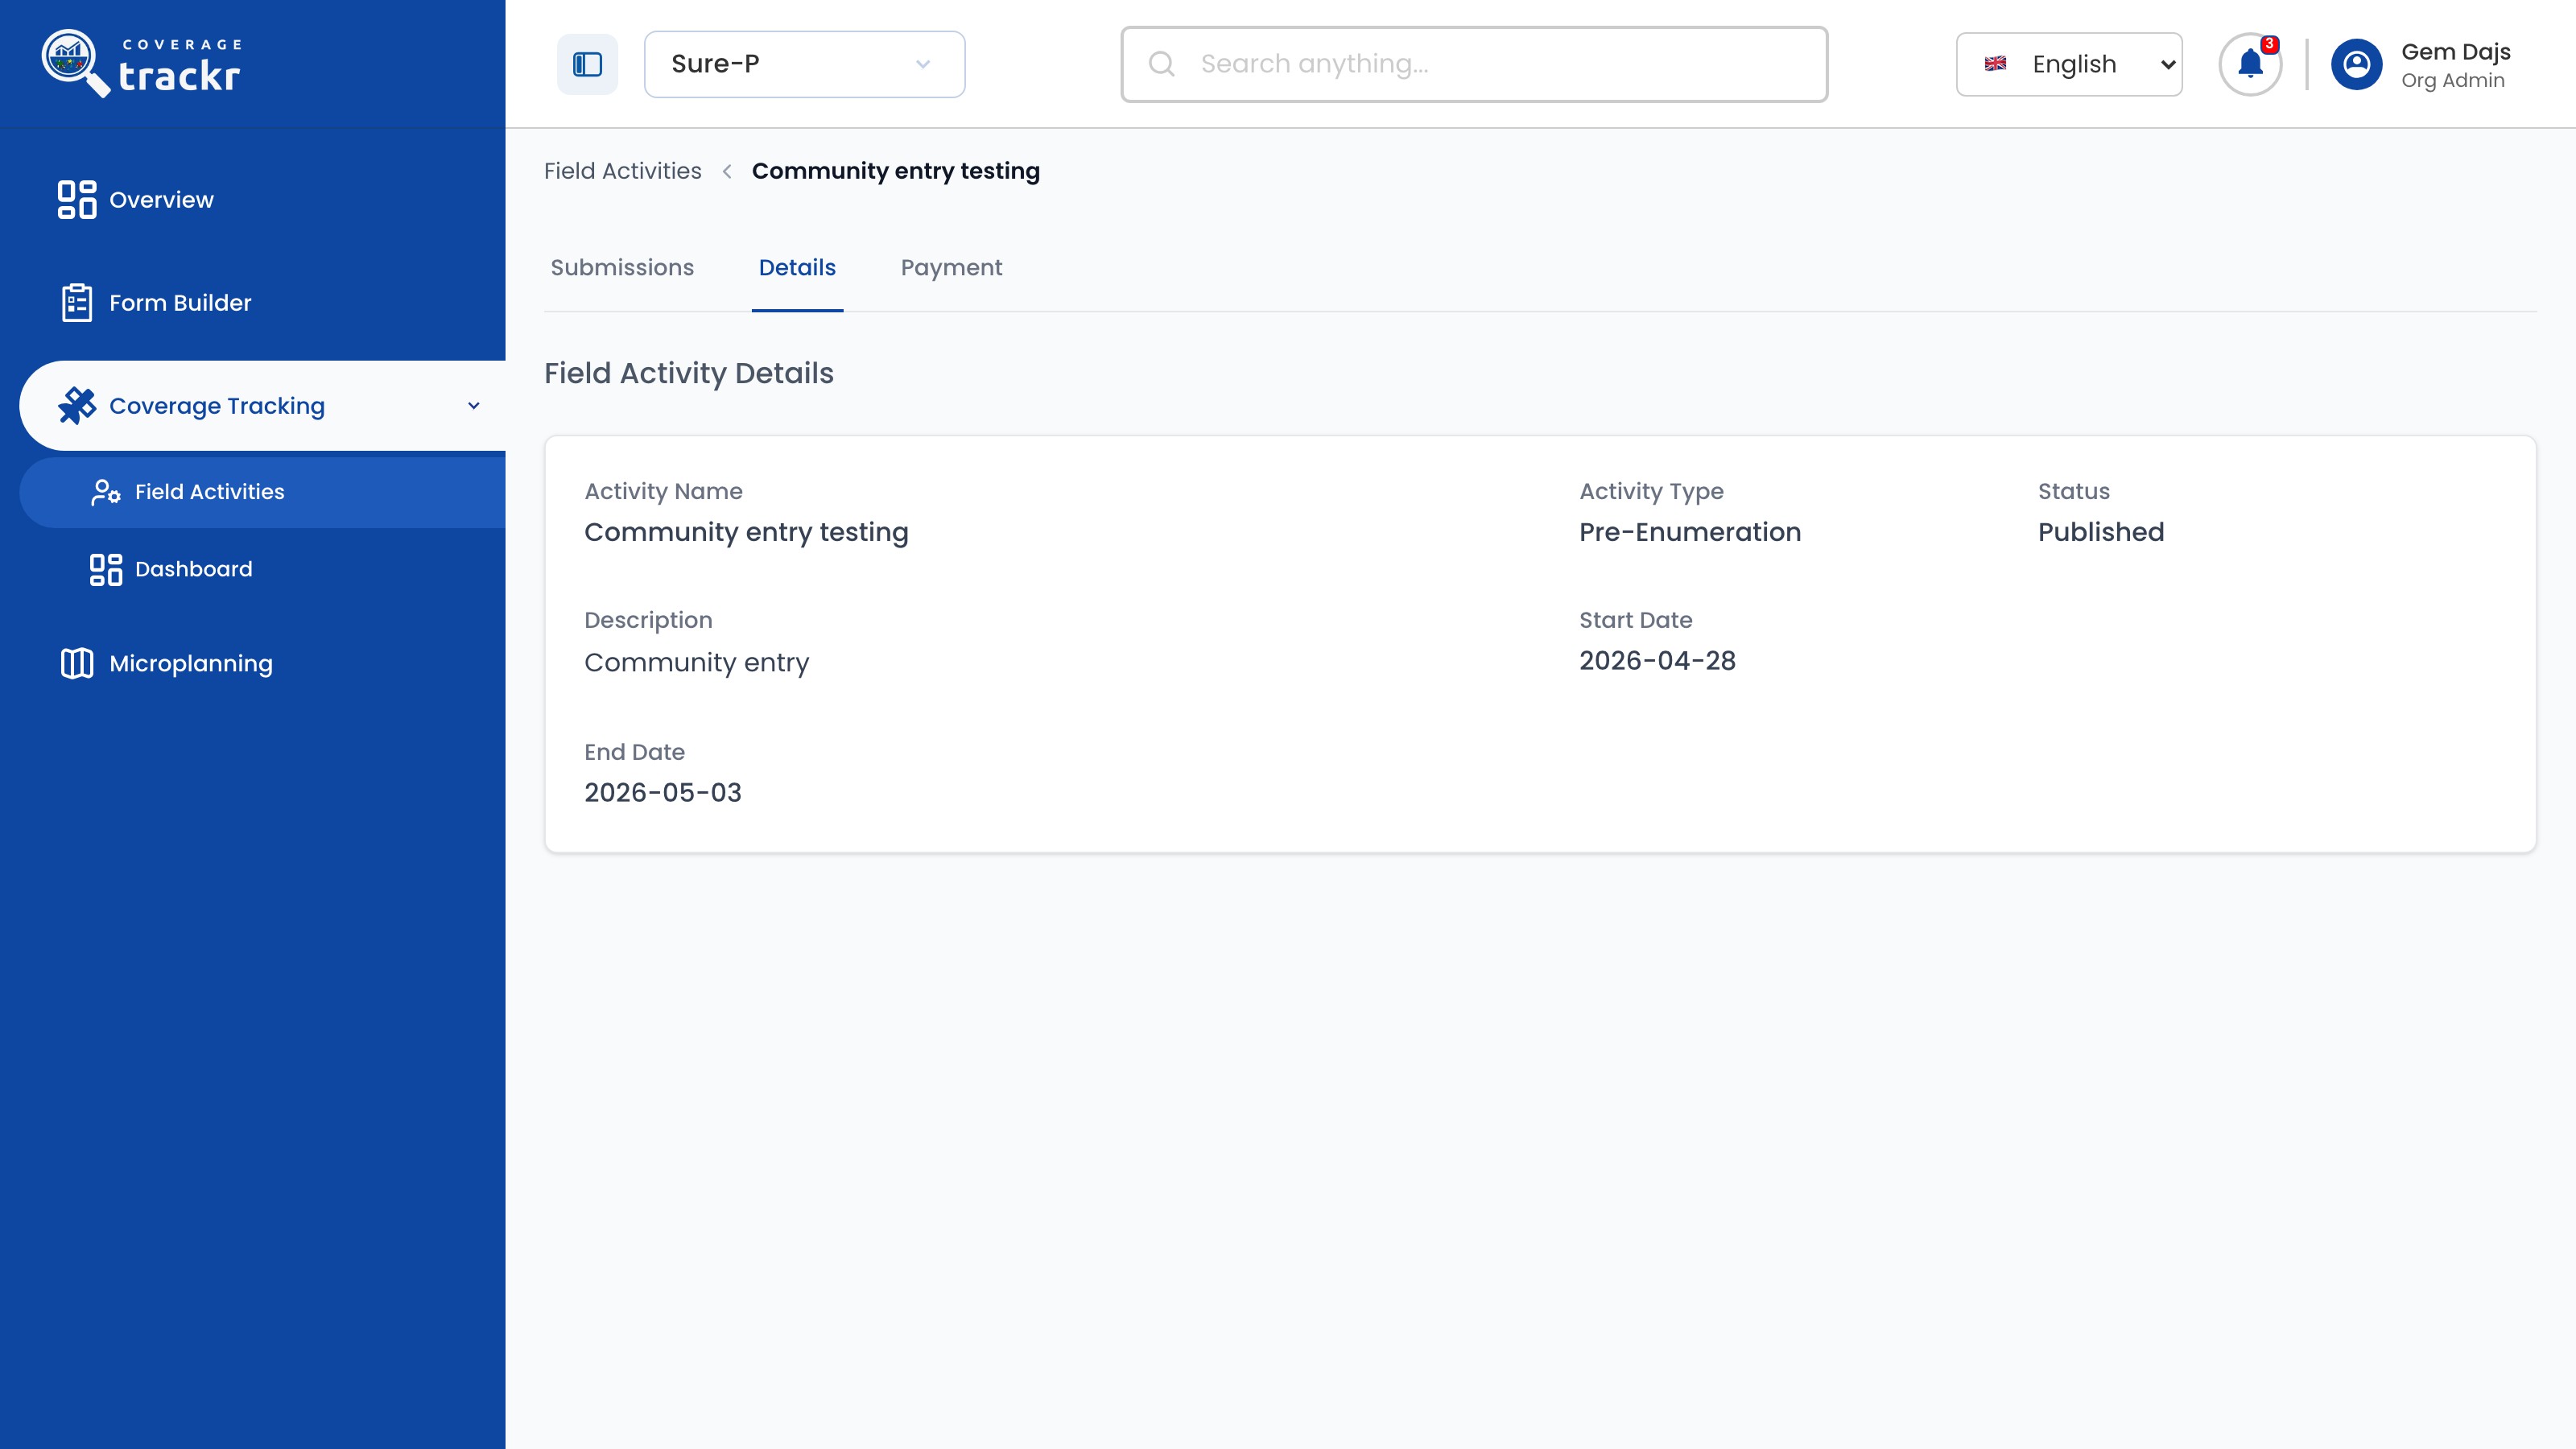
Review the activity details

Open the activity and select Details to check its Activity Type, Status, Description and dates.

Published CoverageTrackr field activity with its Details tab open

1 — details tab · 2 — activity details.

Published CoverageTrackr field activity with its Details tab open

Done. The activity's current status, schedule and linked workflow tabs have been checked.

If something goes wrong

Where do I see an activity's type and dates?

Open the activity and select Details.

Microplanning

Create a microplan

Start a microplan for a planning round by naming it and setting its dates.

Organization Administrator 2 min read Web

Before you start

  • You are signed in and the correct programme is active.

Open Microplanning

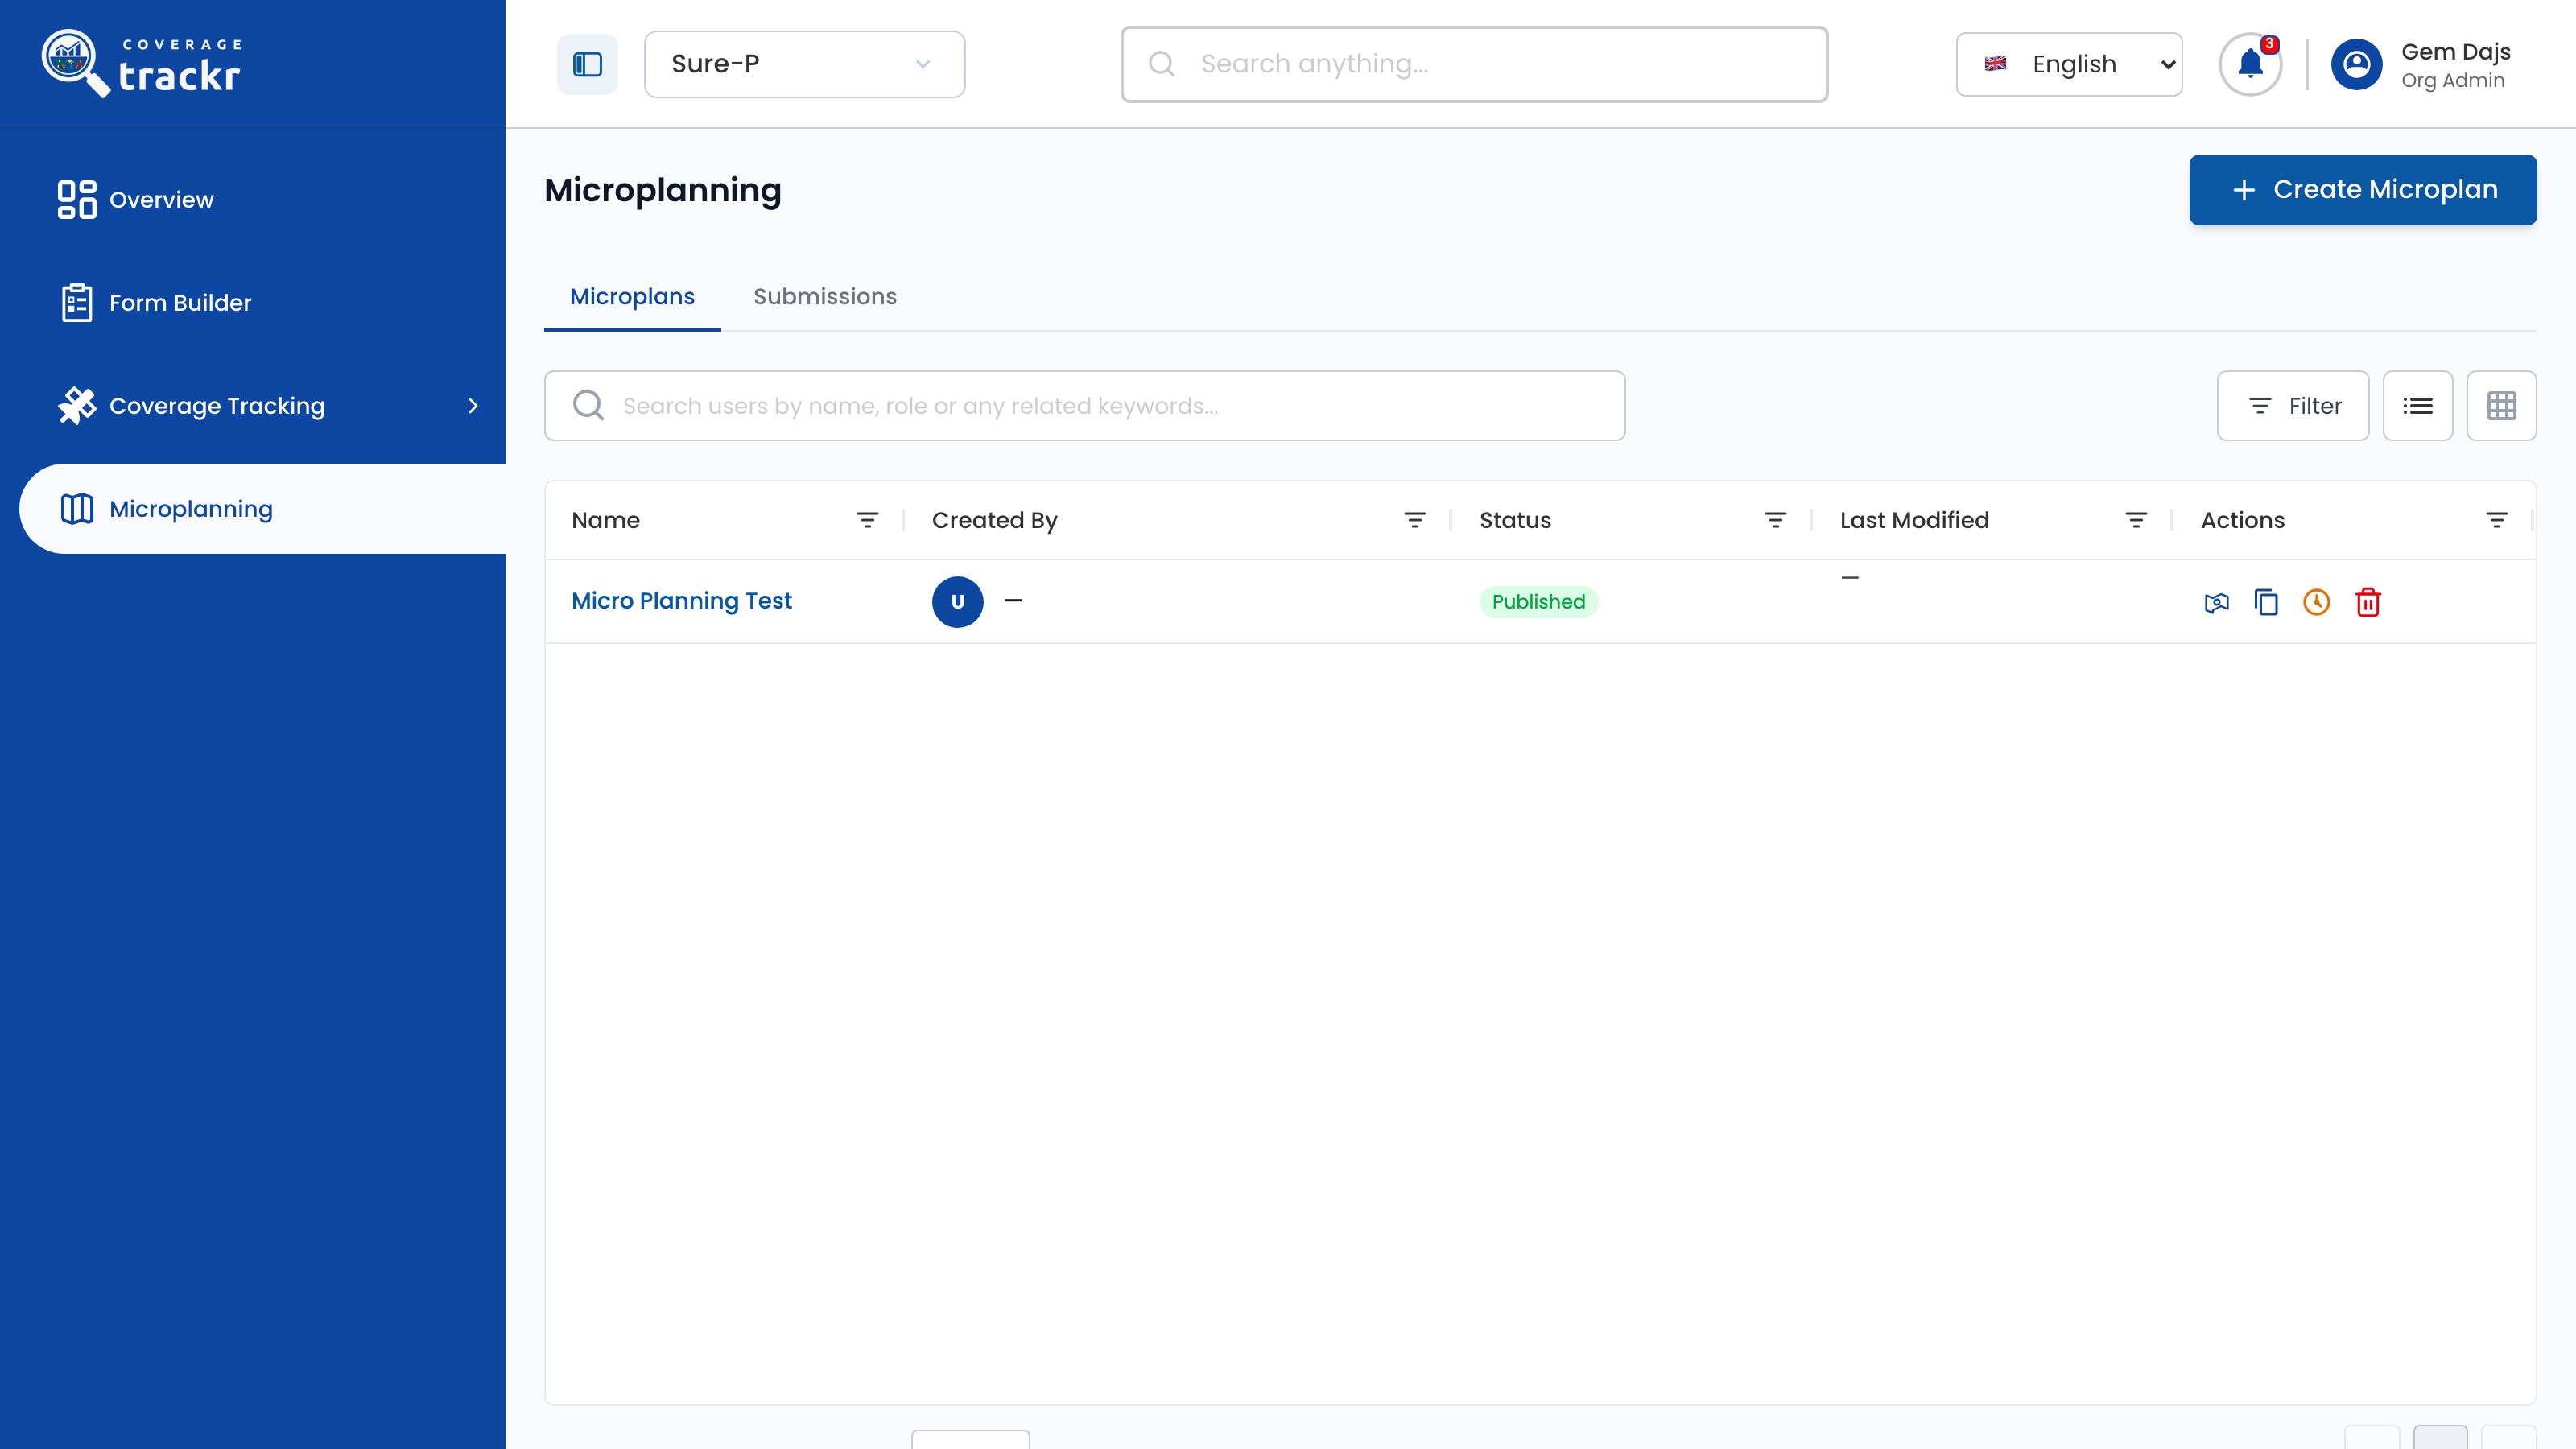
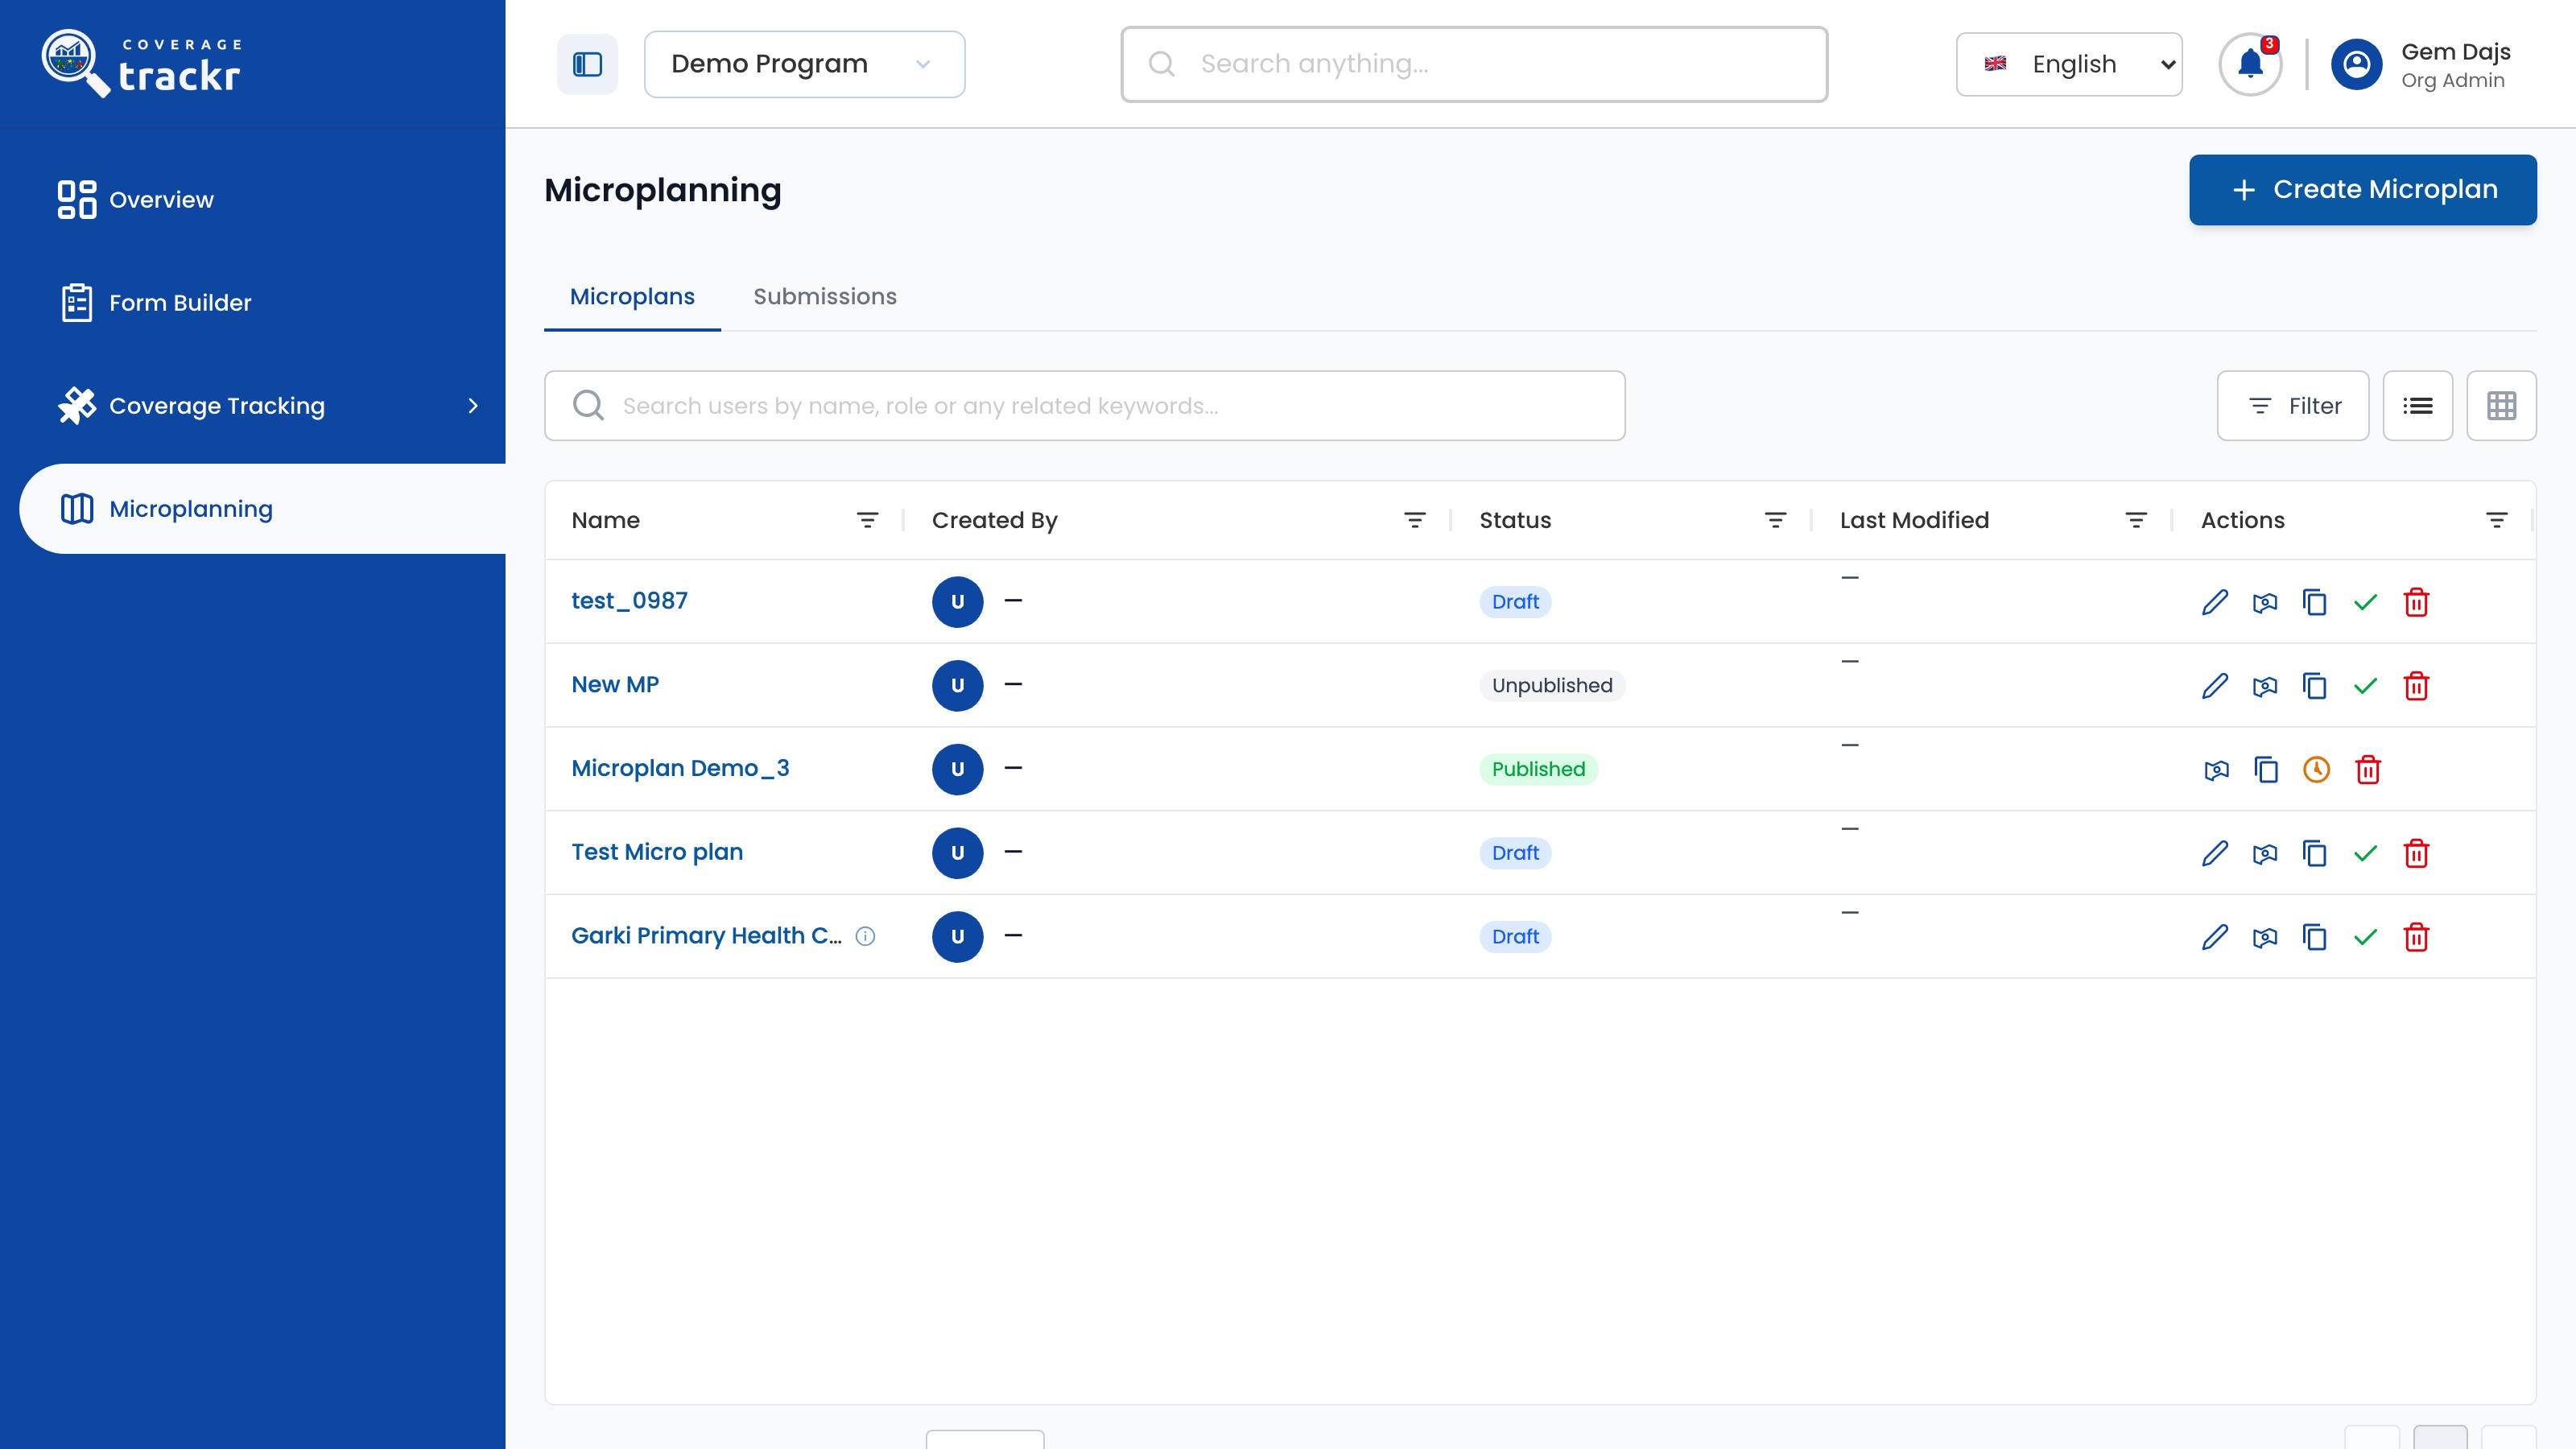
Select Microplanning, then select Create Microplan.

Microplanning list with the Create Microplan button

1 — microplanning · 2 — create microplan.

Microplanning list with the Create Microplan button

Enter the microplan details

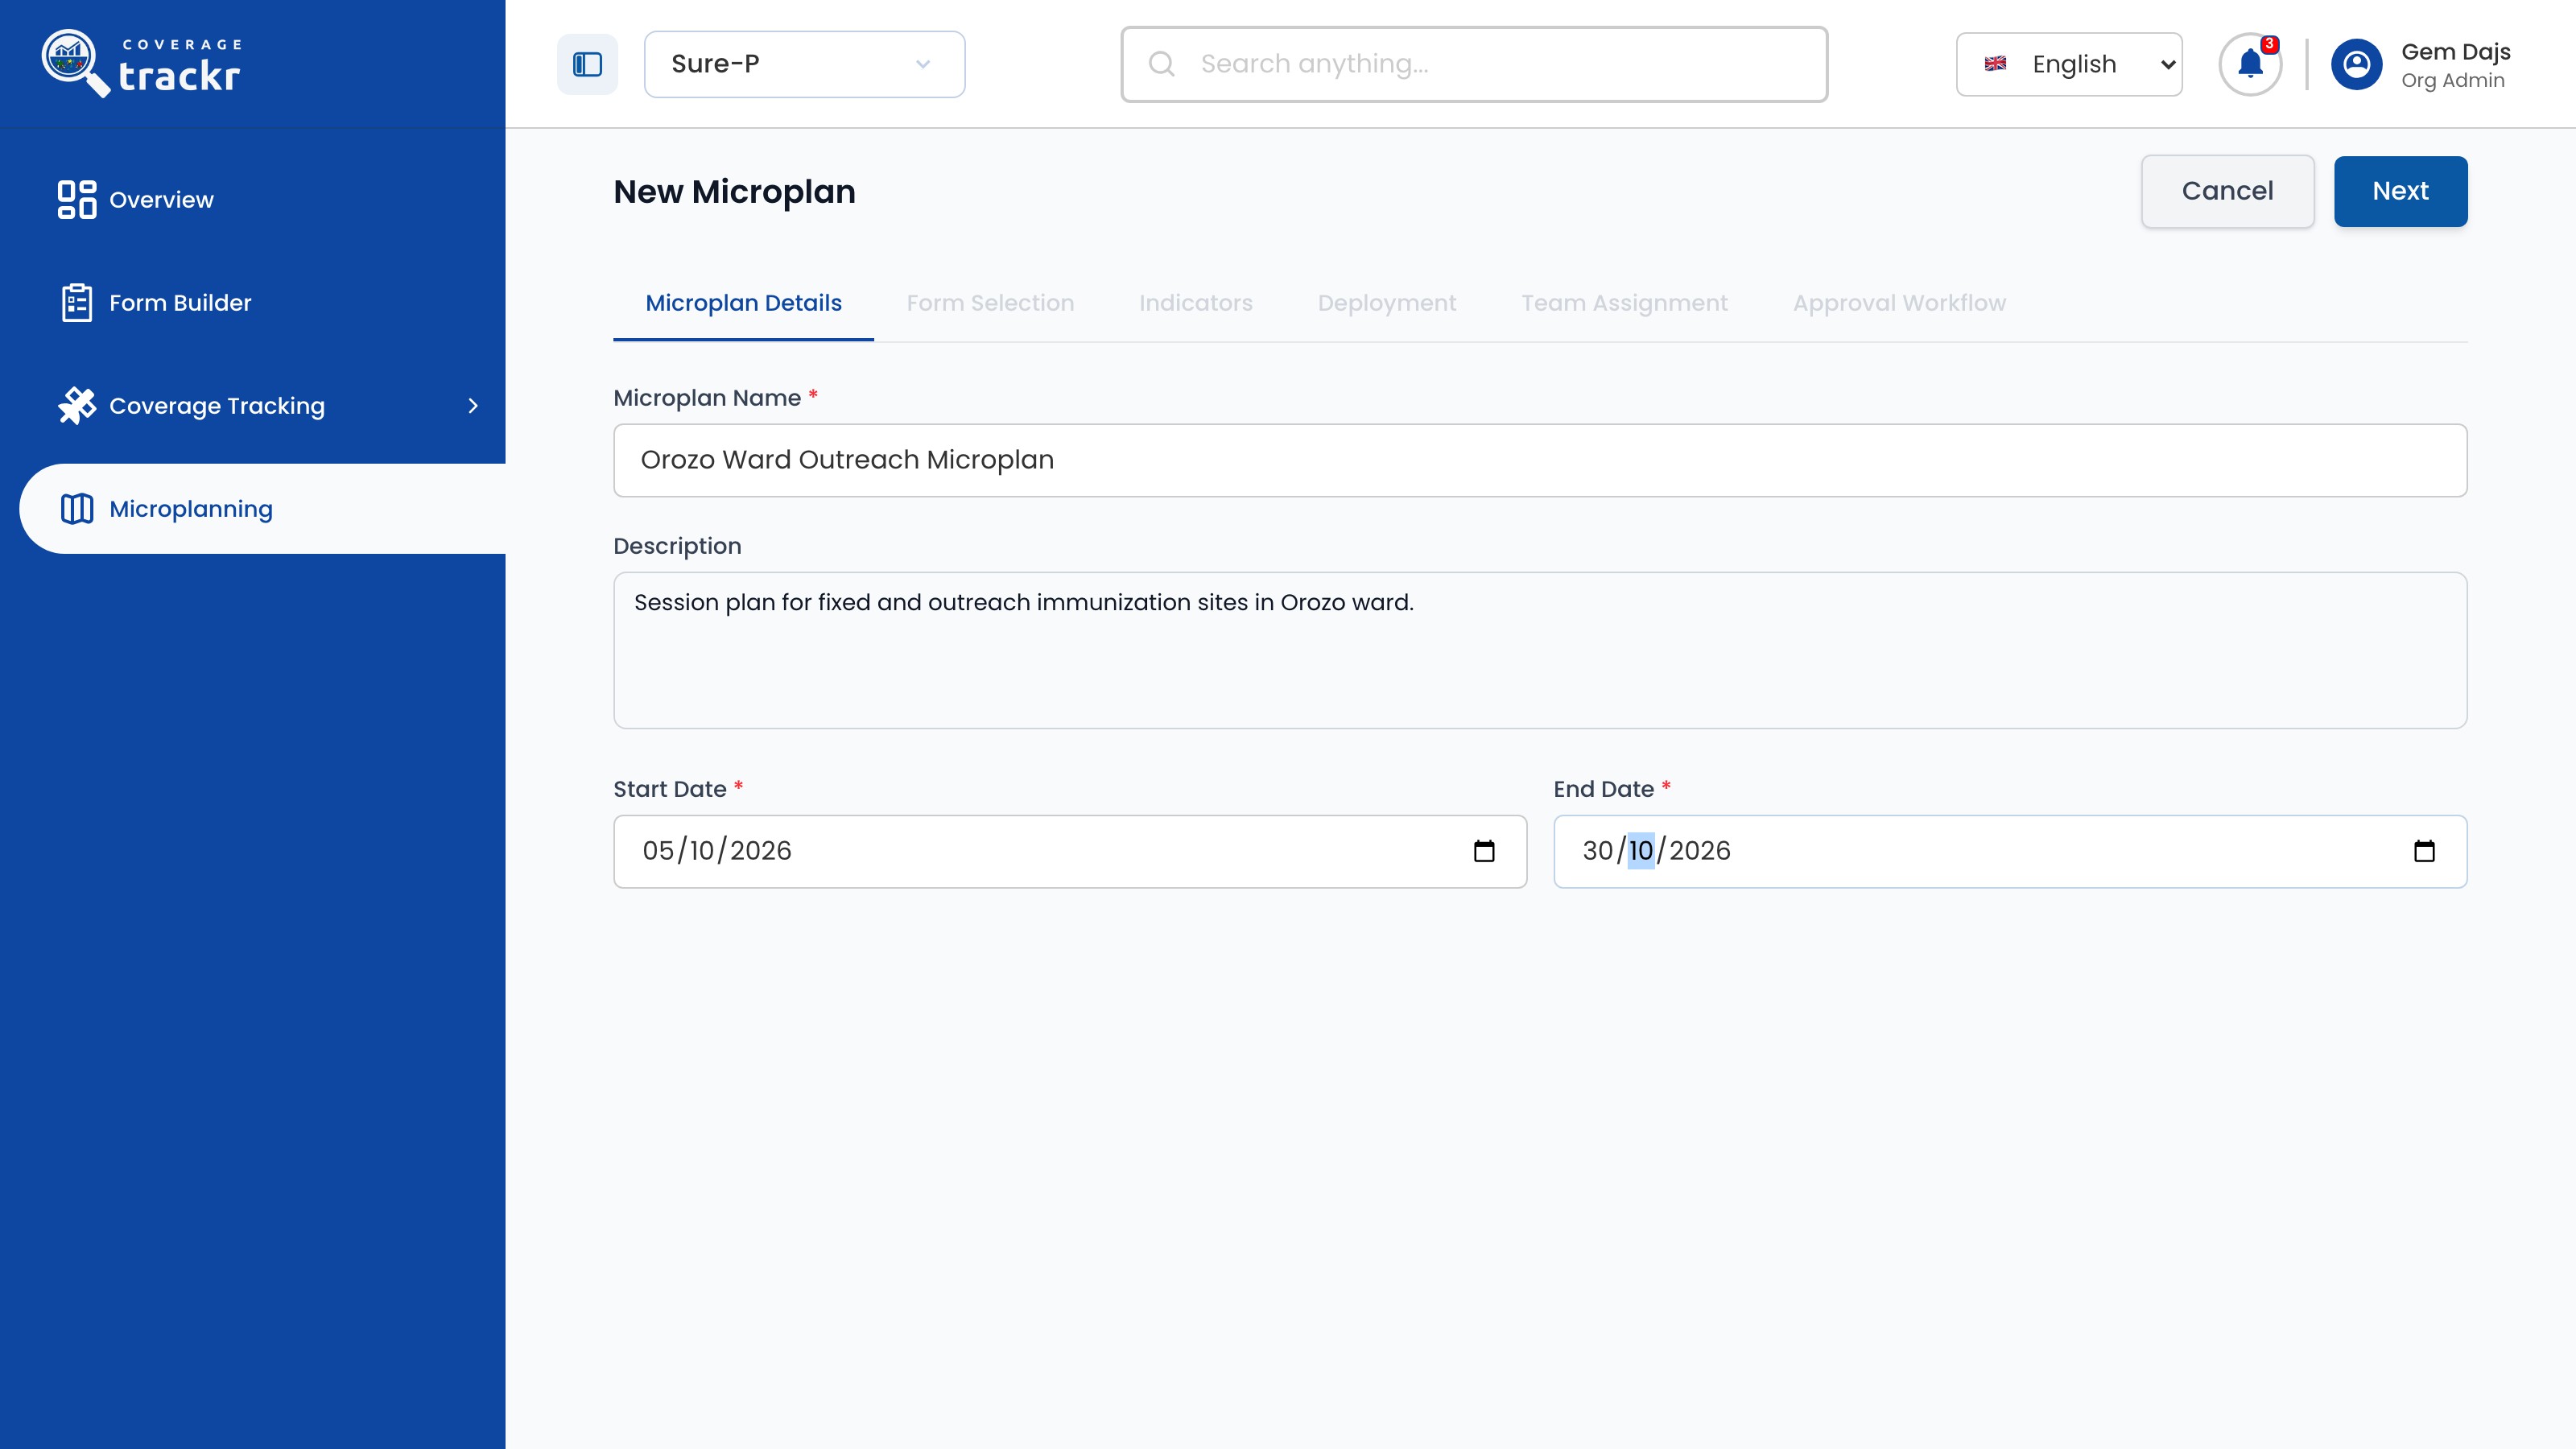
Enter the Microplan Name, a Description and the Start Date and End Date, then select Next.

New Microplan details with name, description and dates entered

1 — microplan details · 2 — next.

New Microplan details with name, description and dates entered

Find the draft

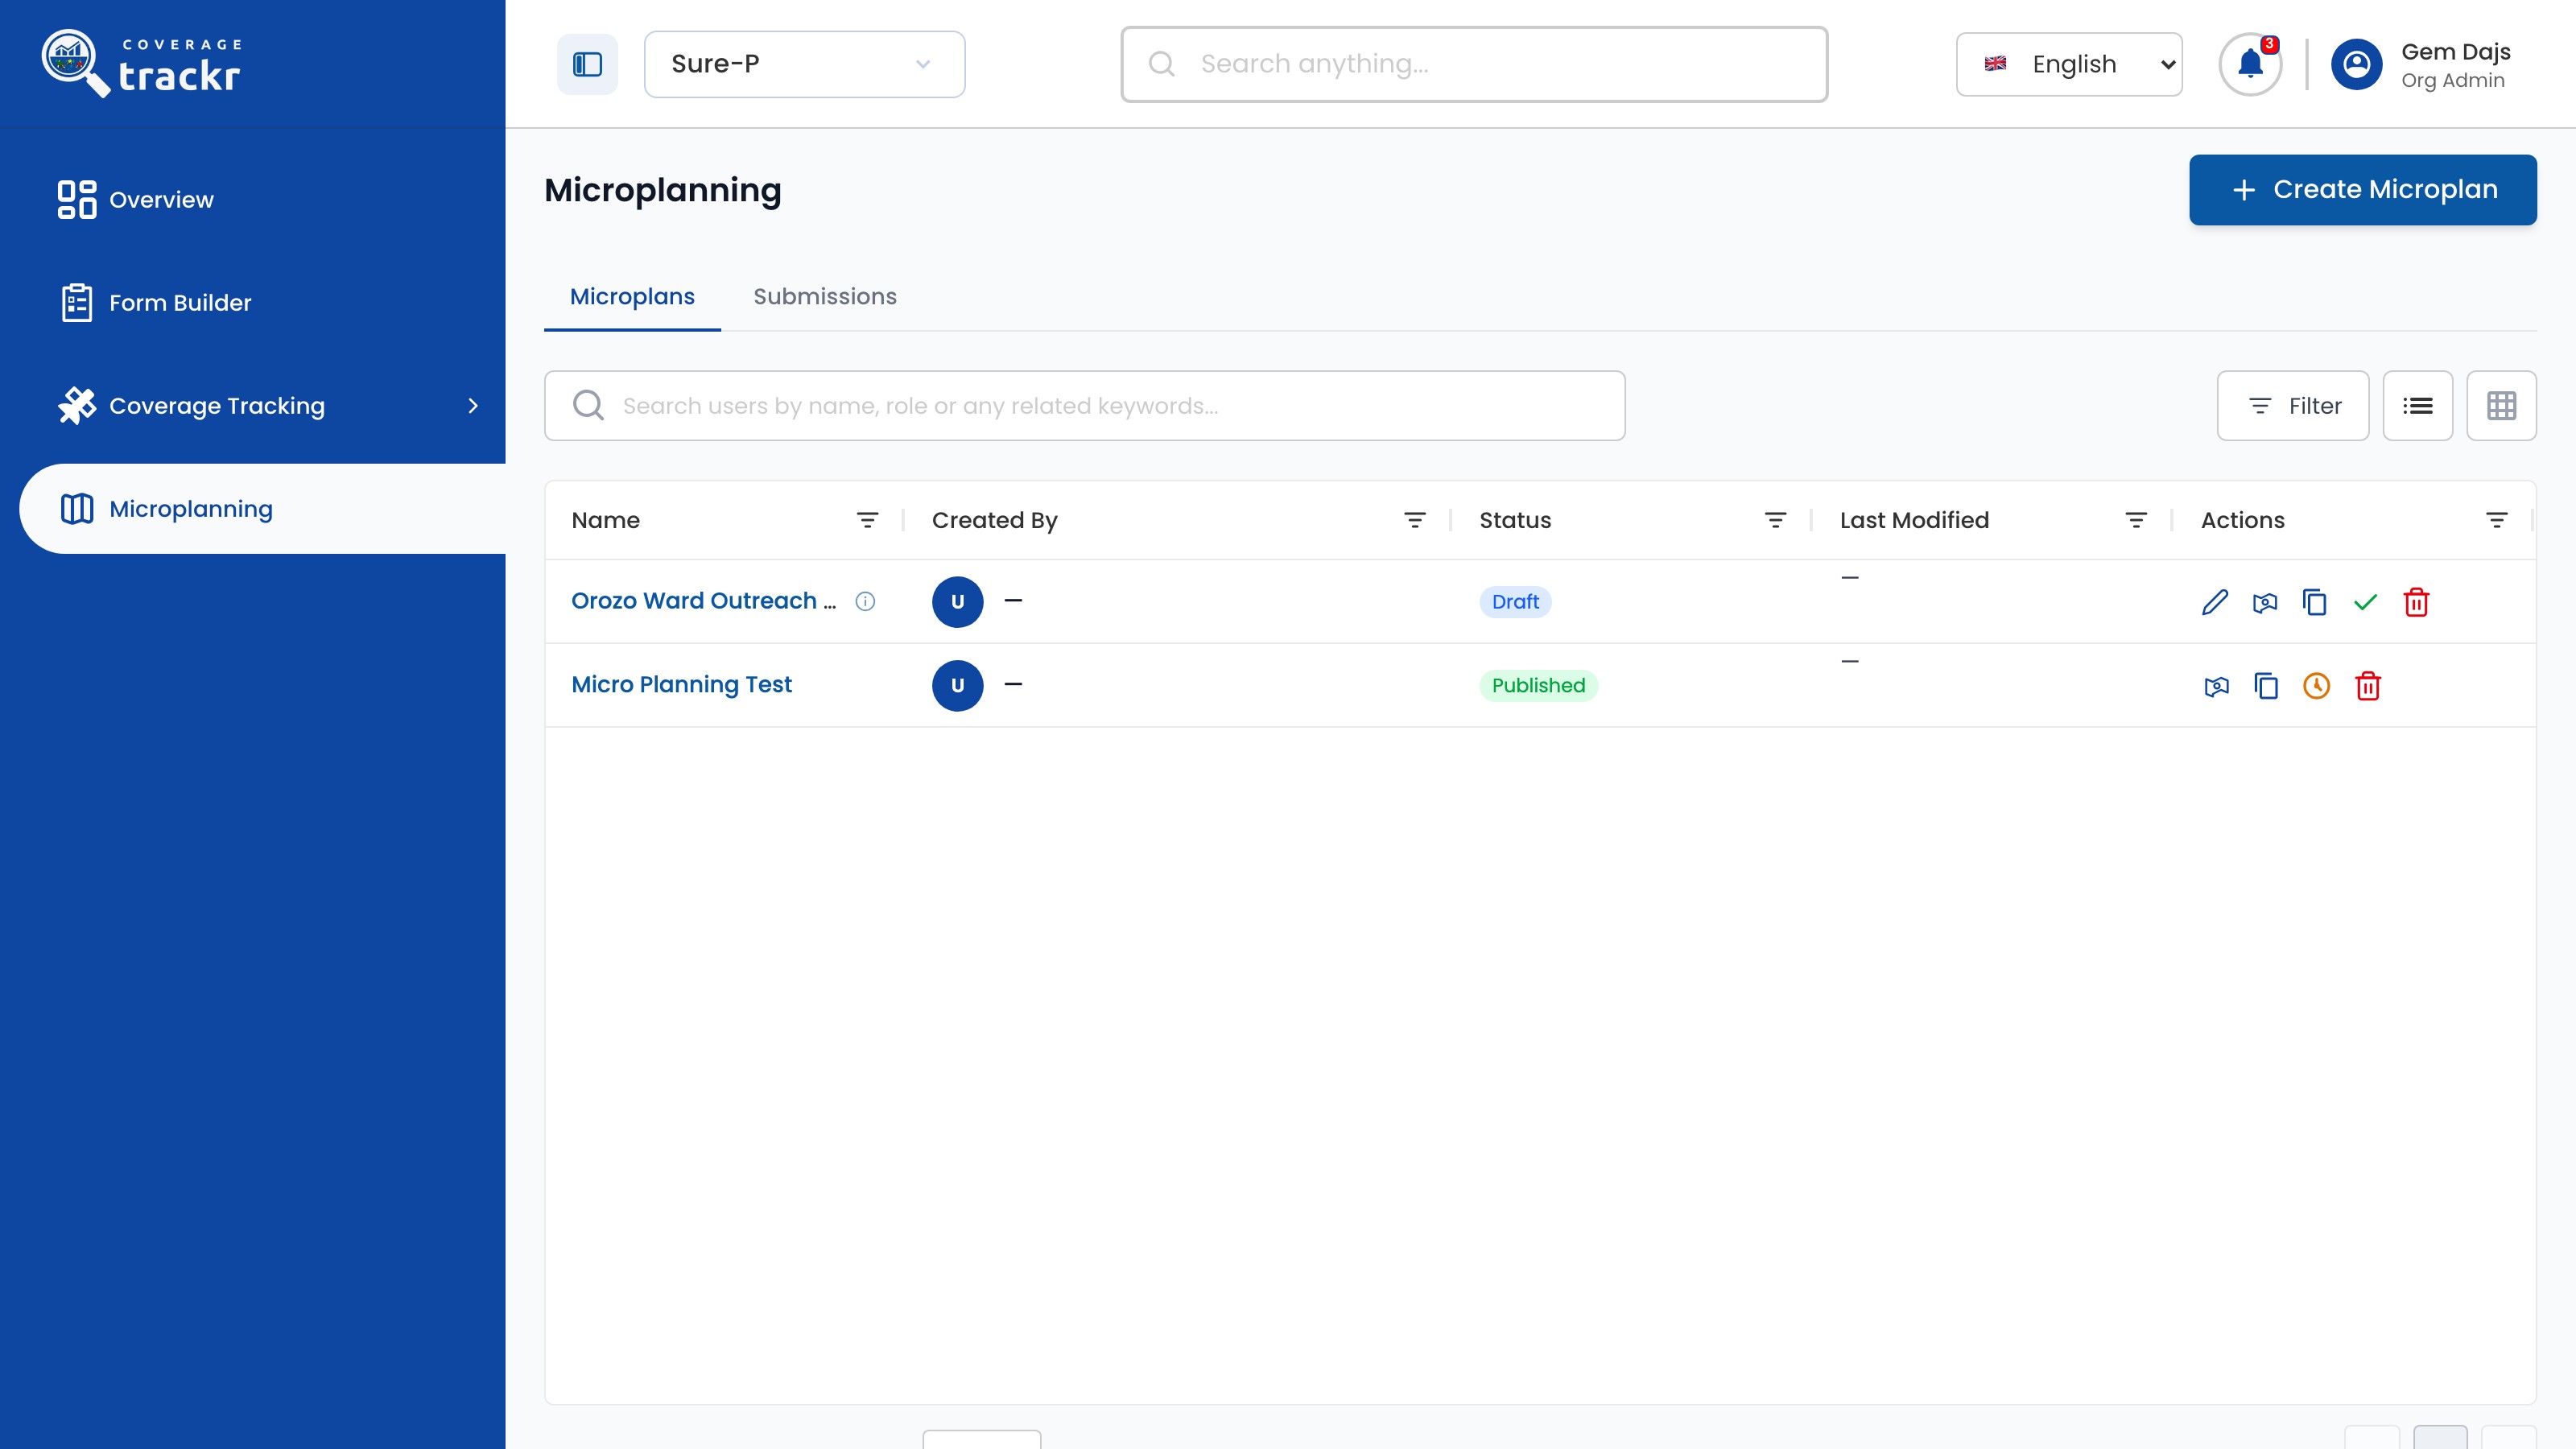
The microplan now appears in the list as a Draft. Use Edit to continue setting it up.

Microplanning list with the new microplan marked Draft

1 — draft microplan · 2 — edit action.

Microplanning list with the new microplan marked Draft

Done. The microplan is saved as a Draft. Continue with Set up a microplan.

If something goes wrong

When is the microplan saved?

Selecting Next on Microplan Details saves it as a Draft, even if you stop there.

Microplanning

Set up a microplan

Choose the microplan's form, indicators, facilities, people and approvers.

Organization Administrator 8 min read Web

Before you start

  • The microplan is a Draft or Unpublished.
  • The form and the facility group already exist.

Open the draft

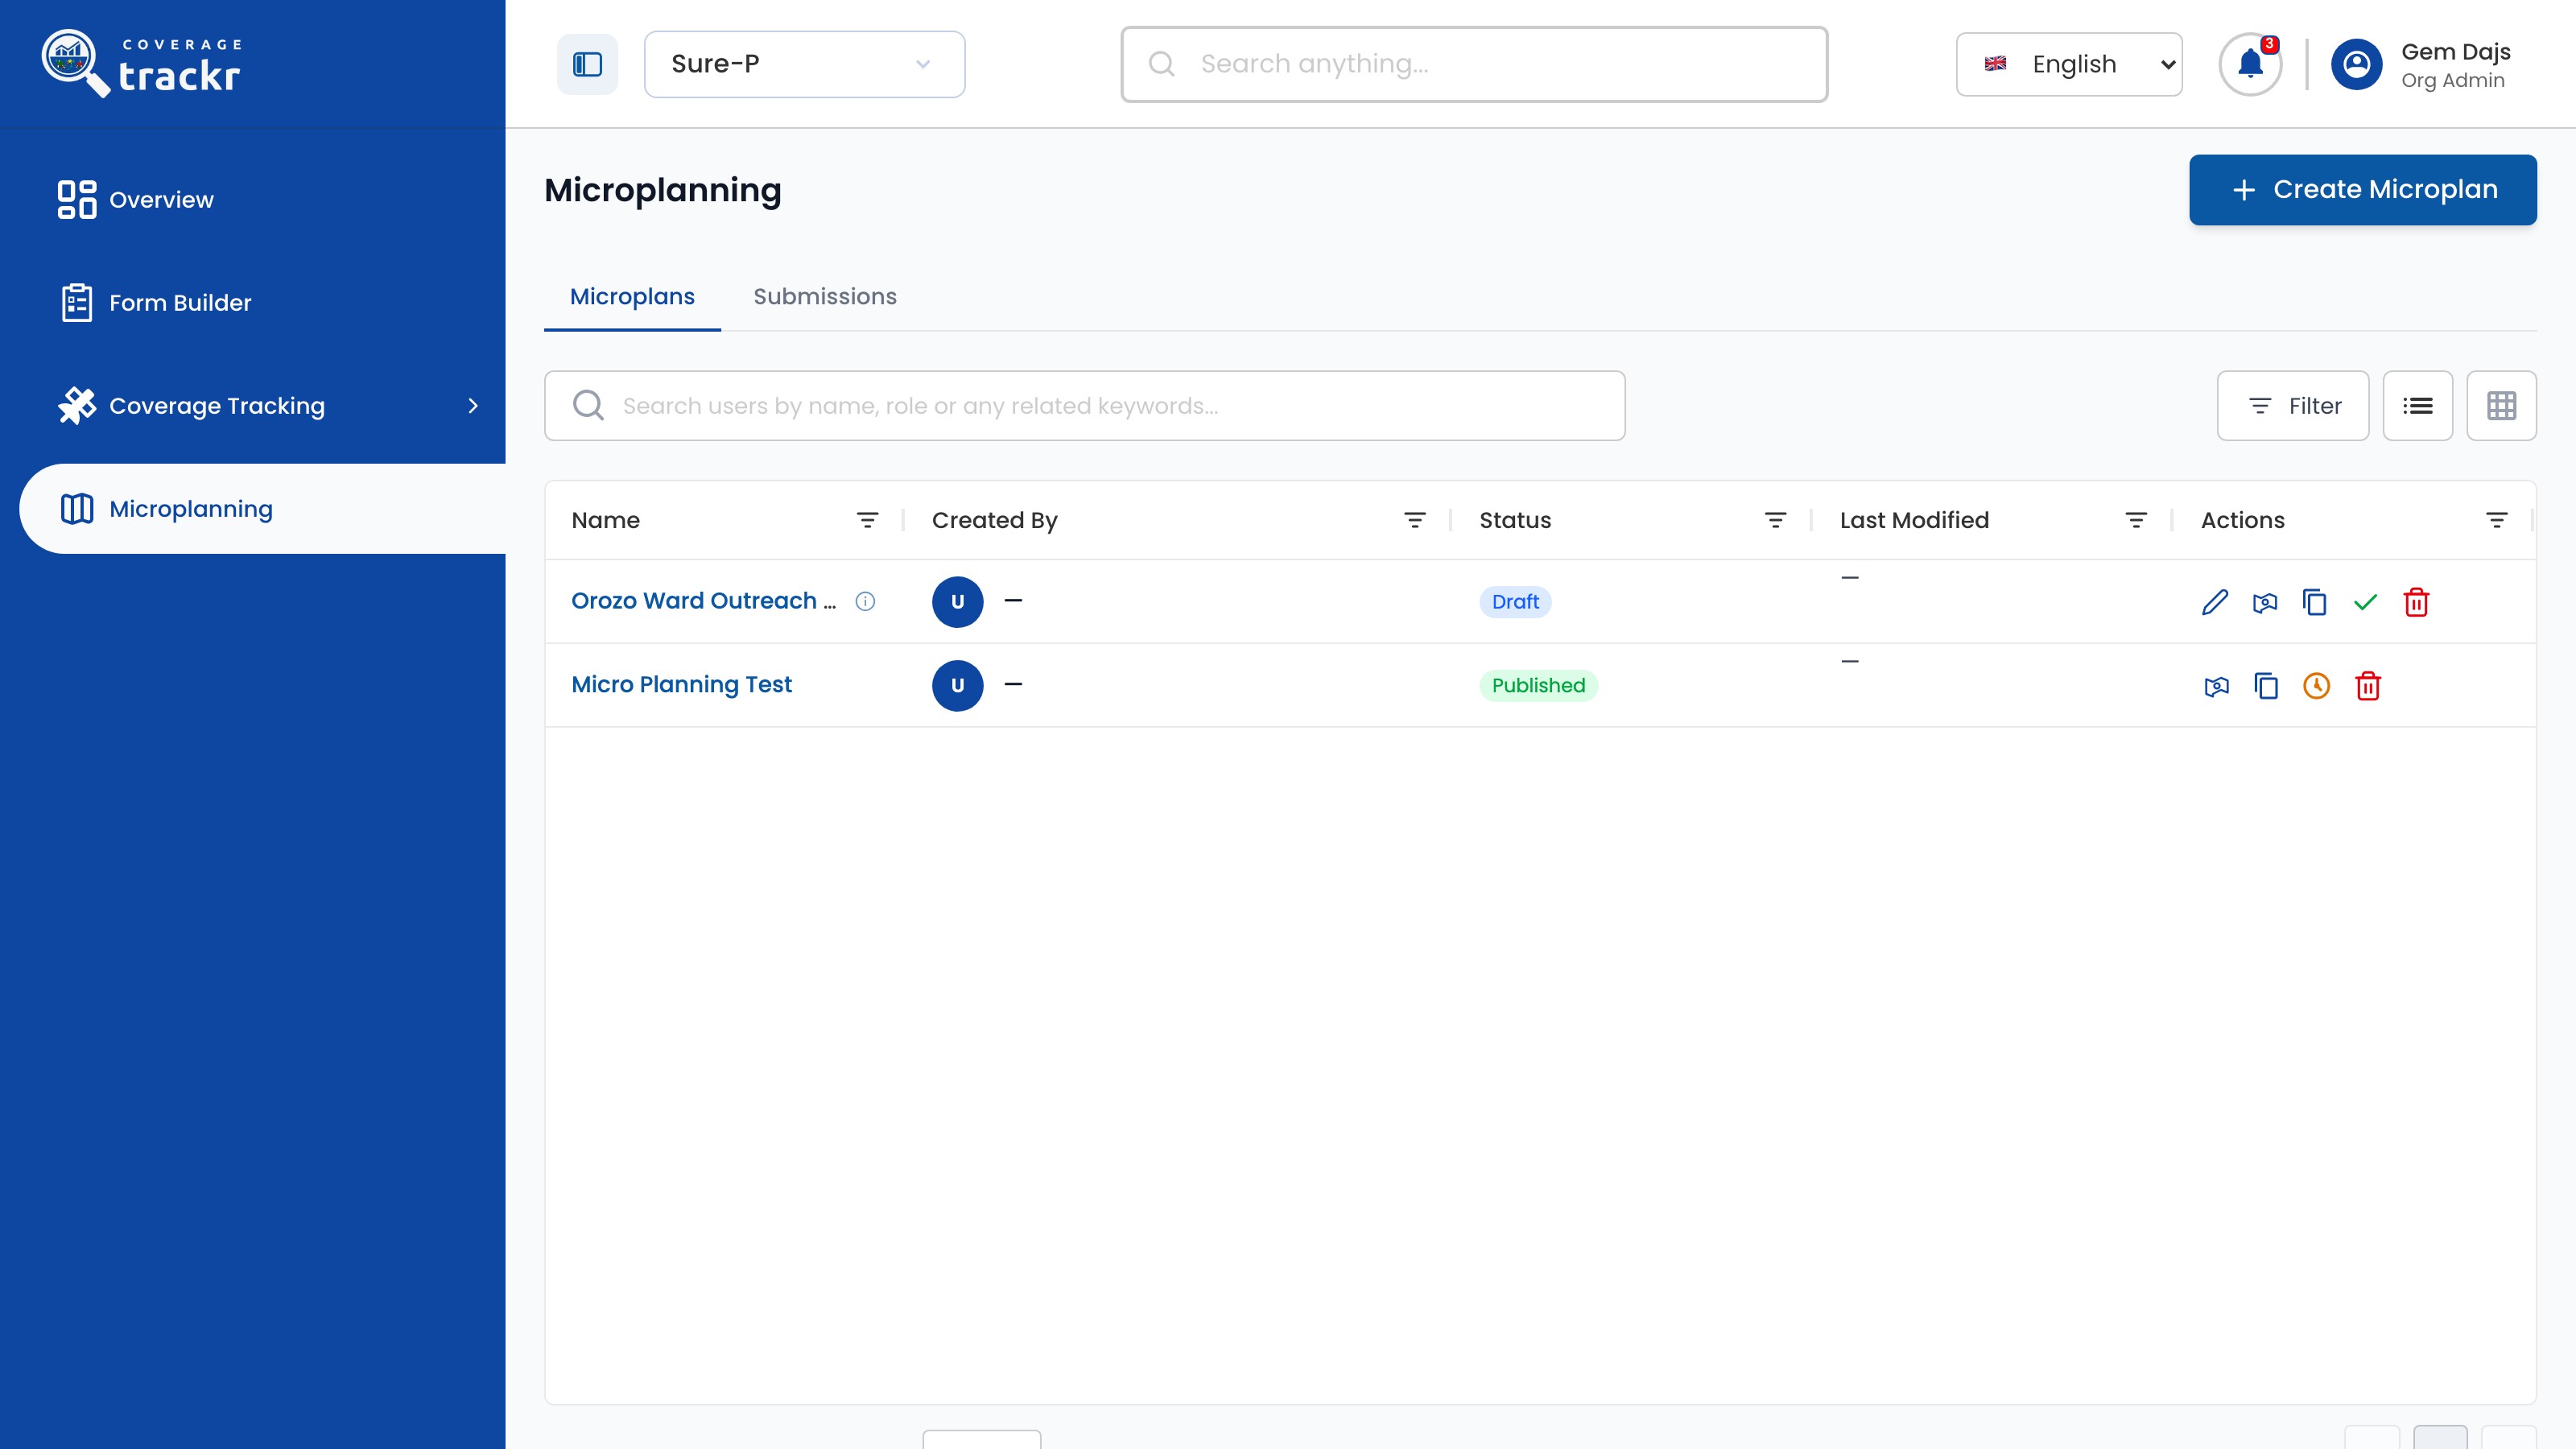
In Microplanning, select Edit on the draft microplan.

Microplanning list with the Edit action on the draft

1 — draft microplan · 2 — edit action.

Microplanning list with the Edit action on the draft

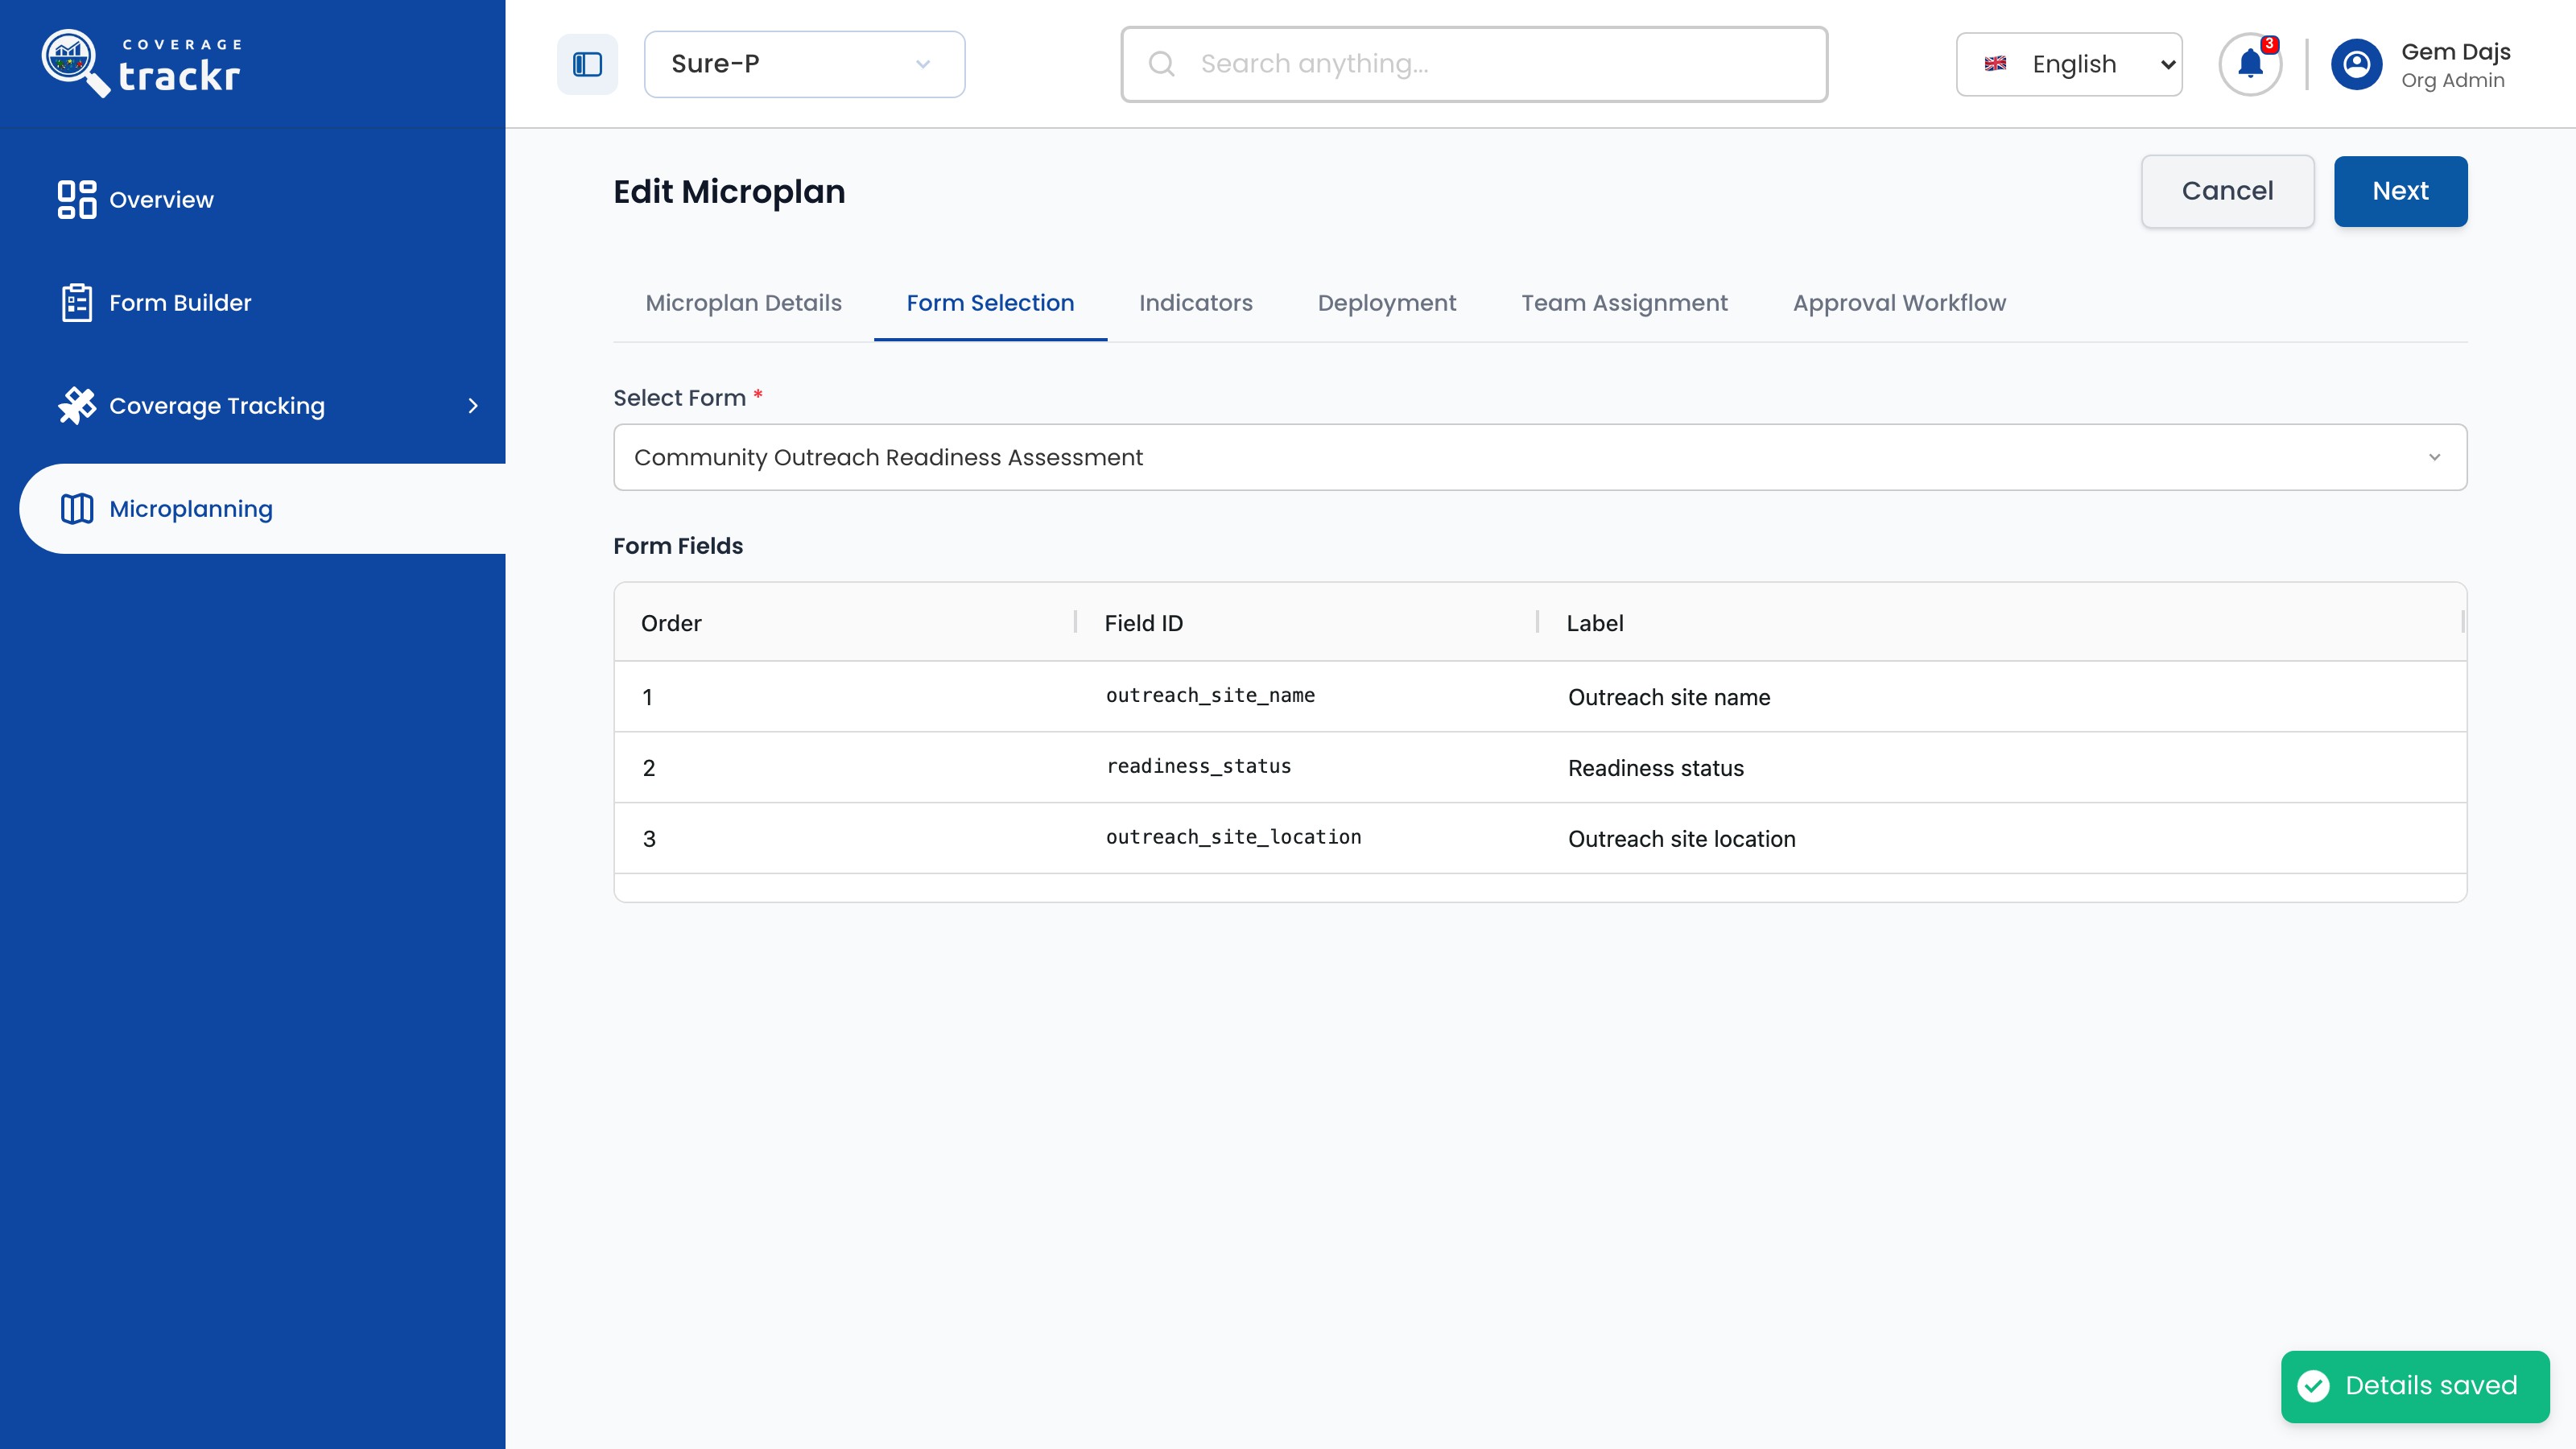
Choose the form

On Form Selection, choose the form under Select Form, check its fields, then select Next.

Form Selection with Community Outreach Readiness Assessment and its fields

1 — select form · 2 — form fields · 3 — next.

Form Selection with Community Outreach Readiness Assessment and its fields

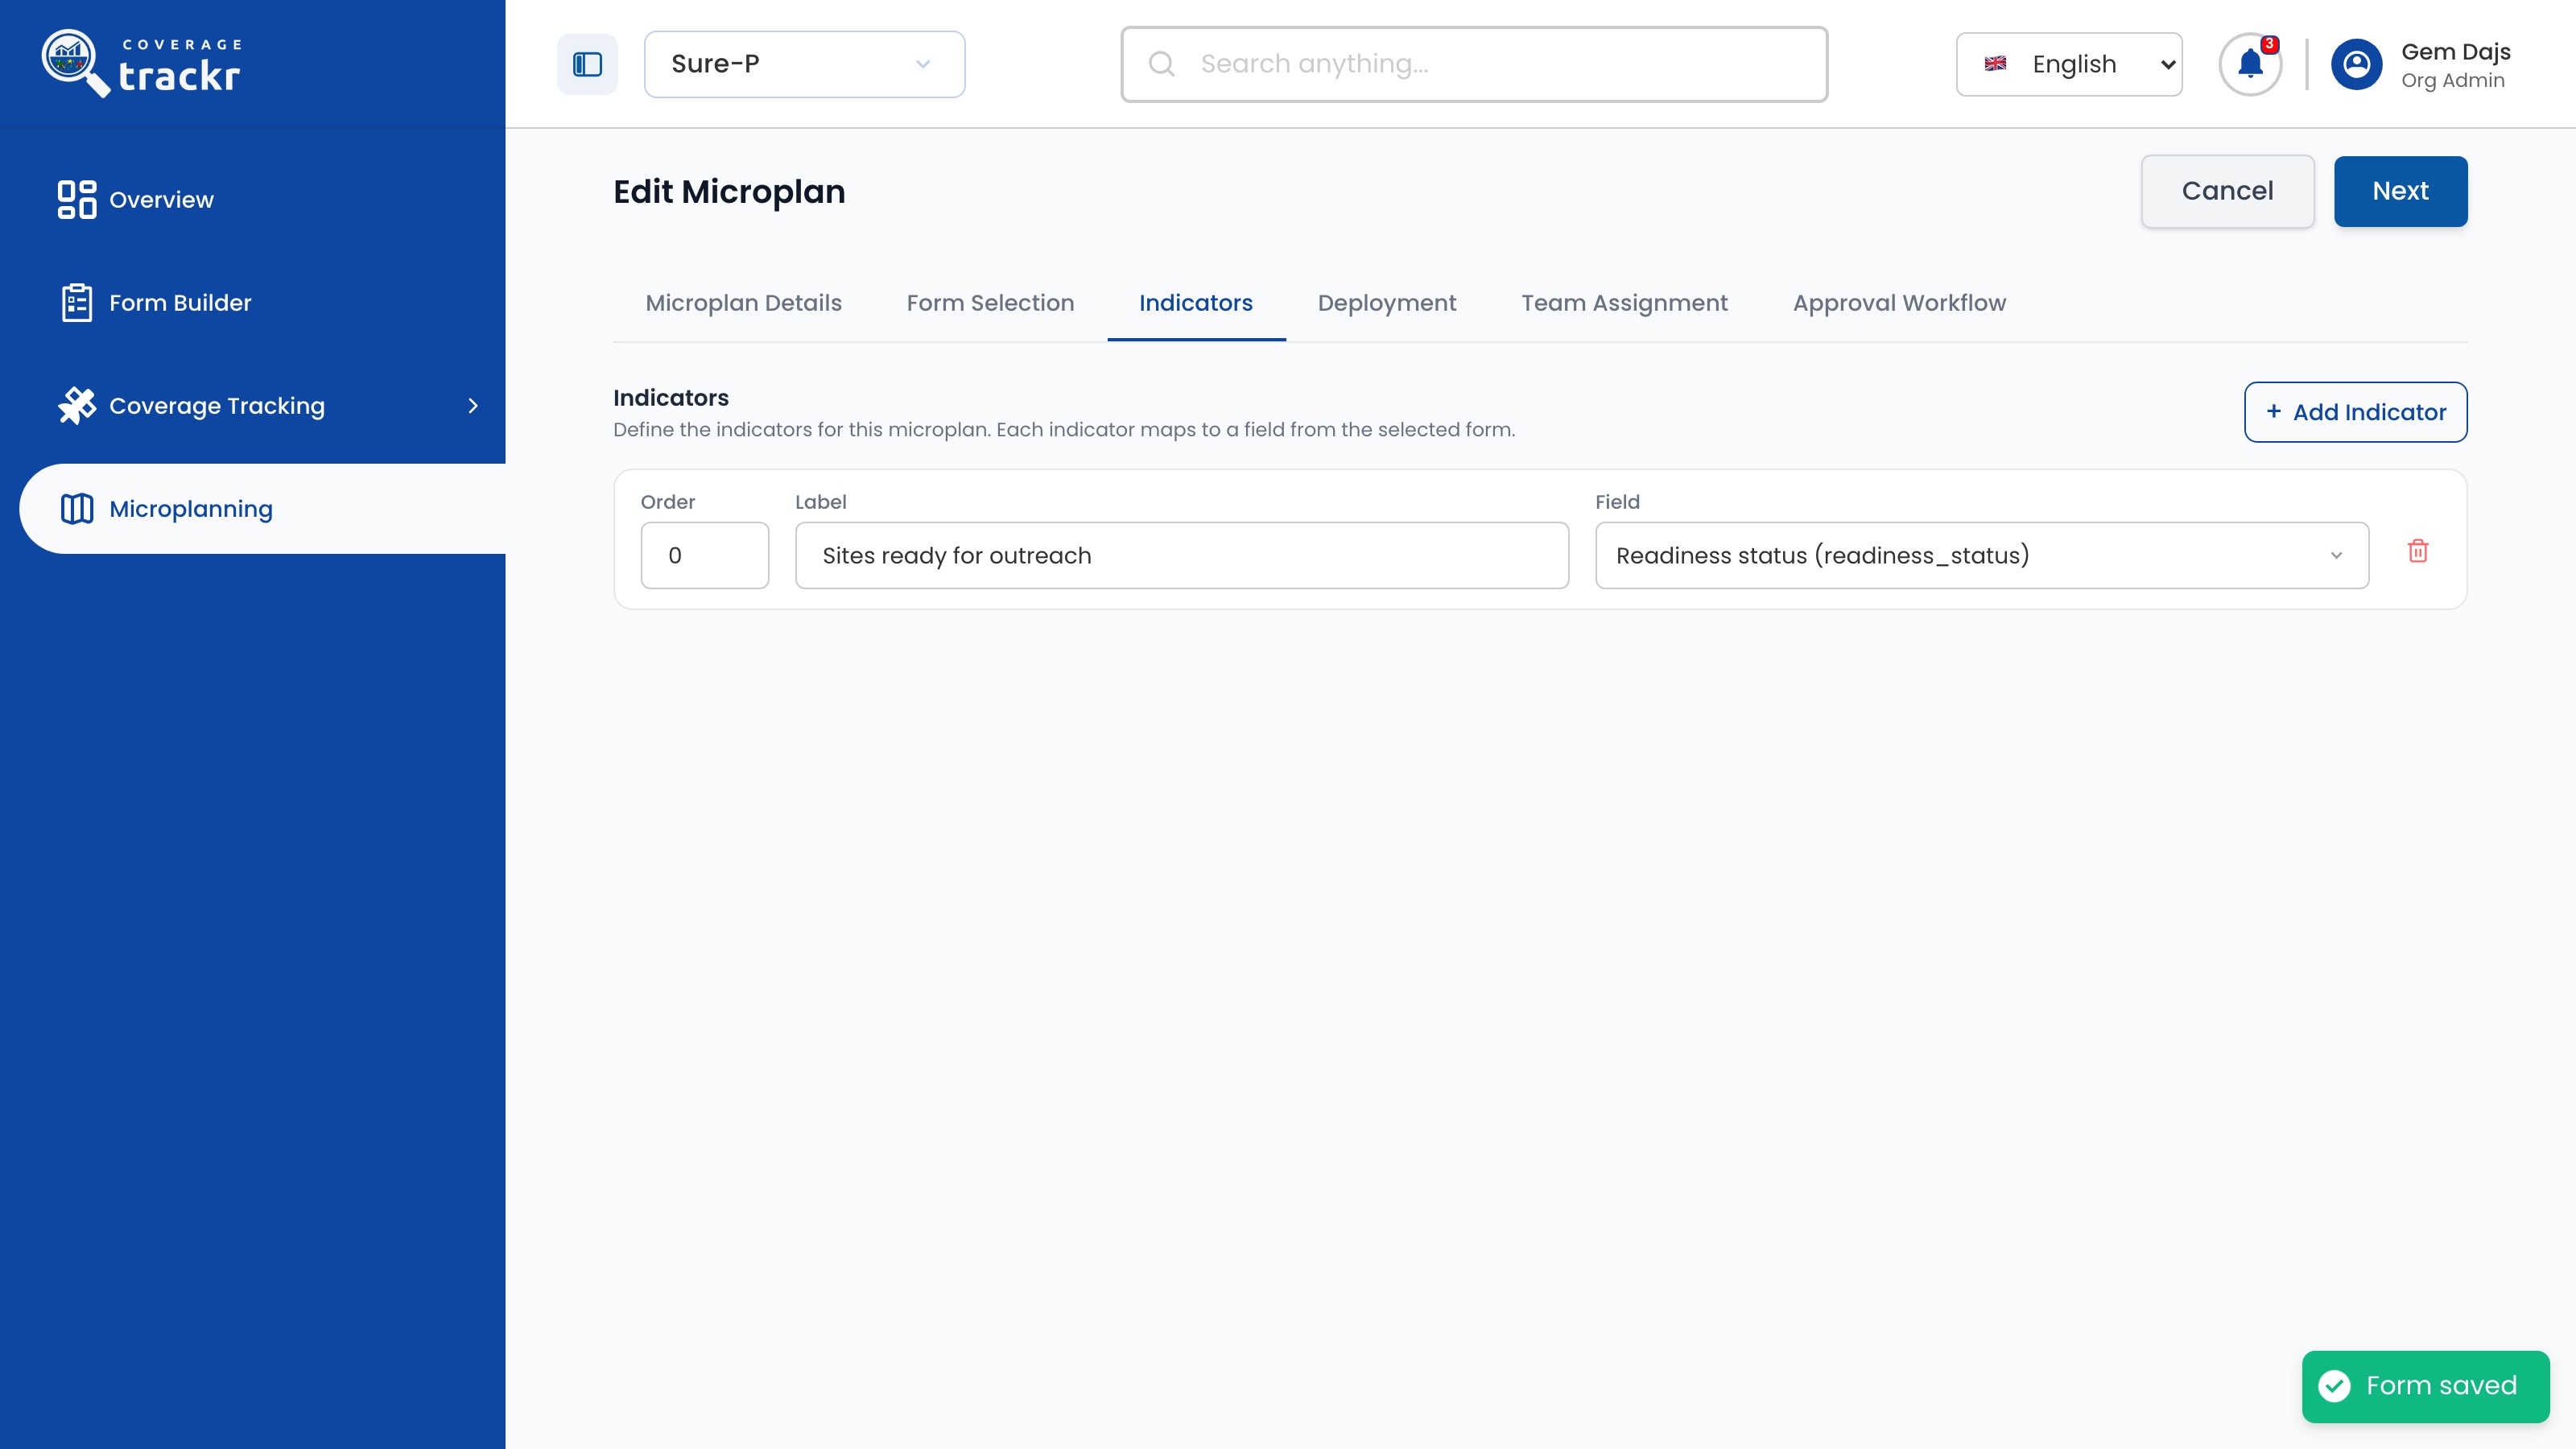
Add indicators

Select Add Indicator, enter a Label and choose the form Field it counts. Select Next.

Indicator Sites ready for outreach mapped to the Readiness status field

1 — add indicator · 2 — indicator definition · 3 — next.

Indicator Sites ready for outreach mapped to the Readiness status field

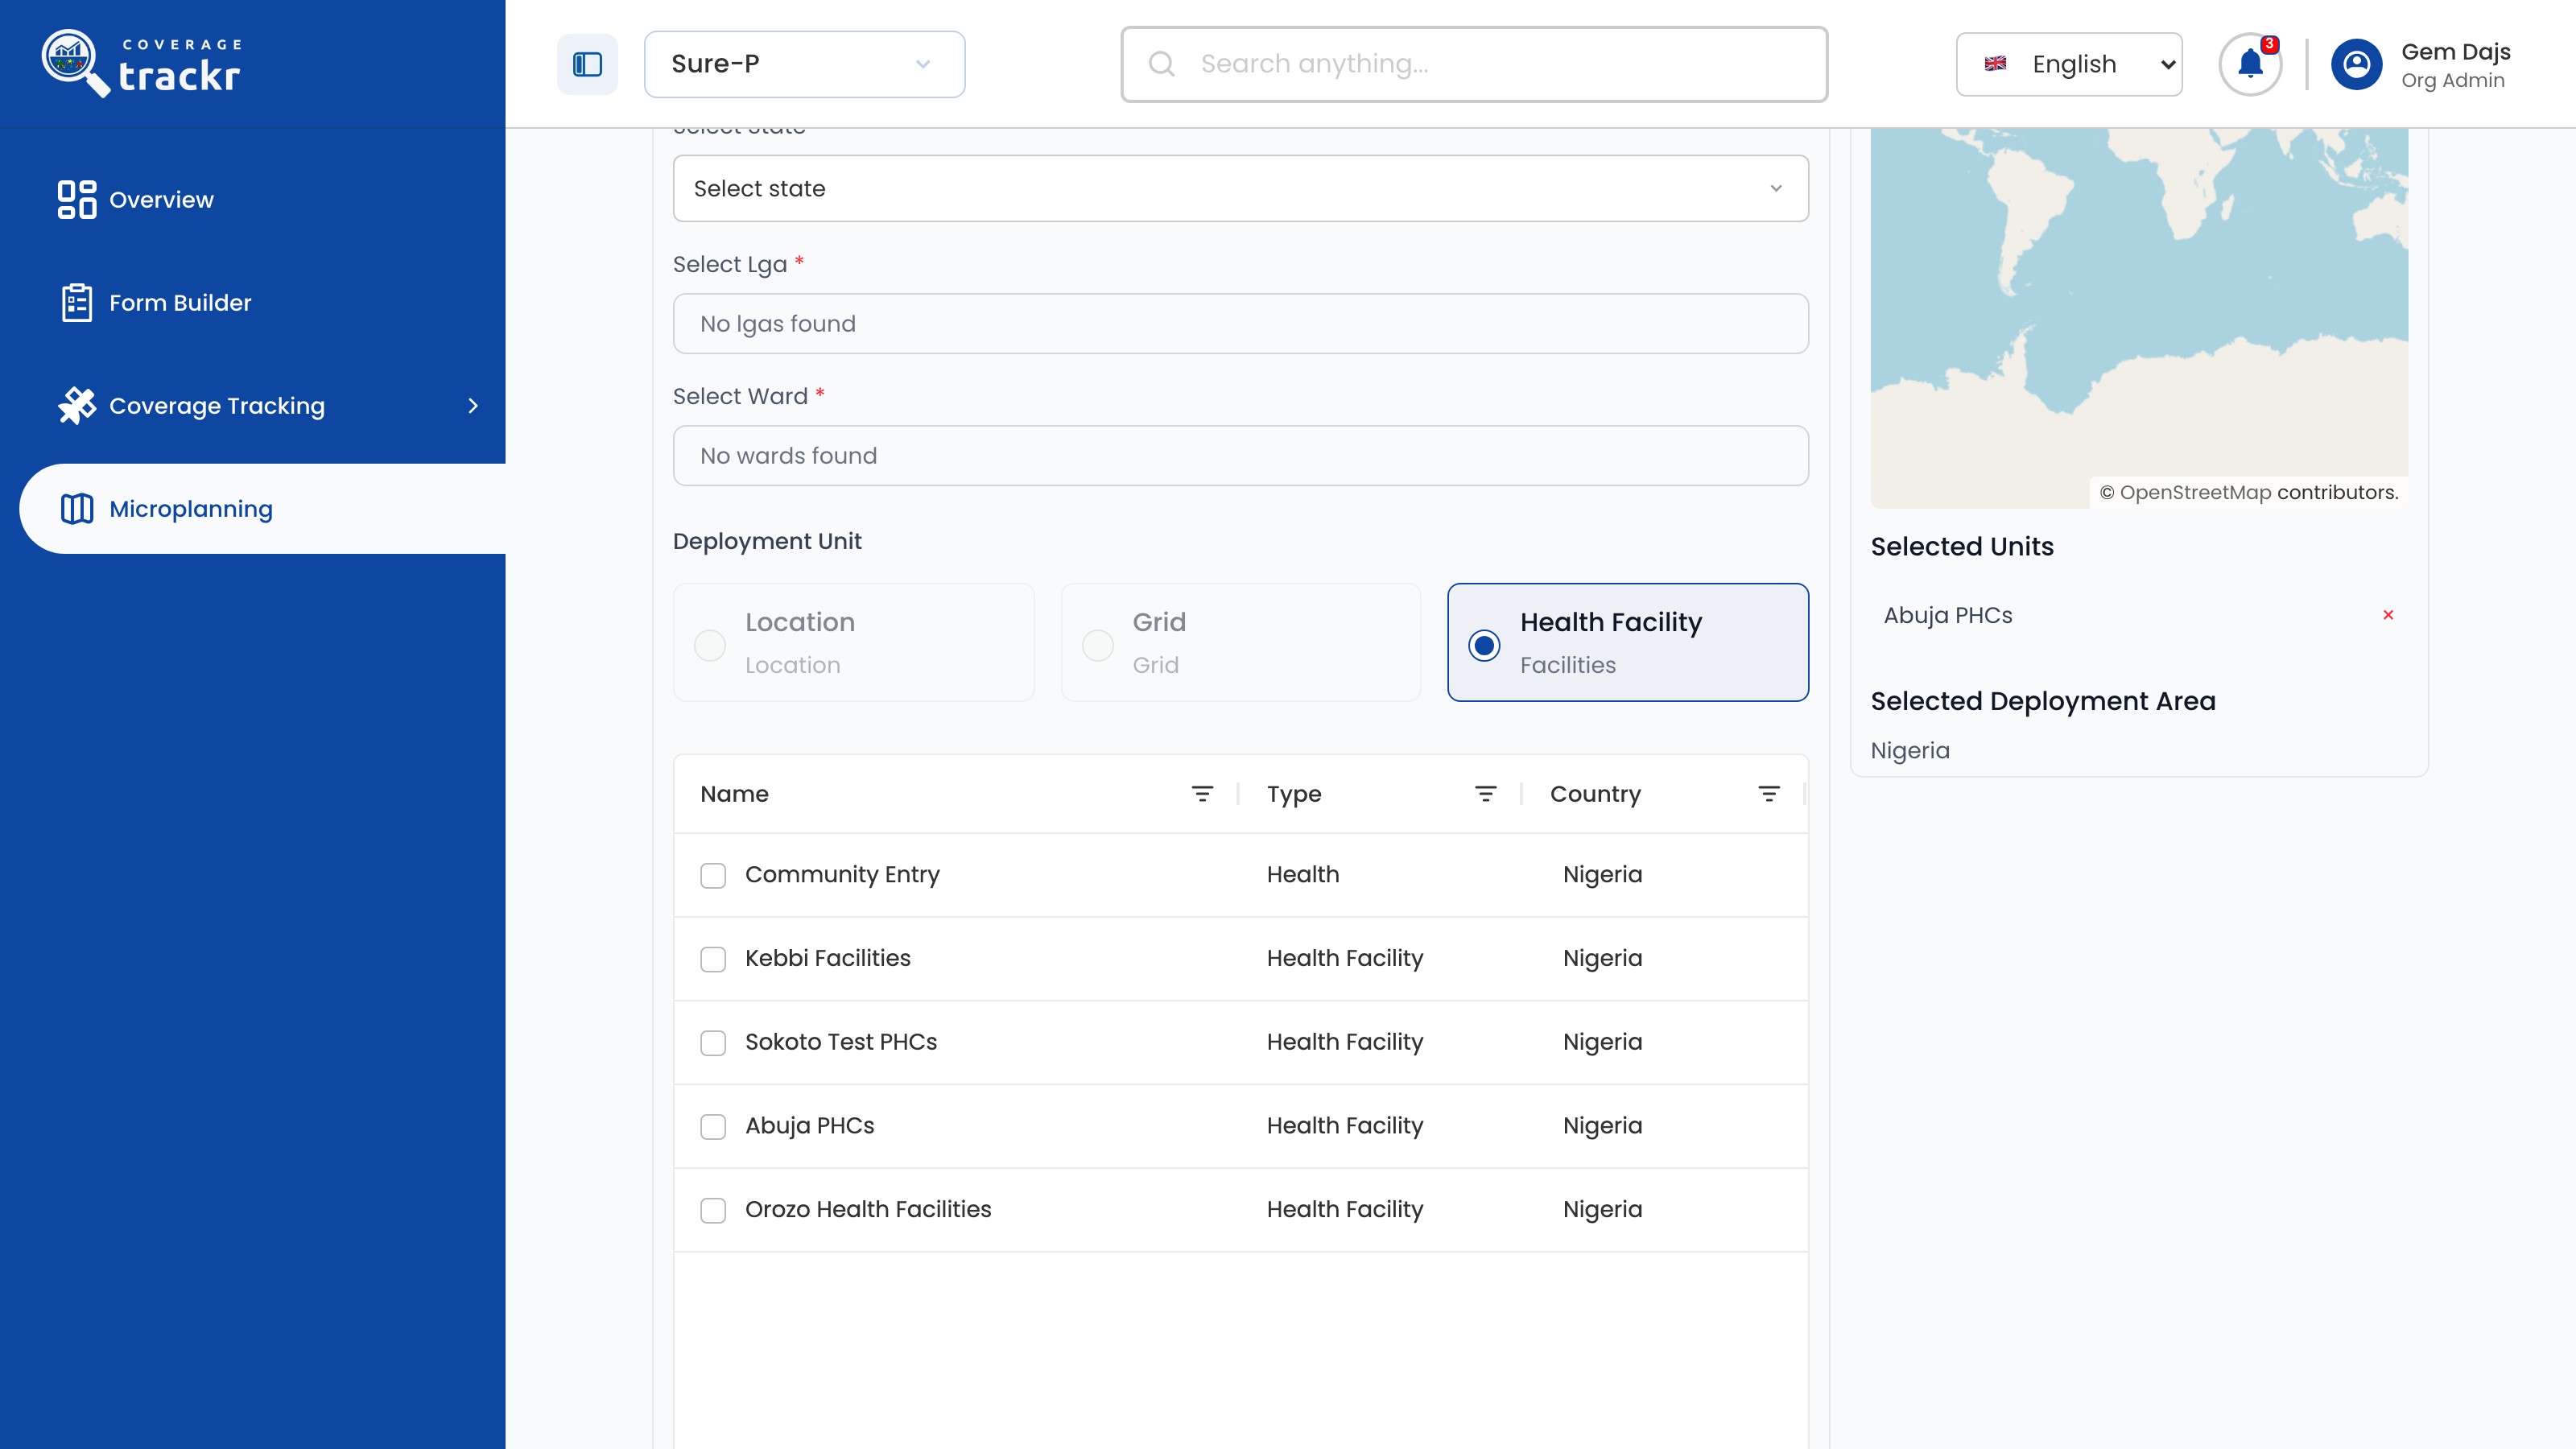
Choose the facilities

On Deployment, choose the country and level, keep Health Facility as the Deployment Unit and tick the facility group. Check it under Selected Units, then select Next.

Deployment with Health Facility selected and Abuja PHCs under Selected Units

1 — health facility · 2 — facility groups · 3 — selected units.

Deployment with Health Facility selected and Abuja PHCs under Selected Units

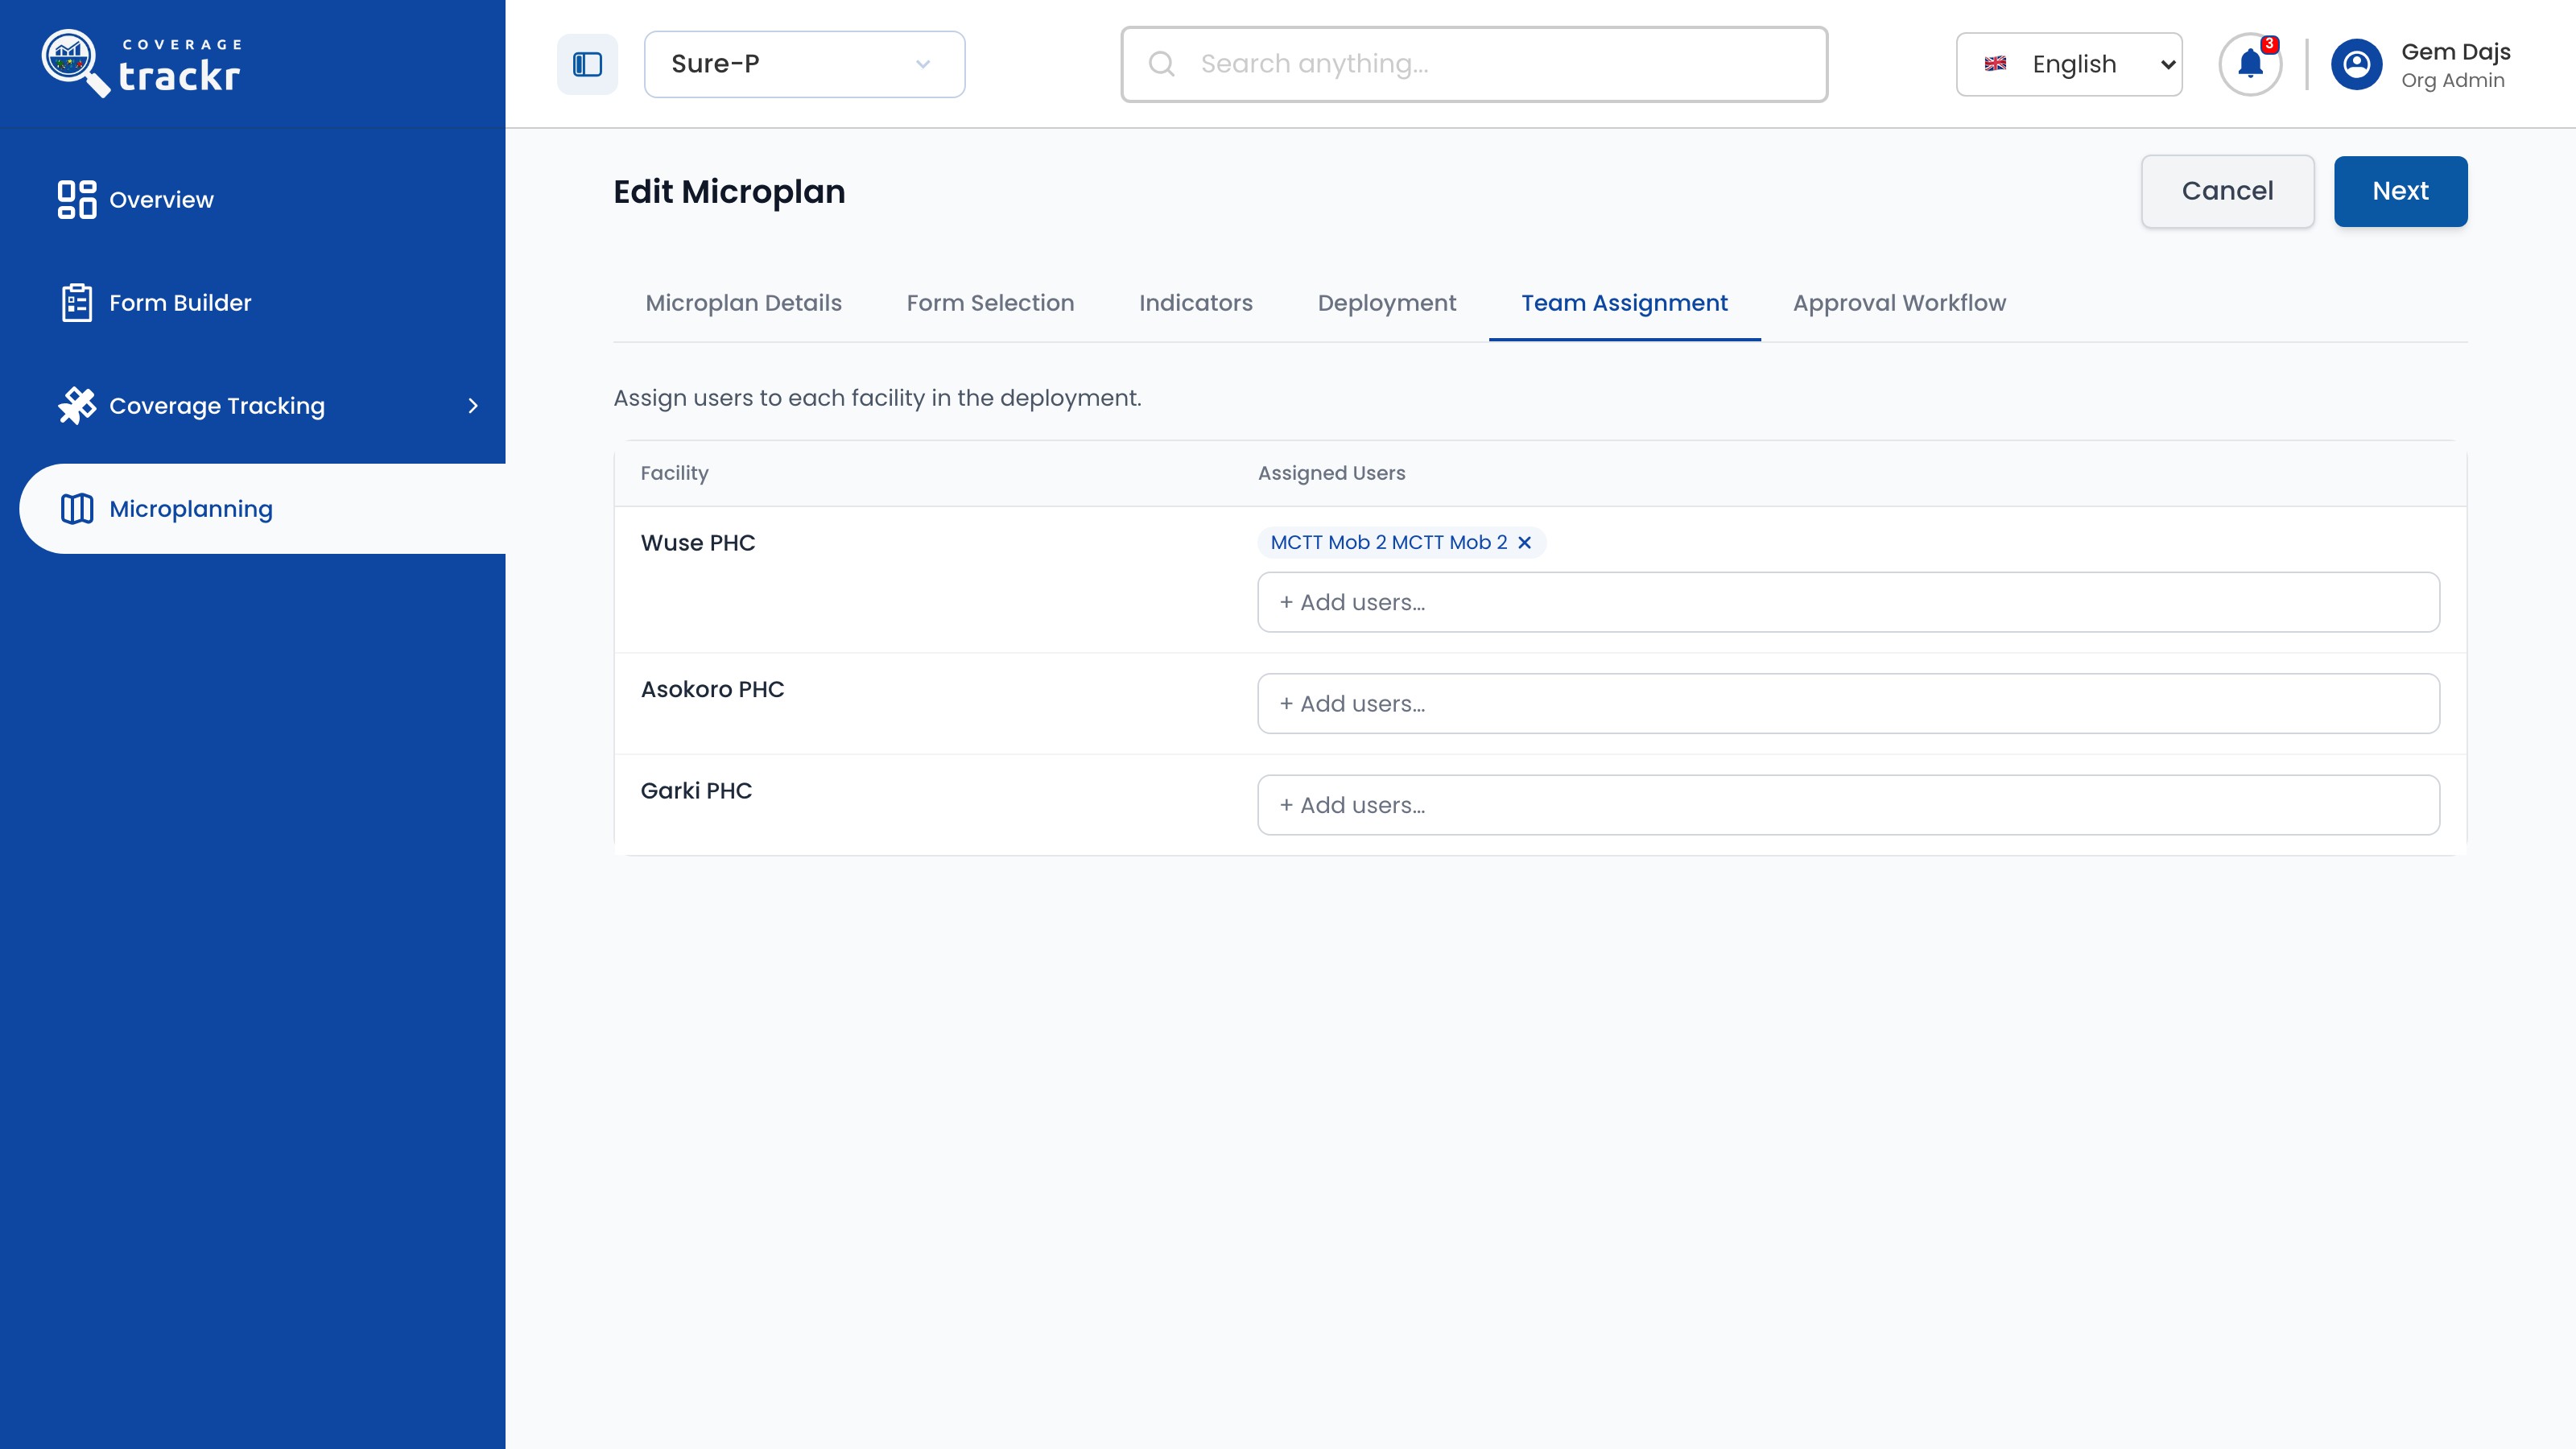
Assign people to facilities

On Team Assignment, use + Add users… beside each facility to choose who covers it.

Team Assignment with a user assigned to Wuse PHC

1 — facility assignments · 2 — add users.

Team Assignment with a user assigned to Wuse PHC

Add an approval stage

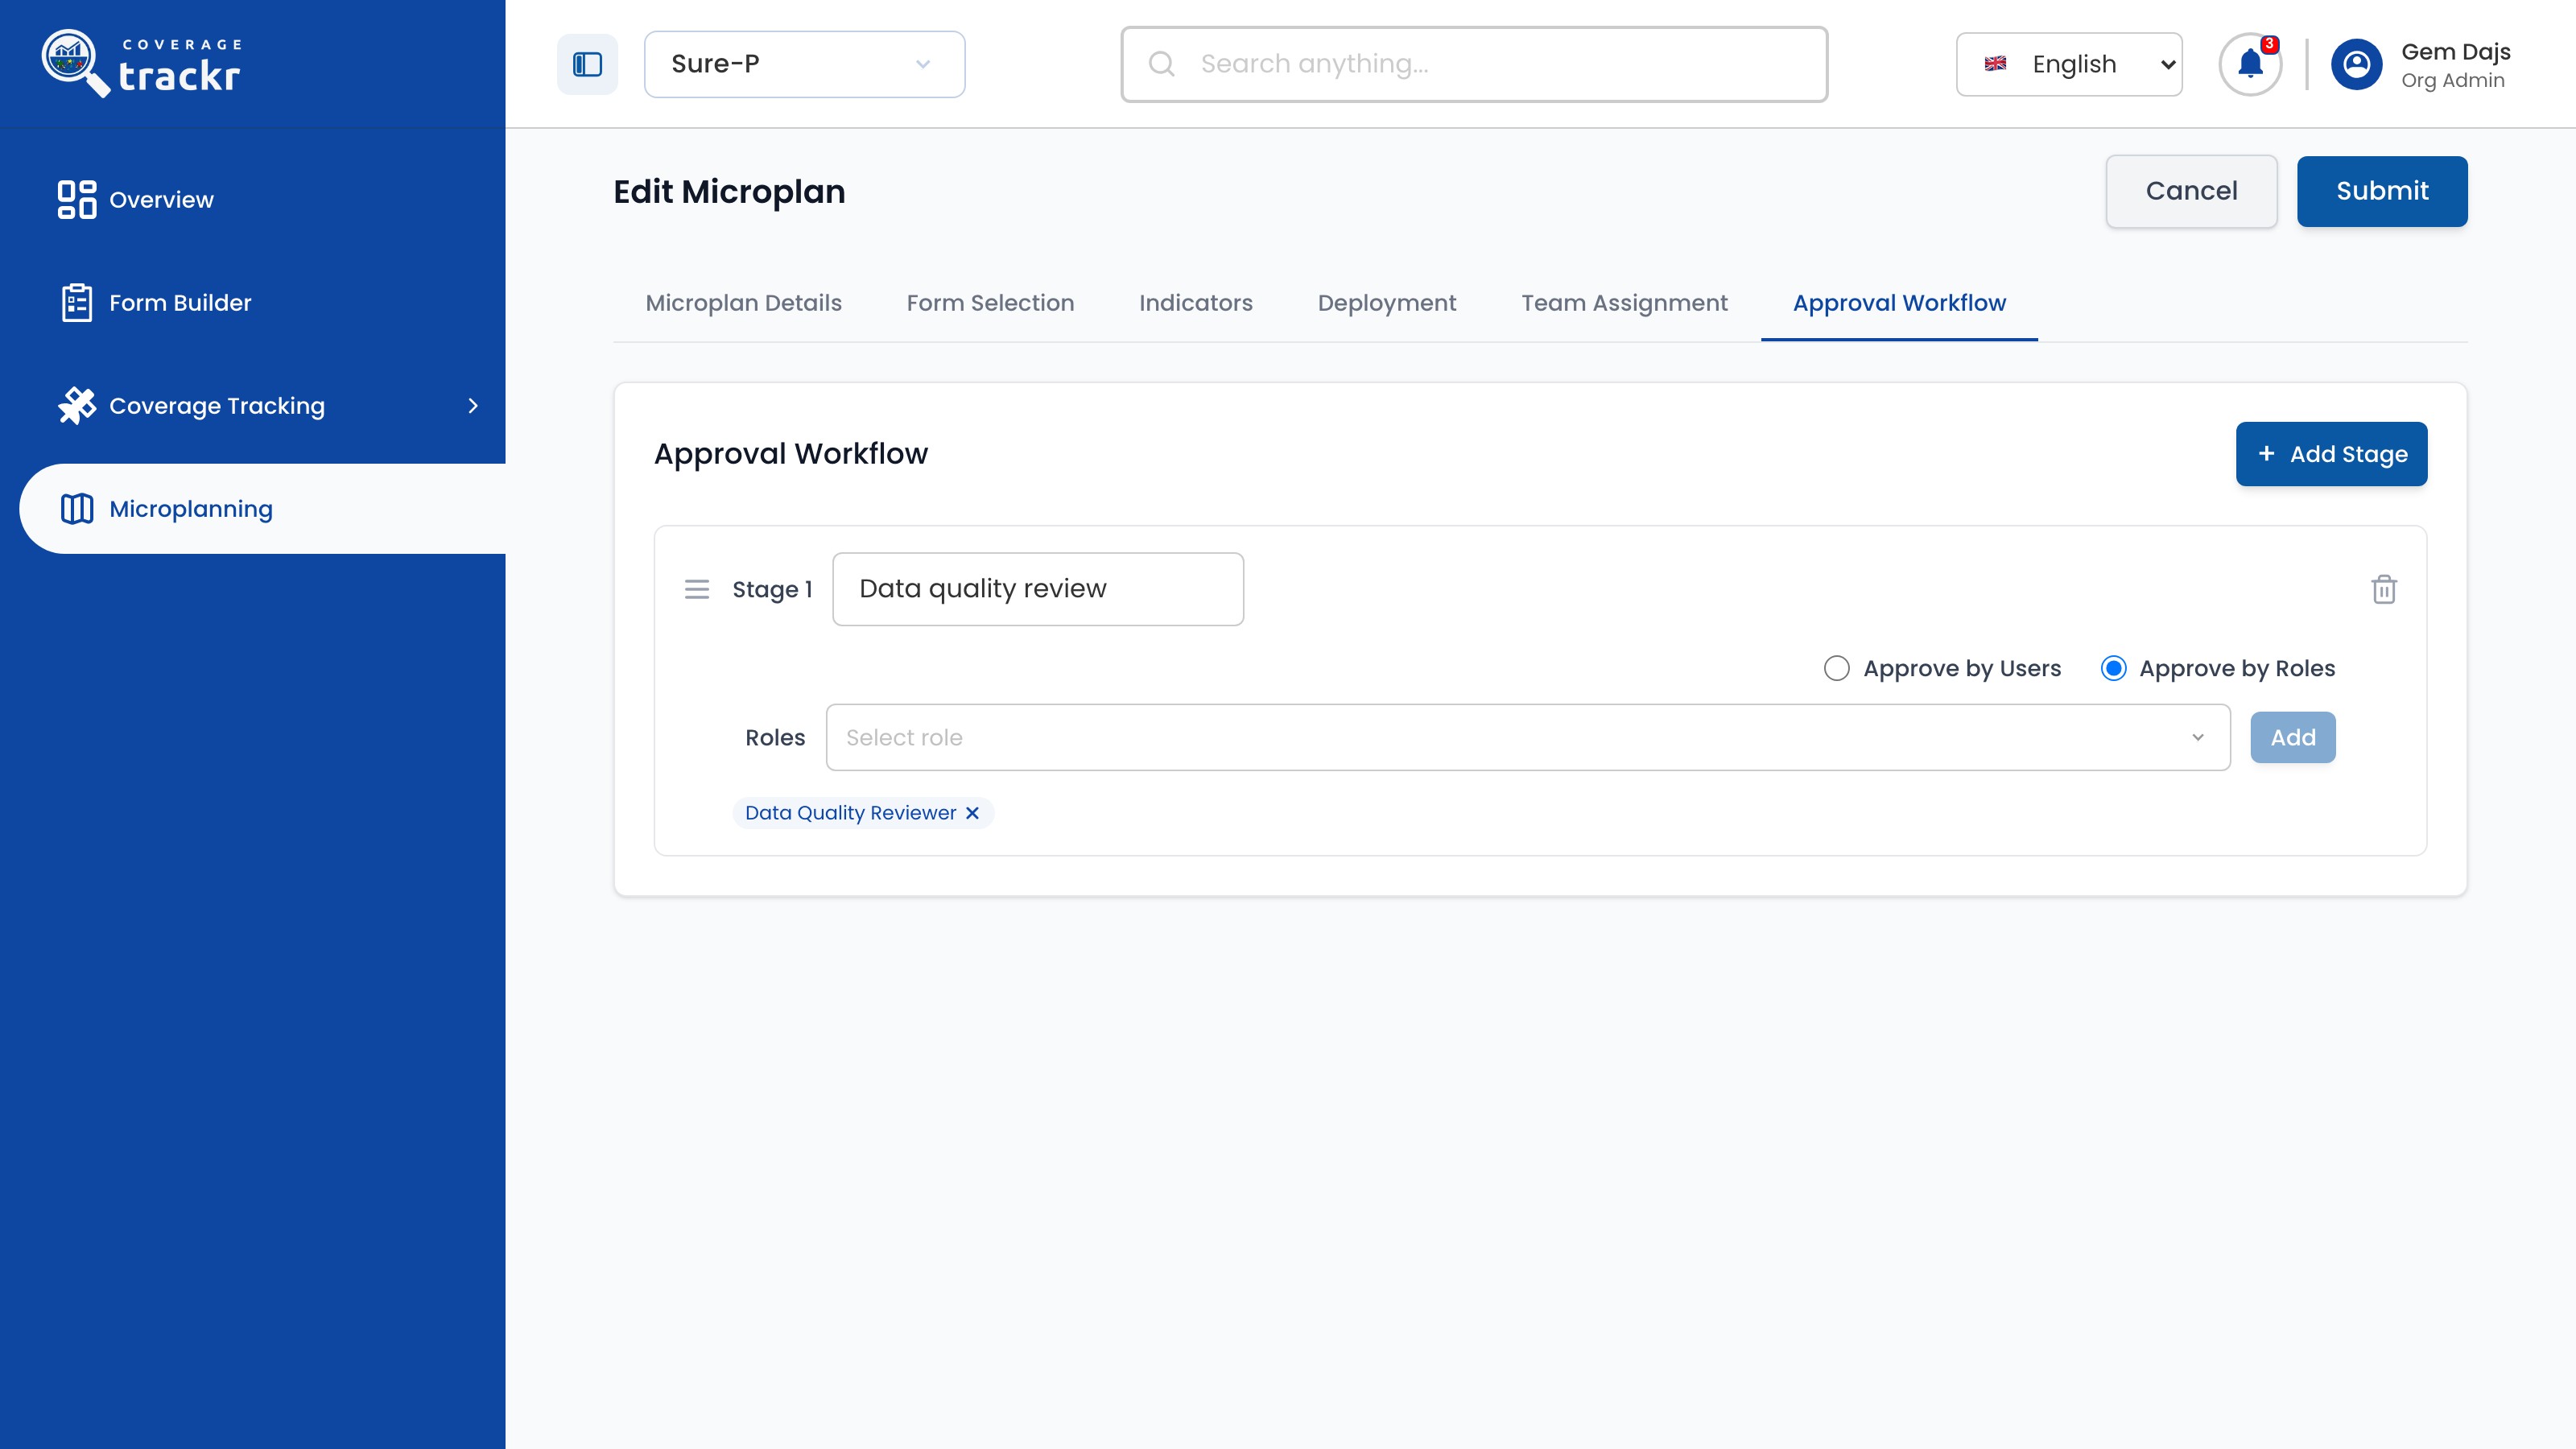
On Approval Workflow, select Add Stage, name it, choose Approve by Roles, pick the role and select Add.

Approval stage Data quality review with the Data Quality Reviewer role

1 — add stage · 2 — stage and approver · 3 — submit.

Approval stage Data quality review with the Data Quality Reviewer role

Submit the set-up

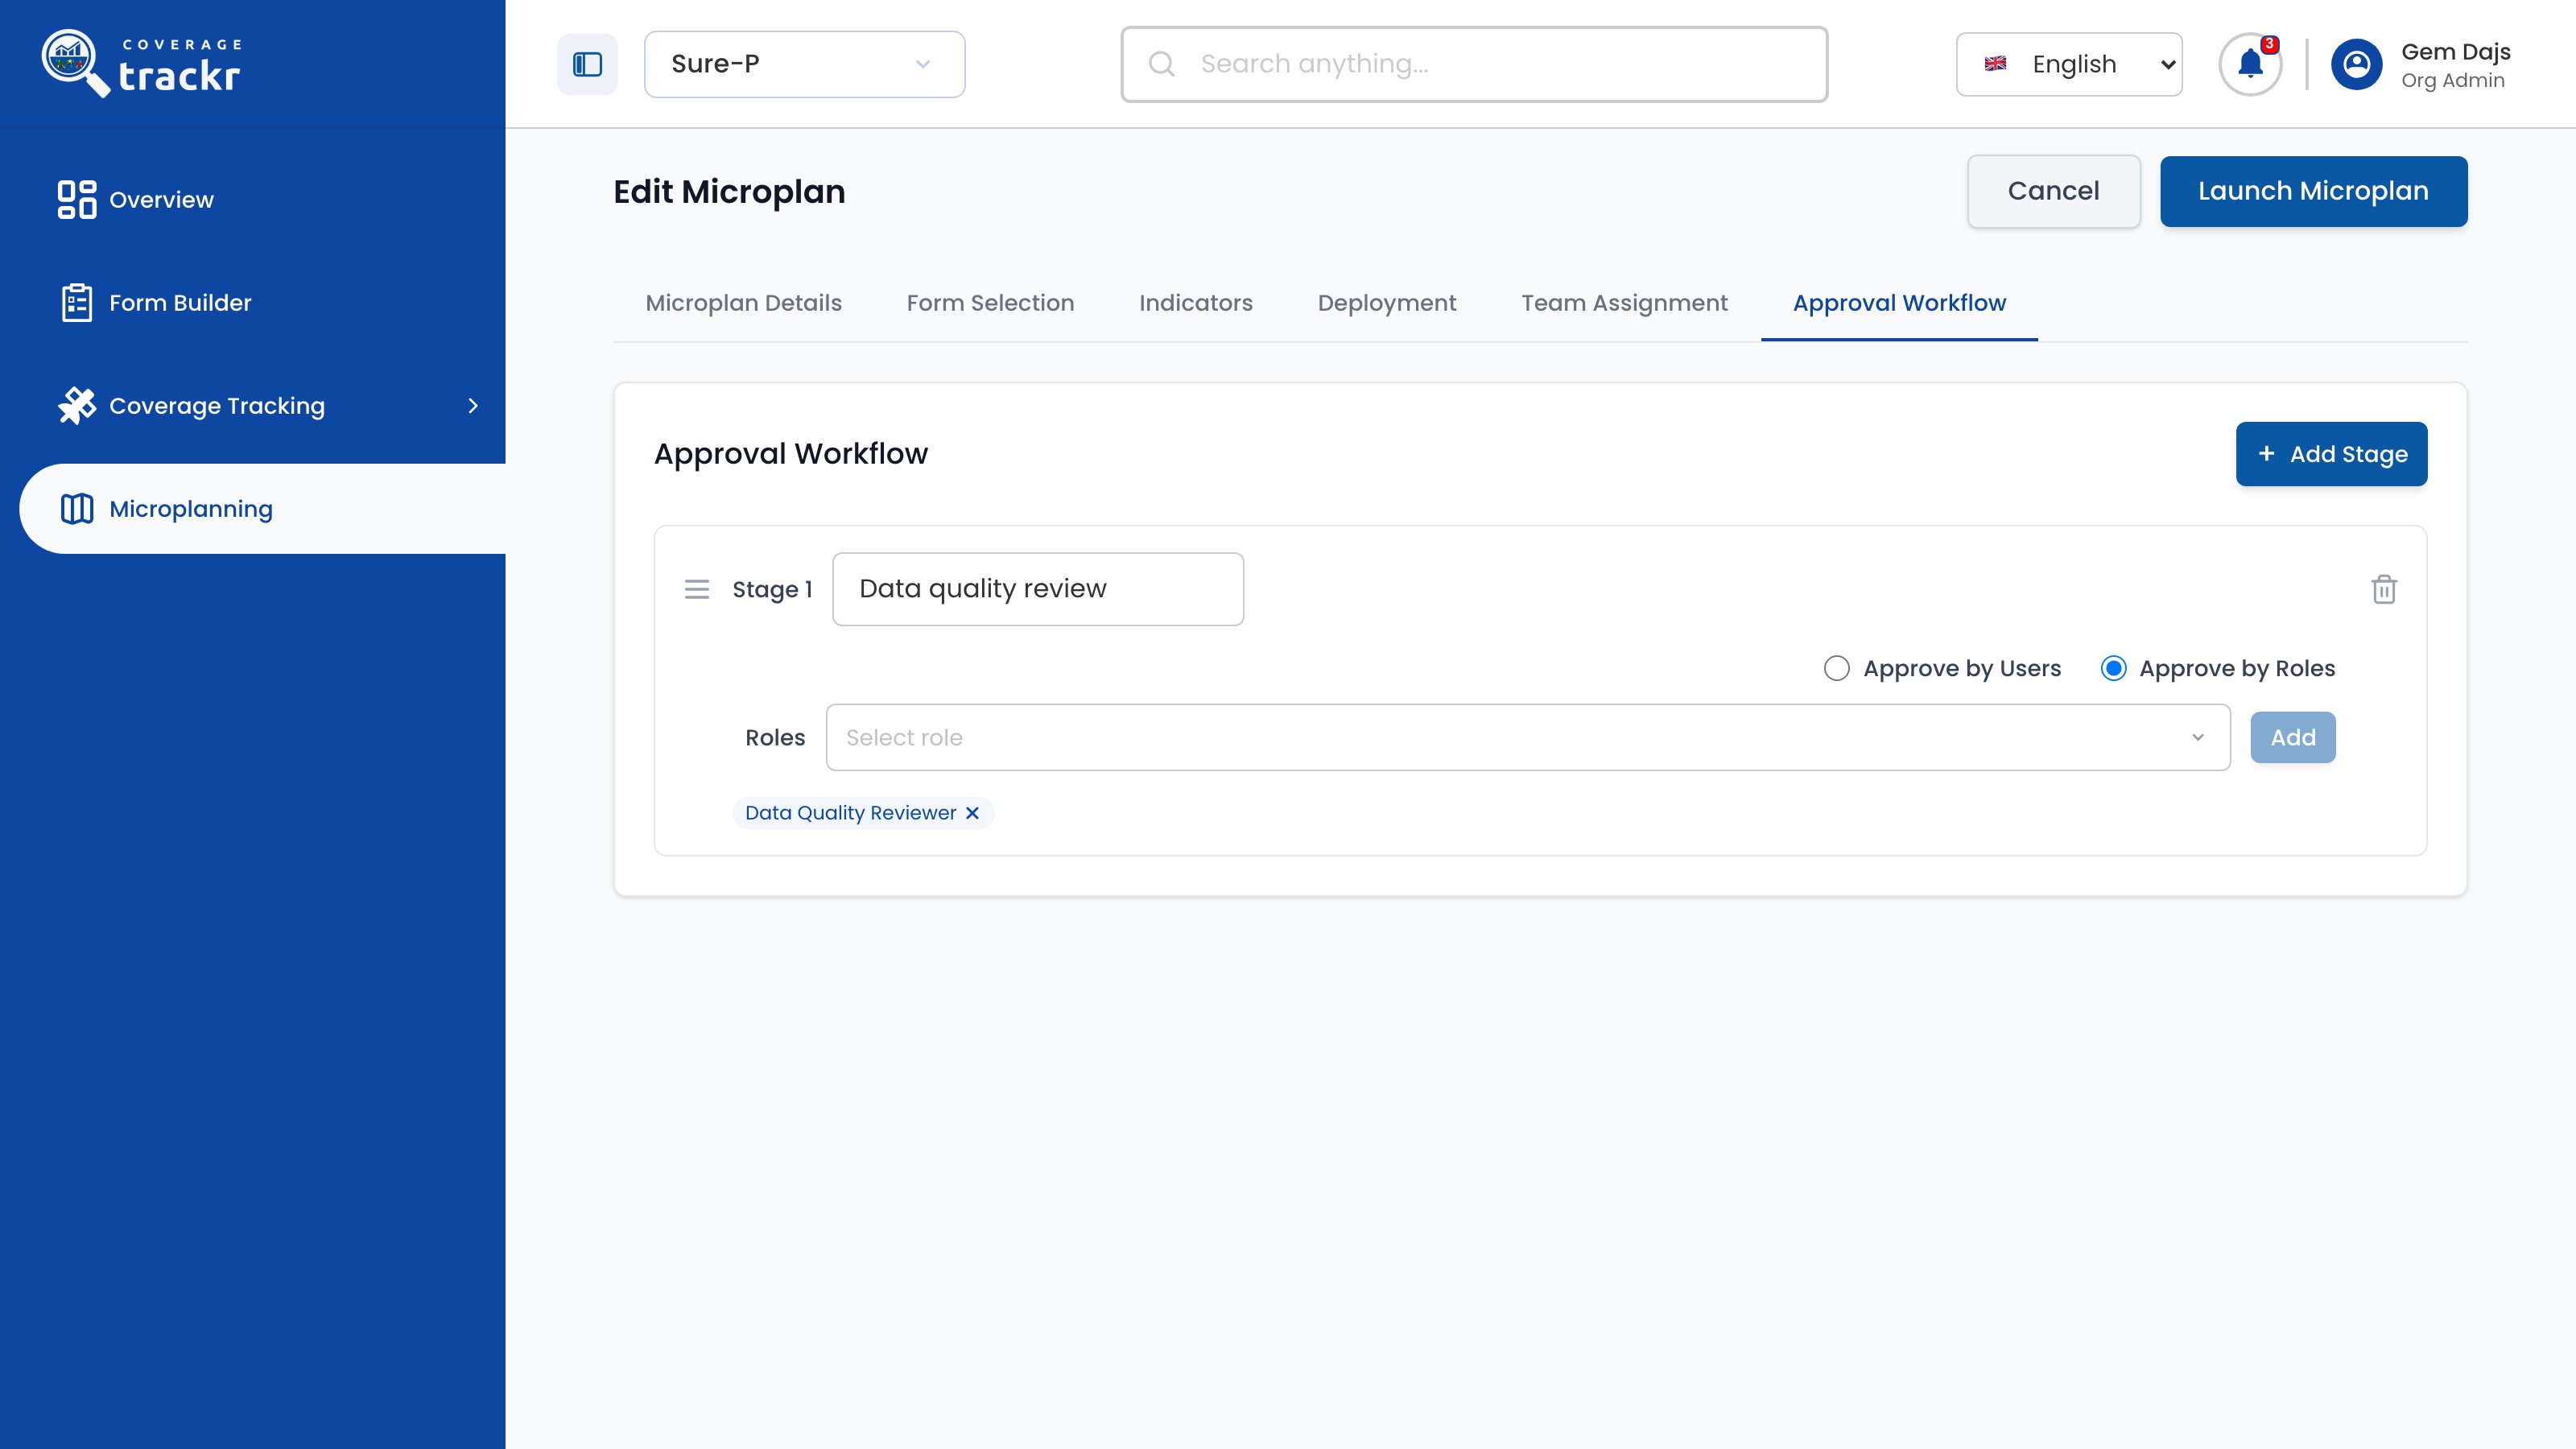
Select Submit. The button changes to Launch Microplan when the set-up is saved.

Saved approval workflow with the Launch Microplan button

1 — saved approval stage · 2 — launch microplan.

Saved approval workflow with the Launch Microplan button

Done. The approval stage is saved and Launch Microplan is available.

If something goes wrong

Which deployment unit should I choose?

Choose Health Facility to plan by facility group. The facilities in the group then appear on Team Assignment.

Microplanning

Publish a microplan

Send a completed microplan to the assigned field users.

Organization Administrator 1 min read Web

Before you start

  • The microplan's set-up has been submitted.

Find the microplan

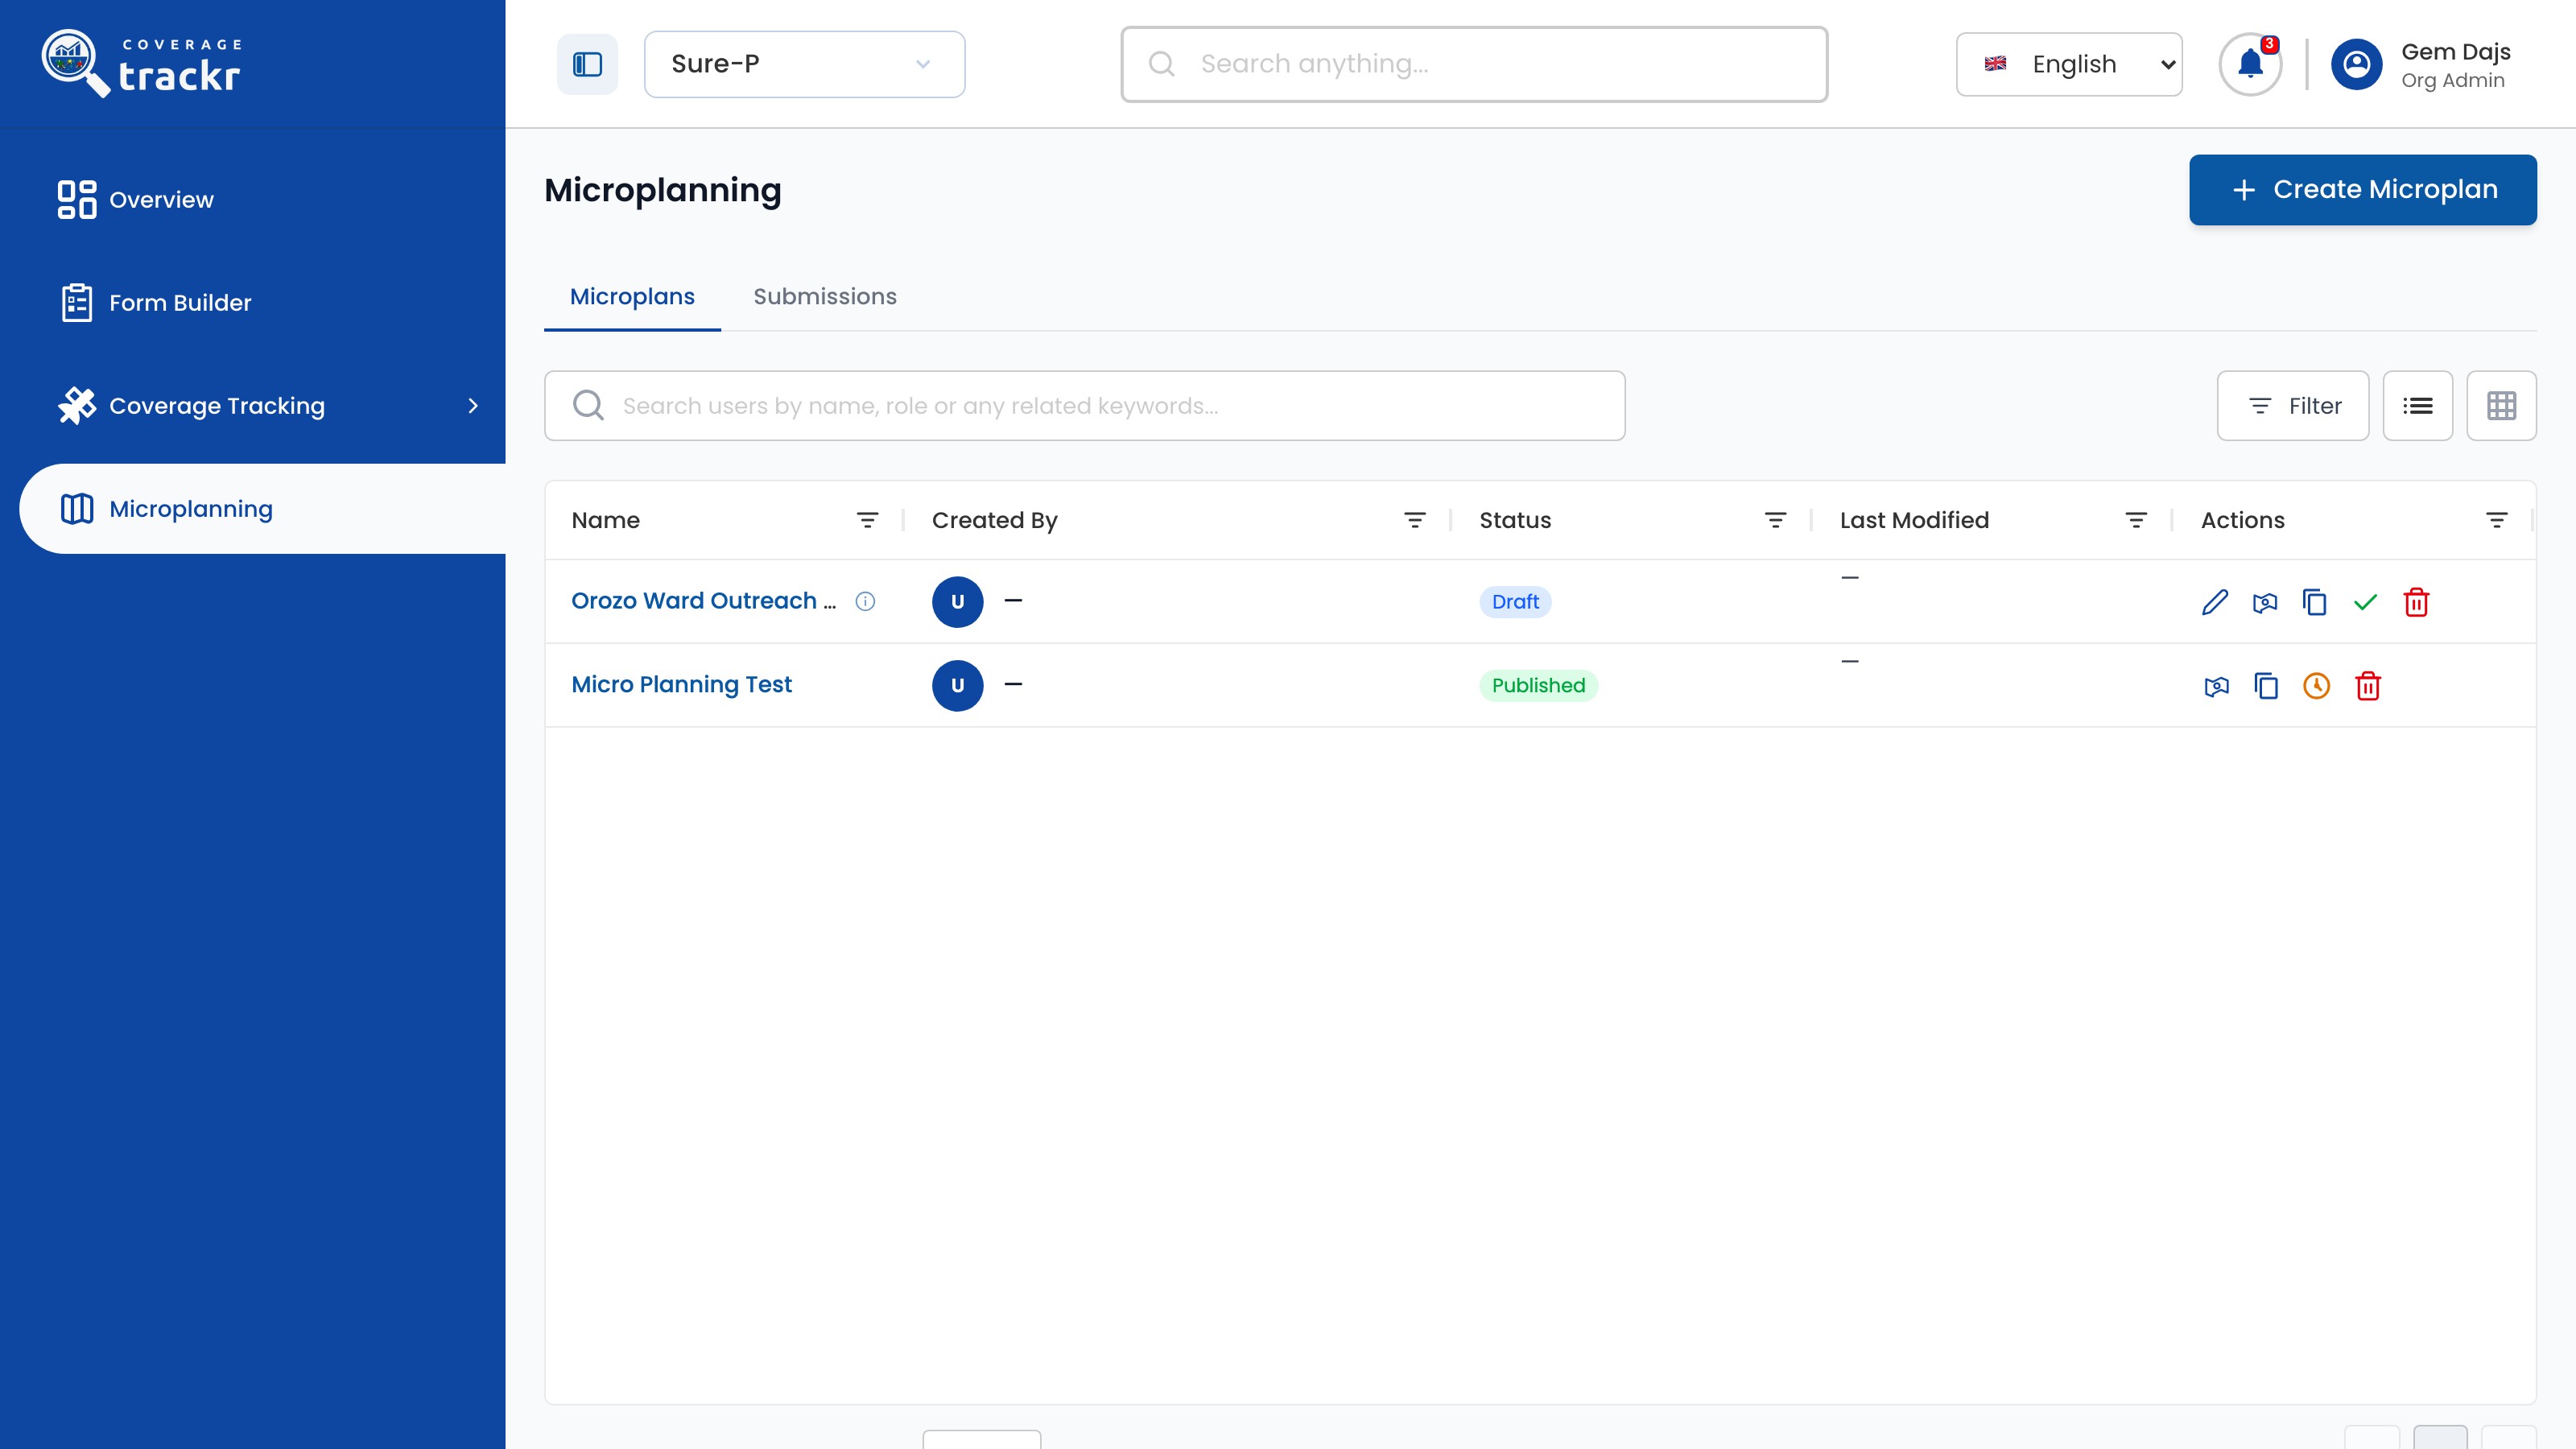
In Microplanning, select the Publish tick on the draft microplan.

Microplanning list with the draft microplan's Publish action

1 — draft microplan · 2 — publish action.

Microplanning list with the draft microplan's Publish action

Confirm publishing

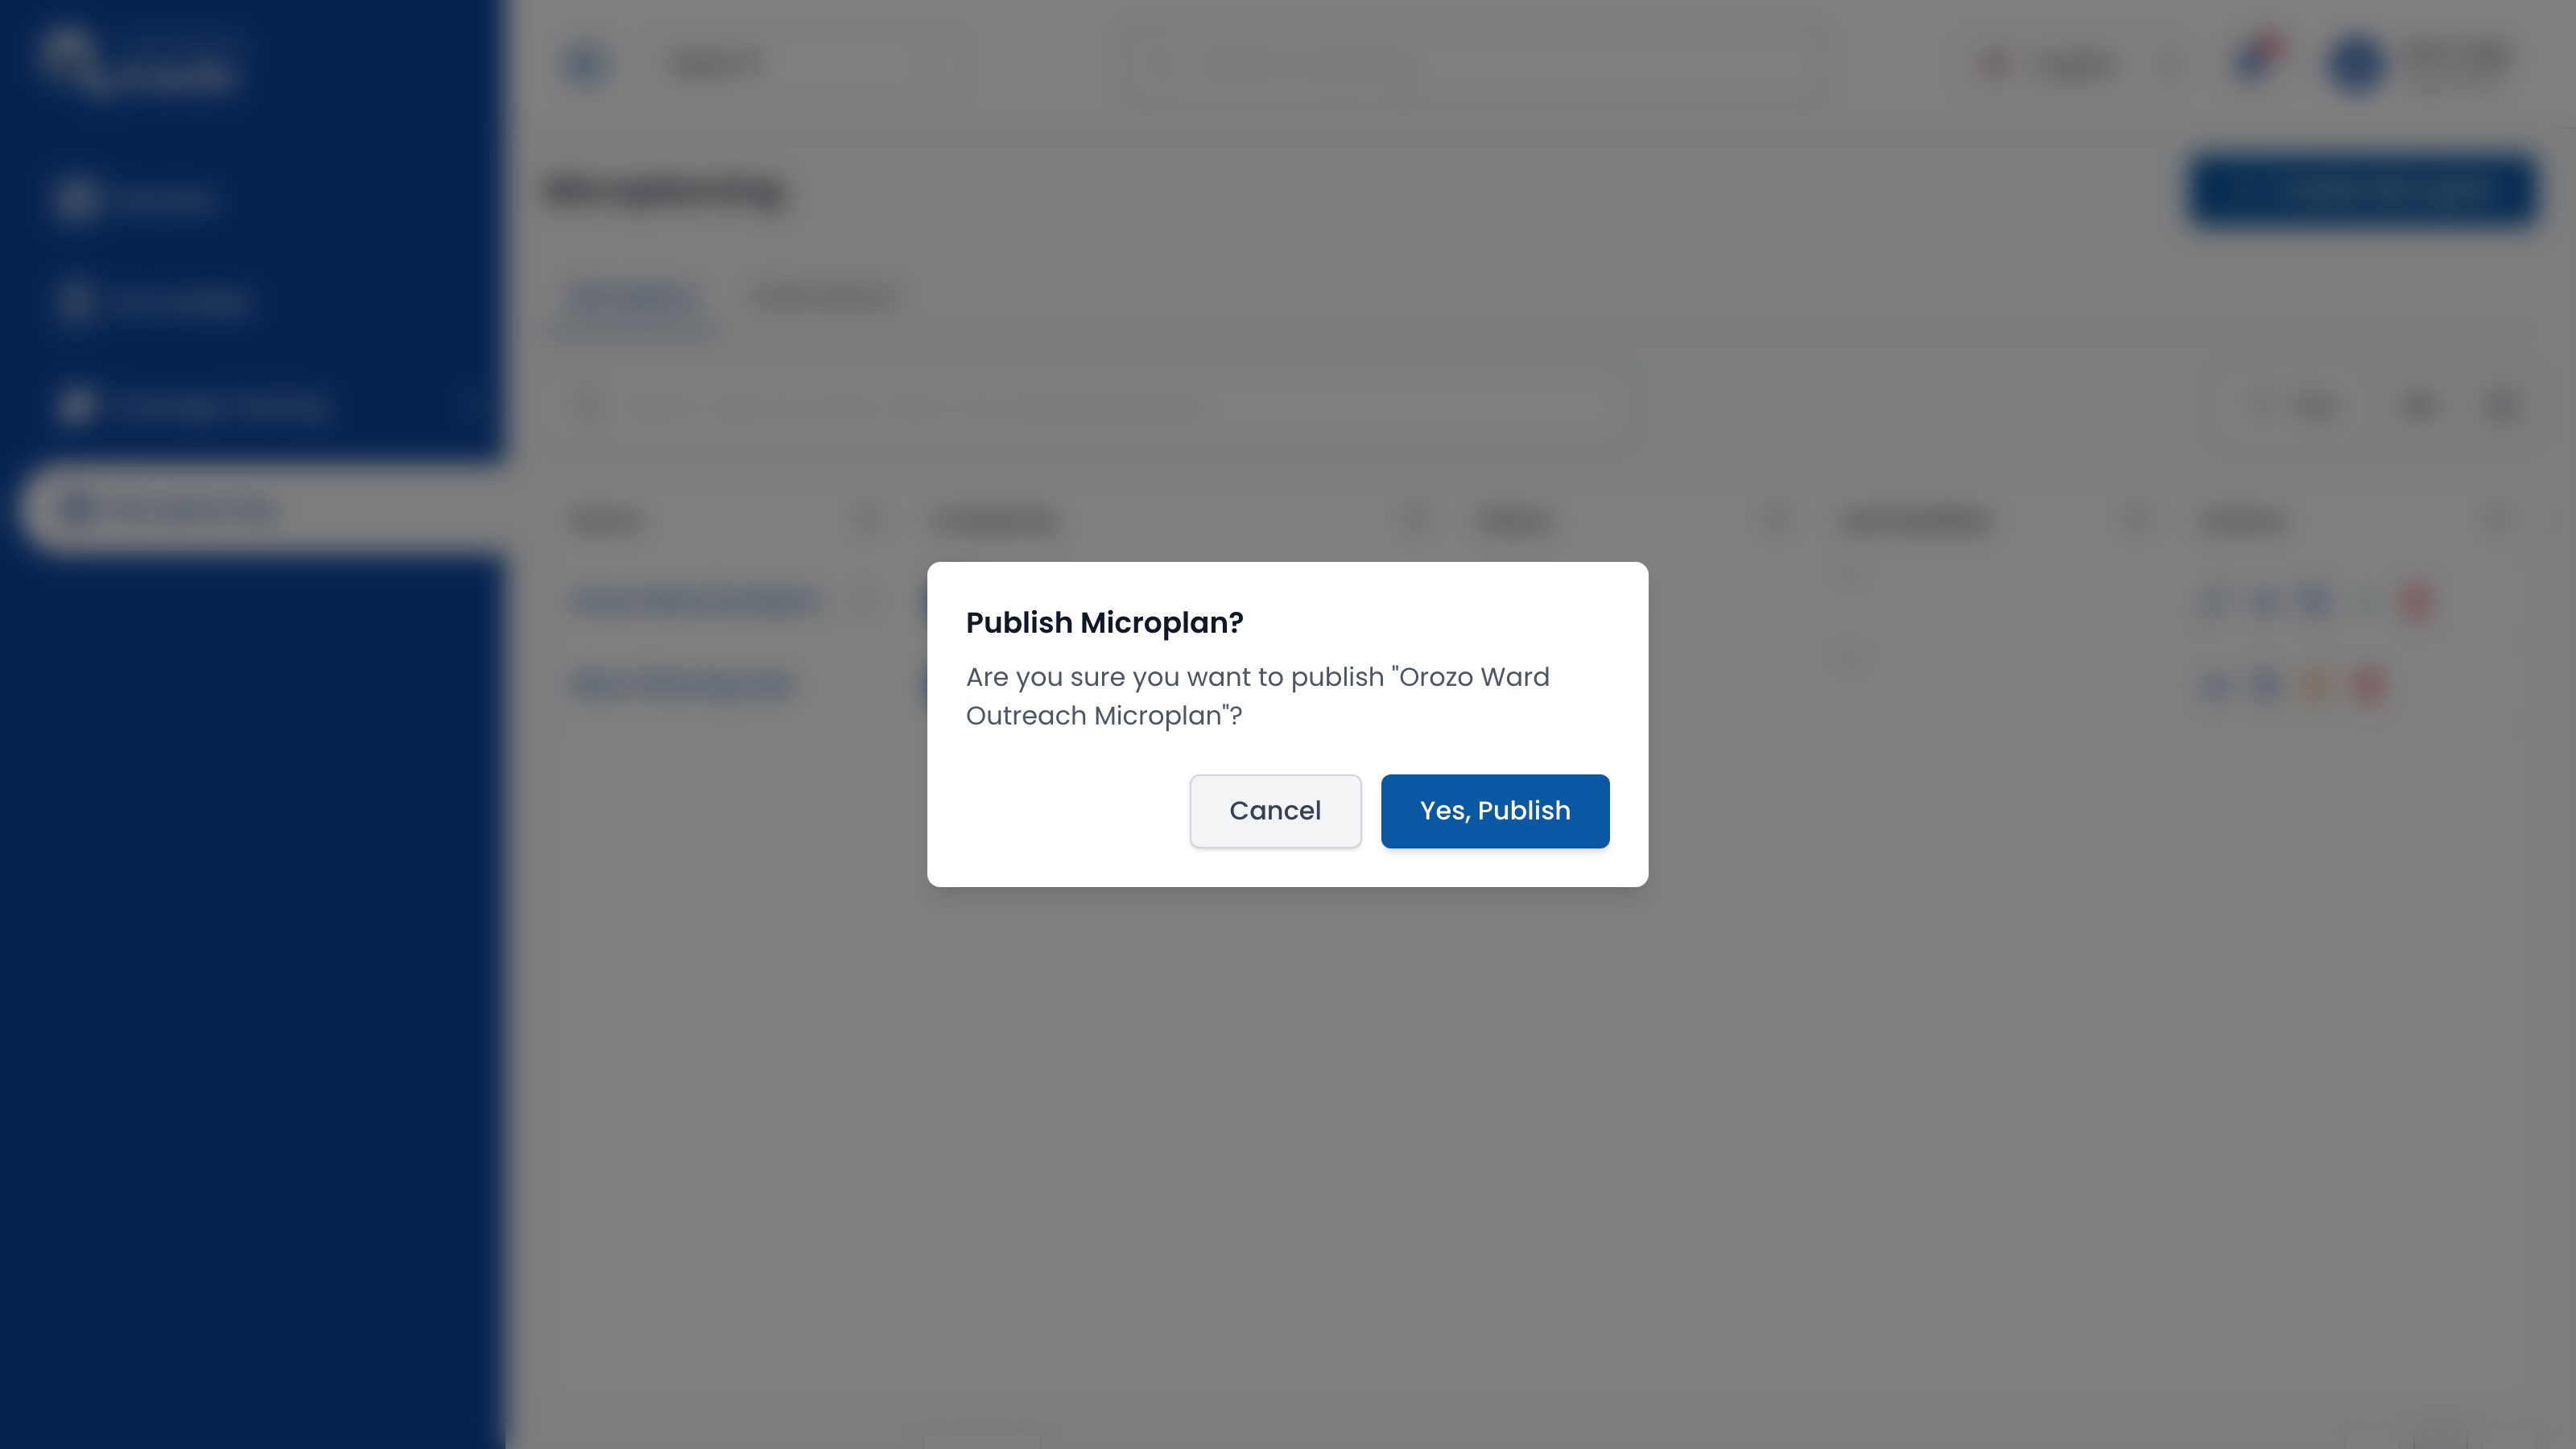
In Publish Microplan?, select Yes, Publish.

Publish Microplan confirmation dialog

1 — publish confirmation · 2 — yes publish.

Publish Microplan confirmation dialog

Check the status

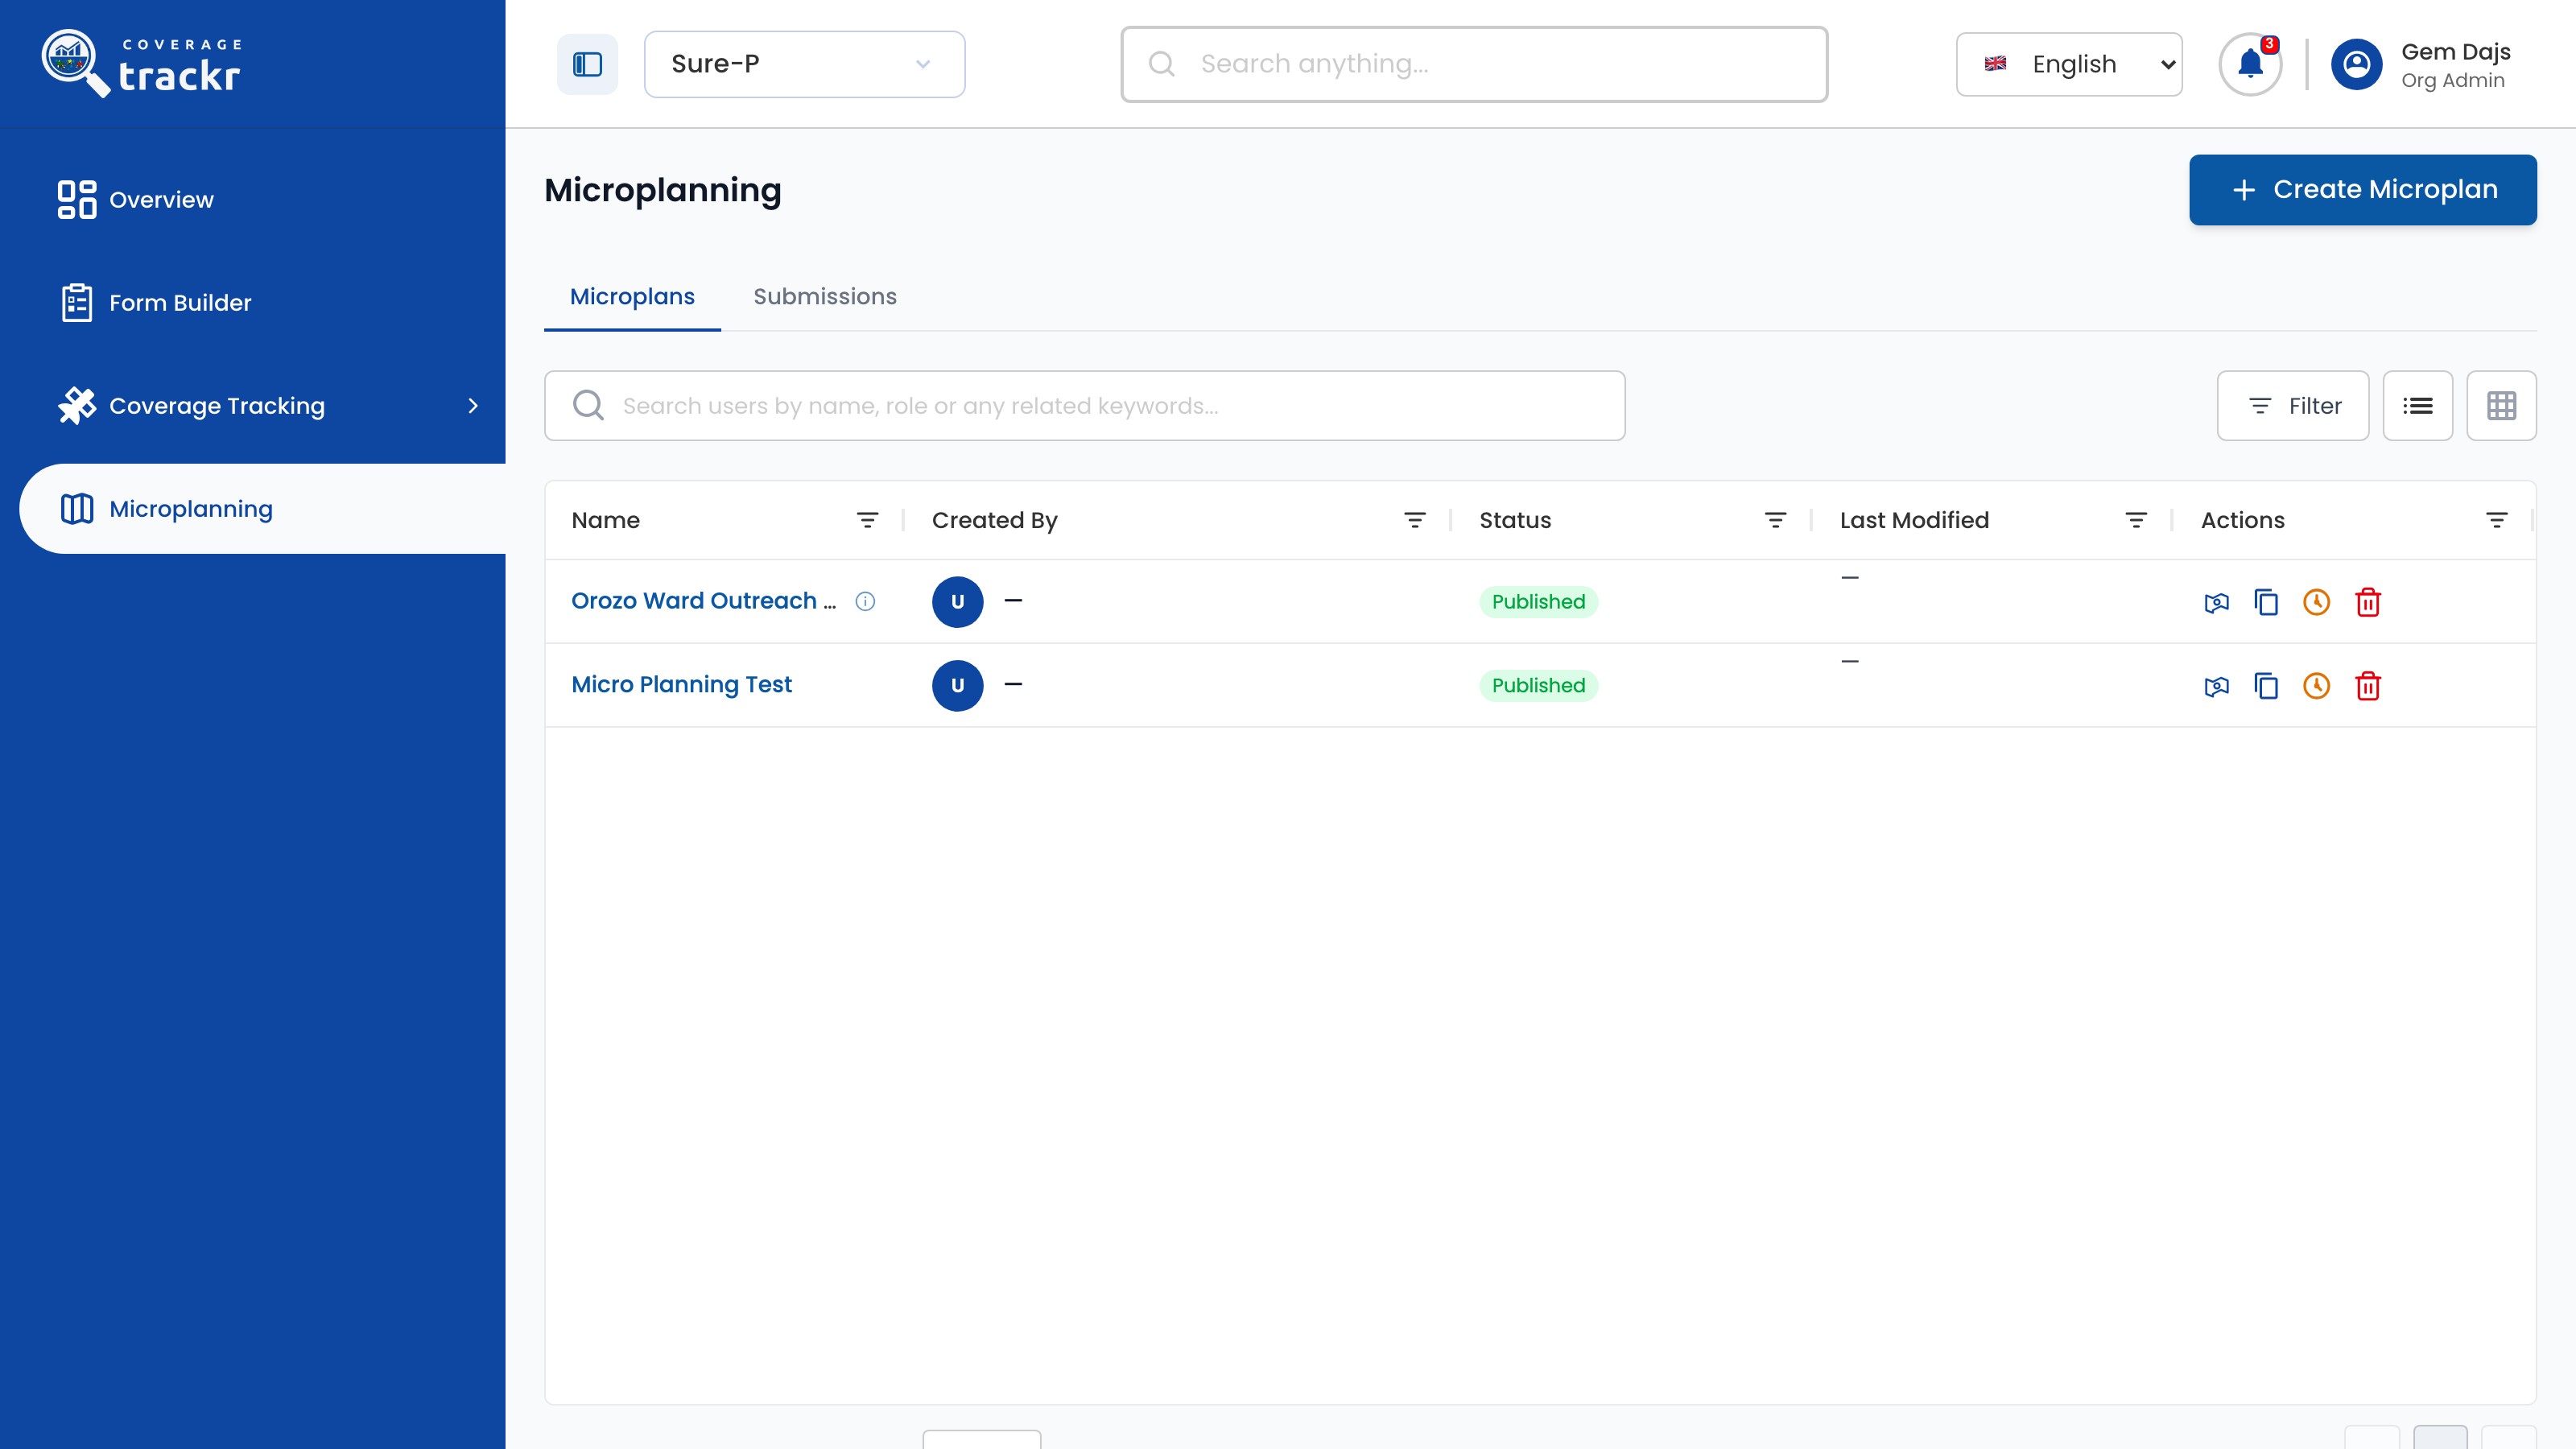
Check that the microplan shows Published.

Microplanning list with the microplan marked Published and a success message

1 — published status · 2 — launch confirmation.

Microplanning list with the microplan marked Published and a success message

Done. The microplan shows Published and a pending task is created for each assigned user.

If something goes wrong

Where do I see the field tasks?

Open the Submissions tab. Each assignment appears with its facility and status.

Microplanning

Unpublish a microplan

Take a microplan out of the field so you can edit it.

Organization Administrator 1 min read Web

Before you start

  • The microplan is Published.

Find the microplan

In Microplanning, select the Unpublish action on the published microplan.

Microplanning list with a published microplan

1 — published microplan · 2 — unpublish action.

Microplanning list with a published microplan

Confirm unpublishing

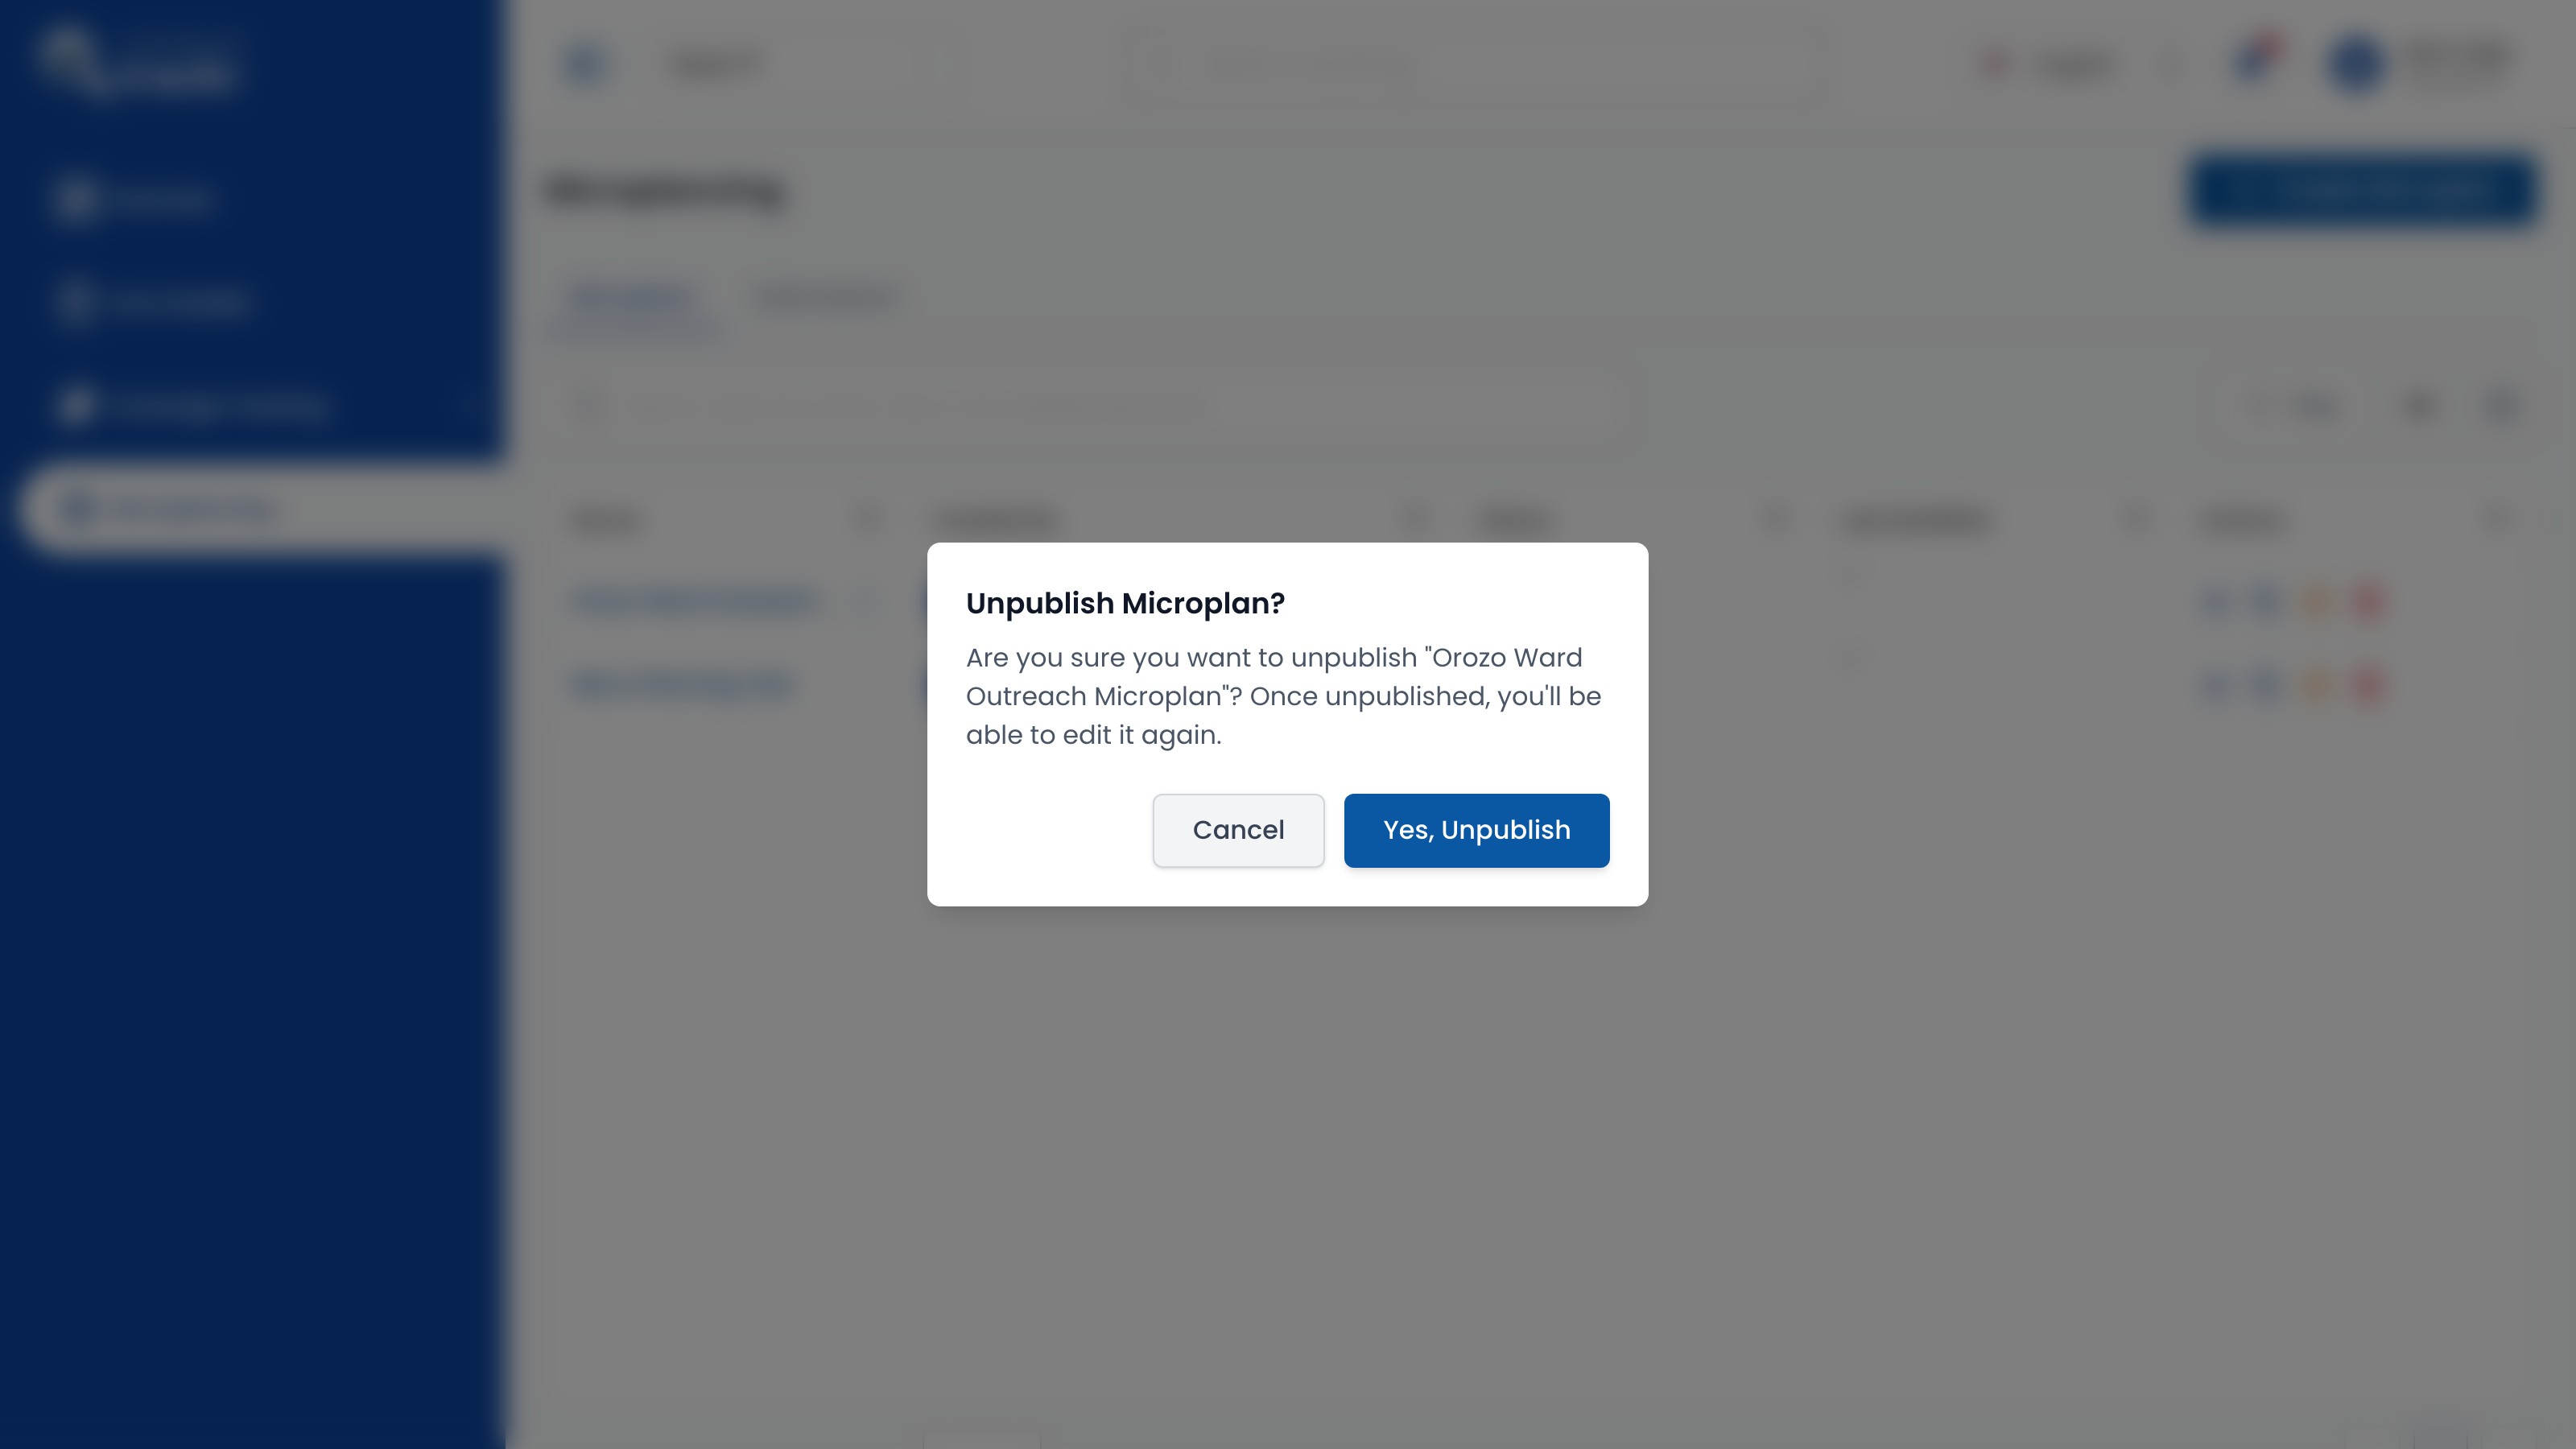
In Unpublish Microplan?, select Yes, Unpublish.

Unpublish Microplan confirmation dialog

1 — unpublish confirmation · 2 — yes unpublish.

Unpublish Microplan confirmation dialog

Check the status

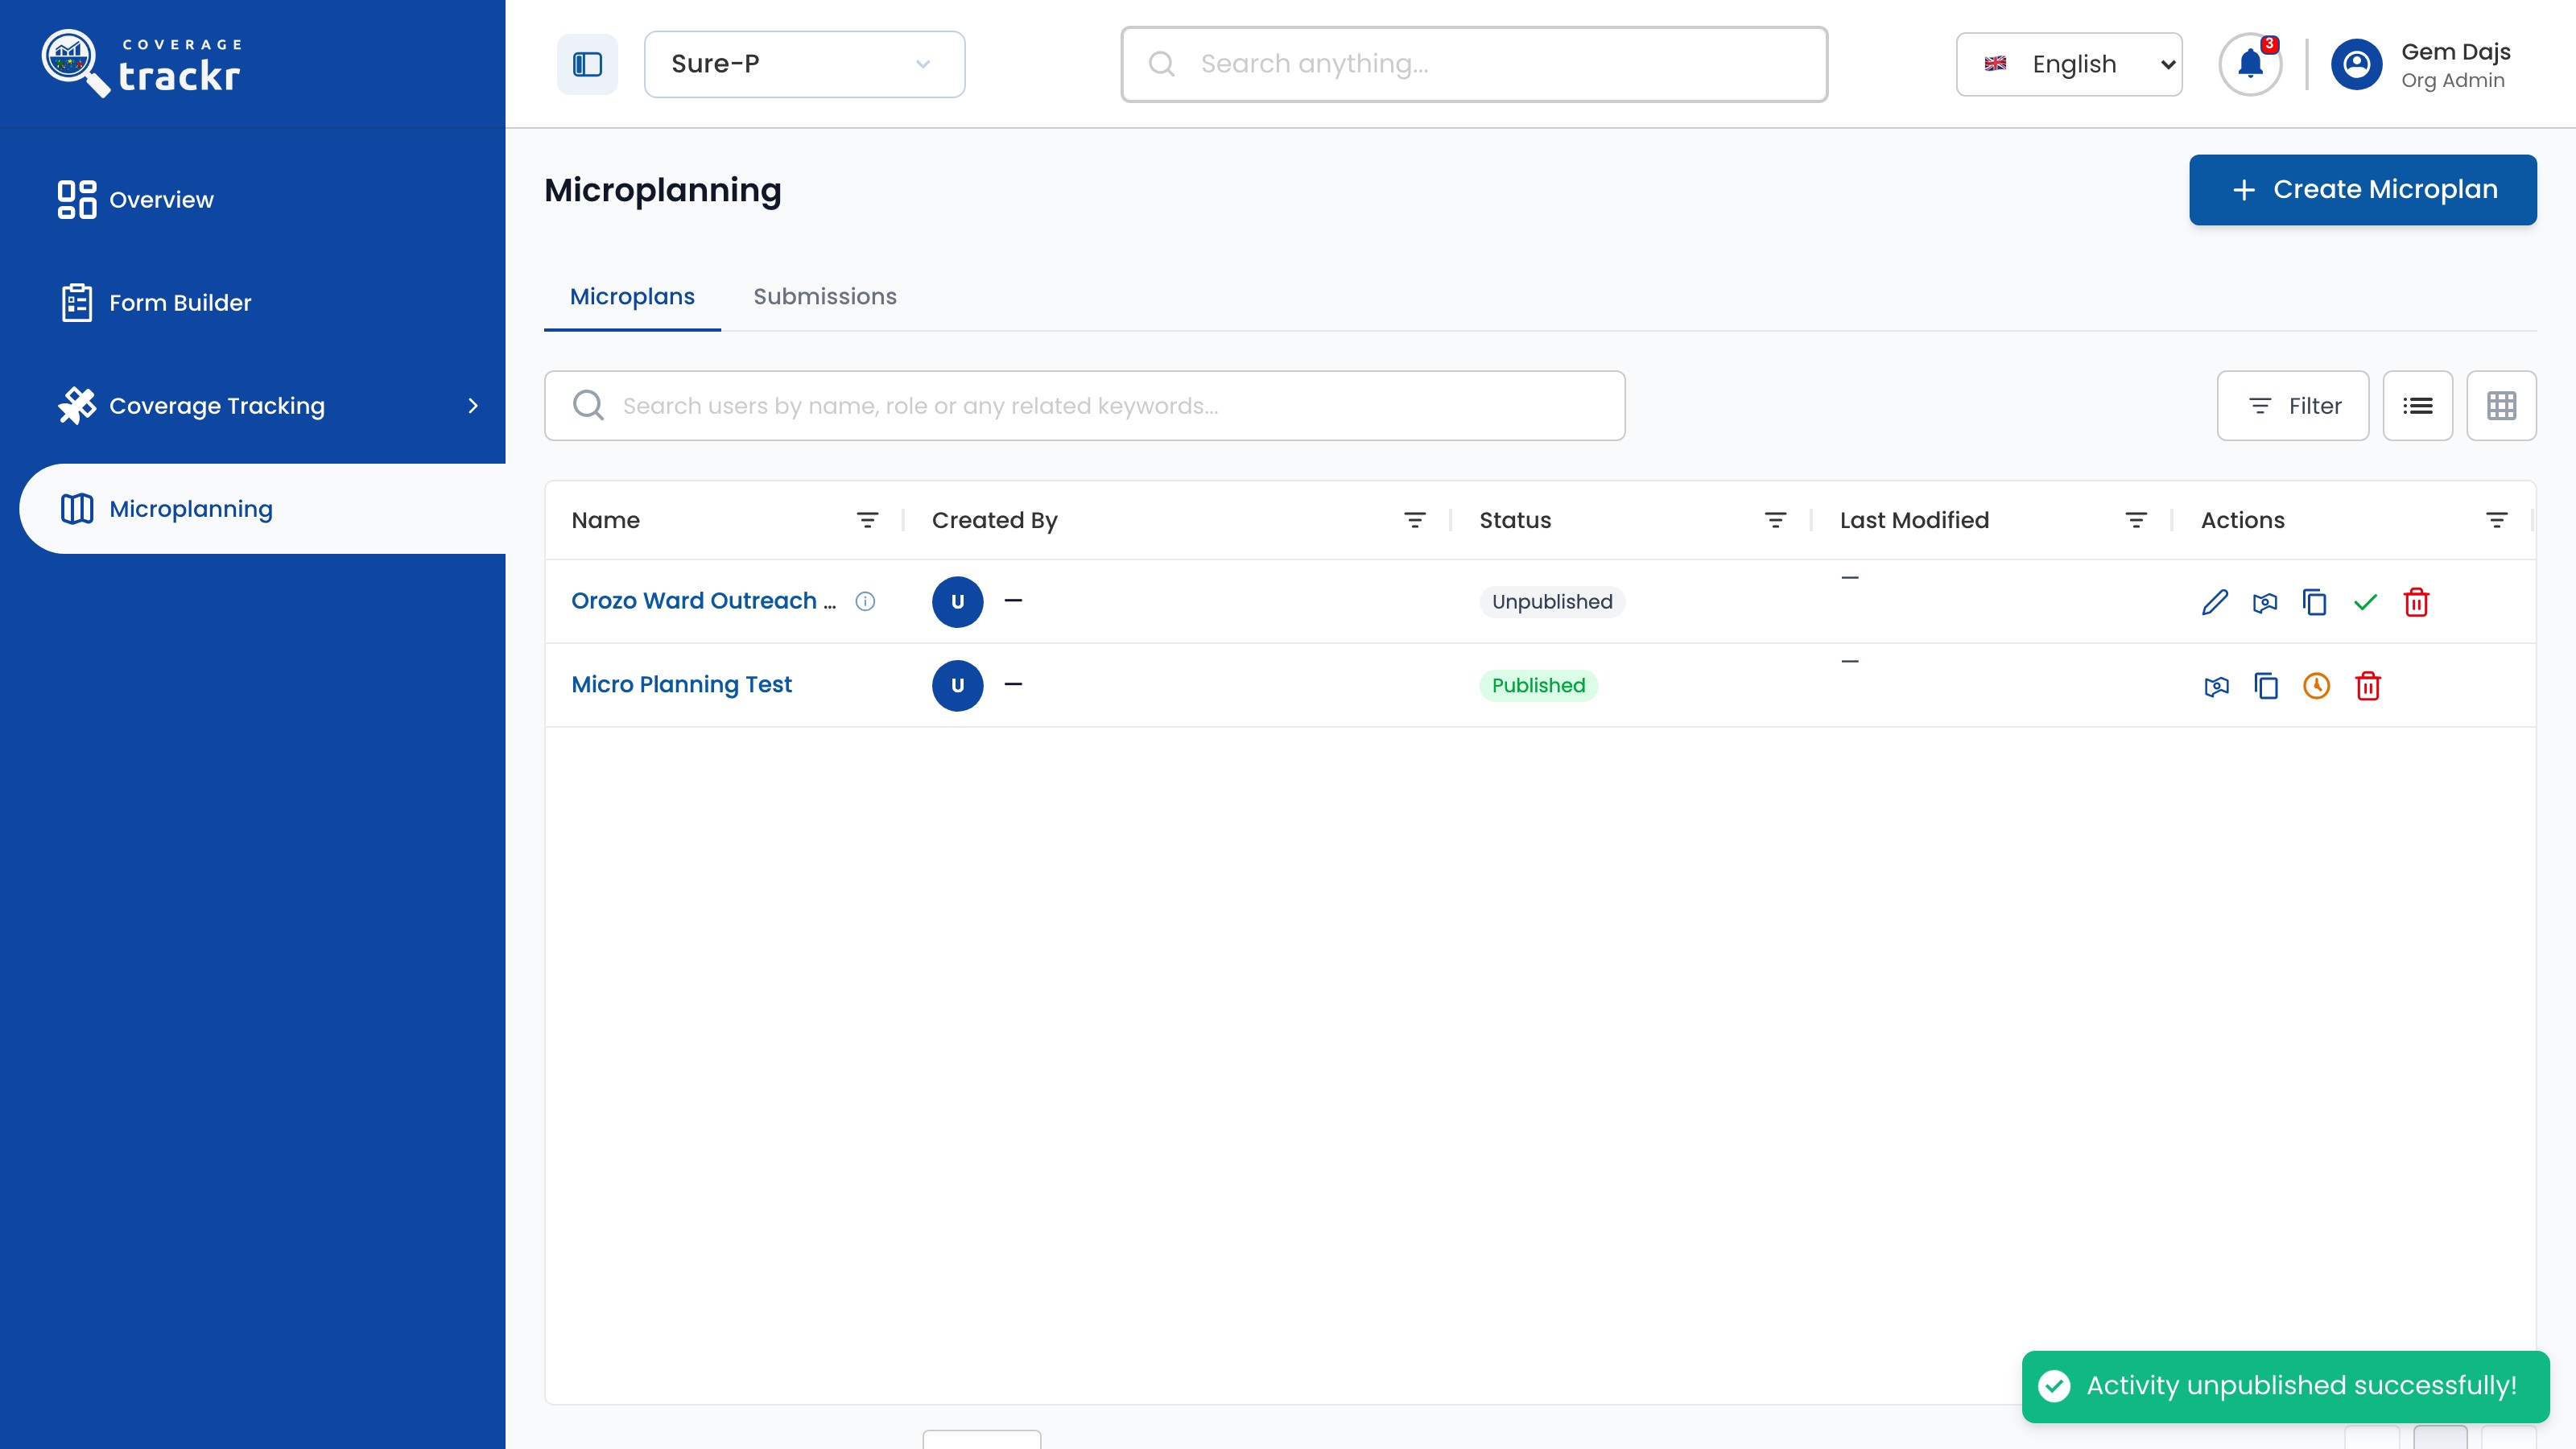
Check that the microplan shows Unpublished.

Microplanning list with the microplan unpublished and a success message

1 — unpublished status · 2 — unpublish confirmation.

Microplanning list with the microplan unpublished and a success message

Done. The microplan shows Unpublished and Edit is available again.

If something goes wrong

How do I change a published microplan?

Unpublish it, make the change with Edit, then publish it again.

Microplanning

Review a microplan map

Open a generated microplan workspace, review its layers and narrow the map by administrative area.

Organization Administrator 3 min read Web

Before you start

  • The active programme contains a microplan.
  • The selected administrative area has a configured health facility if you need a populated catchment result.

Open a microplan

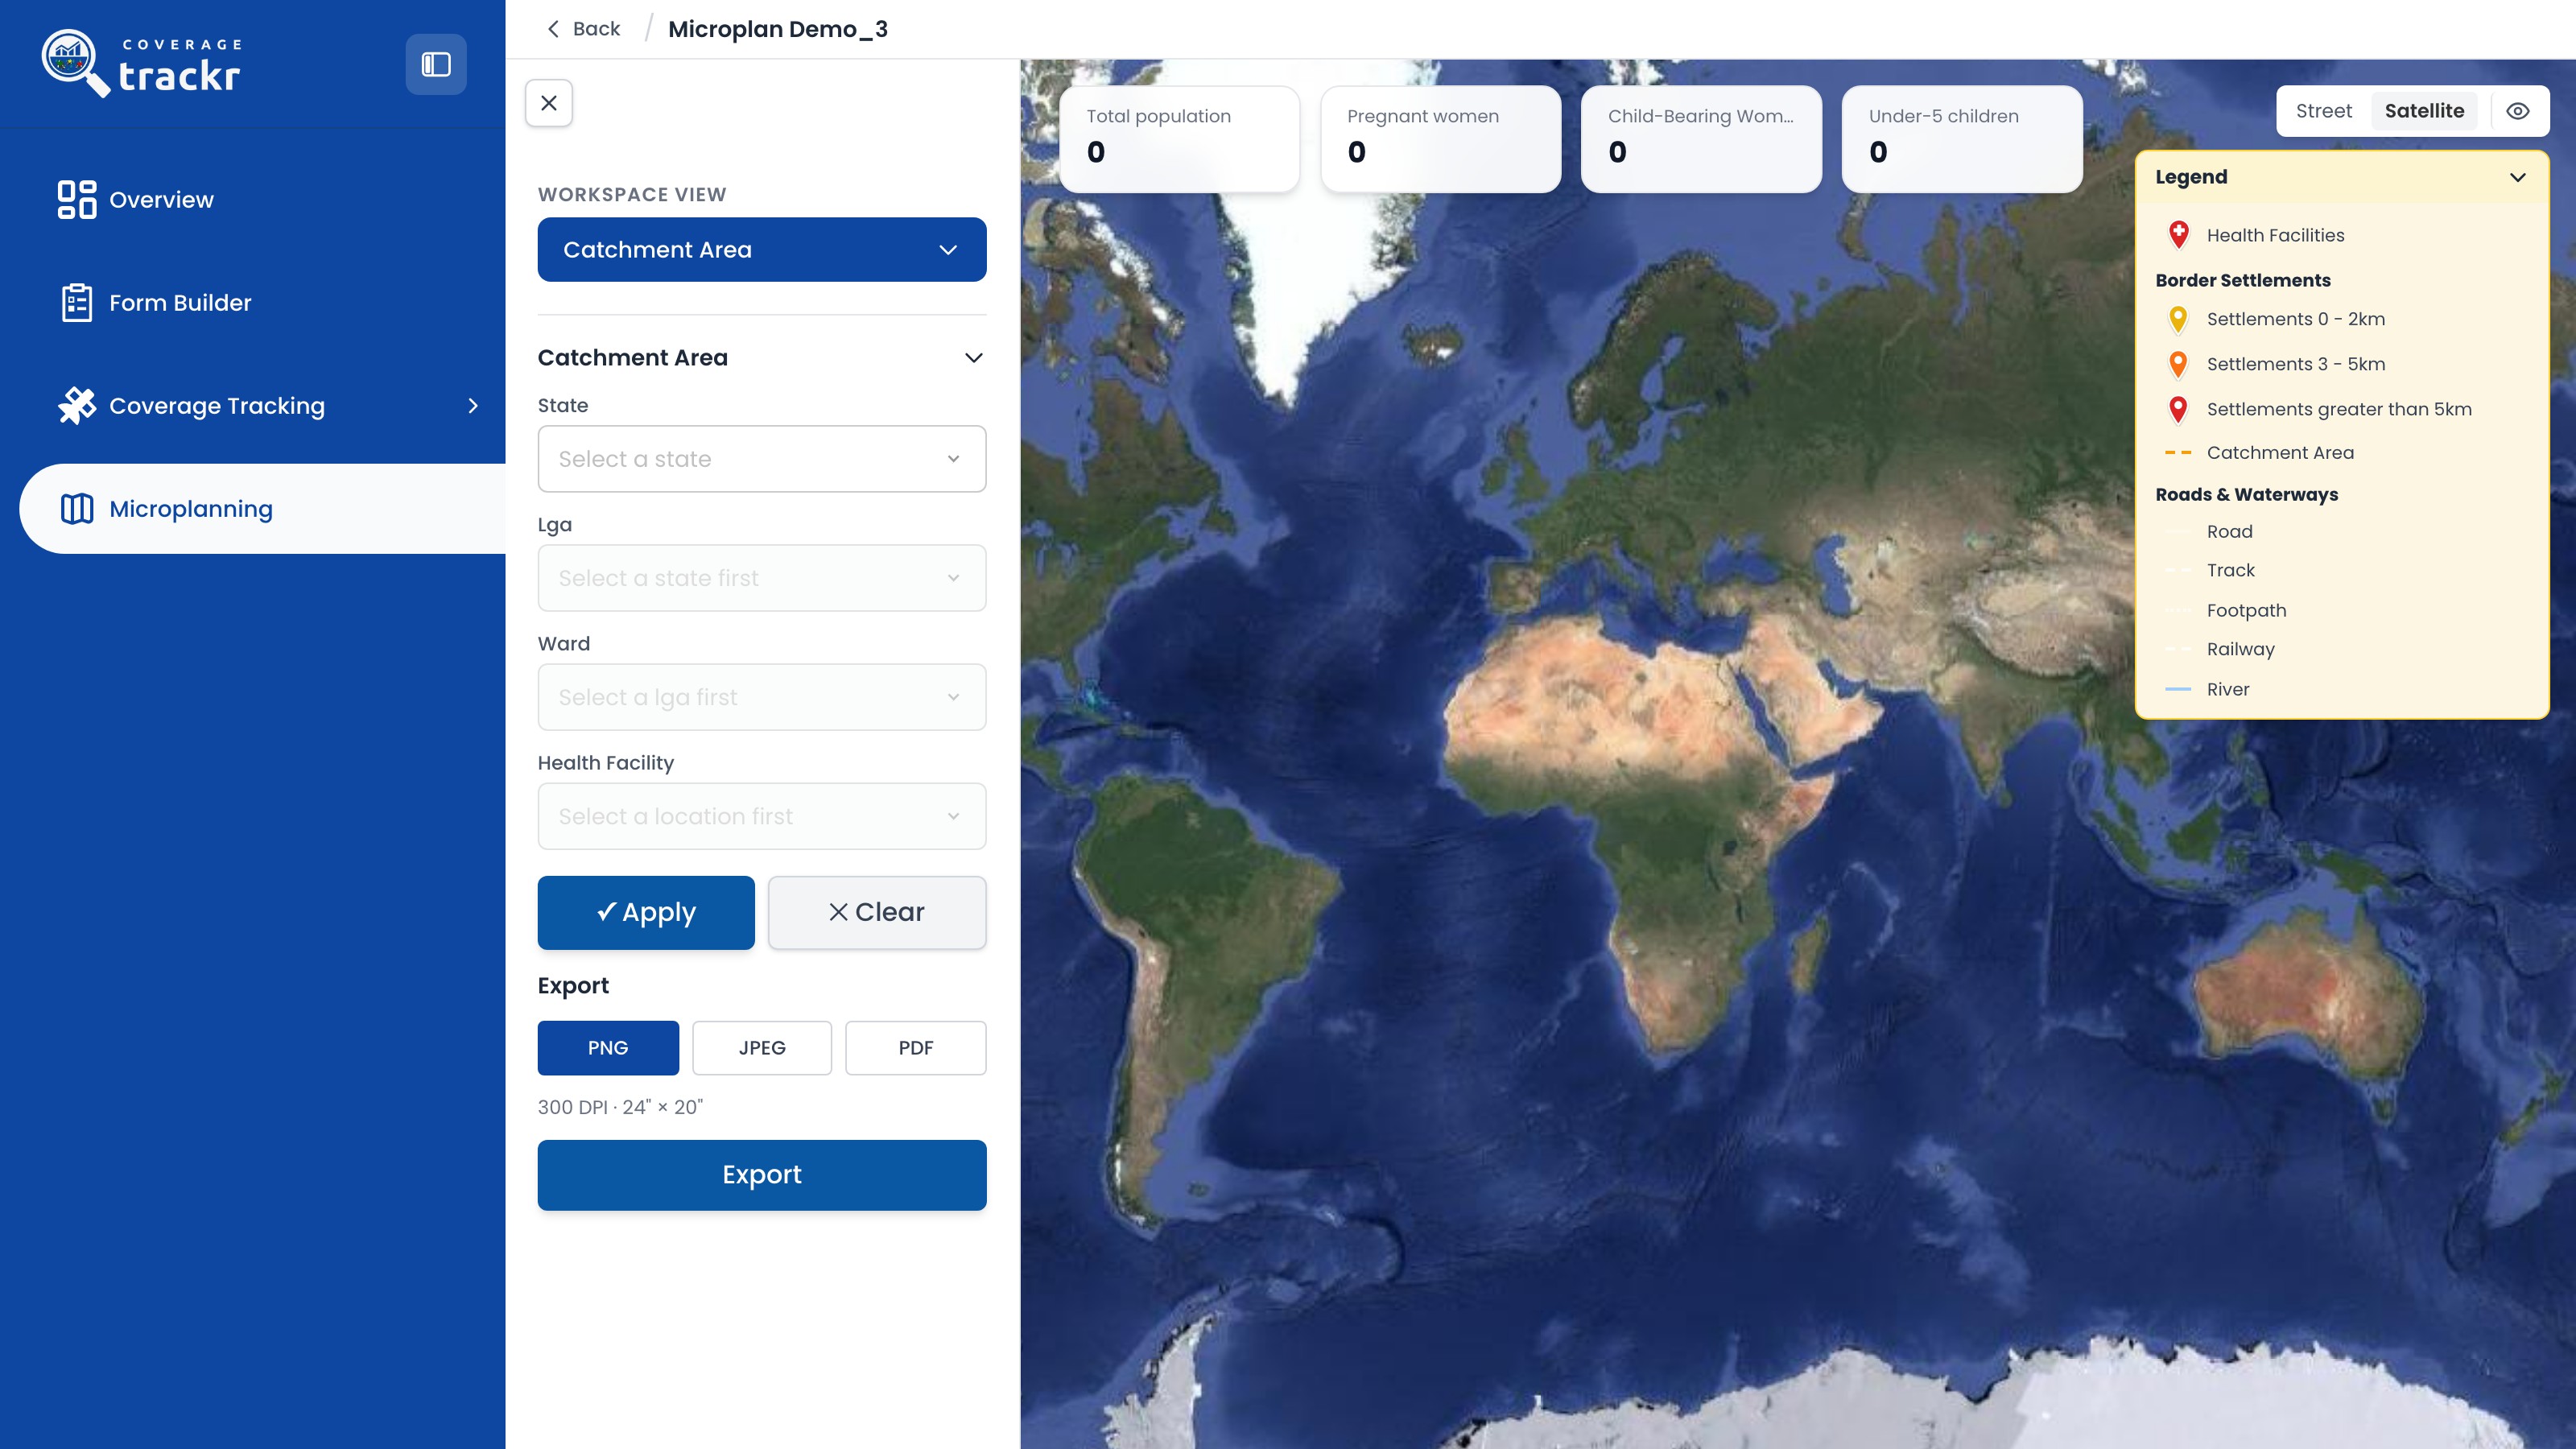
Select Microplanning, find the required microplan, and choose Generate Map.

CoverageTrackr microplan list with a published microplan and Generate Map action

1 — microplan · 2 — generate map.

CoverageTrackr microplan list with a published microplan and Generate Map action

Review the map workspace

Use the Legend and the Street and Satellite layers to understand the facilities, settlements, catchment areas, roads and waterways shown on the map.

CoverageTrackr microplan map with layers, metrics, filters and export controls

1 — map layers · 2 — legend.

CoverageTrackr microplan map with layers, metrics, filters and export controls

Done. The map layers and summary metrics have been reviewed for the selected administrative area, or the missing-facility state has been identified.

If something goes wrong

How do I save the map?

Under Export, choose PNG, JPEG or PDF, then select Export.

Microplanning

Review microplan submissions

Track each facility's microplanning task and open its details.

Organization Administrator 3 min read Web

Before you start

  • At least one microplan has been published.

Open Submissions

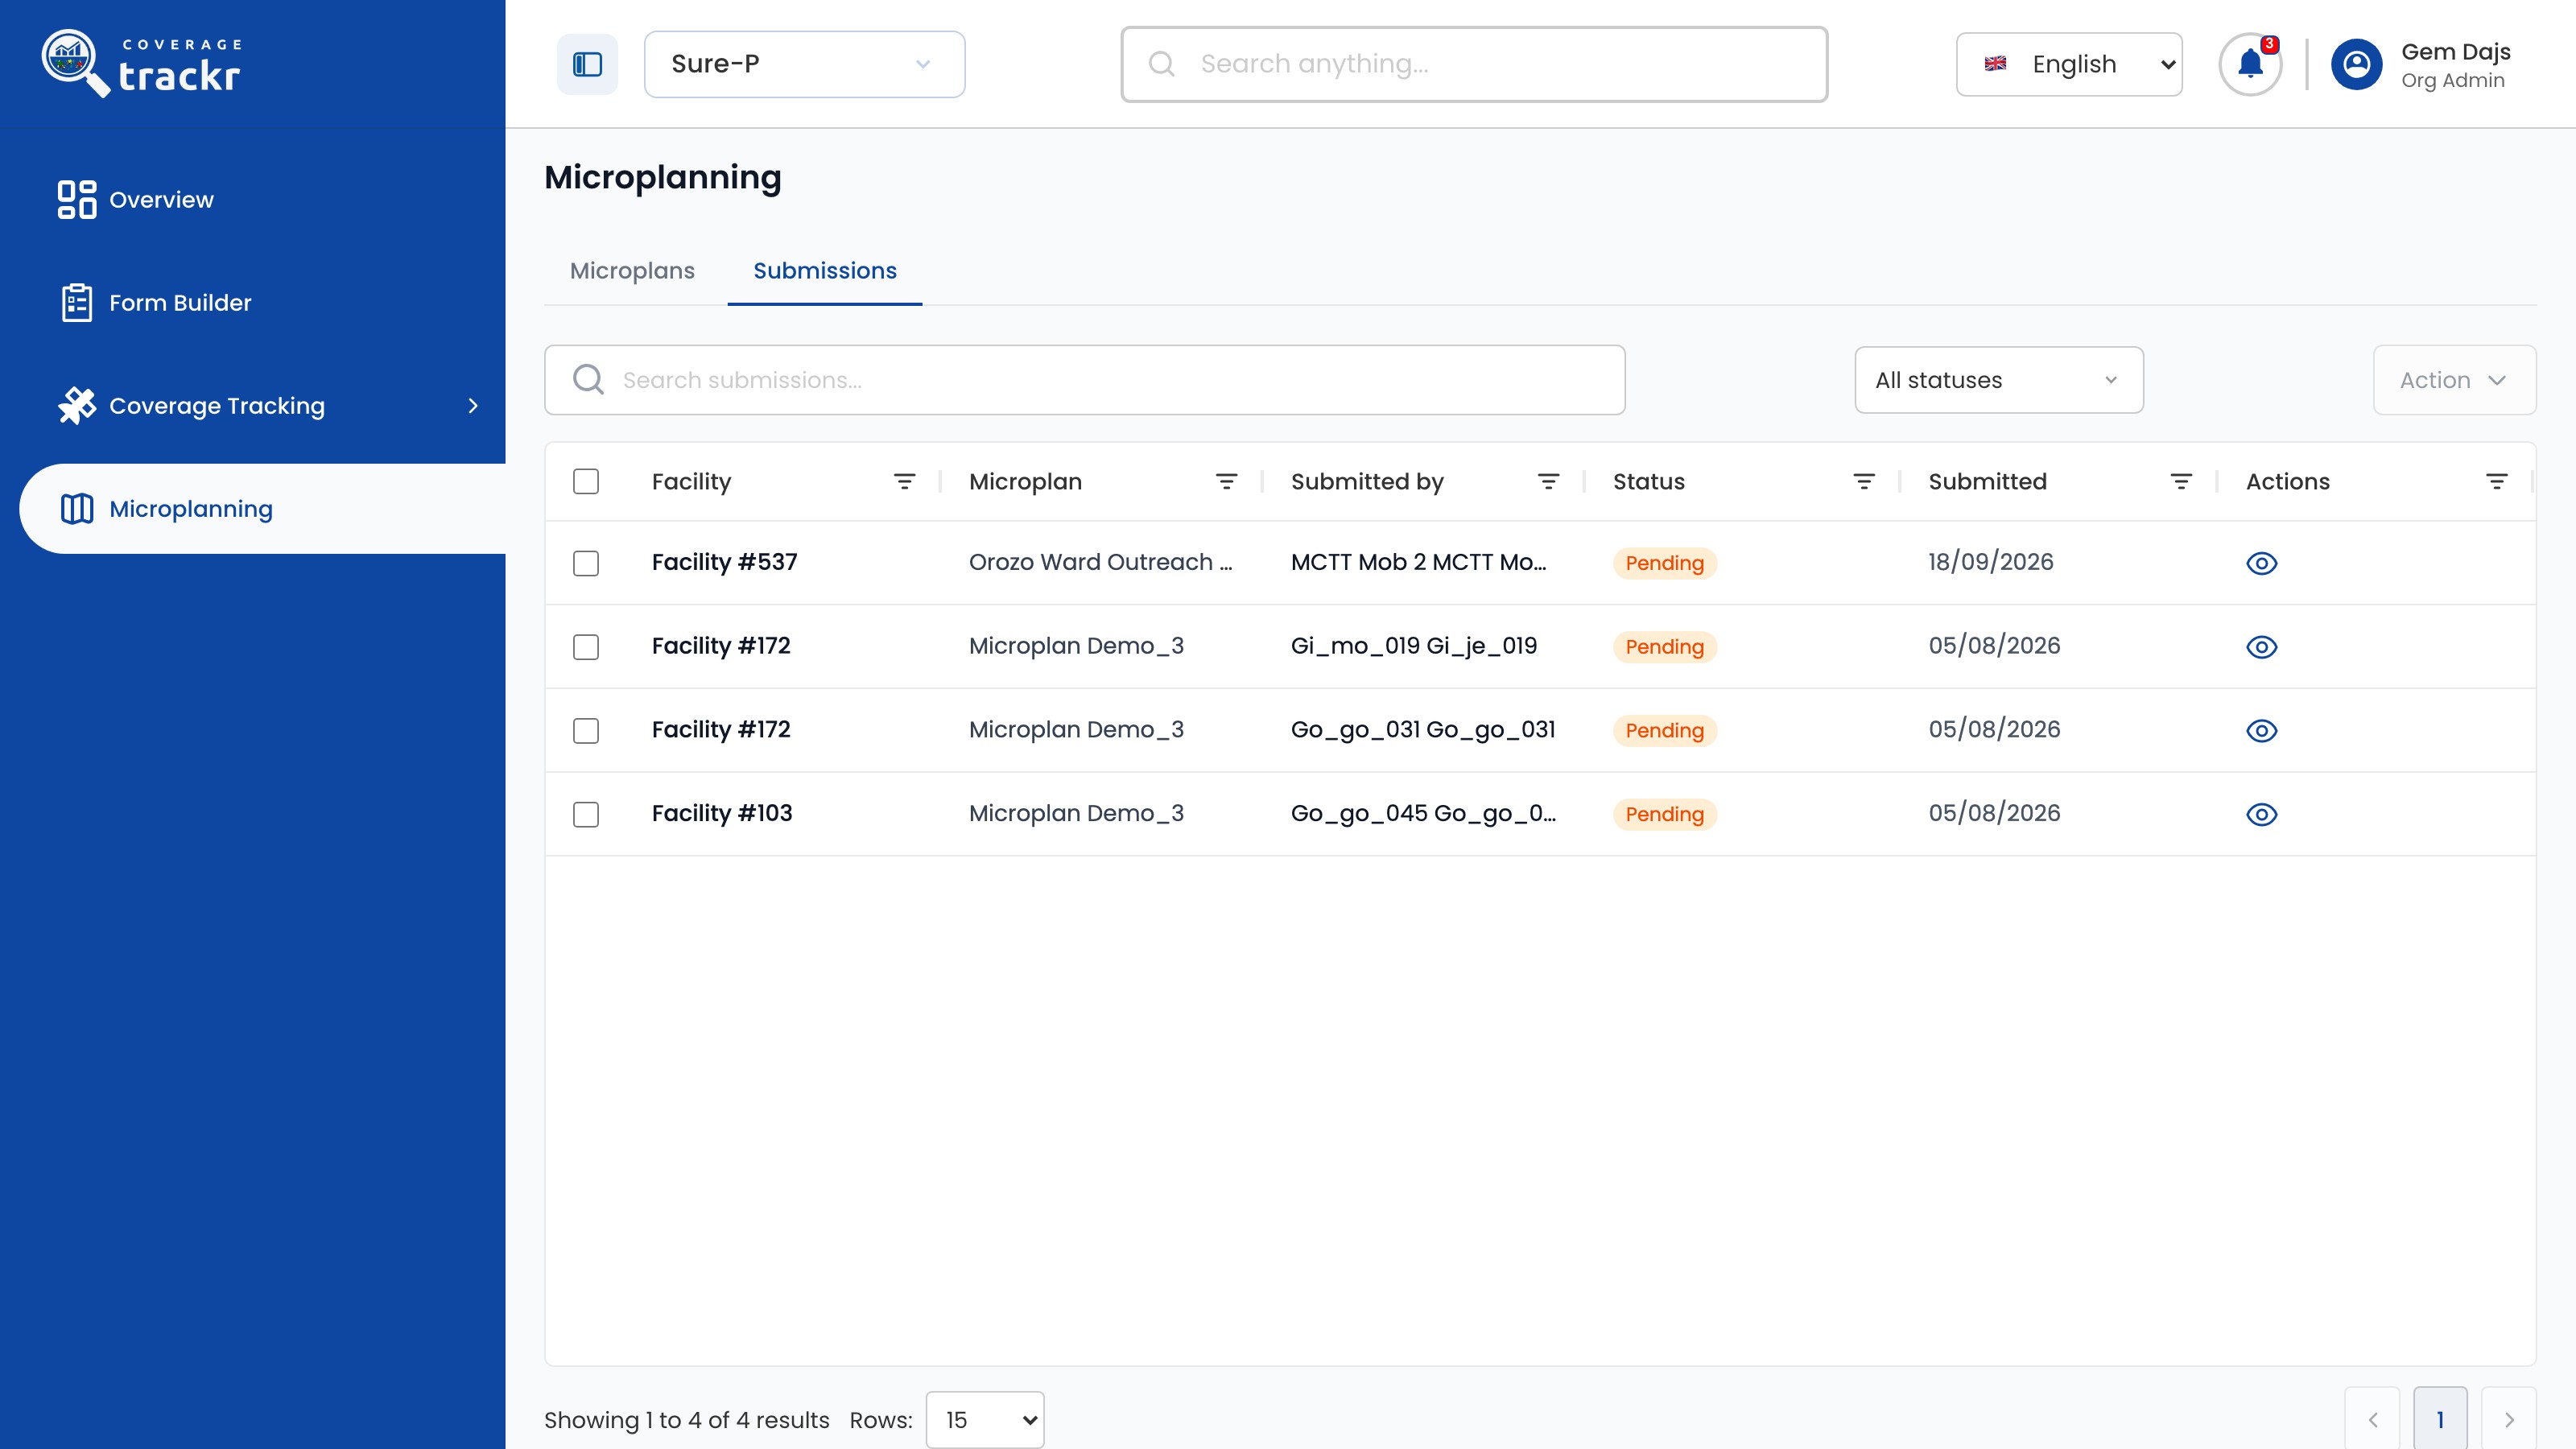
In Microplanning, select the Submissions tab to see each facility, microplan, submitter, status and date.

Microplanning Submissions list with pending facility tasks

1 — submissions tab · 2 — submission records.

Microplanning Submissions list with pending facility tasks

Filter by status

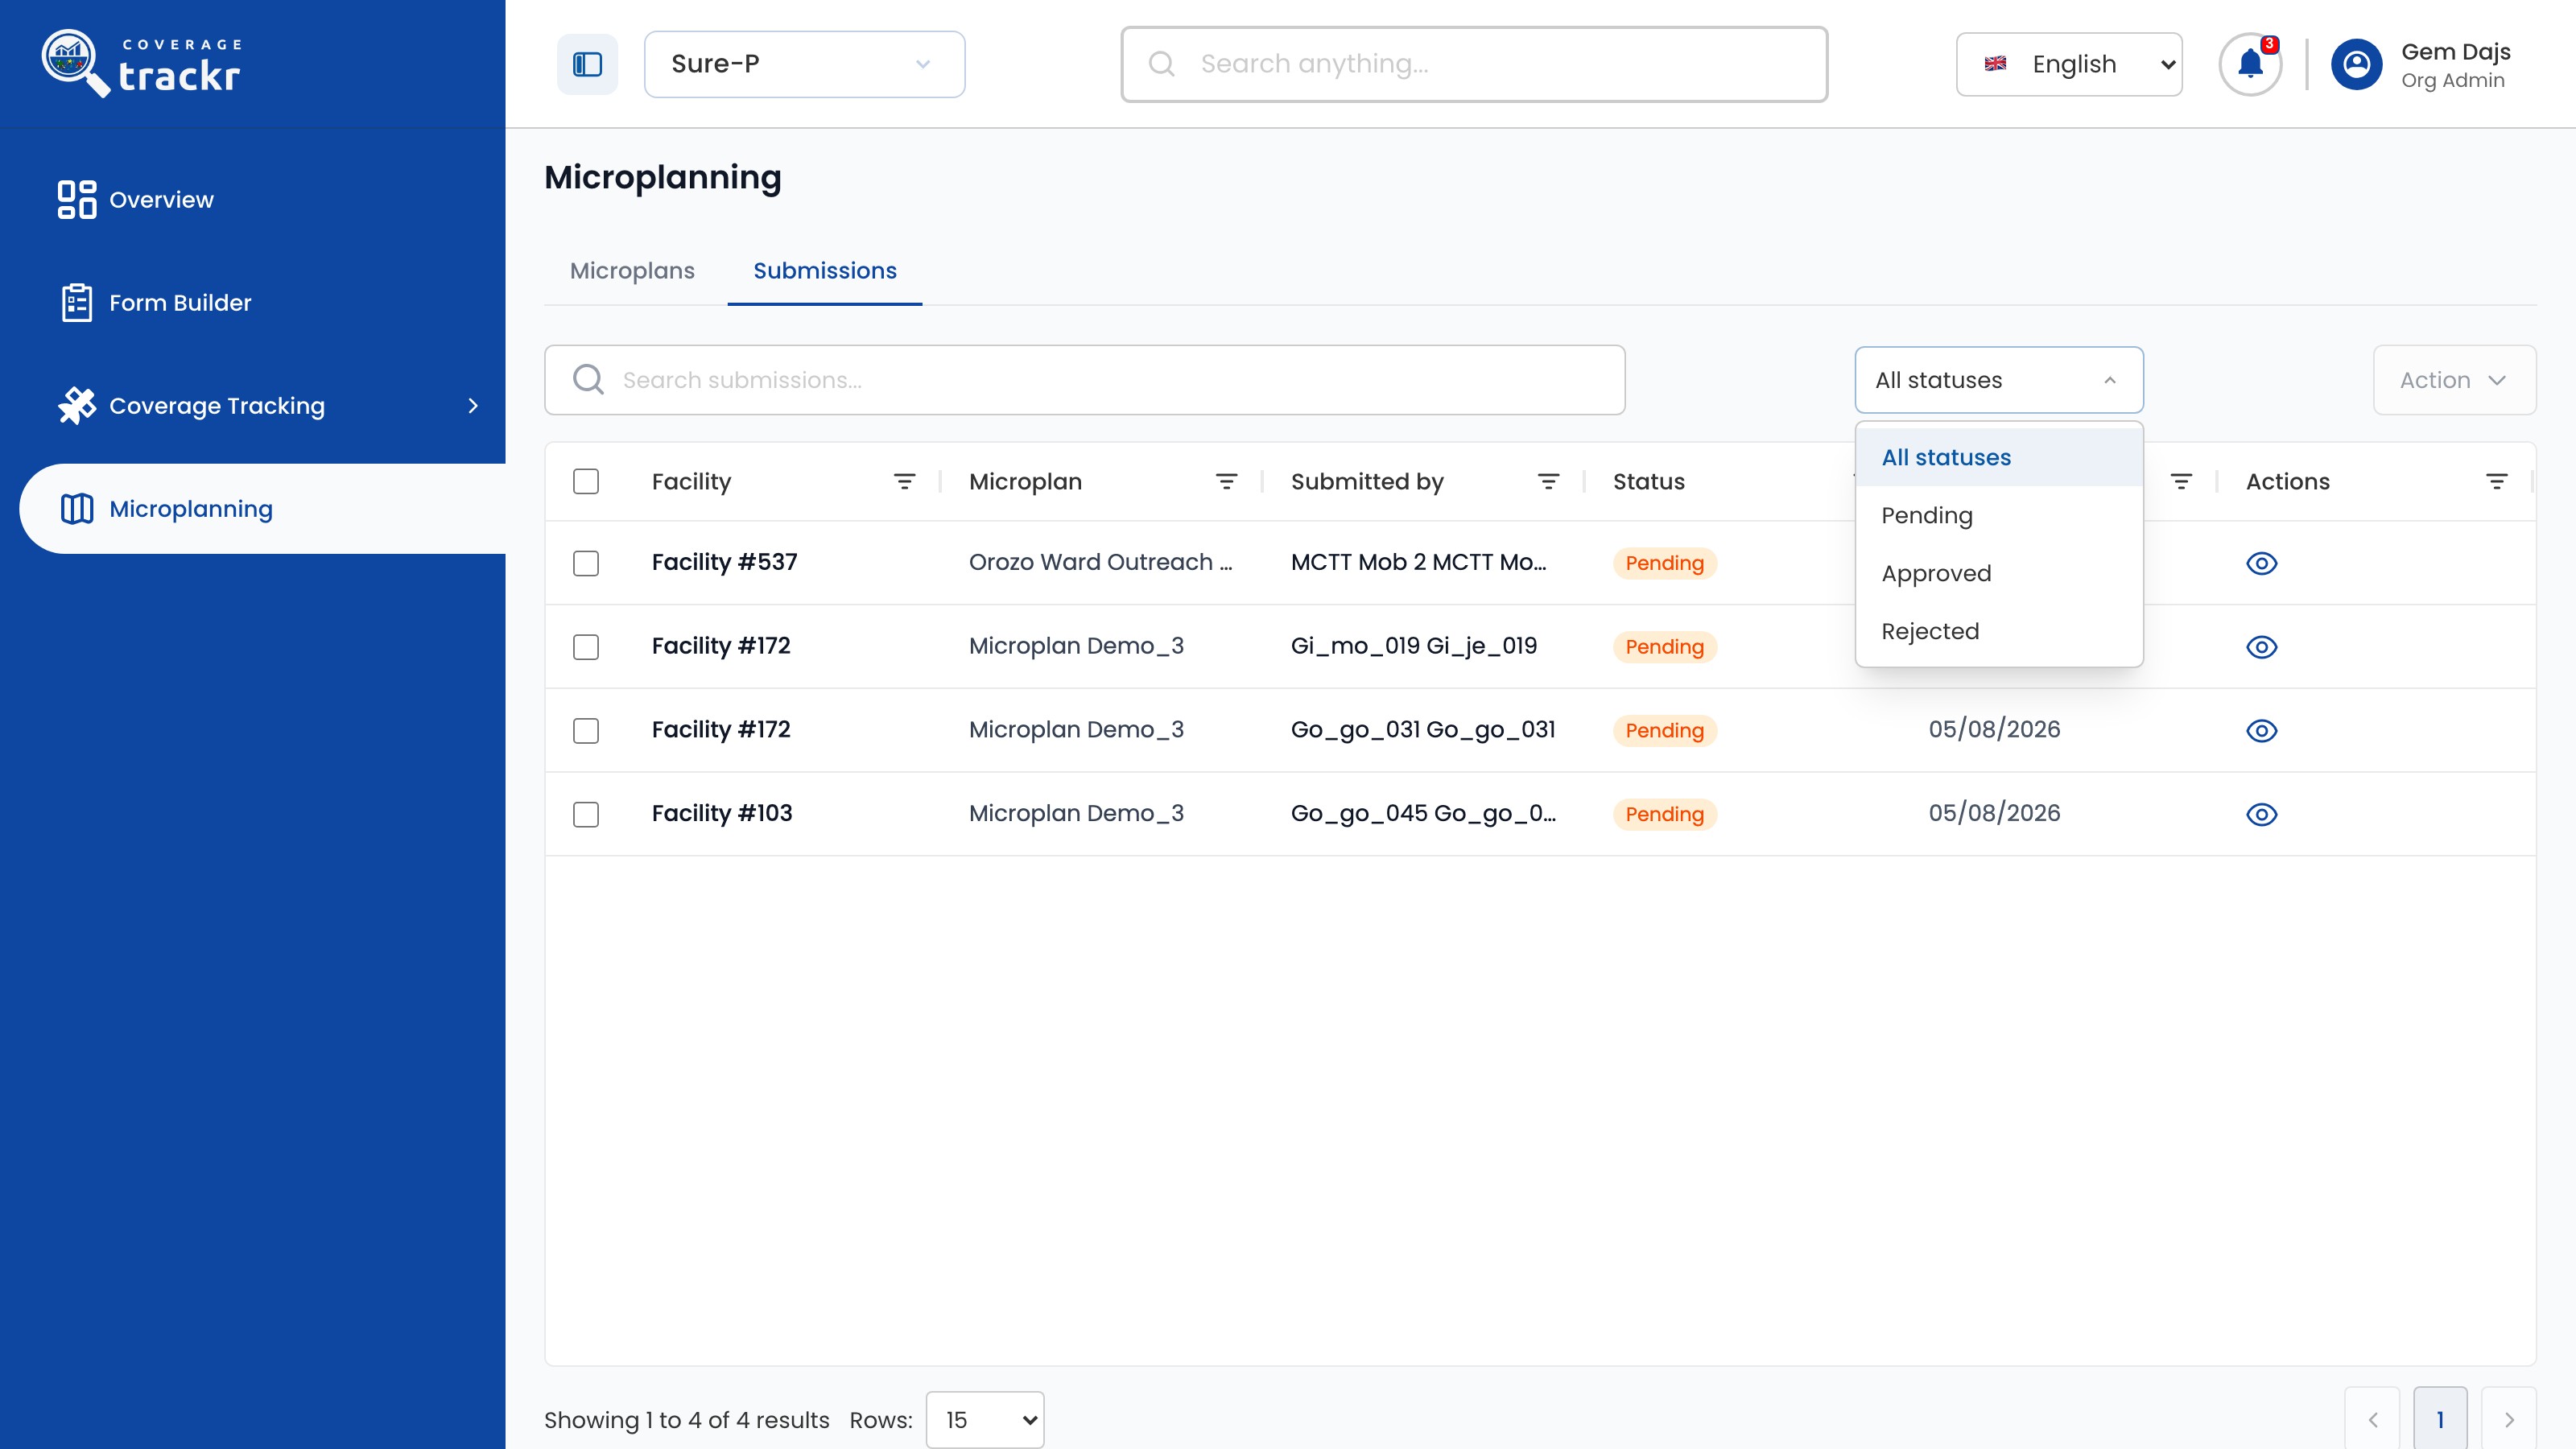
Use All statuses to show only Pending, Approved or Rejected records.

Status filter open with Pending, Approved and Rejected

1 — status filter · 2 — filtered records.

Status filter open with Pending, Approved and Rejected

Open a submission

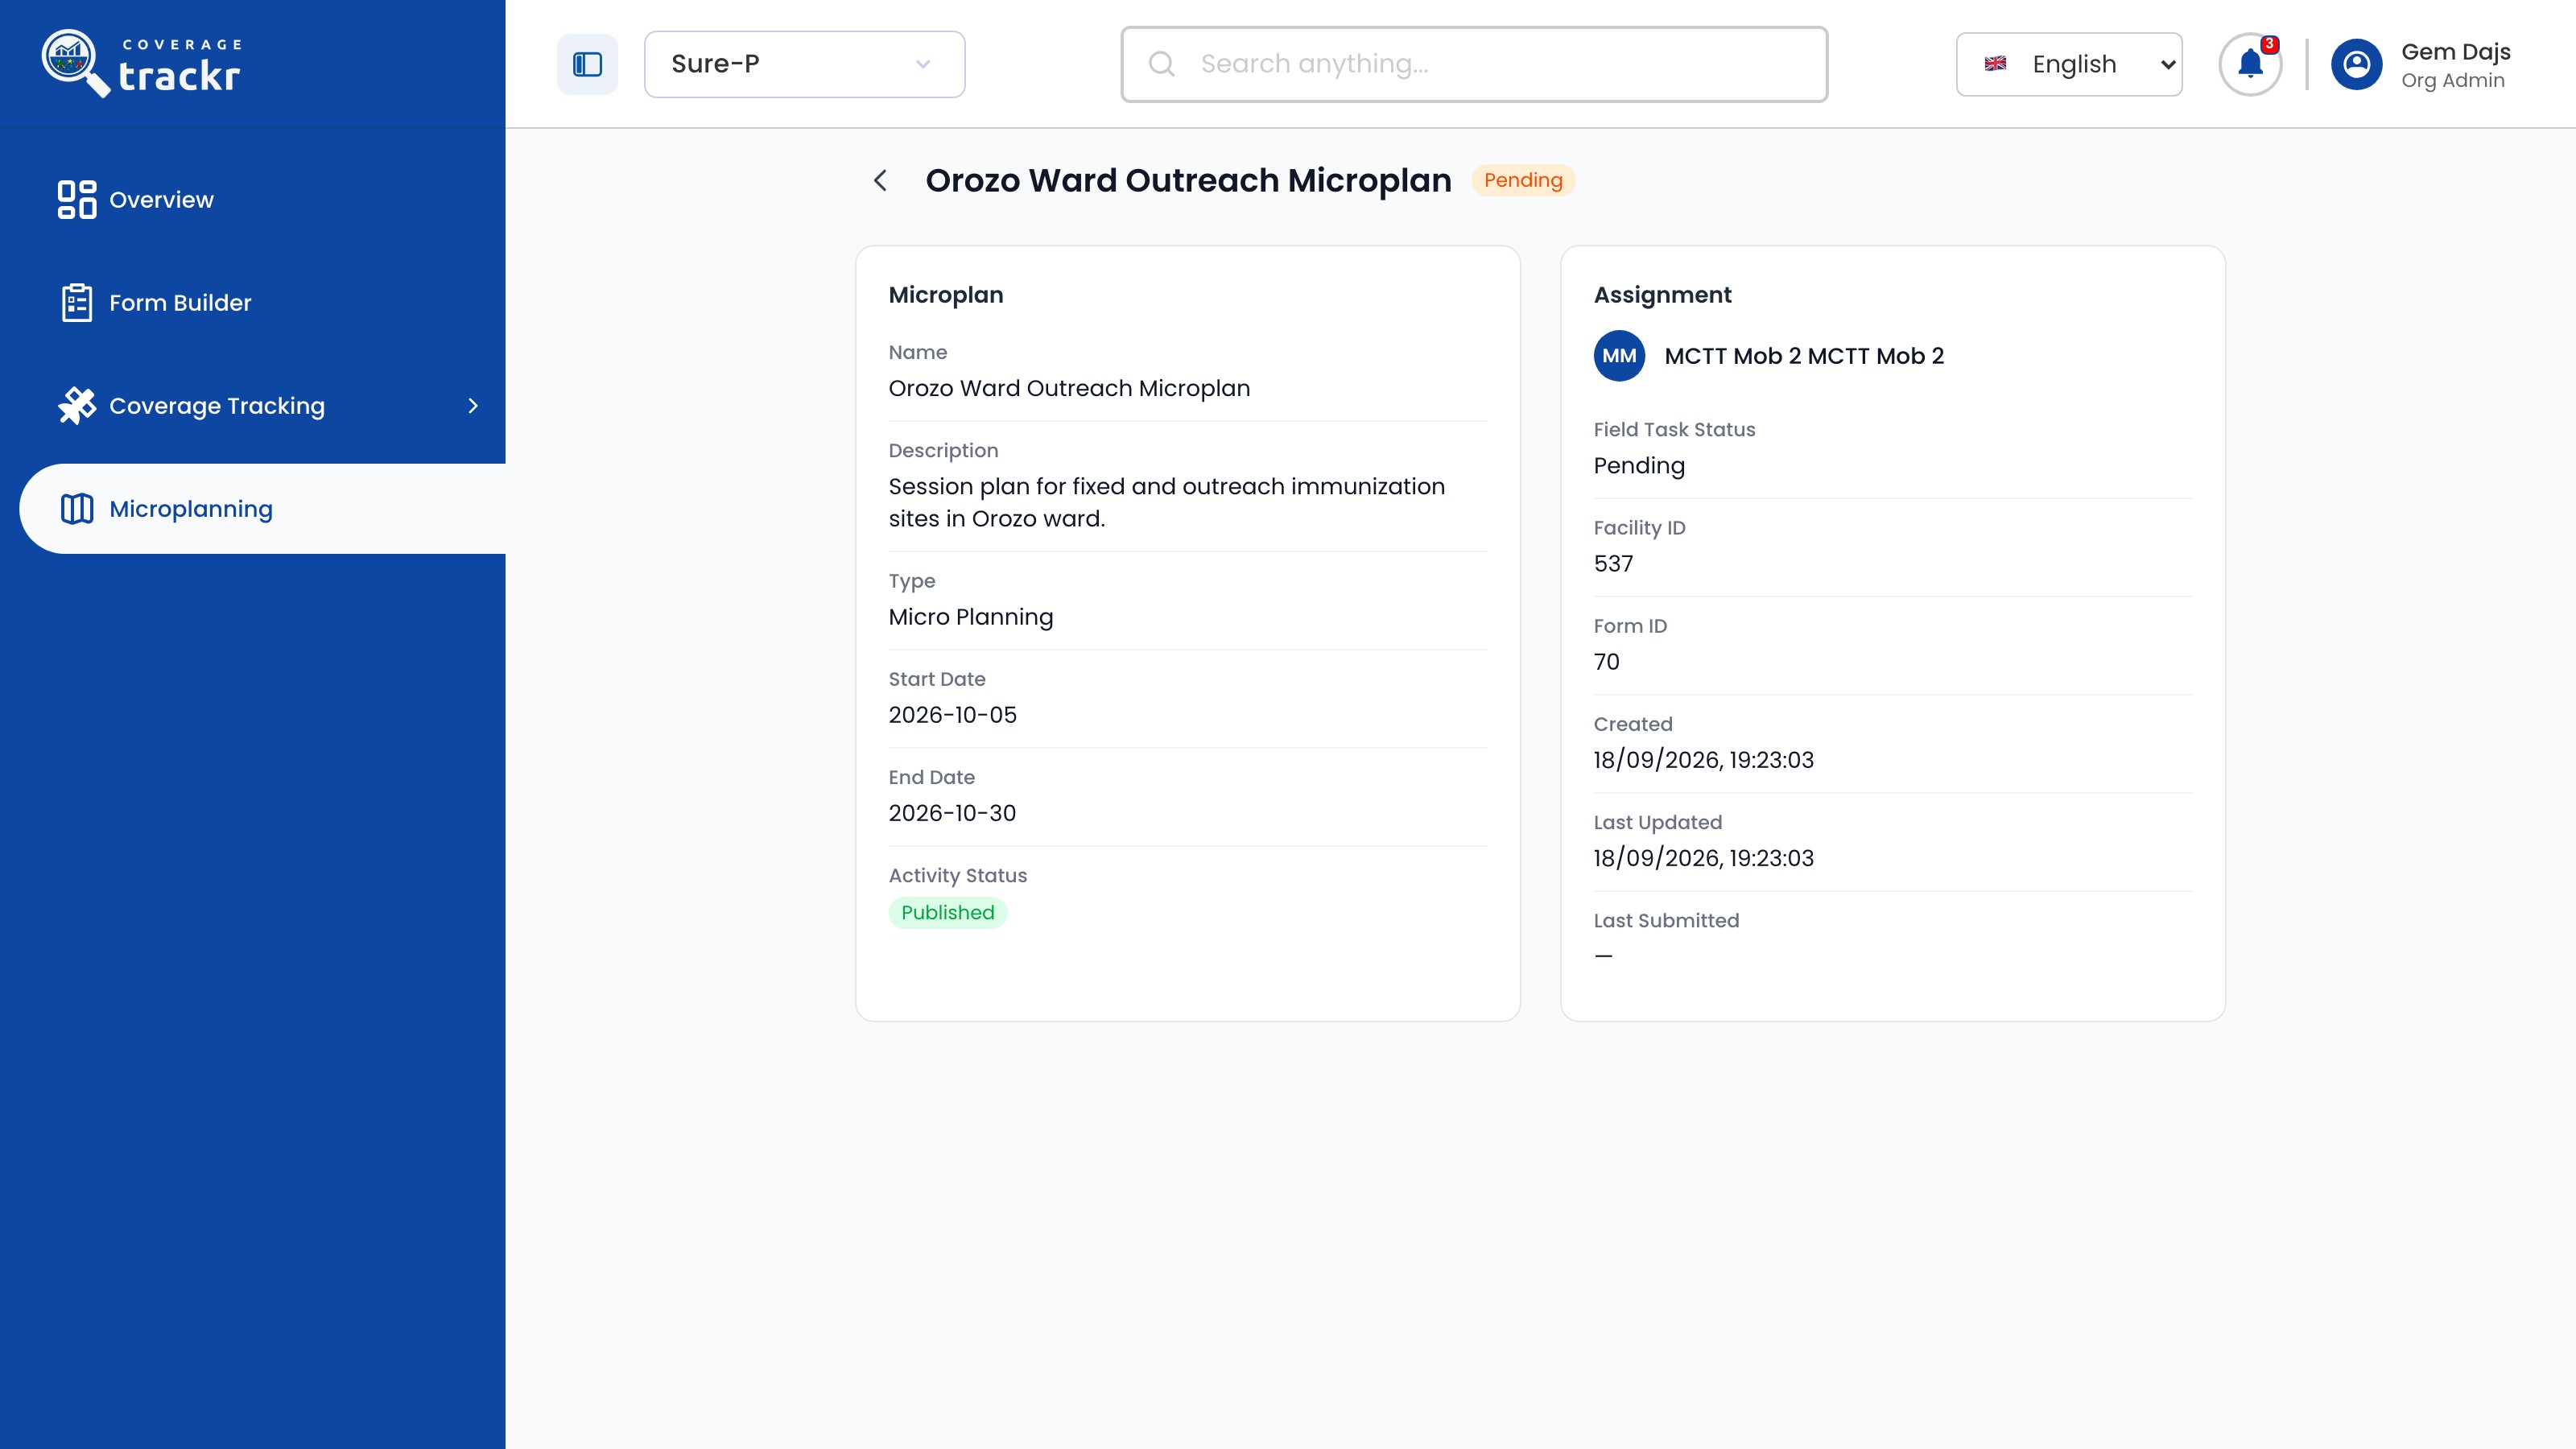
Select the eye icon on a row to see the Microplan, the Assignment, the Field Task Status and the Facility ID.

Submission details for Orozo Ward Outreach Microplan with its assignment

1 — microplan details · 2 — assignment details.

Submission details for Orozo Ward Outreach Microplan with its assignment

Done. You have checked each facility's status and the details of the task you opened.

If something goes wrong

What do the statuses mean?

Pending tasks are waiting for the field user or a reviewer. Approved and Rejected show the review decision.

Monitoring

Add a dashboard

Make an existing analytics dashboard available inside the programme.

Organization Administrator 3 min read Web

Before you start

  • You have the dashboard's web address, and it allows being embedded in other sites.

Open Dashboards

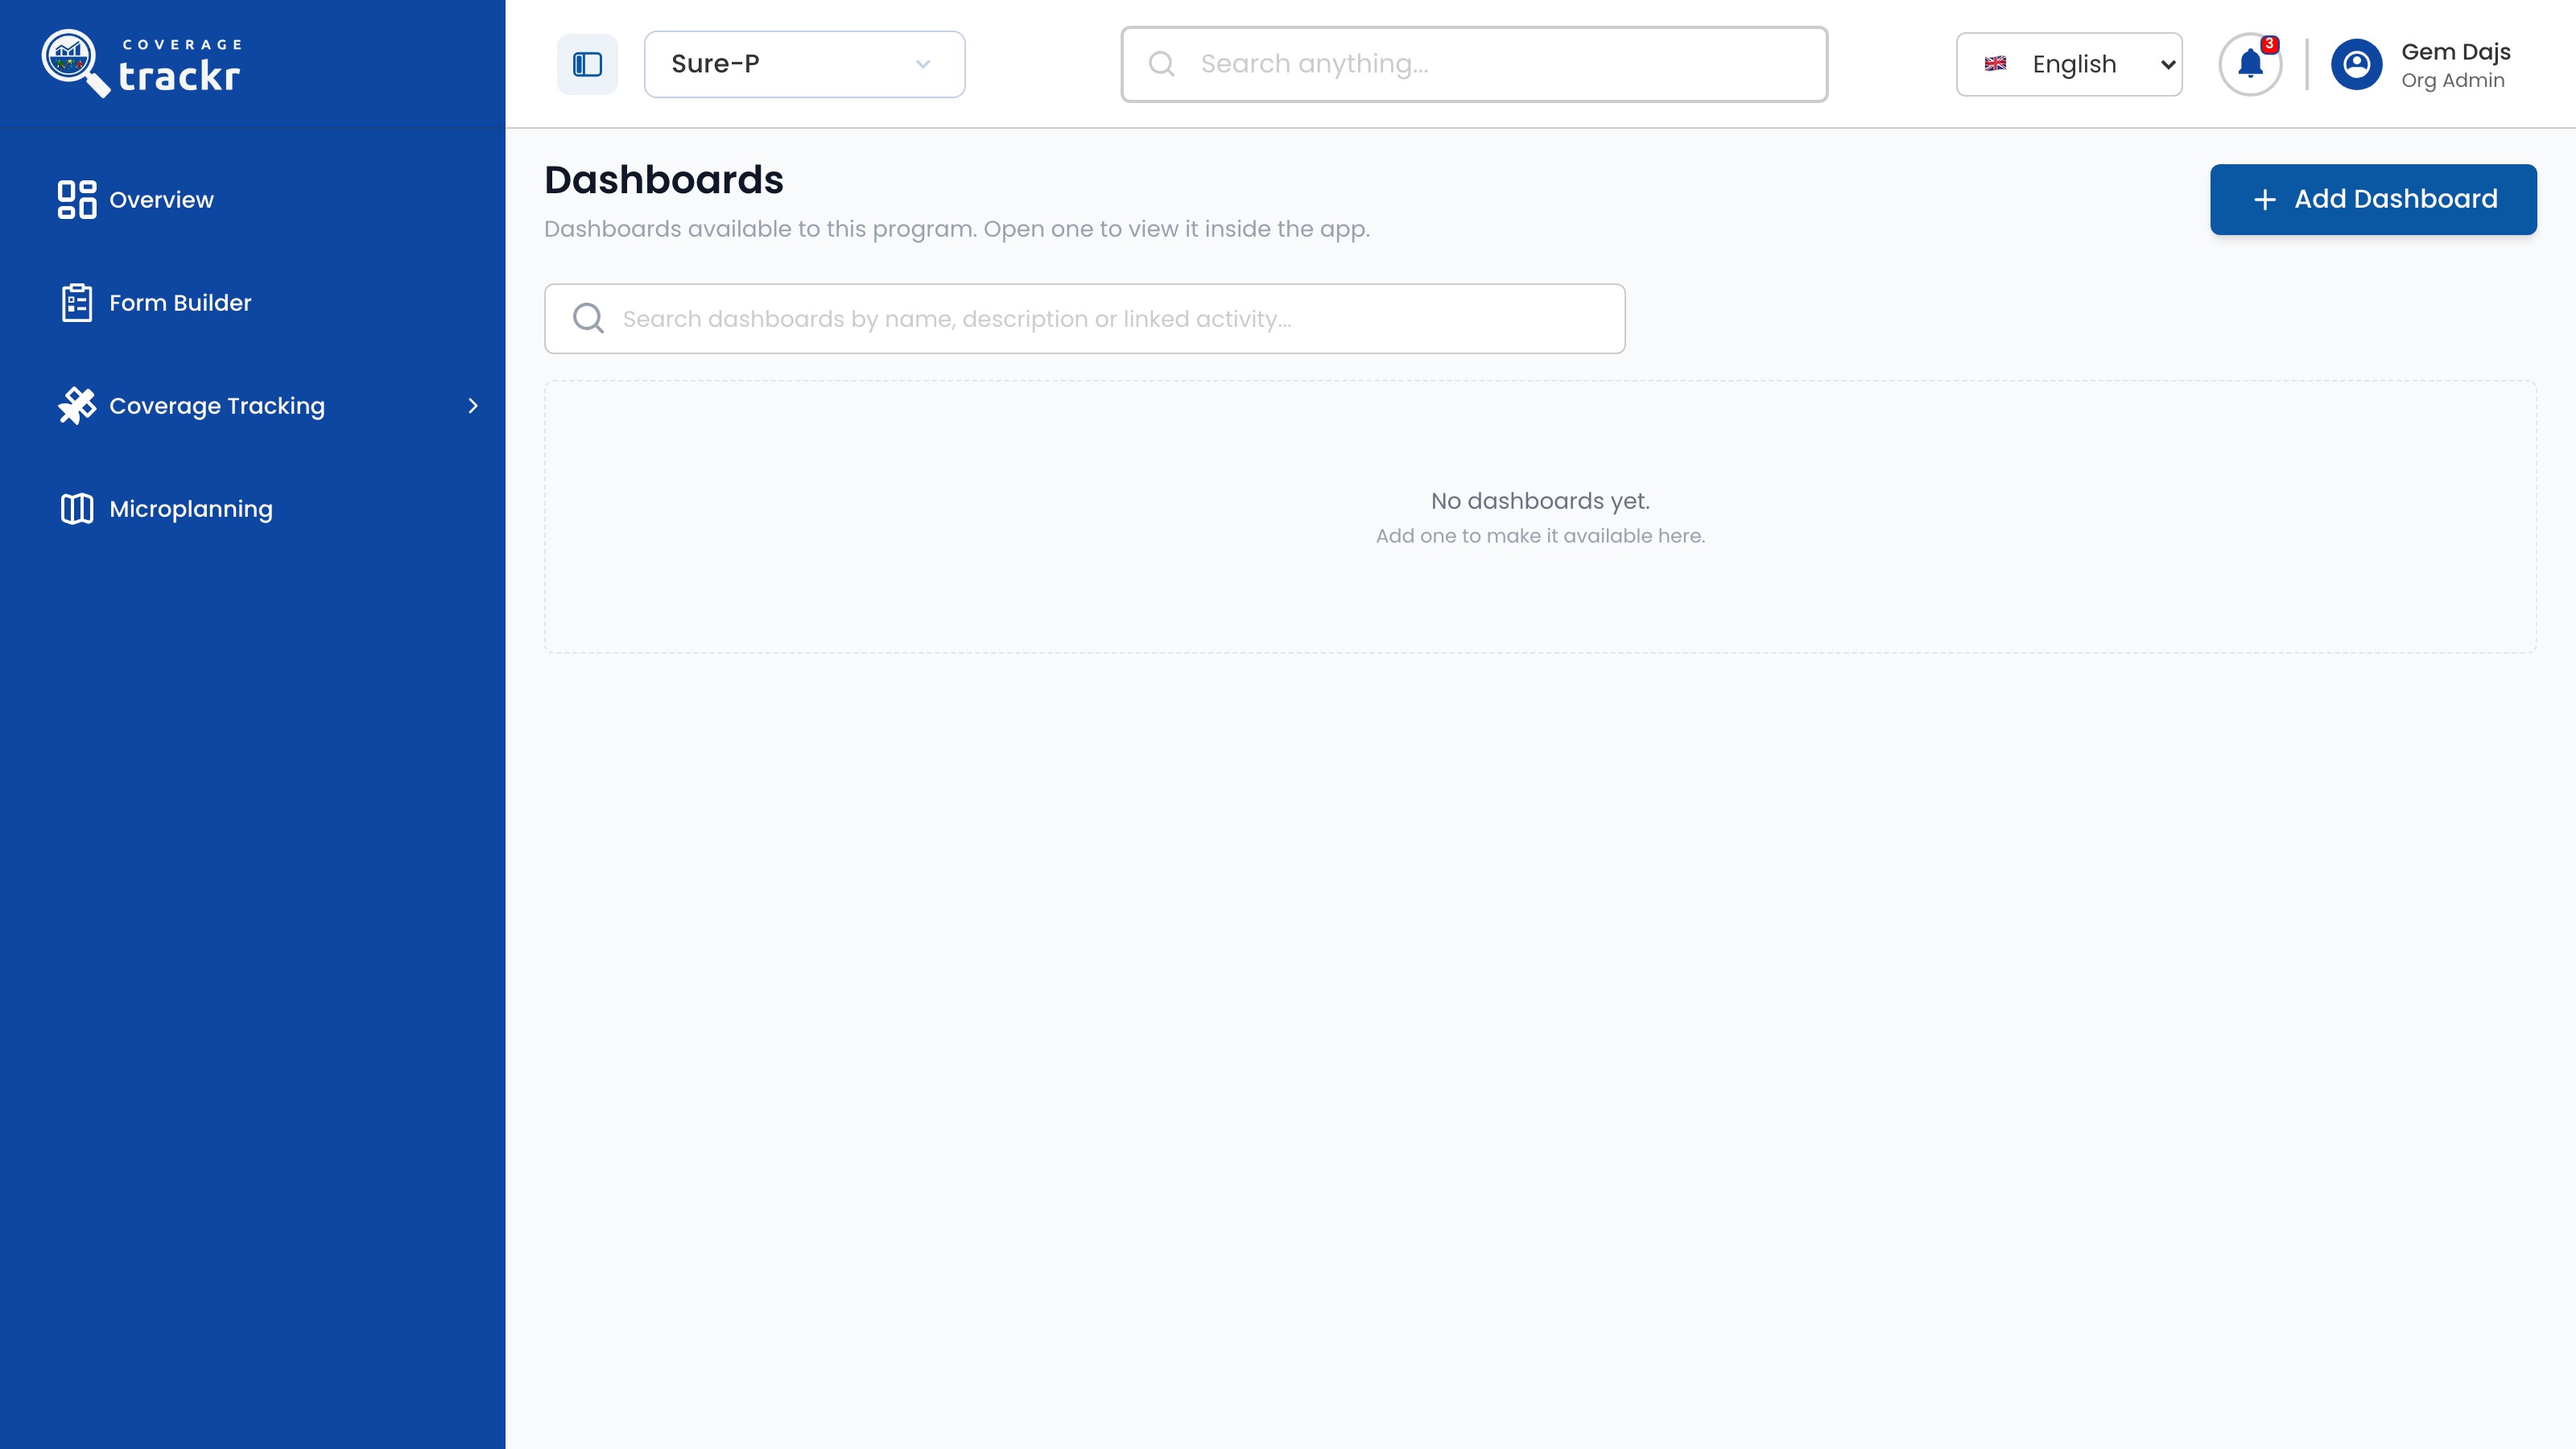
Open Coverage Tracking, select Dashboard, then select Add Dashboard.

Dashboards page with no dashboards yet

1 — dashboard · 2 — add dashboard.

Dashboards page with no dashboards yet

Enter the dashboard details

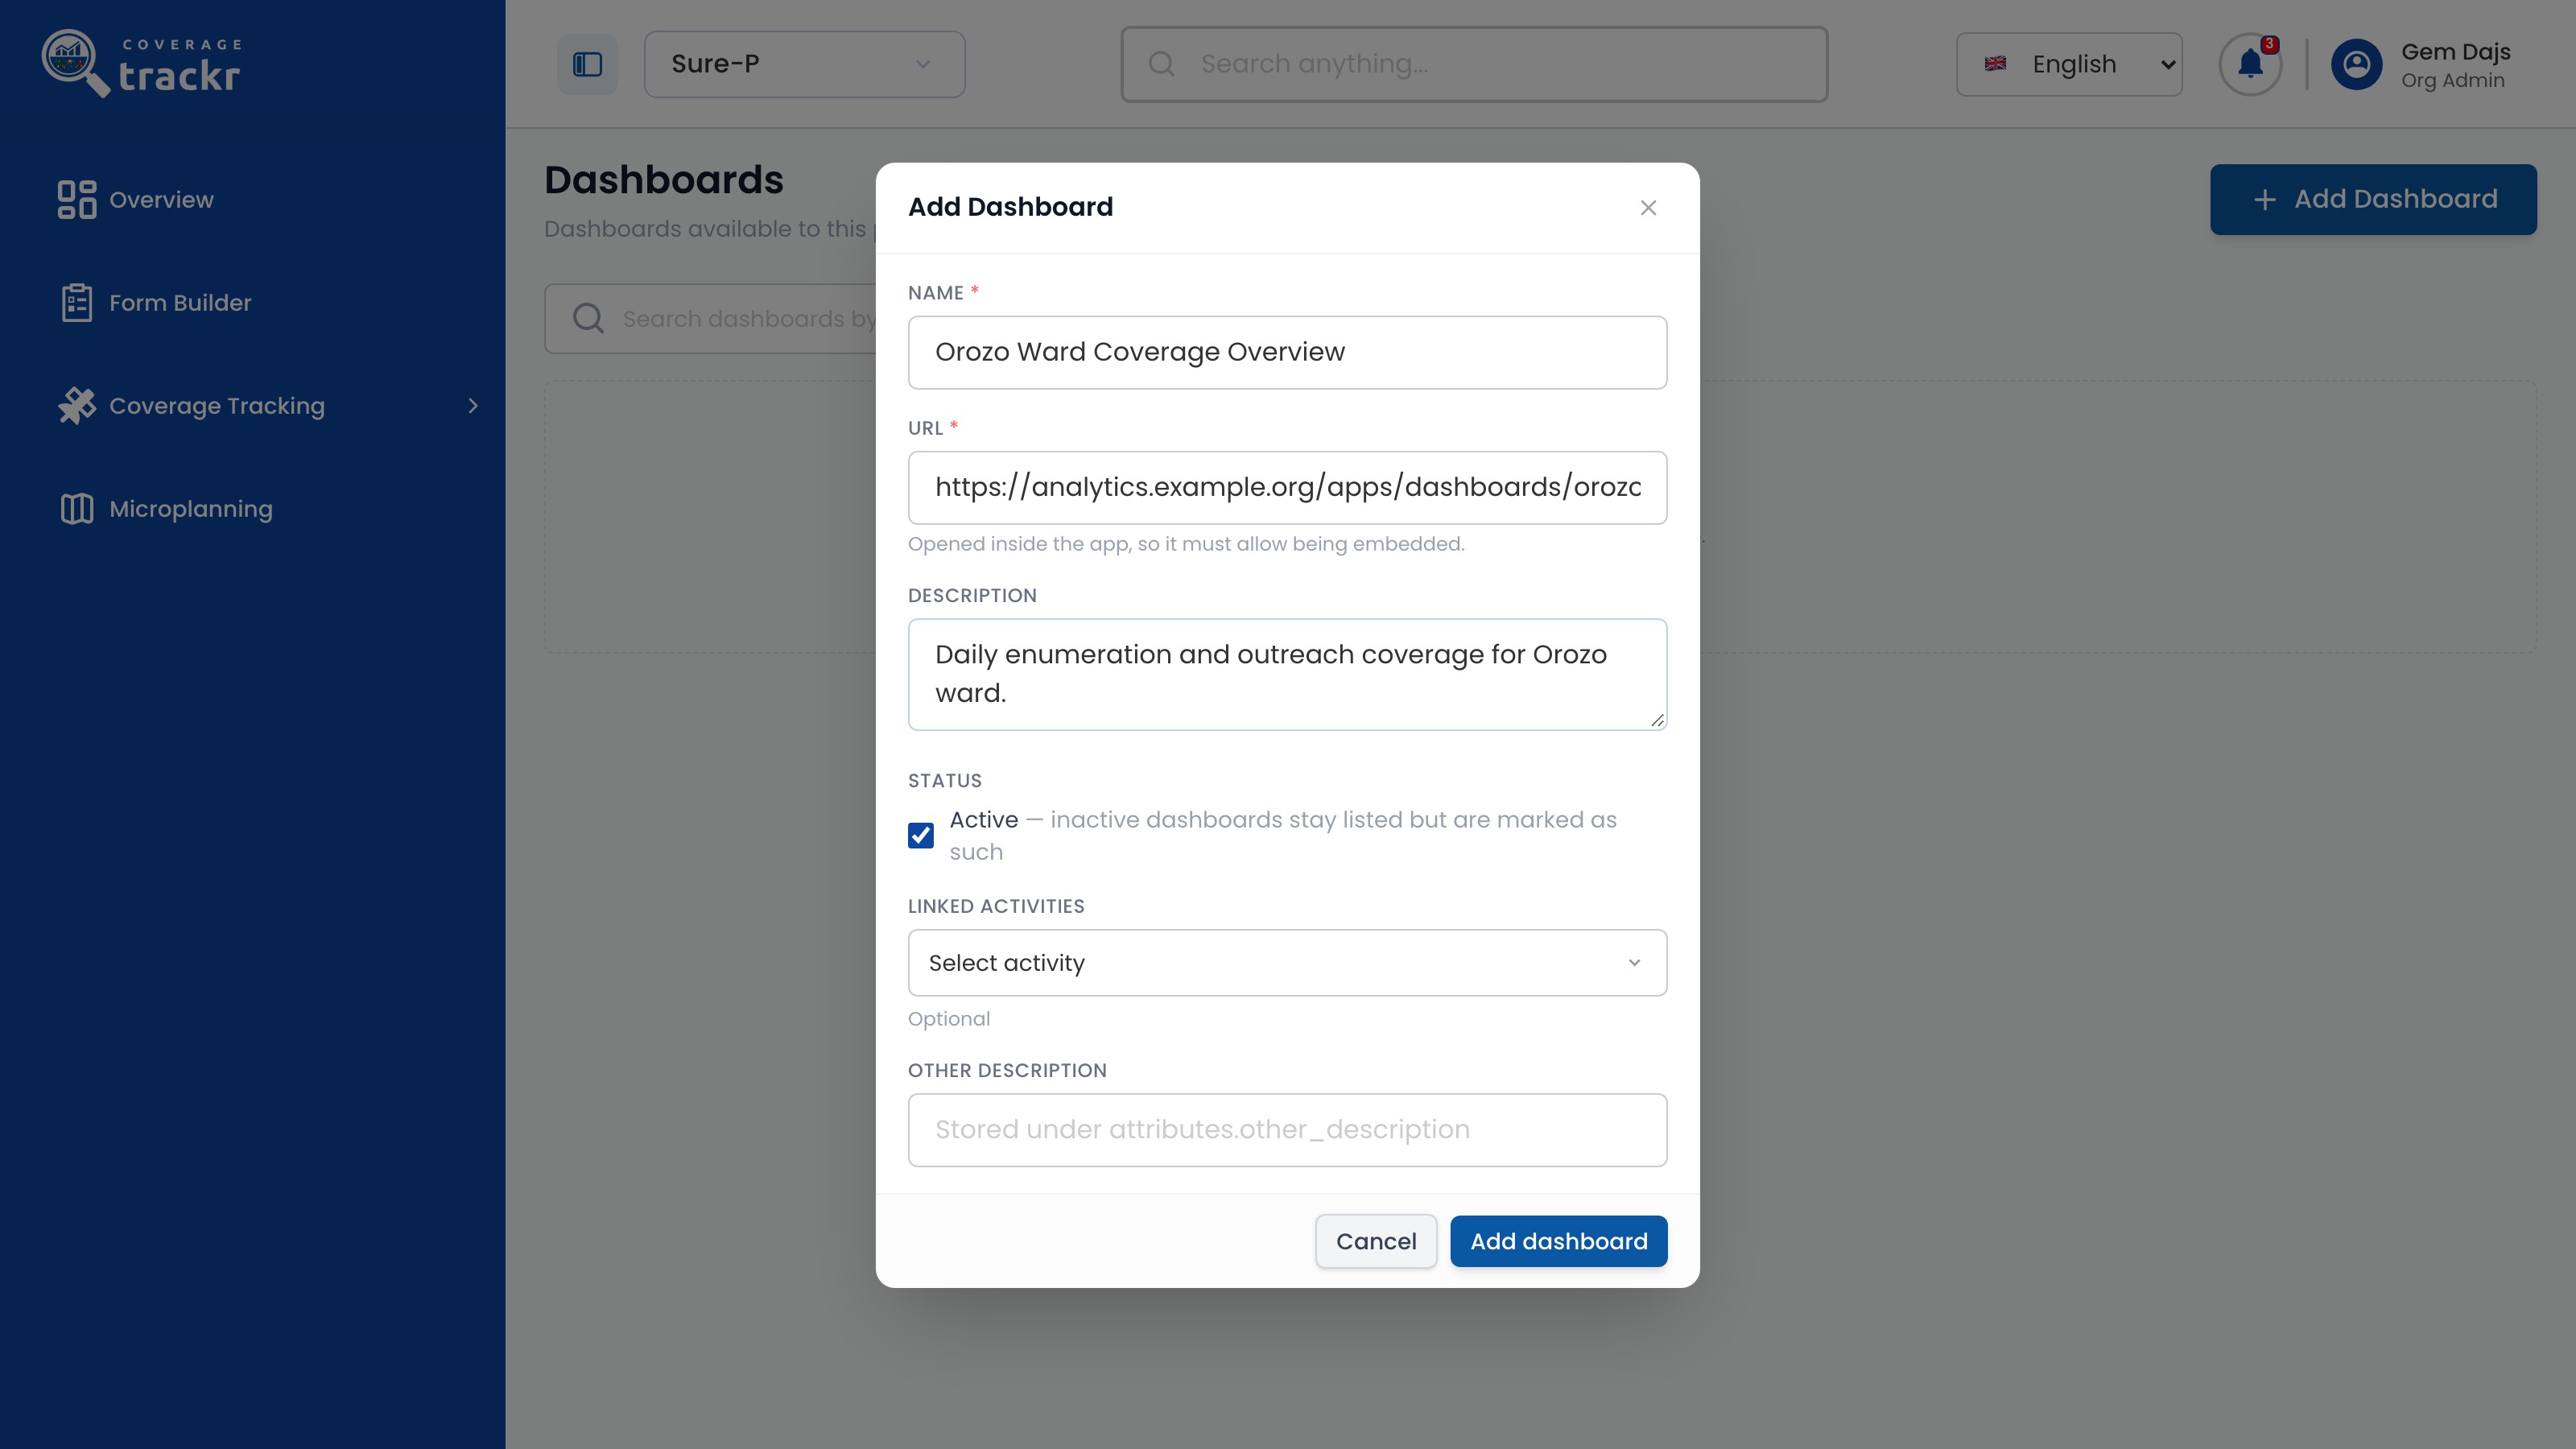
Enter the Name, the dashboard URL and a Description. Keep Active ticked, choose any Linked Activities, then select Add dashboard.

Add Dashboard form with a name, URL and description entered

1 — dashboard details · 2 — active and linked activities · 3 — add dashboard.

Add Dashboard form with a name, URL and description entered

Done. After you select Add dashboard, the dashboard is listed under Dashboards and opens inside CoverageTrackr.

If something goes wrong

Should I link activities?

Link the activities the dashboard reports on so people can find it from the right place. The link is optional.

Mobile app

Sign in to the mobile app

Choose the right environment and sign in to CoverageTrackr on your phone.

Field Worker 2 min read Mobile

Before you start

  • CoverageTrackr is installed on your Android phone.
  • You have the username and password your supervisor gave you.

Open the app

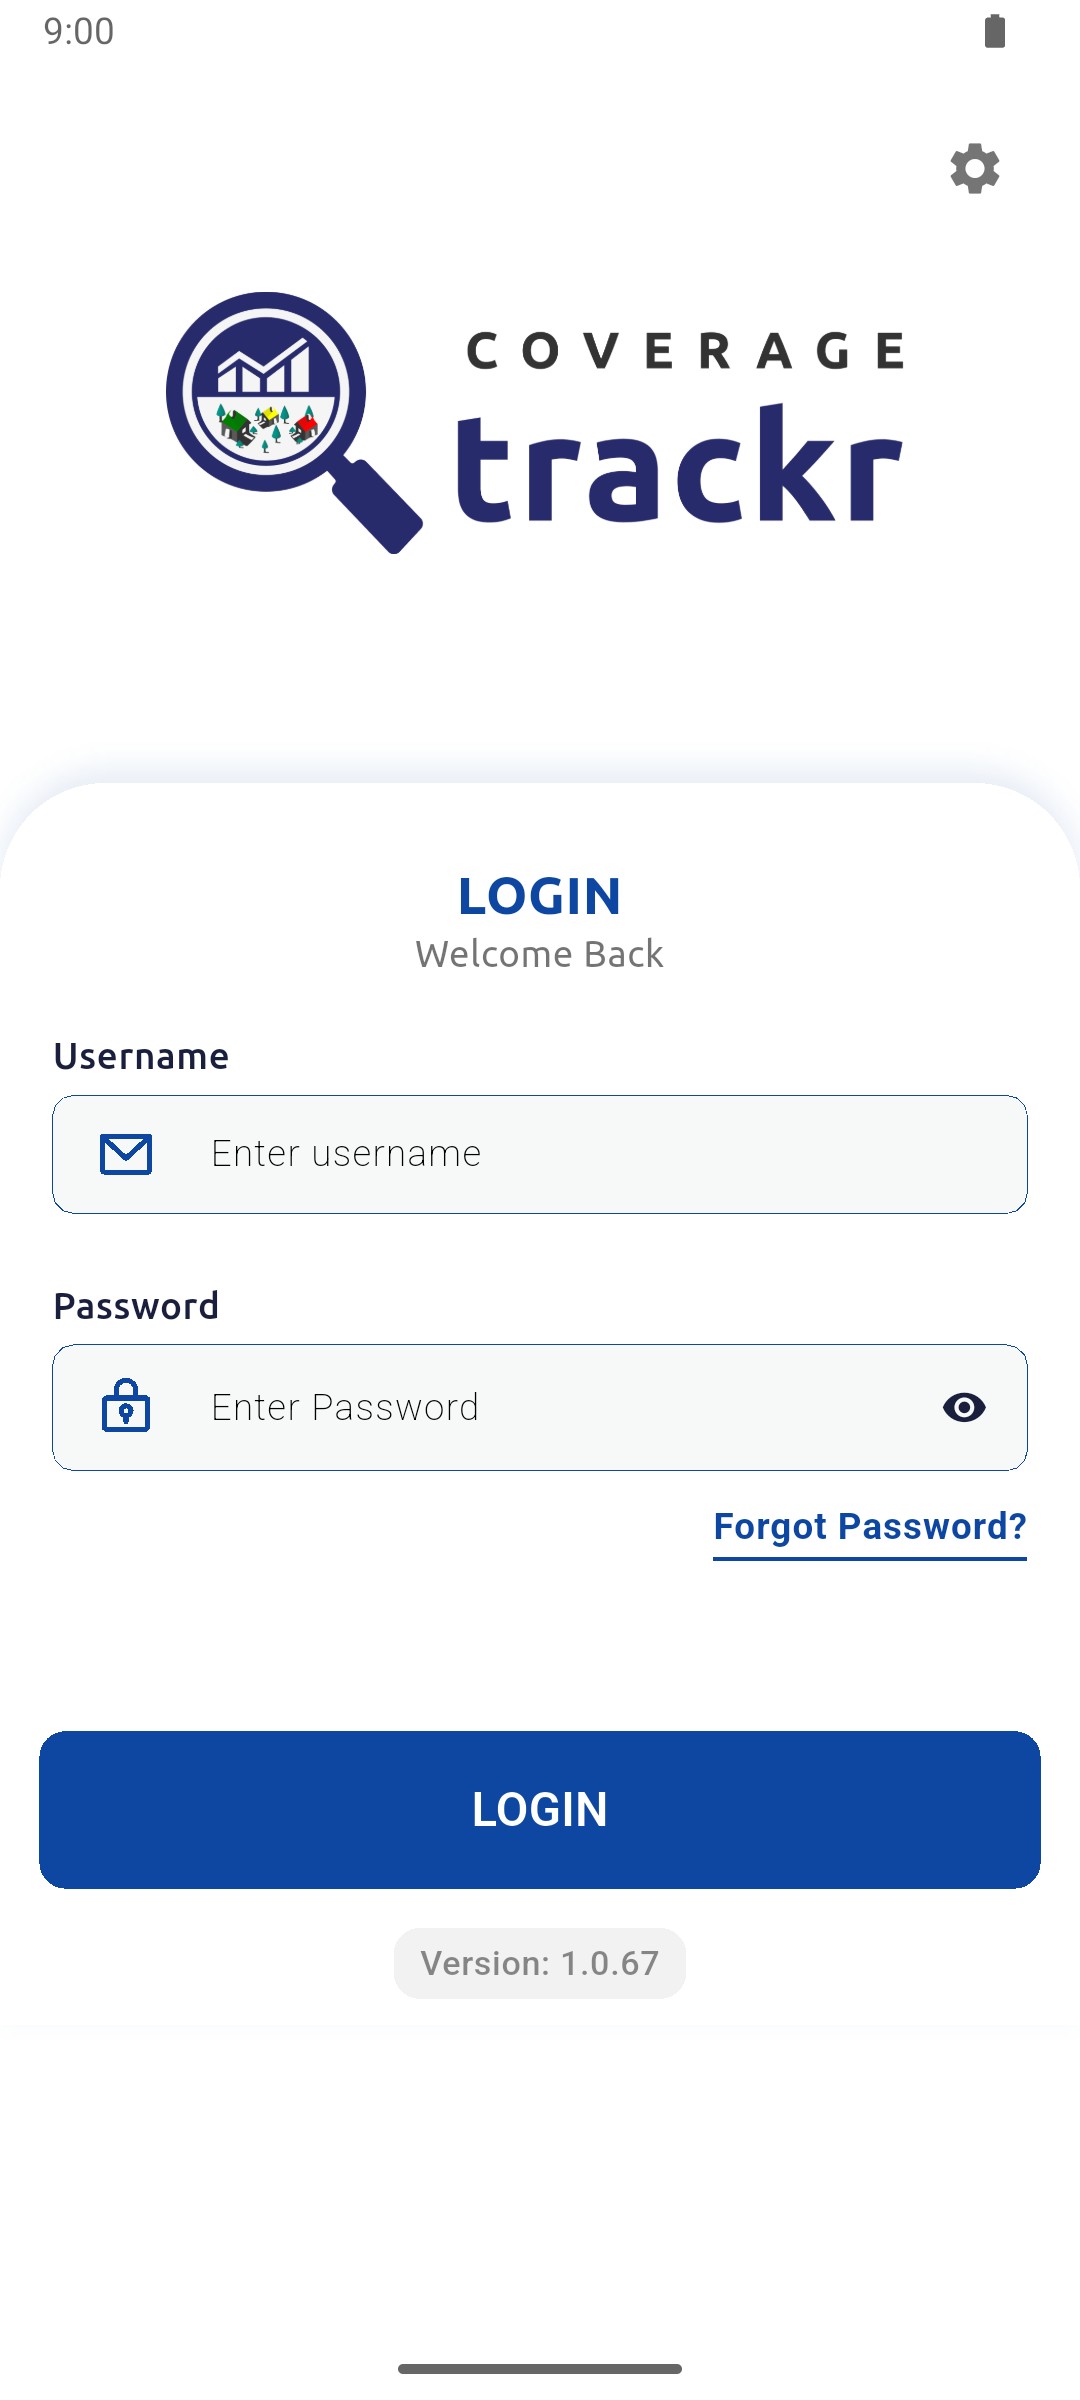
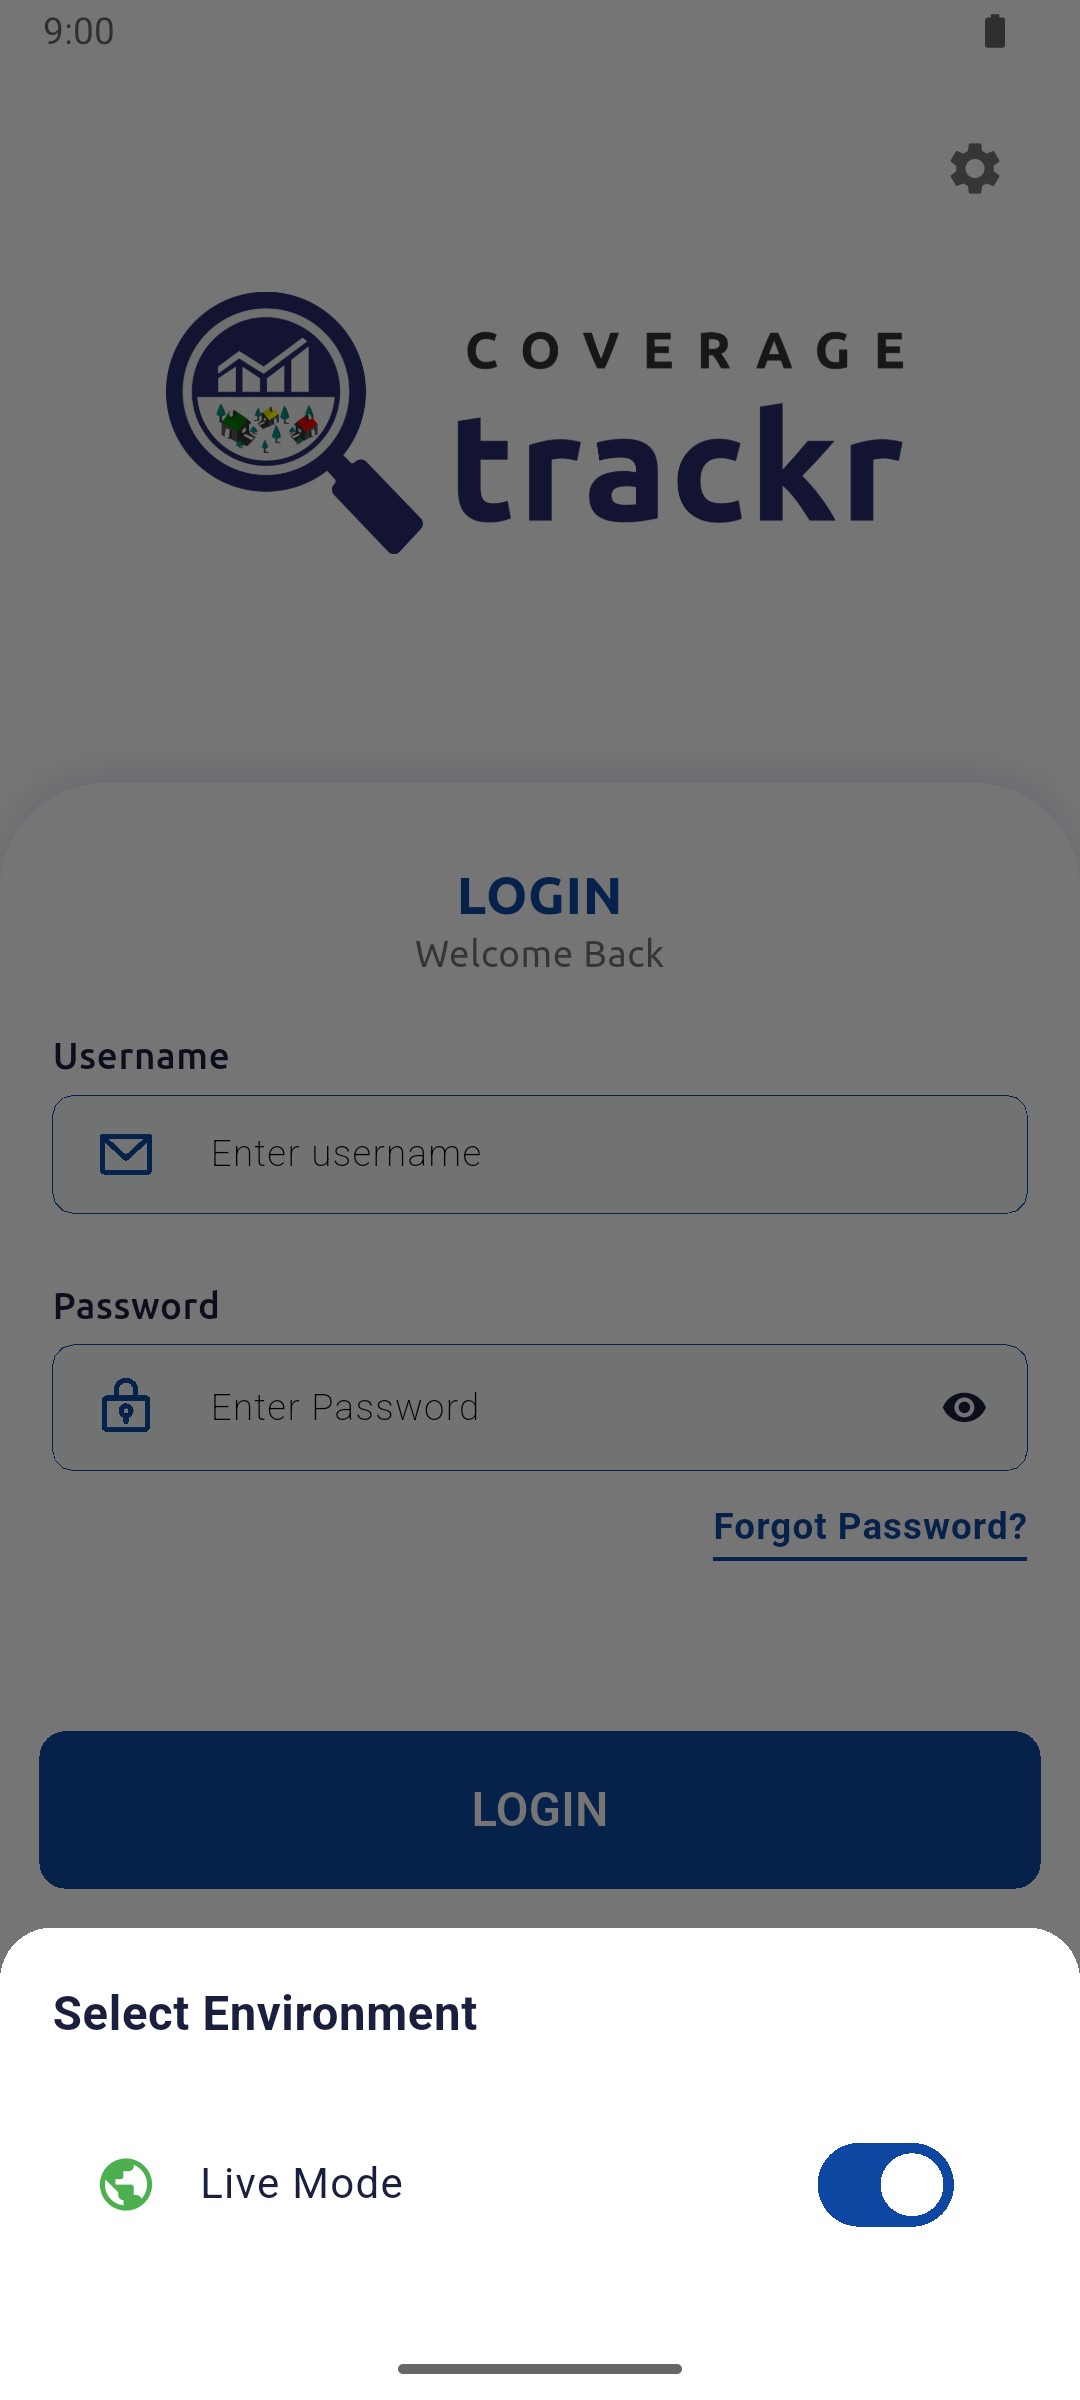
Open CoverageTrackr. The LOGIN screen shows the app version at the bottom.

Mobile LOGIN screen with empty username and password fields

1 — app version.

Mobile LOGIN screen with empty username and password fields

Check the environment

Tap the settings gear at the top right to open Select Environment.

Select Environment panel with the Live Mode switch on

1 — live mode switch.

Select Environment panel with the Live Mode switch on

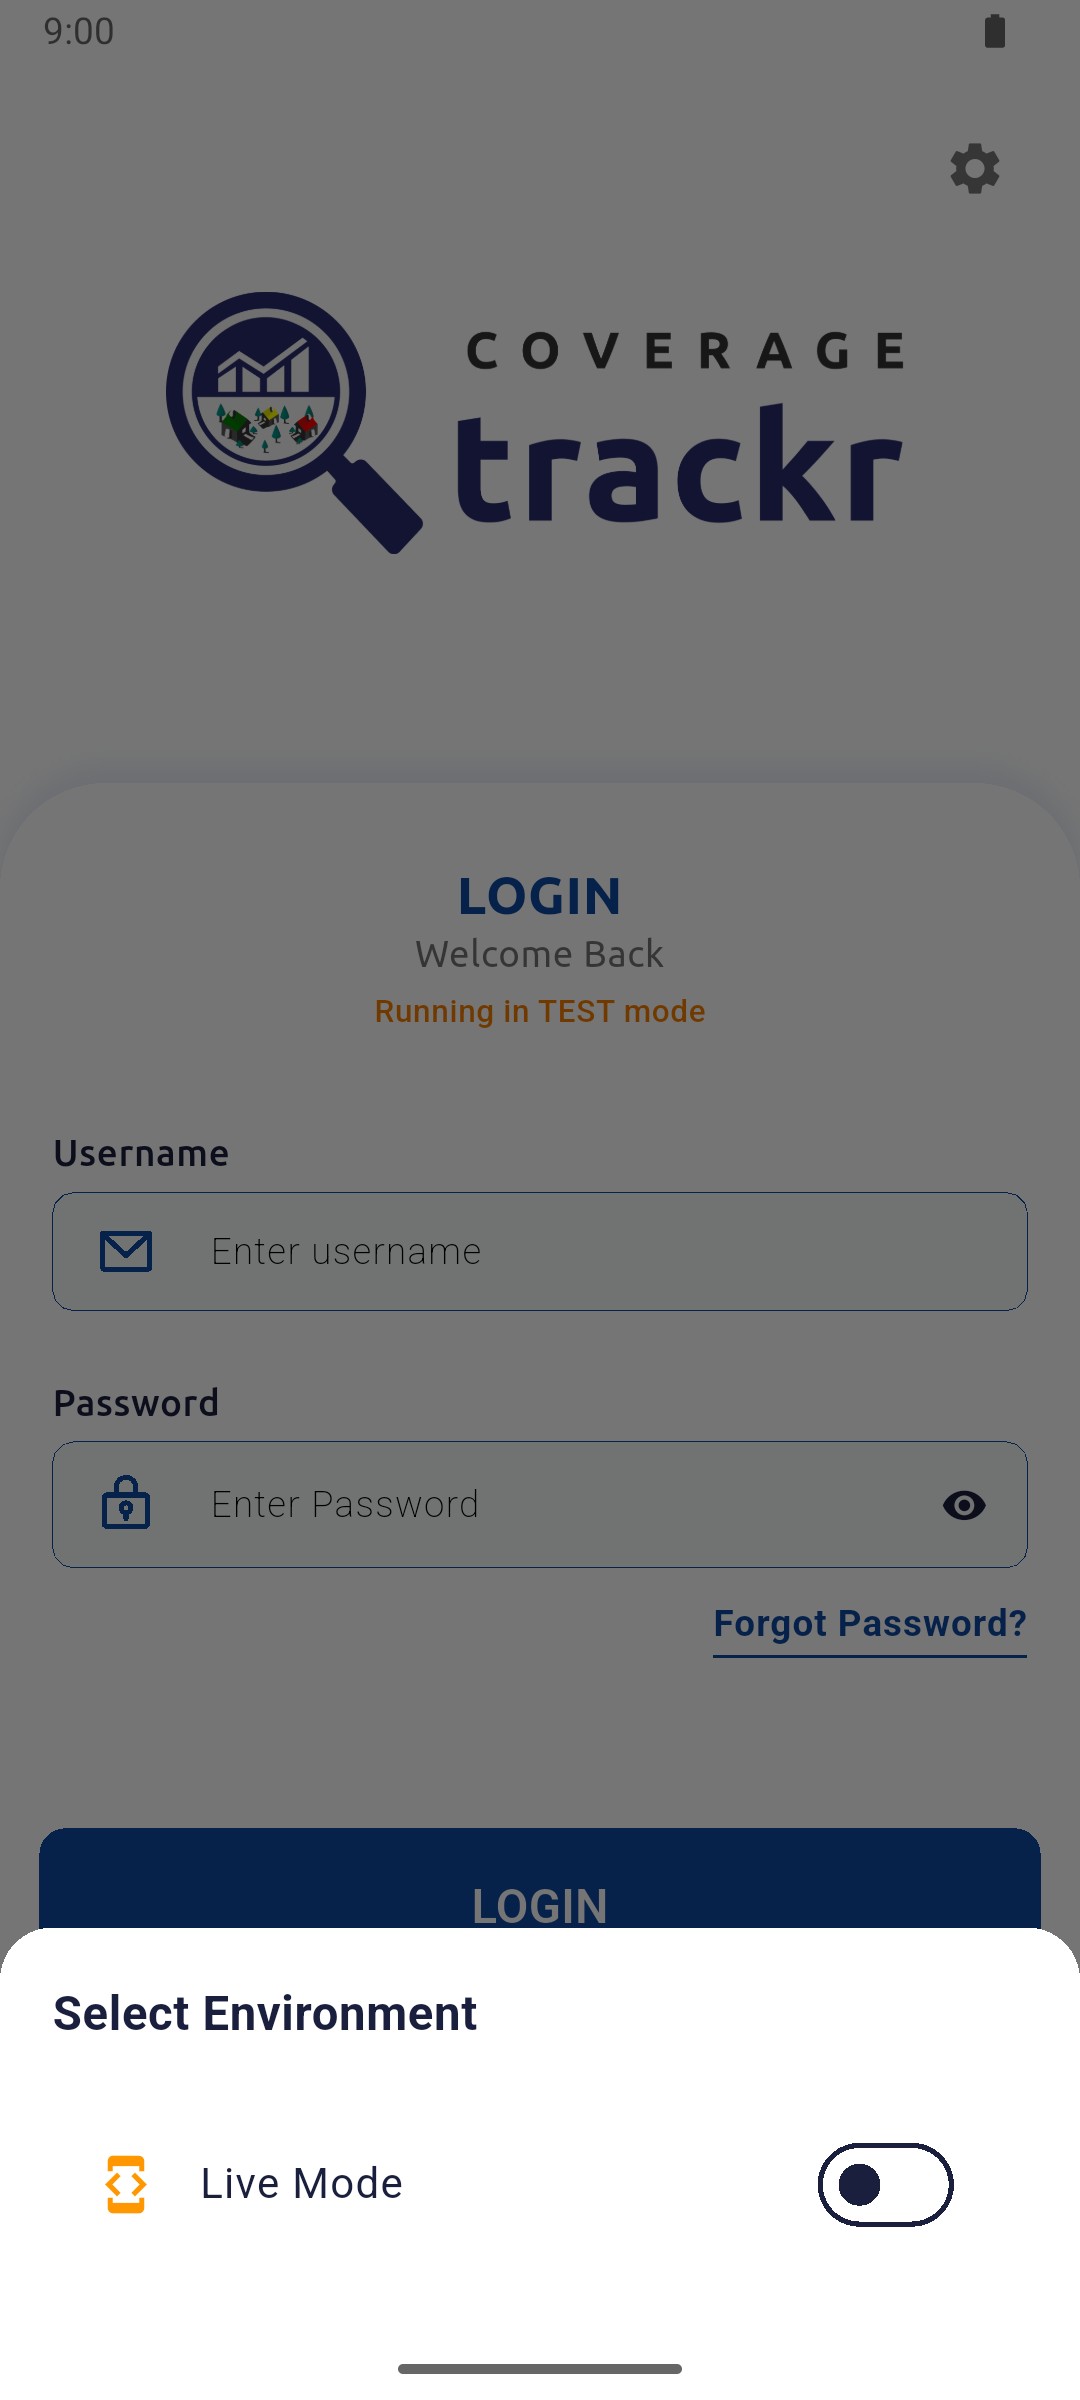
Switch to test only when told to

Switch Live Mode off only for practice or testing. The login screen then shows Running in TEST mode.
Select Environment panel with Live Mode switched off

1 — live mode switch · 2 — test mode message.

Select Environment panel with Live Mode switched off

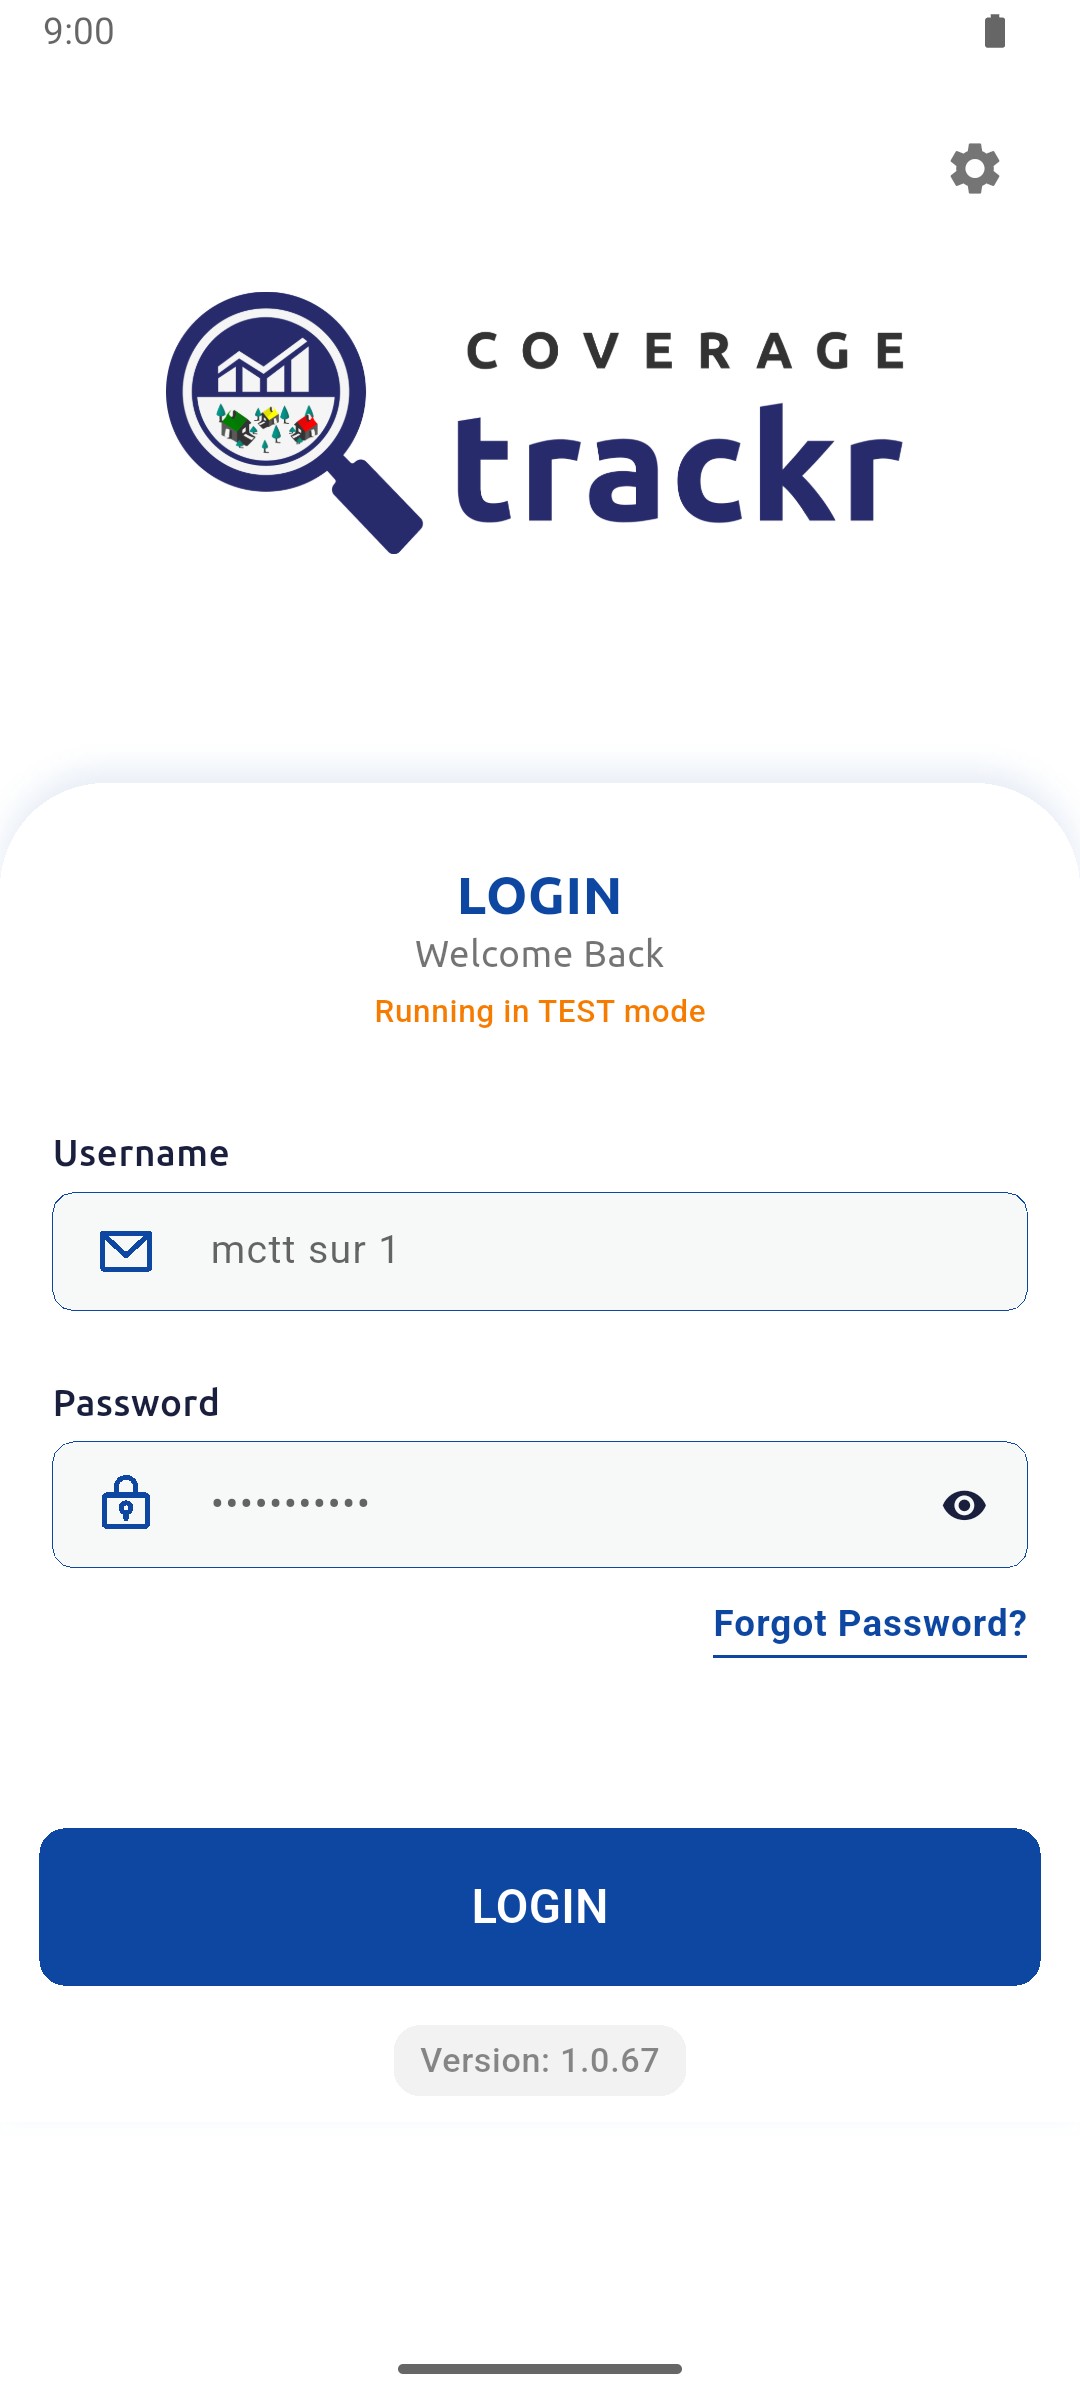
Enter your details

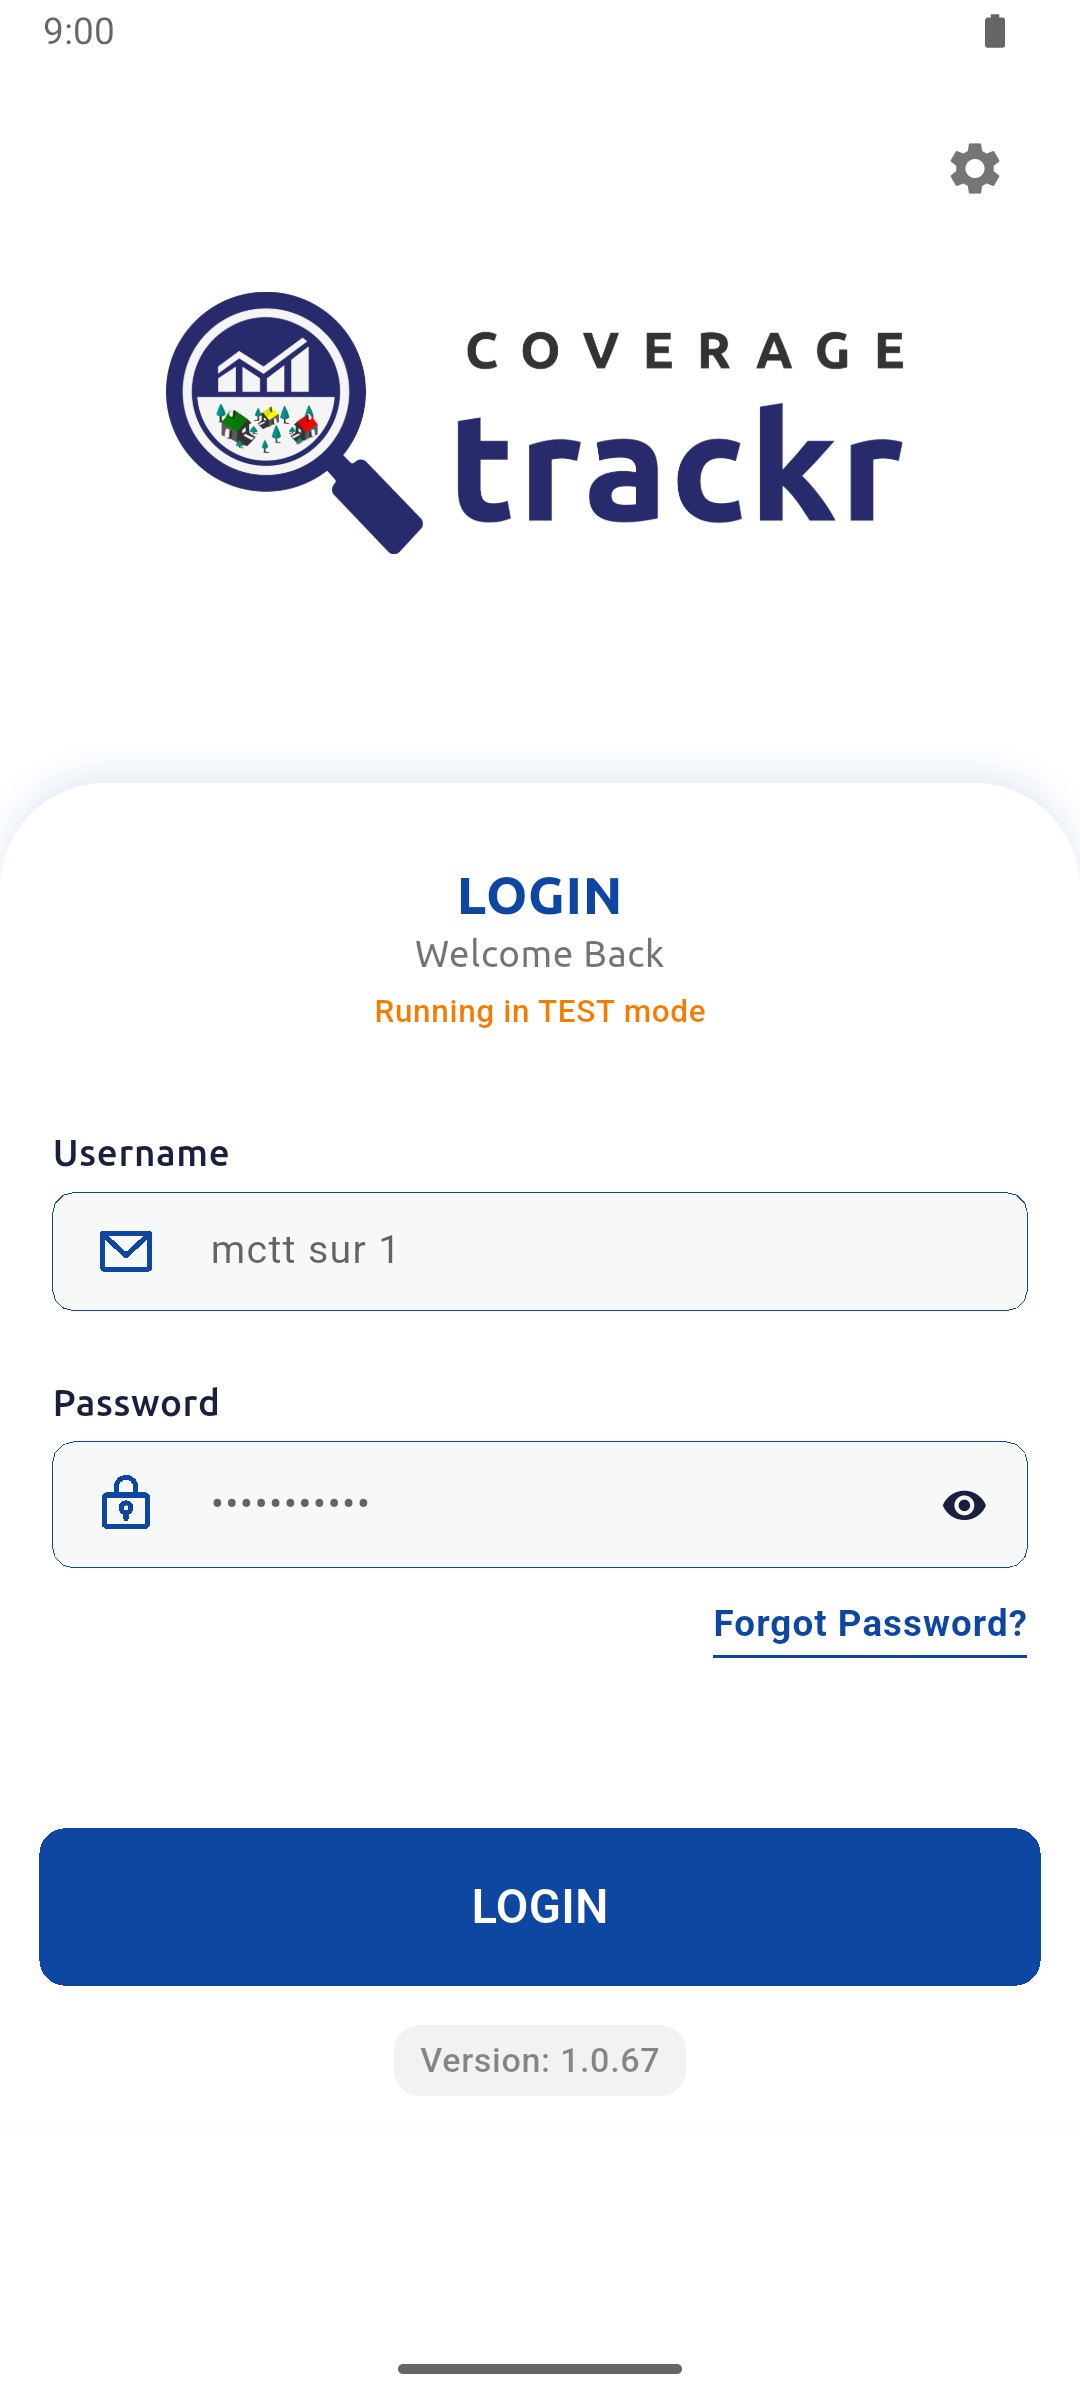
Enter your Username and Password, then tap LOGIN.

Login screen with a username and masked password entered in TEST mode

1 — username field · 2 — password field · 3 — login button.

Login screen with a username and masked password entered in TEST mode

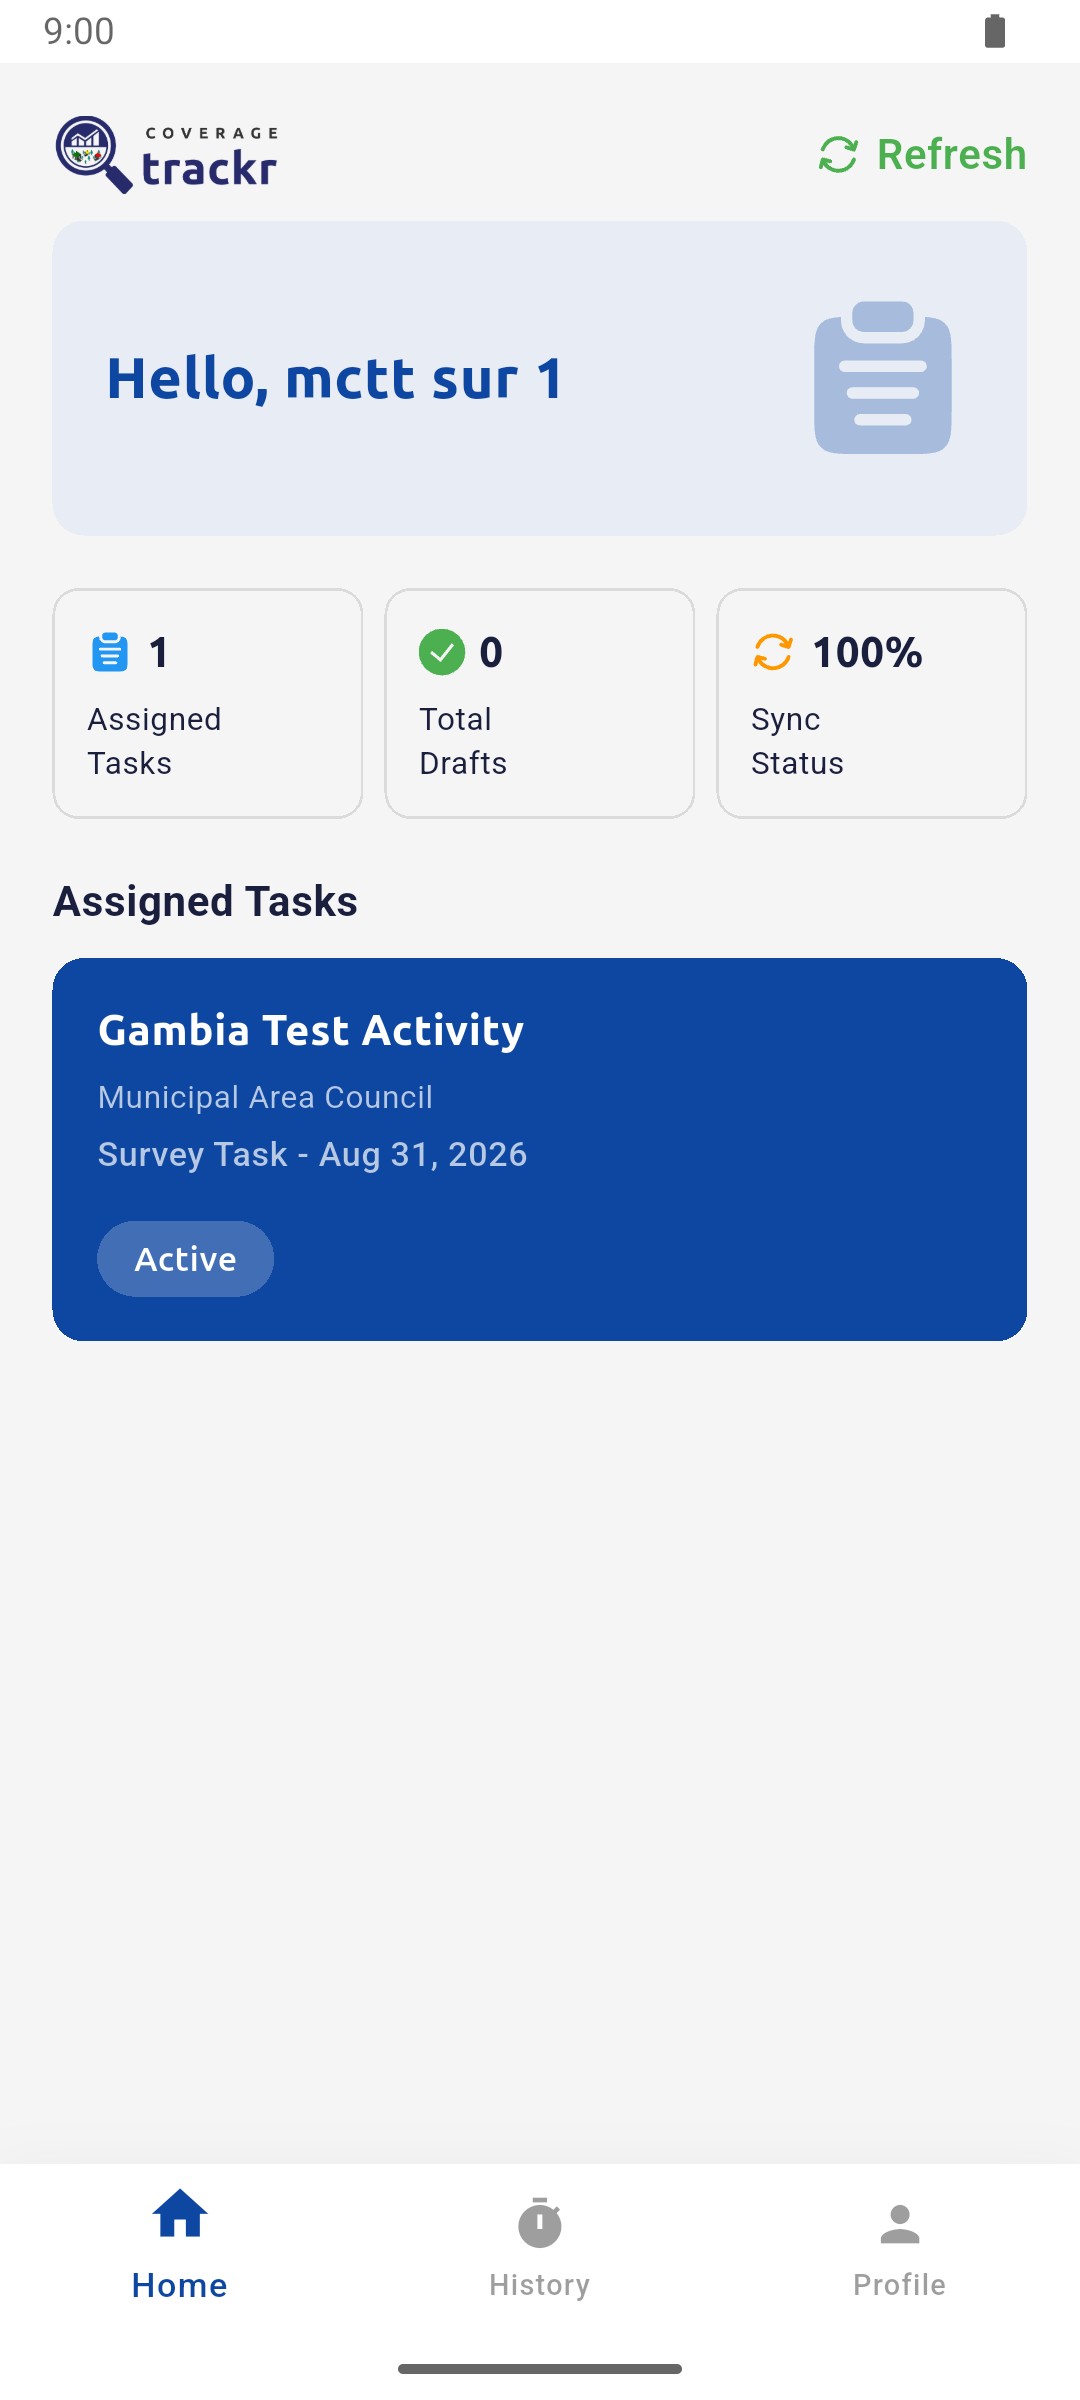
Check the home screen

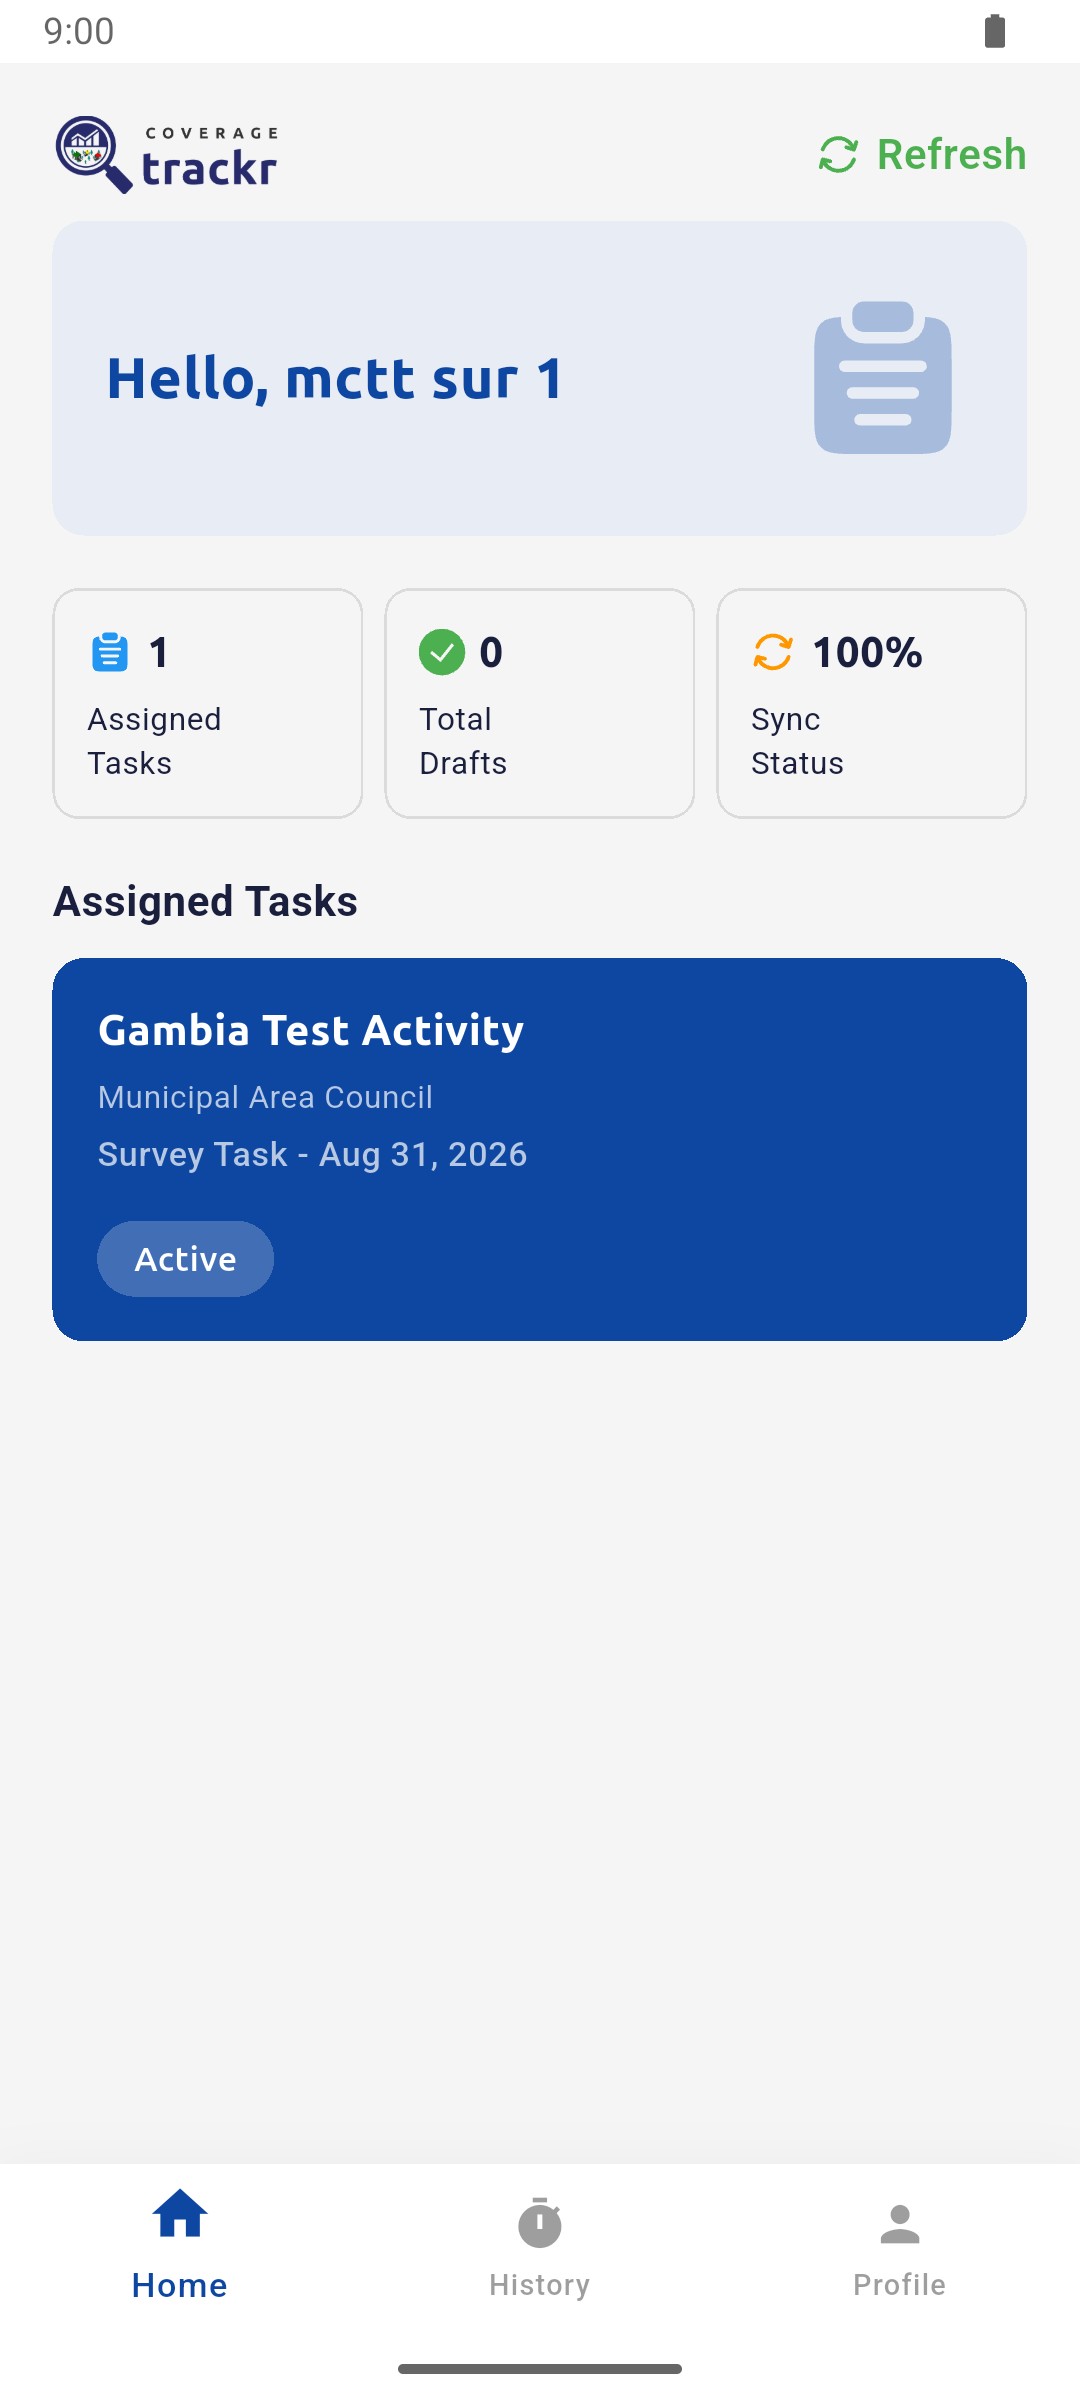
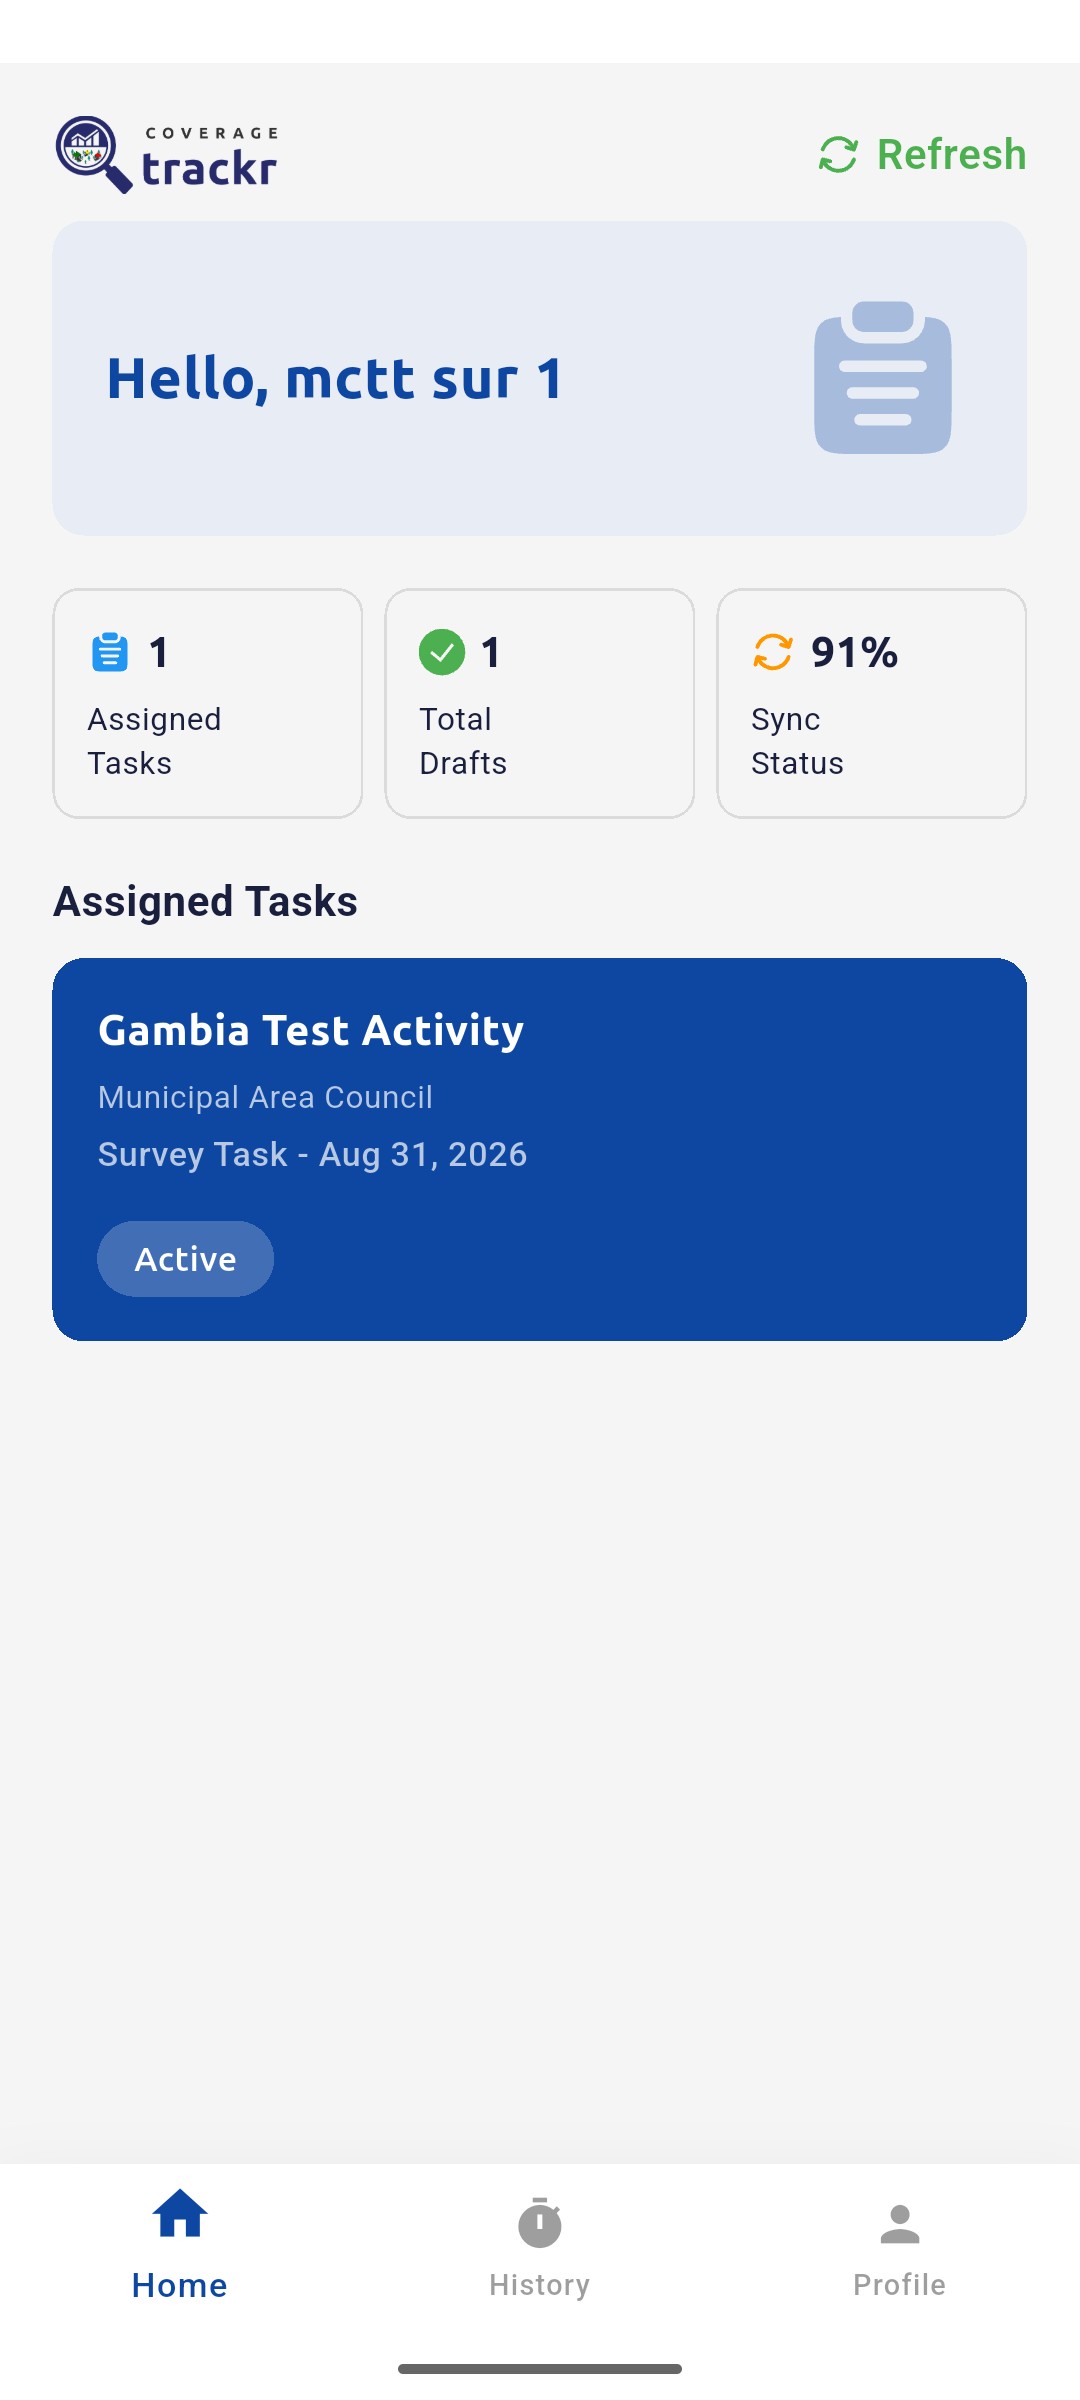
The home screen shows your Assigned Tasks, Total Drafts and Sync Status. Wait for any location download to finish before starting work.

Home screen greeting mctt sur 1 with one assigned task

1 — assigned tasks · 2 — total drafts · 3 — sync status.

Home screen greeting mctt sur 1 with one assigned task

Done. The home screen greets you by name and lists your assigned tasks.

If something goes wrong

When should I switch Live Mode off?

Only when your supervisor asks you to practise or test. Real field work must use Live Mode.

Mobile app

Open a task and confirm your location

Start an assigned task at the right place by confirming your position, facility and settlement.

Field Worker 3 min read Mobile

Before you start

  • You are signed in and at the household or site you are visiting.
  • Location is switched on for your phone.

Open your task

On the home screen, tap your task under Assigned Tasks.

Home screen with the Gambia Test Activity task

1 — assigned task.

Home screen with the Gambia Test Activity task

Allow location

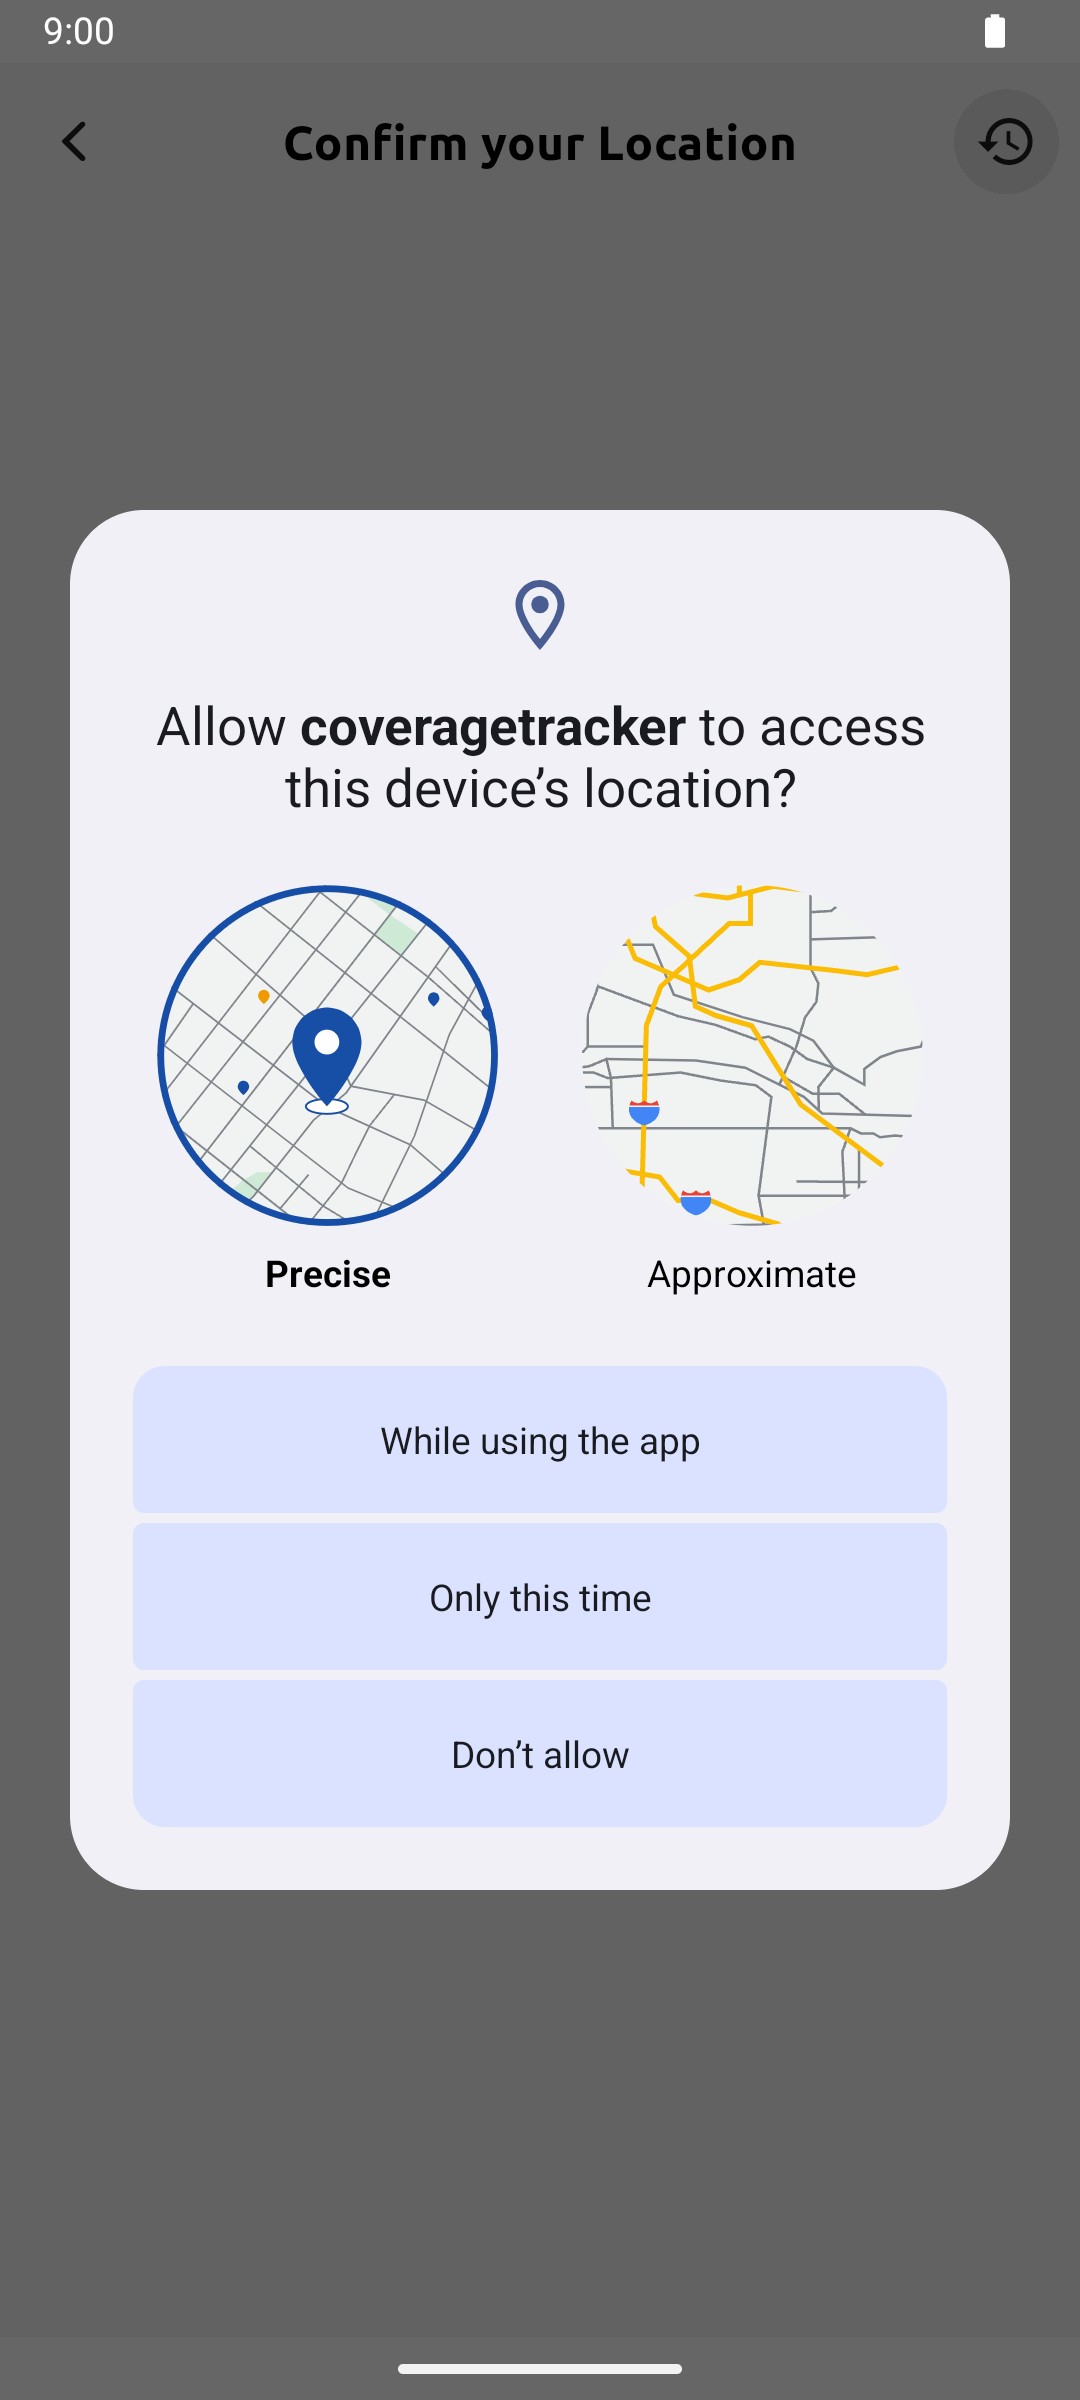
When asked, choose Precise and tap While using the app. The task cannot check your position without it.

Android prompt asking to allow the app to access this device's location

1 — precise location · 2 — while using the app.

Android prompt asking to allow the app to access this device's location

Check you are in range

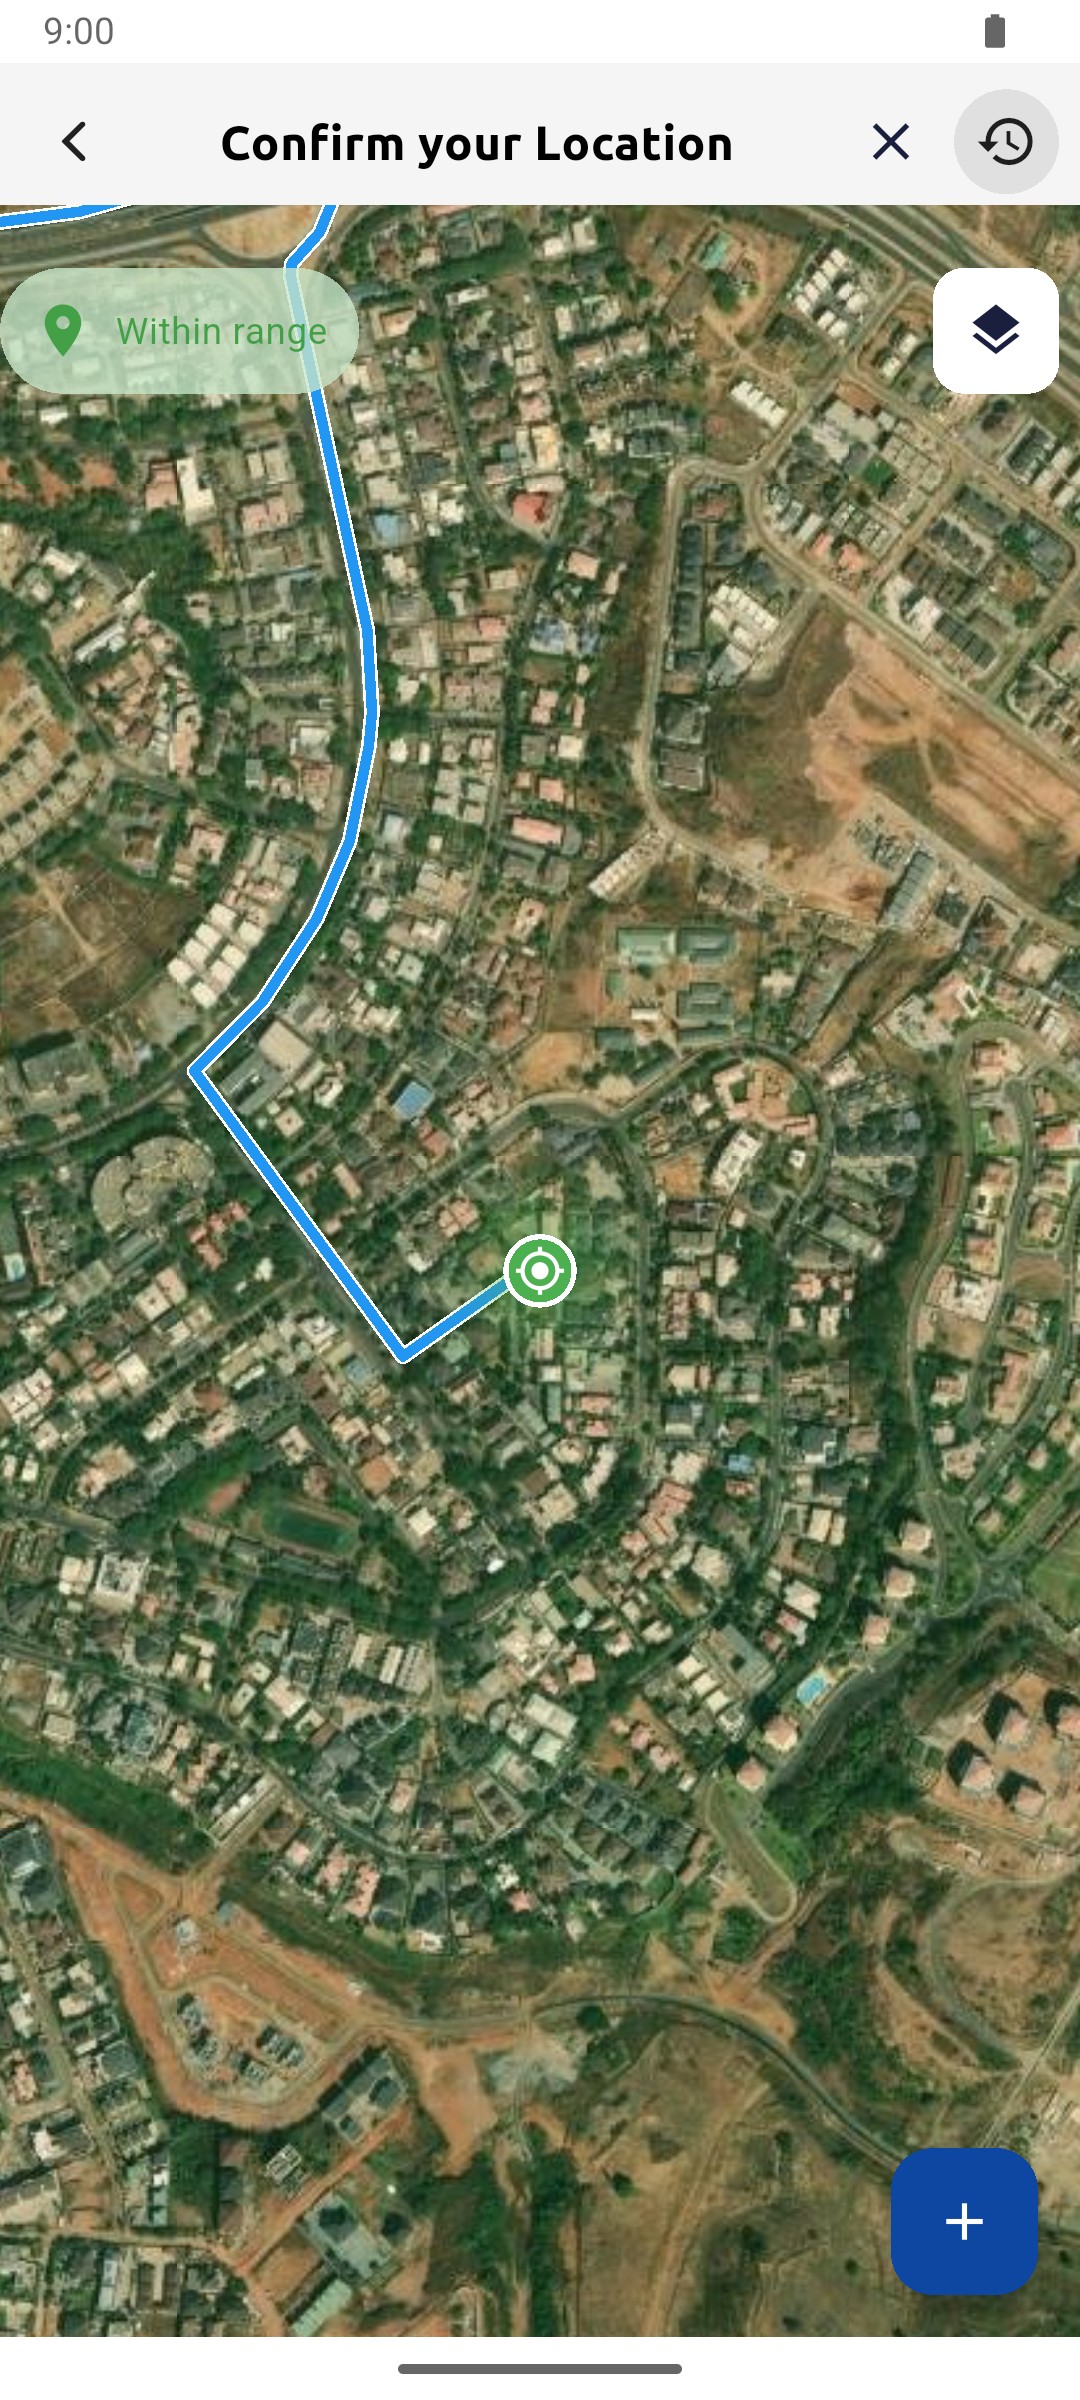
Confirm your Location shows your position and a route. Continue only when it says Within range.

Confirm your Location map showing Within range and a route to the current position

1 — current position · 2 — within range status.

Confirm your Location map showing Within range and a route to the current position

Start picking a point

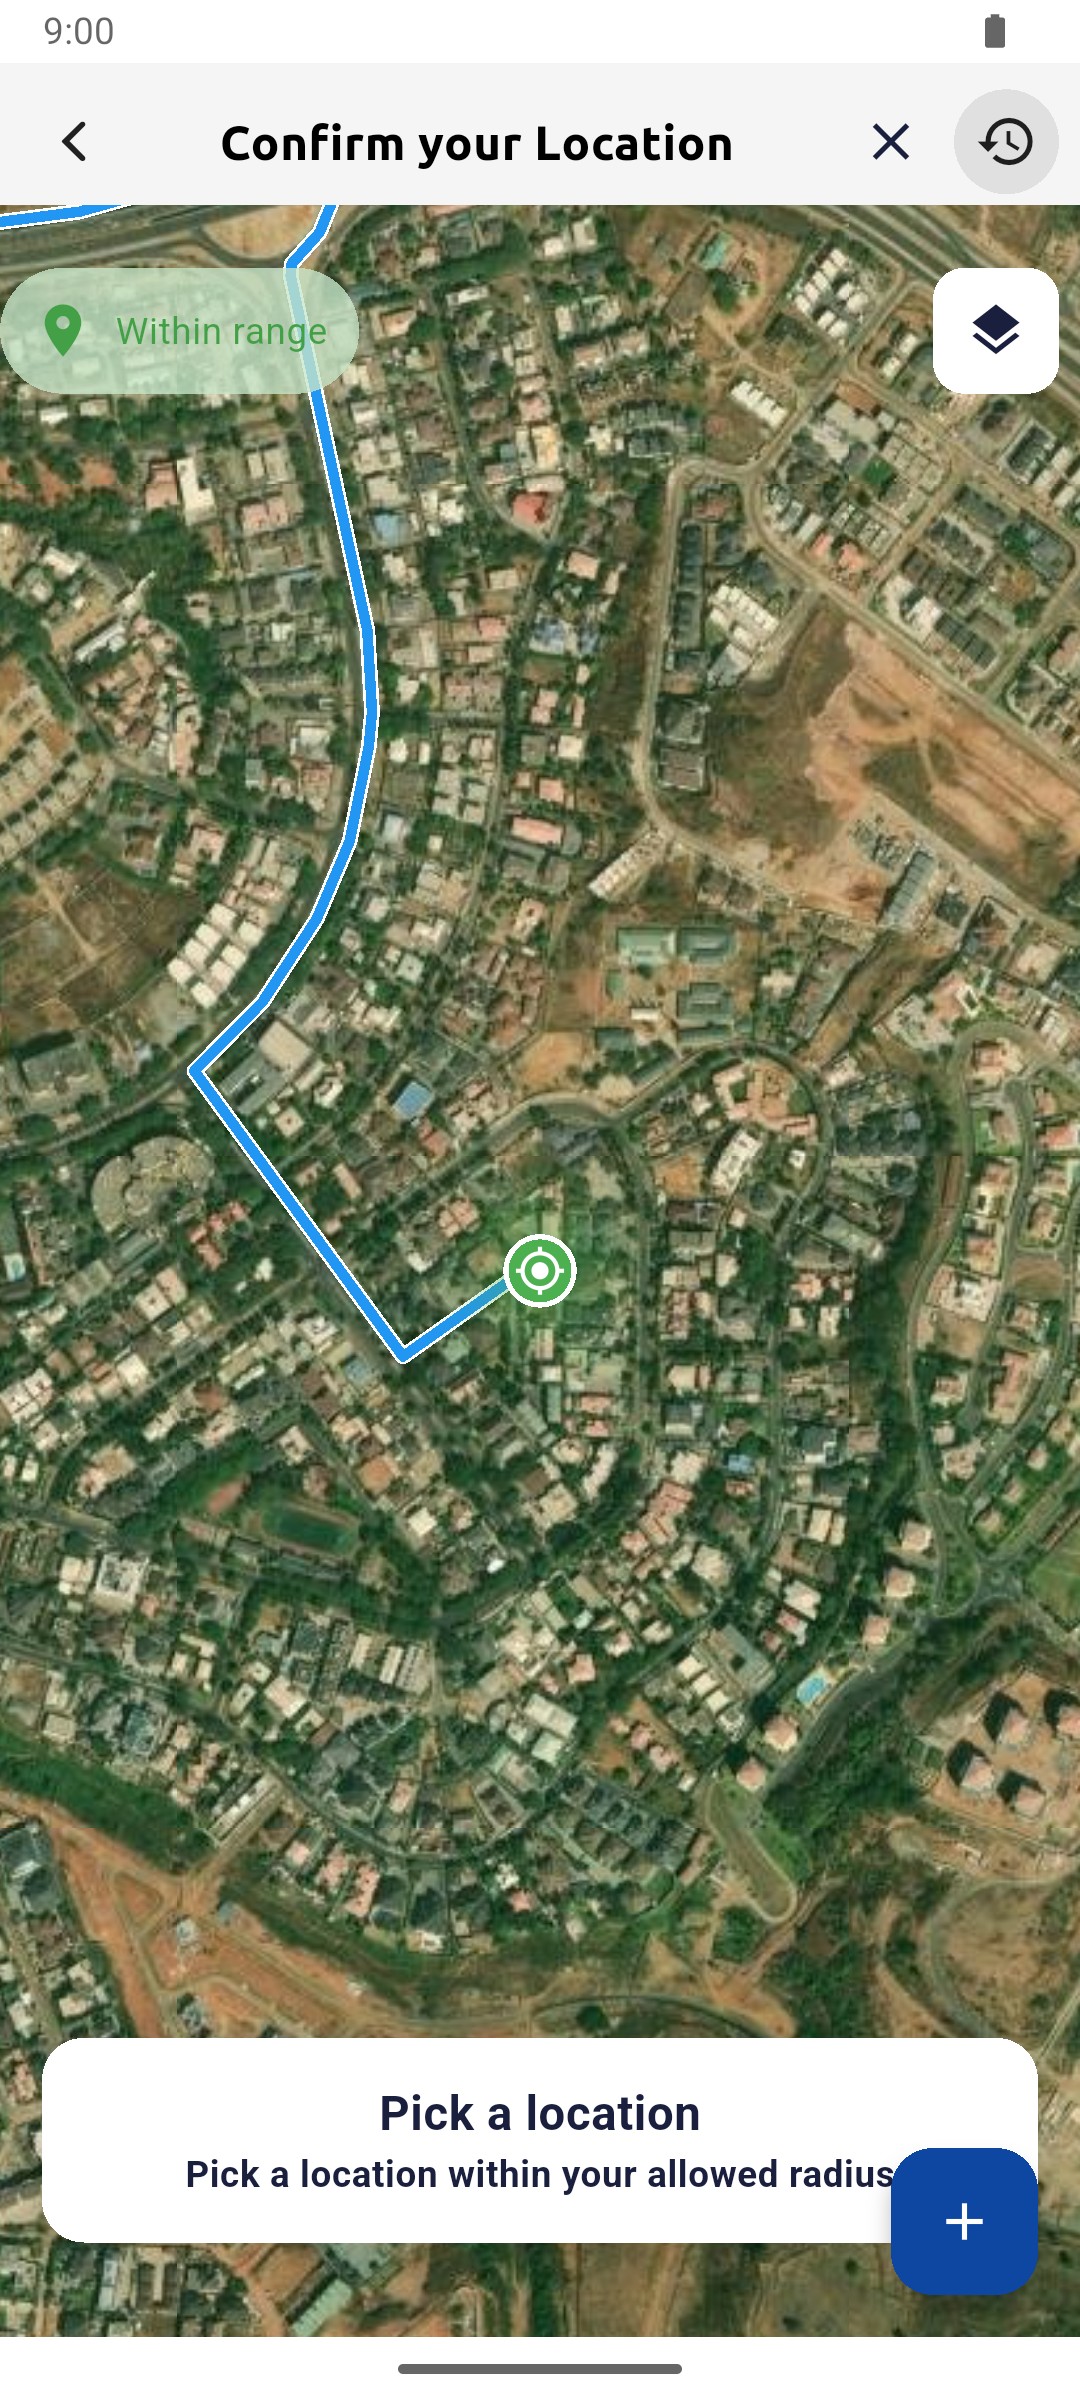
Tap the + button. The app asks you to Pick a location within your allowed radius.

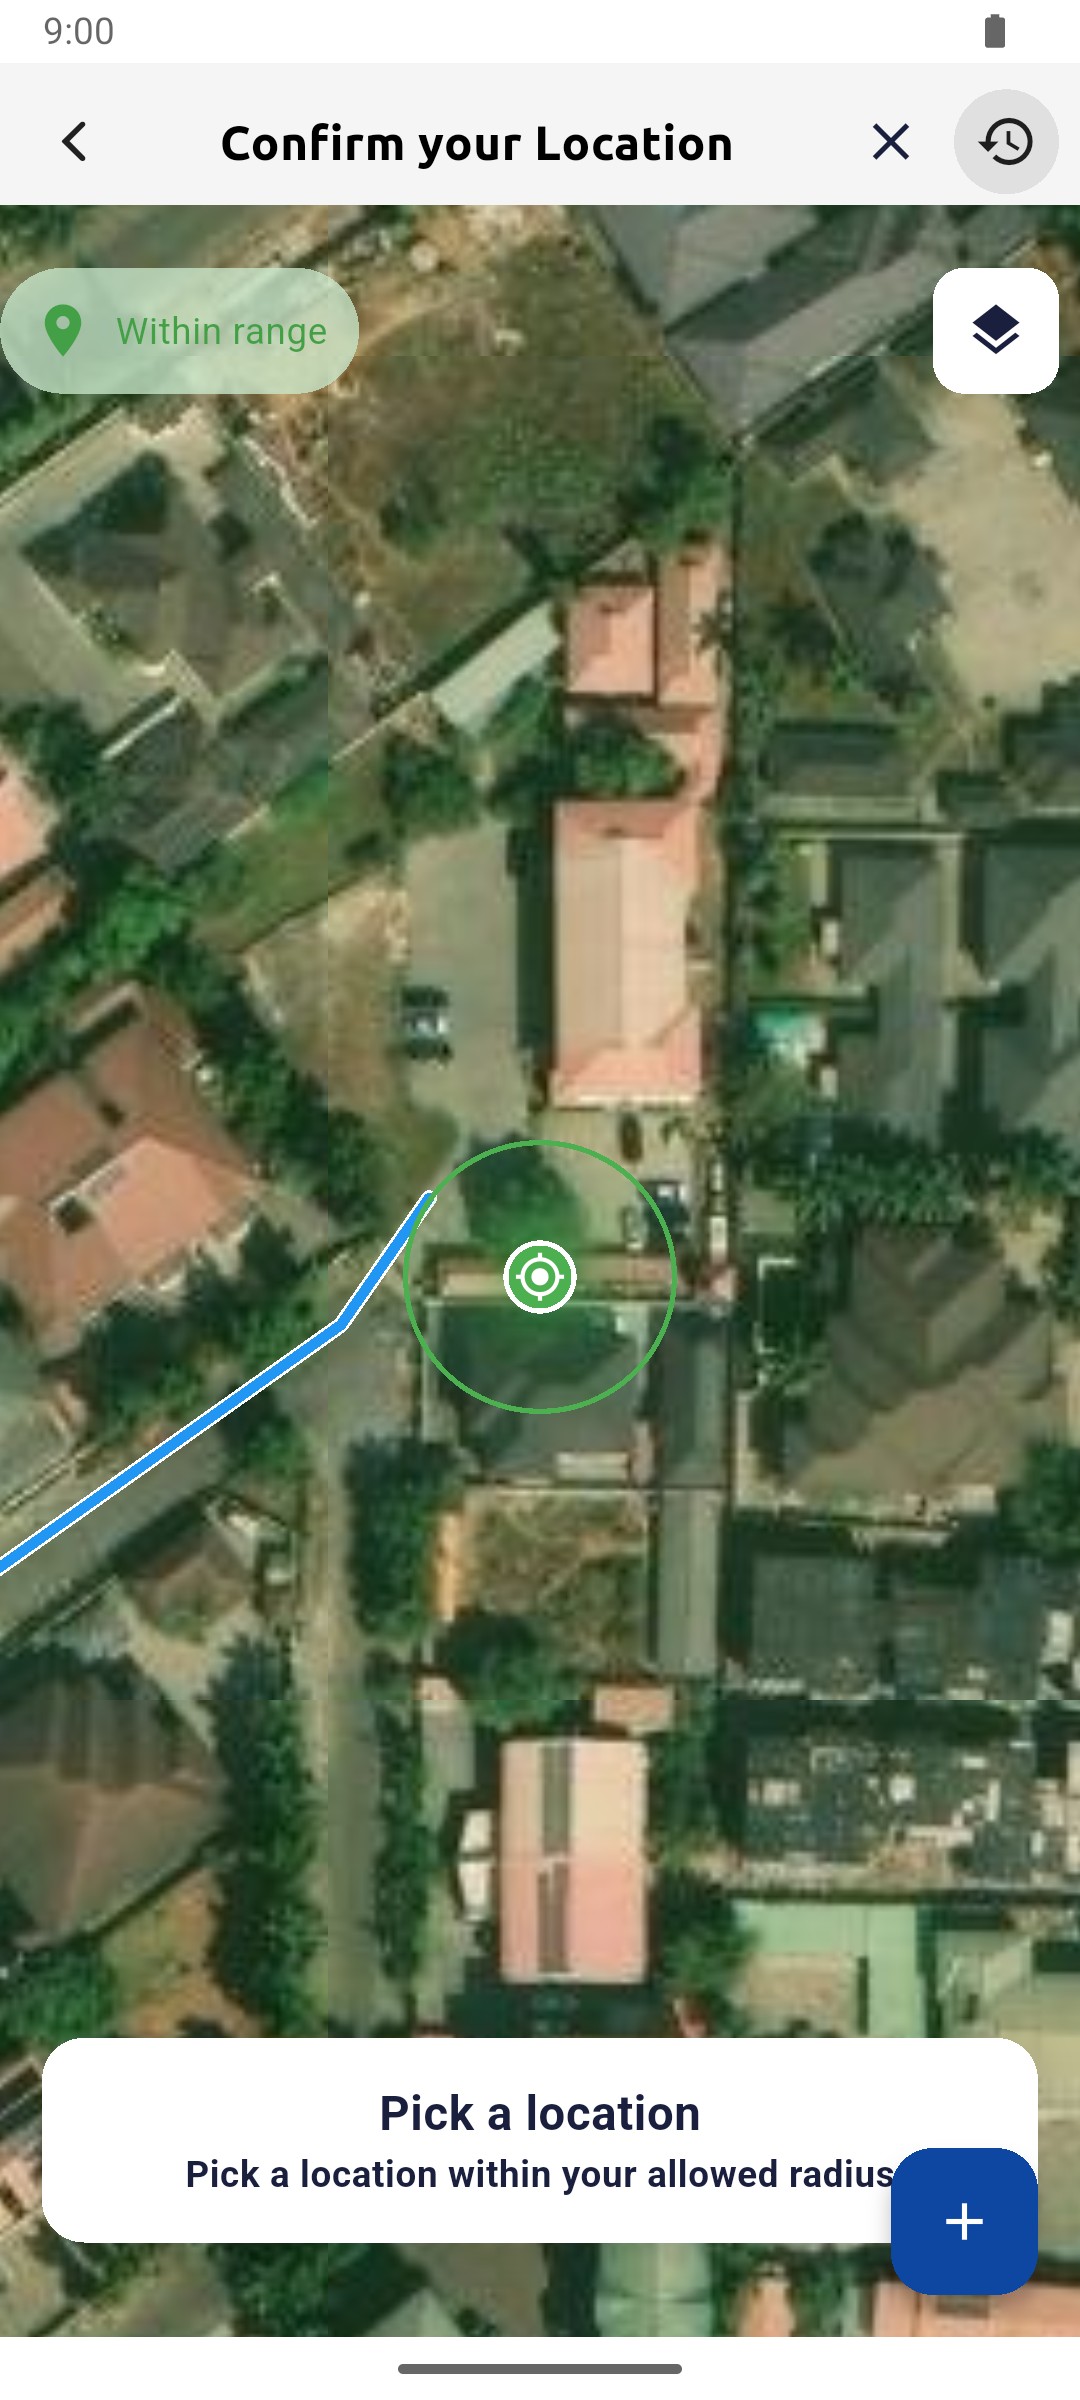
Map with the Pick a location prompt

1 — add location button · 2 — pick a location prompt.

Map with the Pick a location prompt

Zoom in to the circle

Double tap near your position to zoom in until the green circle around you is clearly visible.

Zoomed map showing the green allowed-radius circle around the current position

1 — allowed-radius circle.

Zoomed map showing the green allowed-radius circle around the current position

Tap inside the circle

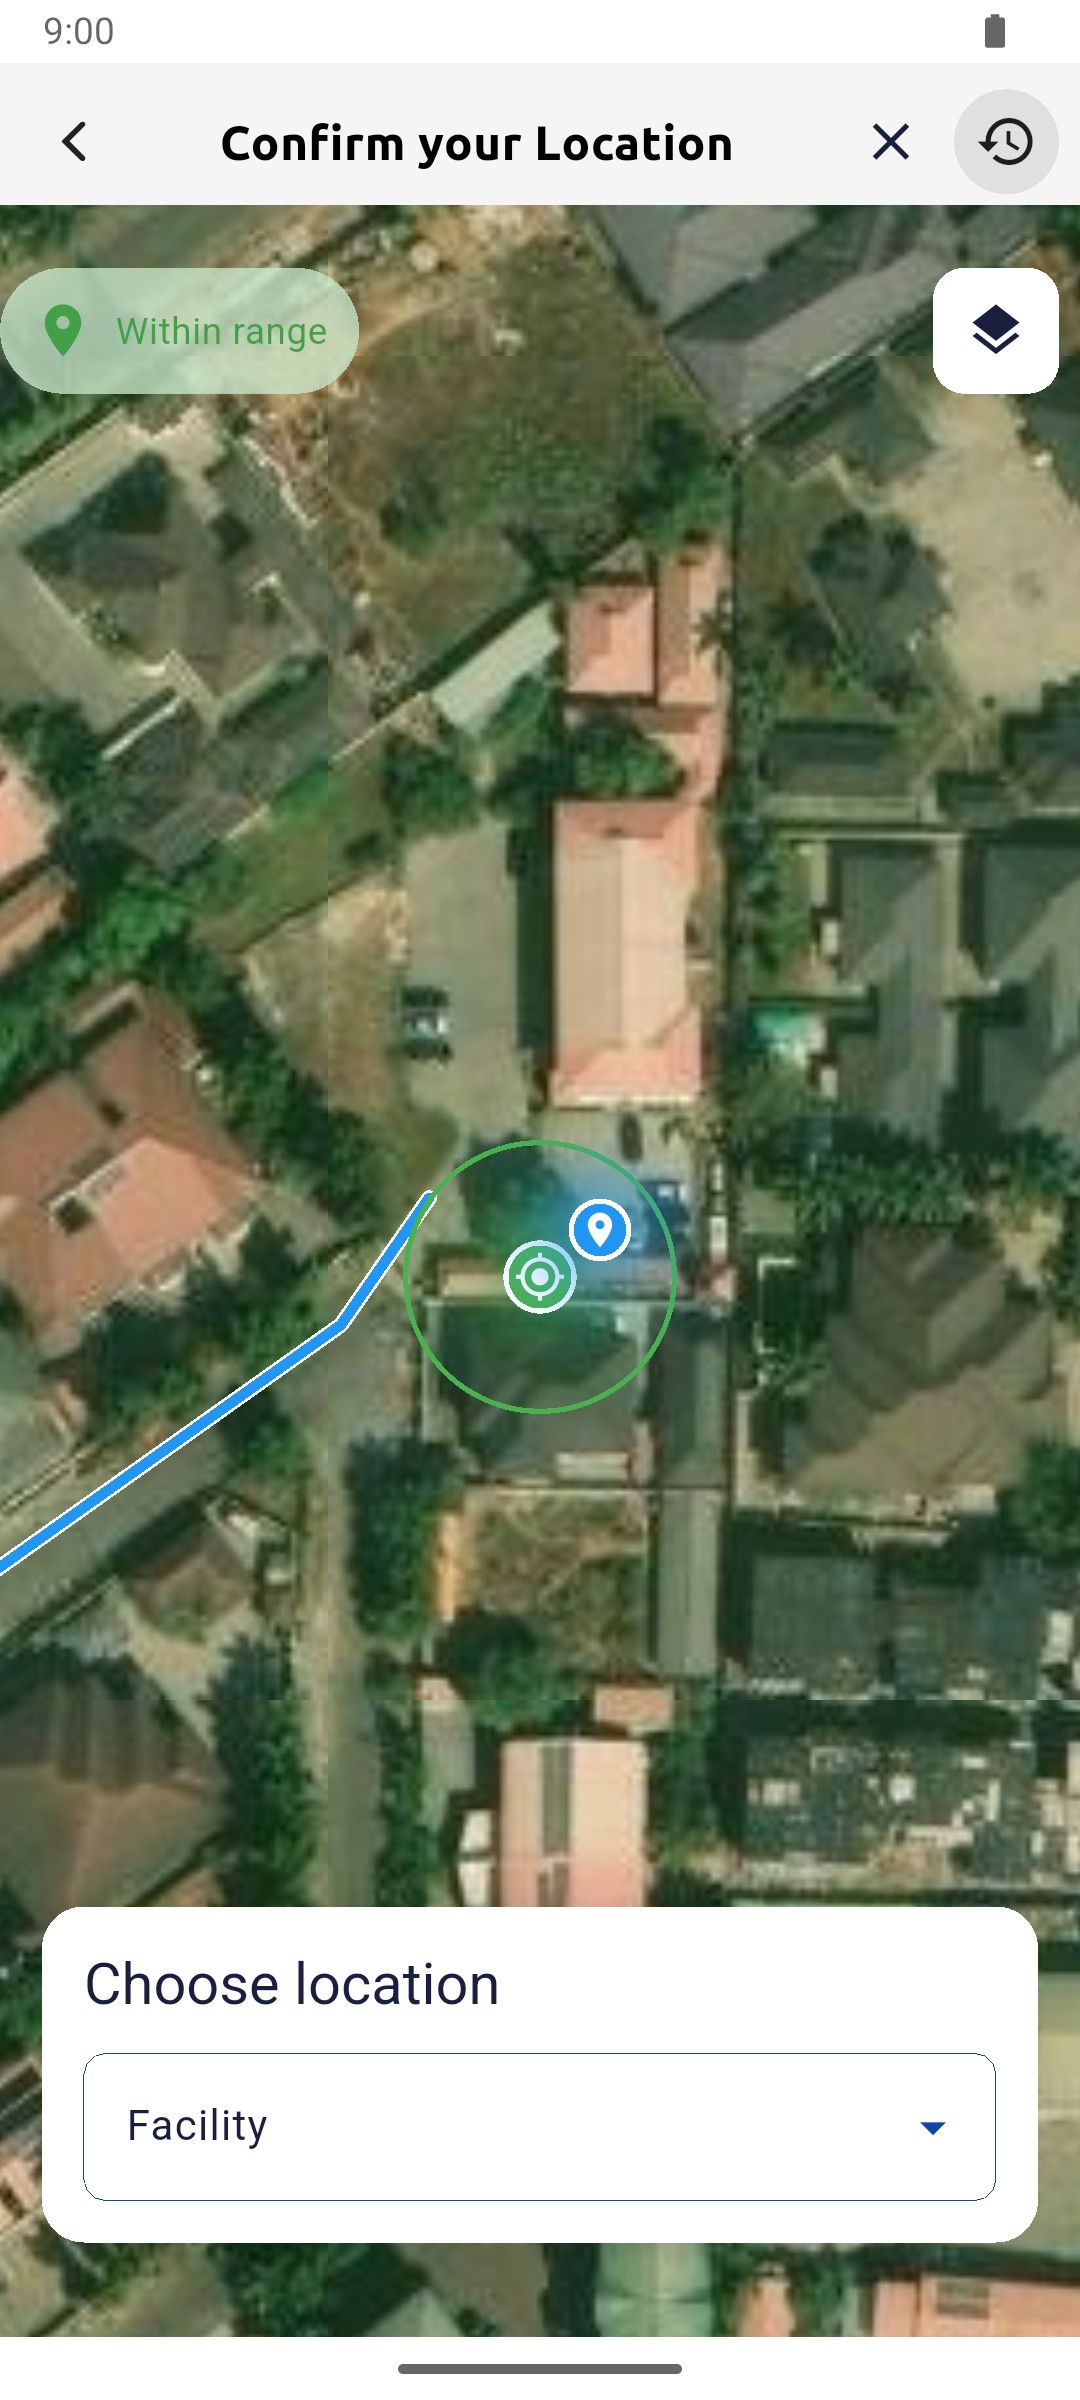
Tap the exact spot of the household inside the circle. A pin appears and Choose location opens.

Pin placed inside the circle with the Facility field shown

1 — selected household pin · 2 — facility field.

Pin placed inside the circle with the Facility field shown

Choose the facility and settlement

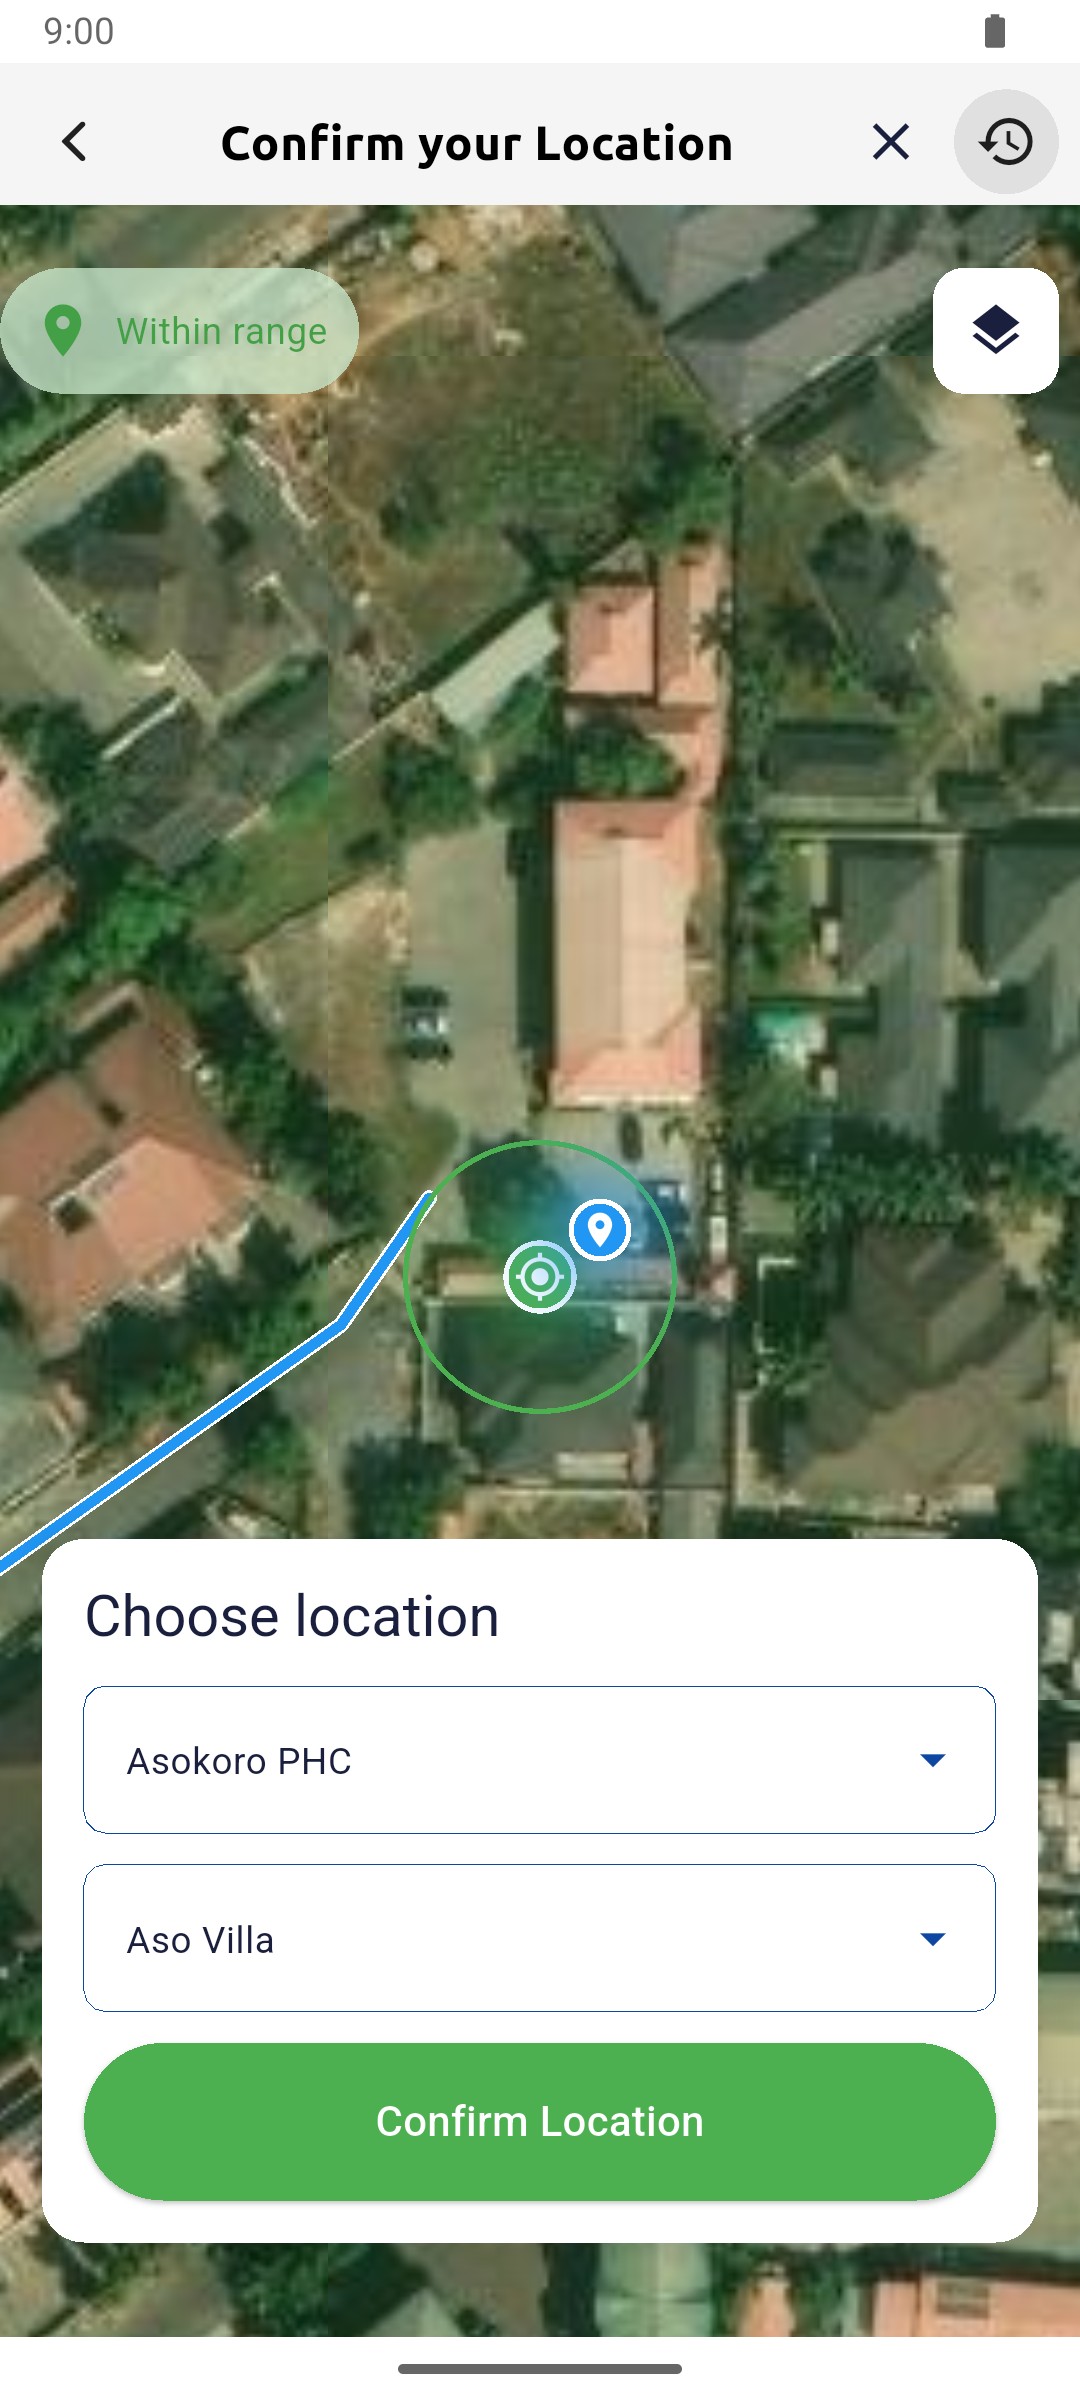
Choose the Facility and Settlement for the household, then tap Confirm Location.

Choose location with Asokoro PHC and Aso Villa selected and the Confirm Location button

1 — facility field · 2 — settlement field · 3 — confirm location button.

Choose location with Asokoro PHC and Aso Villa selected and the Confirm Location button

Done. The survey form opens for the location you confirmed.

If something goes wrong

Why does it say Pick a location within your allowed radius?

You must tap a point inside the green circle around your position. Zoom in with a double tap to see the circle clearly.

Mobile app

Record building data and a photo

Complete the Building Data section and take the required photo of the premises.

Field Worker 5 min read Mobile

Before you start

  • You have confirmed your location and the survey form is open.

Review the required questions

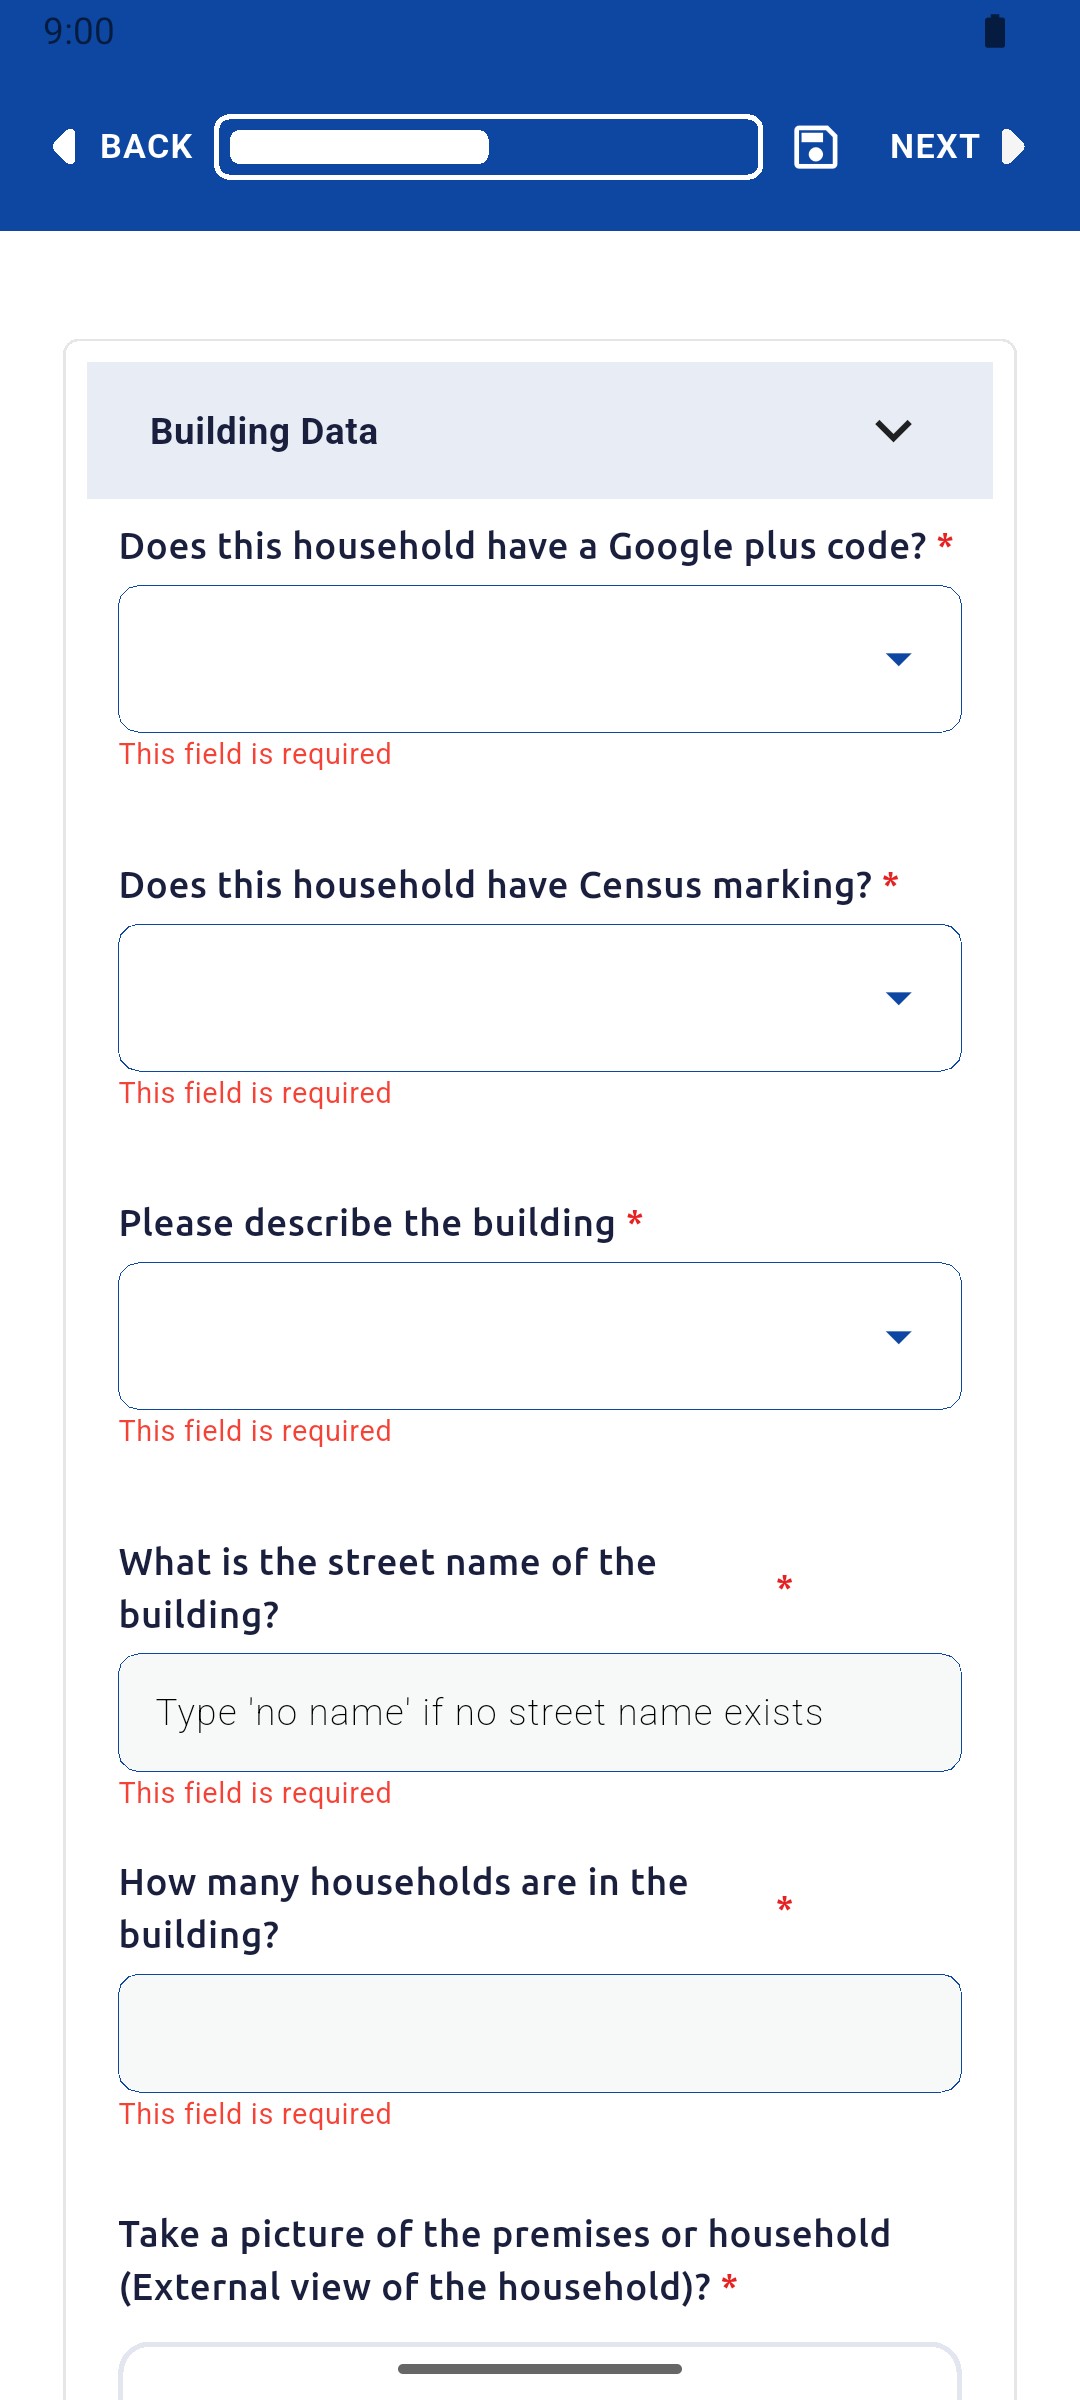
The Building Data section opens first. Questions marked with a red star are required.

Empty Building Data section with required-field messages

1 — required marker.

Empty Building Data section with required-field messages

Answer the building questions

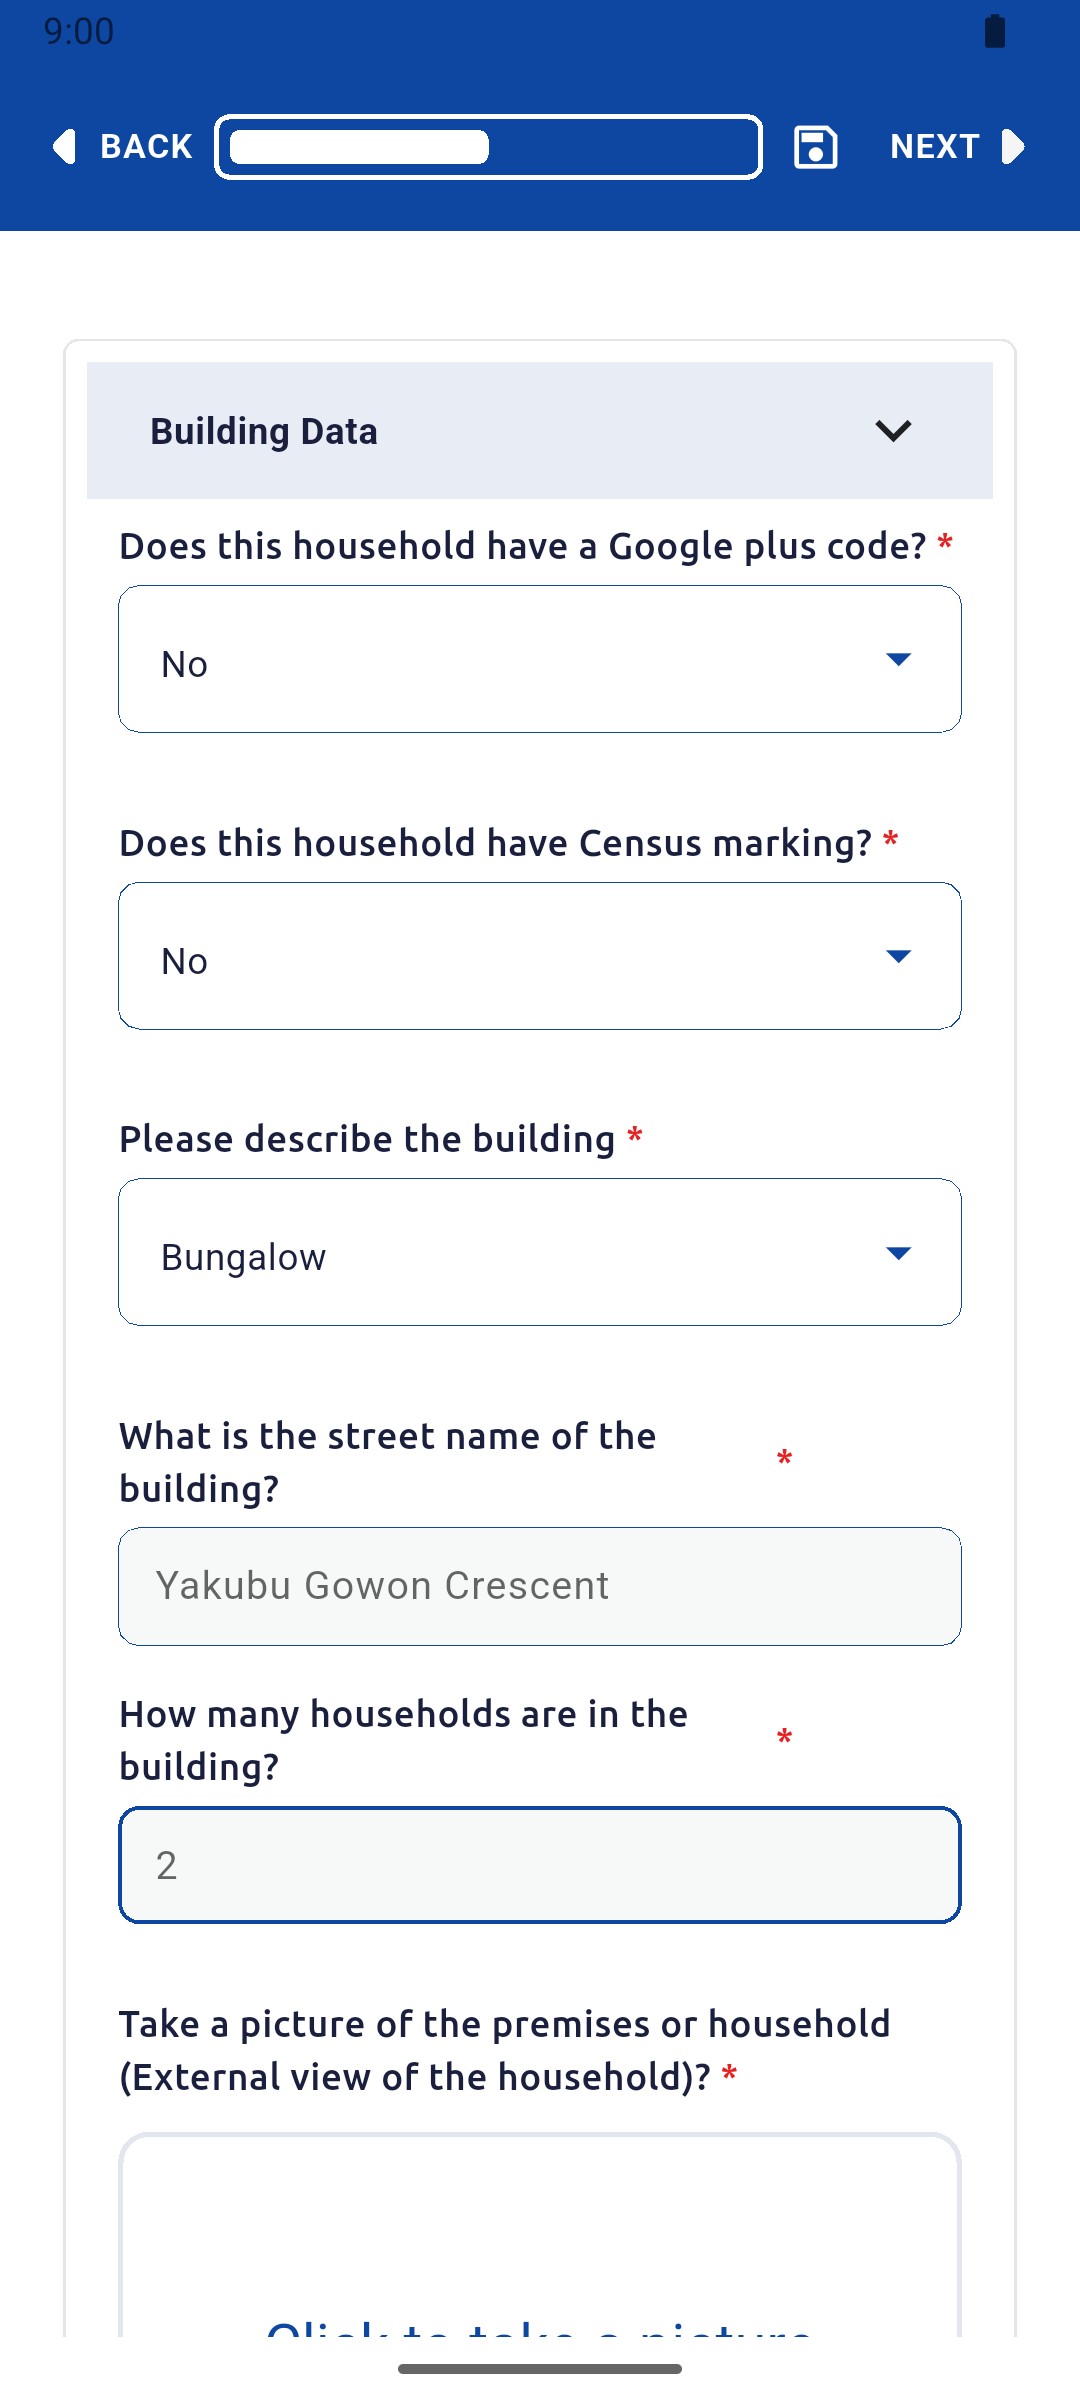
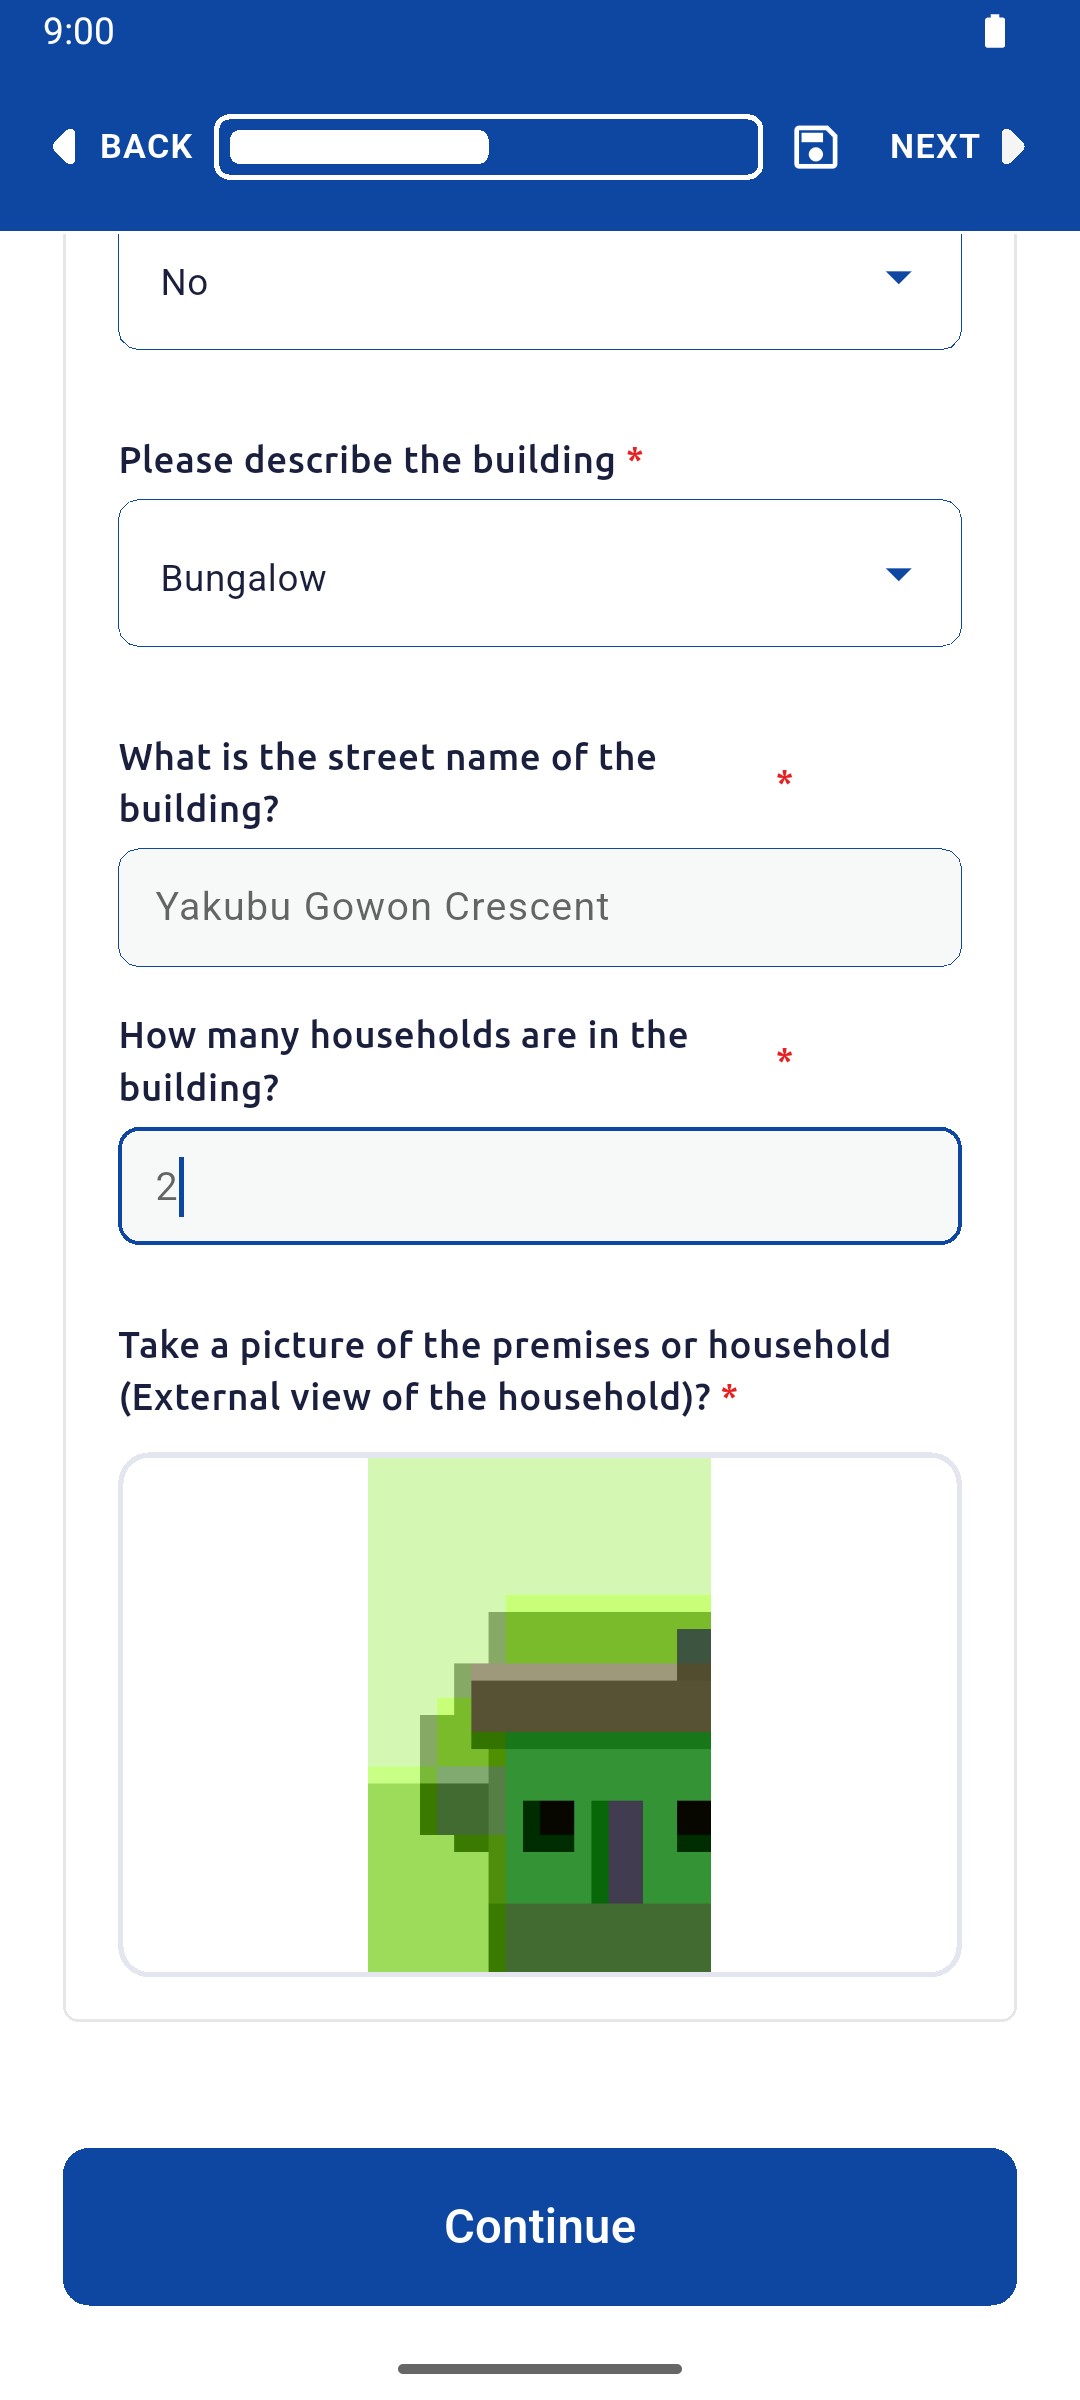
Answer Does this household have a Google plus code? and Does this household have Census marking?, choose the building type, and enter the street name and number of households.

Building Data with No, No, Bungalow, Yakubu Gowon Crescent and 2 households entered

1 — household answers · 2 — street name field · 3 — household count field.

Building Data with No, No, Bungalow, Yakubu Gowon Crescent and 2 households entered

Allow the camera

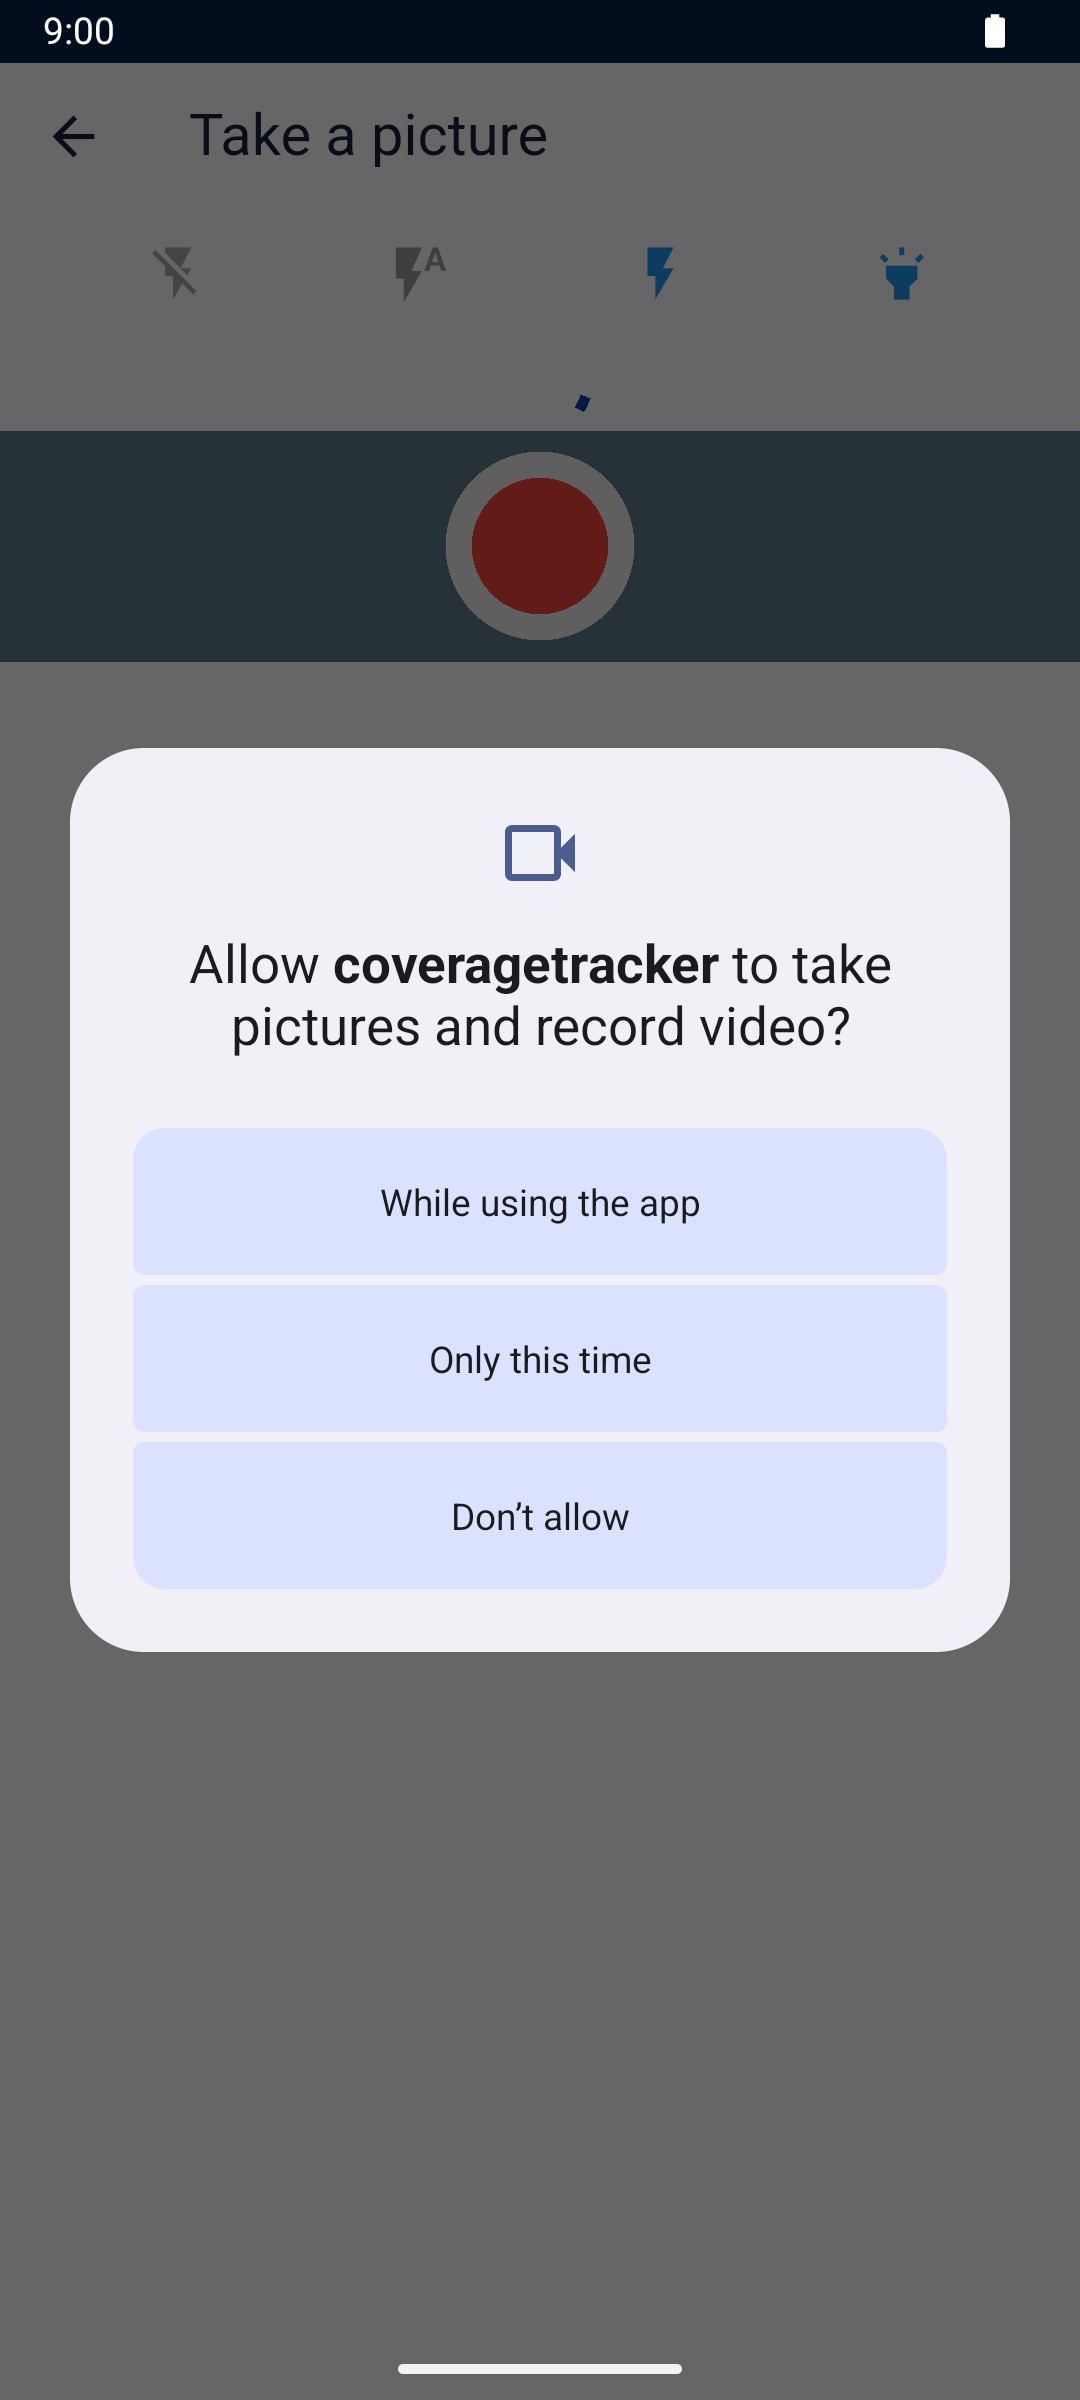
Scroll down and tap Click to take a picture. Allow the camera, and the microphone if asked, with While using the app.

Android prompt asking to allow the app to take pictures and record video

1 — while using the app.

Android prompt asking to allow the app to take pictures and record video

Take the photo

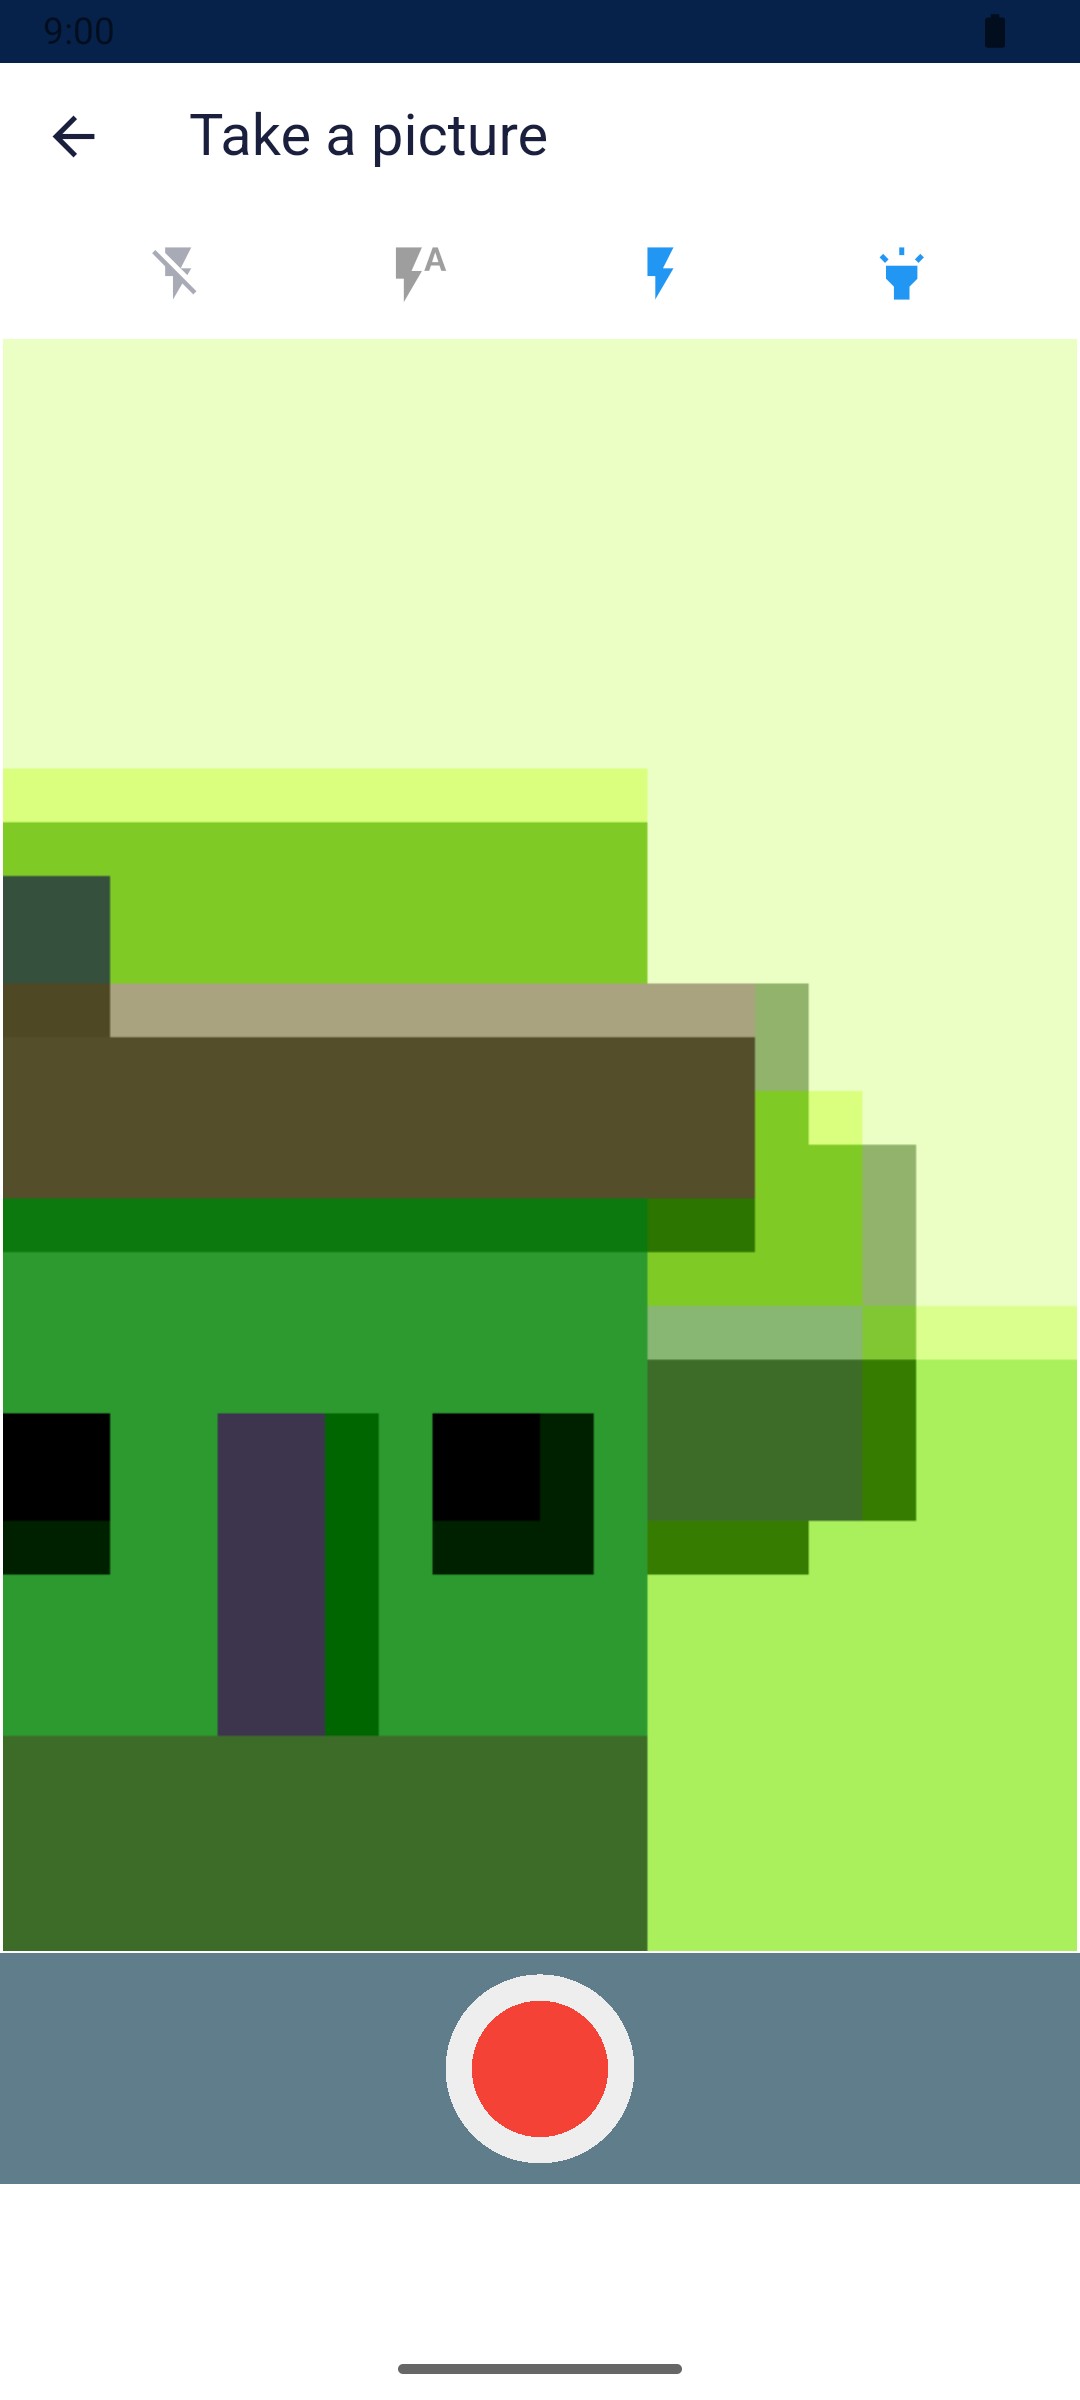
Point the camera at the outside of the building and tap the round shutter button on Take a picture.

Take a picture camera screen with the shutter button

1 — shutter button.

Take a picture camera screen with the shutter button

Check and use the photo

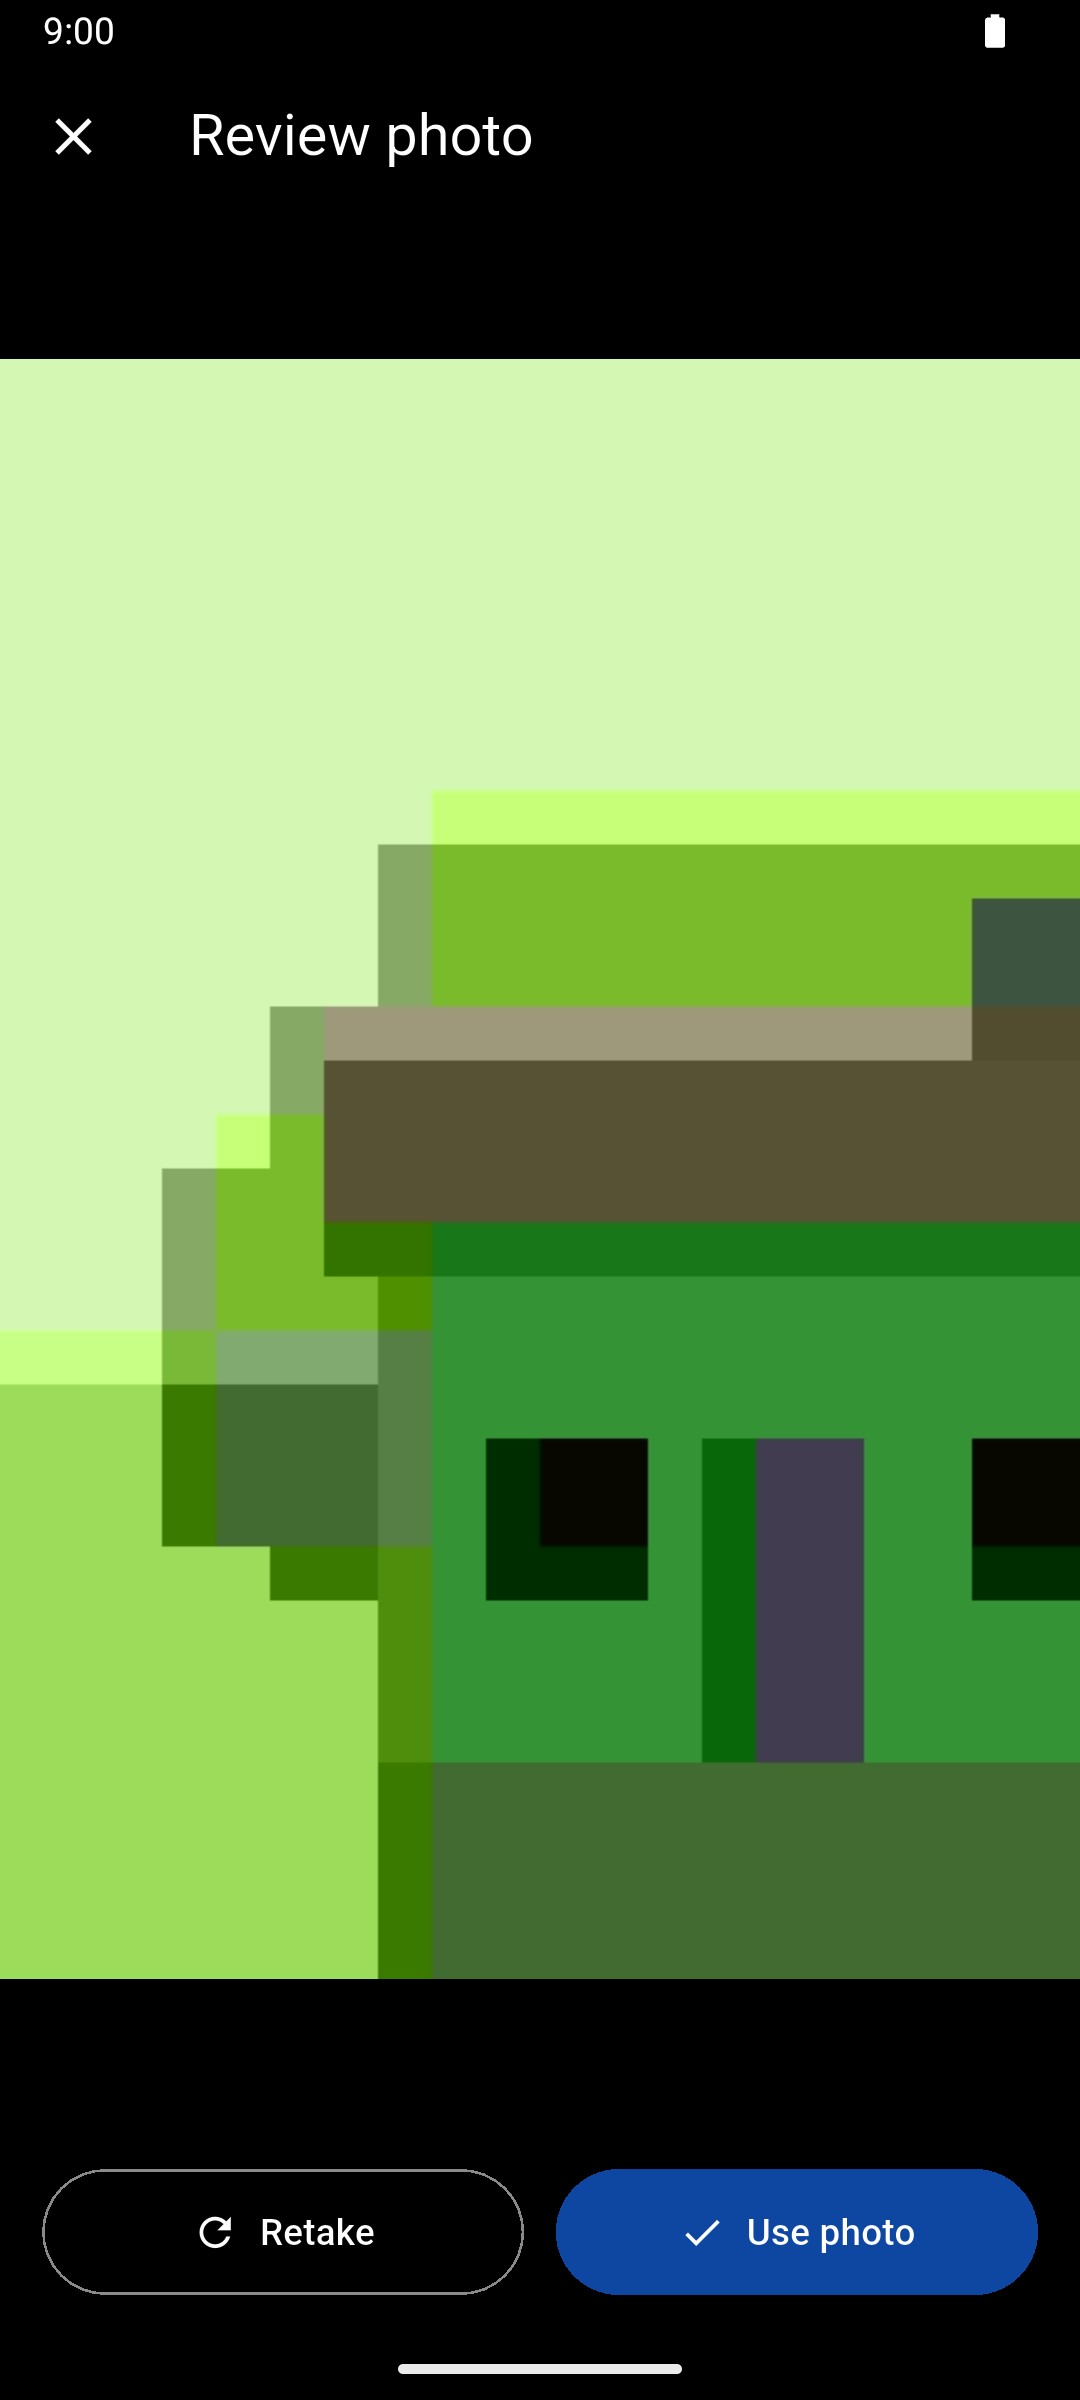
Check the photo is clear, then tap Use photo. Tap Retake if it is blurred.

Review photo screen with Retake and Use photo

1 — retake button · 2 — use photo button.

Review photo screen with Retake and Use photo

Continue to the household entries

Check the photo appears in the form, then tap Continue.

Building Data with the photo attached and the Continue button

1 — attached photo · 2 — continue button.

Building Data with the photo attached and the Continue button

Done. Every Building Data question is answered, the photo is attached and Continue takes you to the household entries.

If something goes wrong

What if the street has no name?

Type no name in the street field.

Mobile app

Record households and submit a survey

Record each household in the building and send the completed survey to the server.

Field Worker 10 min read Mobile

Before you start

  • Building Data is complete.
  • You have a connection.

Ask for consent

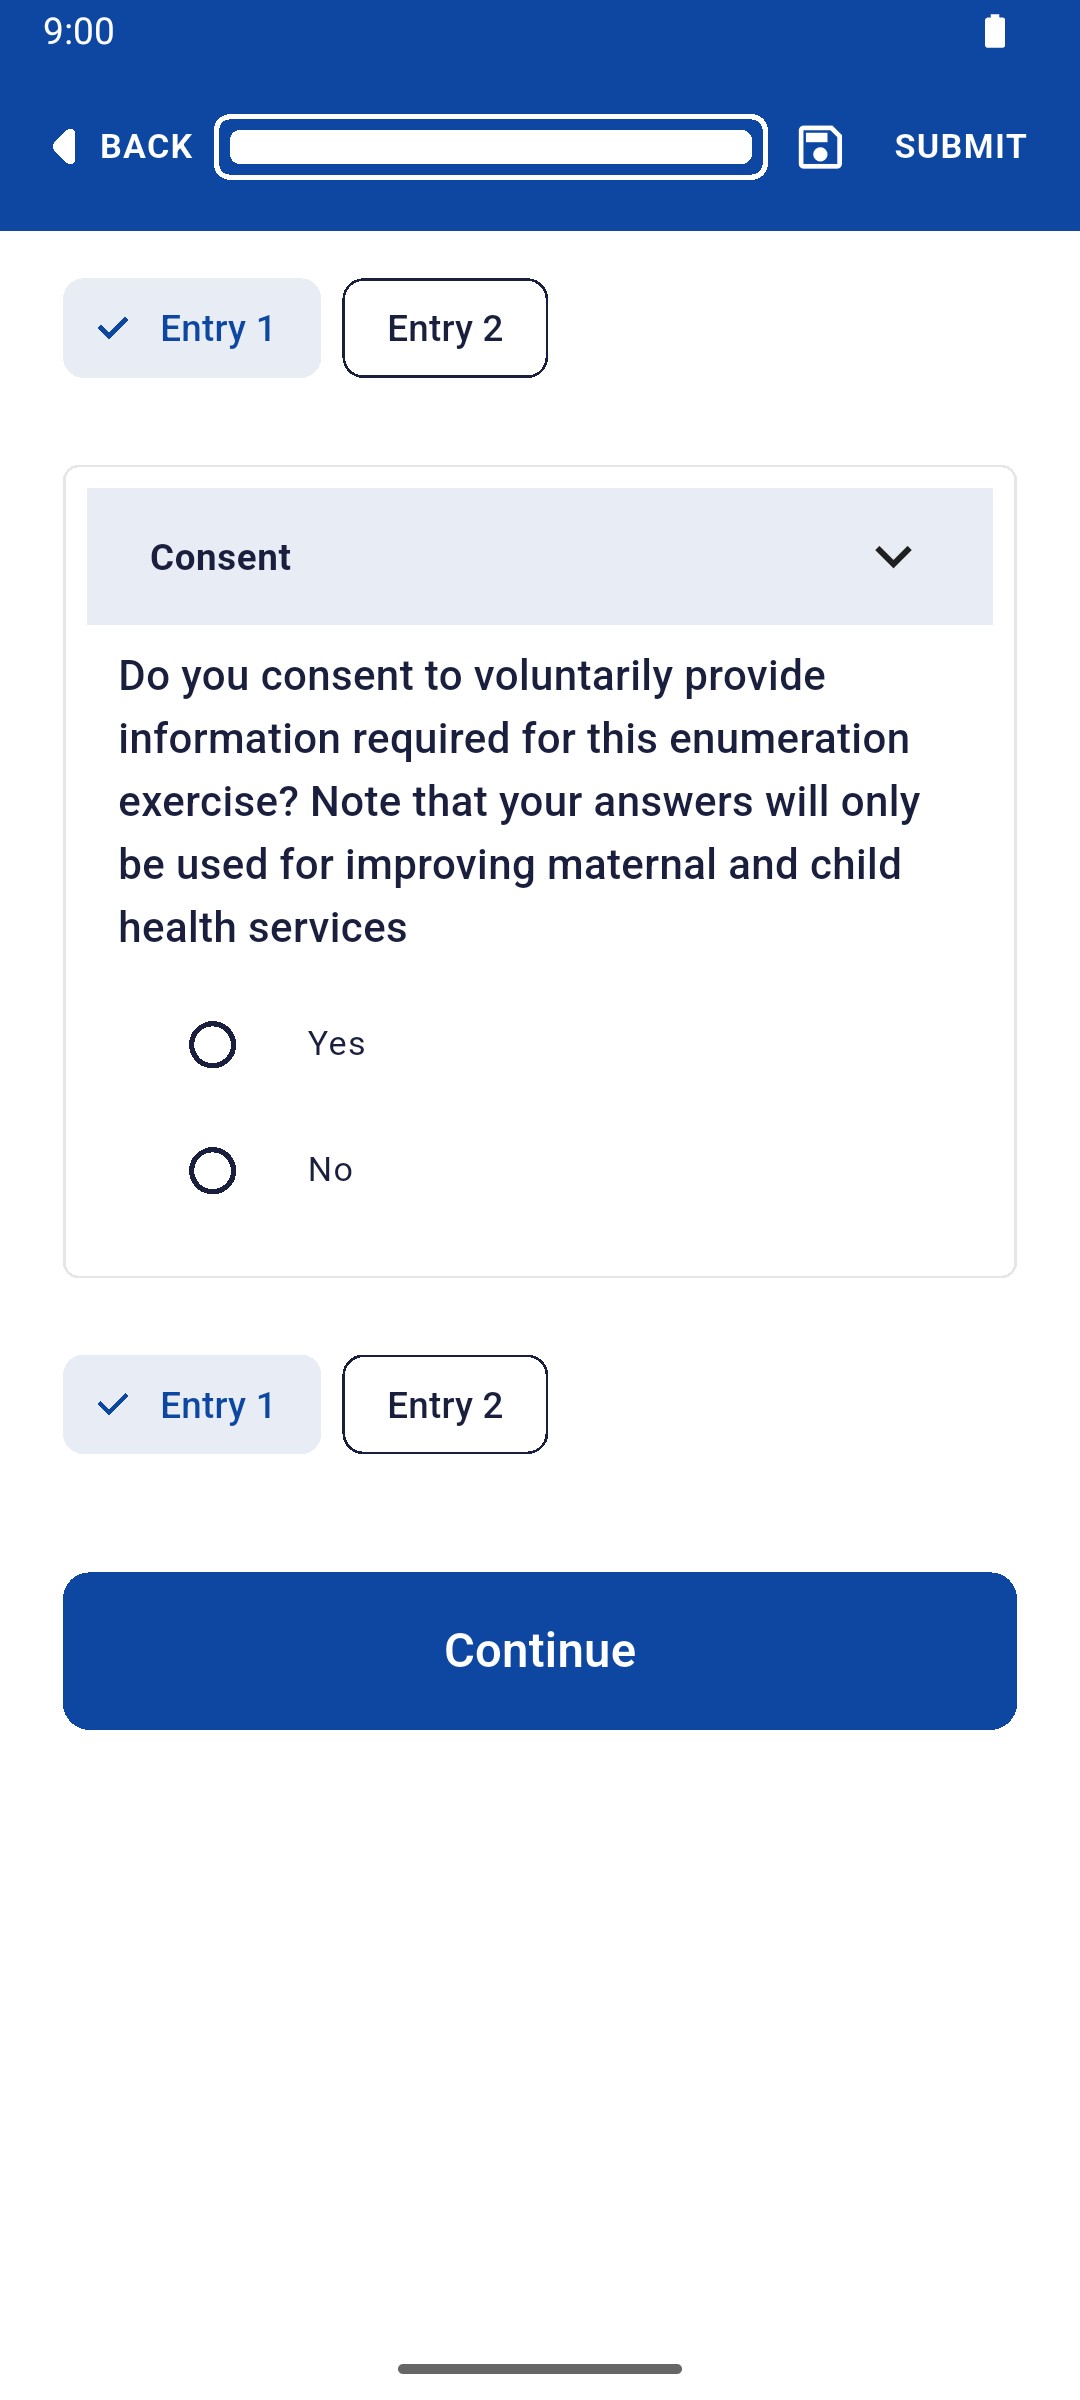
For Entry 1, read the consent question to the household and record Yes or No.

Consent question for Entry 1 with Yes and No options

1 — entry 1 tab · 2 — consent choices.

Consent question for Entry 1 with Yes and No options

Open each section

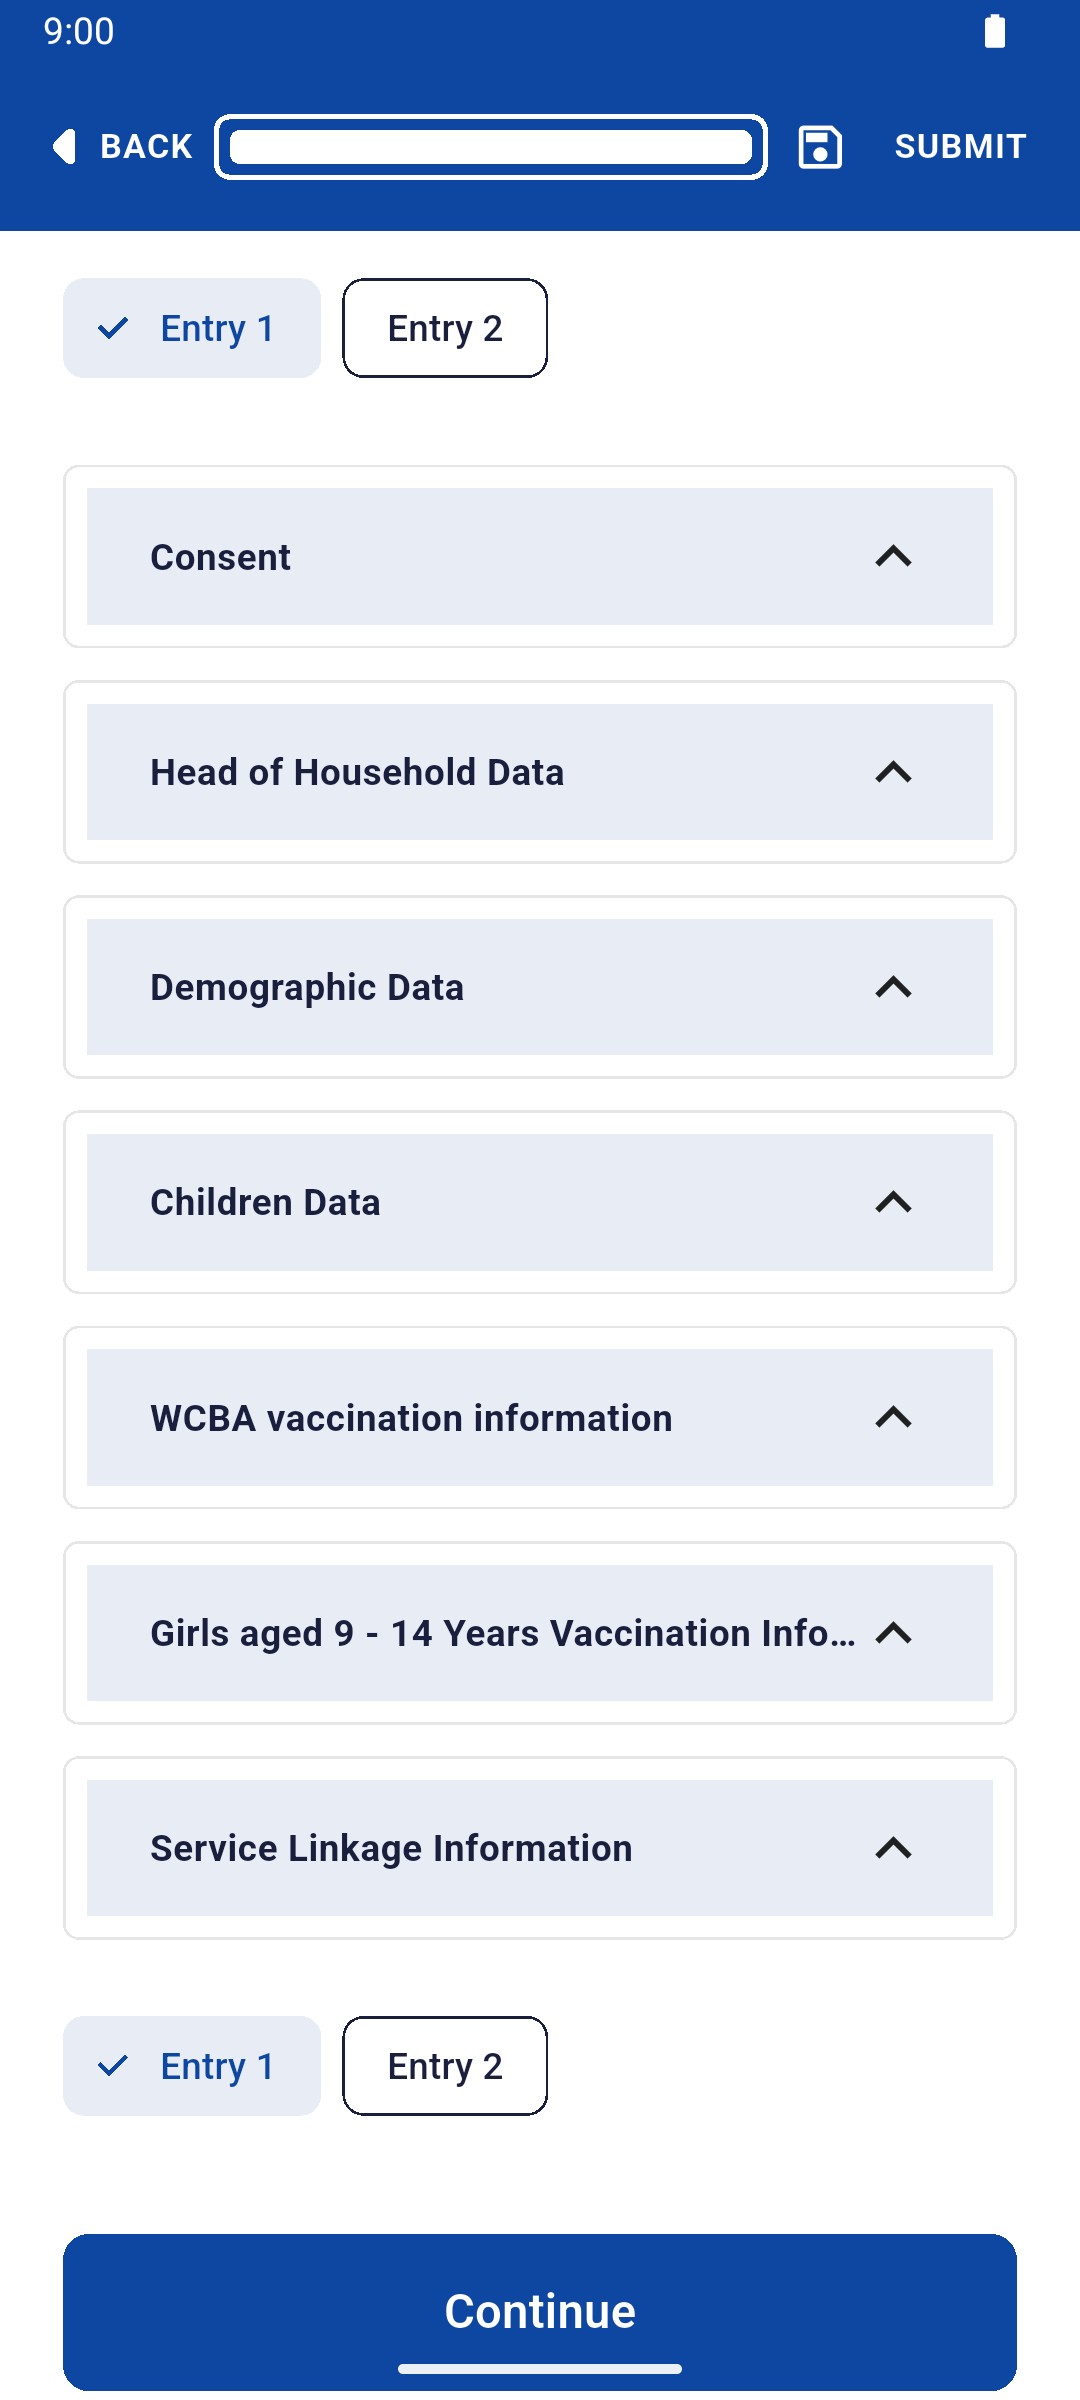
When consent is Yes, the household sections appear. Tap a section to open it.

List of household sections for Entry 1

1 — household sections.

List of household sections for Entry 1

Record the household head

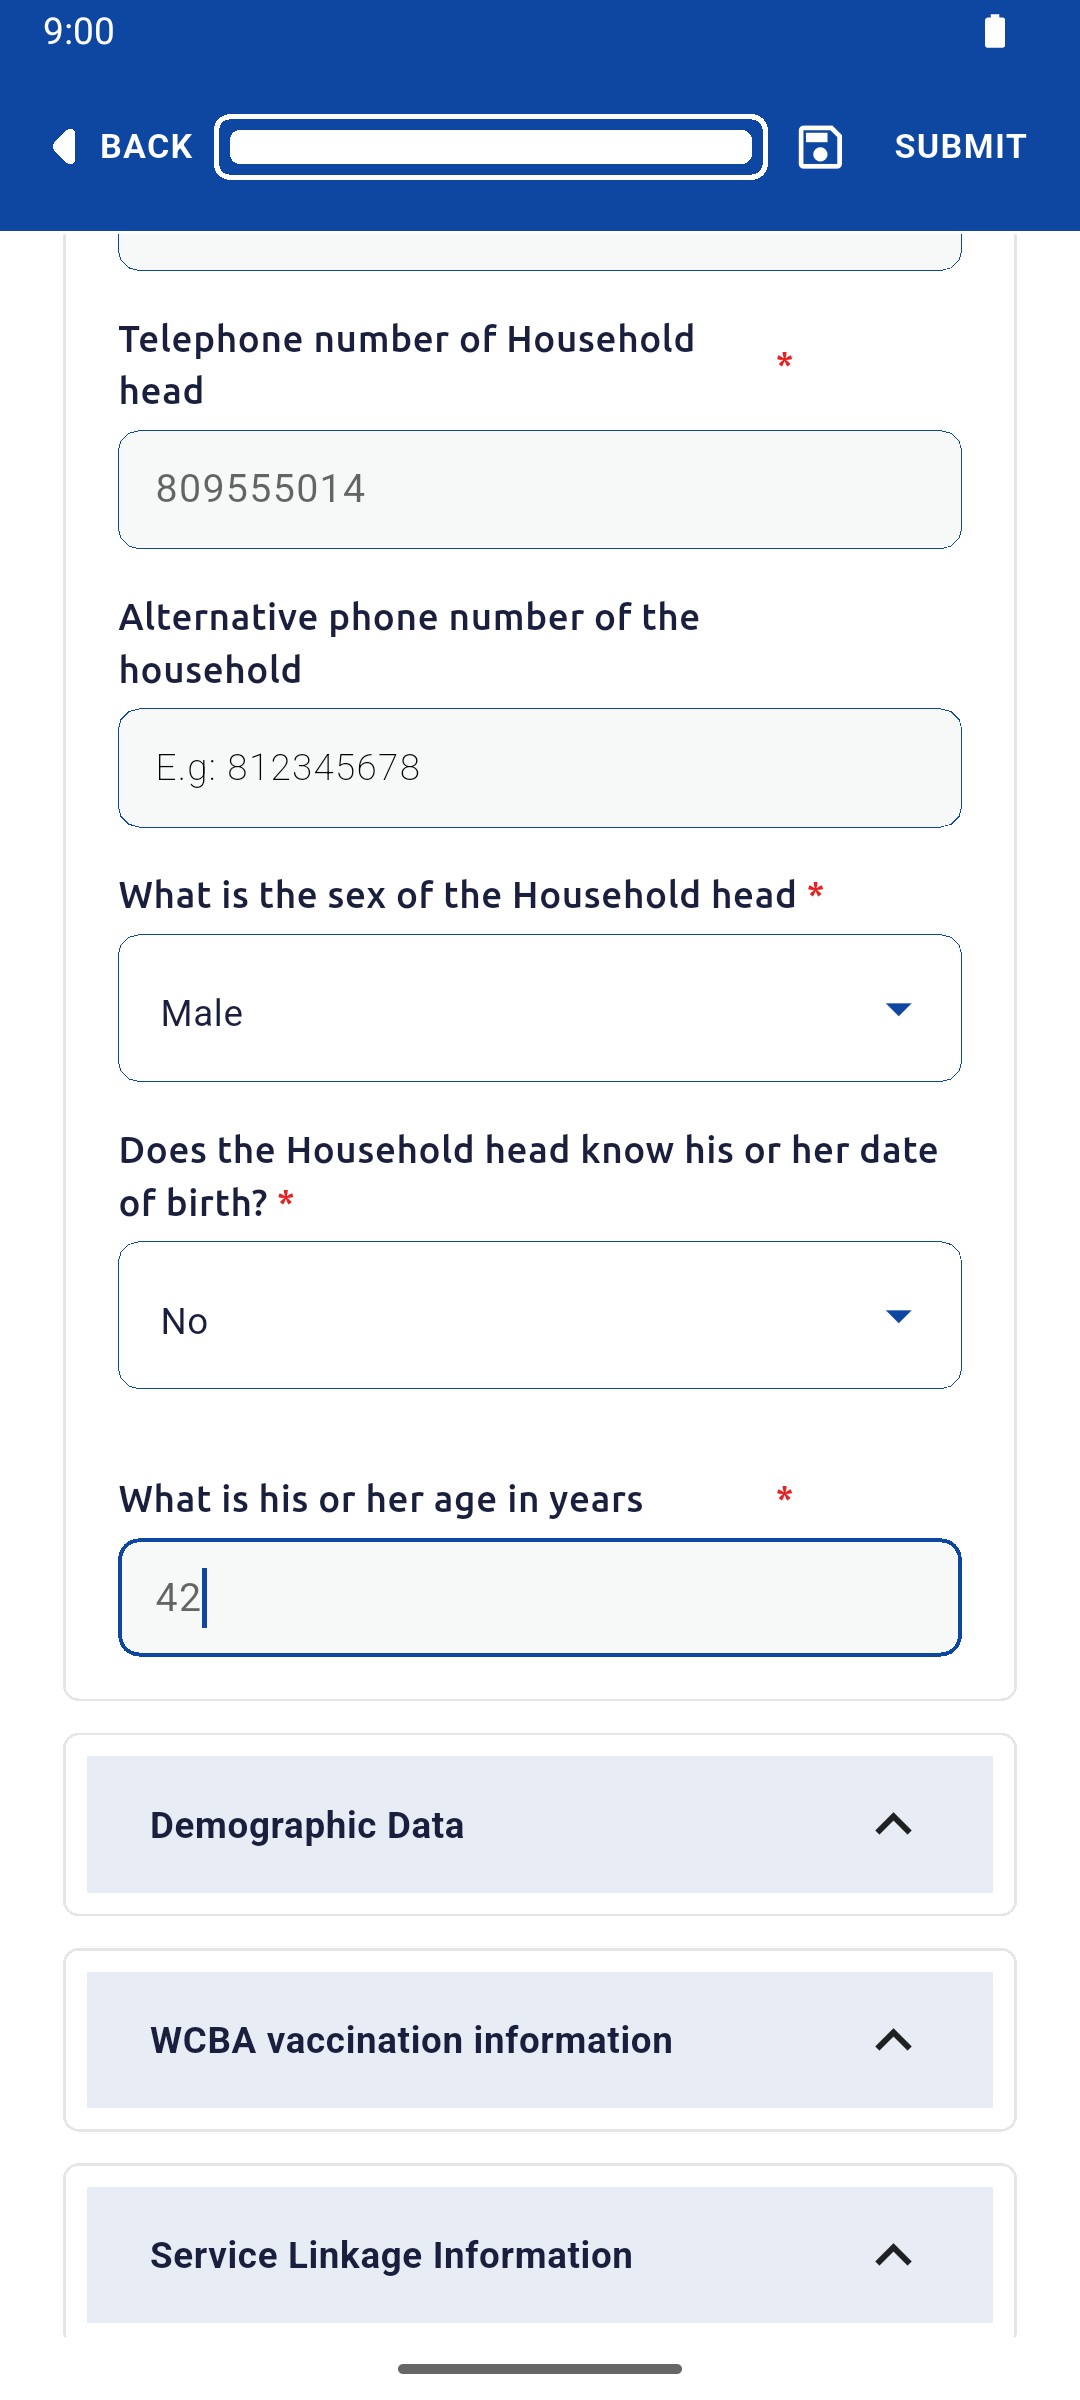
In Head of Household Data, enter the head's name, phone number, sex and age or date of birth.

Head of Household Data with phone, sex, date of birth answer and age entered

1 — phone number field · 2 — sex field · 3 — birth and age fields.

Head of Household Data with phone, sex, date of birth answer and age entered

Count the household members

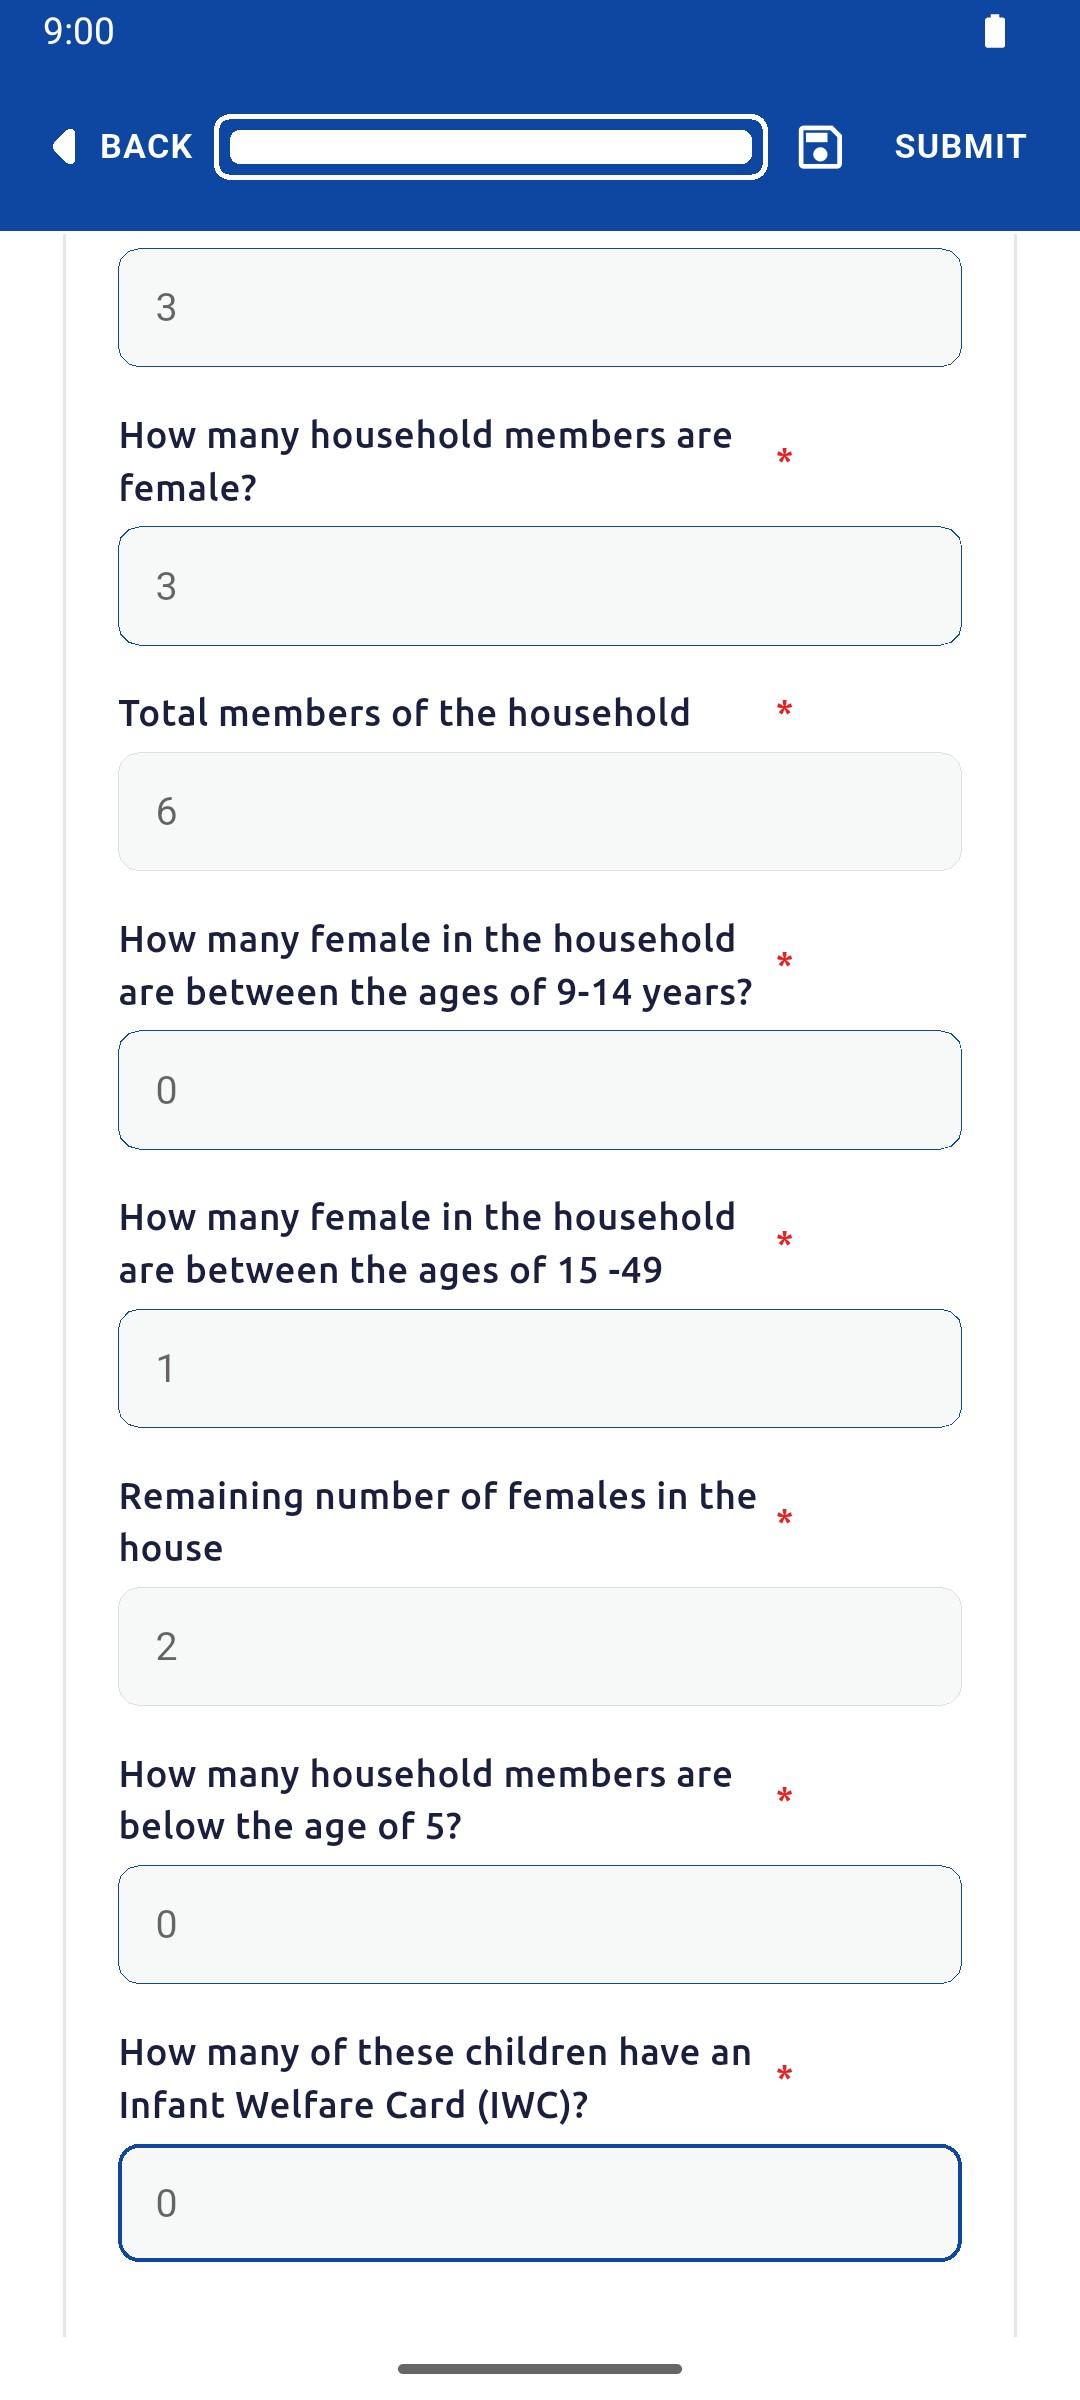
In Demographic Data, enter the number of males and females and each age group. Totals fill in automatically.

Demographic Data counts with the calculated total of 6 members

1 — member totals · 2 — age-group counts.

Demographic Data counts with the calculated total of 6 members

Record women's vaccination

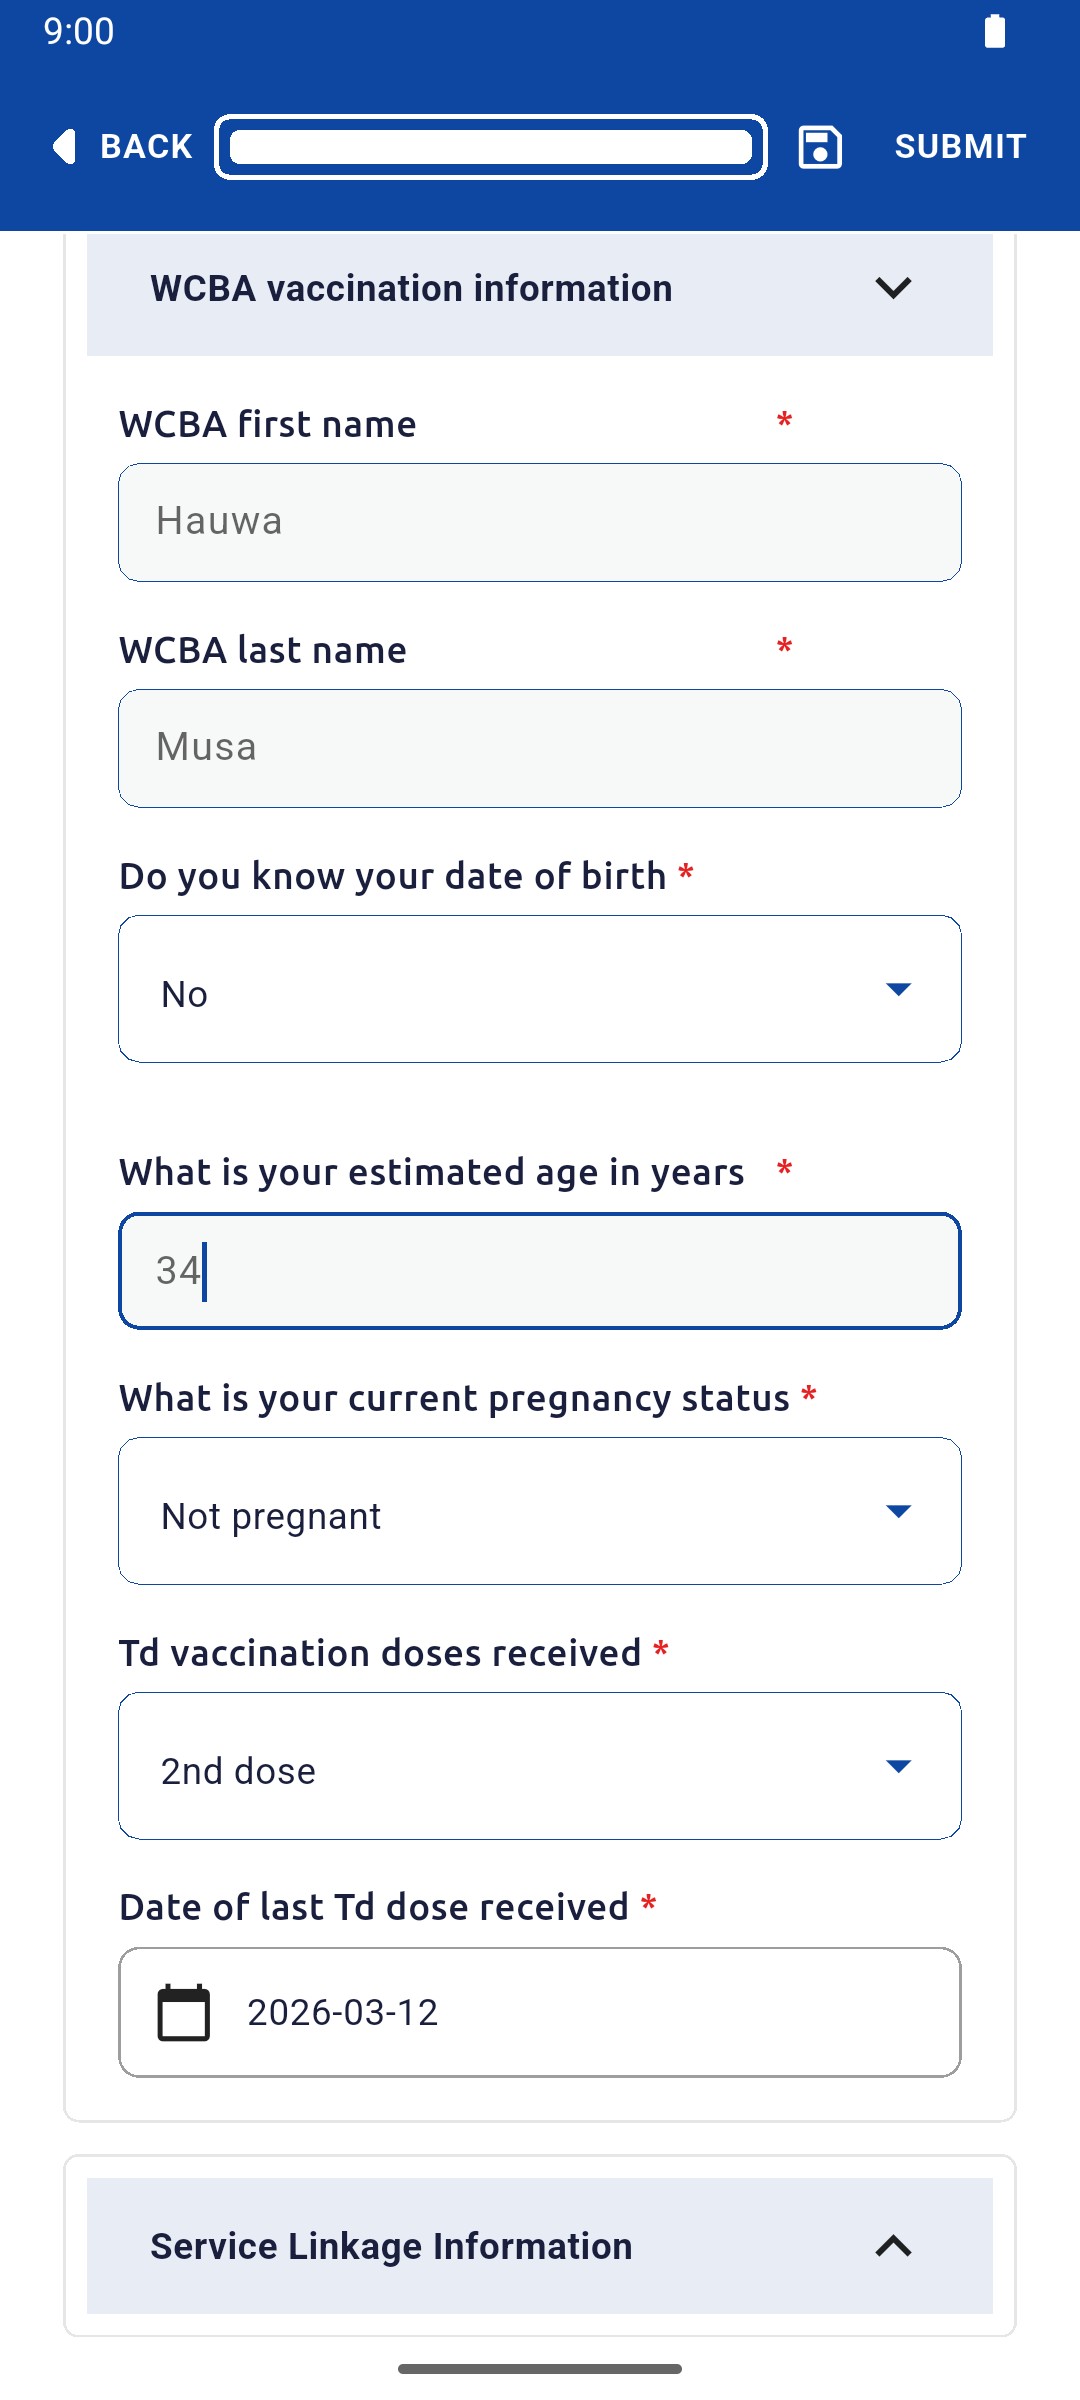
In WCBA vaccination information, record the woman's name, age, pregnancy status, Td doses and the date of her last dose.

WCBA vaccination information with name, age, pregnancy status, Td doses and last dose date

1 — woman's name · 2 — age and pregnancy · 3 — td dose details.

WCBA vaccination information with name, age, pregnancy status, Td doses and last dose date

Record service linkage

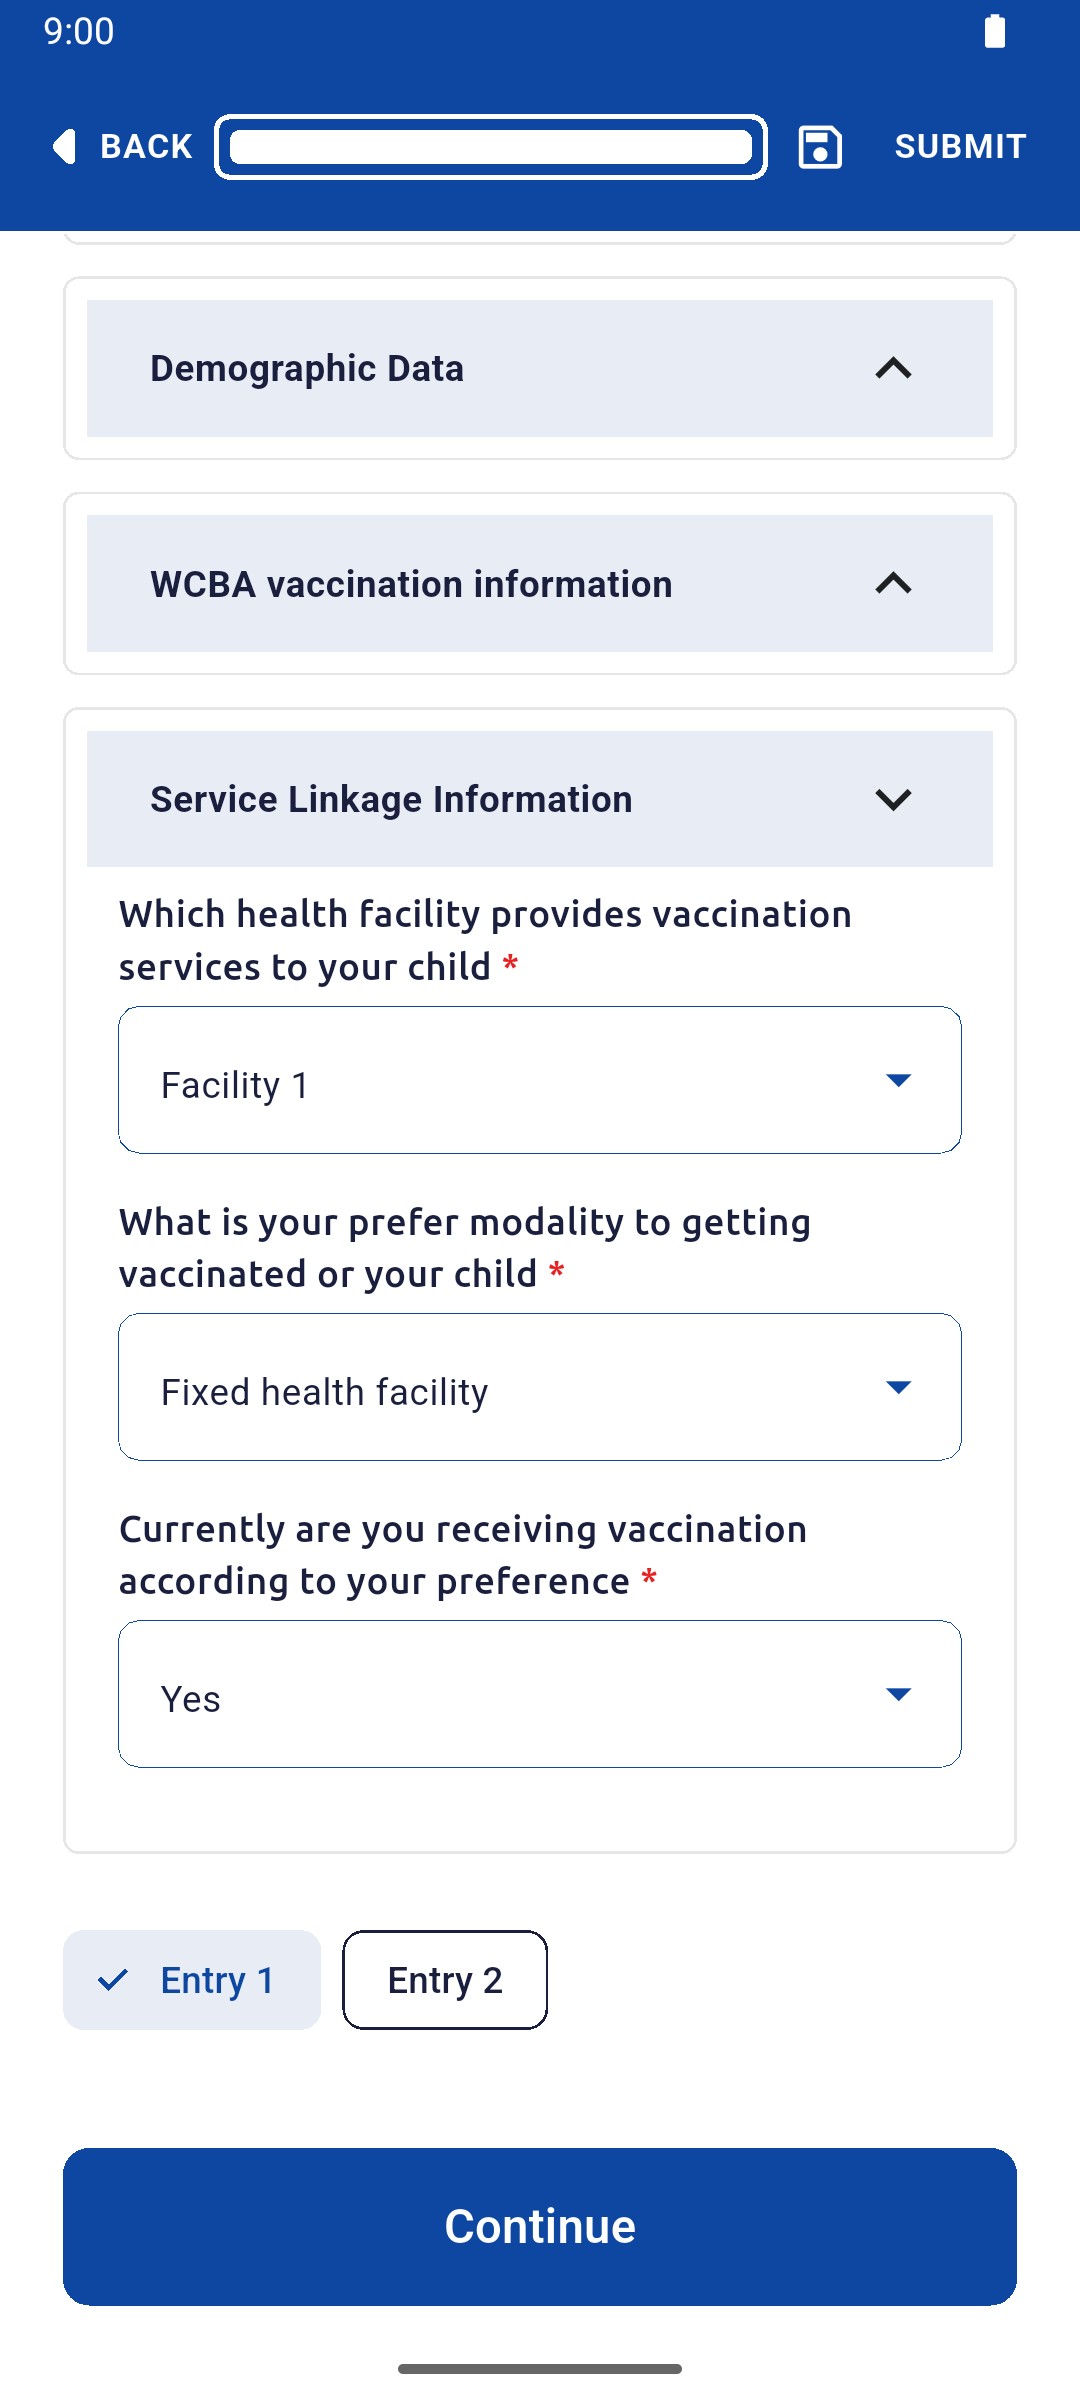
In Service Linkage Information, record the facility the household uses and how they prefer to be vaccinated.

Service Linkage Information with facility, modality and preference answered

1 — health facility · 2 — vaccination modality · 3 — current preference.

Service Linkage Information with facility, modality and preference answered

Complete every entry

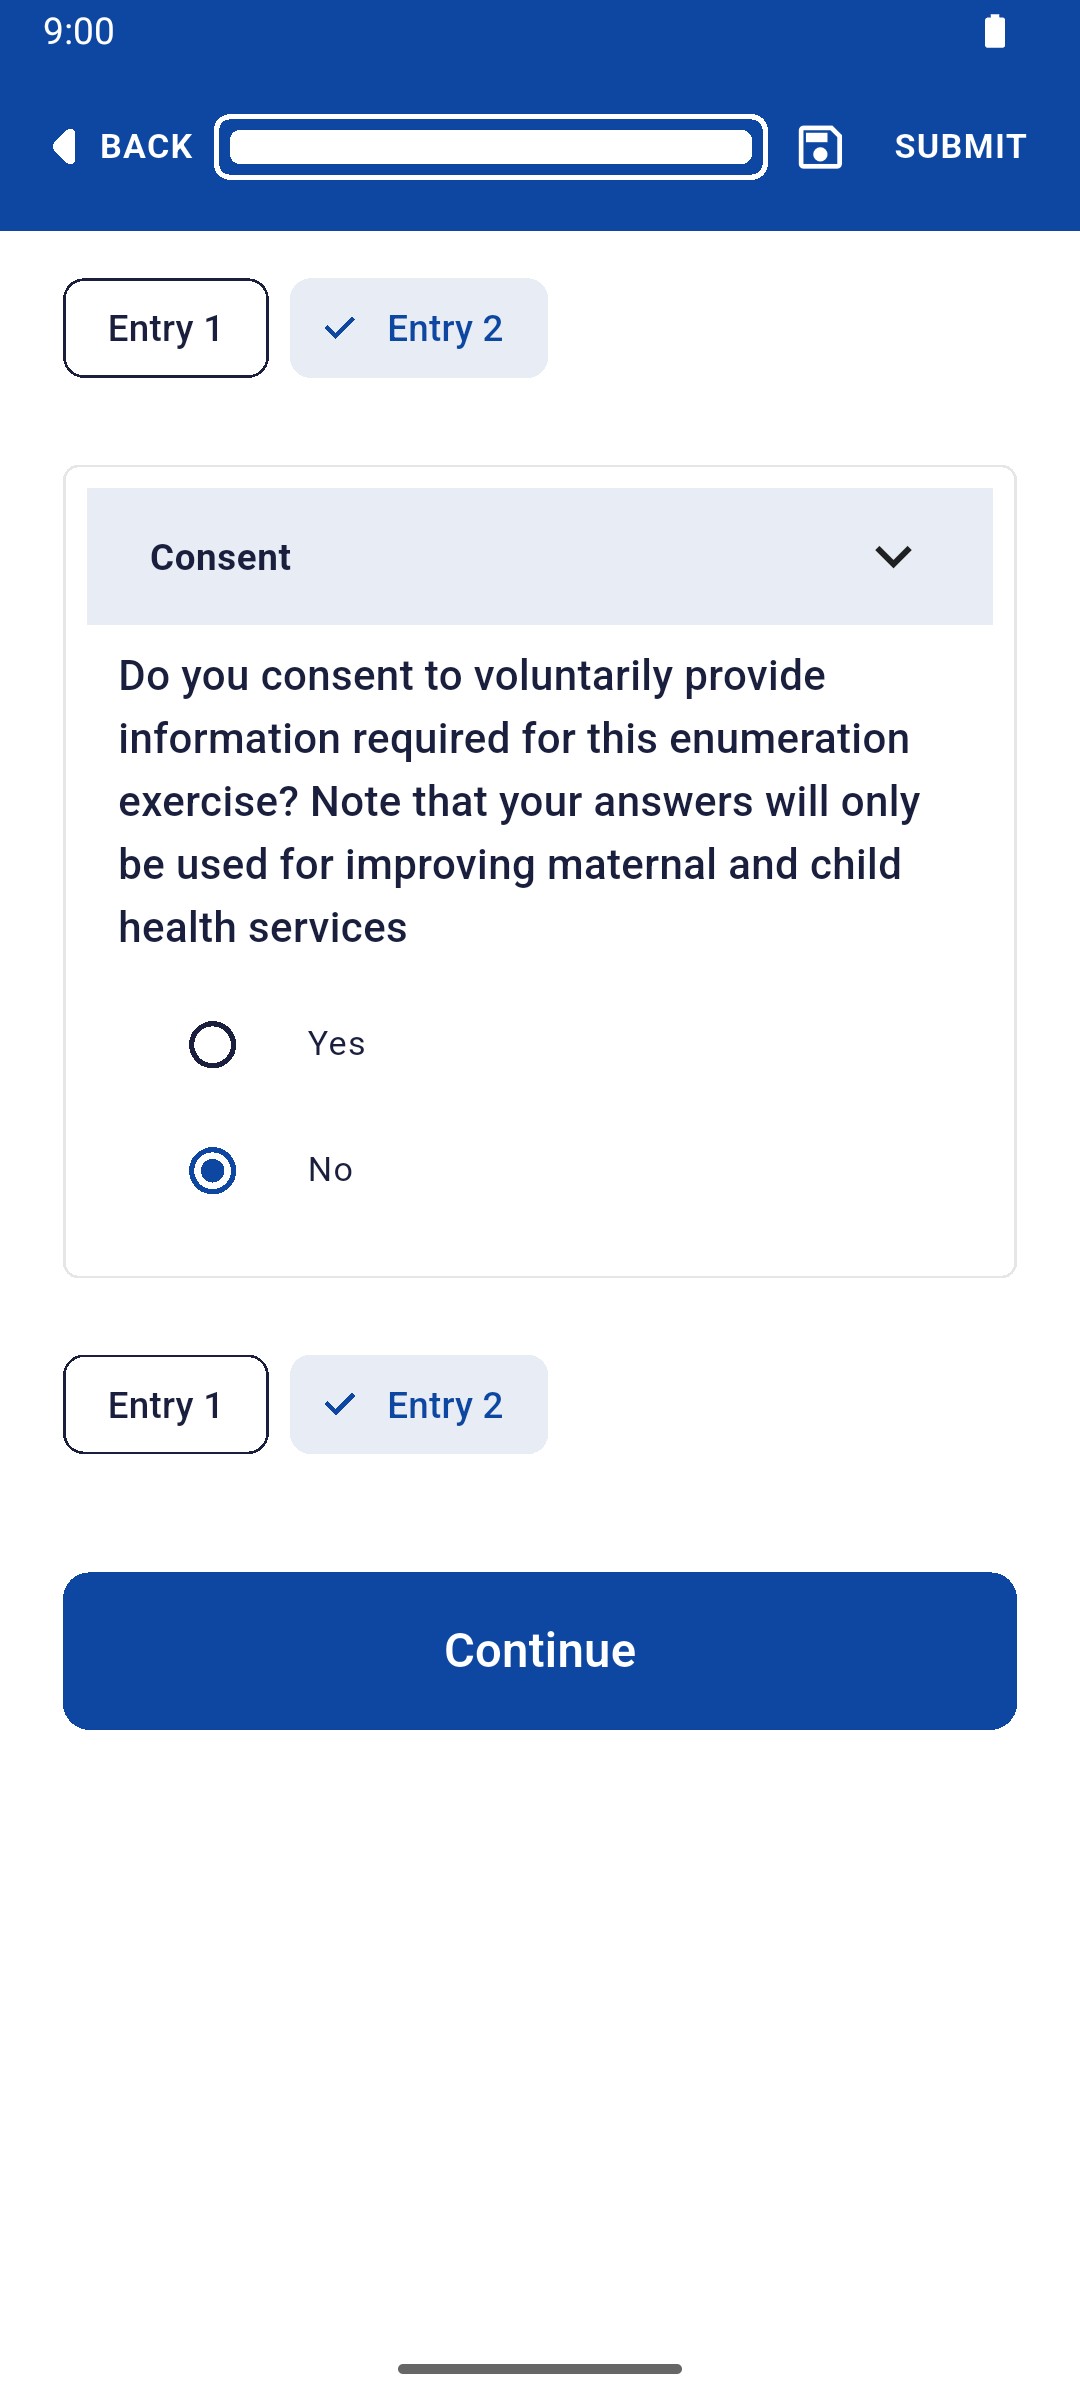
Tap Entry 2 and repeat for the next household. If a household declines, record No for consent.

Entry 2 with consent answered No

1 — entry 2 tab · 2 — no consent.

Entry 2 with consent answered No

Submit the survey

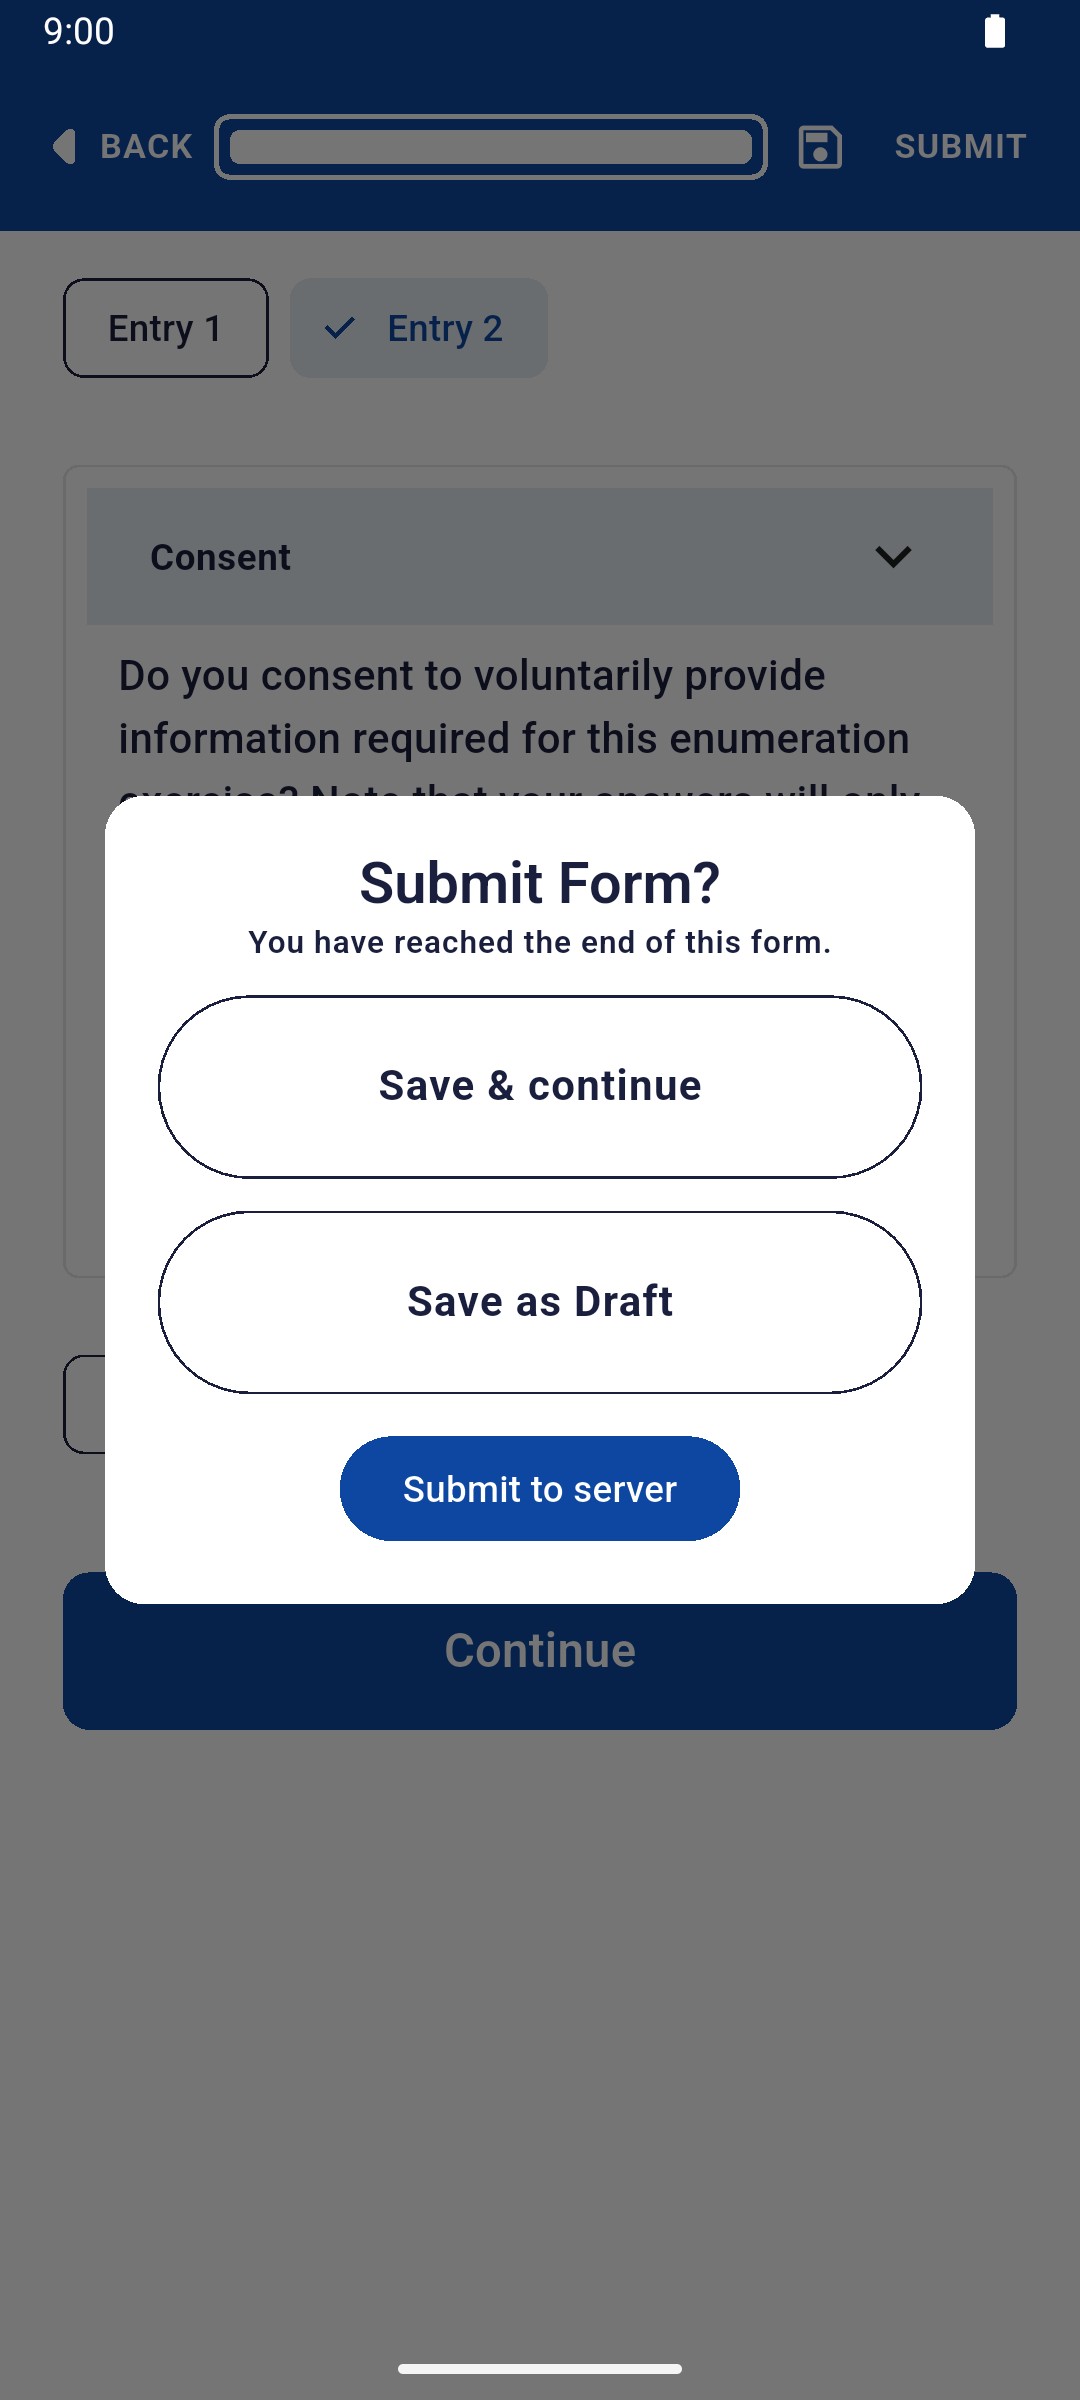
Tap SUBMIT, then tap Submit to server. Use Save as Draft if you need to stop.

Submit Form dialog with Save & continue, Save as Draft and Submit to server

1 — submit action · 2 — save as draft · 3 — submit to server.

Submit Form dialog with Save & continue, Save as Draft and Submit to server

Check the confirmation

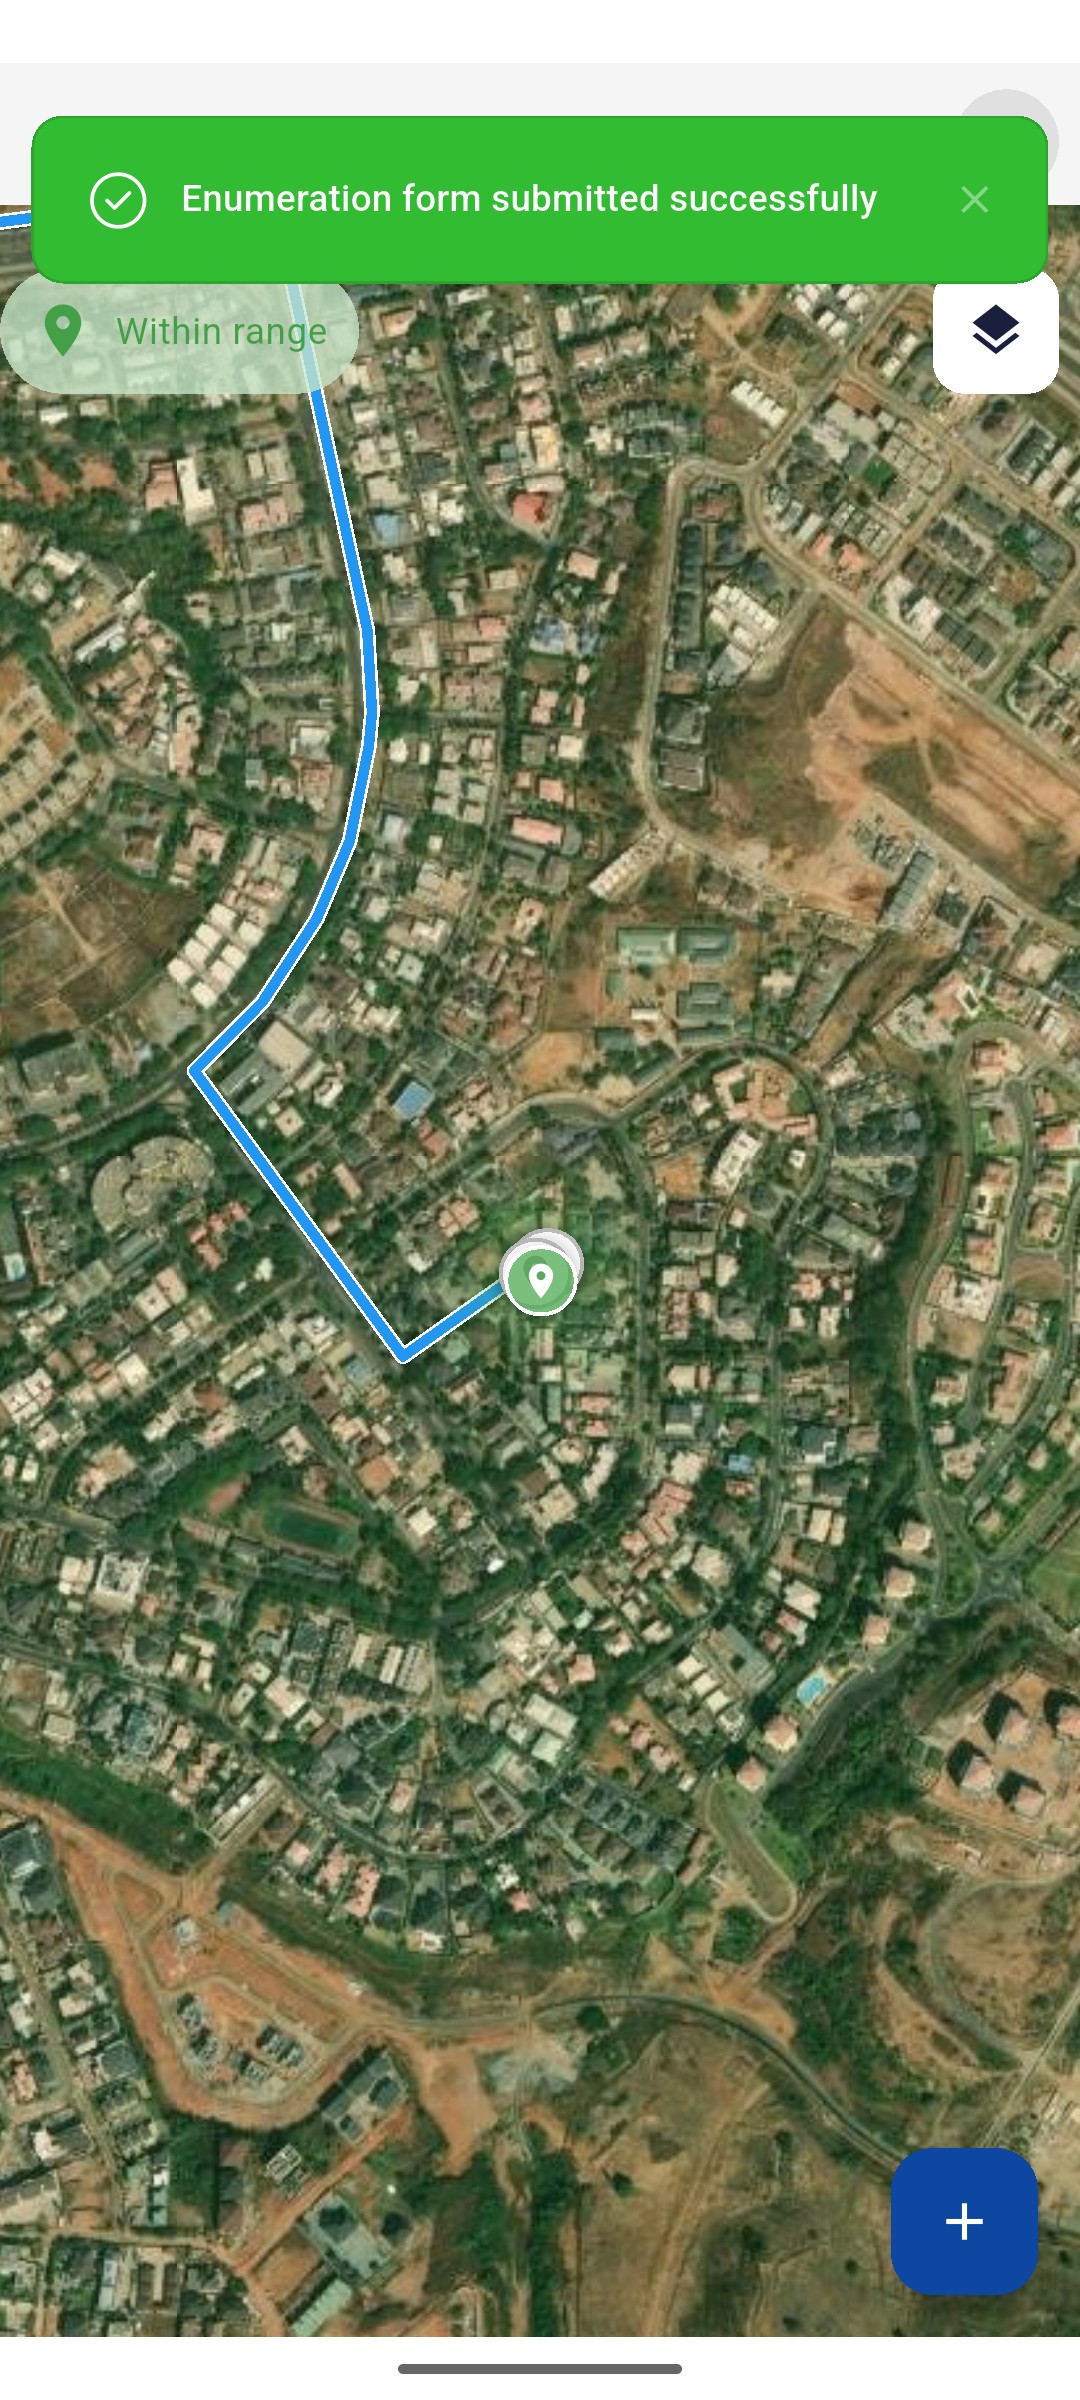
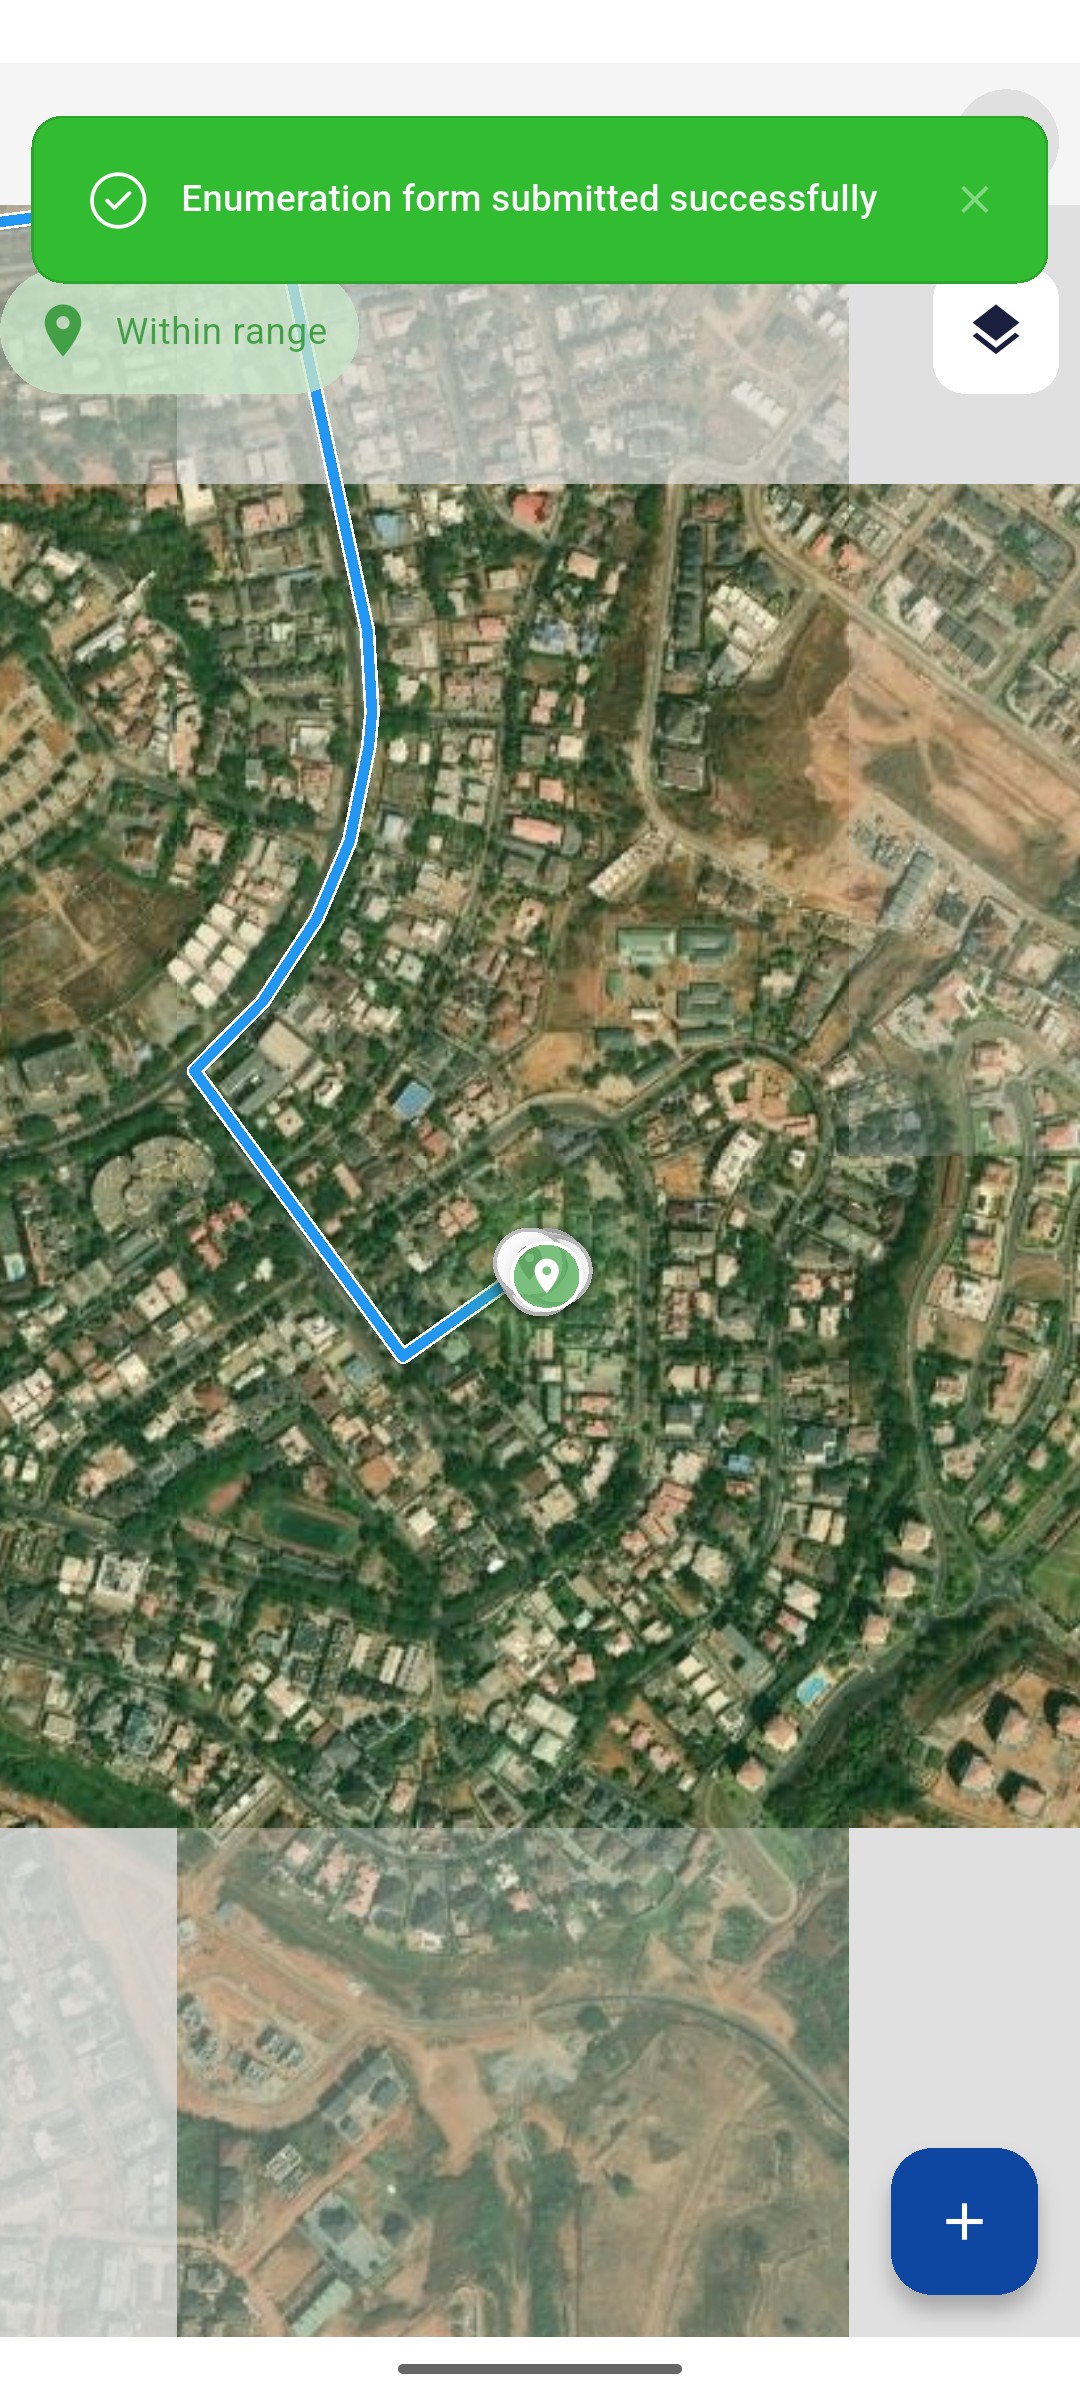
Check for Enumeration form submitted successfully. A green pin marks the household on the map.

Map with the Enumeration form submitted successfully message

1 — submission confirmation · 2 — submitted household pin.

Map with the Enumeration form submitted successfully message

Done. The app shows Enumeration form submitted successfully and the survey appears as Submitted in your history.

If something goes wrong

Why are there several entries?

The app creates one entry for each household you counted in Building Data. Complete every entry before submitting.
Where are the questions about children and girls?

Children Data appears for each child when you record children under five in Demographic Data, and Girls aged 9 - 14 Years Vaccination Information appears when you record girls aged 9 to 14. See Record a child's vaccination details and Record HPV details for girls aged 9 to 14.
Mobile app

Record a child's vaccination details

Record each child under five in the household, with photos of their Infant Welfare Card and the vaccines they received.

Field Worker 6 min read Mobile

Before you start

  • In Demographic Data, you recorded the number of children under five and how many have an Infant Welfare Card.
  • You have the child's Infant Welfare Card to hand.

Enter the child's details

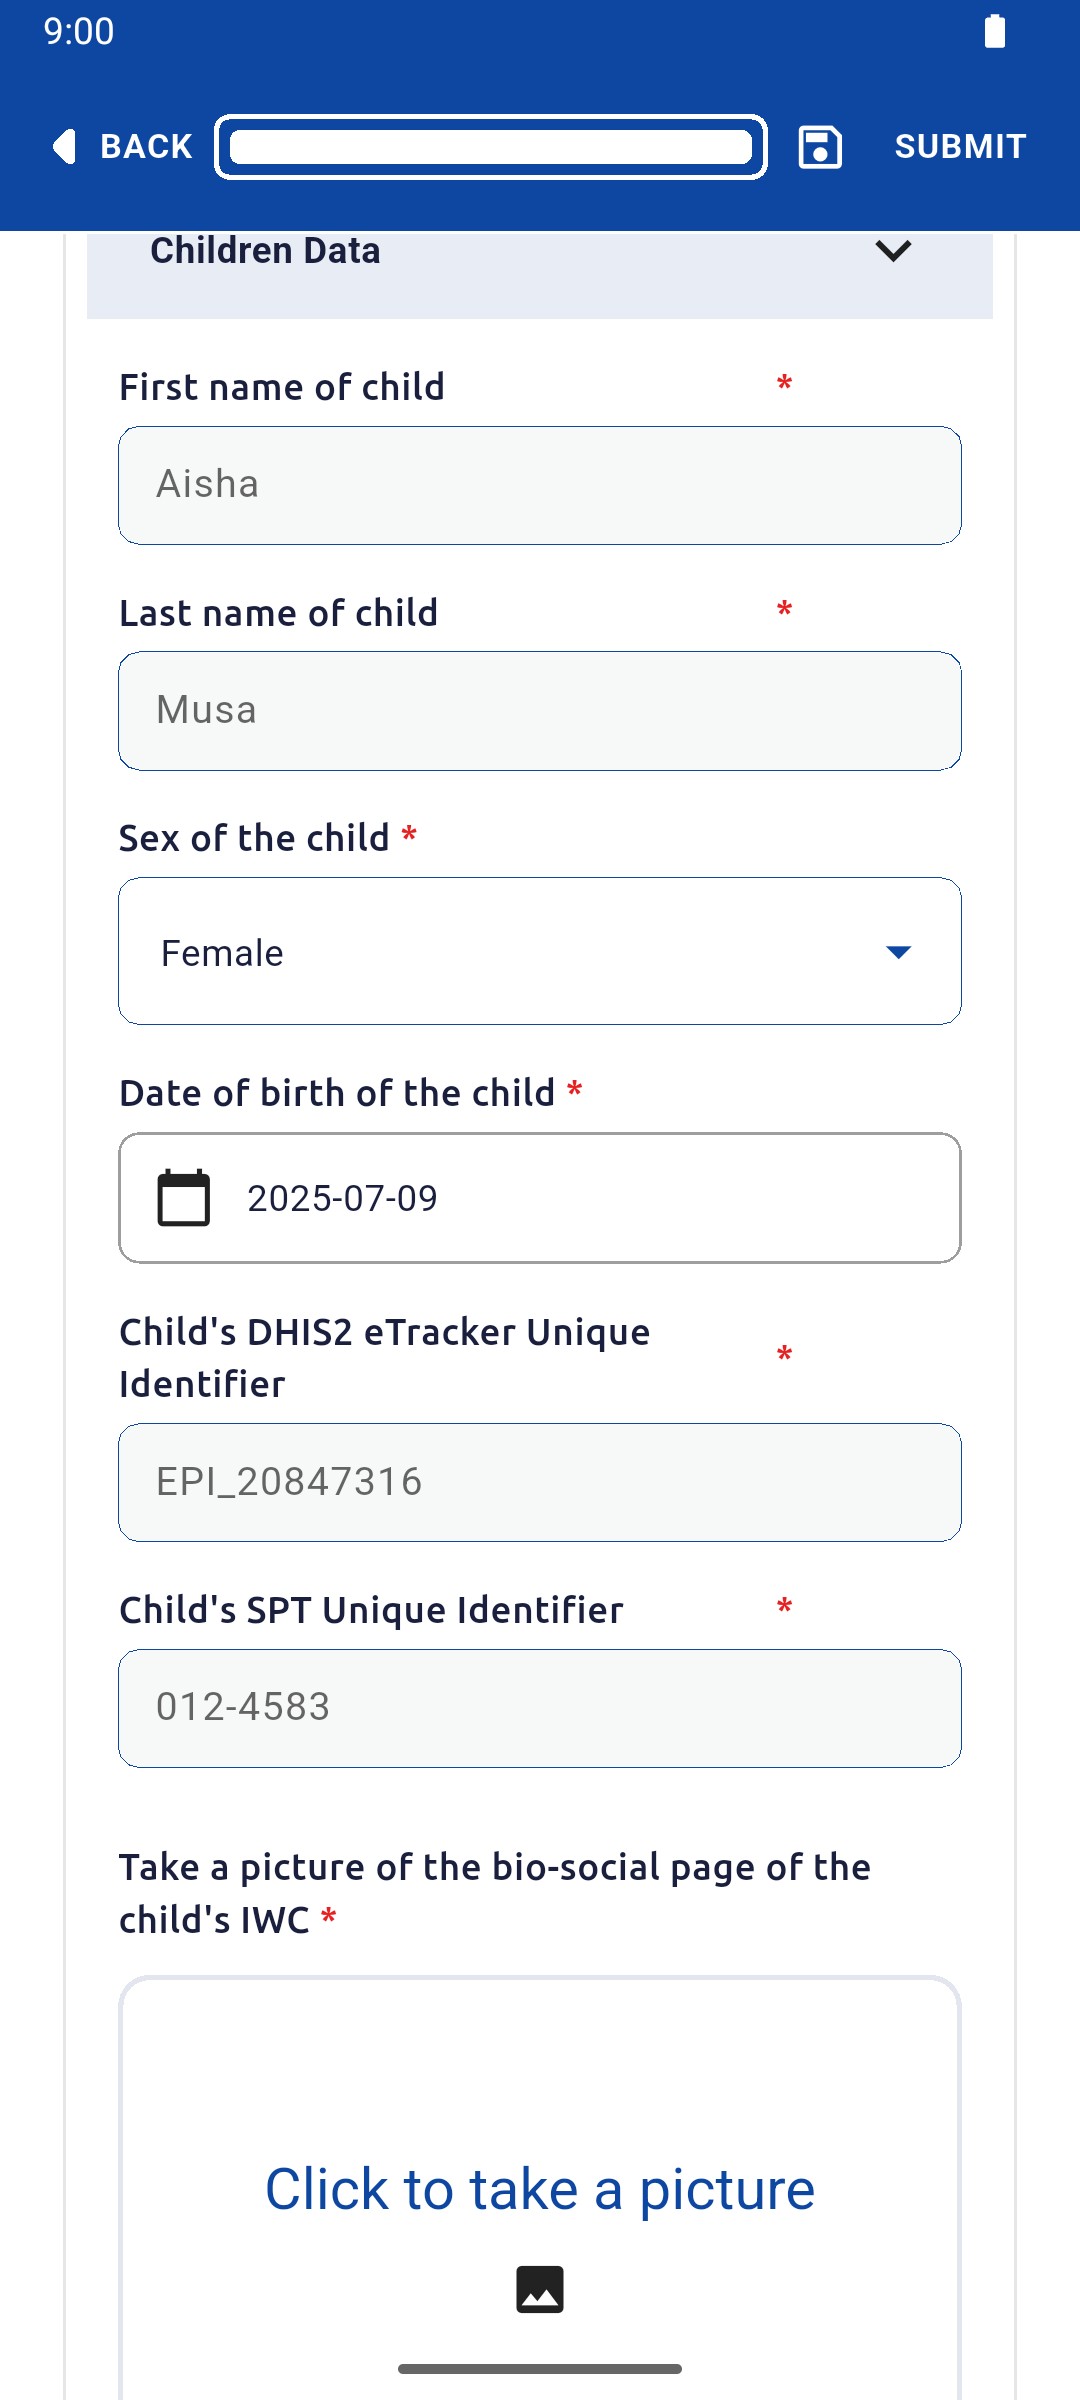
Open Children Data. Enter the child's first and last name, sex and date of birth, then the DHIS2 eTracker and SPT identifiers.

Children Data with the child's name, sex, date of birth and identifiers entered

1 — child's name · 2 — sex and birth date · 3 — dhis2 and spt identifiers.

Children Data with the child's name, sex, date of birth and identifiers entered

Photograph the card

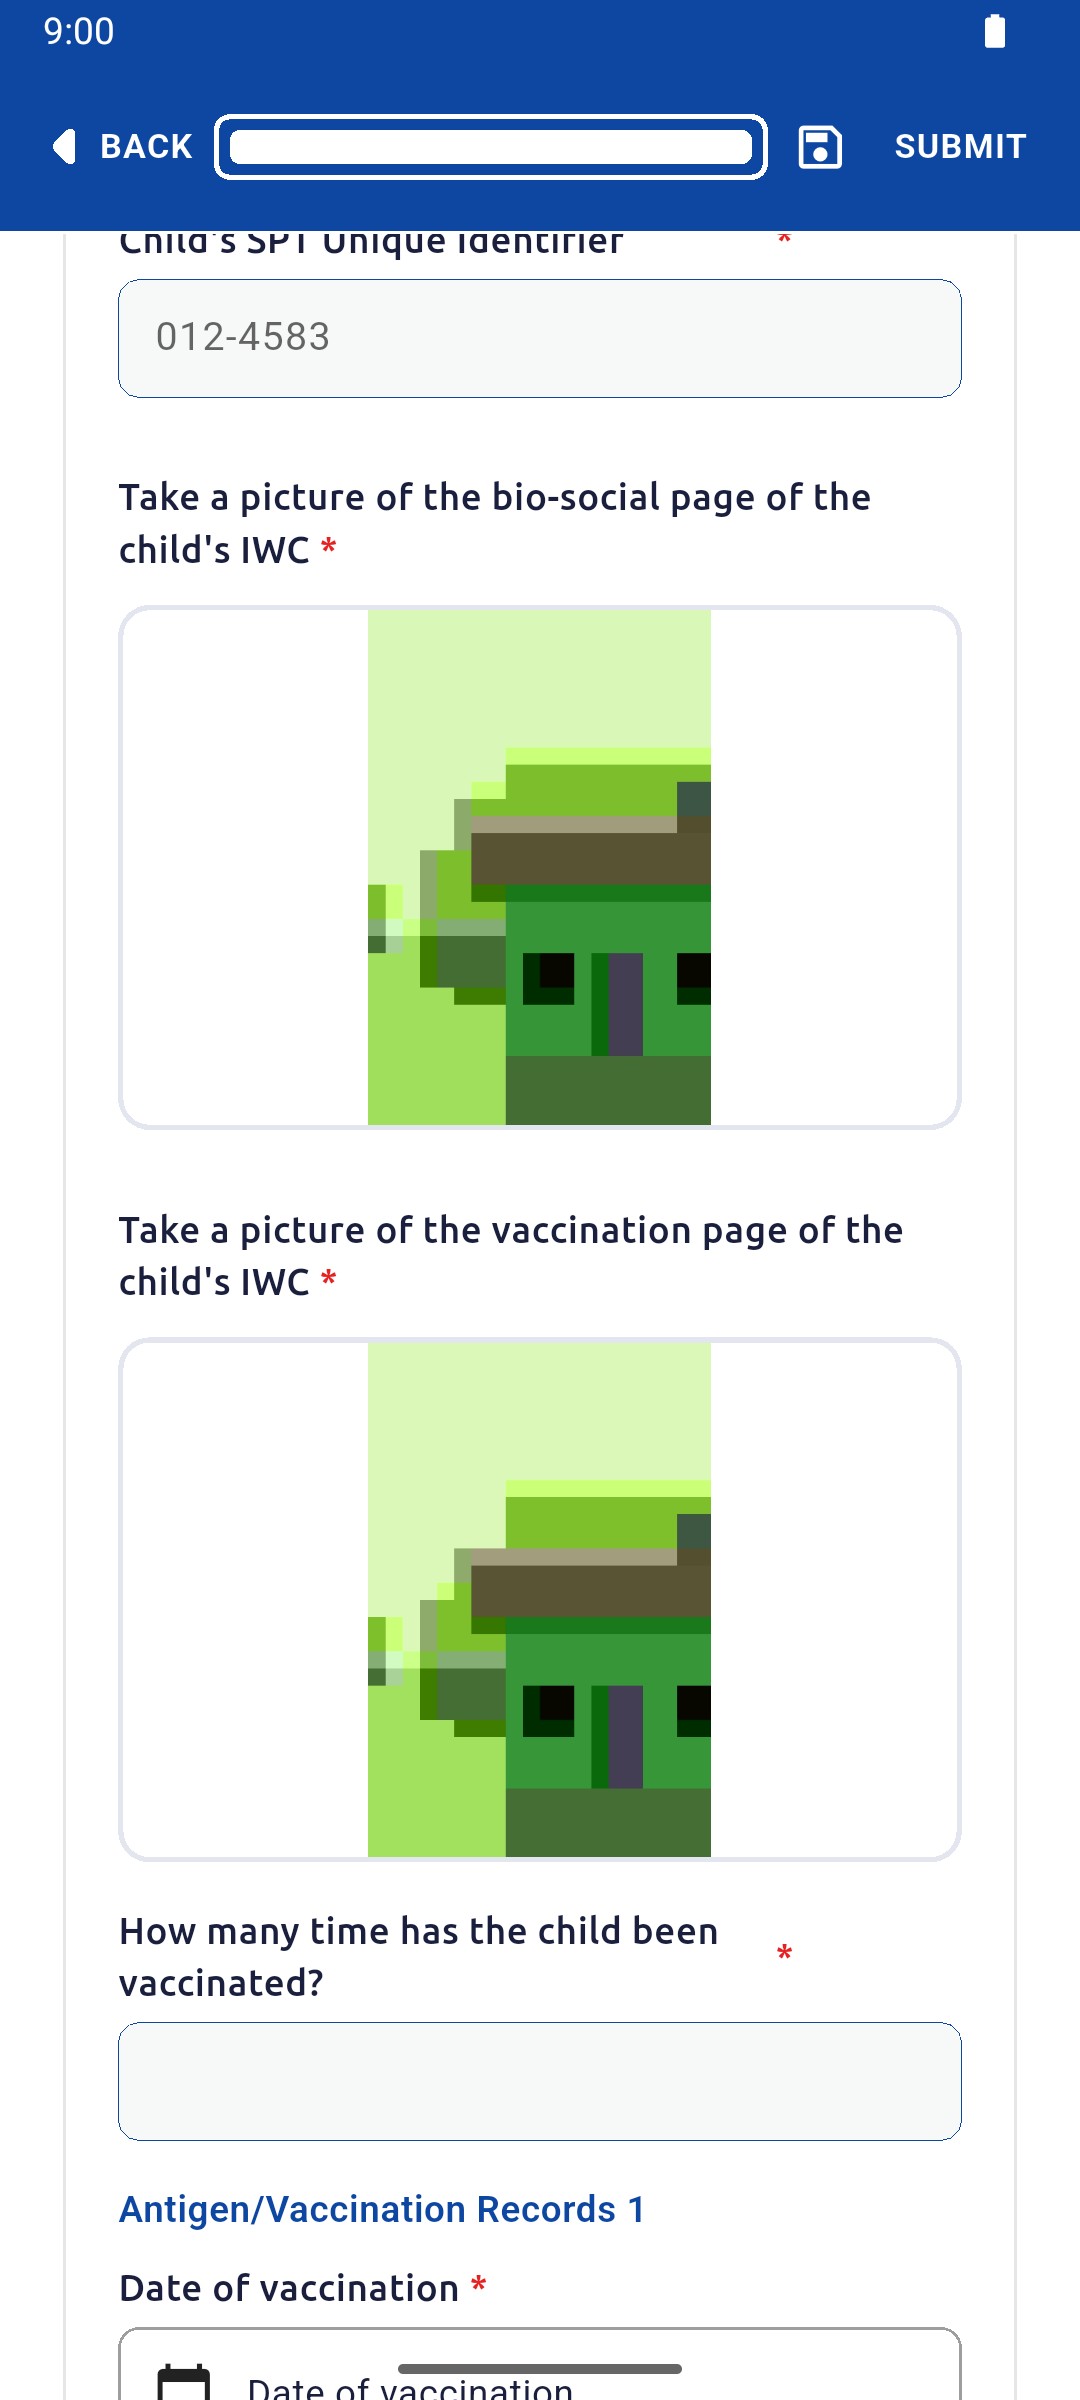
Tap Click to take a picture to photograph the bio-social page, then the vaccination page, of the child's Infant Welfare Card.

Both Infant Welfare Card photo fields with photos attached

1 — bio-social page photo · 2 — vaccination page photo.

Both Infant Welfare Card photo fields with photos attached

Record each vaccination

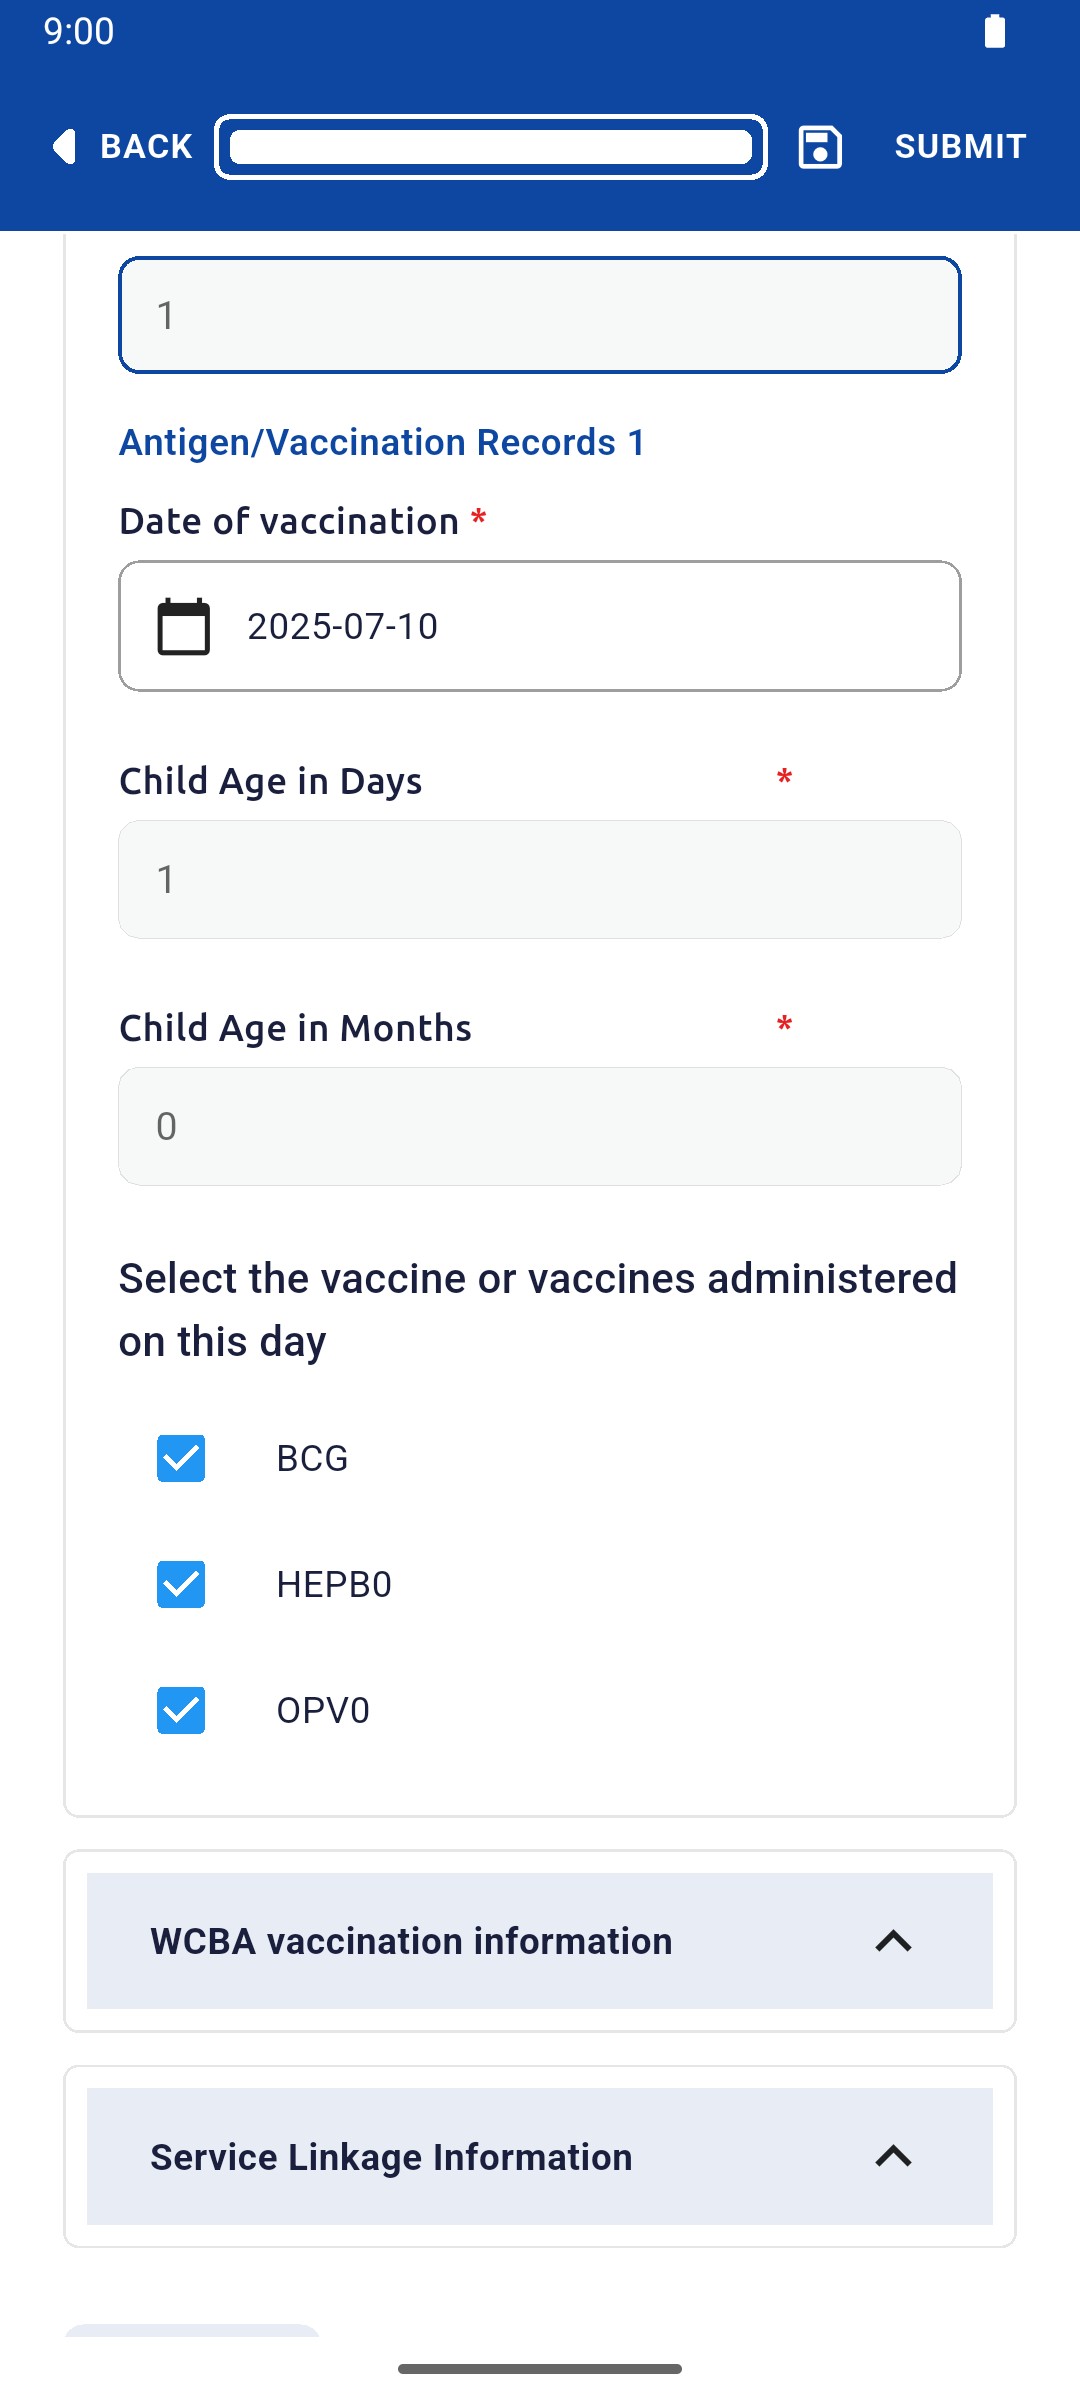
Enter how many times the child has been vaccinated. For each record, choose the Date of vaccination and tick the vaccines given that day.

Vaccination record with date 2025-07-10, calculated age and BCG, HEPB0 and OPV0 ticked

1 — vaccination count · 2 — vaccination date · 3 — vaccines given.

Vaccination record with date 2025-07-10, calculated age and BCG, HEPB0 and OPV0 ticked

Submit the survey

Complete the remaining household sections, tap SUBMIT, then Submit to server.

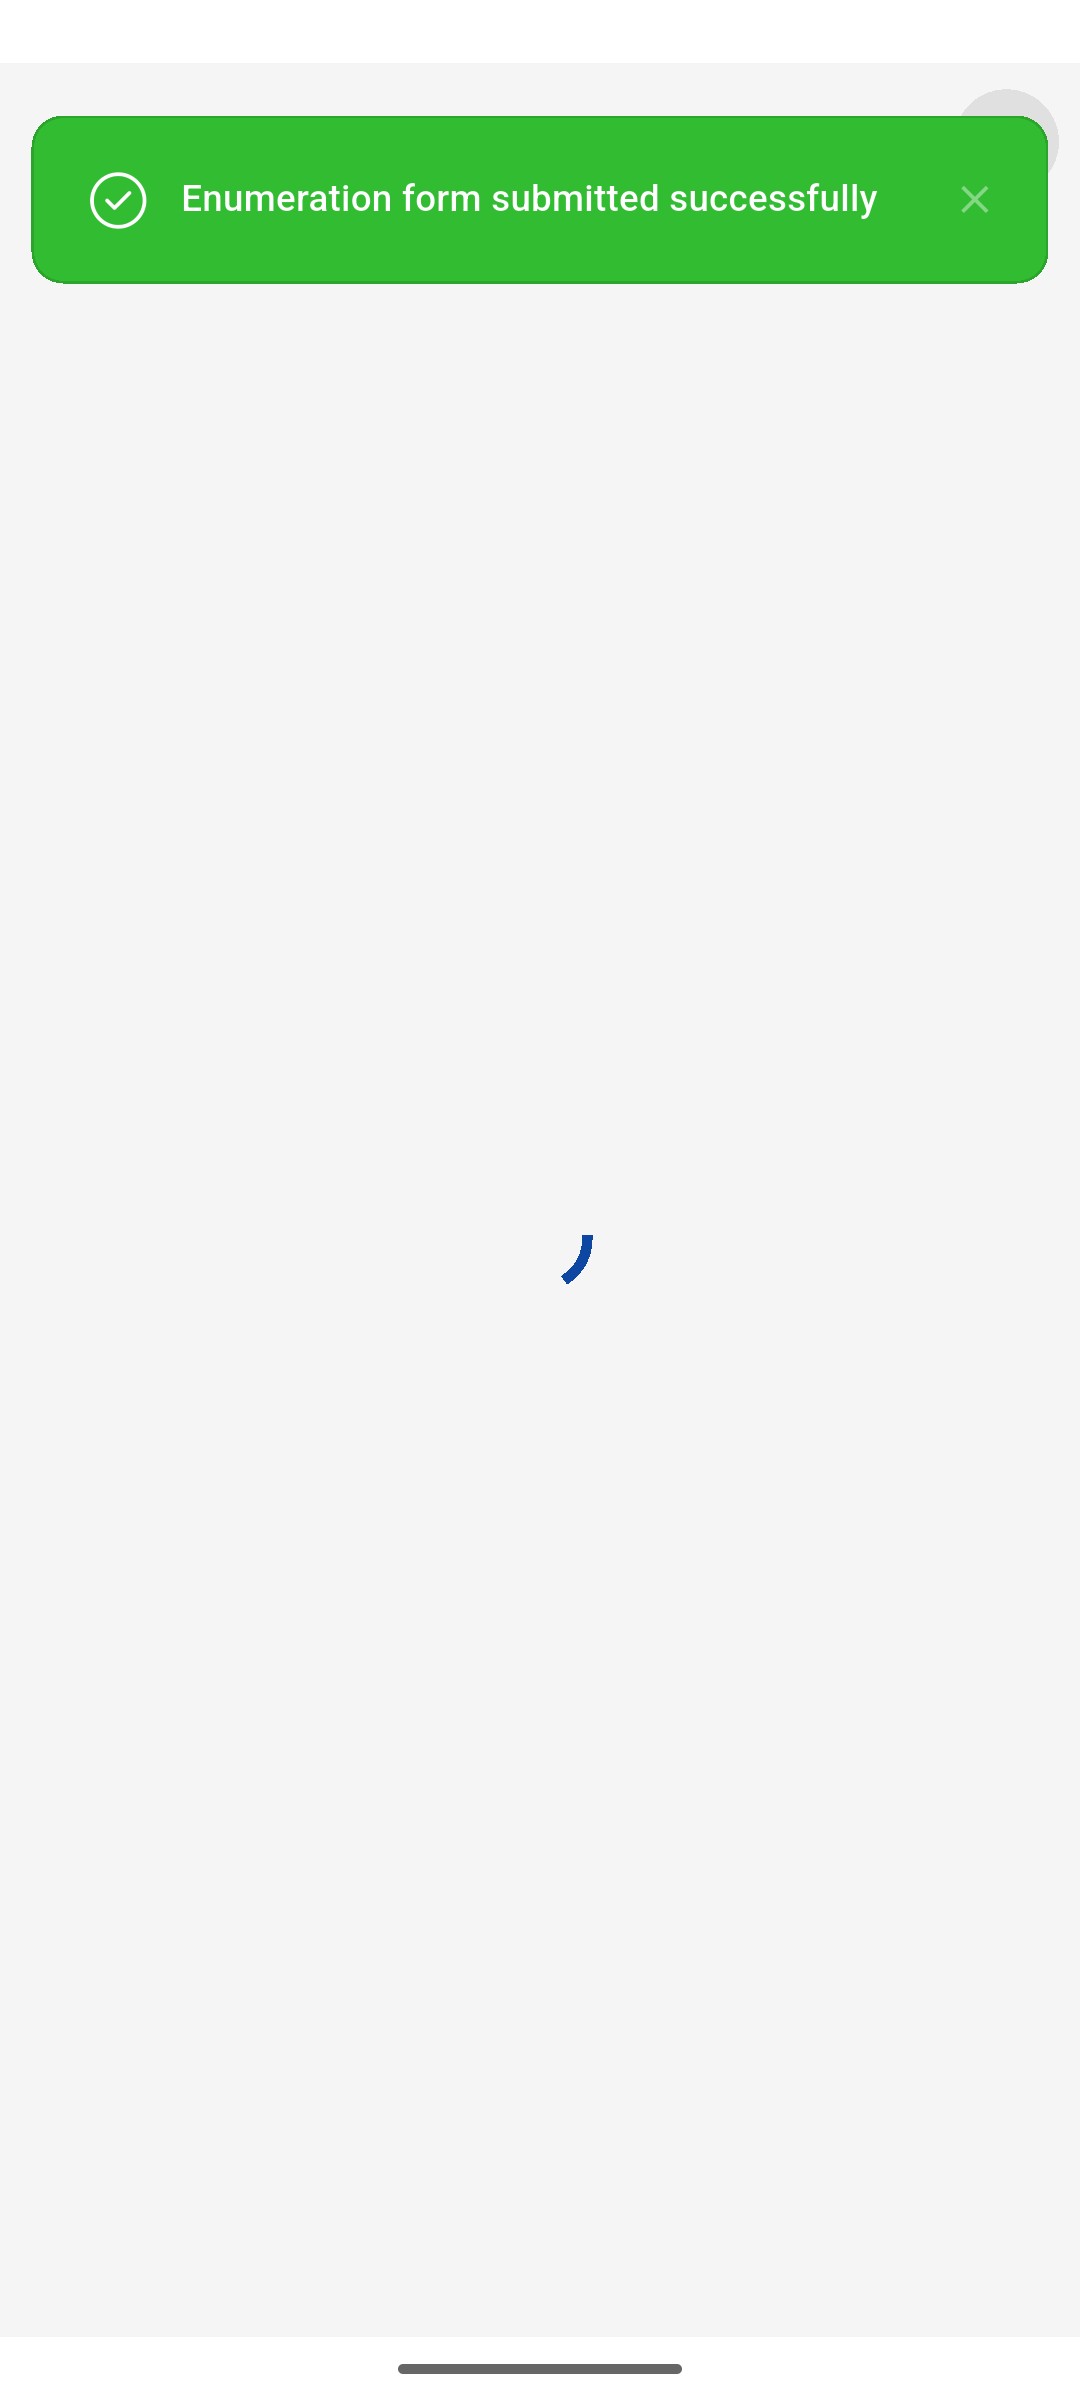
Enumeration form submitted successfully message

1 — submission confirmation.

Enumeration form submitted successfully message

Done. The child's details, card photos and vaccination records are saved with the household and sent when you submit the survey.

If something goes wrong

Where do the identifiers come from?

Copy the DHIS2 eTracker and SPT identifiers from the child's records, in the formats shown in each field.

How are the child's age fields filled?

Child Age in Days and Child Age in Months are calculated from the date of birth and the date of vaccination.

Mobile app

Record HPV details for girls aged 9 to 14

Record each girl aged 9 to 14 in the household, with her schooling and HPV vaccination status.

Field Worker 4 min read Mobile

Before you start

  • In Demographic Data, you recorded how many girls in the household are aged 9 to 14.

Enter her details and schooling

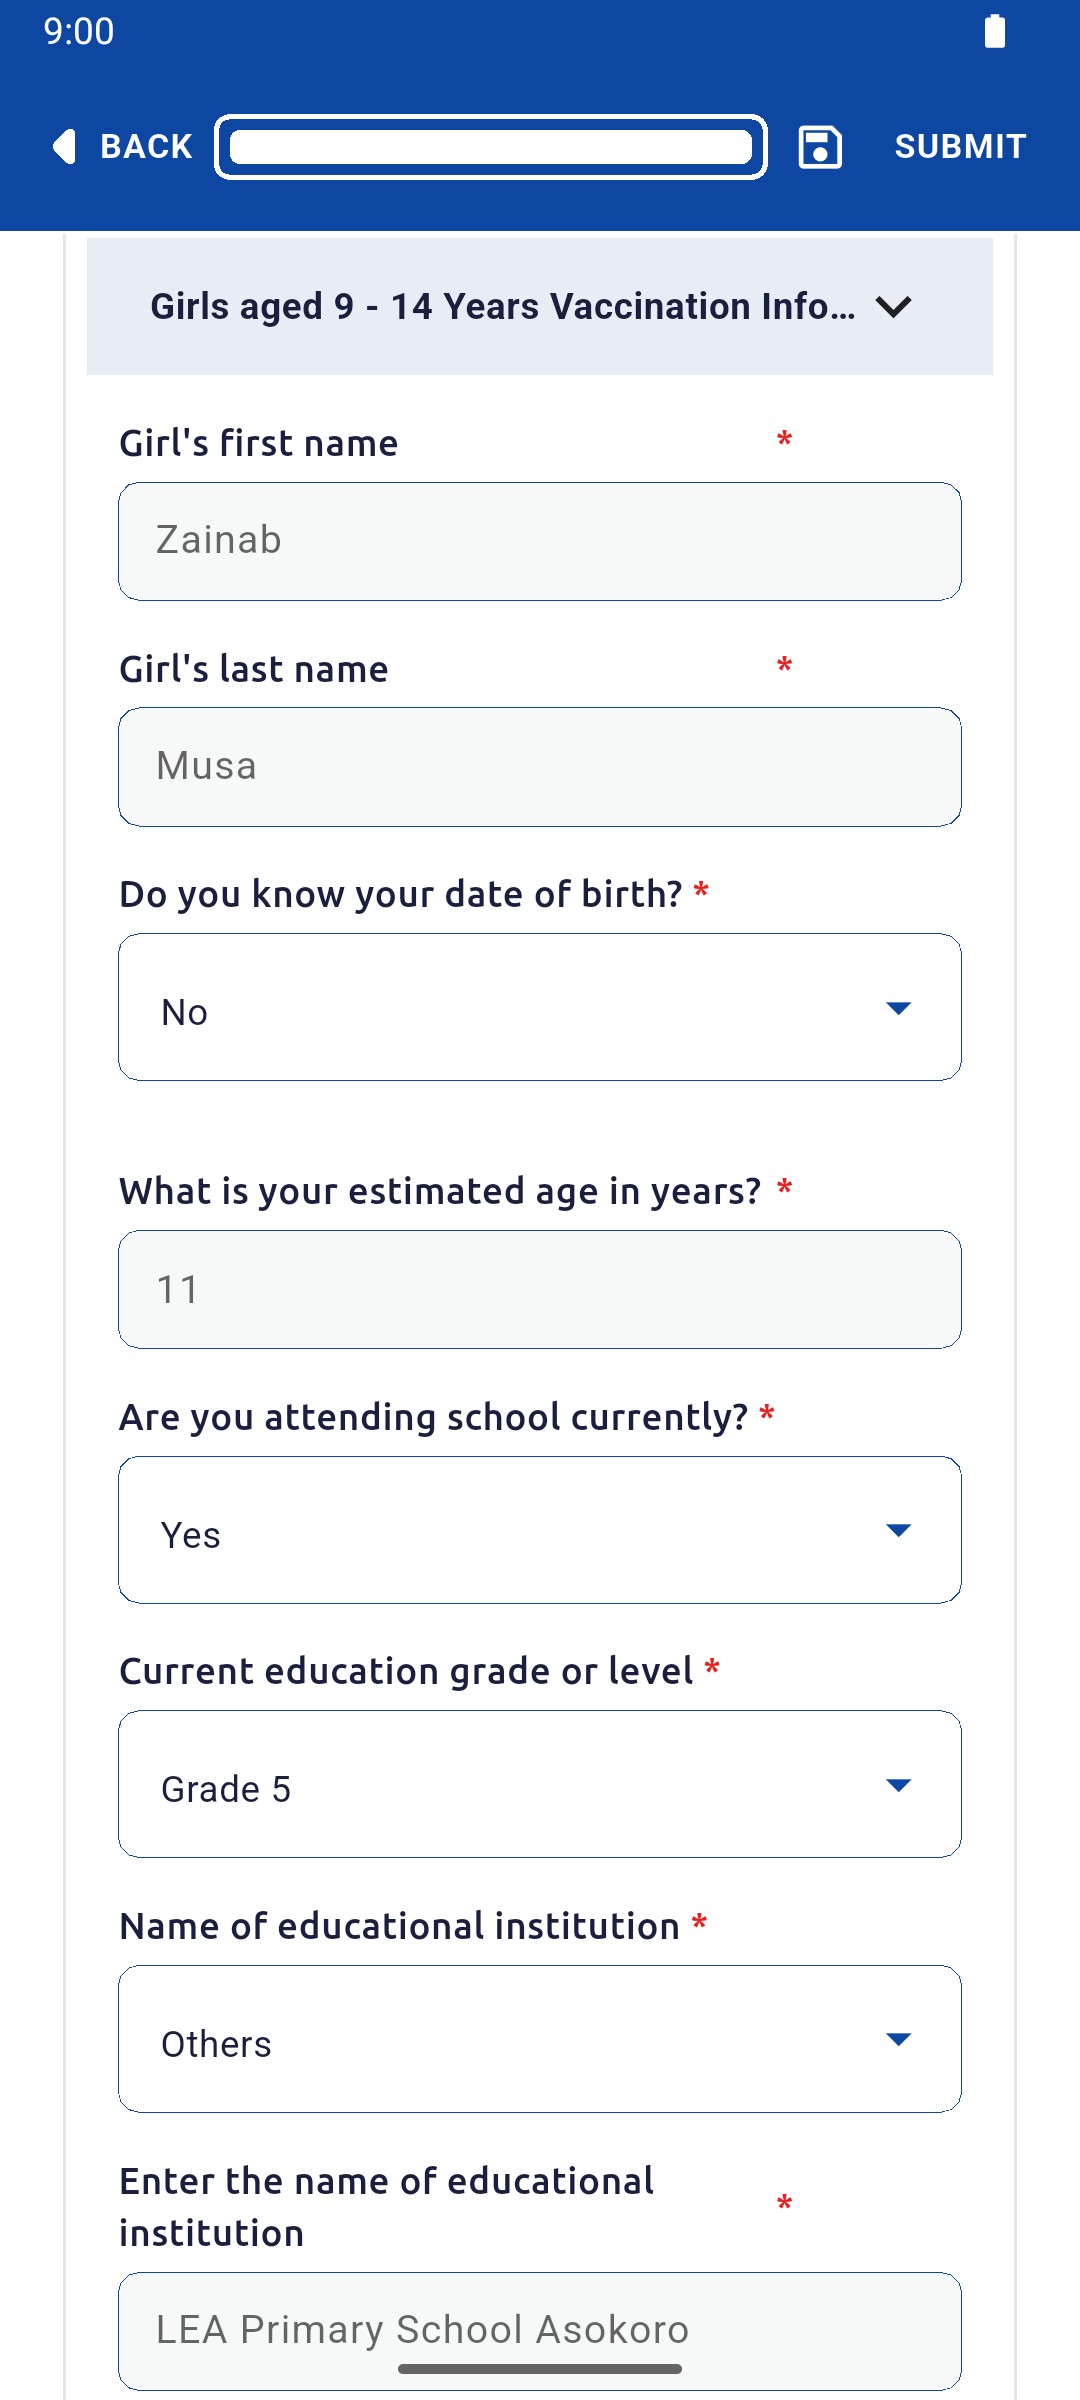
Open Girls aged 9 - 14 Years Vaccination Information. Enter her first and last name, her date of birth or estimated age, and whether she attends school. For a school pupil, choose her grade and school.

Girls aged 9 to 14 section with name, age 11, attending school, Grade 5 and school entered

1 — girl's name and age · 2 — school attendance and grade · 3 — school field.

Girls aged 9 to 14 section with name, age 11, attending school, Grade 5 and school entered

Record her HPV vaccination

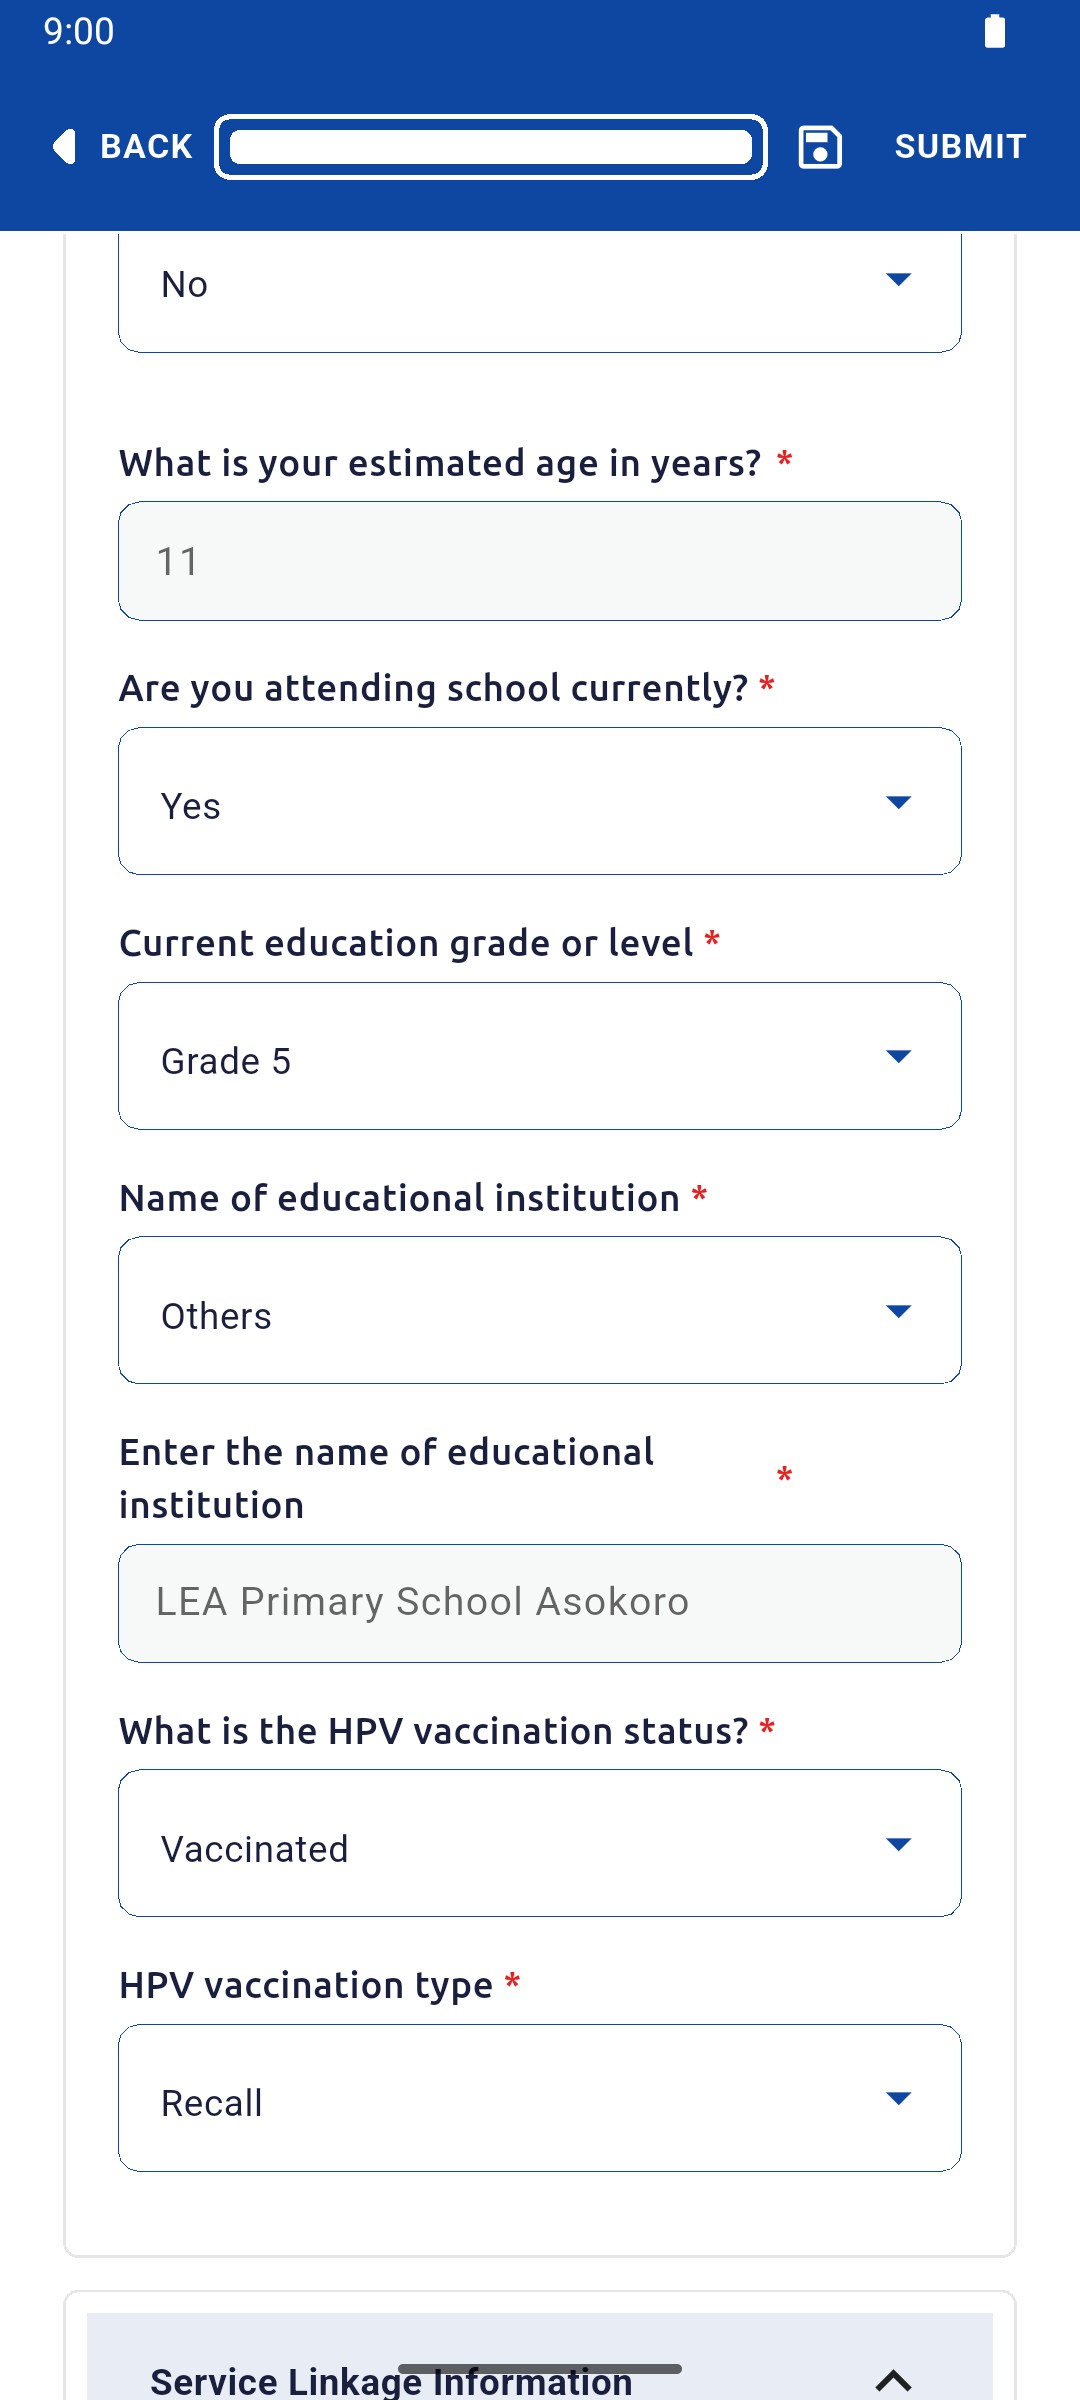
Choose her HPV vaccination status. If she is vaccinated, choose the HPV vaccination type.

HPV vaccination status Vaccinated with type Recall

1 — hpv vaccination status · 2 — hpv vaccination type.

HPV vaccination status Vaccinated with type Recall

Submit the survey

Complete the remaining household sections, tap SUBMIT, then Submit to server.

Map with the Enumeration form submitted successfully message

1 — submission confirmation.

Map with the Enumeration form submitted successfully message

Done. The girl's details and HPV status are saved with the household and sent when you submit the survey.

If something goes wrong

What if her school is not in the list?

Choose Others under Name of educational institution and type the school's name.

What is the difference between Card and Recall?

Choose Card when the vaccination is shown on a card, or Recall when the girl or her caregiver reports it.

Mobile app

Save and reopen a draft

Pause a survey and finish it later without losing your answers.

Field Worker 2 min read Mobile

Before you start

  • A survey form is open.

Save the draft

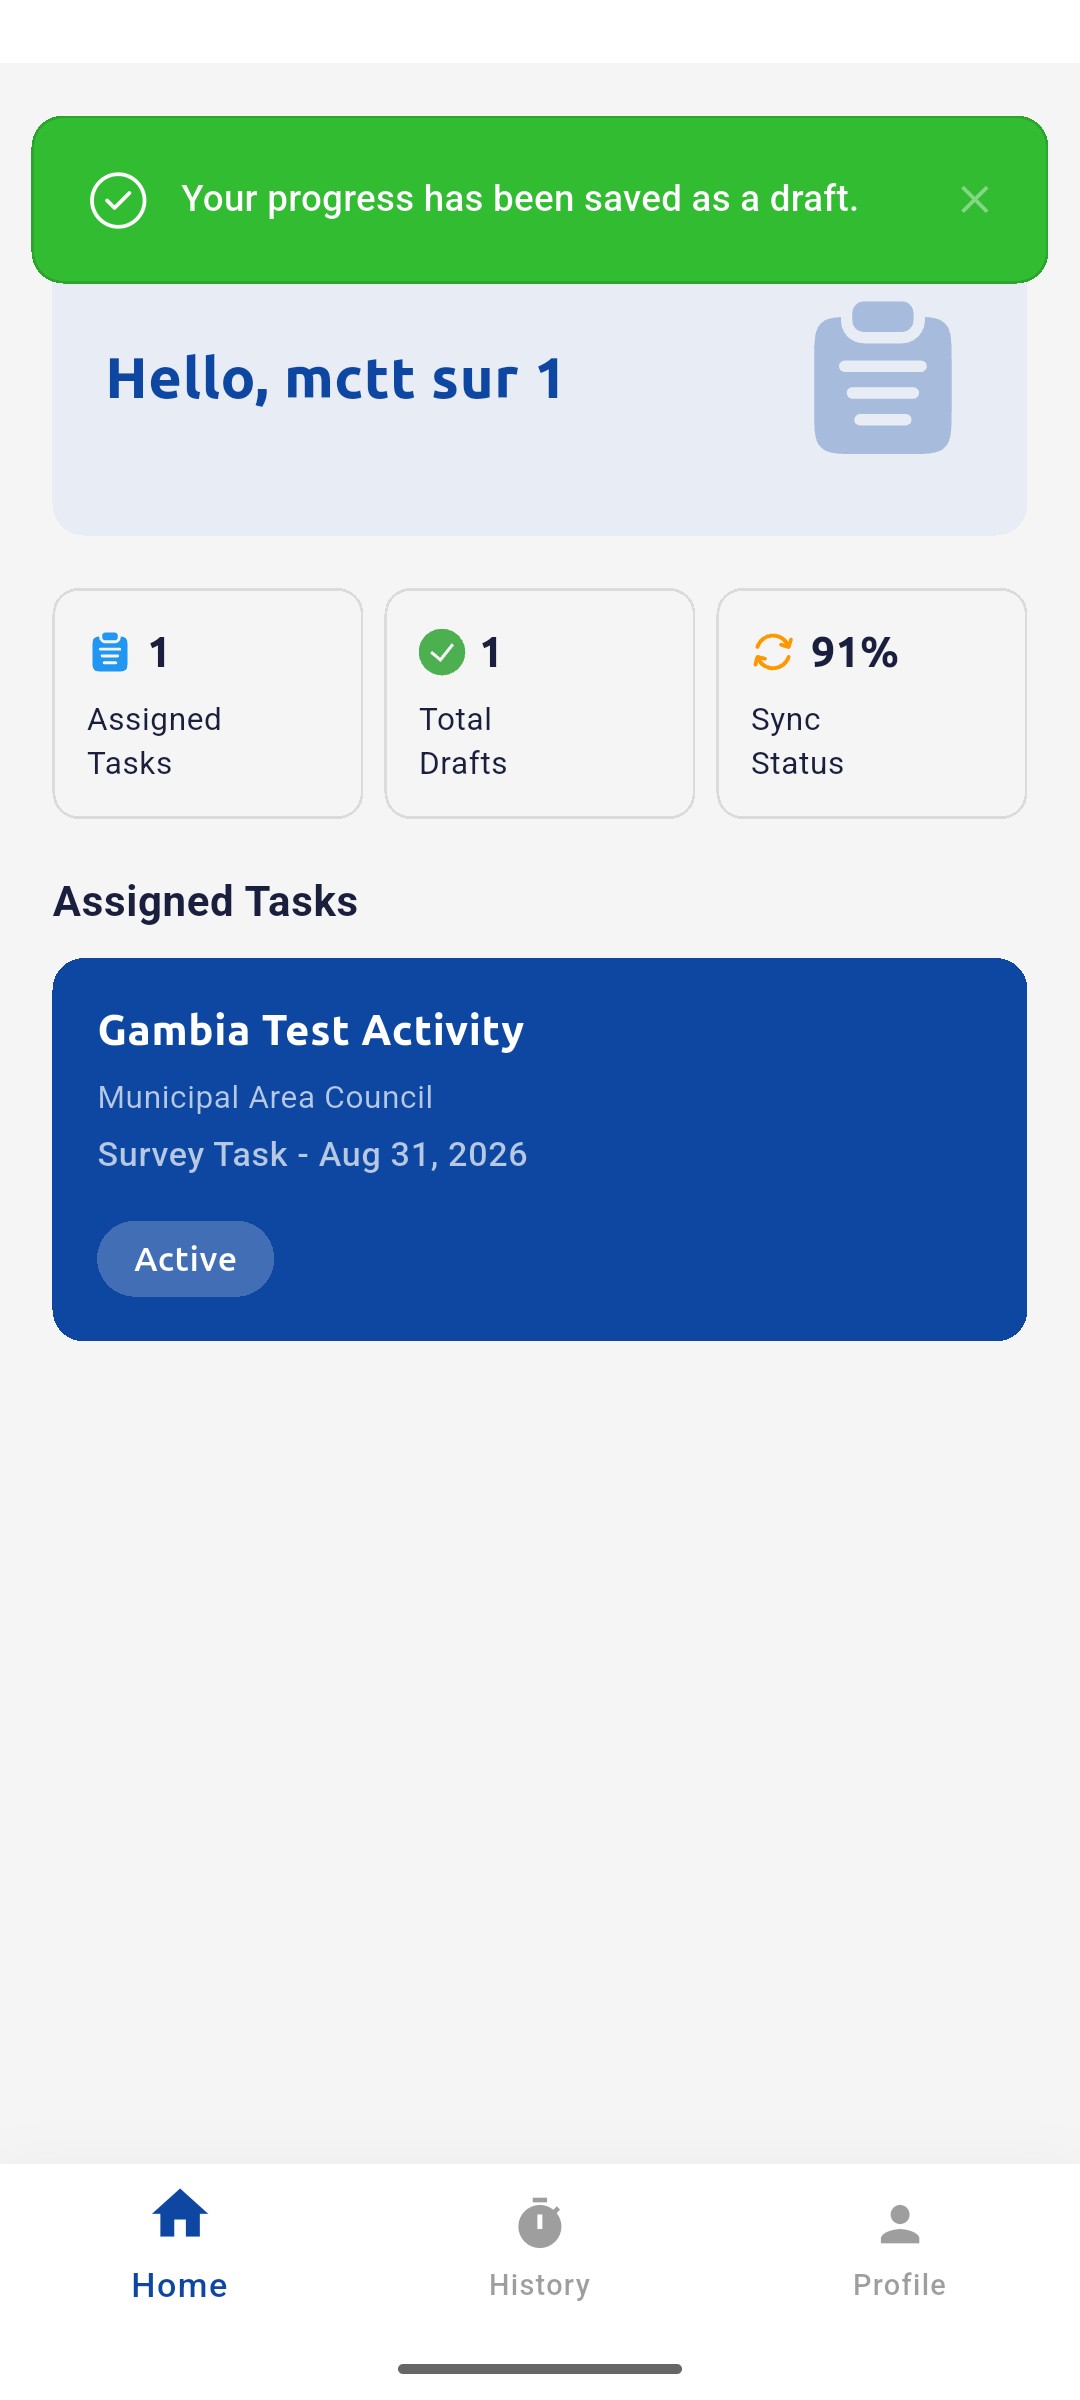
Tap the save icon, Save to draft, at the top of the form. The app confirms Your progress has been saved as a draft.

Home screen with the Your progress has been saved as a draft message

1 — draft saved confirmation.

Home screen with the Your progress has been saved as a draft message

Check the draft count

The Total Drafts card on the home screen goes up by one.

Home screen showing 1 Total Drafts

1 — total drafts.

Home screen showing 1 Total Drafts

Open History

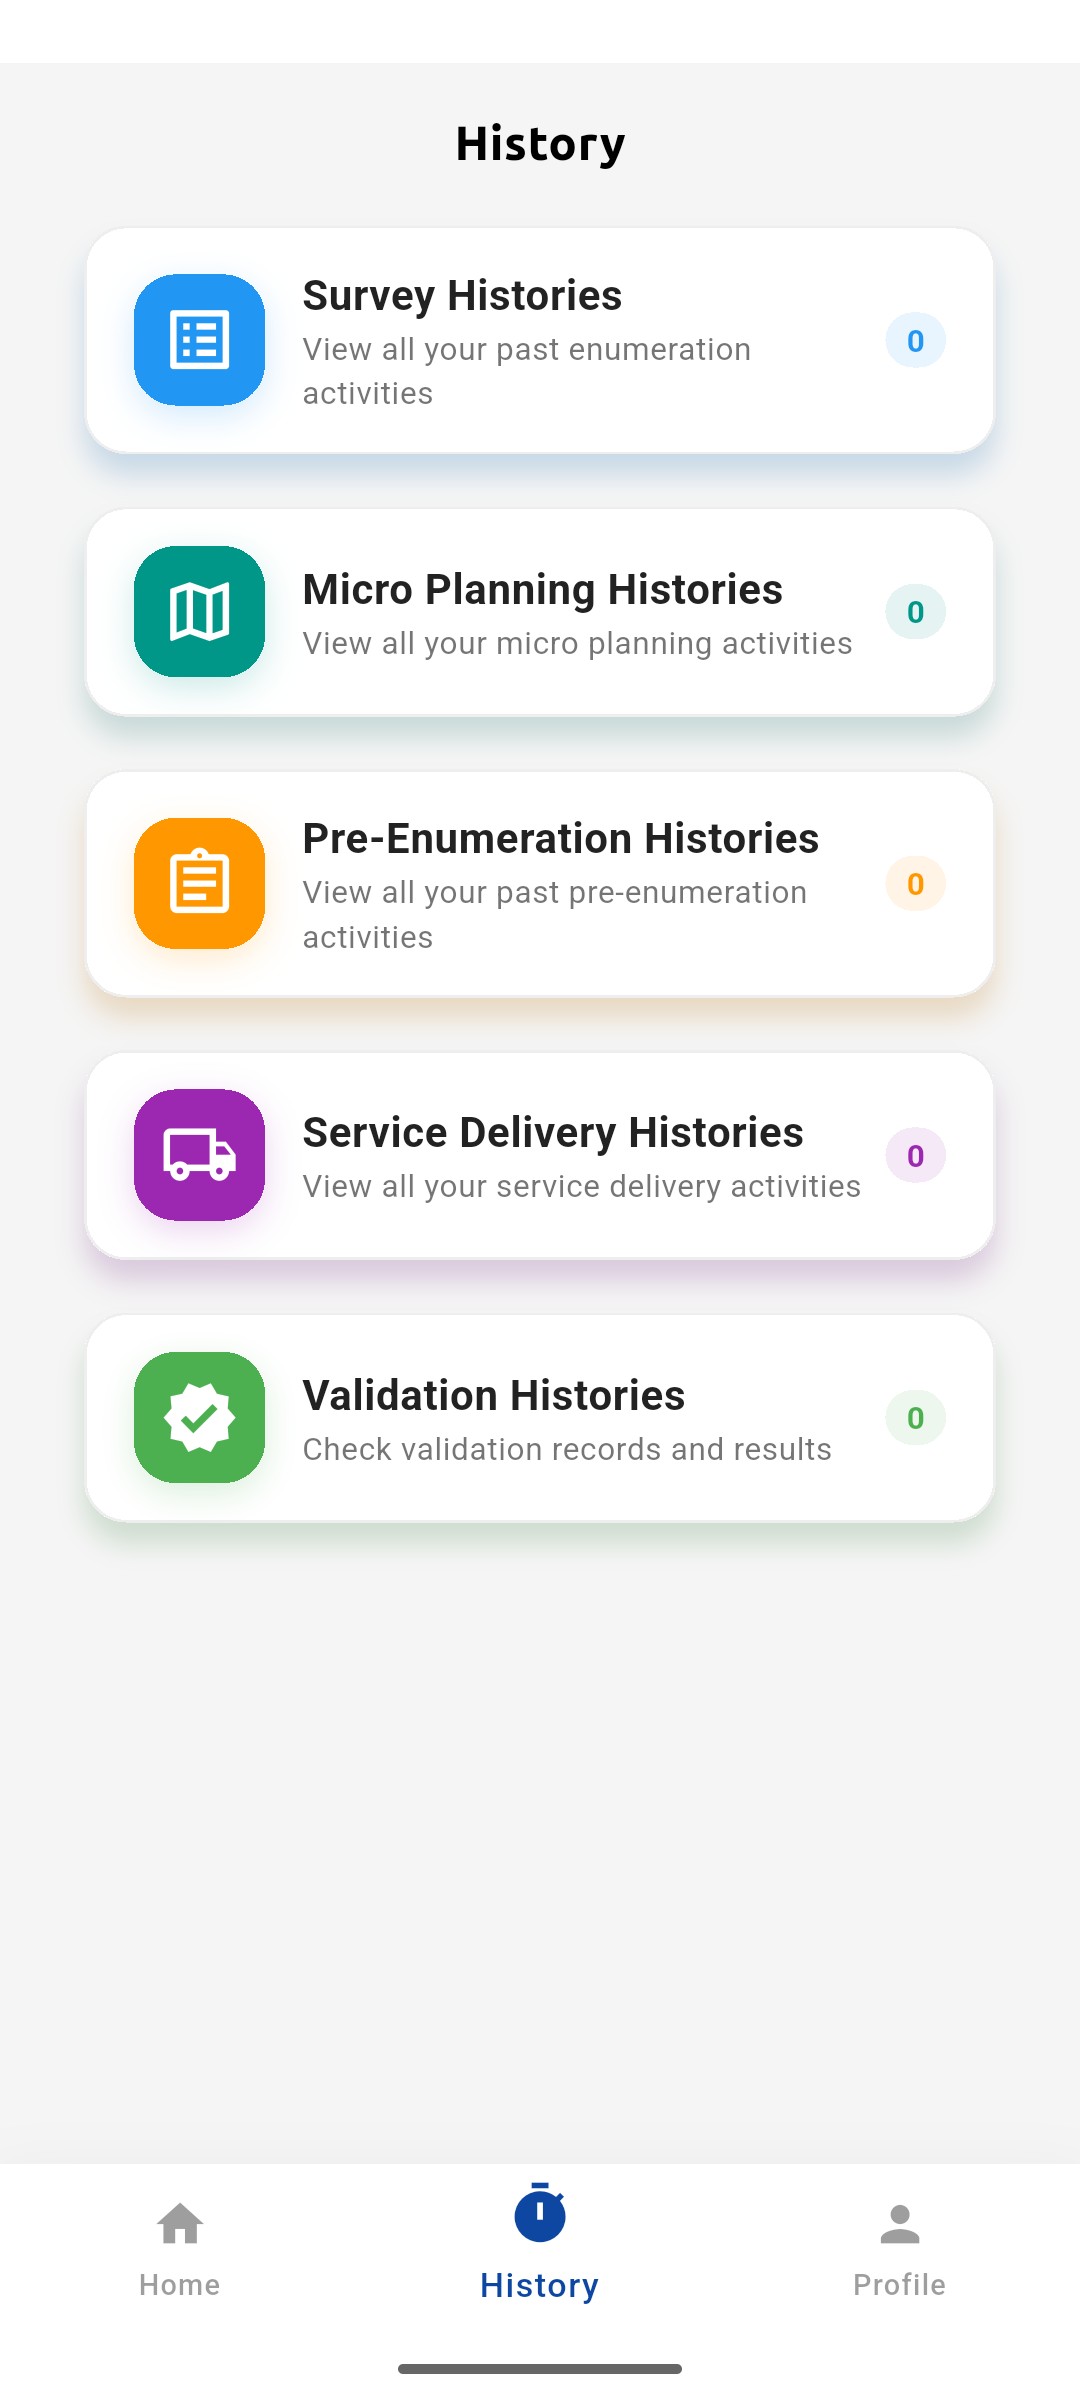
Tap History, then tap Survey Histories.

History screen with the history categories

1 — history tab · 2 — survey histories.

History screen with the history categories

Find the draft

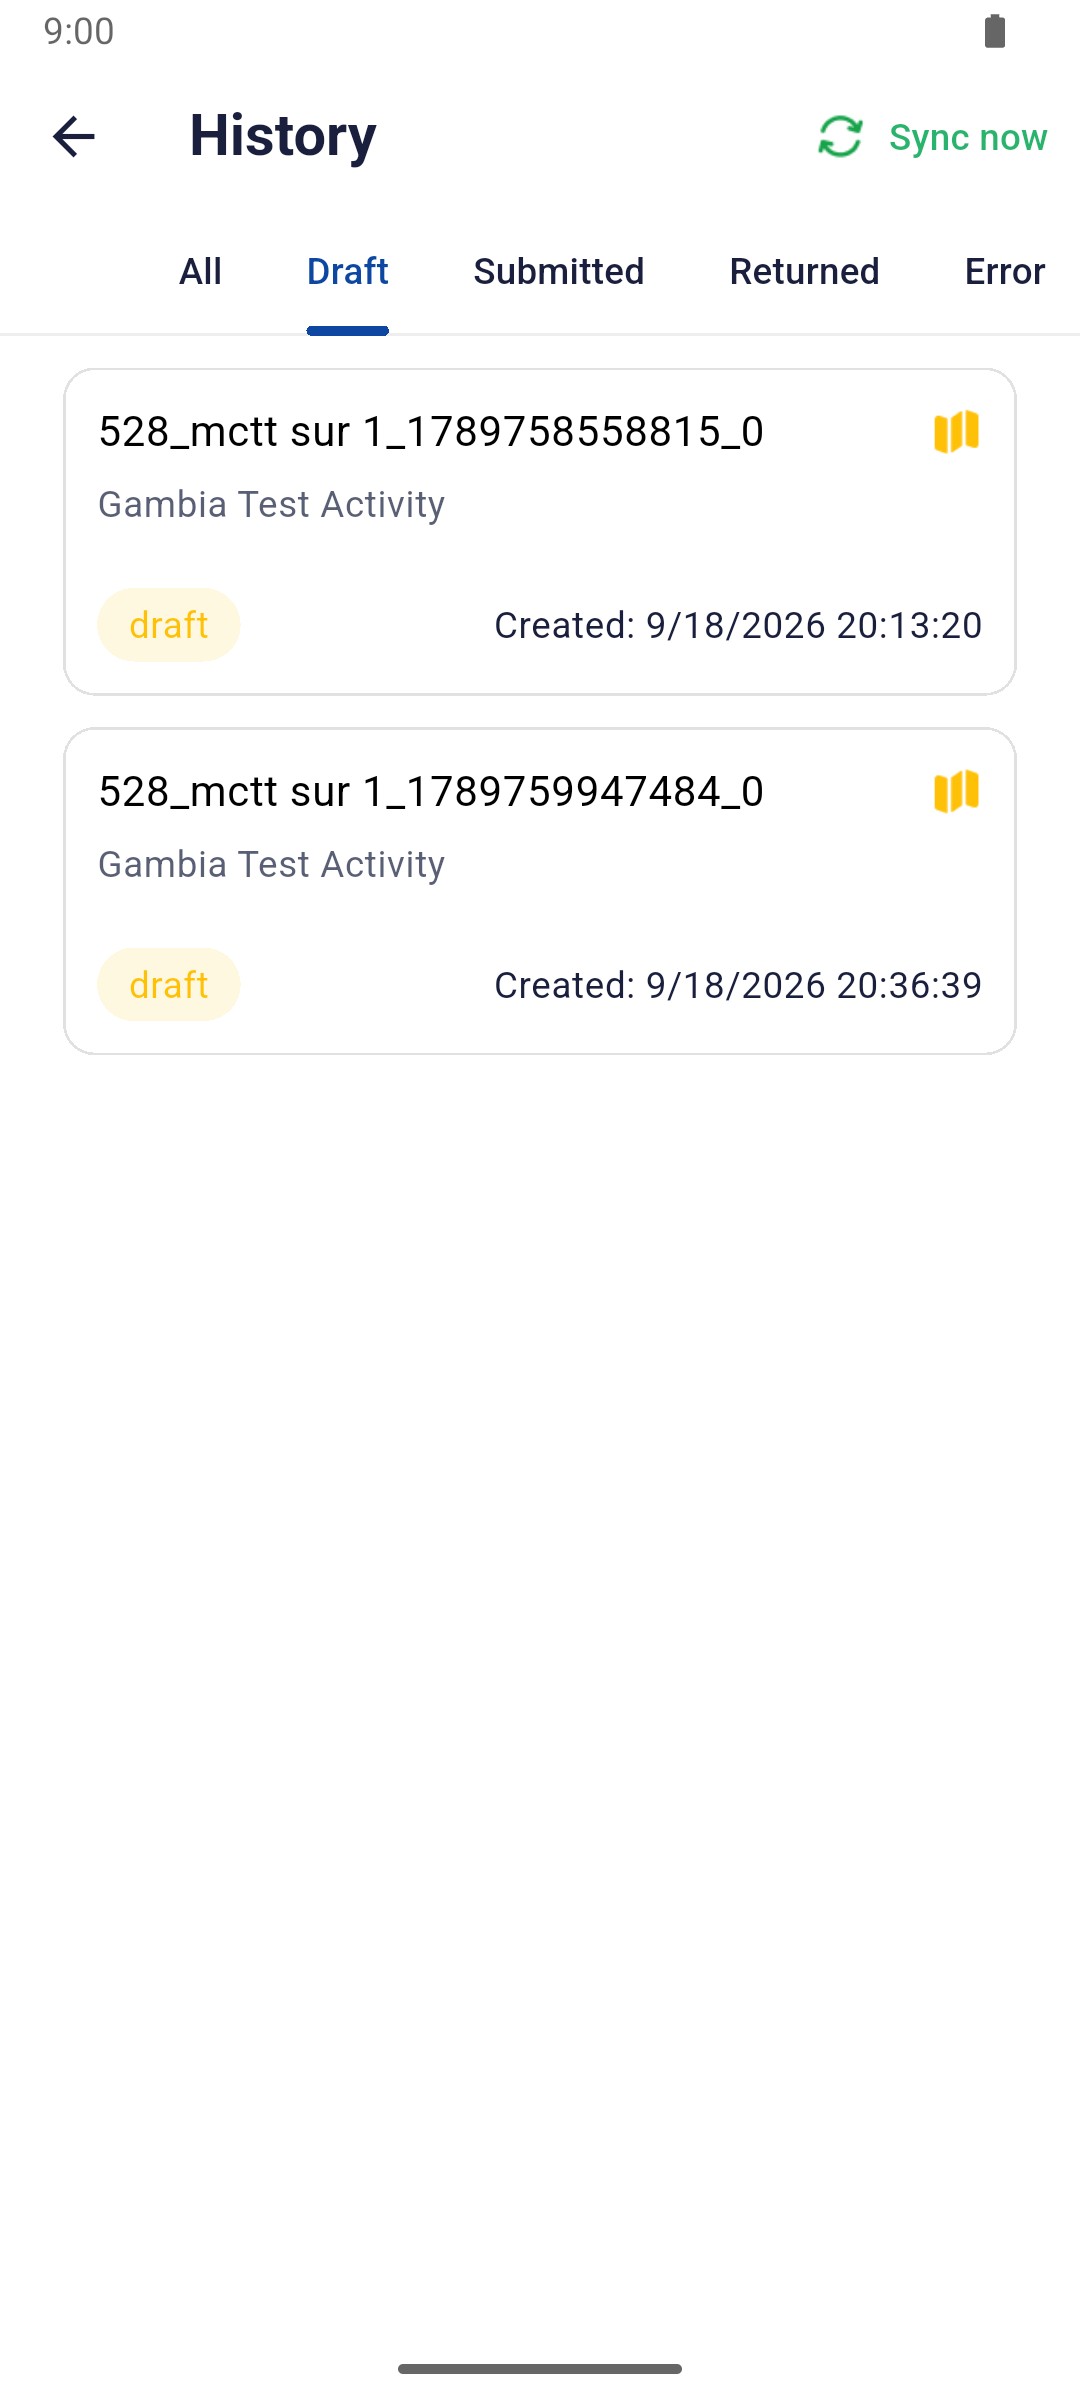
Tap the Draft tab and tap the draft you want to finish.

Draft tab listing two drafts for Gambia Test Activity

1 — draft tab · 2 — draft record.

Draft tab listing two drafts for Gambia Test Activity

Continue editing

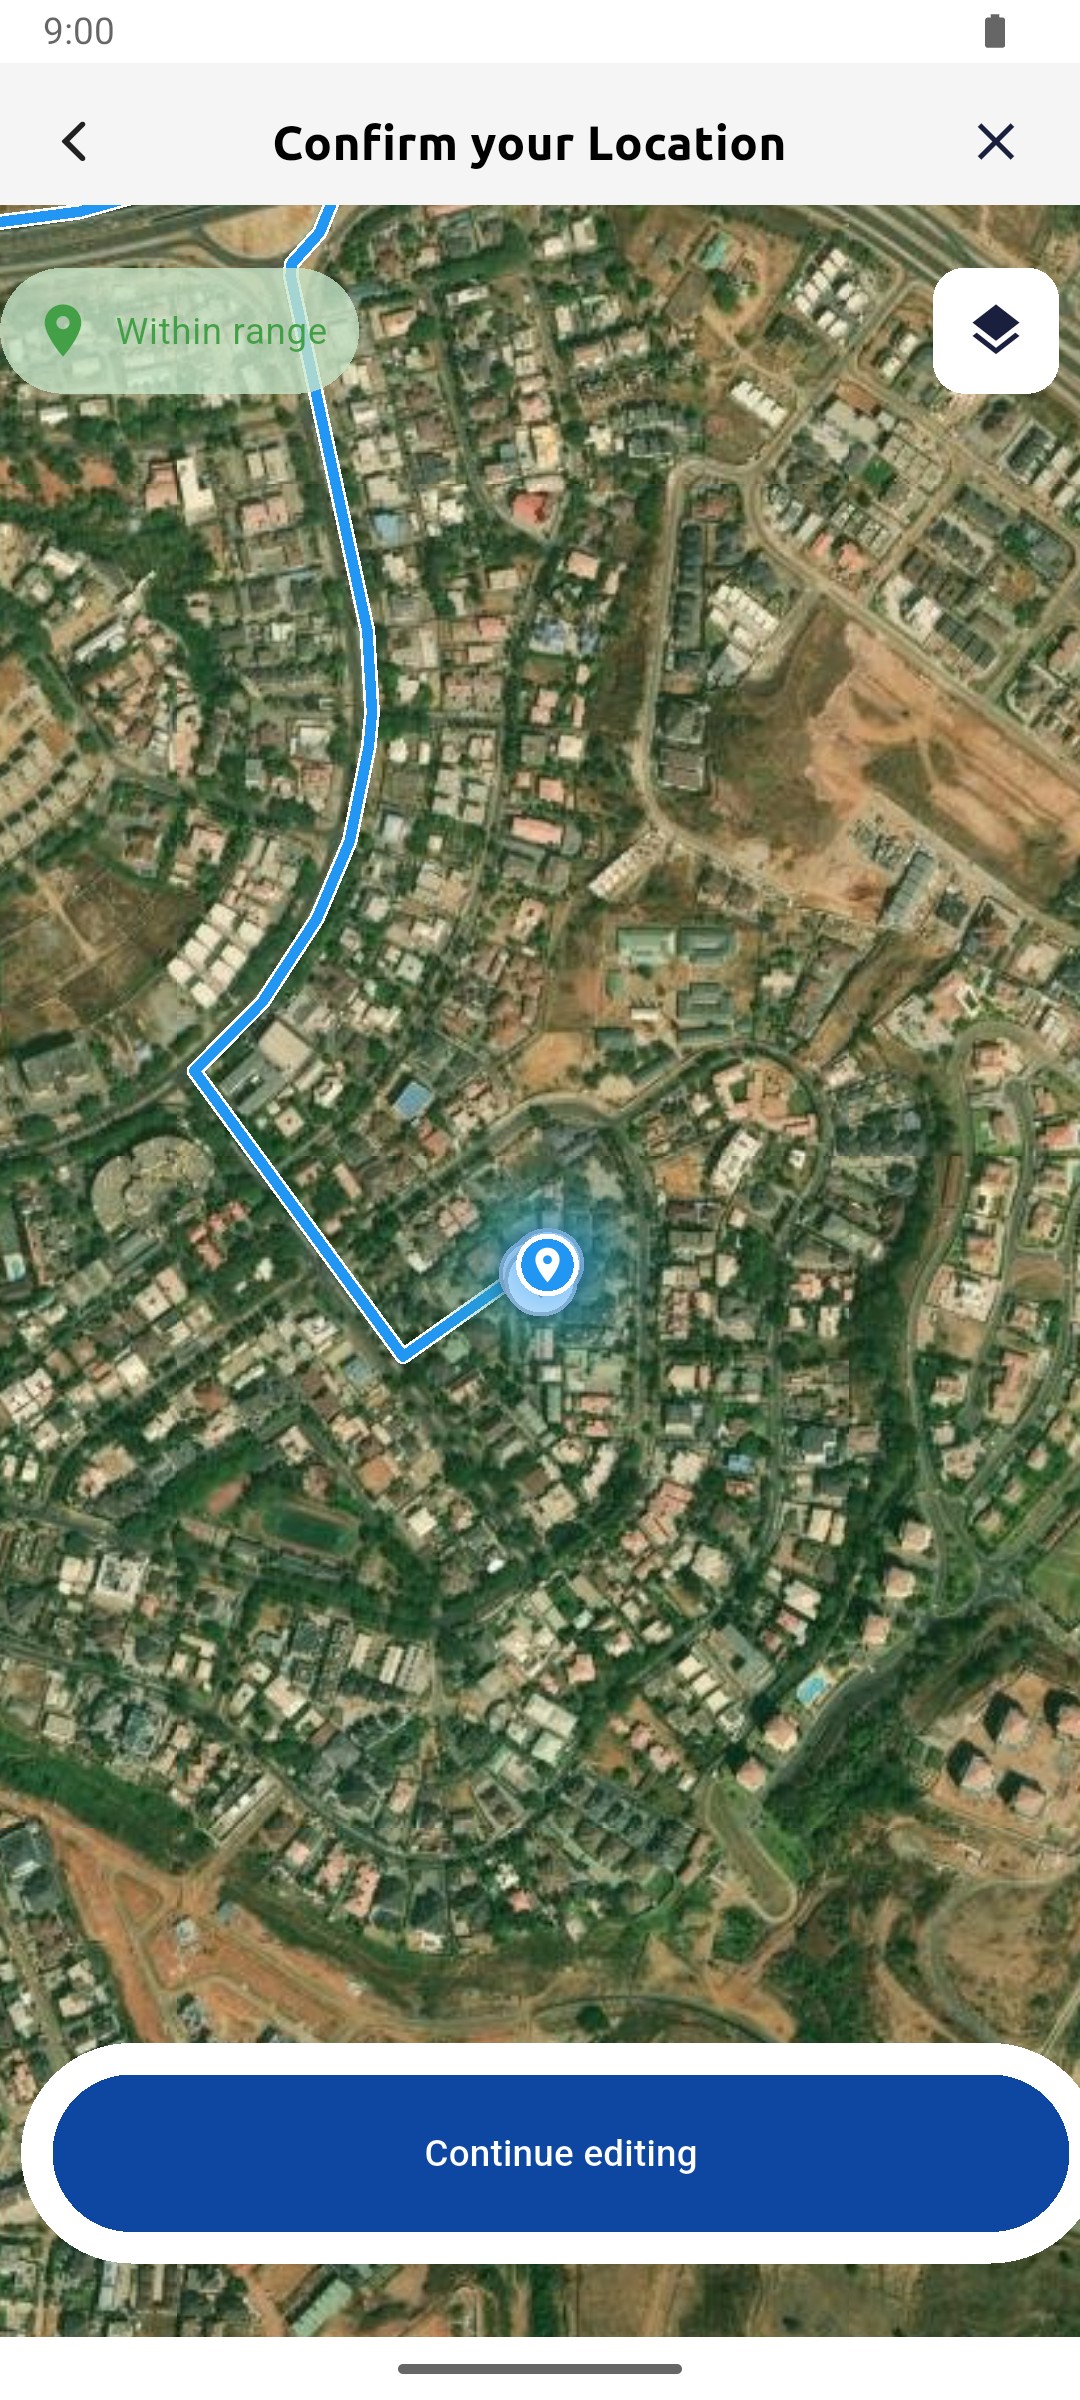
The map shows the draft's location. Tap Continue editing.

Map with the draft location and the Continue editing button

1 — continue editing button.

Map with the draft location and the Continue editing button

Finish the survey

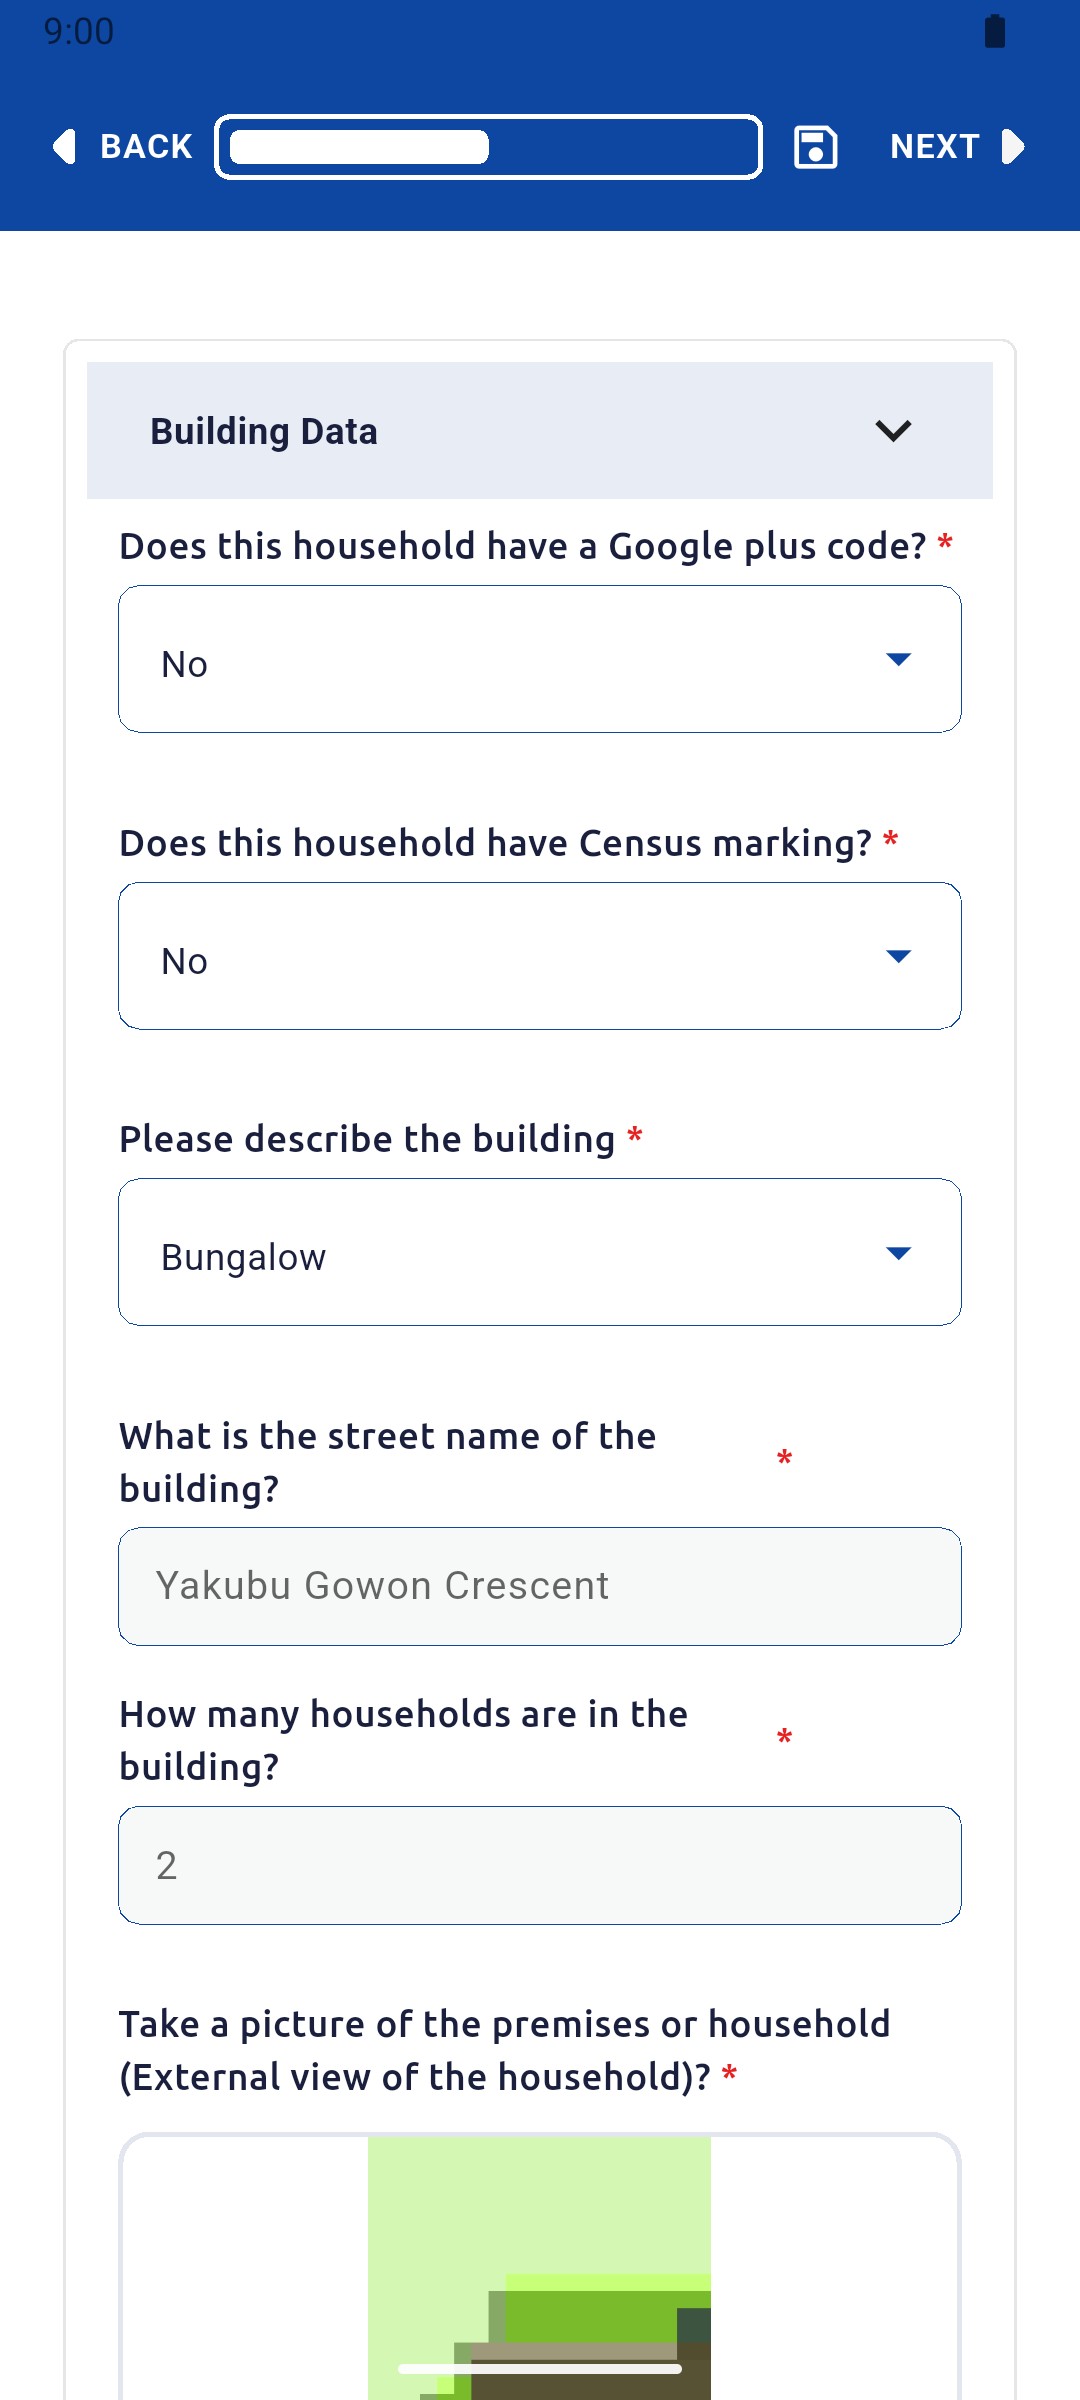
Your answers and photo are restored. Complete the remaining questions, then tap SUBMIT.

Building Data reopened with the saved answers

1 — restored answers · 2 — restored photo.

Building Data reopened with the saved answers

Done. The survey reopens with all your answers and photos, ready to finish and submit.

If something goes wrong

Where are my drafts kept?

Open History, then Survey Histories, then the Draft tab.

Mobile app

Review your submission history

Check which surveys you have submitted, which are drafts and which were returned.

Field Worker 2 min read Mobile

Before you start

  • You are signed in.

Open History

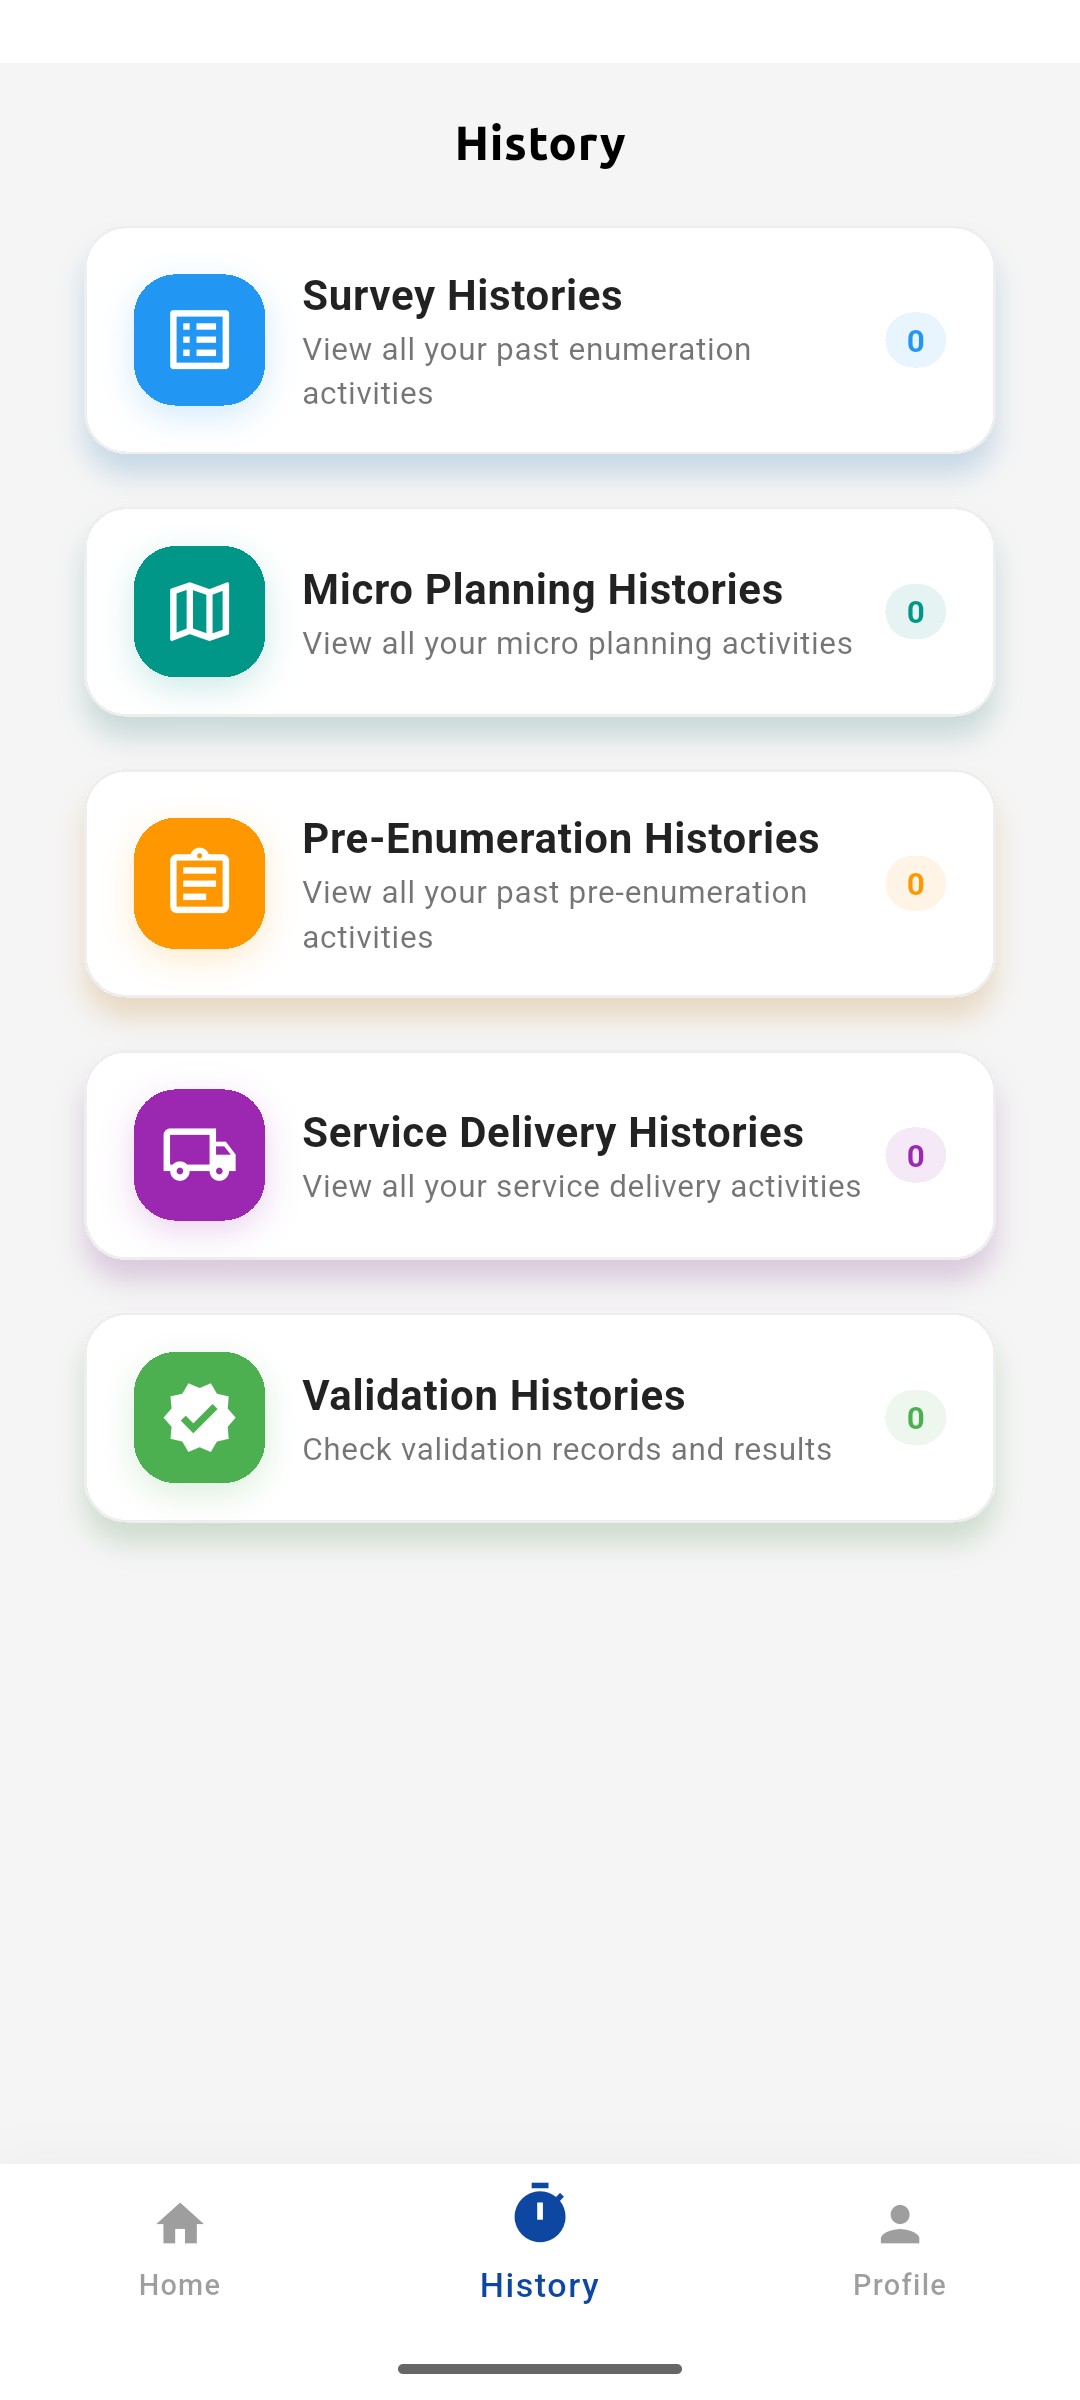
Tap History at the bottom of the screen and choose the type of work, such as Survey Histories.

History screen with survey, micro planning, pre-enumeration, service delivery and validation histories

1 — history tab · 2 — survey histories.

History screen with survey, micro planning, pre-enumeration, service delivery and validation histories

Filter by status

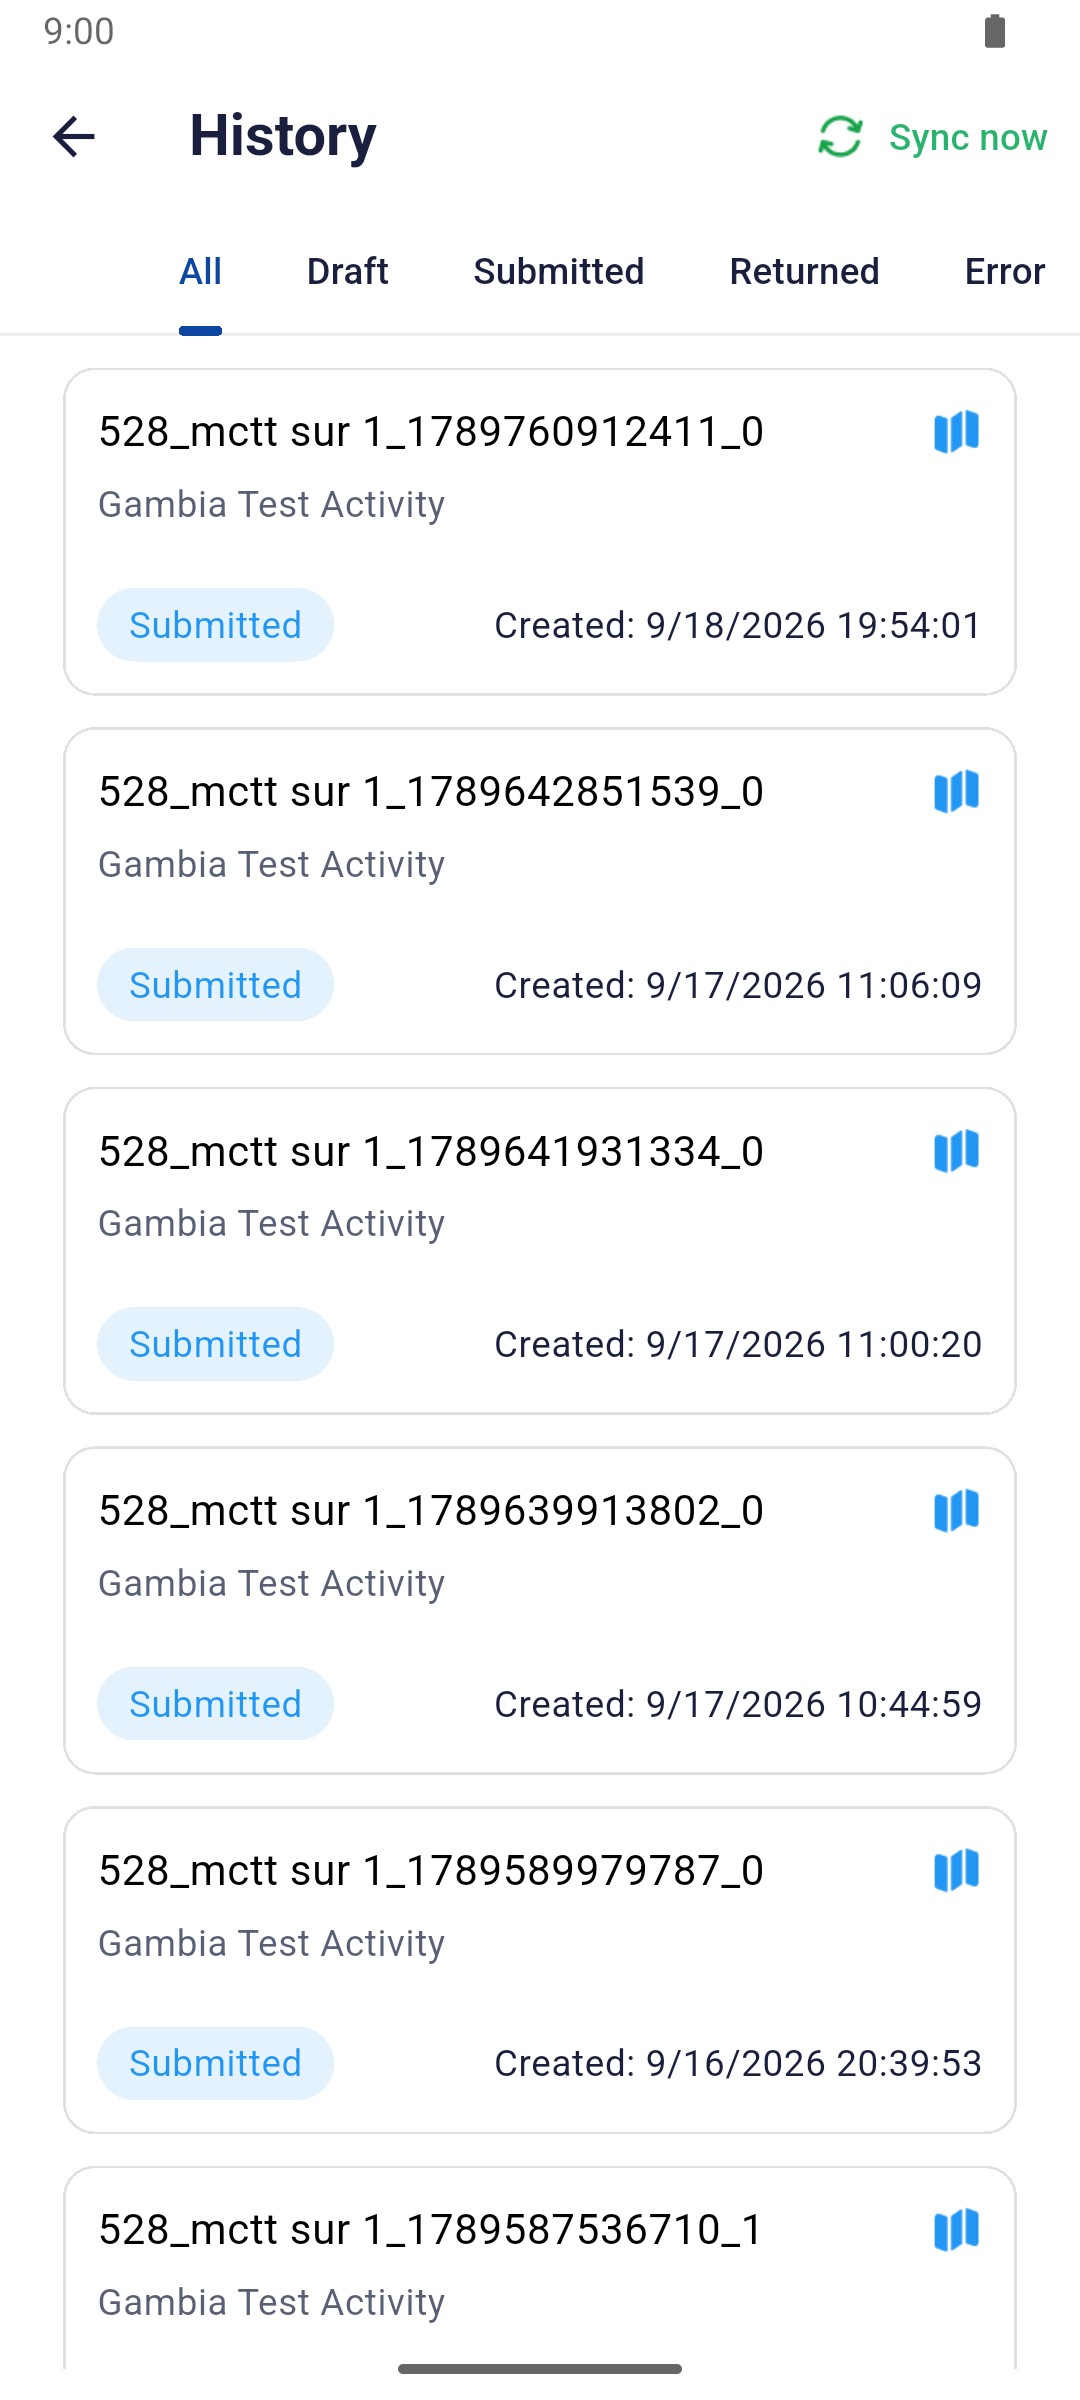
Use the tabs All, Draft, Submitted, Returned and Error. Tap Sync now to refresh the list.

Survey history listing submitted surveys with their creation times

1 — status tabs · 2 — sync now · 3 — submission list.

Survey history listing submitted surveys with their creation times

Done. You have checked the status of your surveys.

If something goes wrong

What should I do with a Returned survey?

Open it, correct what your supervisor asked for and submit it again.

Mobile app

Review your profile and log out

Check your account details and log out at the end of your shift.

Field Worker 1 min read Mobile

Before you start

  • You are signed in.
  • All surveys are submitted, or saved as drafts.

Open your profile

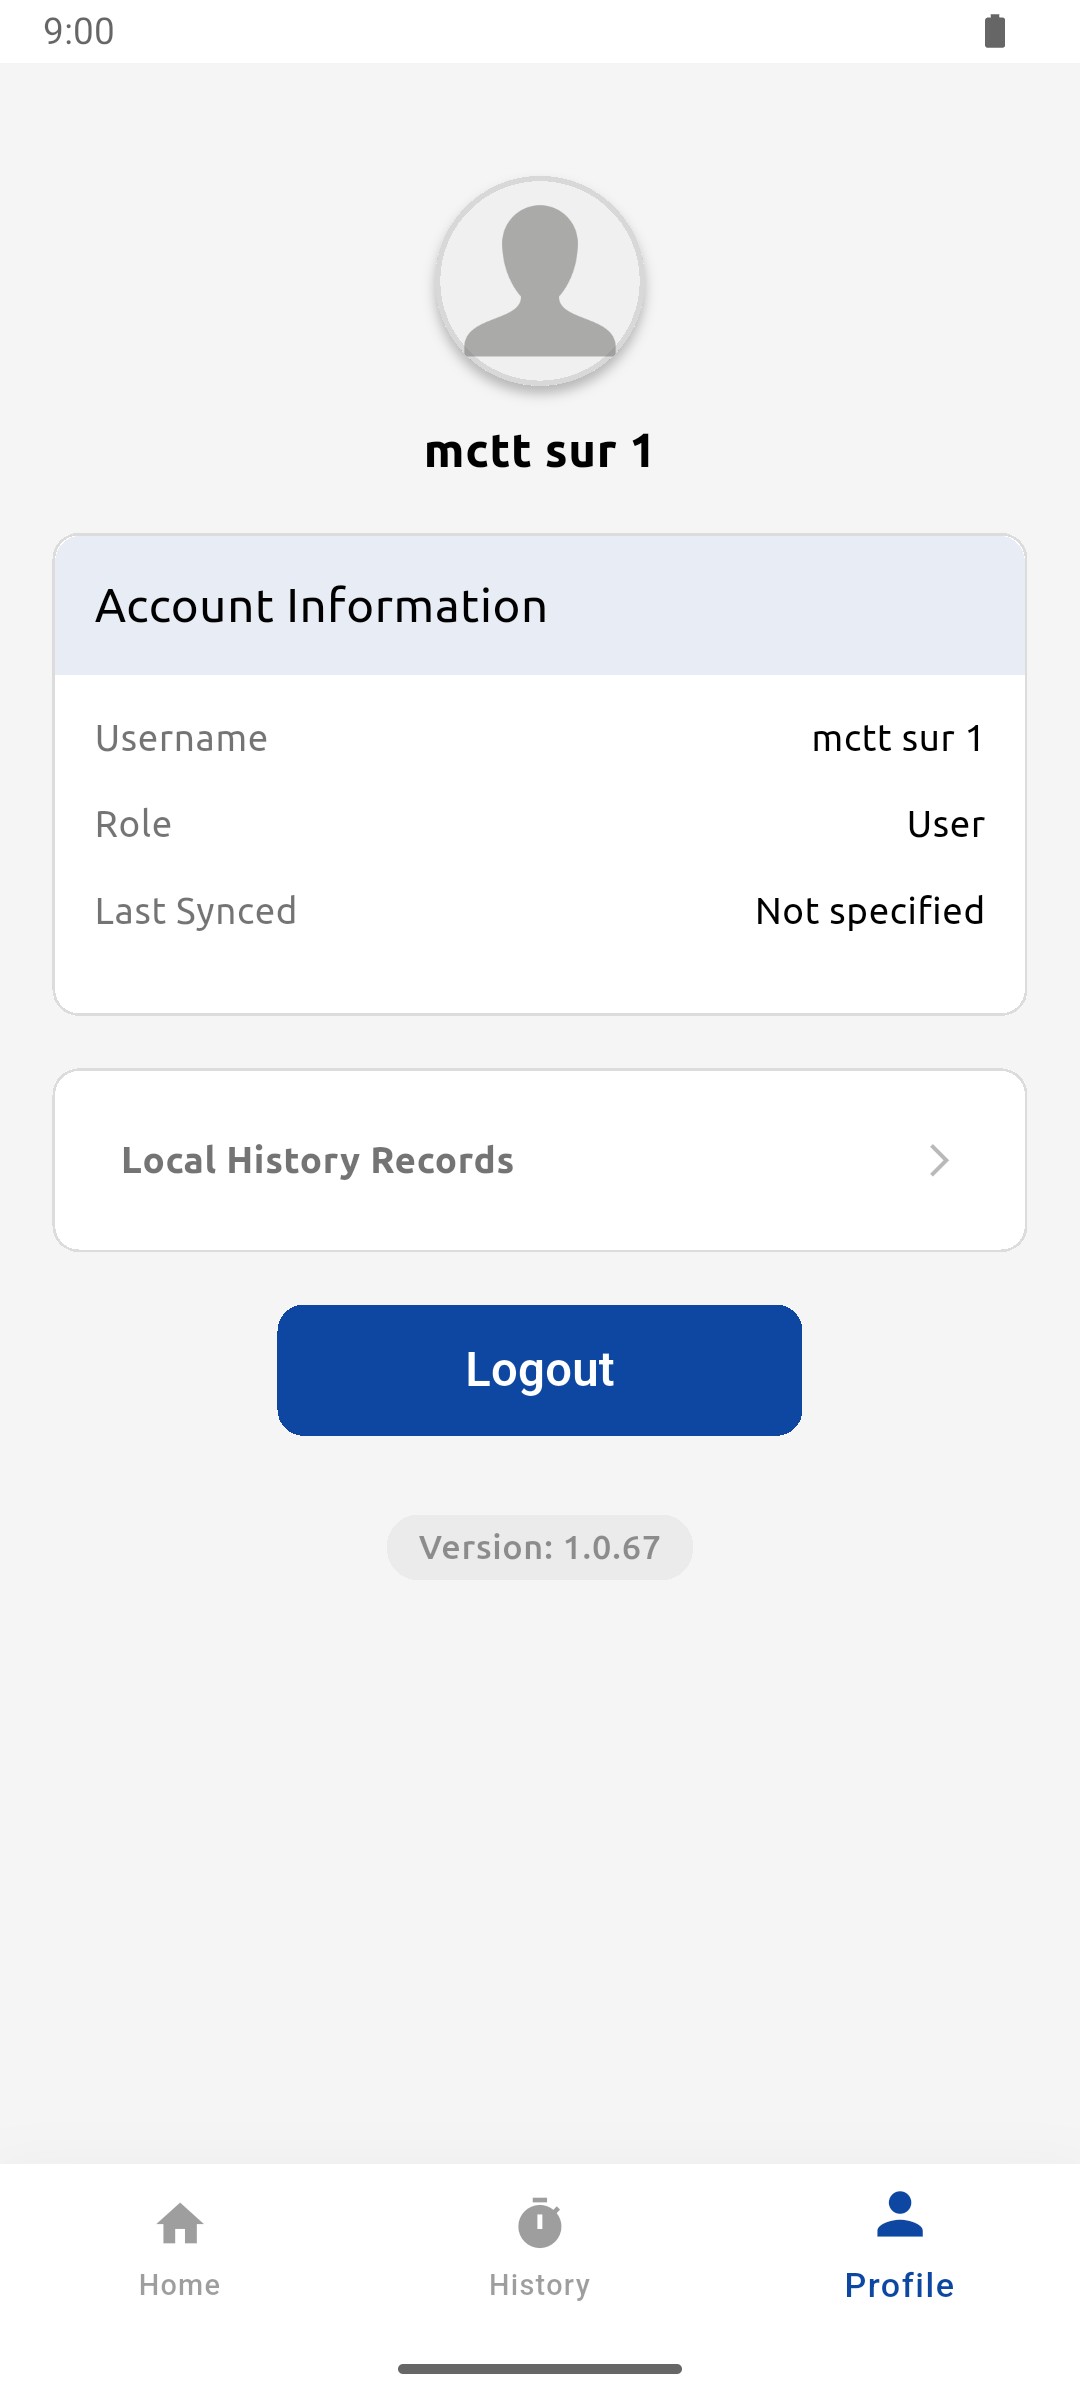
Tap Profile to see your Username, Role, Last Synced time and Local History Records.

Profile screen with account information and the Logout button

1 — profile tab · 2 — account information.

Profile screen with account information and the Logout button

Log out

Tap Logout. The LOGIN screen opens straight away.

Login screen after logging out with the username and masked password still filled in

1 — login screen.

Login screen after logging out with the username and masked password still filled in

Done. You are back on the LOGIN screen.

If something goes wrong

What is Local History Records?

It lists the surveys stored on this phone. See Check a survey stored on your phone.

Mobile app

Check a survey stored on your phone

Look back at the surveys saved on this phone, including their answers, photo and GPS point.

Field Worker 2 min read Mobile

Before you start

  • You are signed in.

Open Local History Records

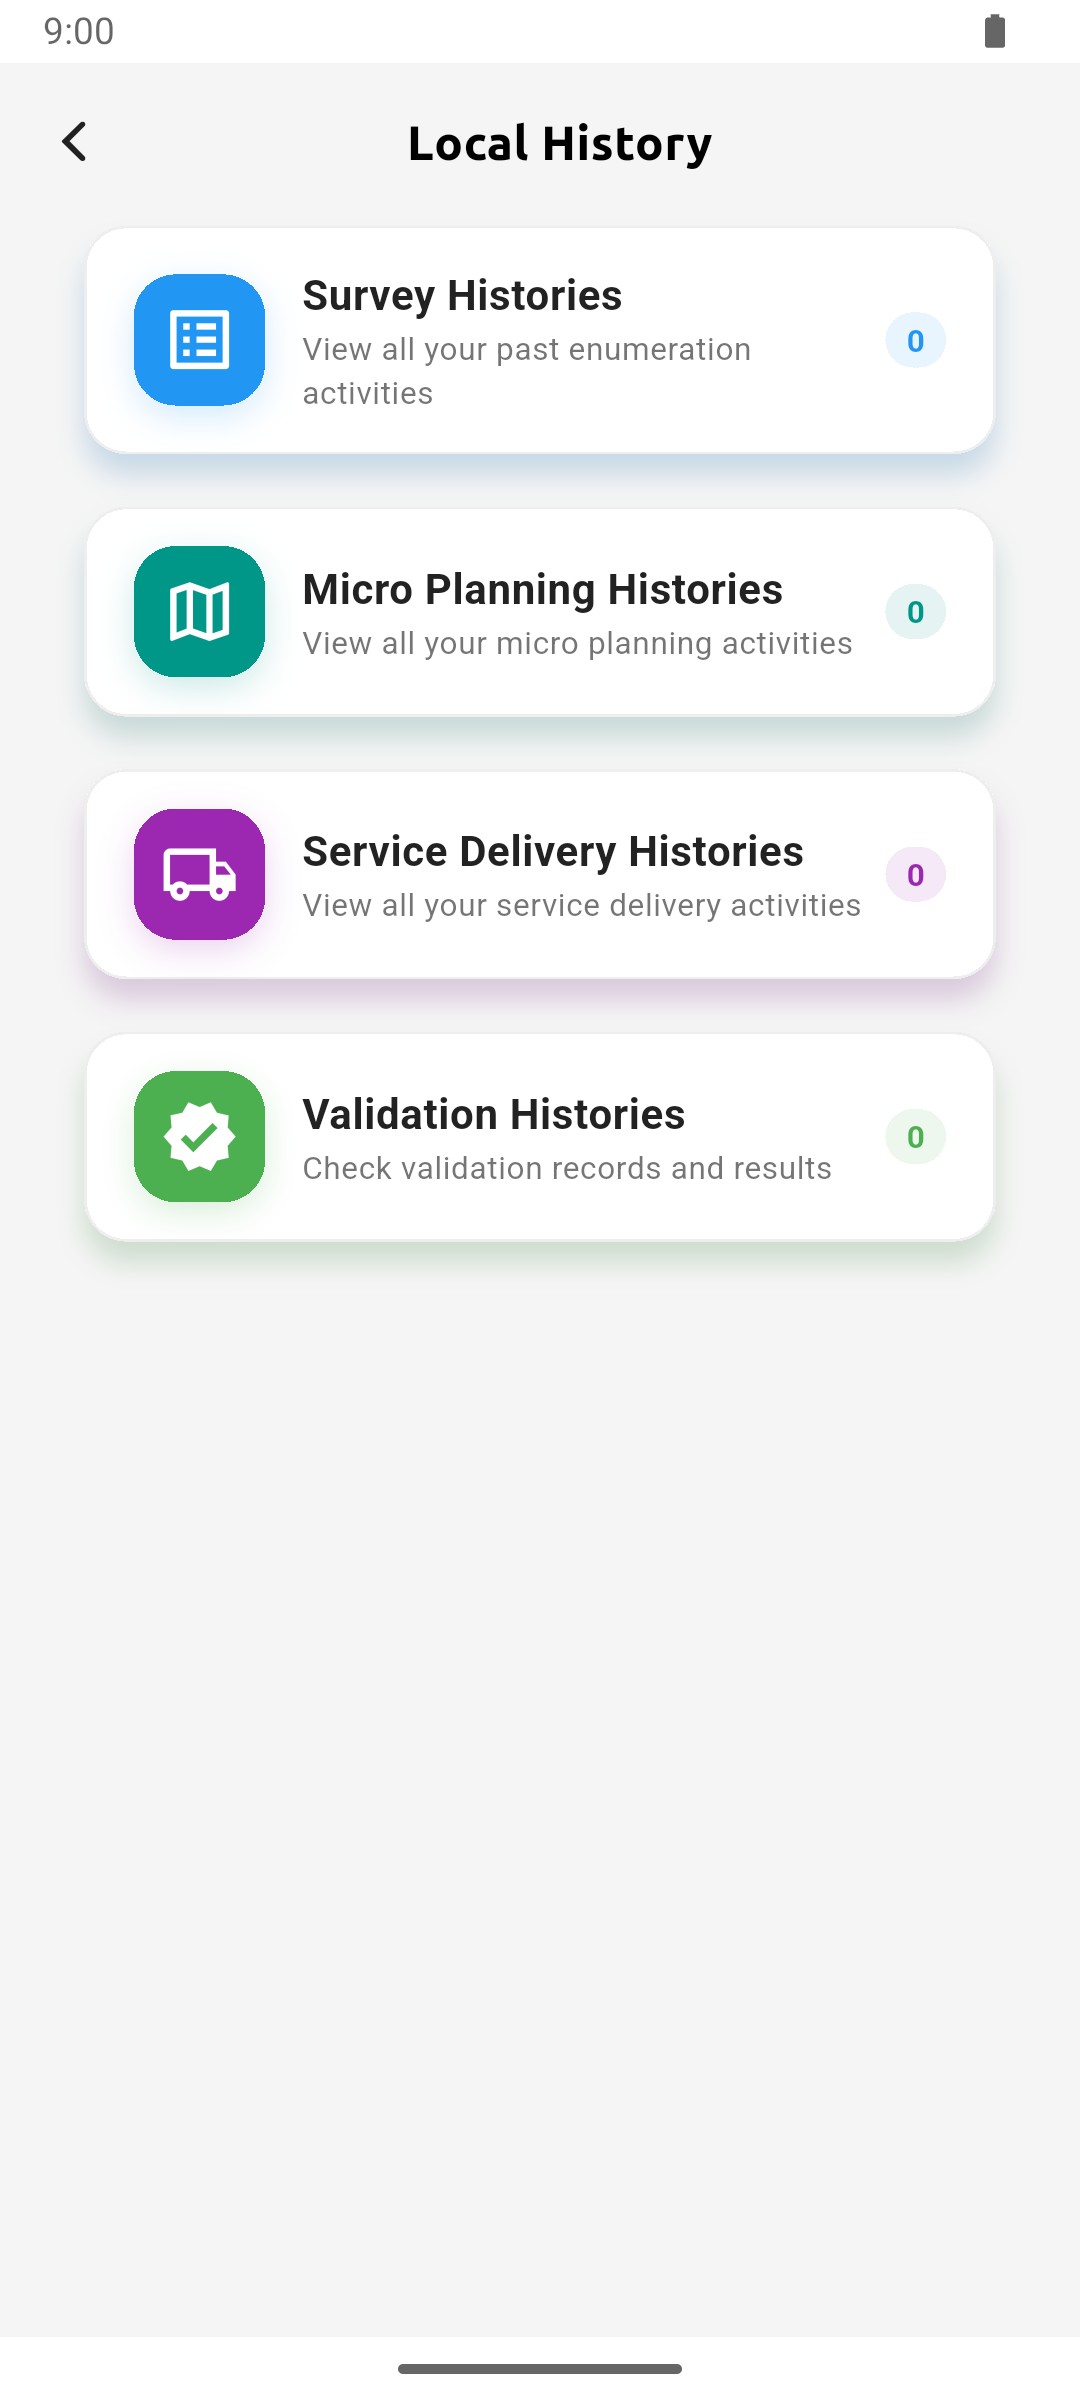
Tap Profile, then tap Local History Records and choose the type of work, such as Survey Histories.

Local History screen with survey, micro planning, service delivery and validation histories

1 — survey histories.

Local History screen with survey, micro planning, service delivery and validation histories

Find the survey

Surveys stored on this phone are listed newest first, with their status, such as Submitted, and creation time. Tap the one you want to check.

Local History list of submitted surveys

1 — stored survey record.

Local History list of submitted surveys

Review the answers

The survey opens with its GPS point, status and each section's answers, including the photo.

Stored survey showing GPS coordinates, Submitted status, building answers and the photo

1 — gps point and status · 2 — survey answers · 3 — household photo.

Stored survey showing GPS coordinates, Submitted status, building answers and the photo

Done. You have checked the answers, photo and location recorded for the survey.

If something goes wrong

Where is the survey's location shown?

The GPS coordinates appear under the survey name.